This article is contributed. See the original author and article here.
What if you can establish a connection between Azure and AWS using only managed solutions instead to have to use virtual machines? This is exactly what we’ll be covering on this article connecting AWS Virtual Private Gateway with the Azure VPN Gateway directly without worry to manage IaaS resources like virtual machines.
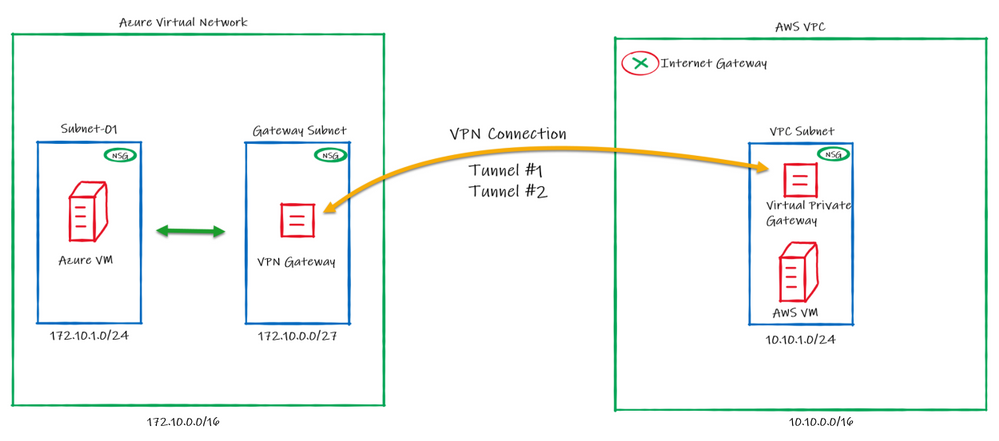
Below the draw of our lab:
Regarding the high availability, please note that on AWS, by default a VPN connection always will have 2 Public IPs, one per tunnel. On Azure it doesn’t happens by default and in this case you will be using Active/Passive from Azure side.
This means that we will be setting only one “node” from Azure VPN Gateway to establish two VPN connections with AWS. In case of a failure, the second node from Azure VPN Gateway will connect to AWS in a Active/Passive mode.
Configuring Azure
1. Crate a resource group on Azure to deploy the resources on that


Choose the subscription, the name and the region to be deployed:

2. Create a Virtual Network and a subnet


Define the subscription, resource group, name and region to be deployed:

Set the address space for the virtual network and for the subnet. Here I’m defining the virtual network address space to 172.10.0.0/16, changing the “default” subnet name to “subnet-01” and defining the subnet address range to 172.10.1.0/24:


3. Create the VPN Gateway
The Azure VPN Gateway is a resource composed of 2 or more VM’s that are deployed to a specific subnet called Gateway Subnet where the recommendation is to use a /27. He contain routing tables and run specific gateway services. Note that you can’t access those VM’s.
To create, go to your Resource Group, then click to + Add


Then fill the fields like below:

After click to Review + create, in a few minutes the Virtual Network Gateway will be ready:

Configuring AWS
4. Create the Virtual Private Cloud (VPC)

5. Create a subnet inside the VPC (Virtual Network)

6. Create a customer gateway pointing to the public ip address of Azure VPN Gateway
The Customer Gateway is an AWS resource with information to AWS about the customer gateway device, which in this case is the Azure VPN Gateway.

7. Create the Virtual Private Gateway then attach to the VPC


8. Create a site-to-site VPN Connection

Set the routing as static pointing to the azure subnet-01 prefix (172.10.1.0/24)

After fill the options, click to create.
9. Download the configuration file
Please note that you need to change the Vendor, Platform and Software to Generic since Azure isn’t a valid option:

In this configuration file you will note that there are the Shared Keys and the Public Ip Address for each of one of the two IPSec tunnels created by AWS:


After the creation, you should have something like this:

Adding the AWS information on Azure Configuration
10. Now let’s create the Local Network Gateway
The Local Network Gateway is an Azure resource with information to Azure about the customer gateway device, in this case the AWS Virtual Private Gateway


Now you need to specify the public ip address from the AWS Virtual Private Gateway and the VPC CIDR prefix.
Please note that the public address from the AWS Virtual Private Gateway is described at the configuration file you have downloaded.
As mentioned earlier, AWS creates two IPSec tunnels to high availability purposes. I’ll use the public ip address from the IPSec Tunnel #1 for now.

11. Then let’s create the connection on the Virtual Network Gateway


You should fill the fields according below. Please note that the Shared key was obtained at the configuration file downloaded earlier and In this case, I’m using the Shared Key for the Ipsec tunnel #1 created by AWS and described at the configuration file.

After a few minutes, you can see the connection established:

In the same way, we can check on AWS that the 1st tunnel is up:

Now let’s edit the route table associated with our VPC

And add the route to Azure subnet through the Virtual Private Gateway:

12. Adding high availability
Now we can create a 2nd connection to ensure high availability. To do this let’s create another Local Network Gateway which we will point to the public ip address of the IPSec tunnel #2 on the AWS

Then we can create the 2nd connection on the Virtual Network Gateway:

And in a few moments we’ll have:


With this, our VPN connection is established on both sides and the work is done.
13. Let’s test!
First, let’s add an Internet Gateway to our VPC at AWS. The Internet Gateway is a logical connection between an Amazon VPN and the Internet. This resource will allow us to connect through the test VM from their public ip through internet. This is not required for the VPN connection, is just for our test:

After create, let’s attach to the VPC:


Now we can create a route to allow connections to 0.0.0.0/0 (Internet) through the Internet Gateway:

On Azure the route was automatically created. You can check selecting the Azure VM > Networking > Network Interface > Effective routes. Note that we have 2 (1 per connection):

Now I’ve created a Linux VM on Azure and our environment looks like this:

And I did the same VM creation on AWS that looks like this:

Then we can test the connectivity betweeen Azure and AWS through our VPN connection:


Brought to you by Dr. Ware, Microsoft Office 365 Silver Partner, Charleston SC.

Recent Comments