This article is contributed. See the original author and article here.
SAP IQ High-Availability can be achieved with IQ Multiplex architecture [ SAP Note 2477758], but not when deployed in NLS mode. As per the SAP First Guidance for SAP IQ 16.x, here, Multiplex Architecture is not available/evaluated for the SAP-NLS solution. This blog discusses one of the solutions to achieve SAP IQ-NLS Highly Available Solution using Azure NetApp Files on SLES 12.x.
Overview
High availability architecture allows an application to be resilient against hardware failure and to minimise downtime during maintenance activities. Many customers use SAP IQ to store historical data by extracting the old data from the SAP BW system to optimise the performance of the SAP BW system & achieve overall lower cost. It is significant to implement SAP IQ highly-available architecture to ensure data is online when required by the business processes. We have worked with our partners [Accenture, Microsoft, SAP, SUSE] & customers to develop a highly available SAP IQ-NLS solution using Pacemaker along with other Clustering Components & Azure NetApp Files to eliminates a single point of failure. With this architecture servers [VM’s] are continuously monitored, and the workload is transferred to a healthy server when a fault or failure occurs using Azure Standard Load Balancer. The application is automatically restarted on a known healthy system to maintain business continuity and minimize unplanned downtime.
There is no official SAP IQ-NLS HA architecture reference from SAP or SUSE, and therefore, a custom solution must be created to achieve a solution to meet customer needs. The complete solution has been built and tested on the Microsoft Azure Cloud.
Architectural Overview

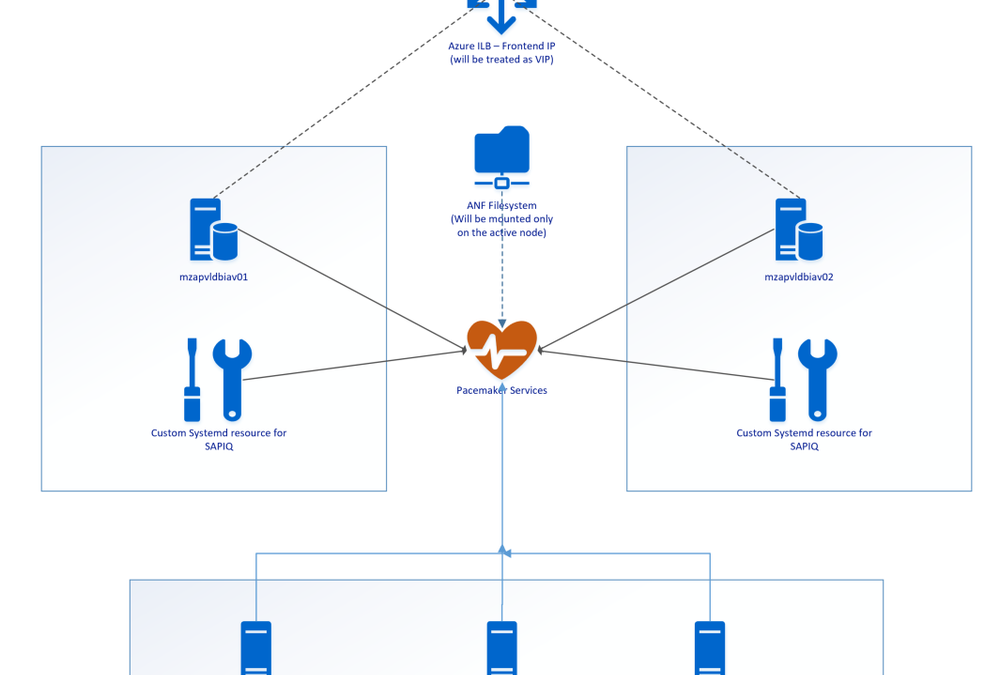
SAP IQ High-Availability Architecture on Azure VMs using Azure NetApp Files on SUSE Linux Enterprise Server.
Above SAP IQ-NLS Architecture contains:
- Two Azure VMs (mzapvldbiav01 & mzapvldbiav02) running with SLES 12 SP4 for SAP.
- Three Azure VMs (mzapvlapsbd01, mzapvlapsbd02 & mzapvlapsbd03) running with SLES 12 SP4 for SAP with iSCSI Components which will be used as STONITH (SBD Devices) for Pacemaker Cluster Fencing.
- iav-ilb-sybase : Azure load balancer which will monitor health probe port and forward the traffic to the node where this health probe port is active.
The Cluster includes following resources:
- systemd:sapiq : Cluster resource for custom systemd service controlling sapiq database. Custom Systemd unit file which will take care of Start, Stop and Health check for Sybase IQ Database.
- azure_lb_health_probe : Cluster resources which create and listens custom port only on the active node.
- pri-ip_vip_63 : Cluster resource for floating IP which will be running only on the active node and works as virtual IP.
- anf_filesystem : Cluster resource containing shared azure netapp filesystem information to enable mounting filesystems only on the active node
- email-agent : Cluster resource which will trigger an email to recipients if any resource changes status like start, stop etc.
Installation & Configuration Steps
- Configuring iSCSI Target Servers
- Create iSCSI devices on iSCSI target server
- iSCSI Discovery on Cluster Nodes
- Set up SBD Device on Cluster Nodes
- Preparing operating system on cluster nodes
- Cluster Installation
- Joining Nodes to Cluster
- Tuning Cluster Configuration
- Preparing Custom Scripts for systemd service
- ANF Shared Filesystem Configuration
- Cluster Configuration
1. Configuring iSCSI Target Servers
Reference Link: https://docs.microsoft.com/en-us/azure/virtual-machines/workloads/sap/high-availability-guide-suse-pacemaker#set-up-iscsi-target-servers
The following Steps needs to be repeated on all iSCSI Target Servers
Step 1: Update SLES
|
sudo zypper update |
Step 2: Remove packages
|
sudo zypper remove lio-utils python-rtslib python-configshell targetcli |
Step 3: Install iSCSI target packages
|
sudo zypper install targetcli-fb dbus-1-python |
Step 4: Enable the iSCSI target service
|
sudo systemctl enable targetcli sudo systemctl start targetcli |
2. Create iSCSI devices on iSCSI target server
The following Steps needs to be repeated on all iSCSI Target Servers
Step 1: Create the root folder for sbd devices
|
sudo mkdir /sbd |
Step 2: Create the SBD device for Cluster Nodes on all iSCSI target servers
- Create block device
|
targetcli backstores/fileio create sbdiav /sbd/sbdiav 50M write_back=false |
- Create iqn
|
targetcli iscsi/ create iqn.2006-04.sbd01.domain.net:iav |
- Adding iSCSI disks to the TPG
|
targetcli iscsi/iqn.2006-04.sbd01.domain.net:iav/tpg1/luns/ create /backstores/fileio/sbdiav |
- Allow iSCSI initiators to connect to the iSCSI target.
|
targetcli iscsi/iqn.2006-04.sbd01.domain.net:iav/tpg1/acls/ create iqn.1996-04.de.suse:01:19b9f6iav01 |
|
targetcli iscsi/iqn.2006-04.sbd01.domain.net:iav/tpg1/acls/ create iqn.1996-04.de.suse:01:19b9f6iav02 |
Step 3: Save the targetcli changes
|
sudo targetcli saveconfig |
Step 4: Confirm the changes
|
sudo targetcli ls |
Step 5: Perform Steps 1 – 4 on all iSCSI Target Servers with their respective iqn.
|
targetcli iscsi/ create iqn.2006-04.xxx.domain.net:iav |
3. iSCSI Discovery on Cluster Nodes
Reference Link: https://docs.microsoft.com/en-us/azure/virtual-machines/workloads/sap/high-availability-guide-suse-pacemaker#set-up-sbd-device
Step 1: Enable the iSCSI and SBD services on Cluster Nodes.
|
sudo systemctl enable iscsid sudo systemctl enable iscsi sudo systemctl enable sbd |
Step 2: Change the initiator name on Cluster Nodes
|
sudo vi /etc/iscsi/initiatorname.iscsi |
Initiator name should be unique on each server.
Step 3: Restart the iSCSI service on Cluster Nodes
|
sudo systemctl restart iscsid sudo systemctl restart iscsi |
Step 4: Connect the iSCSI devices
|
iscsiadm -m discovery –type=st –portal=170.162.93.128:3260 |
|
iscsiadm -m node -T iqn.2006-04.sbd03.domain.net:iav –login –portal=170.162.93.128:3260 |
|
iscsiadm -m node -p 170.162.93.128:3260 –op=update –name=node.startup –value=automatic |
Step 5: Verify iSCSI Sessions
|
iscsiadm -m session |
Step 6: Verify if disks are available on Cluster Nodes
|
lsscsi |
Step 7: Retrieve the IDs of the iSCSI devices on Cluster Nodes
|
ls -l /dev/disk/by-id/scsi-* | grep 3600* |
4. Set up SBD Device on Cluster Nodes
Reference Link: https://docs.microsoft.com/en-us/azure/virtual-machines/workloads/sap/high-availability-guide-suse-pacemaker#set-up-sbd-device
Step 1: Create the SBD Device on Cluster Nodes
|
sudo sbd -d /dev/disk/by-id/scsi-360014052328283facd444a1994a65cf2 -1 60 -4 120 create |
Step 2: Adapt the SBD Config on First Node in the Cluster
|
sudo vi /etc/sysconfig/sbd |
Populate the following parameters within the sbd file
|
[…] SBD_DEVICE=”/dev/disk /by-id/scsi-36001405afb0ba8d3a3c413b8cc2cca03;/dev/disk/by-id/scsi-360014053fe4da371a5a4bb69a419a4df” […] SBD_PACEMAKER=”yes” SBD_STARTMODE=”clean” SBD_DELAY_START=”yes” |
Note: SBD_STARTMODE=”clean”, this will not allow any node to join to the cluster once node is fenced or rebooted. This is part of the Solution Requirement.
Step 3: Create the softdog configuration file
|
echo softdog | sudo tee /etc/modules-load.d/softdog.conf |
Step 4: Now load the module
|
sudo modprobe -v softdog |
5. Preparing Operating System on cluster nodes
Reference Link: https://docs.microsoft.com/en-us/azure/virtual-machines/workloads/sap/high-availability-guide-suse-pacemaker#cluster-installation
Step 1: Perform system update on all Cluster Nodes
|
sudo zypper update |
Step 2: Install components needed for Cluster resources on all Cluster Nodes
|
sudo zypper in socat |
Step 3: Configure the operating system on all Cluster Nodes
Increase the maximum allowed processes
Edit the configuration file
|
sudo vi /etc/systemd/system.conf |
Change the DefaultTasksMax
|
DefaultTasksMax=512 |
to
|
DefaultTasksMax=4096 |
Activate this setting
|
sudo systemctl daemon-reload |
Test if the change was successful
|
sudo systemctl –no-pager show | grep DefaultTasksMax |
Step 4: Reduce the size of the dirty cache on all Cluster Nodes
|
sudo vi /etc/sysctl.conf |
Change/set the following settings
|
vm.dirty_bytes = 629145600 vm.dirty_background_bytes = 314572800 |
Step 5: Configure NTP on all cluster nodes and confirm
stop ntpd daemon
|
/etc/init.d/ntp stop |
edit the /etc/ntp.conf to make appropriate entries of NTP servers.
|
server xxx.xxx.xxx.xxx iburst |
Now start the ntp daemon.
|
/etc/init.d/ntp start |
check the NTP status
|
ntpq -p |
6. Cluster Installation
Reference Link: https://docs.microsoft.com/en-us/azure/virtual-machines/workloads/sap/high-availability-guide-suse-pacemaker#cluster-installation
Step 1: Install Cluster on first node
|
ha-cluster-init –name cls_iqdb_iav |
Step 2: Respond to the following on-screen instructions
|
# /root/.ssh/id_rsa already exists – overwrite (y/n)? n # Address for ring0 [10.0.0.6] Press ENTER # Port for ring0 [5405] Press ENTER # SBD is already configured to use/dev/disk/by-id/scsi-36001405afb0ba8d3a3c413b8cc2cca03 – overwrite (y/n)? n # Do you wish to configure an administration IP (y/n)? n |
7. Joining Nodes to Cluster
Reference Link: https://docs.microsoft.com/en-us/azure/virtual-machines/workloads/sap/high-availability-guide-suse-pacemaker#cluster-installation
Step 1: Add Secondary node to cluster
|
sudo ha-cluster-join |
Step 2: Respond to the following on-screen instructions
|
Do you want to continue anyway (y/n)? y IP address or hostname of existing node (e.g.: 192.168.1.1) []xxx.xxx.xxx.xxx root/.ssh/id_rsa already exists – overwrite (y/n)? y |
8. Tuning Cluster Configuration
Reference Link: https://docs.microsoft.com/en-us/azure/virtual-machines/workloads/sap/high-availability-guide-suse-pacemaker#cluster-installation
Step 1: Change hacluster password on all cluster nodes
|
sudo passwd hacluster |
Step 2: Adjust corosync settings on First Node
|
sudo vi /etc/corosync/corosync.conf |
Change token to 30000 and consensus to 36000
|
[…] token: 30000 token_retransmits_before_loss_const: 10 join: 60 consensus: 36000 max_messages: 20 |
Restart the corosync service
|
sudo service corosync restart |
9. Preparing Custom Scripts for systemd service
Step 1: Create Systemd Service which can initiate start and stop scripts of the SAP IQ DB and place it under /etc/systemd/system/
|
vi /etc/systemd/system/sapiq.service |
sapiq.service should contain the following
|
[Unit] Description=SAP IQ DB
[Service] Type=simple ExecStart=/bin/bash /usr/bin/sapiq_start.sh ExecStop=/bin/bash /usr/bin/sapiq_stop.sh Restart=on-failure
[Install] WantedBy=multi-user.target |
When Start initiated on sapiq.service, the following script will be called
|
ExecStart=/bin/bash /usr/bin/sapiq_start.sh |
When Stop initiated on sapiq.service, the following script will be called
|
ExecStop=/bin/bash /usr/bin/sapiq_stop.sh |
Step 2: Creating sapiq_start.sh & sapiq_stop.sh
sapiq_start.sh:
|
#!/bin/bash runuser -l siqiav -c ‘start_siq’ sleep 20 while [ 1 ] do pid=$(ps -ef | grep iqsrv16 | grep -v grep | awk ‘{print $2}’) if [ “$pid” != “” ] then echo “Process iqsrv16 is running” dsn=$(runuser -l siqiav -c ‘dbping -d -c dsn=SAPIQDB_IAV’ | grep Connected | awk ‘{print $1}’) if [ “$dsn” == “Connected” ] then echo “Database can be reached using DBPING with DSN” else echo “iqsrv16 Process is there but unable to ping DSN using DBPING…. Exiting” exit fi else echo “Process iqsrv16 is not there…. Exiting” exit fi sleep 3 done |
Note: Contact your NLS Admin for DSN Value (SAPIQDB_IAV, in this case) and replace the same in the above script.
sapiq_stop.sh:
|
runuser -l siqiav -c ‘stop_siq’ |
The above two scripts should be placed under /usr/bin
10. ANF Shared Filesystem Configuration
Step 1: Prepare the OS for running SAP IQ NLS on NetApp Systems with NFS
Create configuration file /etc/sysctl.d/netapp-hana.conf for the NetApp configuration settings.
|
vi /etc/sysctl.d/netapp-hana.conf |
|
Within the file, keep the below entries
|
net.core.rmem_max = 16777216 net.core.wmem_max = 16777216 net.core.rmem_default = 16777216 net.core.wmem_default = 16777216 net.core.optmem_max = 16777216 net.ipv4.tcp_rmem = 65536 16777216 16777216 net.ipv4.tcp_wmem = 65536 16777216 16777216 net.core.netdev_max_backlog = 300000 net.ipv4.tcp_slow_start_after_idle=0 net.ipv4.tcp_no_metrics_save = 1 net.ipv4.tcp_moderate_rcvbuf = 1 net.ipv4.tcp_window_scaling = 1 net.ipv4.tcp_timestamps = 1 net.ipv4.tcp_sack = 1 |
Step 2: Create configuration file /etc/sysctl.d/ms-az.conf with Microsoft for Azure configuration settings.
|
vi /etc/sysctl.d/ms-az.conf |
|
Within the file, keep the below entries
|
ipv6.conf.all.disable_ipv6 = 1 net.ipv4.tcp_max_syn_backlog = 16348 net.ipv4.ip_local_port_range = 40000 65300 net.ipv4.conf.all.rp_filter = 0 sunrpc.tcp_slot_table_entries = 128 vm.swappiness=10 |
Step 3: Adjust the sunrpc settings
|
vi /etc/modprobe.d/sunrpc.conf |
|
Within the file, keep the below entries
|
options sunrpc tcp_max_slot_table_entries=128 |
Step 4: Ensure to set the NFS domain in /etc/idmapd.conf on the VM to match the default domain configuration on Azure NetApp Files: defaultv4iddomain.com.
11. Cluster Configuration
Following cluster resources needs to be configured
- Floating IP: Configure Virtual IP which is always available on active node. Here we need to use frontend IP address of Azure Load balancer as Floating IP in Cluster.
|
primitive pri-ip_vip_63 IPaddr2 params ip=170.162.92.63 cidr_netmask=24 nic=eth0 op monitor interval=0 |
- Health Probe Port: Configure 61000 as health probe port which is always available on active node. Azure Load Balancer always monitor this port and sends the traffic to the node where this port is running.
|
primitive azure_lb_health_probe azure-lb params port=61000 |
- Systemd Service: Cluster Primitive which controls start & stop operations of SAP IQ Database.
|
primitive pri-sapiq_systemd systemd:sapiq op start timeout=40 interval=0 op stop timeout=40 interval=0 op monitor timeout=100 interval=10 |
- ANF Shared Filesystems: Individual Cluster Primitive for each ANF Shared filesystem for log, system, dbspace & database. These four filesystems will be shared between two cluster nodes.
|
primitive anf_filesystem Filesystem params device=”170.162.118.4:/Database” directory=”/usr/sap/IAV” fstype=nfs options=”rw,vers=4,minorversion=1,hard,sync,timeo=600,rsize=65536,wsize=65536,intr,noatime,lock,_netdev,sec=sys” op stop timeout=60s interval=0 op start timeout=60s interval=0 op monitor interval=20s timeout=40s |
- Email Alerting: One of the easiest ways to get notifications of any cluster resource events is to add a ClusterMon resource. Whenever any resource is started or stopped, the ClusterMon resource will send notification to the custom script which will trigger email to configured recipients.
|
primitive email-agent ClusterMon params extra_options=”-E /usr/bin/crm_email.sh -e xxxx@xxxx.com” |
|
And clone the resource “email-agent”
|
clone cln_email-agent email-agent |
Post-Configurations
Create the custom script and place under /usr/bin
|
vi /usr/bin/crm_email.sh |
|
Within the file, place the following content
|
#!/bin/bash MAIL_TO=”xxxx@xxxx.com”; SUBJECT=”!!! ATTENTION NEEDED !!! CLUSTER-ALERT on ${CRM_notify_node}”; echo “$MESSAGE”|mailx -s “$SUBJECT” “$MAIL_TO” <<EOF ———————– CLUSTER EVENT TRIGGERED: Node: ${CRM_notify_node} Resource Affected: ${CRM_notify_rsc} Action on Resource: ${CRM_notify_task} ———————– CURRENT CLUSTER STATUS: $(crm status) ————————————————— This mail has been generated automatically EOF |
|
- Grouping of Resources: Grouping of resources will make all child resources to start or stop together on same node.
Grouping resources which includes ANF Filesystem, Floating IP, Health Probe Port & Systemd service. In this case, group name is “grp_anf-sapiq_systemd-azure_lb-vip_6” with migration threshold set to 1**.
|
group grp_anf-sapiq_systemd-azure_lb-vip_63 anf_filesystem pri-sapiq_systemd azure_lb_health_probe pri-ip_vip_63 meta target-role=Started migration-threshold=1 |
** Migration threshold will allow resource to restart on failure with the provided value on the same node.
- Order Constraint: As the group containing systemd resource rely on shared file system to start the database, file system group should start before the group with systemd resource then health probe and virtual IP must start.
|
order ord_anf-sapiq_systemd-azure_lb-vip_63 inf: anf_filesystem pri-sapiq_systemd azure_lb_health_probe pri-ip_vip_63 |
- Resource Stickiness: This is to prevent healthy resources from being moved around the cluster.
|
rsc_defaults rsc-options: resource-stickiness=1000 |
Note: Defaults don’t apply to resources which overwrite them with their own defined resource stickiness value.
Complete CRM Configuration as follows
primitive anf_filesystem Filesystem
params device=”170.162.118.4:/Database” directory=”/usr/sap/IAV” fstype=nfs options=”rw,vers=4,minorversion=1,hard,sync,timeo=600,rsize=65536,wsize=65536,intr,noatime,lock,_netdev,sec=sys”
op stop timeout=60s interval=0
op start timeout=60s interval=0
op monitor interval=20s timeout=40s
mzapvldbiav01:~ # crm configure show pri-ip_vip_63
primitive pri-ip_vip_63 IPaddr2
params ip=170.162.92.63 cidr_netmask=24 nic=eth0
op monitor interval=0
mzapvldbiav01:~ # crm configure show grp_anf-sapiq_systemd-azure_lb-vip_63
group grp_anf-sapiq_systemd-azure_lb-vip_63 anf_filesystem pri-sapiq_systemd azure_lb_health_probe pri-ip_vip_63
meta target-role=Started migration-threshold=2
mzapvldbiav01:~ # crm configure show
node 1: mzapvldbiav02
node 2: mzapvldbiav01
primitive anf_filesystem Filesystem
params device=”170.162.118.4:/Database” directory=”/usr/sap/IAV” fstype=nfs options=”rw,vers=4,minorversion=1,hard,sync,timeo=600,rsize=65536,wsize=65536,intr,noatime,lock,_netdev,sec=sys”
op stop timeout=60s interval=0
op start timeout=60s interval=0
op monitor interval=20s timeout=40s
primitive azure_lb_health_probe azure-lb
params port=61000
primitive email-agent ClusterMon
params extra_options=”-E /usr/bin/crm_email.sh -e ramesh.petla@accenture.com”
meta target-role=Started
primitive pri-ip_vip_63 IPaddr2
params ip=170.162.92.63 cidr_netmask=24 nic=eth0
op monitor interval=0
primitive pri-sapiq_systemd systemd:sapiq
op start timeout=60 interval=0
op stop timeout=60 interval=0
op monitor timeout=100 interval=10
primitive stonith-sbd stonith:external/sbd
params pcmk_delay_max=30s
meta target-role=Started
op start interval=0
group grp_anf-sapiq_systemd-azure_lb-vip_63 anf_filesystem pri-sapiq_systemd azure_lb_health_probe pri-ip_vip_63
meta target-role=Started migration-threshold=2
clone cln_email-agent email-agent
order ord_anf-sapiq_systemd-azure_lb-vip_63 inf: anf_filesystem pri-sapiq_systemd azure_lb_health_probe pri-ip_vip_63
property cib-bootstrap-options:
have-watchdog=true
dc-version=”1.1.19+20181105.ccd6b5b10-3.16.1-1.1.19+20181105.ccd6b5b10″
cluster-infrastructure=corosync
cluster-name=cls_iqdb_iav
stonith-enabled=true
last-lrm-refresh=1594989262
maintenance-mode=false
rsc_defaults rsc-options:
resource-stickiness=1000
op_defaults op-options:
timeout=600
record-pending=true
Monitoring and Managing the Cluster
CRM Status: The status of the cluster can be checked by issuing command “crm status”

CRM Monitoring: Real time changes in the cluster can be monitored continuously by issuing command “crm_mon” on any node which is part of cluster.

The above similar things can be monitored using HAWK Web Console.
To access HAWK Console, enter the following URL with username “hacluster”
|
https:// 170.162.92.63:7630/ |
where 170.162.92.63 is the ip address of any cluster node or virtual IP.
Resources Status:

Node Status:

Node Cleanup Script: Whenever nodes reboots because of Kernel Panic or any other issues, run the crm_node_cleanup.sh script which is placed under /usr/bin to clean the node so that it can join to Cluster.
For mzapvldbiav01:
|
#!/bin/bash sbd -d /dev/disk/by-id/scsi-360014052328283facd444a1994a65cf2 message mzapvldbiav01 clear sbd -d /dev/disk/by-id/scsi-360014052752bf5ef8d14b308cf29c3f5 message mzapvldbiav01 clear sbd -d /dev/disk/by-id/scsi-3600140557a61ec52d994744872c42246 message mzapvldbiav01 clear crm cluster start crm_mon |
For mzapvldbiav02:
|
#!/bin/bash sbd -d /dev/disk/by-id/scsi-360014052328283facd444a1994a65cf2 message mzapvldbiav02 clear sbd -d /dev/disk/by-id/scsi-360014052752bf5ef8d14b308cf29c3f5 message mzapvldbiav02 clear sbd -d /dev/disk/by-id/scsi-3600140557a61ec52d994744872c42246 message mzapvldbiav02 clear crm cluster start crm_mon |
The above scripts are made only for saving time, otherwise, one can run individual commands to clear node messages.
Testing Scenarios
Scenario 1: Stop database on mzapvldbiav01
Stop the IQ DB on database mzapvldbiav01 gracefully. This should failover the database into mzapvldbiav02 and promote it as a master.
The cluster detects the stopped primary IQ database (on mzapvldbiav01) and marks the resource failed. The cluster promotes the secondary IQ NLS database (on mzapvldbiav02) to take over as primary. The cluster migrates the IP address to the new primary (on mzapvldbiav02). The cluster “failed actions” are cleaned up after following the recovery procedure.
Before Test: Cluster Status

Stopping Database:

After Failover:

Resource Cleanup: As the resource pri-sapiq_systemd is failed to restart on mzapvldbiav01, need to perform resource cleanup on mzapvldbiav01 for pri-sapiq_systemd. So next time if mzapvldbiav02 is down for some reason, resource can migrate to mzapvldbiav01 without any issues.

Cockpit View:

Scenario 2: Crash mzapvldbiav01
Simulate a site crash situation using kernel panic (echo ‘b’ > /proc/sysrq-trigger) on database server mzapvldbiav01. This should failover the cluster resources to mzapvldbiav02.
The cluster detects the failure on mzapvldbiav01 and declares it UNCLEAN. The cluster fences mzapvldbiav01. The cluster declares the failed node mzapvldbiav01 as OFFLINE. The cluster promotes the secondary IQ database on mzapvldbiav02 as active.
Before Test: Cluster Status

Simulate Kernel Panic on mzapvldbiav01:

After Failover:

As SBD fencing is used, we need to clear reset message on mzapvldbiav01 once root cause for kernel panic is identified and fixed. The reset message can be cleared with the help of the script /usr/bin/crm_node_cleanup.sh on respective nodes.

After Cleanup:

The node mzapvldbiav01 status will change to Online from Offline.
Cockpit View:

Troubleshooting
Resource Fail count Cleanup: Resource needs to be cleaned if any resource has failed errors like follows

In the above screenshot, we have errors associated with systemd resource “pri-sapiq_systemd”
|
crm resource cleanup pri-sapiq_systemd |
Clearing Temporary Constraints: When we move any resource to other node manually, then location constraints will be created. These needs to be cleared if we need cluster to handle resource movement operations automatically.
|
crm resource clear pri-sapiq_systemd |

Log Files:
Pacemaker Log File:
|
/var/log/pacemaker.log |
The systemd journal can be used to retrieve Pacemaker logs:
|
journactl -lf -u pacemaker |

Alternatively, /var/log/messages can be referred for other errors
|
/var/log/messages.log |
Decision Tree

Brought to you by Dr. Ware, Microsoft Office 365 Silver Partner, Charleston SC.

Recent Comments