This article is contributed. See the original author and article here.
As a Cloud Workload Protection Platform (CWPP), Azure Defender provides protection against cyber threats aimed at servers, no matter whether they are running in Azure, on–premises, or in another cloud platform. For more information about the importance of CSPM and CWPP to manage visibility and control of your cloud workloads, read this article. It also offers protection against cyber threats aimed at your cloud-native workloads in Azure, such as Azure Container Registry, Azure Key Vaults, Storage Accounts, AKS, SQL databases and many more. Learn more about all the resource types that Azure Defender can secure here.
Azure Container Registry (ACR) is a managed, private Docker registry service that stores and manages your container images for Azure deployments in a central registry. Azure Defender for container registries brings deeper visibility into the vulnerabilities effecting the container image. It scans every image for vulnerabilities and provides security recommendations using an integrated scanner powered by Qualys, the industry-leading vulnerability scanning.
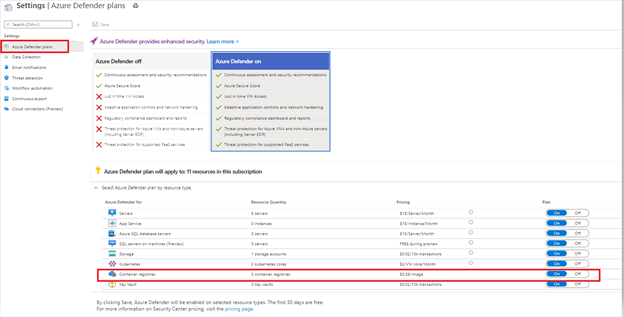
To enable the integration of Azure Defender and ACR, make sure you have Azure Defender ON and Container Registries plan enabled under Azure Defender plans as shown in Image 1

We are gradually rolling out Continuous image scans across regions, which should be available in all regions by end of month. With continuous container image scans, ASC re-scans images periodically (vs. once upon “push” action that we offer currently. Read more about it here), as new vulnerabilities are discovered over time. When an image is rescanned, a new recommendation is created overriding the previous scan/recommendation with all its related findings (only last scan results are available per image in ASC). We released continuous export of the findings as well. To learn more about continuous export please refer to this article
This blog post introduces an automation playbook that you can use to receive an email notification for any newfound vulnerabilities (findings) per image, compared to the last scan of the same image. This becomes more critical now that ASC is introducing continuous scans where the same image would be rescanned on a daily basis.
How to deploy the automation playbook
You can find an ARM template that will deploy the Logic App Playbook and all necessary API connections in the Azure Security Center GitHub repository Once you have deployed the ARM template, you will have some manual steps to take before it works as expected.
Authorize Office 365 API Connection
This API connection is used to send emails once a new resource exemption is created. To authorize the API connection:
- Go to the Resource Group you have used to deploy the template resources.
- Select the Office365 API connection and press ‘Edit API connection’.
- Press the ‘Authorize’ button.
- Make sure to authenticate against Azure AD.
- Press ‘save’.
Authorize the Logic App’s managed identity
The Logic App is using a system assigned managed identity to query information from the resource exemption and policy set definitions APIs. For this purpose, you need to grant it the reader RBAC role on the scope you want it to be used at. It is recommended to give it reader access on the tenant root management group, so it is able to query information for all subscriptions once relevant. To grant the managed identity reader access, you need to:
- Make sure you have User Access Administrator or Owner permissions for this scope.
- Go to the subscription/management group page.
- Press ‘Access Control (IAM)’ on the navigation bar.
- Press ‘+Add’ and ‘Add role assignment’.
- Choose ‘Reader’ role.
- Assign access to Logic App.
- Choose the subscription where the logic app was deployed.
- Choose the Logic App you have just deployed.
- Press ‘save’.
How does it work
The workflow is scanning images on a schedule. It’s getting the list of <image_unique_identifier> from recommendations generated in last 24hrs. For each <image_unique_identifier>, it gets the latest recommendations in last 24hrs compares them to the latest recommendations from beyond 24hrs, marks and sends email notification to only new findings that did not exist 24hrs ago (as shown in the sample email from ‘image 2’) and in an instance where there are no new findings in a scan, no email will be sent.
For example
- If this is the 1st time an <image_unique_identifier> gets scanned, all findings would be reported in an email
- If this is the 2nd time the <image_unique_identifier> is scanned, only findings that were not included in the 1st scan would be reported.
- If this is the 3rd time the <image_unique_identifier> is scanned, only findings that were not included in the 2nd scan would be reported.
And so on…

To learn more about Continuous Export, make sure to watch Episode 5 of Azure Security Center in the Field where we give more insights on this feature.
Make sure to take advantage of this automation artifact and stay on top of vulnerabilities in your container images to keep your environment secure.
Let us know your feedback using any of the channels listed in the Resources
Reviewers
Maya Herskovic, Senior Program Manager – ASC Engineering Team
Yuri Diogenes, Principal Program Manager – CxE ASC Team
Brought to you by Dr. Ware, Microsoft Office 365 Silver Partner, Charleston SC.

Recent Comments