This article is contributed. See the original author and article here.
Virtual Desktop Infrastructure (VDI) brings an interesting dynamic when tuning the platform. The delicate balance of performance and usability are key to the user experience and can require fine tuning of all sorts of items in Windows. Antivirus can also benefit from VDI specific configurations and tuning. Among all other settings, it’s crucial to ensure antivirus protection on the device is configured optimally.
Microsoft Defender Antivirus is a critical and built-in component in the Microsoft endpoint protection platform. this article includes guidance and recommendations for Microsoft Defender Antivirus on non-persistent VDI machines. This article covers optimizations, best practices, and recommended settings for configuring Microsoft Defender AV in a non-persistent VDI environment.
In my first VDI post I described how the non-persistent VDI deployment type works and interacts in a VDI master/child relationship. When non-persistent VDI machines are onboarded to Microsoft Defender ATP at first boot, you also want to provide Microsoft Defender AV protection for non-persistent VDI machines at first boot.
To ensure you have protection for VDI machines at first boot, follow these recommendations:
- Make sure that Microsoft Defender Antivirus security intelligence updates (which contain the Microsoft Defender Antivirus updates) are available for the VDI machines to consume
- Configure bare minimum settings that tell the VDI machines where to go to get the updates
- Apply any optimizations and other settings to the VDI machines at first boot. Some security policy settings can be set via the local security policy editor
Part 1: Security intelligence updates download and availability
As described in the first VDI post, non-persistent VDI machines generally don’t use a configuration management solution like Microsoft Endpoint Manager because they don’t persist their state (all changes to the VDI machine are lost at logoff, reboot, or shutdown). This means the usual recommended delivery mechanism for security intelligence updates can’t be used. Fortunately, you have options to configure how the updates are delivered to Windows. The settings can be accessed in the local group policy editor at the following path:
Computer ConfigurationAdministrative TemplatesWindows ComponentsMicrosoft Defender Antivirus
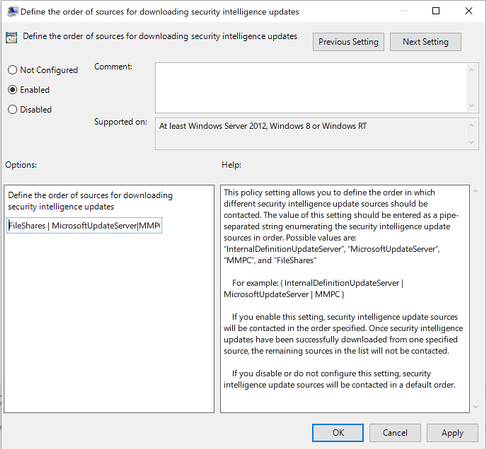
Note: Depending on the release of Windows the ADMX template can vary and the path will either be “Windows Defender Antivirus” or “Microsoft Defender Antivirus” in the latest templates. The Define the order of sources for downloading security intelligence updates setting is what you should configure first. There are four ways the update can be delivered to the VDI machine:
- InternalDefinitionUpdateServer
- MicrosoftUpdateServer
- Security intelligence updates (formerly known as the Microsoft Malware Protection Center (MMPC) security intelligence)
- FileShares
These are the only possible values for the setting. You can configure the order that VDI machines will check these locations by listing them in the preferred order and delimiting them the pipe (|) character. Guidance on configuring this setting is documented here.
For VDI, the most optimal choice is to have the non-persistent machines fetch the security intelligence update from a file share on the LAN. The recommended setting would look like this:
- FilesShares
- MicrosoftUpdateServer
- Security intelligence updates (formerly known as the Microsoft Malware Protection Center (MMPC) security intelligence)
- InternalDefinitionUpdateServer
Steps 3 and 4 can be swapped if you have a Windows Server Update Service (WSUS) server that hosts the updates. As noted in the guidance, security intelligence updates (formerly MMPC) should be a last resort, due to the increased size of the updates. In a case where there is no WSUS server in the environment, in the local group policy editor, the setting will look like this:

When a preference order is set for the VDI machines, it’s important to understand how to get the security intelligence packages to the file share in question. This means that a single server or machine must fetch the updates on behalf of the VMs at an interval and place them in the file share for consumption.
First, create an SMB/CIFS file share. In the following example, a file share is created with the following share permissions, and an NTFS permission is added for Authenticated Users:Read:

For this example, the file share is:
fileserver.fqdnmdatp$wdav-update
Ensure that the server or machine that is fetching the updates has read/write access to it so that it can write the security intelligence updates into the wdav-update folder. General guidance on how to download and unpack the updates with a PowerShell script and run it as a scheduled task are here.
In addition, there are some other things to consider for this operation and tie them all together. I’ve written a sample PowerShell script (based on the guidance) that can be run at an interval as a scheduled task. The script takes the following steps:
- Fetch x64 security intelligence update and download to local folder that is named as a unique GUID, such as the following:
C:Windowswdav-update{00000000-0000-0000-0000-yMMddHHmmss}mpam-fe.exe
- Extract the x64 security intelligence update:
mpam-fe.exe /X
- The contents of the folder are now the compressed package (mpam-fe.exe) and the contents of the package (this is important later)
- Copy the entire C:Windowswdav-update{00000000-0000-0000-0000-yMMddHHmmss} folder to the file share at the following path:

fileserver.fqdnmdatp$wdav-update
- Copy the file C:Windowswdav-update{00000000-0000-0000-0000-yMMddHHmmss}mpam-fe.exe to the following path:
fileserver.fqdnmdatp$wdav-updatex64
Note: The x64 directory MUST be present or clients will fail to find the security intelligence
package update.
- Remove folders older than 7 days (configurable) in the following paths:
C:Windowswdav-update
fileserver.fqdnmdatp$wdav-update
- Log all actions to the Application event log on the system
That’s a quick breakdown of what the sample does and it’s available here. It takes care of fetching the security intelligence updates, unpacking them, and copying them to the file share that the VDI machines will grab them from. To recap, at this point, the VDI machines are configured to go to the file share for the updates, and a single machine gets the updates to the file share.
Part 2: First boot Microsoft Defender Antivirus settings
When the file share is all set up and populated with the updates, you can configure a few things on the VDI master. Remember to configure these settings in the VDI master so that the child VDI machines will have the settings at first boot. The settings can be viewed in the local security policy editor here:
Computer ConfigurationAdministrative TemplatesWindows ComponentsMicrosoft Defender Antivirus
Note: Depending on the release of Windows the ADMX template can vary and the path will either include “Windows Defender Antivirus” or “Microsoft Defender Antivirus” in the latest templates.
In this tree of the editor there are a couple of settings to configure and they are listed below.
“Define file shares for downloading security intelligence updates” This setting tells the VDI machines what the UNC path to the file share that holds the updates is. In this example we set it to:
fileserver.fqdnmdatp$wdav-update
Note: This setting requires a reboot of the VDI machine for it to take effect. This is why it is critical to include it as a first boot policy. Here is a snip from the MPLog (located in C:ProgramDataMicrosoftWindows DefenderSupport) after enabling the setting:
All VDI machines (that will use a file share) must have this setting enabled, even if they are using the shared security intelligence feature below Define security intelligence location for VDI clients.
- Initiate Security Intelligence on startup This setting tells the VDI machines to update security intelligence on startup when there is no antimalware engine present. In our example, we set it to Enabled or Not Configured.
- Check for the latest virus and spyware security intelligence on startup This setting tells the VDI machines to check for the latest AV and spyware updates at startup. In our example we set it to Enabled.
- Define security intelligence location for VDI clients This setting offloads the extraction of the security intelligence update onto a host machine (the server that is running the PowerShell job to fetch the updates and place them in the share in this case), which saves CPU, disk, and memory resources on the non-persistent VDI machines.
Note: Defining a security intelligence location only works in Windows 10, version 1903 and above. If you are running 1903 or later, then you can enable this setting, but be aware that the VDI machines expect the extracted security intelligence update to be available at the following location:
fileserver.fqdnmdatp$wdav-update{GUID}
This is why in the PowerShell sample, not only do we copy the compressed security intelligence package (mpam-fe.exe) to the share, but we also copy the extracted contents of it as well. Since we copy both the package and the contents, we can point any version of Windows 10 to the same share for the security intelligence updates.
When a VDI machine is using , in the MPLog (located in C:ProgramDataMicrosoftWindows DefenderSupport) you’ll see it parse the GUID folder in the file share looking for the security intelligence update:

Note: This setting will NOT work without the Define file shares for downloading security intelligence updates setting also enabled. If you do not enable this other setting, you will see the following error in the operational log:

The biggest thing to remember is what folders machines will go to for the security intelligence update depending on whether or not the Define security intelligence location for VDI clients setting is enabled.
For VDI systems with the Define security intelligence location for VDI clients setting enabled, they will look at the following path for updates:
fileserver.fqdnmdatp$wdav-update{00000000-0000-0000-0000-yMMddHHmmss}
For VDI systems (or physical machines that will use a file share) that DO NOT have the Define security intelligence location for VDI clients setting enabled, they will look at the following path for updates:
fileserver.fqdnmdatp$wdav-updatex64
This is why the x64 directory is required. This is detailed in the MPLog (located in C:ProgramDataMicrosoftWindows DefenderSupport):

Part 3: Microsoft Defender Antivirus settings
One of the most important settings to consider is the Turn off Microsoft Defender Antivirus setting. We strongly recommend that you do NOT change this setting to Enabled as doing so will disable Microsoft Defender Antivirus. Even if you are using a third-party antivirus solution, Microsoft still recommends leaving this setting at its default setting of Not Configured.
The reason for this is that when a third-party antivirus registers itself with the Microsoft Defender Security Center in Windows Microsoft Defender Antivirus will automatically go into passive mode. When Microsoft Defender Antivirus is in passive mode, Microsoft Defender ATP still uses the AV engine to perform certain functions, some of which are in the Microsoft Defender Security Center portal (https://securitycenter.windows.com). A few examples are:
- Trigger an antivirus scan
- Detection information
- Security intelligence updates
- Endpoint detection and response (EDR) in block mode
More information on Microsoft Defender Antivirus in passive mode can be found here. The rest of the settings are pulled from the Microsoft Defender Antivirus VDI guidance, but let’s go over them here as well for our example scenario.
- Specify the scan type to use for a scheduled scan This setting allows you to specify the type of scan to be used, and for VDI machines the Quick Scan (default) value is recommended.
- Randomize scheduled task times This setting ensures that scheduled scans are randomized at a four-hour interval and for VDI machines the Enabled or Not Configured (Default) value is recommended.
- Specify the day of the week to check for security intelligence updates This setting allows you to specify the day of the week that you want the VDI machines to check for updates. Since VDI machines are non-persistent and are in some cases short lived the recommended setting for this is Every Day or Not Configured (Default Setting).
- Specify the interval to check for security intelligence updates This setting sets the interval (in hours) at which the VDI machines will check the file share for security intelligence updates. Tune this based on the interval that your scheduled task (on the server) is downloading the security intelligence packages, and other environmental factors. For our example, my server machine is fetching security intelligence packages every 4 hours, and I’ve set this to every 2 hours on the VDI machines.
Note: Microsoft releases security intelligence updates up to every four hours.
- Define the number of days before Antivirus security intelligence is considered out of date This setting does just that. You need to pick the number of days after which you consider an endpoint’s antivirus to be out of date. If a client surpasses the number of days, certain actions, such as failing back to an alternate source and displaying warning icons in the user interface are triggered. This is another one you need to tune for your environment. Plan on tuning this in accordance with the number of days of security intelligence packages that you are keeping on the file share.
For this example, I’m removing security intelligence package downloads (via the PowerShell sample script) from the file share that are older than 7 days, so I’ve also set this setting to 7 (since I only keep 7 days’ worth anyway).
- Define the number of days before virus security intelligence is considered out of date This is the same setting as above, treat it and tune the same way. Typically, this will be the same setting as the setting above and in this example, I’ve also set this to “7.”
Tying it all together
In summary, we’ve configured a scheduled task on a designated machine to fetch, extract, and place the compressed and uncompressed security intelligence packages in a file share. Non-persistent VDI machines are pointed to this share in order to fetch the updates. We also went over a few of the bare minimum settings to provide first boot protection for non-persistent VDI machines, as well as a few other settings that should be optimized for them. Automation is definitely the glue here that keeps all of this together.
From the VDI master perspective, fold all of these settings together either in the registry or by using a local group policy object.
Tools like the Microsoft Deployment Toolkit (MDT) allow for automation of applying these settings to the VDI master, and as mentioned in my last post I’ve also integrated these first boot Microsoft Defender Antivirus settings into a sample script that’s used to stage the Microsoft Defender ATP onboarding script on your VDI master during an MDT task sequence.
Hopefully, this helps you test, optimize, and deploy Microsoft Defender Antivirus on your non-persistent VDI pools! Let us know what you think by leaving a comment below.
Jesse Esquivel, Program Manager
Microsoft Defender ATP
Brought to you by Dr. Ware, Microsoft Office 365 Silver Partner, Charleston SC.

Recent Comments