This article is contributed. See the original author and article here.
PIM for Groups
Entra ID (formerly Azure AD) offers the Privileged Identity Management (PIM) for Groups feature, enabling users to attain just-in-time membership and ownership of groups, thus governing access to a range of services. This feature allows the implementation of policies similar to those in PIM for Entra ID Roles and PIM for Azure Resources, allowing the configuration of actions like approval enforcement, multi-factor authentication (MFA), justification requirements, and activation time limits. Each PIM for Groups configured group features two distinct policies, catering to membership and ownership activation. This means that if an account is both an eligible owner and an eligible member of a group, each of them have their own activation.
For more information you can read the official documentation here.
Microsoft 365 Defender RBAC
Microsoft 365 Defender RBAC offers centralized permissions management for the following services:
- Defender for Endpoint
- Defender for Identity
- Defender for Cloud Apps
- Defender for Office 365
- Microsoft Defender Vulnerability Management
- Secure score
When a role is created, the services which the role covers can be selected. The advantage of using the new M365 Defender RBAC as opposed to the legacy RBAC for each individual service is that it is possible to grant permissions to multiple services from just a single role assignment. If you have been using legacy RBAC assignments it’s very simple to import those roles into the new M365 Defender unified RBAC. The steps for importing the roles can be found here.
M365 Defender unified RBAC workloads need to be activated before they are applied. Until the workloads are activated Defender will apply the legacy RBAC model for each individual service.
When creating an M365 Defender role you will need to create an assignment for it. Assignments will have a scope (which Defender data sources the assignment will apply to) and Entra ID users or groups (which users or groups the assignment will be applied to).
For more information you can read the official documentation here.
Putting the two together
As group membership can define getting M365 Defender roles, and group membership can be given in a just-in-time manner, it means that indirectly M365 Defender roles can be given in a just-in-time manner.
The steps to set this up would be the following.
Create the Entra ID group and add members
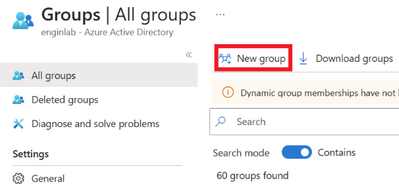
In the Azure portal go to Azure Active Directory and click on Groups and then New group.
Figure 1 Creating new group
Enter the details as required.

Figure 2 Adding details to group being created
Add Eligible Members to the group
Go to the Azure portal and search for Azure AD Privileged Identity Management in the search bar. Once there, select Groups on the left side of the menu. The group needs to be discovered before eligible members can be added. To discover the group, search the group name and select Discover groups.

Figure 3 Discover groups to manage with PIM
Select the group and click Manage groups.

Figure 4 Manage group using PIM
Click on OK.

Figure 5 Onboarding selected groups
Now the group should be visible. Select the group and click Assignments, then Add assignments in the Eligible assignments tab. If it is not added to this tab, the assignment will be active and not eligible.

Figure 6 Adding assignment to PIM managed group
Select the members to be added to the group.

Figure 7 Selecting members

Figure 8 Selecting members
Select Eligible and enter the start and end dates of the eligibility assignment. Once the correct dates are set click Done. Finish the assignment process.

Figure 9 Setting details of eligible membership
Now there should be the account added in the Eligible assignments tab on the groups membership.

Figure 10 Viewing eligible assignment of groups members
Now the group has PIM eligible members.
Create the M365 Defender Role
M365 Defender roles can be created in the M365 Defender portal. If you have the correct permissions you can click on Permissions on the left side in the menu.

Figure 11 Permissions tab in Defender menu
Under Microsoft 365 Defender select Roles.

Figure 12 Microsoft 365 Defender Roles in permissions page
Click on Create custom role. Enter the name of the role and click Next.

Figure 13 Beginning the creation of a custom role
On the Choose permissions tab click on each permission an select the level of access you want the role to have.

Figure 14 Permissions selection screen

Figure 15 Example permissions for Security Operations
Once the permissions you want are selected click on Next.

Figure 16 Permissions selected for each group
On the next screen assignment are created for the role. The assignments created will determine which account are assigned this role. Click on Add assignment.

Figure 17 Adding assignment to role
Enter the assignment name and select the group created in Step 1. Click Add.

Figure 18 Entering assignment details
Move to the next screen by clicking Next. Review the permissions and click Submit.

Figure 19 Reviewing and submitting the roles settings
As mentioned earlier, the M365 Defender RBAC has to be activated for workloads so that it can be applied. If this hasn’t been done already then it will need to be activated. On the main page for M365 Defender Roles there will be a note if any workload has not been activated. If this note is there then you will need to Activate workloads.


Figure 21 Activating workloads
Users perspective
Once a user has been made an eligible member of the group they can activate their membership and get temporarily assigned to the M365 Defender role. The user will have to follow these steps:
Go to Azure AD Privileged Identity Management and to the Groups tab in the menu on the left. The group should be visible. If the group is not visible, verify that the user is an eligible member of the group and that the group was ‘discovered’ by the admins. These steps can be found in the previous sections. Select Activate role.

Figure 22 Activating group membership
On the next screen select Activate on the group you want to activate the membership for.

Figure 23 Activating group membership
Select the duration the membership should last for and add a reason. Select Activate.

Figure 24 Activating group membership
After activating the role, if the membership status of the group is checked, you will see the account there with details about when the membership was activated.

Figure 25 Viewing the activated group membership
The users view in M365 Defender before and after activating the group membership, and therefore getting assigned the M365 Defender role. Notice that after the role is assigned the user can see menus for Defender related activities.

Figure 26 The Defender menu before activating the group membership

Figure 27 The Defender menu after activating the group membership
Wrapping it up
PIM for Groups paired with M365 Defender RBAC offers a solution for those looking for just-in-time Defender access. These can also be used in combinations. For example, if you want a certain sures to always have read access but access to take device actions should be granted just-in-time, then a read-only Defender role can be assigned permanently and the role for taking device actions can be granted to the group via the steps mentioned above.
Brought to you by Dr. Ware, Microsoft Office 365 Silver Partner, Charleston SC.

Recent Comments