This article is contributed. See the original author and article here.
Azure Firewall Premium, which entered Public Preview on February 16th, introduces some important new security features, including IDPS, TLS termination, and more powerful application rules that now handle full URLs and categories. This blog will focus on TLS termination, and more specifically how to deal with the complexities of certificate management.
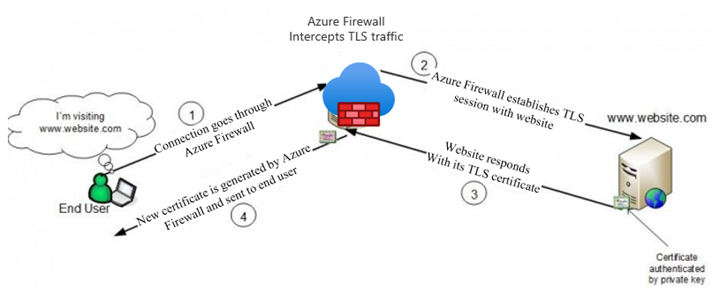
There is an overview of the TLS certificates used by clients, websites, and Azure Firewall in a typical web request that is subject to TLS termination in our documentation (diagram below). In summary, a Subordinate (Intermediate) CA certificate needs to be imported to a Key Vault for Azure Firewall to use. To ensure a seamless experience for clients, they all must trust the certificate issued by Azure Firewall.
The rough steps for enabling TLS Inspection are:
- Issue and export a subordinate, or intermediate, CA certificate along with its private key.
- Save the certificate and key in a Key Vault.
- Create a Managed Identity for Firewall to use and allow it to access the Key Vault.
- Configure your Firewall Policy for TLS Inspection.
- Ensure that clients trust the certificate that will be presented by Azure Firewall.
The rest of the blog will walk through the different ways to accomplish steps 1 and 5.
General Certificate Requirements
From our docs, the certificate issued must conform to the following:
- It must be a single certificate, and shouldn’t include the entire chain of certificates.
- It must be valid for one year forward.
- It must be an RSA private key with minimal size of 4096 bytes.
- It must have the KeyUsage extension marked as Critical with the KeyCertSign flag (RFC 5280; 4.2.1.3 Key Usage).
- It must have the BasicContraints extension marked as Critical (RFC 5280; 4.2.1.9 Basic Constraints).
- The CA flag must be set to TRUE.
- The Path Length must be greater than or equal to one.
These requirements can be fulfilled by either generating self-signed certificates on any server, or by using an existing Certificate Authority, possibly as part of a Private Key Infrastructure (PKI). Public Certificate Authorities will not issue a certificate of this type because it will be used to issue other certificates on behalf of the root or issuing CA. Since most public CAs are trusted by default on client operating systems, allowing others to issue certificates on behalf of those would be a major security risk.
Self-Signed Certificates
The quickest and easiest method of generating a certificate for use on Azure Firewall is to generate root and subordinate CA certs on any Windows, Linux, or MacOS machine using openssl. This is the recommended method to use for testing environments, due to its simplicity.
There are scripts in our documentation that make this process very easy. If you are using these certificates in a production environment, be sure to secure the root CA certificate by storing it in a Key Vault.
Establishing Trust
If the certificate used on Azure Firewall is not trusted by the client making a web request, they will be met with an error, which would disrupt normal operations. The best way to establish trust is to add the Root CA that issued the Firewall certificate as a Trusted Root CA on every client device that will be sending traffic through the Firewall. You will need an exported .cer file from your Root CA.
Using Ubuntu as the example for Linux, this can be done using update-ca-certificates.
On Windows, you can use the UI or import using Powershell.
This process can be scripted and run remotely if the environment allows it.
PKI
A Private Key Infrastructure can be used by organizations to manage trust within an enterprise. There are several advantages to using this approach rather than self-signed certificates, including:
- CA infrastructure may already be in place in some environments, especially hybrid ones.
- Enterprise Root CA is automatically trusted by all domain-joined Windows computers. No extra steps are needed to establish trust.
- Certificate rotation and revocation can be done centrally via Group Policy, so changes are more easily managed.
Using PKI, you will not have to import your certificate on your Windows clients, since they will all automatically trust your Enterprise Root CA. The full process of generating, exporting, and configuring Azure Firewall to use a PKI certificate is documented in a new article here.
Intune
Intune does not generate certificates, but it can be a great tool to manage them on clients. If your Azure VMs are managed by Intune, you can use certificate profiles to add your chosen CA as trusted.
Custom Images
If your environment is not connected to or managed by Active Directory, Intune, MEM, or any other client management tool, you still have an option to deploy certificates at scale. Using custom images, you can install the trusted Root CA certificate, capture an image, and use that image to deploy or re-deploy your VM instances.
This process works best in environments where servers are treated as “cattle” rather than “pets,” meaning that they are spun up and down often and automatically configured, rather than manually configured and maintained for long periods of time.
Summary
This has been an overview of some different methods available to create certificates for use on Azure Firewall Premium and establish trust for those certificates on your clients. This is certainly not an exhaustive list of the options out there, so we would like to hear more from you. Please leave a comment telling us what methods you are currently using or would like to use. We will use your feedback to create more documentation and other instructional content.
Brought to you by Dr. Ware, Microsoft Office 365 Silver Partner, Charleston SC.

Recent Comments