
by Scott Muniz | Sep 11, 2020 | Azure, Technology, Uncategorized
This article is contributed. See the original author and article here.

Project Server Permission Mode Vs SharePoint Permission Mode
Mohamed El-Qassas is a Microsoft MVP, SharePoint StackExchange (StackOverflow) Moderator, C# Corner MVP, Microsoft TechNet Wiki Judge, Blogger, and Senior Technical Consultant with +10 years of experience in SharePoint, Project Server, and BI. In SharePoint StackExchange, he has been elected as the 1st Moderator in the GCC, Middle East, and Africa, and ranked as the 2nd top contributor of all the time. Check out his blog here.

Start your DevOps pipeline in the Azure Cloud
James van den Berg has been working in ICT with Microsoft Technology since 1987. He works for the largest educational institution in the Netherlands as an ICT Specialist, managing datacenters for students. He’s proud to have been a Cloud and Datacenter Management since 2011, and a Microsoft Azure Advisor for the community since February this year. In July 2013, James started his own ICT consultancy firm called HybridCloud4You, which is all about transforming datacenters with Microsoft Hybrid Cloud, Azure, AzureStack, Containers, and Analytics like Microsoft OMS Hybrid IT Management. Follow him on Twitter @JamesvandenBerg and on his blog here.

ASP.NET Core 5: Make your options immutable
Anthony Giretti is a specialist in web technologies with 14 years of experience. He specializes in particular in Microsoft .NET and he is currently learning the Cloud Azure platform. He has twice received the Microsoft MVP award and he is also a certified Microsoft MCSD and Azure Fundamentals. Follow him on Twitter @anthonygiretti.

Starting with FIDO2 security keys With Azure Active Directory
Robert Smit is a EMEA Cloud Solution Architect at Insight.de and is a current Microsoft MVP Cloud and Datacenter as of 2009. Robert has over 20 years experience in IT with experience in the educational, health-care and finance industries. Robert’s past IT experience in the trenches of IT gives him the knowledge and insight that allows him to communicate effectively with IT professionals. Follow him on Twitter at @clusterMVP

Microsoft Flight Simulator 2020 running in Windows Virtual Desktop!
Freek Berson is an Infrastructure specialist at Wortell, a system integrator company based in the Netherlands. Here he focuses on End User Computing and related technologies, mostly on the Microsoft platform. He is also a managing consultant at rdsgurus.com. He maintains his personal blog at themicrosoftplatform.net where he writes articles related to Remote Desktop Services, Azure and other Microsoft technologies. An MVP since 2011, Freek is also an active moderator on TechNet Forum and contributor to Microsoft TechNet Wiki. He speaks at conferences including BriForum, E2EVC and ExpertsLive. Join his RDS Group on Linked-In here. Follow him on Twitter @fberson
by Scott Muniz | Sep 11, 2020 | Uncategorized
This article is contributed. See the original author and article here.
Welcome to the Governance and Management blog!
Summary
An important change has been released to policies in category Guest Configuration. The policy format has been updated to address customer feedback, to simplify the experience of auditing settings inside machines. Existing policies that were assigned prior to this release will continue to display accurate results and will not be deleted in the near future. For new policy assignments, only the updated definitions are available.
In the new experience, a single initiative handles all prerequisite requirements. Once the prerequisites are completed, Audit policies may be added/removed without needing to run remediation tasks.
Switching to the new experience requires assigning the new definitions.
TL/DR Engineering perspective on the change
Here is a full post-mortem on the change and why we have made it.
Background
Guest Configuration policies operate together with the Microsoft.GuestConfiguration resource provider (RP). The role of the RP is to map scenarios to machines. In the example below, the RP stores a “guest configuration assignment” that audits for groups/accounts that should not be members of the Administrators group.
"guestConfiguration": {
            "name": "AdministratorsGroupMembersToExclude",
            "version": "1.*",
            "contentUri": "https://oaasguestconfigeus2s1.blob.core.windows.net/builtinconfig/AdministratorsGroupMembersToExclude/AdministratorsGroupMembersToExclude_1.0.0.0.zip",
            "contentHash": "4D4AC73EE559B4B4C52BF123E6BE62A6901BC3E24750A238C32759DB366E433D",
            "contentType": null,
            "assignmentType": null,
            "configurationParameter": [
                {
                    "name": "[LocalGroup]AdministratorsGroup;MembersToExclude",
                    "value": "foobar"
                }
            ],
            "configurationProtectedParameter": [],
            "configurationSetting": null
        }
The Azure resource must be created when an Azure Policy is assigned for guest configuration scenarios. The information provided by the resource makes the scenario visible in the Azure Resource Manager API, which is how Azure Policy evaluates the results returned by the agent.
For the last two years, guest configuration policies have followed a pattern where each scenario included an initiative containing two definitions. Each definition played an important role:
- A Deploy If Not Exists definition that created the guest configuration assignment, and ensured the extension is installed for the machine and the machine has a system assigned managed identity.
- An Audit If Not Exists definition that would examine the results returned by the agent in ARM to make the compliance state available in the Azure Policy experience.
Challenge
The consequence of this design was that when the definitions were assigned to a scope with existing machines, a remediation task needed to be run for the guest configuration assignments to be created. Customer feedback told us that the notion of remediating an audit policy did not sound logical and was too confusing for a “day 0” experience.
Resolution
We have now launched a new policy experience for guest configuration definitions. Effective now, only the Audit If Not Exists definition is required. Customers will not need to assign Deploy If Not Exists definitions per scenario, and will not need to assign an initiative per scenario.
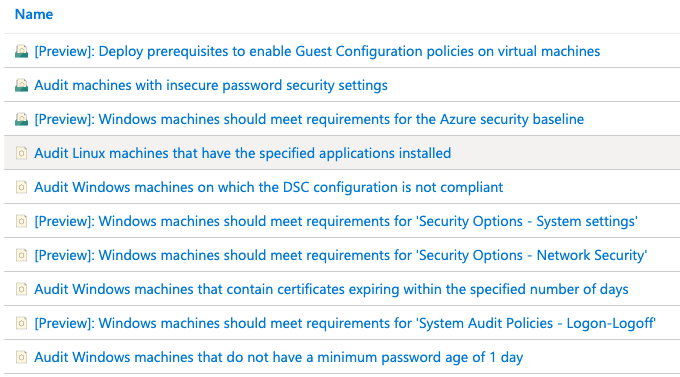
You can see the definitions in the Azure Portal by filtering to Category = Guest Configuration.

To handle creation of the guest configuration assignment resource, we have implemented an automation solution in our service. When Azure Policy performs a GET request to determine machine compliance, the automation will create the resource and return a state of Pending. Once the agent has performed the audit and calculated the compliance state, the service will write Compliant or NonCompliant as the state of the scenario per machine. This PUT activity triggers Azure Policy to evaluate the resource again, which means the state of the resource in Azure Policy will always be current with the latest compliance state of the machine (within 30 minutes).
IMPORTANT
To start using the new definitions you must create a new Policy assignment.
We took our time in releasing this change because we thoroughly investigated every possibility for migrating existing assignments to the new model. In every design proposal we were able to find edge cases where parameter values could be at risk. To ensure the highest degree of reliability, the only possibility is to release new policies and mark the existing policies as deprecated.
Existing definitions appearing as ‘Deprecated’
All existing guest configuration definitions will appear with the text “[Deprecated]” added to the beginning of the display name. This does not mean they have been deleted, or that they will be deleted near term. The only change is that they are not visible in the Azure Portal for new assignments. Where they are used for existing assignments, they will continue to function as they have in the past and they will show accurate results.
There is no date and time when customers using the previous Initiative/Deploy/Audit policy combinations must change to the new policies. The new experience is simplified and easier to use. When you would like to enjoy the new experience, you can assign the new policies. Having the “old” policies and “new” policies both assigned to the same or overlapping scopes is fine as long as they use the same parameter values.
Only one set of prerequisite definitions
To simplify handling all prerequisite requirements to perform an audit inside the machine, we now have an initiative named Deploy prerequisites to enable Guest Configuration policies on virtual machines. This initiative combines 4 definitions:
- Create a system assigned managed identity for machines with no identity
- Create a system assigned managed identity for machines with an existing user assigned managed identity
- Deploy the ‘AzurePolicyforWindows’ extension to Windows machines
- Deploy the ‘AzurePolicyforLinux’ extension to Linux machines
These policies will deploy requirements to new machines automatically and make remediation tasks available for existing machines. Once machines have been remediated for prerequisites, you do not need to run additional remediation tasks as you assign more audit policies.
Thank you
I know this change is inconvenient since it requires making a manual change. We have done our best to lessen the impact of the change, with intention to bring you the best experience possible. Thank you for your patience and I look forward to hearing your feedback.
To provide feedback or engage in discussion about guest configuration, I would suggest the following options.
* You are also welcome to direct-message me here with questions or feedback about guest configuration
Thank you!
Michael Greene
Principal Program Manager
Azure management services

by Scott Muniz | Sep 11, 2020 | Uncategorized
This article is contributed. See the original author and article here.

In this HLS Partner Plays webcast recording Randy Nale, Healthcare Technology Strategist at Microsoft, and Wes Wright, CTO at Imprivata, show how to boost efficiency in the demanding hospital setting using Imprivata Mobile and Microsoft 365.
Resources:
Thanks for visiting – Michael Gannotti LinkedIn | Twitter
 Michael Gannotti
by Scott Muniz | Sep 11, 2020 | Uncategorized
This article is contributed. See the original author and article here.
My name is Rini Banerjee, and I am about to start my third year of Joint Mathematics and Computer Science at Imperial College London.
I’ve spent this summer doing a remote research internship on the Devito Project, under the supervision of Prof Paul Kelly and Dr Gerard Gorman. I’ve been working on the Devito Book: a set of Jupyter Notebook tutorials that teach the finite difference method for solving partial differential equations using Devito, based on the textbook “Finite Difference Computing with PDEs – A Modern Software Approach” by H. P. Langtangen and S. Linge.
What is Devito?
Devito is a domain-specific language and code generation framework that automates the finite difference method for solving partial differential equations (PDEs). It can be used as a library in Python to provide a high-level symbolic abstraction for the user, allowing them to input their problem concisely using simple mathematical operators. This makes code extremely readable and intuitive to understand. In addition, Devito turns symbolic Python code into highly optimised C++ code under the hood and, as a result, is much faster than its contemporaries. Its performance and usability give it a significant edge over many existing programs.
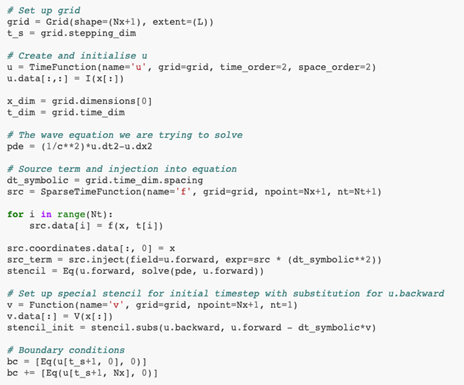
 Symbolic Computation in Devito
Devito is primarily used to solve inverse problems. In particular, the original motivation for Devito was to create wave propagation kernels to solve PDEs in the context of seismic equations.
 Marmousi Full Waveform Inversion (FWI),
Marmousi Full Waveform Inversion (FWI), done using JUDI (from this paper)
You can find out more about Devito here: https://www.devitoproject.org/
Some introductory papers about Devito are available here: http://arxiv.org/abs/1807.03032 and https://www.geosci-model-dev.net/12/1165/2019/
Devito is an open-source project, available here: https://github.com/devitocodes/devito
Making the Devito Book
I started the summer with an empty GitHub repository. The objectives for my summer project were as follows:
- Re-engineer the existing book source (https://github.com/hplgit/fdm-book/tree/master/src) into Jupyter Book (https://jupyterbook.org) format.
- Configure CI/CD using GitHub Actions to verify that code examples (both stand alone examples and individual Jupyter notebooks) execute correctly and to deploy the revised Jupyter Book.
- Re-implement the existing finite difference coding examples using Devito.
The main aim of this project is to provide an interactive, easy-to-follow online textbook for teaching the finite difference method. It is hoped that by doing these tutorials, students will not only gain a deeper understanding of how the finite difference method works, but also learn how to use Devito as a powerful tool for numerical computation.
Re-engineering the book format
My first task was to take the original book, which was essentially a set of DocOnce files, and convert these files into a form that could be represented as a Jupyter Book. Jupyter Books allow Jupyter Notebooks to be represented as an online book with a table of contents and simple navigation between different notebooks. Thankfully, DocOnce came with a command-line tool for directly converting from DocOnce (.do.txt) files into Jupyter Notebook (.ipynb) files, and so after importing the original textbook into the devito_book repository, I used this tool to generate the Jupyter Notebooks.
Configuring CI/CD
Next, I used GitHub Actions to configure CI/CD for the book. This involved setting up a few workflows (.yml files) that do the following:
- Test that the code in the completed Jupyter Notebooks is compiling, using pytest and a plugin called nbval (NoteBook VALidation)
- Test that the numerical computation is being done correctly in the Jupyter Notebooks, using tests that were written for the original textbook
- Deploy the completed notebooks to GitHub Pages, onto https://www.devitoproject.org/devito_book/
Re-implementing the existing NumPy solvers using Devito
Once the initial setup for the Devito Book was complete, it was time to get to work on re-implementing the existing finite difference coding examples. These existing examples were written in Python, using the NumPy library, and my task was to change these examples to use Devito instead.
My approach to doing this conversion from NumPy to Devito code involved:
- Writing a new function with the same expected behaviour using Devito
- Plotting the Devito function’s output against the original NumPy function’s output for the same inputs
- Using the original textbook’s verification tests to check that the Devito function was performing as expected
Once I was confident that my Devito solvers were executing correctly for a particular notebook, I would deploy it to GitHub Pages.
 The deployed Jupyter Book
Throughout the summer, I worked on notebooks that teach students how to computationally solve wave equations, vibration equations and diffusion equations. I mainly used the Jupyter Notebook interface for working on these notebooks. I also used Visual Studio Code extensively for working on Python files, and later loaded the relevant functions from these files into Jupyter Notebook code cells.
 Using Visual Studio Code to write Devito solver functions
The devito_book repository can be viewed here: https://github.com/devitocodes/devito_book
Additional tasks
During the project, some of the team noticed that there were a lot of dependencies for these notebooks, including visualisation packages such as Bokeh and Mayavi. For users of the book who preferred the more interactive Jupyter Notebook interface, it would require some effort to get the book running quickly if they did not have all of these dependencies already installed. For this reason, we decided to containerise the book using Docker. Running docker-compose up devito_book starts a Jupyter notebook server inside a container and forwards the port to http://localhost:8888 .

Calling all contributors!
Now that I am approaching the end of my summer project, I will be leaving this project to the Devito team so that they can complete what I have been working on for the last 10 weeks.
If you are interested in numerical computation, programming in Python, and/or applied mathematics, and would like to contribute to our open-source textbook, feel free to reach out to us on Slack and check out the devito_book repository on GitHub.
Thank you to everyone on the Devito Project for giving me the opportunity to learn so much this summer in a really friendly and supportive work environment. It’s been great!

by Scott Muniz | Sep 11, 2020 | Azure, Technology, Uncategorized
This article is contributed. See the original author and article here.
A fully automated DevOps deployment of an synchronous pattern with Azure Integration Services. Setup with services like: API Management, Logic Apps, Key Vault (to store connections strings and keys for API Connections), Cosmos DB, Application Insights (for logging and monitoring API Management) and Log Analytics (for logging metrics from Logic Apps).
Here is the GitHub repository with all resources used in this tutorial: https://github.com/pascalvanderheiden/ais-sync-pattern
The architecture is based on the Basic Enterprise integration pattern: https://docs.microsoft.com/en-us/azure/architecture/reference-architectures/enterprise-integration/basic-enterprise-integration
I’ve used API Management GUI to create the API. And, I’ve used the Extract Tool to create the definition for my API: https://github.com/Azure/azure-api-management-devops-resource-kit
https://azure.microsoft.com/en-us/blog/build-a-ci-cd-pipeline-for-api-management/
You can also use the API Management Extension in Visual Studio Code, it has the Extract tool embedded in the extension.
Azure Architecture

The architecture uses Logic Apps to orchestrate the API workflow and API Management to create and publish the API. This architecture is sufficient for basic integration scenarios where the workflow is triggered by synchronous calls to backend services. A more sophisticated architecture using queues and events builds on this basic architecture (https://github.com/pascalvanderheiden/ais-async-pattern)
This architecture focusses on retrieving data from a Cosmos DB and returning that query in the response.
In this case I’ve used Cosmos DB to get the messages from, but this can be replace with any backend application / database.
In DevOps with the build pipeline all shared resources are deployed. The release pipeline deploys the specific services needed for this pattern. In this way are able to deploy, by cloning, multiple sync pattern, using the same shared components for cost optimization.
In this DevOps project I’ve made it possible to deploy to 3 environments by choice. So, you can deploy to a dev, staging and production environment in the DevOps project. There are 3 build pipelines which will provide the deployment of completely separate environments. All shared components are deployed in the build pipelines. In the release pipeline we will do a staged deployment of each environment, with a approval in between. This way you can choose if you want to deploy duplicate environments or not.

Step by Step installation
Before we hit it off
This integration returns data from Cosmos DB. This database is not pre-populated. You can implement the asynchronous pattern first, to get data in via the API (https://github.com/pascalvanderheiden/ais-async-pattern). Or you can just add data manually via the Data Explorer in the Azure Portal. There is a sample JSON included in this repository.
Another important note: if you’ve already implemented the asynchronous pattern (https://github.com/pascalvanderheiden/ais-async-pattern), this tutorial will be complementary to that setup.
Step 1: In the Azure Portal create a Service Principal
In the Azure Cloud Shell (https://shell.azure.com:(
- az ad sp create-for-rbac –name [your-service-principal-name]
Copy the JSON Output! We’ll be needing this information to create the service connection in Azure DevOps.
Step 2: Generate your Azure DevOps Project for Continuous Integration & Deployment with the Azure DevOps Generator
The project is split-up into 2 pieces; shared resources & integration specific resources. Enabling you to extend your project with more integration and re-using the shared resources for cost efficiency.
You can find the documentation on the Azure DevOps Generator here: https://vstsdemodata.visualstudio.com/AzureDevOpsDemoGenerator/_wiki/wikis/AzureDevOpsGenerator.wiki/58/Build-your-own-template
Step 3: In Azure DevOps, create a service connection
- Login with your account Azure DevOps. Go to the Project Settings of the DevOps Project you’ve created in step 2.
- Go to Service Connections*.
- Create a new service connection, choose Azure Resource Manager, next.
- Select Service Principal (manual).
- Fill in the Subscription Id, Subscription Name.
- Copy the appId from step 1 in “Service Principal Id” and the password from step 1 in “Service Principal key”. Give the service connection a name and verify the connection.
- Tick “Grant access permission to all pipelines. Save.
Step 4: In Azure DevOps, update the Variables Group.
- Go to Pipelines, Library. Click on the Variable group “Shared Resources”.
- Tick “Allow access to all pipelines.
- Update the values of the variables to match your naming conventions needs. I’ve put in some generic naming, but you need to update the variables. Otherwise, the creation of some services will fail, because they’ve been already used.
- The variable “KVCOSMOSDBLABEL” is used as a label for Key Vault to retrieve the connection string and key for API Connections. Leave that as it is: “aissharedcosmosdb”
- Do the same for the “Environments” Variable group.
- Don’t forget to save.
Step 5: In Azure DevOps, update the Build pipeline and Run it.
- Go to Pipelines, Pipelines.
- Select “Build AIS shared resources-env1-CI”, Edit.
- In Tasks, select the Tasks which have the explanation mark “Some settings need attention”, and update Azure Subscription to your Service Principal Connection.
- In Variables, update the variables to match your naming conventions needs. Keep in mind to pick unique naming for exposed services. I’ve put in some generic naming, but you need to update the variables. Otherwise, the creation of some services will fail, because they’ve been already used.
- Repeat this for “Build AIS shared resources-env2-CI” and “Build AIS shared resources-env3-CI”.
- Save & queue.
- Click the Agent Job to check the progress. Check if everything is create correctly, because of the unique naming for some services. And because it’s fun :)
- Keep in mind that the CLI scripts will check if the resource is already created, before creating. I’ve used an ARM Template for the deployment of the Application Insights, because I wanted to automatically integrate it with the API Management Instance I’ve just created. This is not yet supported in AZ CLI.
Step 6: In Azure DevOps, add the Key Vault secret to the variables.
- Go to Pipelines, Library. Add Variable group. Give it a name, something like “Key Vault Secrets Environment 1”.
- Tick “Allow access to all pipelines.
- Tick “Link secrets from an Azure key vault as variables”.
- Update the Azure Subscription to your Service Principal Connection.
- Select the Key vault name. If your build pipeline ran succesfully, you can select your Key vault. Add variables, and it will popup with the secret we’ve created earlier: “aissharedcosmosdb”. Select it one by one, OK. And Save.
- Do this for each environment.
Step 7: In Azure DevOps, update the Release pipeline and Run it.
- Go to Pipelines, Releases.
- Select “Release AIS Synchronous pattern-CD”, Edit.
- In Tasks, select the Tasks which have the explanation mark “Some settings need attention”, and update Azure Subscription to your Service Principal Connection.
- In Variables, update the variables to match the naming you used in the Build pipeline.
- In Variables groups, link the “Key Vault Secrets” variable groups, by clicking the Link button. Scope it to the specific environment stage.
- In the Pipeline, Click on the Pre-deployment conditions (blub next to each stage), and Check Pre-deployment approvals and enter your e-mail as approver.
- Save & Create Release.
Step 8: Go to your API Management Instance and test the API
In the Azure Portal, just go to API Management, APIs, click your new API, Click the operation GET and click the tab “Test” and click Send.

by Scott Muniz | Sep 11, 2020 | Uncategorized
This article is contributed. See the original author and article here.
The seasons are changing as we crawl through 2020 – while the Northern Hemisphere says goodbye to summer and many students return to school, the Southern Hemisphere is shrugging off winter jackets and watching gardens come back to life. Wherever you are in the world, there are always updates to Azure each week! Lets take a look:
Select Azure Availability Zones during migration
You can now select Availability Zones when migrating servers using the Azure Migrate: Server Migration tool. Azure Availability Zones are a high availability offering that protects your applications and data from datacenter failures.
Achieve improved resiliency for critical application workloads that you are migrating by pinning individual virtual machines to different Availability Zones in the target Azure region.
This functionality is currently available via the Azure portal. Use this capability and get industry-leading 99.99 percent uptime SLA for your migrated workloads with virtual machines running in two or more Availability Zones in the same region. Learn more about Regions and Availability Zones.
Azure Blob storage object replication is now generally available
Out of public preview, object replication is a new capability for block blobs that lets you replicate your data from your blob container in one storage account to another anywhere in Azure.
Object replication unblocks a new set of common replication scenarios:
– Minimize latency: Users consume the data locally rather than issuing cross-region read requests.
– Increase efficiency: Compute clusters process the same set of objects locally in different regions.
– Optimize data distribution: Data consolidated in a single location for processing/analytics and then distribute only resulting dashboards to your offices worldwide.
– Minimize cost: Tier down your data to Archive upon replication completion using lifecycle management policies to minimize the cost.
Learn more about object replication for block blobs.
Universal Print integration with Microsoft Endpoint Manager
A top request that Microsoft has received for endpoint management is the ability to deploy printers with Microsoft Intune. Based on your feedback, Microsoft has announced the new Universal Print printer provisioning tool! Here are the steps to deploy it.
Automatic VM guest patching is now in public preview
Keeping your operating system up to date is one of the most important pieces of your security strategy. Automatic VM guest patching for virtual machines helps ease your update management by safely and automatically patching virtual machines to maintain security compliance.
With automatic VM guest patching enabled, the VM is assessed periodically to determine the applicable patches for that VM. Updates classified as ‘Critical’ or ‘Security’ are automatically downloaded and applied on the VM during off-peak hours. Patch orchestration is managed by Azure and patches are applied following availability-first principles.
Automatic VM guest patching is now available in public preview for Windows virtual machines on Azure.
MS Learn Module of the week
Deploy Windows Update in Microsoft 365 – Speaking of patching, you need to ensure that your Windows 10 devices are updated too. This short module explains the different methods for managing updates to Windows 10, including Group Policy and Windows Update for Business.
And that’s our highlights for another week! The countdown to Microsoft Ignite is on, so make sure you register for the full, free interactive experience starting Sept 22 and coming to your timezone!

Recent Comments