by Scott Muniz | Sep 2, 2020 | Azure, Microsoft, Technology, Uncategorized
This article is contributed. See the original author and article here.
I was asked to make up a short demo video about creating a custom image for deployment in Microsoft Azure the other week to support some new content going into Microsoft Learn. Since this involves making an on-prem virtual machine first and then preparing it to upload into Azure – I figured I would make a new Windows Server 2019 CORE image (default deployment option) instead of a full desktop. I always found it strange you didn’t have an option to deploy a Core server deployment of Windows Server from Azure Marketplace.
Time to fix that.
Why Windows Server Core? Windows Server Core implementations are:
- Smaller in disk footprint, so potentially cheaper to run in an Azure VM
- Smaller in attack surface, since fewer binaries and fewer services running inside the VM
- Less demand on resources to run workloads, so potentially cheaper to run in an Azure VM
- More “remote friendly” then earlier implementations with management tools, remote PowerShell, remote RDP
- Runs most workloads you might want to run on-prem or in Azure.
I thought this was going to be a simple process that was documented in a single doc. Little did I know that the info I needed was spread across three different official docs as well as some good old trial and error. To save you time – I’ve pulled everything together and have the main steps here, but include links back to the source documents in case you want more detailed information.
The TL;DR of this process is the following:
- Build a Hyper-V VM image of Windows Server 2019 with a Core interface.
- Configure specific settings unique to uploading a Custom VM Image for Azure
- Generalize your local VM image and shut it down
- Upload VHD into a new Azure Managed Disk in your Azure Subscription
- Create a VM Image for deployment using the Azure Managed Disk
- Deploy a new VM using the uploaded image
From there – you can make a new VM from that custom uploaded image. Management wise – the deployed image is compatible with Azure Bastion, Just-In-Time remote access, Remote PowerShell or PowerShell commands via the Azure Portal.
Lets get started!
Build a Hyper-V VM image of Windows Server 2019 with a Core interface.
This should be self-explanatory. You have a Server that is running Hyper-V and you can make a new Windows Server 2019 VM using the install media (ISO file) for Windows Server 2019. The default install experience is to have a CORE install (i.e. no desktop experience) and you create a new password for the local administrator account to further configure the system. To keep things simple – I created a Generation 1 VM initially to do the install and for the most part kept the defaults for the base creation process.

I don’t know what it is, but I really like the simple logon for a Windows Server core box – if I have to logon to the console at all. I need to do some tasks from the Hyper-V host before customizing the local VM – so I’ll shut it down for now.
Configure specific settings unique to uploading a Custom VM Image for Azure
For this example, I am taking this base image as is, and doing the recommended configuration changes as per the “Prepare a Windows VHD or VHDX to upload to Azure”. These include:
- If you made your VM from the Hyper-V Create VM Wizard, you probably have a Generation 1 VM with a dynamically expanding VHDX file. You NEED to convert this to a VHD file and change from a Dynamically expanding file to a FIXED hard drive size. Keep things simple and use the GUI console to do this – or you can follow the instructions in the document referenced above to go the PowerShell route.
- With the VM shutdown, edit the VM settings and select the Hard Disk. Choose the EDIT button to manage the disk.
- Select Convert to convert the disk. Select VHD for a max size of 2 TB, but we’re going to go smaller here.
- Select Fixed Size and choose the appropriate size (I went with 126 GB)
- Create a new name for the VHD as it makes a COPY of the disk.
- Because you change the disk from Dynamic to Fixed and it’s a new disk – you need to edit the settings of the VM to reference THIS new fixed size disk in order to proceed. Once this is updated – boot the machine and logon as the local administrator account
- From the command prompt – start up a PowerShell prompt to continue to prep this VM
- Run the System File Checker utility
Sfc.exe /scannow
- Run and Install all windows updates, I find it’s easies to use SCONFIG to setup Windows Update to run Automatically and check for updates.

- I can force an update check with option 6 and In this case – I had three downloads / updates I needed to process which included a reboot.

At this point the document goes through an extensive list of checks and settings you should review and implement in your base image in order to ensure a smooth deployment. I am not going to list them all off here – but refer you to the document to follow:
Note: You will get some errors based on if your image is domain joined or if there are group policies in place. I got a number of red error dumps from PowerShell commands, but they were expected since my VM is not domain joined.
OK – we’re ready to go, no turning back now.
Generalize your local VM image and shut it down
You have prepared your machine, set it up for optimal Azure compatibility and you have it tested for remote connectivity. Time to Generalize it with good old sysprep.exe. Logon to the box and change to the c:windows folder. You can save a bit of space (or a lot of space if this image was an upgrade) by deleting the c:windowspanther directory. Once that’s done, change into c:windowssystem32sysprep folder and then run sysprep.exe.
Make sure you check the Generalize checkbox and choose to Shutdown instead of Reboot.

OK – you are all set for an UPLOAD to Azure now.
Upload VHD into a new Azure Managed Disk in your Azure Subscription
NOTE: I only ever use Managed Disks for my virtual machines now, since it saves me from having to architect a strategy around how many VM disks can be in each storage account before maxing out my throughput OR having issues with storage cluster failures… Just keep it simple and promise me you will always use Azure Managed Disks for your VMs.
You will already need to have a ResourceGroup in azure that you can store these VM images in and you will want to define the location for the storage group to be in the same area where you will be using this image. I assume you are using the same system where the VHD is located OR you have copied it to your admin workstation locally before uploading it.
On this system – you will need to ensure you have the latest version of AzCopy v10 installed and the Azure PowerShell modules installed. We’re following the procedures outlined in the “Upload a VHD to Azure” document.
To upload the image – you first have to create an empty standard HDD managed disk in your pre-created ResourceGroup that is the same size as your soon to be uploaded VHD. These example commands will get your VHD disk size and set the configuration parameters required for making a disk. In order for this to work, you will need to replace <fullVHDFilePath>, <yourdiskname>, <yourresourcegroupname>, and <yourregion> from the example below with your information.
$vhdSizeBytes = (Get-Item "<fullVHDFilePath>").length

$diskconfig = New-AzDiskConfig -SkuName 'Standard_LRS' -OsType 'Windows' -UploadSizeInBytes $vhdSizeBytes -Location '<yourregion>' -CreateOption 'Upload'

New-AzDisk -ResourceGroupName '<yourresourcegroupname>' -DiskName '<yourdiskname>' -Disk $diskconfig
In my example, the complete commands were:
$vhdSizeBytes = (Get-Item "C:vmsContosoVM2.vhd").length

$diskconfig = New-AzDiskConfig -SkuName 'Standard_LRS' -OsType 'Windows' -UploadSizeInBytes $vhdSizeBytes -Location 'eastus' -CreateOption 'Upload'

New-AzDisk -ResourceGroupName ContosoResourceGroup -DiskName ContosoVM2 -Disk $diskconfig
Next You need to grant SAS access to the empty disk
$diskSas = Grant-AzDiskAccess -ResourceGroupName ContosoResourceGroup -DiskName ContosoVM2 -DurationInSecond 86400 -Access 'Write'

$disk = Get-AzDisk -ResourceGroupName ContosoResourceGroup -DiskName ContosoVM2
Now Upload the local VHD file to the Azure Managed Disk. Don’t forget to replace the <fullVHDFilePath> with your local VHD filePath
AzCopy.exe copy "<fullVHDFilePath>" $diskSas.AccessSAS --blob-type PageBlob
Once the AzCopy command completes, you need to revoke the SAS access in order to change the state of the manage disk and enable the disk to function as an image for deployment.
Revoke-AzDiskAccess -ResourceGroupName ContosoResourceGroup -DiskName ContosoVM2
Create a VM Image for deployment using the Azure Managed Disk
OK – final stretch. You’ve made a Windows Server 2019 Core image locally, prepared it for use in Azure, generalized it and uploaded it into you Azure subscription as a Managed Disk. Now you have to identify that managed disk as a VM Image that can be deployed. We’re following our third document on this called “Upload a generalized VHD and use it to create new VMs in Azure”.
- You need to get the information about the Managed Disk you just created. In my case it’s in the ContosoResourceGroup and has a name of ContosoVM2image. The command to run and build the variable is:
$disk = Get-AzDisk -ResourceGroupName ContosoResourceGroup -DiskName ContosoVM2
- Set some more variables including location of where you will be using the image, what image name is and in what resource group does it reside. In my case I used the following:
$location = 'East US'
$imageName = 'ContosoVM2Image'
$rgName = 'ContosoResourceGroup'
- Now Create the image configuration
$imageConfig = New-AzImageConfig -Location $location
$imageConfig = Set-AzImageOsDisk -Image $imageConfig -OsState Generalized -OsType Windows -ManagedDiskId $disk.Id
- FINALLY – create the image object in your subscription for deployment from portal, powershell, AzureCLI or Azure Resource Manager template.
$image = New-AzImage -ImageName $imageName -ResourceGroupName $rgName -Image $imageConfig
And with that – we are finally DONE.
If you open up the Azure portal and explore what is in that resource group where you uploaded the VHD – you should see something similar to what I see in this portal screenshot: a simple VHD uploaded and an Image definition that you can use to deploy new VMs.

In this blog post, the custom local VM that was created was a Windows Server 2019 core install server that was customized, generalized, uploaded and converted into a specialized Image for use in Azure. Because I took the time to build my own custom image and upload it into my Azure subscription – I can deploy as many Windows Server 2019 core boxes as I need for my projects now.
by Scott Muniz | Sep 2, 2020 | Azure, Microsoft, Technology, Uncategorized
This article is contributed. See the original author and article here.
Introduction to Elastic Pool:
https://docs.microsoft.com/en-us/azure/sql-database/sql-database-elastic-pool
In this article, we will setup an Azure Monitor Alert to Scale up the Storage limit of an SQL Elastic Pool on Azure. Please read more about Elastic Pool in the above article.
We will divide this into three parts
i. Setting up an Automation Runbook and Webhook
ii. Setting up an Alert Action Group
iii. Setting up an Alert under Azure Monitor.
We will not talk much about Azure Automation or Azure Monitor as they are off the topic, we will only cover the steps for setting up of this Auto scale of storage. Here are some of the articles that should bring you up to Speed.
Create Azure Automation Account [ In this case, we would need to use RunAsAccount]
https://docs.microsoft.com/en-us/azure/automation/automation-create-standalone-account
Using Az modules in Azure Automation Account
https://docs.microsoft.com/en-us/azure/automation/az-modules
Azure Monitor
https://docs.microsoft.com/en-us/azure/azure-monitor/
Azure Monitor Overview
https://docs.microsoft.com/en-us/azure/azure-monitor/overview
Monitoring Azure Service
https://docs.microsoft.com/en-us/azure/azure-monitor/insights/monitor-azure-resource
Setting Up Automation Modules
By default, you cannot run both Az and Rm Modules on the Automation and this is explained here:
https://docs.microsoft.com/en-us/azure/automation/az-modules
So, we will import the Az Modules to the Automation Account and not Rm Modules. By default, when you create an Automation Account, there is a bunch of modules imported and we will not touch them as we will use the AZ modules.
Here is what you need to do.
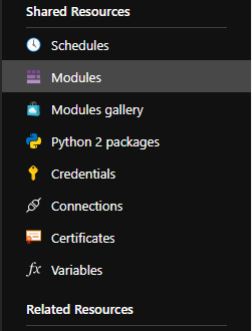
- Go to Azure Automation Account.
- Click on Modules under Shared resource.

- Click on Browse gallery.

- Search for Az.Accounts and Click on Import.

- Likewise, search of Az.sql and import it too [ once the Az.Accounts import is complete. Otherwise, it may fail].
- Let the modules get imported.
- Once the modules are imported, you would see the status as available..

- Further, you don’t need to add any modules as we will use only SQL related Cmdlets unless you are using this Automation Account for other purposes.
- Next, we will need to setup an Automation Account Runbook, for that Navigate to Runbooks under Process Automation under Automation Account.

- Click on Create Runbook and Provide the details as below, Click Ok

- In the Runbook Edit section, copy paste the following script:
#Author: Shashanka Haritsa
#Date: 19th March 2020
<#WARNING: The sample scripts are not supported under any Microsoft standard support program or service. The sample scripts are provided AS IS without warranty of any kind.
Microsoft further disclaims all implied warranties including, without limitation, any implied warranties of merchantability or of fitness for a particular purpose. The entire risk arising out of the use or performance of the sample scripts and documentation remains with you. In no
event shall Microsoft, its authors, or anyone else involved in the creation, production, or delivery of the scripts be liable for any damages whatsoever (including, without limitation, damages for loss of business profits, business interruption, loss of business information, or other pecuniary loss) arising out of the use of or inability to use the sample scripts or documentation, even if Microsoft has been advised of the possibility of such damages. #>
#Read Webhook data
param
(
[Parameter (Mandatory = $false)]
[object] $WebhookData
)
# If runbook was called from Webhook, WebhookData will not be null.
if ($WebhookData) {
#Authenticate to Azure First using an RunAsAccount
$getrunasaccount= Get-AutomationConnection -Name ‘AzureRunAsConnection’
Add-AzAccount -ServicePrincipal -ApplicationId $getrunasaccount.ApplicationId -CertificateThumbprint
$getrunasaccount.CertificateThumbprint -Tenant $getrunasaccount.TenantId
# Authentication Complete
$WebhookData.Requestbody
$Converteddata = $WebhookData.Requestbody | ConvertFrom-Json
$resourcegroupname = $converteddata.data.context.resourceGroupName
$resourceName = $converteddata.data.context.resourceName
$getservername=(($converteddata.data.context.resourceId) -split(‘/’))[8]
#Read ElasticPools Current storage and double it
$GetElasticPoolStorage=(Get-AzSqlElasticPool -ElasticPoolName $resourceName -ResourceGroupName
$resourcegroupname -ServerName $getservername).StorageMB
$GetElasticPoolStorage
$NewStorage = ($GetElasticPoolStorage *2) #I am just Increasing my storage to 100% more for my Standard
Plan so I am multiplying the storage by 2, you may need to change this according to your requirement
#Set the new storare limit
Set-AzSqlElasticPool -ElasticPoolName $resourceName -ResourceGroupName $resourcegroupname –
StorageMB $NewStorage -ServerName $getservername
}
Else{
Write-output “No Webhookdata found. Exiting”
}
- Click on save and Click on Publish.
- Now, we will need to create a Webhook. Under the same Runbook, Click on Webhooks

- Click on Add Webhook.

- Under Create Webhook, give it a name and copy the URL to a safe place from where you can retrieve it in future. [ NOTE: This URL cannot be retrieved after creation, so please keep it safe] Click ok and Click on Create.

- Once the Webhook is created, you will see that under the Webhooks section.
This Completes the first part where we have created the Automation Runbook, setup modules and a Webhook.
Setting up an Alert Action Group
In this section, we will create an Action Group that we will use with an Alert.
Please follow the steps below to create an Action Group
- Login into Azure Portal [ If you haven’t already]
- Navigate to Azure Monitor →Alerts and Click on Manage actions

- Next, click on Add action group and fill in the information as needed.
- Under the Action Name, provide a name as desired and under Action Type, select Webhook

- A Webhook URI screen pops up on the right-hand side, please use the Webhook URL we had copied during the Webhook creation under the Automation Account and click ok.

- Click OK again on the Add action group screen. This will create an action group.
This completes the creation of Action Group.
Setting up an Alert under Azure Monitor
In this part, we will create an Alert that will trigger our Runbook whenever the used space is greater than some value. Please follow the steps below.
- Navigate to Azure Monitor
- Click on Alerts and Click on New alert rule
- Under the resource, click on Select

- Filter the Subscription and Resource type as SQL elastic pools and location, select the Elastic Pool of Interest. This should populate the resource as below.

- Now, click on add under condition. Select Signal type as Metrics and Monitor Service as Platform
- Select the Signal name of interest, in this case we will select Data space used percent

- Once you select the Metric, you will now need to add alert logic, lets say that you would like to trigger an alert when the Percentage used space is 70 [ Average] for last 1 hour, we will set it up as below:

What does it mean? We are checking the Average Data space used Percentage for last one hour and we will evaluate this condition every 5 minutes as a part of Alert.
- Click on done and now click on Add under ACTIONS GROUPS and select the one you created during the action group creation.
- Now provide Alert details and a Description. Select Severity of Interest. Once you are happy with the details provided, click Create alert rule
That covers all the three configurations involved. Whenever the data space used percentage on the Elastic Pool increases over 70%, an alert will be triggered, and the Runbook invoked through Webhook will resize the storage on the Elastic Pool.
IMPORTANT NOTE:
- This above sample document is for reference purpose only and is provided AS IS without warranty of any kind.
- The author is not responsible for any damage or impact on the production, the entire risk arising out of the use or performance of the above sample document remains with you
- For the Script section, under Automation Runbook setup, we have taken Standard plan[ Elastic Pool] in account and have only doubled the storage based on our requirement, if your requirement is different, you should evaluate the logic for increasing the storage and then amend the script as necessary.
by Scott Muniz | Sep 2, 2020 | Azure, Microsoft, Technology, Uncategorized
This article is contributed. See the original author and article here.
This post was co-authored by Krishna Anumalasetty, Tom Drabas, Nalini Chandhi from Microsoft and Abhilash Somasamudramath, Manuel Reyes Gomez, Brad Genereaux, Akhil Docca from NVIDIA

Figure 1. CT-Scan Images Classified for COVID-19 Probability
COVID-19 has fundamentally transformed the world we live in. As the scientific community across the globe unites in the face of this pandemic, it is crucial to enable researchers to collaborate and leverage tools that will speed up detection and drug discovery for COVID-19. The power of AI in radiological medical imaging is helping with faster detection, segmentation, and notifications.
Leveraging AI for healthcare applications is challenging for many reasons. The complicated science required to build and train deep learning neural networks, setup and maintenance of the supporting infrastructure required to develop, deploy, and manage these applications at scale, pose barriers towards addressing our most pressing healthcare challenges with AI.
Cloud computing has enabled researchers with easy access to scalable, on-demand infrastructure to get their AI applications up and running quickly. In the medical imaging space, the real need is for a platform that combines the power of NVIDIA GPUs with a secure environment that also allows easy access to AI software. NVIDIA Clara™ is a full-stack GPU-accelerated healthcare framework accelerating the use of AI for medical research and is available on the NVIDIA NGC Catalog.
Azure Machine Learning
Azure Machine Learning (Azure ML) empowers developers, data scientists, machine learning engineers, and AI engineers to build, train, deploy, and manage machine learning models. It is an open platform with built-in support for open-source tools and frameworks, such PyTorch, SciKit Learn and, TensorFlow along with numerous Integrated Developer Environments (IDEs), supporting key languages like Python and R.
Azure ML abstracts the set-up, installation and configuration of the machine learning environment, saving you the hassle of infrastructure management by taking care of the underlying technicalities. This enables domain experts, such as healthcare researchers and developers, to build mission-critical AI solutions faster and easier. Whether the project requires image classification, object detection, speech analysis, or natural language processing. Azure ML streamlines AI-powered solution development.
Productivity is also boosted by accelerating your training jobs with Azure’s global infrastructure. Enhance your workflow by scaling out to multi-node compute clusters or scaling up to powerful GPU-enabled machines. Combining this with end-to-end AI lifecycle management through industry-leading MLOps means data science teams can collaborate better and get to production quicker. And, with more than 60 compliance certifications including FedRAMP High, HIPAA and DISA IL5, plus configurable security features, Azure ML allows you to create a trusted working environment.
NVIDIA NGC Catalog and Clara
A key component of the NVIDIA AI ecosystem is the NGC Catalog. It is a software hub of GPU-optimized AI, HPC, and data analytics software built to simplify and accelerate end-to-end workflows. With over 150 enterprise-grade containers, 100+ models, and industry-specific SDKs that can be deployed on-premise, cloud or at the edge, the NGC Catalog enables data scientists and developers to build best-in-class solutions, gather insights, and deliver business value faster. Every single asset in the NGC Catalog is validated for performance, quality, and security by NVIDIA, providing you with the confidence needed to deploy within the Azure ML environment.
The deep learning containers in the NGC Catalog are updated and fine-tuned monthly to enable maximum performance through software-driven optimizations that augment GPU hardware acceleration. These performance improvements are made to libraries and runtimes to extract maximum performance from NVIDIA GPUs. Pre-trained models from the NGC Catalog help speed up the application building process. You can find more than 100 pre-trained models across a wide array of applications such as image analysis, natural language processing, speech processing and recommendation systems. The models are curated and tuned to perform optimally on NVIDIA GPUs for maximum performance. By applying transfer learning, you can create custom models by retraining it against your own data.
NVIDIA Clara is one many artifacts available in the NGC Catalog. Clara is a healthcare framework that comprises of full-stack GPU-accelerated libraries, SDKs, and reference applications to create secure, and scalable healthcare applications.
The Clara family of application frameworks include:
- Clara Imaging: Application frameworks for accelerating the development and deployment of AI based medical imaging workflows in radiology and pathology, as well as in some medical instruments
- Clara Parabricks: Computational framework supporting genomic analysis in DNA and RNA
- Clara Guardian: Application framework and partner ecosystem that simplifies the development and deployment of smart sensors within the hospital with multimodal AI
Clara Imaging, the focus of this blog, offers easy-to-use, domain-optimized tools to create high-quality, labeled datasets, collaborative techniques to train robust AI models, and end-to-end software for scalable and modular AI deployments. It consists of two essential elements – Clara Train and Clara Deploy:
- Clara Train is a framework that includes two main libraries; AI-Assisted Annotation (AIAA), which enables medical viewers to rapidly create annotated datasets suitable for training, and a Training Framework, a TensorFlow based framework to kick start AI development with techniques like transfer learning, federated learning, and AutoML.
- Clara Deploy provides a container-based development and deployment framework for multi-AI, multi-domain workflows in smart hospitals for imaging, genomics, and signal processing workloads. It leverages Kubernetes to enable developers and data scientists to define a multi-staged container-based pipeline.

Figure 2. The entire Clara pipeline that includes Clara train and deploy
The entire Clara Framework can be easily accessed from the Clara portfolio page. In addition to Clara Train and Deploy, reference models and pipelines are also available for download. Applying transfer learning, developers can create new models with their own custom dataset.

Figure 3. Various types of pre-trained models that cover both 2D and 3D segmentation and classification for different use cases
NGC-AzureML Quick Launch Toolkit
A ready-to-use Jupyter notebook was created to showcase the fine-tuning of a pre-trained COVID-19 CT Scan Classification model from the NGC Catalog.
To help automate the deployment, we have developed the NGC-AzureML Quick Launch toolkit that leverages the Azure ML SDK and creates the necessary compute and software resources needed to run Machine Learning applications. The Azure ML SDK uses Azure Machine Learning Compute Clusters, which require their own quota, and can be created using the same mechanism as the process followed to setup a quota for Azure VMs.
The toolkit can be used to launch any asset from the NGC Catalog, by just changing a config file. In our example, the toolkit takes relevant assets for Clara, but you can customize it to pull assets related to other uses cases such as computer vision, natural language understanding, and more.
The toolkit automates the steps outlined below:
- An Azure instance with NVIDIA GPUs is configured with the right NVIDIA libraries and drivers
- Setting the desired NGC Catalog image (Clara Train SDK in this example) onto the Azure instance
- Uploading additional material: model(s) (the pre-trained COVID-19 CT Scan Classifier in this case), auxiliary code and the corresponding datasets from the NGC Catalog to the Azure instance
- Loading the ready-to-use Jupyter notebook from the NGC Catalog that contains the application
- Installing JupyterLab the Azure instance and accessible locally to run the ready-to-use Jupyter notebook
To set up the AzureML environment, you only need to run two commands in the command line interface (CLI):
Install azureml-ngc-tools
First, install the NGC-AzureML Quick Launch Toolkit on the local machine, via Pip:
pip install azureml-ngc-tools
Configure azure_config.json
This file contains the Azure credentials and desired choice of instance type. A ready-to-use template for this example to complete can be downloaded here, which should be edited with user credentials.
An example of how the azure_config.json file might look is the following:
{
    "azureml_user":
    {
        "subscription_id": "ab221ca4-f098-XXXXXXXXX-5073b3851e68",
        "resource_group": "TutorialTestA",
        "workspace_name": "TutorialTestA1",
        "telemetry_opt_out": true
    },
    "aml_compute"
    {
        "ct_name":"clara-ct",
        "exp_name":"clara-exp",
        "vm_name":"Standard_NC12s_v3",
        "admin_name": "clara",
        "min_nodes":0,
        "max_nodes":1,
        "vm_priority": "dedicated",
        "idle_seconds_before_scaledown":300,
        "python_interpreter":"/usr/bin/python",
        "conda_packages":["matplotlib","jupyterlab"],
        "environment_name":"clara_env",
        "docker_enabled":true,
        "user_managed_dependencies":true,
        "jupyter_port":9000
    }
}
When the above file is used with the azureml-ngc-tools command, an Azure Machine Learning Compute Cluster named “clara-ct” is created using a node from the “Standard_NC12s_v3” VM size. Follow this link to learn more about the other specifications.
This file lists references to all the NGC Catalog assets that are to be pre-installed in the Azure ML environment to achieve the specific use-case. In this example, the additional resources are the ready-to-use Jupyter notebook and the associated data files. A ready-to-use config file lists the various assets needed for the application below, can be downloaded here. No additional modifications are required for this file.
The ngc_config.json file looks like:
{
    "base_dockerfile":"nvcr.io/nvidia/clara-train-sdk:v3.0",
    "additional_content": {
        "download_content": true,
        "unzip_content": true,
        "upload_content": true,
        "list":[
            {
"url":"https://api.ngc.nvidia.com/v2/models/nvidia/med/clara_train_covid19_3d_ct_classification/versions/1/zip",
                "filename":"clara_train_covid19_3d_ct_classification_1.zip",
                "localdirectory":"clara/experiments/covid19_3d_ct_classification-v2",
                "computedirectory":"clara/experiments/covid19_3d_ct_classification-v2",
                "zipped":true
            },
            {
"url":"https://api.ngc.nvidia.com/v2/resources/nvidia/med/getting_started/versions/1/zip",
                "filename":"clarasdk.zip",
                "localdirectory":"clara",
                "computedirectory":"clara",
                "zipped":true
            },
            {
"url":"https://api.ngc.nvidia.com/v2/resources/nvidia/azuremlclarablogquicklaunch/versions/example/zip",
                "filename":"claractscanexample.zip",
                "localdirectory":"clara/claractscanexample",
                "computedirectory":"clara",
                "zipped":true
            }
        ]
    }
}
When used with the azureml-ngc-tools command, the “nvcr.io/nvidia/clara-train-sdk:v3.0” container is pulled from the NGC Catalog and loaded onto the Azure ML Compute Cluster. Additionally, three resources are downloaded and unzipped into the local environment (with the names “filename” and at the relative directories “localdirectory” provided) and then loaded into the Compute Cluster at the provided location (“computedirectory”).
Run azureml-ngc-tools
Once the two configuration files are ready, run the azureml-ngc-tools command on the local machine to provision the instance:
azureml-ngc-tools --login azure_config.json --app ngc_config.json
Refer to the following screenshot:

Figure 4. AzureML instance being setup by NGC-AzureML Quick Launch Toolkit
The command creates a Compute Cluster “clara-ct” using vmSize :”Standard_NC12s_v3,” then it creates AzureML environment, “clara_env,” with base image “nvcr.io/nvidia/clara-train-sdk:v3.0.” The container is downloaded and subsequently cached after the first use, making it easier for you to reuse the container the next time.
Next, the additional NGC Catalog content is downloaded and unzipped locally, which is then uploaded to the Compute Cluster. The user should be able to see the newly created Compute Cluster, “clara-ct”, in the Azure Portal under the specified workspace, “TutorialTestA1” in this example and tabs Compute ->Compute clusters. This should look like the following:

Figure 5. Console view of AzureML Environment Setup by NGC-AzureML Quick Launch Toolkit
Additional Clara introductory content such as examples of other pre-trained model, datasets and Jupyter notebooks are also downloaded and unzipped locally at the relative directories provided in the “ngc_config.json” file. That content is also uploaded to the Compute Cluster, visible as follows:

Figure 6. Assets from the NGC Catalog pre-loaded onto Azure ML by NGC-AzureML Quick Launch toolkit
The command creates and launches JupyterLab in the Compute Cluster and forwards the port to the local machine so that the Jupyter Lab is accessed on your local machine. A URL is generated that contains the link to JupyterLab running on the Azure ML instance setup, along with the assets specified in the “ngc_app.json” file to be used on your local machine.

Figure 7. Direct URL to fully setup and configured Azure ML JupyterLab for this particular use-case
Once the you have completed your work on the JupyterLab, the Compute Cluster can be stopped by simply entering CTRL+C on the terminal.
The JupyterLab can be launched by copying and pasting the URL into a browser window, as follows:

Figure 8. URL opened on any browser window launches ready-to-use Azure ML JupyterLab
Note that it starts at the workspace root folder for the provided workspace.
To access the content uploaded by the NGC-AzureML Quick Launch Toolkit, you should navigate to the “workspaceblobstore/clara/” folder. All your relevant content will be now available in the session:

Figure 9. Overview of NGC assets pre-loaded onto your AzureML JupyterLab for this use-case
Fine-Tuning a Model with Clara Imaging and Azure ML
To demonstrate how to build and deploy AI for medical imaging using Clara Imaging and Azure ML, we will fine-tune a pre-trained COVID-19 CT Scan Classification model and optimize it for inference with a custom dataset. This pre-trained model was developed by NVIDIA Clara researchers in collaboration with the NIH, which had a repository of CT radiological images from around the world. The NVIDIA pre-trained model reports an accuracy of over 90% on classification of COVID vs. Non-COVID findings from chest CT scans. More information about the training methodology and results achieved by this pre-trained model are contained in a white paper here.
The model uses two inputs– a CT scan image, and a lung segmentation image. A computerized tomography (CT) scan is a 3D medical imaging procedure that uses computer-processed combinations of many X-ray measurements taken from different angles to produce cross-sectional (tomographic) slices of images. The data needs to be preprocessed, first by converting to Hounsfield units and then rotated to a prescribed orientation, before it can be used for training. A multitude of other pre-trained models developed by NVIDIA Clara for various healthcare applications are made available for free in the NGC Catalog. (N.B. These models are provided for research purposes only.)
The following images show one slice of the stack of images that comprise of the patient’s CT and the corresponding mask:

Figure 10. Example CT-Scan Slice with the corresponding mask (on the right) to focus the model on the lungs
The classifier produces a probability between zero and one, indicating whether the patient has or has not been infected with COVID-19. However, such predictions require a high degree of accuracy and in most cases, the CT scans used for training may have different characteristics from the original data set used to build the base model. Thus, a model will need to be fine-tuned to achieve the necessary accuracy. NVIDIA Clara includes a fine-tuning mechanism to efficiently adapt the pre-trained model to your dataset, with minimal effort, while increasing the accuracy of your model.
The hospital data for the blog is simulated using 40 labelled data from two sources:

Figure 11. The Jupyter notebook for this blog example walks through these steps
Step 1: Set Up
The ready-to-use Jupyter notebook first describes the mechanics of how the pre-trained model is built, and how it can be fine-tuned by introducing the concept of a MMAR (Medical Model ARchive). The dataset from Kaggle is downloaded (by previously obtaining the user’s Kaggle key) and the input examples are examined and visualized. The new data is then indexed in a way that Clara can refer to it for different tasks, such as inferring if the patient has COVID-19 or not, fine tuning, and/or deploying the model. Refer to the CovidCT-ScanClassifier.ipynb Jupyter notebook to see how all these tasks are done with more details.
The data set that we are using to fine-tune the model consists of 40 samples studies. To test the current accuracy of the model, we’ll use three data points from the set. We’ll exclude these three data points when we eventually fine-tune the model.
The Jupyter notebook separates those example as seen here:

Figure 12. Slicing the reference dataset for training and testing
Step 2 Classify/Infer on Test Data
Use the infer.sh command to check the accuracy of the model by using the test data.
The MMAR from the base model has the original configuration files used to train the base model with. Those files need to be adapted to the new data before the infer.sh command is run. The Jupyter notebook will execute all the modifications needed to the required files.
Once the configuration files have been adapted, the infer command is run on the test data.
Inspecting the inference results
The Jupyter Notebook then retrieves the probabilities produced by the “new_infer.sh” command and estimates the predicted labels (1:COVID, 0:NO COVID). Those labels are then used along the true labels to compute the testing examples average precision score using the sklearn.metrics.average_precision_score function.

Figure 13. Testing the pre-trained model for performance without fine-tuning on the new reference dataset
Notice that the average precision (0.833) is not as high as expected (.90 or 90% or higher) because some instances of the new data have either not been preprocessed in Hounsfield units or haven’t be rotated to a specific orientation. We can now improve the accuracy of the model by fine-tuning it with the full data set.
Step 3 Fine Tune
The train_finetune.sh command executes the fine-tuning mechanism where the original script and its configuration files are adapted to point to the new training data.
Execute new_train_finetune.sh Command


Figure 14. Fine-tuning the Clara COVID-19 CT Scan Classification pre-trained model with training set of reference dataset
Once the training is complete, you can view the training accuracy, training loss, mean accuracy, and the time it took for the fine-tuning to finish. You can decide to either export the model or continue fine-tuning the model. By default, the resulting model is not automatically saved nor exported. The trained model can be exported using the export.sh command. This produces the frozen graphs necessary for the model to be used by other applications, such as Clara Deploy. The Jupyter notebook sets up the new model so that it can be used to classify the test data.
Step 4: Re-test Reclassifying Inference with fine-tuned model
The Jupyter notebook creates a new infer.sh command that points to the full data set and to the new fine-tuned model and then executes the command.
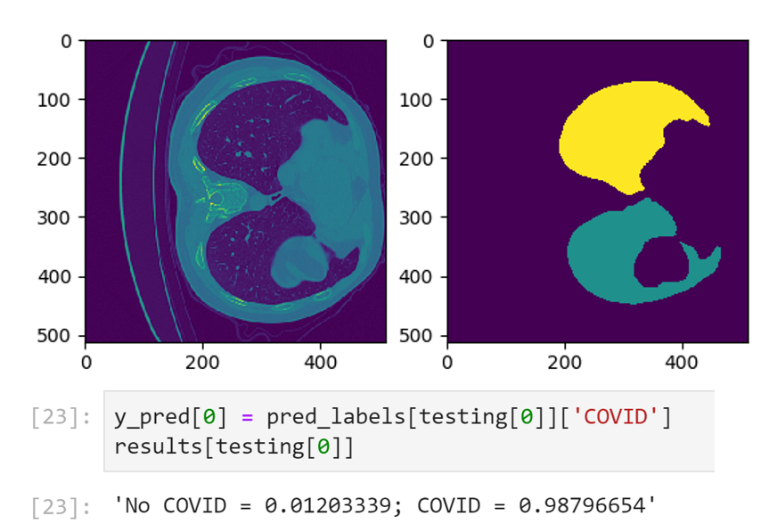
The next step is to compute the Average COVID-19 Classification Precision across all testing examples. The Jupyter Notebook then retrieves the probabilities produced by the “finetuned_infer.sh” command and estimates the predicted labels with 1 (high likelihood of infection) or 0 (low likelihood of infection).
Those labels are then used along the true labels to compute the testing examples’ average precision score using the sklearn.metrics.average_precision_score function.

Figure 15. Testing the fine-tuned model for performance on the testing slice of data from the new reference dataset
Notice that the average precision is now much higher, so the fine-tuning mechanism has succeeded to fine tune the model to account for the peculiarities of the new data.
Deploying the Model
After the AI model is exported and checked, the Medical Model Archive MMAR can then be connected into research workflow pipelines. These pipelines contain operators for the various phases of pre-transforms and inference. The results are consumable by a medical imaging ecosystem. (e.g. a DICOM-SR, a secondary capture image with burnt-in results, an HL7 or FHIR message) The imaging pipeline can be constructed using Clara Deploy SDK, which uses building blocks called operators. Clara Deploy SDK comes with many ready-made pipelines for getting started.
Understanding and mapping the architecture in any given environment is important to know when constructing this pipeline. For example, simulating the connectivity from an image manager like a PACS by using transformation frameworks to transform the data for the model, is a good first step. Subsequent to the first step, inference tasks follow, and then delivering the outputs in the format accepted by systems and devices at medical institutions.

Figure 16. A sample deployment workflow using the Clara Deploy application framework
When thinking about the results, it is important to consider the types of data being produced and the systems that it will be deployed on. For instance, is it a classification result (presence or absence of a disease, like COVID-19), a DICOM-SR for display within a PACS, or a FHIR Observation object. If it is a segmentation result (identifying a lesion or nodule), creating a DICOM Segmentation object may be appropriate. These are examples of the types of objects consumable by the medical imaging ecosystem and the architecture of the environment is important to know when constructing this pipeline.
Summary
We have shown you how you get started with Clara Train on AzureML for radiological CT images, using a pre-trained AI COVID-19 classification model. This is one example that can be built with the software from the NGC Catalog and AzureML. Beyond just building healthcare centric application, you can use the containers, models, and SDKs from the NGC Catalog to build applications across other use cases, such as conversational AI, recommendation systems, and many more.
Get started today with NVIDIA Clara from the NVIDIA NGC Catalog on Azure ML.
![[Guest Blog] From Upskilling Myself to Upskilling a Community!](https://www.drware.com/wp-content/uploads/2020/09/medium-2)
by Scott Muniz | Sep 1, 2020 | Uncategorized
This article is contributed. See the original author and article here.
This article is written by Humans of IT Community Ambassador and Business Applications MVP, Foyin Olajide-Bello, who shares her passion for enabling and empowering others through Power Platform. She also leads an active Power Platform user group in Nigeria. She recently founded “Tech Stylers” – a community of inspiring ladies in Power Platform. Follow them on Twitter: @tech_stylers.
I have been in the collaboration space for a while now. Twelve years of supporting employees, customers and organizations to do more with less. Helping them figure out how collaborate effectively and automate manual processes using Microsoft SharePoint which was then called MOSS. Finding fulfillment with supporting knowledge workers, solving their daily headaches around document management, search and retrieval, automation and collaboration, I happily jumped on Office 365 when it was released to the market.
About Me
Loving automation with InfoPath, SharePoint designer, I continued on this path until mid 2019 when a friend introduced me to Microsoft Power Apps. He showed me the basics about it and I asked, “How do I get licensed for this?”. To my surprise, he said, “You are already licensed for this. Once you are licensed for Office 365, you automatically get Power Apps and Power Automate license.” I was amazed, and decided I was going to build my next application with Power Apps and that’s how I started my journey into Power Platform.
With very few people in my professional network having the knowledge of Power Apps, I found my own learning journey a bit isolating and lonely. I struggled to learn the technology alone, and did multiple searches on the Internet to try and find answers to my questions.
“What I can do about this?” I asked myself. I had no idea – I felt lost and frustrated.
However, a few weeks into this, I was then invited to a Power Apps 101 session organized by Microsoft and I was so delighted to see other professionals with some knowledge of Power Apps. Here’s a photo of me at the Microsoft office in Nigeria:

I was also surprised that these professionals had a similar experience to mine. That’s when the idea of community popped in my mind. I realized that I could start a local community here and we could all come together to support each other as we learn the Power Platform tools. I created a WhatsApp group, which started with just 2 people, and has since grown to 1,200 people total!
Exponential Growth
The exponential growth of the community is largely anchored on the passion of the members of the community. Once they learn, they get so inspired that they often start up user groups in their local communities and schools. The leadership team is also an amazing one as we have all decided to put in our best and this has really helped the community grow and thrive.

First Meetup November 2019

Power Platform Nigeria Leaders

Global Power Platform Bootcamp (February 2020)
After leading the community for a couple of months, I discovered that our female representation at these user groups was very low. Our ladies were often not very involved in the community, and hardly ever respond to Call for Content (CfCs) / Call for Speakers. This need to get more women actively involved in Power Platform and other technical communities inspired me to create Tech Stylers (Twitter:@Tech_Stylers). Our vision is to empower all women who desire to have a career in technology, help get more women into technology and support them through mentoring and knowledge sharing which will position them for bigger opportunities.
Trust me – as a wife and mother of 3 young children under the age of 10 who also runs a busy day job in tech, I have more than enough to keep me on my toes every day. However, I have a greater and deeper desire to help and support others which is why the community has become an integral part of my life. I encourage everyone to go beyond up-skilling yourself alone, to up-skilling someone else instead. Be a part of someone’s success story. To me, that’s the key to leading a fulfilling life in tech.
#WeRiseByLiftingOthers
#PowerAddicts
#HumansOfIT
#TechStylers


Recent Comments