This article is contributed. See the original author and article here.
We are excited to share major updates to the Malware protection capabilities of Microsoft Defender for Endpoint on Android. These new capabilities form a major component of your next-generation protection in Microsoft Defender for Endpoint. This protection brings together machine learning, big-data analysis, in-depth threat research, and the Microsoft cloud infrastructure to protect Android devices (or endpoints) in your organization.
Today, we are thrilled to announce the public preview of this new, enhanced anti-malware engine capability!
What to expect with this enhancement:
Cloud Integration with support for metadata-based ML models, file classifications and reputation-based ML models, etc.
Better support for false positive and false negative prevention.
Reduced memory and CPU footprints.
Integrates seamlessly with Microsoft 365 Defender portal across platforms.
Threat nomenclature: The change in threat / malware name will now be in accordance with the standard naming scheme followed across all platforms, including Windows. This is part of the effort for aligning our nomenclature across all platforms and having a single naming mechanism for consistency.
Changes to Android Threat names as depicted in the security center portal will be as under:
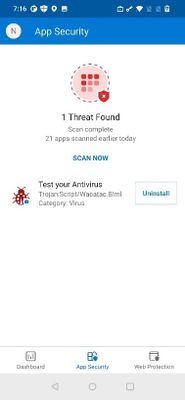
There are no changes to the user experience aside from the threat naming:
Screenshot showing a threat detection on the device
Microsoft 365 Defender portal example:
Screenshot showing an alert in the portal with the new naming convention
Getting started with the preview:
To get started, an IT Admin needs to use Microsoft Endpoint Manager (MEM) – Intune – to manage deployments from Managed Google Play’s pre-production tracks for Android.
Use the recommended minimum version as 1.0.3825.0301. Sometime after GA, APKs older than version 1.0.3825.0301 would stop getting Antimalware protection, so it’s recommended to plan for an upgrade.
We welcome your feedback and look forward to hearing from you! You can submit feedback through the Microsoft Defender Security Center or through the Microsoft 365 security center.
This article is contributed. See the original author and article here.
The pandemic has greatly influenced the way we work. For many of us, the option to work from home was a relatively smooth transition. Video calls, instant messaging, and other digital tools filled the colleague collaboration gapreplacing in-person meetings and chats around the water cooler. Office-based workers overcame a few technological speed bumps; however, business continued to hum along at a decent pace.
But what if the focus of your job is to physically interact with the customer and their equipment on site? This level of interaction is dependent on a whole new set of digital tools, and nowhere is this more important than in the delivery of field service. In fact, the most crucial aspect of field service is mobility.
For there to be true mobility, there must be complete and seamless functionality across any and all devices at the same time. These mobile devices keep the technician digitally tethered to operations by providing real-time access to dataincluding updated schedules, recommended travel routes, and key customer information. With the right technology and devices, offline mobile capabilities provide frontline workers what they need when they need it, even in the most remote locations.
On a mobile device (phone, tablet, or laptop), technicians can access knowledge articles, work orders, and task lists from anywhere. They can also add notes and images, which sync to the back office. If a problem is outside of his or her expertise, the technician can leverage videos and product guides, and even consult with experts by connecting with Microsoft Teams or via mixed reality tools like Microsoft Dynamics 365 Remote Assist and HoloLens 2.
About 75 percent of field service businesses that utilize mobility tools have observed increased employee productivity, while the rest have seen customer satisfaction rates rise.1
True mobility transforms the customer into a knowledgeable partner and enhances the customer experience with transparency into all facets of service delivery. Information is available for customers in real-time using an easy-to-use portal to navigate the service history and on-demand appointment scheduling. Customers can even track and trace the route of the technician enroute on any mobile device.
Connecting people, places, and things to consistently deliver customer-centric experiences is at the core of Dynamics 365 Field Service and is the foundation in transforming service delivery. And within this transformation is the art of true mobility through the Dynamics 365 Field Service mobile app.
With the 2022 release wave 1, we have made notable enhancements in the Field Service mobile app. First, we improved how frontline workers perform actions, view, and update data to increase productivity and usability. These usability enhancements include:
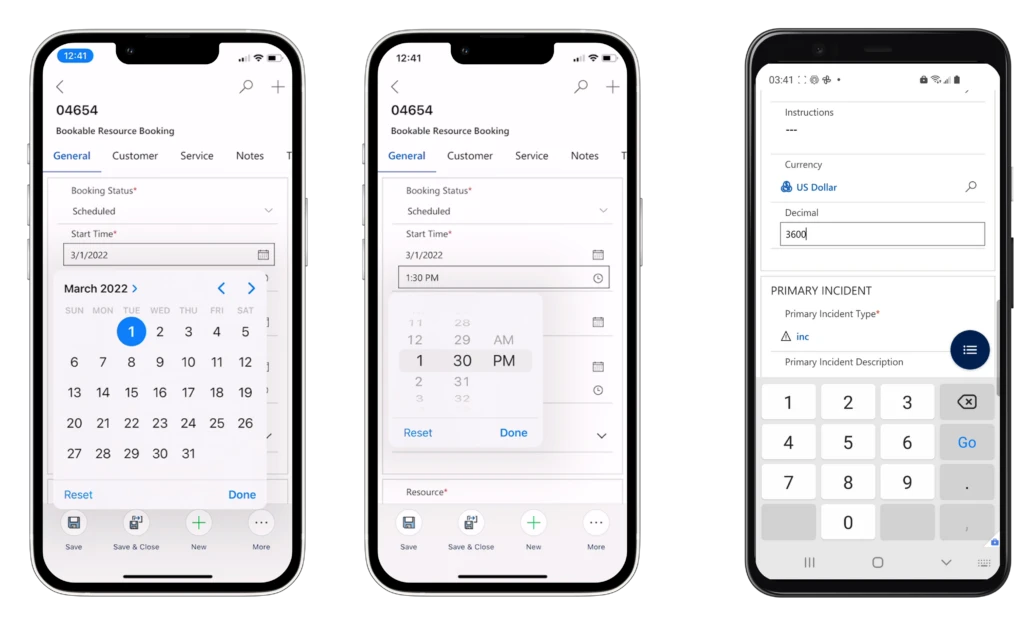
Date and time input fields will leverage default input controls provided by the device operating system.
Mobile optimized device keyboards will be shown when interacting with numeric, phone, email, and URL input fields.
Large format devices (such as tablets and PCs) will have a streamlined agenda view available as part of their booking calendar.
Customers’ primary account phone numbers will be accessible directly on the Bookable Resource Booking Customer tab.
A long list of enhancements to Dynamics 365 Field Service mobile are now available for iOS (left-center) and Android (right) devices.
In addition to usability enhancements, we have continued to invest in core functional and performance improvements such as:
Offline sync notifications to alert users when the offline-enabled application is downloading data from the cloud. This will provide clarity on the app status and feedback to the user when data is refreshing.
Offline Profile (Preview)configuration that will be available in the modern app designer and offer an improved experience to makers. The new offline profile can be assigned to an app module, removing the need to manually add users to the offline profile. This will greatly simplify app user management for makers and admins.
Mobility on every device
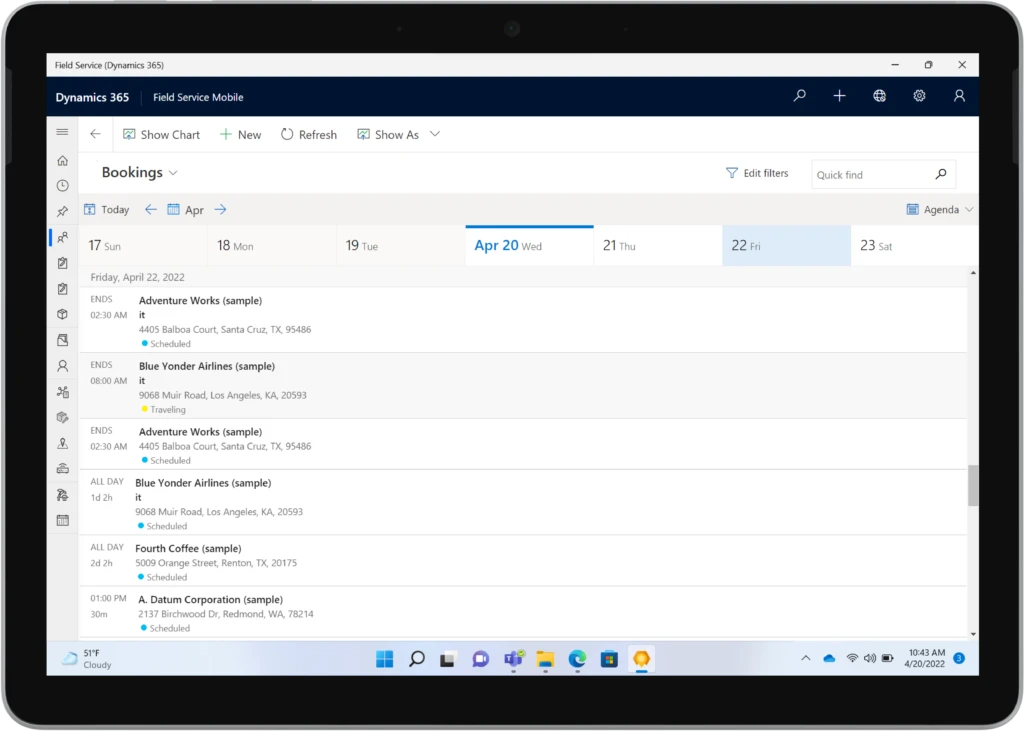
Not every frontline worker wants to perform work using their mobile device or carry multiple devices from location to location. For frontline workers that prefer working on a single tablet or laptop, or are required to use a PC for their business needs, we are pleased to announce the general availability of the Windows Dynamics 365 Field Service app. Technicians can do all of their work tasks on the same Windows device, such as a Microsoft Surface Go, without having to carry multiple devices. Technicians will be able to fulfill end-to-end scenarios without losing context or switching devices. They can view their bookings, manage their work orders, and perform inspections with this rich application that is deeply integrated with the rest of their Dynamics 365 applications.
The Field Service mobile app is now available on Windows laptops to enable seamless mobility across all devices.
This Windows Field Service app includes:
Offline support to keep the frontline worker productive even without internet access. While using the app offline, data is stored in the local device database and uploaded to the server when network access is restored.
Outlook-style calendar for bookings, with intuitive user interface which gives the frontline worker visibility into active and upcoming workincluding key information like scheduled times, duration, customer name, and address as well as the type of work to be done. The calendar can be further extended to include additional fields giving at-a-glance information a frontline worker needs to prepare for their day, such as assets they may be working on or the customer contact’s name.
Tailored user experiences available with Power Apps component framework with hundreds of powerful controls out of the box.
Access to device camera to take pictures and scan barcodes.
Deep-link support into the Dynamics 365 Field Service mobile app.
Using a tablet, Surface, or laptop, frontline workers can access detailed customer information including a map showing the service account location using the Windows supported Dynamics 365 Field Service app.
Improve customer experiences with Dynamics 365 Field Service
The focus of this release was to further extend customer and worker mobility while acknowledging different work requirements and work styles. These enhancements come together to create a seamless workflow by enhancing the tools that increase productivity and optimize system operations. Our goal is to develop features to overcome barriers frontline workers experience every day when delivering superior serviceon or offsite. We will continue to laser focus on the customer experience by arming technicians with the right technology at the right time to do their job better, faster, and more efficiently.
This article is contributed. See the original author and article here.
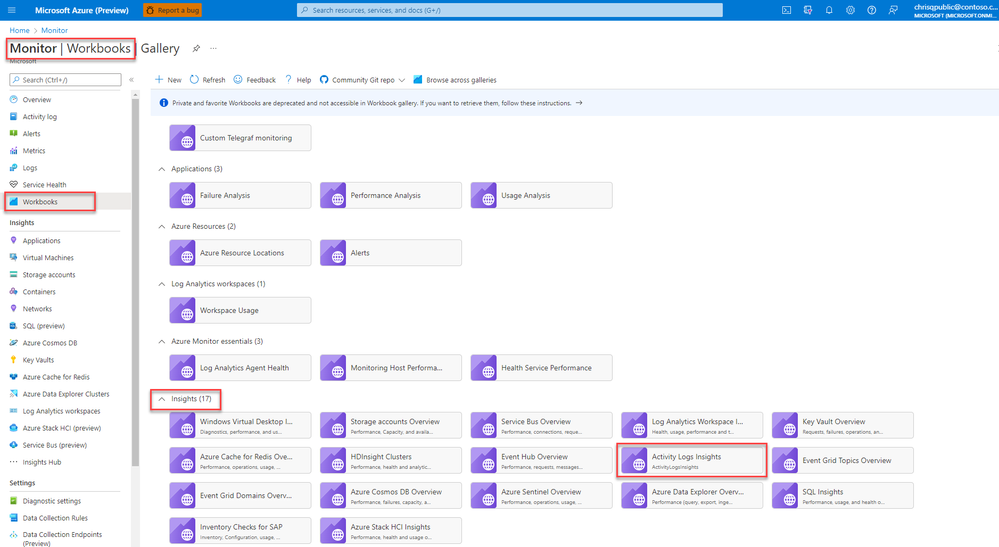
Activity Logs Insights is a centralised place to see all of the activities done in a resource or resource group, information such as who administrators deleted, updated or created resources, and whether the activities failed or succeeded. This article explains how to enable and use Activity log insights.
Note: This current version of Activity Log Insights is a preview, and offers basic Activity logs insights. The next version, planned for the upcoming months, will offer additional information and insights
This article is contributed. See the original author and article here.
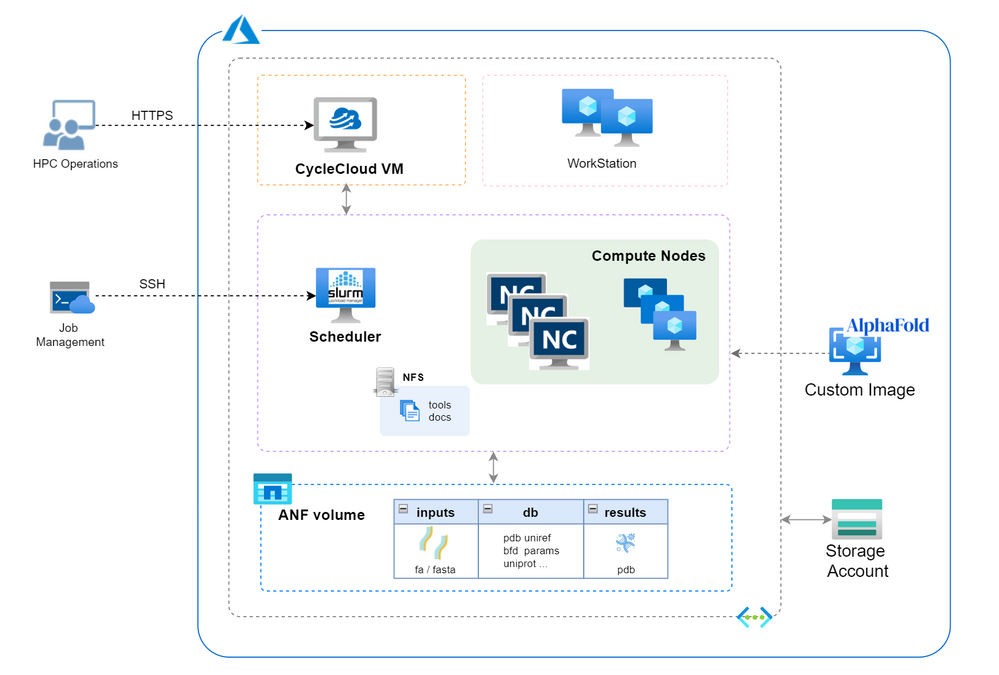
Since released from July last year, AlphaFold2 protein folding algorithm is often used by more researchers and companies to drive more innovations for molecular analysis, drug discovery & etc. To build an AlphaFold2 computing cluster rapidly on the cloud will be the necessary step to leverage agility of cloud computing without CAPEX ahead.
Azure HPC stack has complete portfolio suitable for running AlphaFold2 in large scale, including GPU, storage and orchestrator service. This blog brings detailed steps of building AlphaFold2 HPC cluster on Azure to fasten your process.
Build CycleCloud environment following ARM template method. Set the VNet name as “vnetprotein“. Use the “saAlphaFold2” as the related storage account. After all the resources are built, you can find the CycleCloud UI portal address in console “Home->Virtual Machines->cyclecloud->Overview->DNS name”. Go through the first login process using your username and password.
Config ANF storage. Follow the steps to set up an ANF volume. Consider the dataset size of AlphaFold2, suggest to set the capacity pool and volume size as 4TB at least. Set the volume name as “volprotein” and create a dedicate subnet with CIDR “10.0.2.0/24” in Visual Network “vnetprotein“. In “Protocol” settings, set file path also as “volprotein” and select “NFSv4.1”. After volume is ready, remember the “Mount path” info like “10.0.2.4:/volprotein“.
Check the “docker images” to confirm the “alphafold:latest” is ready in the list.
Build the custom image. Keep in the same SSH window and execute as below and go ahead with a ‘y’ confirmation.
sudo waagent -deprovision+user
Back to Cloud Shell. Execute these commands to produce the custom image.
export myVM=vmImgAlpha
export myImage=imgAlphaFold2
export myResourceGroup=Rampup-study
az vm deallocate --resource-group $myResourceGroup --name $myVM
az vm generalize --resource-group $myResourceGroup --name $myVM
az image create --resource-group $myResourceGroup --name $myImage --source $myVM --hyper-v-generation V2
After accomplished, find the image’s “Resource ID” in console “Home->Images->Properties” page and remember it for further usage, which the form is as “/subscriptions/xxxx-xxxx-x…/resourceGroups/…/providers/Microsoft.Compute/images/imgAlphaFold2“.
Create HPC cluster for Alphafold2.
Create a new cluster in CycleCloud and select “Slurm” as the scheduler type. Set parameter as below with other as is. Save the configuration then.
“Require setting” page – HPC VM Type: Standard_NC8as_T4_v3, Max HPC Cores: 24, Subnet ID: vnetprotein-compute.
“Advanced Settings” page – Scheduler & HPC OS both with “Custom image” option clicked and stuff with custom image resource ID string in step 4.
Start the cluster and wait several minutes to wait cluster in ready.
Login scheduler. Below steps aim to prepare dataset. Total size of the Alphafold2 dataset is ~2.2TB. Suggest to execute each download sentence in download_all_data.sh if you want to save some time, such as download_pdb70.sh, download_uniref90.sh & etc.. Dataset preparation may need several hours as expected.
Now we can submit the AlphaFold2 computing jobs! Submit this job with a test sample (*.fa or *.fasta) in /volprotein/AlphaFold2/input. At the first running, cluster need several minutes waiting compute nodes get ready. Parallel jobs can be submitted and will be running on different compute node according Slurm’s allocation. Then we can use “squeue” to check the Slurm queue status. Meanwhile, there are resource monitoring graphic in CycleCloud UI to grasp the performance status of this AlphaFold2 cluster. After certain job is done, check the info in .out file and the pdb result file in /volprotein/AlphaFold2/result.
This article is contributed. See the original author and article here.
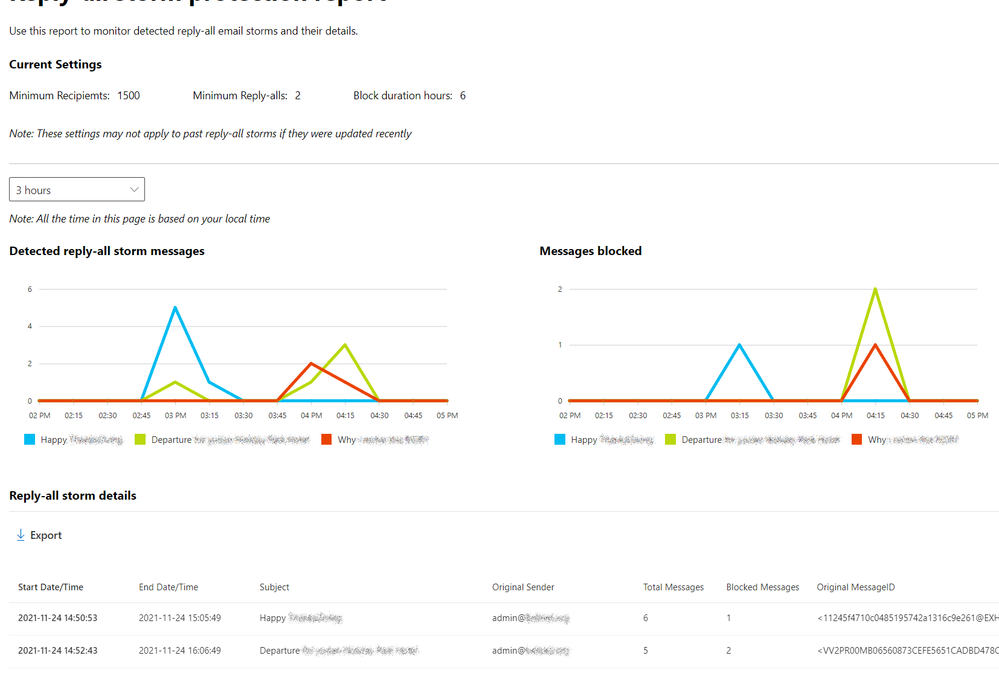
The Reply-all Storm Protection feature in Exchange Online helps protect your organization from unwanted and disruptive reply-all storms. Last year we updated the feature to give admins the ability to customize key settings for reply-all storm detection and block duration, and in that announcement we noted that several additional updates were planned for a future date. We’re pleased to announce that we’re rolling out three updates:
A Reply-all Storm Protection Report to track reply-all storms and the messages blocked by the feature.
The ability to customize feature settings within the EAC (in addition to Remote PowerShell).
A mail flow system alert policy to notify admins when a reply-all storm hits your organization.
The report includes charts for detected reply-all storms and associated blocked messages, and a pop-out storm details panel available when you click on a storm name at the bottom of each chart. additional details about each storm, it also includes a CSV-exportable table with key details of each storm such as subject, original message, total messages, and message ID. The report is available in the new EAC under the Reports > Mail flow section. Here’s a sample report:
Roll-out of the report starts this week and should finish by the end of May for the WW environments (including GCC), with availability in the GCC-High environment expected by the end of July. More information about the report can be found in Reply-all storm protection report in the new EAC in Exchange Online.
It’s been possible to customize key settings for the Reply-all storm protection feature using Remote PowerShell for over a year. Today, we’re happy to announce that you can now also customize these settings in the new EAC under the Settings > Mail flow panel, available now, as shown below:
To change these settings, you must have permission to change Transport configuration information (e.g., Set-TransportConfig) as part of the Organization Transport Settings role group (and included as part of the Exchange Admin and Global Admin roles).
Lastly, we’re currently working on a mail flow system alert policy that will notify admins when a reply-all storm has been detected and at least one reply-all has been blocked. Like all mail flow alerts it will be customizable so you can configure who gets notified and other common alert parameters. When the Reply-all Storm Protection alert policy is release (by the end of July) it will appear in the Mail flow > Alert policies section of the new EAC.
We hope you find these new updates for the Reply-all Storm Protection feature useful, and we look forward to any feedback or suggestions for future updates you might have.
This article is contributed. See the original author and article here.
The Federal Bureau of Investigation (FBI) has released a Flash report detailing indicators of compromise (IOCs) associated with attacks involving BlackCat/ALPHV, a Ransomware-as-a-Service that has compromised at least 60 entities worldwide.
CISA encourages users and administrators to review the IOCs and technical details in FBI Flash CU-000167-MW and apply the recommend mitigations.

.png")


Recent Comments