This article is contributed. See the original author and article here.
CISA has added two vulnerabilities to its Known Exploited Vulnerabilities Catalog, based on evidence of active exploitation. These types of vulnerabilities are a frequent attack vector for malicious cyber actors and pose significant risk to the federal enterprise. Note: to view the newly added vulnerabilities in the catalog, click on the arrow in the “Date Added to Catalog” column, which will sort by descending dates.
Although BOD 22-01 only applies to FCEB agencies, CISA strongly urges all organizations to reduce their exposure to cyberattacks by prioritizing timely remediation of Catalog vulnerabilities as part of their vulnerability management practice. CISA will continue to add vulnerabilities to the Catalog that meet the specified criteria.
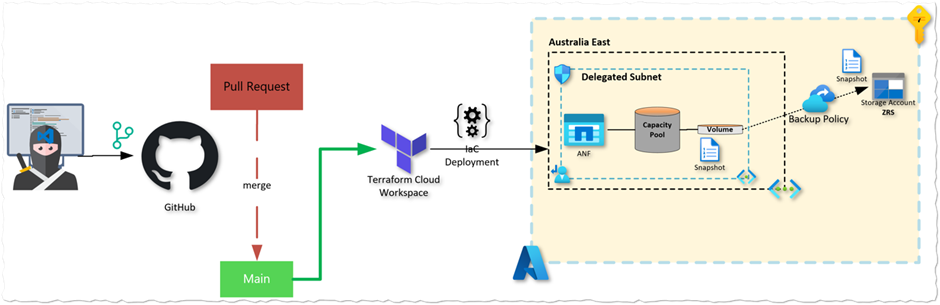
This article demonstrates how to enable the use of preview features in Azure NetApp Files in combination with Terraform Cloud and the AzAPI provider. In this example we enhance data protection with Azure NetApp Files backup (preview) by enabling and creating backup policies using the AzAPI Terraform provider and leveraging Terraform Cloud for the deployment.
As Azure NetApp Files development progresses new features are continuously being brought to market. Some of those features arrive in a typical Azure ‘preview’ fashion first. These features normally do not get included into Terraform before general availability (GA). A recent example of such a preview feature at the time of writing is Azure NetApp Files backup.
In addition to snapshots and cross-region replication, Azure NetApp Files data protection has extended to include backup vaulting of snapshots. Using Azure NetApp Files backup, you can create backups of your volumes based on volume snapshots for longer term retention. At the time of writing, Azure NetApp files backup is a preview feature, and has not yet been included in the Terraform AzureRM provider. For that reason, we decided to use the Terraform AzAPI provider to enable and manage this feature.
Azure NetApp Files backup provides fully managed backup solution for long-term recovery, archive, and compliance.
Backups created by the service are stored in an Azure storage account independent of volume snapshots. The Azure storage account will be zone-redundant storage (ZRS) where availability zones are available or locally redundant storage (LRS) in regions without support for availability zones.
Backups taken by the service can be restored to an Azure NetApp Files volume within the region.
Azure NetApp Files backup supports both policy-based (scheduled) backups and manual (on-demand) backups. In this article, we will be focusing on policy-based backups.
In the following scenario, we will demonstrate how Azure NetApp Files backup can be enabled and managed using the Terraform AzAPI provider. To provide additional redundancy for our backups, we will backup our volumes in the Australia East region, taking advantage of zone-redundant storage (ZRS).
Azure NetApp Files backup preview enablement
To enable the preview feature for Azure NetApp Files, you need to enable the preview feature. In this case, this feature needs to be requested via the Public Preview request form. Once the feature is enabled, it will appear as ‘Registered’.
A ‘Pending’ status means that the feature needs to be enabled by Microsoft before it can be used.
Managing Resource Providers in Terraform
In case you manage resource providers and its features using Terraform you will find that registering the preview feature will fail with the below message, which is expected as it is a forms-based opt-in feature.
Resource “azurerm_resource_provider_registration” “anfa” {
   name     = “Microsoft.NetApp”
   feature {
     name       = “ANFSDNAppliance”
     registered = true
   }
   feature {
     name       = “ANFChownMode”
     registered = true
   }
   feature {
     name       = “ANFUnixPermissions”
     registered = true
   }
   feature {
     name = “ANFBackupPreview”
     registered = true
    }
 }
Terraform Configuration
We are deploying Azure NetApp Files using a module with the Terraform AzureRM provider and configuring the backup preview feature using the AzAPI provider.
Microsoft has recently released the Terraform AzAPI provider which helps to break the barrier in the infrastructure as code (IaC) development process by enabling us to deploy features that are not yet released in the AzureRM provider. The definition is quite clear and taken from the provider GitHub page.
The AzAPI provider is a very thin layer on top of the Azure ARM REST APIs. This new provider can be used to authenticate to and manage Azure resources and functionality using the Azure Resource Manager APIs directly.
The code structure we have used looks like the sample below. However, if using Terraform Cloud you use the private registry for module consumption. For this article, we are using local modules.
Azure NetApp Files backup is supported in the following regions. In this example we are using the Australia East region.
After deployment, you will be able to see the backup icon as part of the NetApp account as below.
Azure NetApp Files backup policy creation
The creation of the backup policy is similar to a snapshot policy and has its own Terraform resource. The backup policy is a child element of the NetApp account. You’ll need to use the ‘azapi_resource’ resource type with the latest API version.
(!) Note
It is helpful to install the Terraform AzAPI provider extension in VSCode, as it will make development easier with the IntelliSense completion.
The ‘parent_id’ is the resource id of the NetApp account
Because we are deploying this in the Australia East region, which has support for availability zones, the Azure storage account used will be configured with zone-redundant storage (ZRS), as documented under Requirements and considerations for Azure NetApp Files backup. In the Azure Portal, within the volume context, it will look like the following:
(!) Note
Currently Azure NetApp File backups supports backing up the daily, weekly, and monthly local snapshots created by the associated snapshot policy to the Azure Storage account.
The first snapshot created when the backup feature is enabled is called a baseline snapshot, and its name includes the prefix ‘snapmirror’.
Assigning a backup policy to an Azure NetApp Files volume
The next step in the process is to assign the backup policy to an Azure NetApp Files volume. Once again, as this is not yet supported by the AzureRM provider, we will use the `azapi_update_resource` as it allows us to manage the resource properties we need from the existing NetApp account. Additionally, it does use the same auth methods as the AzureRM provider. In this case, the configuration code looks like the following where the data protection block is added to the volume configuration.
The data protection policy will look like the screenshot below indicating the specified volume is fully protected within the region.
AzAPI to AzureRM migration
At some point, the resources created using the AzAPI provider will become available in the AzureRM provider, which is the recommended way to provision infrastructure as code in Azure. To make code migration a bit easier, Microsoft has provided the AzAPI2AzureRM migration tool.
Summary
The Terraform AzAPI provider is a tool to deploy Azure features that have not yet been integrated in to the AzureRM Terraform provider. As we see more adoption of preview features in Azure NetApp Files this new functionality will give us deployment support to manage zero-day and preview features, such as Azure NetApp Files backup and more.
This article is contributed. See the original author and article here.
Commercial and public sector organizations continue to look for new ways to advance their goals, improve efficiencies, and create positive employee experiences. The rise of the digital workforce and the current economic environment compels organizations to utilize public cloud applications to benefit from efficiency and cost reduction.
This article is contributed. See the original author and article here.
As the world started unwinding from the pandemic, Sarah joined thousands of travelers in booking flights for a long-planned vacation. Realizing she forgot to add her food preferences, she immediately opened a chat on the airline portal. After a long wait, the virtual agent told her to try again later. All the human support agents were busy. She returned after a few hours and started another chat, but she was too late. The chat service had ended for the day. Super upset and frustrated, she left the chat giving the lowest rating.
Busy queues often lead to lower CSAT
Service delivery organizations dread scenarios like Sarah’s, where the customer must wait a long time in the queue, abandons the attempt with a low satisfaction rating, orworst of allboth. Managing workloads effectively during periods of peak demand is a frequent problem for all businesses. Service organizations face the additional challenge of support requests that arrive outside of business hours. Companies are looking for ways to enhance their customers’ experience to drive higher CSAT. Efficient queue overflow management is an essential part.
Introducing queue overflow management in Microsoft Dynamics 365 Customer Service
With queue overflow management, businesses can proactively manage overflow when callers are experiencing abnormally long wait times or a queue has many unassigned work items.
Corrective actions are specific to service channels or modalities. During peak demand, organizations can transfer calls to a different queue or to voicemail or offer to call the customer back later. Similarly, conversations and records can be transferred from an overflowing queue to a different queue.
How to set up queue overflow management
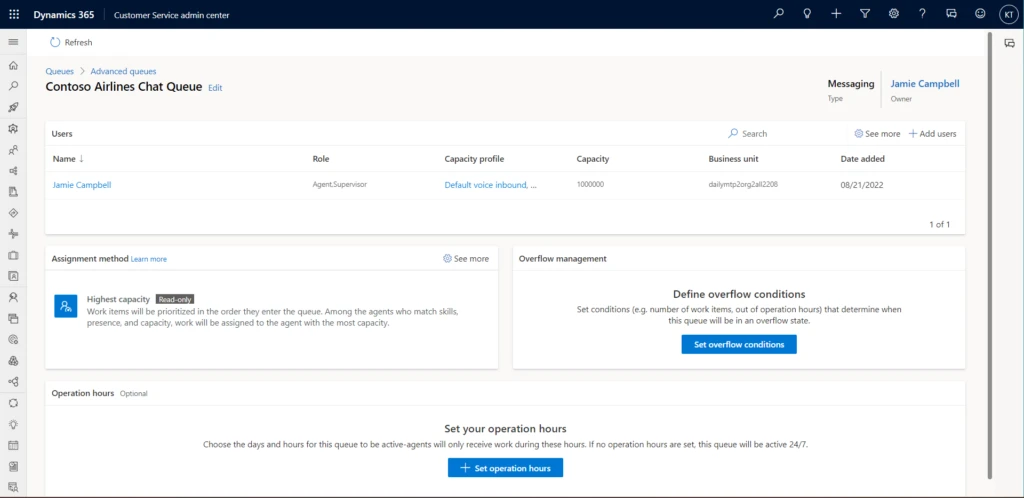
In the Customer Service admin center, select Queues > Advanced queues. Select Set overflow conditions in the Overflow management tile.
Then define the conditions that will determine whether the queue is overflowing and what action to take if it is.
Overflow evaluation happens before a work item is added to the queue. You can think of it as a sort of “pre-queueing” step.
How queue overflow management would make Sarah a happy customer
Let’s return to our excited traveler Sarah to learn how queue overflow management would help the airline avoid a dissatisfied customer. She’s bought her tickets and initiated a chat to add a meal preference to her reservation. The airline now has two queues for customer chats. With customers already holding in one, queue overflow management automatically routes Sarah to the other, where there’s no wait.
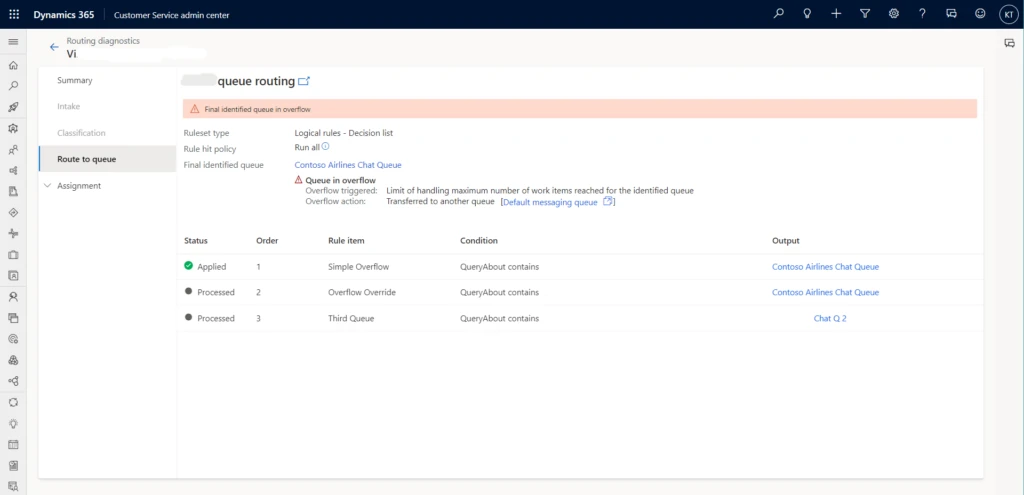
Investigate queue overflow events with routing diagnostics
Dynamics 365 Customer Service captures information about queue overflow events in routing diagnostics. Admins can use the information to understand failure scenarios and plan their business workflows accordingly.
Prepare better to serve better
It’s hard to predict peak demand events. Queue overflow management can help. Admins and supervisors are better prepared for contingencies, and customers like Sarah get a faster resolution to their issues.
This article is contributed. See the original author and article here.
Skill-based routing automatically assigns the agents with the right skills to work on customer support requests. With skill-based routing in Microsoft Dynamics 365 Customer Service, your call center can reduce the number of queues it operates, improve agents’ productivity, and increase customers’ satisfaction.
To get the most out of skill-based routing, it should be easy to onboard your agents with the right set of skills, proficiencies, and queues. It should be just as easy to modify your workforce configuration to keep up with the ever-changing demands on your call center. With the October 2022 release, Dynamics 365 Customer Service introduces a new skills hub and an enhanced user management experience that helps you onboard and manage the agents in your workforce more efficiently than ever before.
One-stop skill-based routing in the new skills hub
Let’s look at a common scenario. Morgon is the call center administrator for Contoso Enterprises, a global e-commerce company. Morgon has observed a surge in service requests around “Returns” in the North American region. Customers are facing long wait times because of it. In response, Morgon wants to make two changes to his workforce.
First, he wants to boost the “Returns” skill and support the additional requests using agents who have lower proficiency in handling returns but can provide timely support. Second, he wants to move some agents from the Latin American queue to the North American queue to assist with the additional demand.
Previously, Morgon would have had to visit separate admin centers to accomplish these tasks. Now he can do everything in one place: the skills hub.
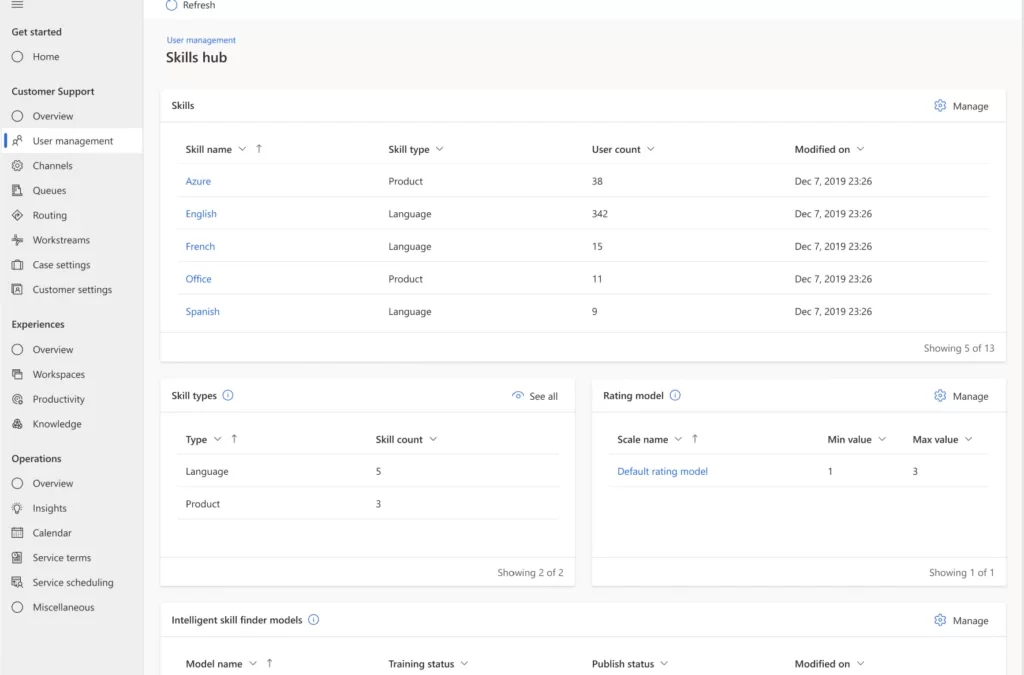
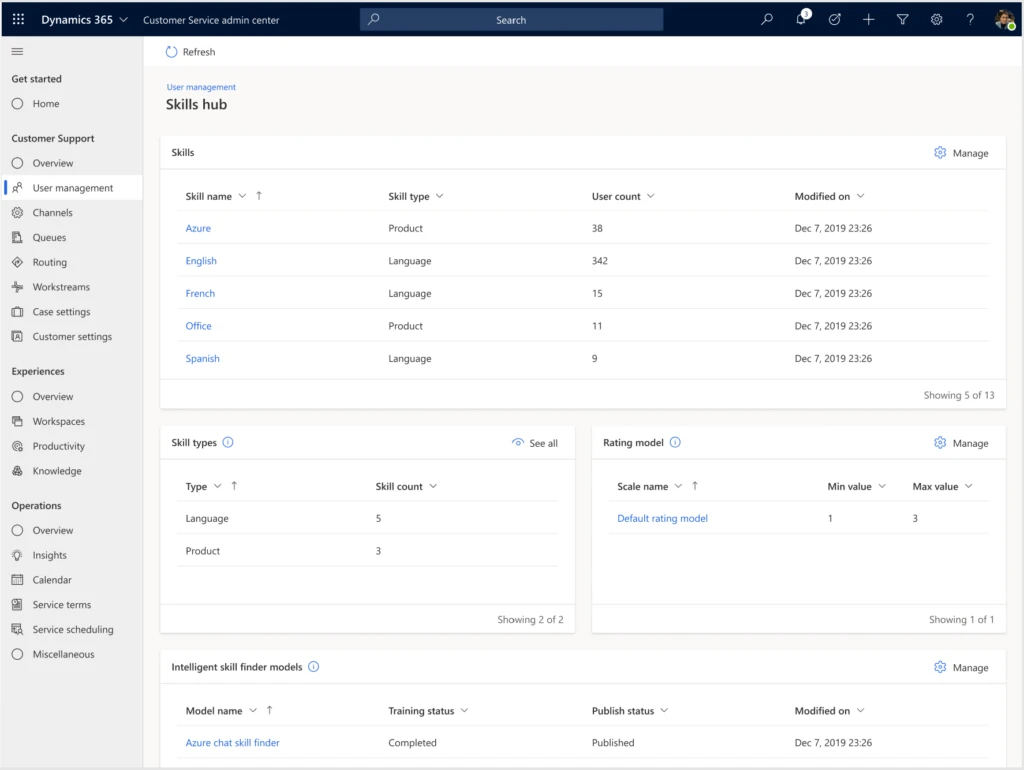
Skills, skill types, proficiency scales, and intelligent skill finder models are all important parts of skill-based routing. The new skills hub is the one-stop place to manage these attributes across your entire call center.
Here’s what you’ll find in the new skills hub:
An overview of all the skills you’ve configured in your call center and the number of users associated with each one
A single seamless flow to create a skill, add agents to it, and assign the agents’ proficiency in the skill
A simple way to add or remove multiple agents from a skill in just a few steps
An out-of-box proficiency scale to help you start using skill-based routing in as few steps as possible
An intuitive experience to create or modify proficiency scales
Enhanced user management
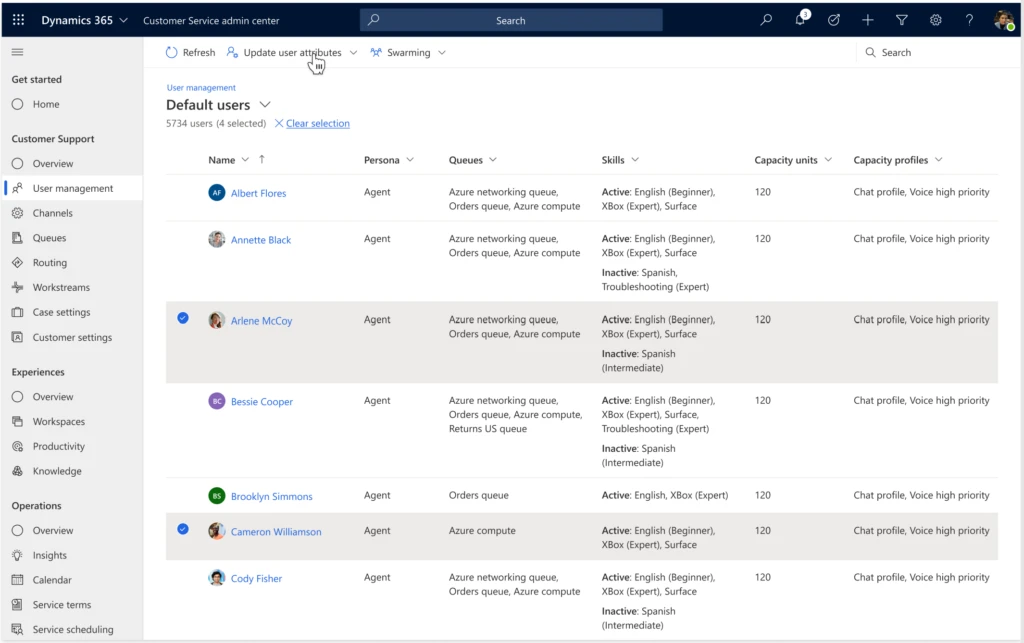
Along with skills, Customer Service uses queues and capacity profiles to efficiently route work requests to the agents best suited to handle them. With enhanced user management, you can easily view how your agents are configured across these attributes. Managing the attributes for multiple agents takes just a few simple steps.
Here are some highlights of the new user management experience:
A page that lists the skills, proficiency scales, queues, and capacity profiles of all agents in your organization
Search functionality to find agents with specific skills or other attributes
The ability to update the attributes of multiple agents at once
One place to manage skills, proficiencies, queues, and capacity profiles of users
You can even enable agents to participate in swarming requests as part of the collaboration features in Dynamics 365 Customer Service.
With the new skills hub and enhanced user management, call center administrators can now quickly configure their workforce and make changes on the fly to keep up with customers’ varying demands.
The skills hub and enhanced user management are available as a public preview in the Dynamics 365 Customer Service admin center for all organizations.
Next steps
To learn about the new features and try out their capabilities, read the documentation:


Recent Comments