This article is contributed. See the original author and article here.
The use of SaaS applications has become widespread in businesses of all sizes. With more SaaS apps in use, there are more potential targets for attackers. They frequently exploit centralized user authentication systems targeting unaware users with phishing attacks. Attackers can take advantage of this lack of awareness to trick users into authorizing malicious apps, steal credentials and gain access to multiple services. Attack techniques are getting more sophisticated and frequent exploits of poorly designed of SaaS applications are on the rise.
In this blog, we’ll demonstrate how SOC teams can benefit from App governance and its integration with Advanced Hunting to better secure SaaS apps.
Why use advanced hunting?
Advanced hunting uses a powerful query language called Kusto Query Language (KQL). KQL allows security analysts to create complex queries that can filter, aggregate, and analyze large volumes of data collected from endpoints, such as security events, process data, network activity, and more. However, this can be challenging for new security analysts who may not be familiar with writing queries in KQL. By using the pre-defined KQL queries and app signals collected in Microsoft 365 Defender, security analysts can immediately benefit from hunting capabilities to investigate app alert insights without having to use any KQL.
A real-life example of threat investigation
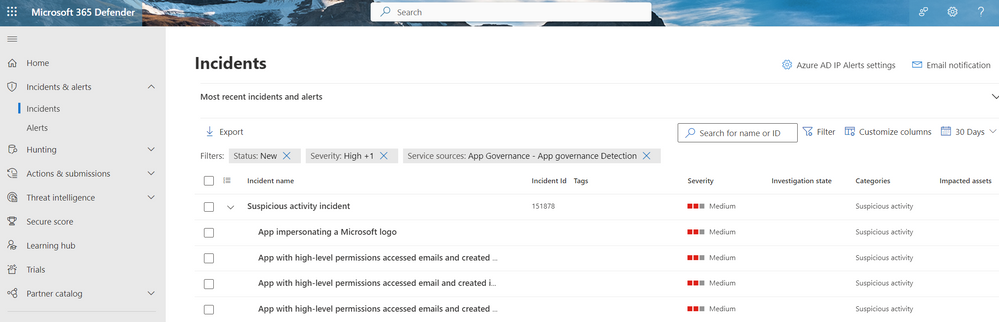
Let’s investigate a real-life incident triggered by a built-in threat detection policy in App governance. In our case, the “App impersonating a Microsoft logo” alert was triggered. Using our unified XDR platform, Microsoft 365 Defender, a SOC analyst can access all defender alerts in one place via the incidents view. The SOC analyst can filter on status, severity, incident assignment, service sources and other categories. In Figure 1, the Filter Service source = App Governance, Status = New, Severity= High, was applied to help with incident detection and prioritization.
Note: To learn more about App governance built in policies, check out our documentation.
Figure 1. Selecting incidents.
The incident (Figure 1) consists of four alerts that the SOC analyst can review to verify if they are true positives (TP) or false positives (FP) and act accordingly. The SOC analyst can click on the incident and access the attack story (Figure 2), where the alerts can be reviewed in chronological order. They can also view additional information in “What happened” and “Recommended actions” sections which gives the analyst a much better understanding as to why the alert was triggered in the first place with a path forward to remediate.
Figure 2. Reviewing the attack story.
Let’s learn more about the application, by selecting view app details (Figure 3).
Figure 3. Selecting View app details.
Usually, malicious apps will not have any certification or publisher verification because of the app nature community verification would be rare. The combination of all those attributes (highlighted at Figure 4) raise red flags.
Because the app is registered in Azure AD, the SOC team can easily access additional information available in the Azure portal which may help with providing additional context that may help with the incident resolution.
Figure 4. The malicious O365 Outlook Application card, Highlighted red flags and links to Azure AD and App activities in hunting.
In Figure 5, we can see why the machine learning algorithm highlighted the app as malicious, the logo impersonates the original Outlook logo, but the publisher domain does not match the Microsoft domain. The SOC analyst can now follow their company guidelines to disable the app (this can be completed directly in AAD or in App governance app details window – Figure 4)
Figure 5. View of app details in Azure Portal.
Use of Advanced Hunting as part of incident investigation.
After disabling the malicious app, the SOC analyst should investigate further the app activity by selecting, “View app activities” (option highlighted in Figure 4), which will generate the Query 1 also visible in Figure 6. The results visible in Figure 7&8 will include all graph API activities the app preformed on SharePoint Online, Exchange Online, One Drive for Business and Teams workloads.
Figure 6. Advanced hunting query.
Query 1:
// Find all the activities involving the cloud app in last 30 days
| where ((RawEventData.Workload == “SharePoint” or RawEventData.Workload == “OneDrive”) and (ActionType == “FileUploaded” or ActionType == “FileDownloaded”)) or (RawEventData.Workload == “Exchange” and (ActionType == “Send” or ActionType == “MailItemsAccessed”)) or (RawEventData.Workload == “MicrosoftTeams” and (ActionType == “MessagesListed” or ActionType == “MessageRead” or ActionType == “MessagesExported” or ActionType == “MessageSent”))
| extend AppId = appid(RawEventData)
| where AppId == “Paste your app Id“
| where Timestamp between (datetime(“2023-08-08 00:00:00Z”)..30d)
| extend tostring(RawEventData.Id)
| summarize arg_max(Timestamp, *) by RawEventData_Id
In the query results, the analyst can see the IP address which could be an indicator of malicious activity, attackers frequently use IP of bad reputation, blacklisted, Tor exit nodes. Analyzing historical data can reveal patterns of malicious behavior associated with specific IP addresses. This can be useful for threat intelligence and proactive threat hunting. The analyst can also see impacted workloads and action types which are crucial for them to understand hacker actions.
By analyzing these actions, security analysts can trace the steps of the attacker to determine the scope of the breach, how the attacker gained access, and what data or systems may have been compromised. MailItemsAccessed action suggests that an unauthorized user or hacker has accessed the contents of one or more email messages within an email account and UpdateInboxRules can be a sign of an attacker attempting to manipulate email traffic by diverting, filtering, or forwarding messages to their advantage.
Figure 7. Advanced hunting query results.
The analyst may want to create a detection rule (option visible on Figure 6) to proactively identify and alert on similar suspicious activities in the future, which is essential for enhancing an organization’s ability to detect and respond to security threats effectively, automate alerts, reduce false positives, and stay ahead of evolving cyber threats. Learn more about custom detections rules and how to create them here.
By selecting one of the records (Figure 8), the SOC analyst can get more information about the impacted user to act accordingly and “stop the bleeding.” They can take immediate action to halt or mitigate the security breach, prevent further access (changing passwords, revoking access privileges or even disabling the compromised account), all result in minimizing the damage. After the bleeding has stopped, the data helps security teams conduct a thorough investigation to determine the root cause of the incident. Understanding how the breach occurred is essential for preventing similar incidents in the future.
Figure 8. Advanced hunting inspected record details.
The app impersonation security incident shows the benefits of app governance machine learning in detecting malicious applications which offers additional layer of protection for your users and organization. The integration of app governance with advanced hunting capabilities provides SOC teams with the tools and insights needed to proactively detect, respond to, and mitigate security threats in SaaS OAuth applications. It allows for a more comprehensive and data-driven approach to SaaS app security, helping organizations protect their critical data and assets.
This article is contributed. See the original author and article here.
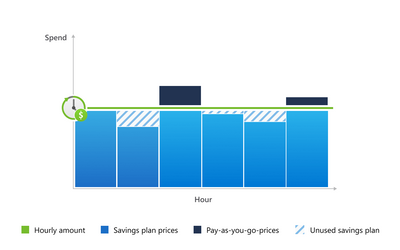
Azure Container Apps is now eligible for Azure savings plan for compute! With Azure Container Apps you can build and deploy fully managed, cloud-native apps and microservices using serverless containers. All Azure Container Apps regions and plans are eligible to receive 15% savings (1 year) and 17% savings (3 years) compared to pay-as-you-go when you commit to an Azure savings plan.
Learn about Azure Savings Plan for Compute
The Azure savings plan for compute unlocks lower prices on select compute services when you commit to spend a fixed hourly amount for 1 or 3 years. You choose whether to pay all upfront or monthly at no extra cost. As you use select compute services across the world, your usage is covered by the plan at reduced prices, helping you get more value from your cloud budget. During the times when your usage is above your hourly commitment, you’ll simply be billed at your regular pay-as-you-go prices. With savings automatically applying across compute usage globally, you’ll continue saving even as your usage needs change over time.
Here is an example of how Azure savings plan for compute works. If you buy a 1-year savings plan and commit to $5 USD of spend per hour, Azure automatically applies the savings plan to compute usage globally on an hourly basis up to the example $5 hourly commitment. Hourly Consumption plan vCPU usage for Azure Container Apps in West US would be billed at the lower savings plan price of $0.07344 instead of $0.0864 for active usage as follows:
Usage at or below $5 USD for the hour is billed at lower savings plan prices and covered by the savings plan hourly commitment. Note that you would pay the $5 USD amount every hour, even if usage is less.
For usage above $5 USD for any given hour, the first $5 USD of usage is billed at lower savings plan prices and covered by the savings plan hourly commitment. The amount above $5 USD is billed at pay-as-you-go prices and will be added to the invoice separately.
Azure savings plan for compute is first applied to the product that has the greatest savings plan discount when compared to the equivalent pay-as-you-go rate (see your price list for savings plan pricing). The application prioritization is done to ensure that you receive the maximum benefit from your savings plan investment.
This article is contributed. See the original author and article here.
As you embark on your journey back to college or university, it’s essential to prioritize the security of your digital assets, especially when dealing with platforms like Microsoft Azure. One of the most effective ways to fortify your online defenses is by implementing Two-Factor Authentication (2FA), and in this comprehensive guide, we’ll walk you through the process, step by step of how-to setup 2FA and recovery your (2FA) authenticator setting is loose or misplace your device.
The Step-by-Step Process to Safeguard Your Azure Account By following these steps, you’ll have successfully added Two-Factor Authentication to your Microsoft Azure account, significantly enhancing your online security. Remember that you can also easily remove your account’s connection to a previous Microsoft Authenticator App.
Thank you for prioritizing the security of your online accounts, and we hope this guide has been helpful. If you have any questions or encounter issues along the way, feel free to reach out for assistance. Your digital safety is paramount, and taking these steps will go a long way in safeguarding your valuable information.
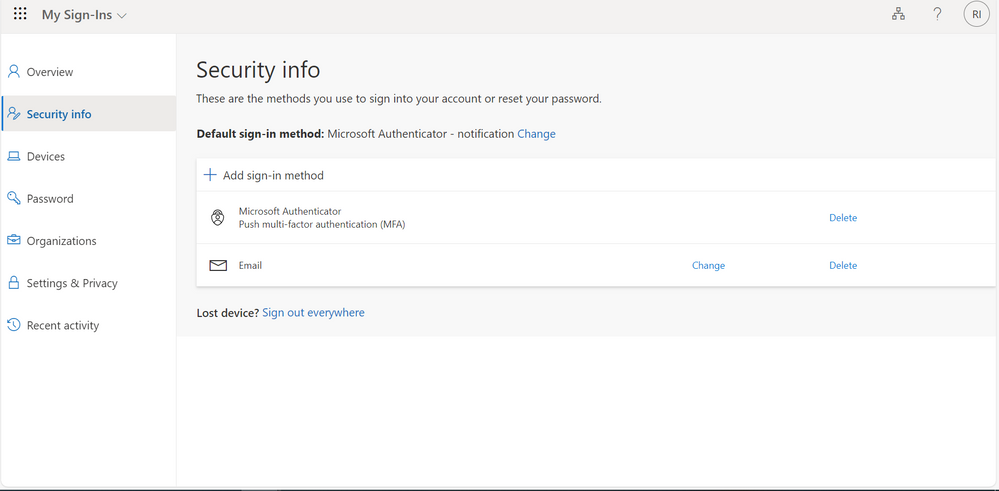
Make sure at the left hand of your screen, you are on Security info.
Note: This page will look different for you, before I hid my email address and device name the previous Authenticator App is connected to.
Step 3
Click on Add sign-in method
Step 4
Choose a method by clicking on the drop down icon
Step 5
Here, I will be using Microsoft Authenticator
Select Microsoft Authenticator
Step 6
Click on Add
Step 7
Download the Microsoft Authenticator App if you previously do not have it on your phone or tablet.
Step 8
Next, after sorting out Step 7 click on Next
Step 9
On the Set up your account screen, click on Next
Step 10
Scan the barcode by
Clicking on the Authenticator App in your device
Click on the + sign at the top right of your screen
Select what type of account you are adding
This are the options
Personal account
Work or school account
Other(Google, Facebook, etc.)
Step 11
Click from this option on what you are using, for me I clicked on Work or school account
There is new option to add work or school account that gives you an option to
Sign in
Scan QR code
Cancel
Click on Scan QR code
If this does not work for you that is fine, mine showed an error message
For me it showed an error message that reads:
You’ve have already used this QR code to add an account. Generate a new QR code and try again.
Let’s resolve this together, you can either use of any this steps
By starting the process again and scan the image (this worked for me)
Or clicking on manually on your device and adding the code and URL
Adding the code and URL
Step 12
Click on Can’t scan image
Step 13
Either you are continuing from Step 11 or Step 12
Click on Next
Step 14
After this step, this will show a number for you to enter in your Authenticator App,
Enter the number and click on Next
Note: you can easily delete the connection of your account to the previous Microsoft Authenticator App so if you lose your device or change device simply follow the steps above to add a new device.
Thank you very much for reading keep secure and stay safe.
This article is contributed. See the original author and article here.
Working on a service request our customer reported the following error message: Sync failed with state: SyncSucceededWithWarnings, Syncgroup: XXX – Error #1: SqlException ID: XXXX-NNN-ZZZZ-YYYY-FFFFFFFF, Error Code: -2146232060 – SqlError Number:547, Message: The INSERT statement conflicted with the FOREIGN KEY constraint “FK_Table1”. The conflict occurred in database “DB1”, table “dbo.Table1”, column ‘Id’. SqlError Number:3621, Message: SQL error with code 3621
Decoding the Error Message:
The warning state signifies that while synchronization was successfully executed, some errors, like the SqlException indicated above, occurred during the process.
Navigating Through the Errors:
Foreign Key Constraint Error Analysis:
The error message elucidates a failed attempt to insert a record into a table due to a Foreign Key Constraint Error. The conflict arises when the inserted record’s foreign key doesn’t align with any existing primary keys in the referenced table.
Error Resolution Steps:
Identify and Analyze: Utilize tools like SSDT / SSMS to compare the databases and pinpoint the conflicting records causing the constraint error.
Data Correction: Engage in a meticulous process of amending the data by adding the absent records in the referenced table, or adjusting the foreign key values in the records to be inserted, ensuring they correspond to existing primary keys in the referenced table.
Sync Group Recreation: In moments of low traffic or scheduled downtime, recreate the sync group to implement the rectified records seamlessly.
Reinitiate Synchronization: After addressing the conflicting records, reinitiate the synchronization process, which should now proceed without constraints or warnings.
This article is contributed. See the original author and article here.
Segundo relatórios de investigações da Verizon Data Breach em 2020, foi constatado que 80% das violações de segurança em aplicações Web estão relacionadas a credenciadas roubadas; e 83% das aplicações hoje possuem ao menos uma vulnerabilidade de segurança. Essas brechas são grandes oportunidades para pessoas mal-intencionadas explorarem seus aplicativos e causarem grandes danos.
Organizações que adotam práticas de DevSecOps (checks de segurança, busca por vulnerabilidades diariamente etc.) reduzem o tempo de recuperação para problemas de segurança em 72% em relação a organizações que rodam essas validações apenas ocasionalmente.
Em ordem de suprir estes pontos de melhoria em um mundo onde o desenvolvimento de softwares está em contante e rápida transformação de forma maravilhosa as comunidades ao nosso redor, a Microsoft traz o GitHub Advanced Security for Azure DevOps (GHAzDO) para dentro do suíte de serviços do Azure DevOps.
O que é GHAzDO?
Conforme mencionado, o GHAzDO é um serviço que provê funcionalidades de segurança para implantação de shift-left (prática que consiste em iniciar os testes de aplicação mais cedo e duram todo o ciclo de vida do desenvolvimento de software), tornando mais simples diagnosticar e prevenir brechas de segurança da sua aplicação em estágios de desenvolvimento mais iniciais.
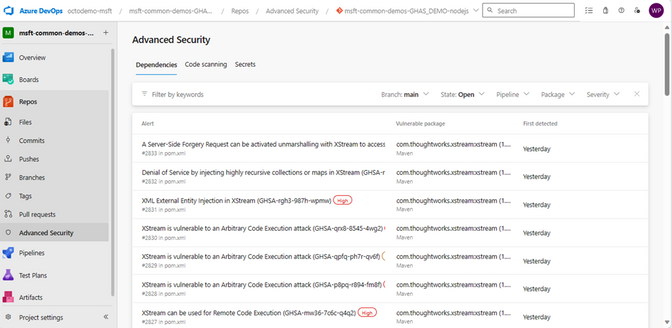
O GHAzDO é dividido em 3 abordagens: Secure Dependencies, Secure Code e Secure Secrets.
Secure Dependencies
Ataques a ferramentas de código aberto são cada vez mais frequentes. Com o Dependency Scanning, é possível identificar vulnerabilidades em pacotes presentes no código e receber um conjunto de orientações em como mitigar essas aberturas.
Secure Code
Com o conceito de Code Scanning, o GHAzDO inclui uma ferramenta de análise estática capaz de detectar centenas de vulnerabilidades de segurança no código como SQL Injection, XPath Injection, Authorization bypass em uma ampla variedade de linguagens (C/C++, C#, Go, Java/Kotlin, Javascript/Typescript, Python etc.). Tudo isso, é executado dentro do contexto do Azure Pipelines sobre o código no Azure Repos. Ou seja, é uma ferramenta nativa focada em ser totalmente natural para os usuários do Azure DevOps.
Secure Secrets
Metade das brechas de segurança em aplicações estão relacionadas com credenciais expostas. Com a funcionalidade do Secret Scanning, é possível listar todos os segredos expostos no repositório e seus respectivos arquivos. Não só isso, com apenas 1 clique é possível bloquear o envio de segredos para o repositório, impedindo que brechas de segurança sejam causadas.
Uma vez que um segredo está exposto no repositório, ele faz parte do histórico de commits. Em uma situação como essa, é necessário revogar o segredo, e atualizar todos os recursos que potencialmente façam uso deste para um novo. Se porventura algum recurso for esquecido, é possível causar uma indisponibilidade na aplicação. Não o bastante, será necessário também resetar o histórico do repositório para o commit anterior ao momento em que o segredo foi exposto. Se este foi exposto há um tempo considerável, isso pode causar sérios danos em relação ao trabalho que foi desenvolvido até então, gerando um grande atraso a equipe de desenvolvimento.
Portanto, certificar-se de que secrets, credenciais, ou qualquer outra informação sensível nunca seja exposta ao repositório (push protection) é de extrema importância para a saúde e segurança da aplicação.
This article is contributed. See the original author and article here.
This post was co-authored by Lax Gopisetty, Vice President, Global Practice Head, Microsoft Business Applications & Digital Workplace Services, Infosys Ltd.
In an age defined by single-click purchases, instant deliveries, and personalized experiences, customer expectations continue to rise, and frontline technicians are expected to meet these ever-changing demands. When customers face a problem, they want it fixed fast and right the first time. For many organizations, customer experience is both a challenge and an opportunity to differentiate from the competition.
It is no longer acceptable for technicians to operate on disparate technologies that individually are good enough to execute work orders, manage assets, and dispatch resources with real-time support. Timely resolution is key in field service, and arming frontline technicians with intuitive solutions that combine workflow automation, scheduling algorithms, and mobility can significantly enhance the customer experience. Tools that empower field technicians with timely inputs to focus on their core responsibilities and enable processes to track each work order closure, along with billing, are now becoming existential.
For example, solutions that unlock efficiencies for telecommunications providers with field service automation, empower medical device service technicians with improved downtime, maintain safe and highly automated facility management operations, and manage smart elevator service with Internet of Things (IoT)-driven field service are all recipes for greater customer satisfaction.
Dynamics 365 Field Service
Transform your service operations and deliver exceptional service.
Microsoft Dynamics 365 Field Service integration supports positive customer experiences
Dynamics 365 Field Service integrates with Outlook, Microsoft Teams, and Microsoft Viva Connections so that frontline workers and managers can create, view, and manage work orders within Outlook and Teams. This integration enhances collaboration between dispatchers, frontline technicians, and managers by enabling work order data to sync automatically between Dynamics 365 and Microsoft 365. Additionally, frontline technicians can quickly start their day with access to key workday information at a glance, with work orders visible as Tasks from the Viva Connections homepage in Teams. Dynamics 365 and Microsoft 365 empower technicians with the right information to resolve issues the first time, which adds a great deal to creating a positive customer experience.
For example, a leading energy supplier based out of the UK partnered with Infosys to establish itself as a leader in the energy-as-a-service market by offering best-in-class customer experience. The connected field service-based solution unified the capabilities of Dynamics 365 and Microsoft 365 to unlock a leaner and flexible business model that also enabled future scalability to ensure:
Better workforce management through flexible scheduling, route optimization, and quota management.
Field job execution via remote supervision, site awareness/recording, and offline mode.
Customer intimacy powered by service history management, technician visibility, voice of customer, and closed loop tracking.
Superior job outcomes powered by higher first-time resolution rates and reduced job aborts.
Connected field service helped redefine the leading energy supplier’s customer engagement model with a seamless work order management process. From streamlining work order creation, scheduling the best suited frontline technician, receiving remote expert assistance, and integrating asset management, Dynamics 365 enabled the customer to transform their field operations. Additional engagement highlights include:
Seamless migration from more than 20 legacy disparate business apps onto Dynamics 365.
Implemented core business functionalities with over 75 percent out-of-the-box feature fitment.
Six phased incremental rollouts to enable more than 1,500 field technicians and more than 600 internal users.
On track to reduce overall cost of IT operations by over 25 percent.
The leaner, AI-powered, and truly automated business, has unleashed novel revenue streams with infinite potential for the client:
Growth segment
Value delivered
Smart new connections
Manage the smart new connections—such as customer management (property developers), lead management, opportunity management, quote management, billing, consolidated billing, and disputes.
Smart field connections
Provide onsite service for smart field connections—work order management, skills management, scheduling management, capacity management, and resource management.
Electric vehicles (e-mobility)
Manage electric vehicle (EV) meter installation services—to manage the sales processes for business-to-business (B2B) customers, including installation.
This UK-based leading energy supplier is now well-positioned to drive its future growth. The organization is supported by a skilled and engaged workforce that works seamlessly with connected and leaner processes that together offer a sustainable competitive advantage.
Standardizing and automating processes through connected field service
Field Service continues to break ground into unexplored industries. Capabilities like GPS and routing, which enable timely visits and quicker resolution, are saving the day for thousands of field service professionals. They are now able to summarize completed tasks with inline Microsoft Power Apps component framework (PCF) capability.
Field service solutions must always be driven by an organization’s unique priorities, pain points, and process nuances. Partners like Infosys are co-innovating with clients to address these challenges with Microsoft Power Platform and its extensibility components. They are enabling nontechnical business users to build applications that cater to their unique requirements without the aid of IT experts.
The emergence of AI-embedded innovations like Copilot in Dynamics 365 Field Service will enhance service further. From creating work orders with the right information and assigning them to the right technicians, to equipping technicians with sufficient support to successfully complete jobs, Copilot will help streamline critical frontline tasks. These advanced functionalities will help companies genuinely standardize and automate field service processes.
Organizations competing in a market with high turnover are using mixed reality-based Microsoft Dynamics 365 Guides for remote support and collaboration. This results in accelerated training with context and seamless transfer of information, insights, and skills, which help in lowering overall costs.
Technology is key to building a scalable and efficient field service operation. However, a significant portion of success still rides on the technician who is delivering the service. So, it is imperative for service organizations to unify field operations, frontline technicians, and customers with connected digital platforms, to unlock value—because service is no longer a cost center for organizations.
Learn more about Dynamics 365 Field Service
Learn how Dynamics 365 Field Service can help you transform your service operations and deliver exceptional service. And read how Copilot in Dynamics 365 Field Service can accelerate service delivery, boost technician productivity, and streamline work order management with next-generation AI. Watch the video below to see it in action.


Recent Comments