This article is contributed. See the original author and article here.
Welcome to the fall! This month’s Microsoft Syntex update is gearing up to be a great one in the world of content processing. We have updates on Syntex taxonomy tagging and image tagging; a set of Syntex capabilities coming to preview for pay-as-you-go users; the general availability of the Syntex optical character recognition (OCR) is expanding to include PDF and TIFF support; and lastly, both Syntex OCR and Syntex structured document processing are moving to general availability.
Syntex taxonomy tagging and Syntex image tagging in general availability
In our previous blog post, we shared that Syntex taxonomy tagging and image tagging were rolling into general availability. We’re happy to share that both services have now completed rollout and are generally available to all Syntex pay-as-you-go users.
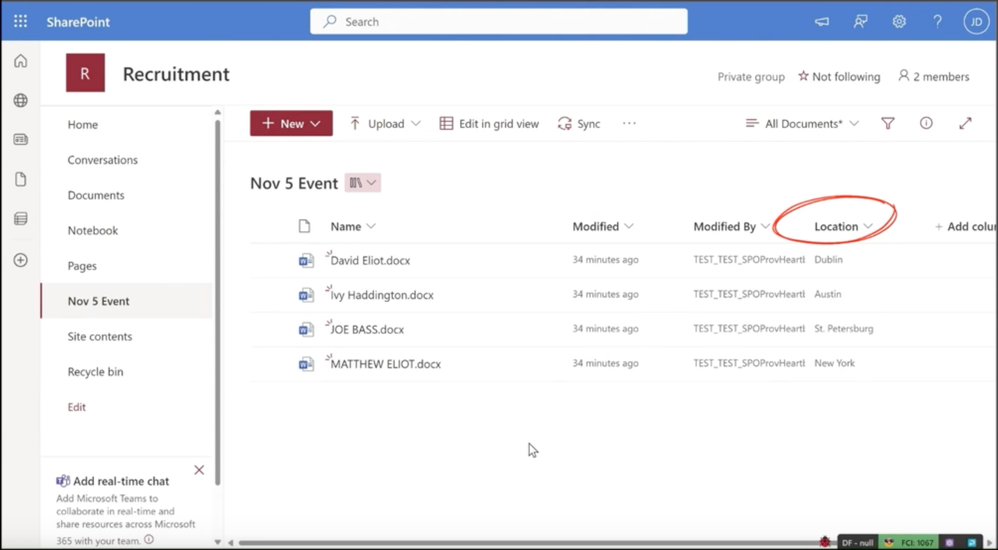
As a refresher, Syntex Taxonomy Tagging uses AI to help you label and organize documents by automatically tagging them with descriptive keywords, based on your taxonomy defined in SharePoint. By applying a taxonomy column and enabling taxonomy tagging, the document is automatically tagged with keywords from your term store to help with searching, sorting, filtering and more. This reduces manual work, and makes it faster and more efficient to categorize, find, and manage files in your document libraries. Overview of taxonomy tagging in Microsoft Syntex – Microsoft Syntex | Microsoft Learn
Taxonomy Tagging – the location column auto-populates based on your term store in this example
Syntex Image Tagging is now also generally available. Image Tagging is an AI-powered service that helps you label and organize images by automatically tagging them with descriptive keywords. These tags are stored as metadata to optimize searching, sorting, filtering, and managing your images. With this Syntex service, it’s much faster to categorize and search for specific images that you need. Overview of enhanced image tagging in Microsoft Syntex – Microsoft Syntex | Microsoft Learn
Image Tagging – images are auto-tagged with descriptive keywords
New features in preview for Syntex pay-as-you-go users
We’re excited to share that, for a limited time, Syntex pay-as-you-go users now get to use all the Syntex features previously only available to customers with the SharePoint Syntex seat license. If you’re not yet a Syntex customer, now is a particularly great time to give it a go. These services will be available as a preview through June 30, 2024.
1. Content query – an advanced, powerful search with custom metadata in a form-based interface 2. Universal annotation – add ink and highlights to additional file types like PDF & TIFF supported by our file viewer 3. Accelerators – preconfigured templates that leverage Syntex capabilities in an end-to-end solution for common scenarios like contract management and accounts payable 4. Taxonomy services – admin reporting on term set usage, easy import from SKOS-formatted taxonomies, and the ability to push a content type to a hub 5. Content processing rules – lightweight automation for common operations such as moving or copying a file, and setting a content type from the file name or path in SharePoint 6. PDF merge/extract – combine two or more PDF files into a new PDF file, or extract pages from one PDF into a new one
Site accelerator – preconfigured site templates for Accounts Payable
Syntex OCR and structured document processing will be generally available this month
Lastly, Syntex optical character recognition (OCR), which was previously in public preview, will be generally available this month! In images containing text – such as screenshots, scanned documents, or photographs – Syntex OCR automatically extracts the printed or handwritten text and makes it discoverable, searchable, and indexable.
It can be used for image-only files, now including PDF and TIFF as mentioned in the introduction, in OneDrive, SharePoint, Exchange, Windows devices and Teams messages. Searching for images is improved thanks to OCR, and IT admins can better secure images across OneDrive, SharePoint, Exchange, Teams and Windows devices with data loss prevention (DLP) policies.
Optical Character Recognition (OCR) auto-extracts text from images
You will also be able to use both the Syntex structured and freeform document processing features later this month when they become generally available as a new pay-as-you-go meter called “Structured document processing”. Unlike in the past, you will be able to use these services with your Azure subscription – no per-user license required, no AI Builder credits needed (but if you want to use AI Builder credits, we will still support that as well). Microsoft 365 roadmap ID 167309. Get started here.
Stay connected
And there you have it, lots of updates on Syntex services that will help your organization manage your content and improve content discovery, with less redundancy and greater efficiency. To get the latest on Syntex, join our mailing list for updates, and register for the upcoming October 18th Syntex Community Call.
Be sure to also connect with us at Microsoft Ignite, November 14-17, 2023, in Seattle or virtually!
This article is contributed. See the original author and article here.
Author: Reems Thomas Kottackal, Product Manager
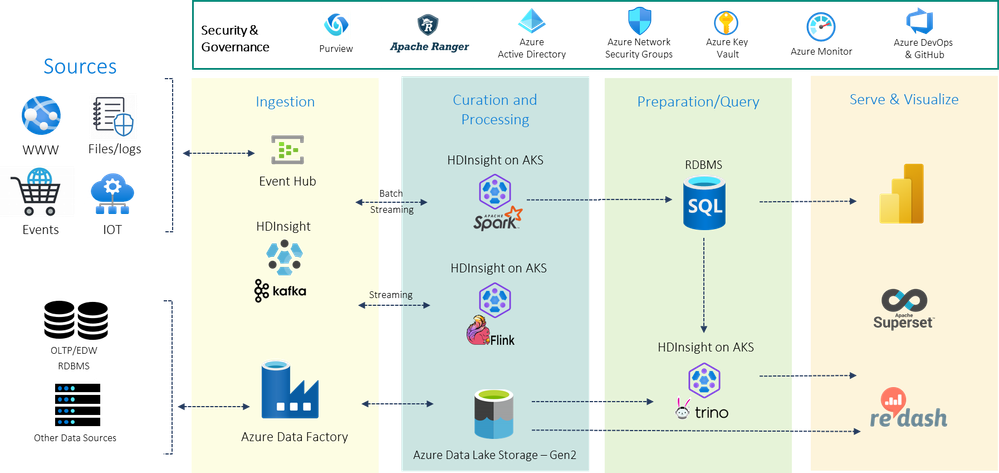
HDInsight on AKS is a modern, reliable, secure, and fully managed Platform as a Service (PaaS) that runs on Azure Kubernetes Service (AKS). HDInsight on AKS allows an enterprise to deploy popular open-source analytics workloads like Apache Spark, Apache Flink, and Trino without the overhead of managing and monitoring containers.
You can build end-to-end, petabyte-scale Big Data applications spanning event storage using HDInsight Kafka, streaming through Apache Flink, data engineering and machine learning using Apache Spark, and Trino‘s powerful query engine. In combination with Azure analytics services like Azure data factory, Azure event hubs, Power BI, Azure Data Lake Storage.
HDInsight on AKS can connect seamlessly with HDInsight. You can reap the benefits of using needed cluster types in a hybrid model. Interoperate with cluster types of HDInsight using the same storage and meta store across both the offerings.
The following diagram depicts an example of end-end analytics landscape realized through HDInsight workloads.
We are super excited to get you started, lets get to how?
This article is contributed. See the original author and article here.
We’re excited to announce a new AI-powered Skills in Viva service that will help organizations understand workforce skills and gaps, and deliver personalized skills-based experiences throughout Microsoft 365 and Viva applications for employees, business leaders, and HR.
This article is contributed. See the original author and article here.
Taking your machine learning (ML) models from local development into production can be challenging and time consuming. It requires creating a HTTP layer above your model to process incoming requests, integrate with logging services, and handle errors safely. What’s more, the code required for pre- and post-processing, model loading, and model inference vary across models and must integrate smoothly with the HTTP layer.
Today, we are excited to announce the General Availability (GA) and open sourcing of the Azure Machine Learning Inference Server. This easy-to-use python package provides an extensible HTTP layer that enables you to rapidly prepare your ML models for production scenarios at scale. The package takes care of request processing, logging, and error handling. It also provides a score script interfacethat allows for custom, user-defined, pre- and post-processing, model loading, and inference code for any model.
Summary of the AzureMLInference HTTP Server
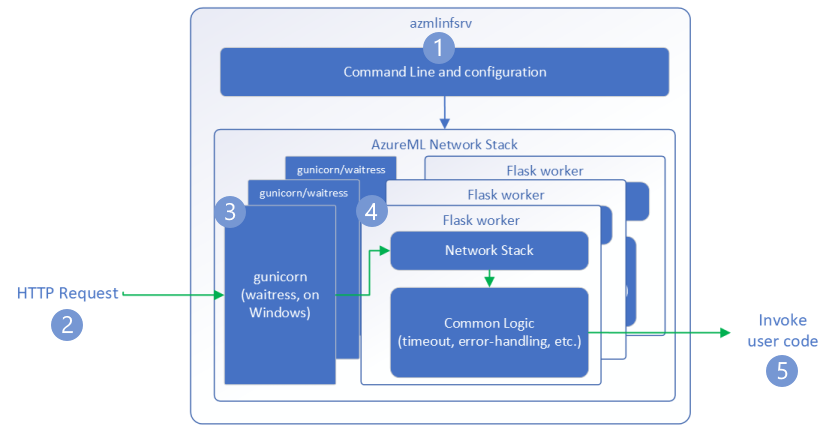
The Azure Machine Learning Inference Server is a Python package thatexposes yourML model as a HTTP endpoint. The package contains a Flask-based server run via Gunicornand is designed to handle production scale requests. It is currently the default server used in the Azure Machine Learning prebuilt Docker images for inference. And, while it is built for production, it is also designed to support rapid local development.
Figure 1: How the Azure Machine Learning Inference Server Handles Incoming Requests
Score Script
The score script (sometimes referred to as the “scoring script” or “user code”) is how you can provide your model to the server. It consists of two parts, an init() function, executed on server startup, and a run() function, executed when the server receives a request to the “/score” route.
On server startup…
The init()function is designed to hold the code for loading the model from the filesystem. It is only run once.
On request to “/score” route…
Therun()function is designed to hold the code to handle inference requests. The code written here can be simple: passing raw JSON input to the model loaded in the init()function and returning the output. Or, it can be complex: running several pre-processing functions defined across multiple files, delegating inference to a GPU, and running content moderation on the model output before returning results to the user.
The score script is designed for maximum extensibility. Any code can be placed into init() or run() andit will be run when those functions are called as described above.
Developing a complex score script may require iterative debugging and often it’s not feasible to redeploy an online endpoint several times to debug potential issues. The AzureML Inference Server allows you to run a score script locally to test both model loading and inference request handling. It easily integrates with the VS Code debugger and allows you to step through potentially complex processing or inference steps.
The Azure Machine Learning Inference Server can also be used to create validation gates in a continuous integration and deployment (CICD) pipeline. For example, you can start the server with a candidate score script and run a test suite against this local instance directly in the pipeline, enabling a safe, efficient, and automatable deployment process.
Production Deployments
The Azure Machine Learning Inference Server is designed to support production-scale inference. Once local testing is complete, you can feel confident using the score script you developed alongside the Azure Machine Learning prebuilt inference images to deploy your model as an AzureML Managed Online Endpoint.
Safely bring your models into production using the Azure Machine Learning Inference Server and AzureML Managed Inference by referencing the resources below.
This article is contributed. See the original author and article here.
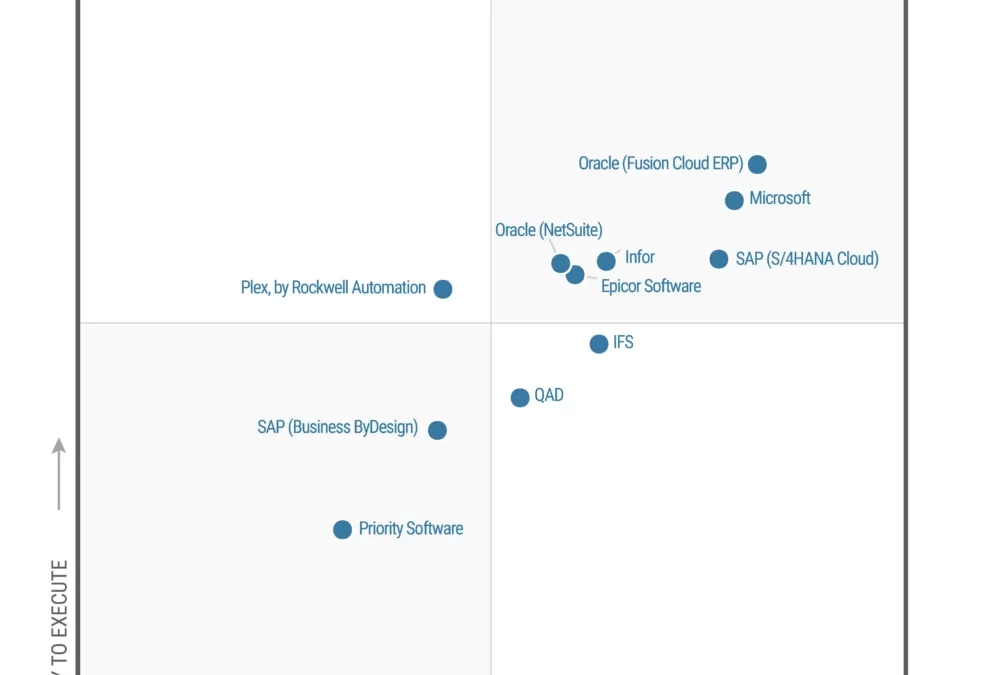
We are excited and honored that Gartner has recognized Microsoft as a Leader in their 2023 Magic Quadrant™ for Cloud ERP for Product-Centric Enterprises.* This evaluation of Microsoft was based on specific criteria that analyzed our overall Completeness of Vision and Ability to Execute. This is the third year in a row that we’ve been recognized as a Leader.
Agile enterprise resource planning (ERP) system for new ways of working
The way we do business has fundamentally changed. New business models are disrupting the way companies sell products and services, blurring industry lines and transforming customer experiences. ERP systems need to evolve from mere systems of transaction to systems of reasoning, offering their users prescriptive actions that they can take in their functional areas to accelerate growth.
Microsoft Dynamics 365 has already been helping thousands of organizations optimize finance and supply chains to create a connected enterprise by infusing automation and analytics powered by AI into the various ERP processes. Now, with Dynamics 365 Copilot in our ERP portfolio included in Microsoft Dynamics 365 Supply Chain Management, Microsoft Dynamics 365 Finance, and Microsoft Dynamics 365 Project Operations, we can enable every person in every organization to be more productive, collaborative, and deliver high-performance results.
For instance, with Copilot, organizations can supercharge productivity of procurement professionals and collections agents. Procurement professionals can efficiently handle purchase order changes at scale and assess the impact of changes downstream to production and distribution before making the right decision. Copilot enables quick collaboration with internal and external stakeholders that brings relevant information into Outlook and Microsoft Teams using natural language to meet customer and partner needs.
Collections managers with quick access to credit and payment history can prioritize and personalize customer communication and increase successful collection rates while proactively keeping customers in good standing. With Copilot, project managers can rapidly create new project plans for new engagements in minutes, automate status reports, identify risks, and suggest mitigation plans on a continuous basis, saving a significant amount of time, preventing project delays and budget overruns.
At Microsoft, we are fully committed to revolutionizing the future of ERP systems by harnessing the power of intelligent, composable technologies. The ERP portfolio from Dynamics 365, powered by generative AI technology, has the ability to speed time to insight, intelligently automate processes, and foster productivity ensuring that organizations can stay ahead of their competition in an increasingly complex business landscape.
Cloud-native ERP systems on a composable platform
One of the key strengths of Dynamics 365 Supply Chain Management and Dynamics 365 Finance is their extensibility. The ERP portfolio is built on a composable platform, making it easy to extend the solution with Microsoft Power Platform, providing low-code tools like Microsoft Power Apps and Microsoft Power Automate.
Where ERP customizations were once a heavy, time-consuming task, these tools empower businesses to customize their solutions and build apps with a modern user experience so that they can adapt to their bespoke industry specific needs and end users can work the way they want. Furthermore, companies and users can leverage prebuilt customizations and industry-specialized solutions from our ISV partner network to help speed development even further.
One of our customers, Nestlé, chose Dynamics 365 as the preferred platform for agile and speedy business system requests for mergers and acquisitions (M&A) activities. Nestlé needed business applications that would provide flexibility to adapt to different business models across geographies that could be reused multiple times. The company needed rich out-of-the-box features that could be extended with low-code/no-code capabilities. With Dynamics 365, Nestlé was able to create reusable strategies and blueprints for migrating business data and operations that would enable faster and more efficient acquisitions and divestitures easily with limited disruptions to customers and employees. This also helped them adhere to compliance, security, and data privacy regulations effectively. In just four short months after the project kicked off, Nestlé went live with Dynamics 365 Finance, Supply Chain Management, and Commerce.
AIM for the future with Microsoft today
In conclusion, running a business on Dynamics 365 offers numerous benefits for organizations. From seamless integration and enhanced productivity to real-time analysis and smart decision-making capabilities, Dynamics 365 empowers businesses to thrive in today’s dynamic market. Microsoft is committed to empowering customers to take advantage of AI capabilities in every line of business.
Organizations relying on on-premises applications will struggle to compete with peers embracing these AI-powered technologies in the cloud. It is paramount for companies to migrate their critical business processes to the cloud now. That is why we introduced AIM (Accelerate, Innovate, Move) earlier. AIM offers organizations a tailored path to move critical processes to the cloud with confidence. It provides qualified customers with access to a dedicated team of migration advisors, expert assessments, investment offers, tools, and migration support.
Magic Quadrant reports are a culmination of rigorous, fact-based research in specific markets, providing a wide-angle view of the relative positions of the providers in markets where growth is high and provider differentiation is distinct. Providers are positioned into four quadrants: Leaders, Challengers, Visionaries, and Niche Players. The research enables you to get the most from market analysis in alignment with your unique business and technology needs. View a complimentary copy of the Magic Quadrant report to learn more.
*Gartner is a registered trademark and service mark and Magic Quadrant is a registered trademark of Gartner, Inc. and/or its affiliates in the U.S. and internationally and are used herein with permission. All rights reserved. Gartner does not endorse any vendor, product or service depicted in its research publications, and does not advise technology users to select only those vendors with the highest ratings or other designation. Gartner research publications consist of the opinions of Gartner’s research organization and should not be construed as statements of fact. Gartner disclaims all warranties, expressed or implied, with respect to this research, including any warranties of merchantability or fitness for a particular purpose.
**This graphic was published by Gartner, Inc. as part of a larger research document and should be evaluated in the context of the entire document. The Gartner document is available upon request from Microsoft.
Source: Gartner, “Magic Quadrant for Cloud ERP for Product-Centric Enterprises,” Greg Leiter, Robert Anderson, Dixie John, Tomas Kienast, David Penny, September 26, 2023.
This article is contributed. See the original author and article here.
Issue
We recently encountered a support case where a customer using In-memory tables in an Azure SQL DB, receives an error message while trying to insert data into the table that also has a clustered columnstore index. The customer then deleted the entire data from the In-memory Tables (With the clustered columnstore index), however it appeared that the Index Unused memory was still not released. Here’s the memory allocation the customer could see:
Error
In addition to the error above- here is the error text:
Msg 41823, Level 16, State 109, Line 1
Could not perform the operation because the database has reached its quota for in-memory tables. This error may be transient. Please retry the operation. See ‘http://go.microsoft.com/fwlink/?LinkID=623028‘ for more information
Workaround
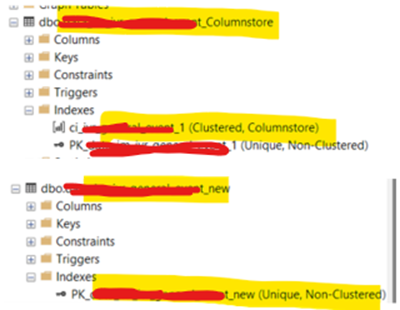
To reproduce the issue, we created two tables in our premium tier Azure SQL DB, one with a clustered columnstore Index while the other just had a regular clustered index. Also, the columnstore index was created with the option- MEMORY_OPTIMIZED=ON.
Then we went ahead and inserted data in both the tables and ran the script below to find the memory consumption of the indexes (Notice the 97 MB reported by the Index_Unused_memory column below in the table containing the columnstore Index):
IF( SELECT COUNT(1) FROM sys.data_spaces WHERE type = ‘FX’) > 0
BEGIN
SELECT OBJECT_NAME(object_id) AS tblName,
CAST(memory_used_by_table_kb / 1024.00 AS DECIMAL(10, 2)) [Total used Memory MB],
CAST(memory_allocated_for_table_kb / 1024.00 AS DECIMAL(10, 2)) – CAST(memory_used_by_table_kb / 1024.00 AS DECIMAL(10, 2)) [Total Unused Memory MB],
CAST(memory_used_by_indexes_kb / 1024.00 AS DECIMAL(10, 2)) [Index used Memory MB],
CAST(memory_allocated_for_indexes_kb / 1024.00 AS DECIMAL(10, 2)) – CAST(memory_used_by_indexes_kb / 1024.00 AS DECIMAL(10, 2)) [Index Unused Memory MB]
FROM sys.dm_db_xtp_table_memory_stats
ORDER by 2 desc;
END;
Now we went ahead and deleted all data from the table (with the columnstore Index) and ran the same query above:
The test above proves that it is not the data contained in an In-memory table that consumes the memory, but it is rather the Columnstore Index that consumes the memory and occupies it till the index stays on the table. Even if we delete the data from the table, the memory will still remain in the Index Unused memory. The only possible option to release the Index Unused memory is to drop the clustered Columnstore Index.
Moreover, it is also recommended to use a Columnstore Index only for tables with a lot of data (Millions or even billions) only if using it helps achieve the overall performance levels expected.
.png")
.png")
.png")


Recent Comments