Known issue: Incorrect count for onboarded Microsoft Defender for Endpoint devices report

Known issue: Incorrect count for onboarded Microsoft Defender for Endpoint devices report

This article is contributed. See the original author and article here.

We were recently alerted to an issue where devices onboarded to Microsoft Defender for Endpoint are not properly reflected in the Microsoft Intune admin center report for devices with/without the Defender for Endpoint sensor. We’ve identified a bug that is causing incorrect counts for the number of devices onboarded to Defender for Endpoint and are working on a fix that is expected to be released later this year. The report is located under Endpoint security > Microsoft Defender for Endpoint and on the connector page.


Note: This is a reporting bug only. It does not impact onboarding to Defender for Endpoint.


A screenshot highlighting the Devices with/without Microsoft Defender for Endpoint sensor report in Endpoint security.A screenshot highlighting the Devices with/without Microsoft Defender for Endpoint sensor report in Endpoint security.



Temporary workaround


As a temporary workaround, check for the Defender for Endpoint onboarding status in the Antivirus agent status report under Reports > Microsoft Defender Antivirus. Look for the columns for MDE Onboarding Status and MDE Sense Running State for more information.


We’ll update this post when the fix has rolled out or as more information becomes available. If you have any questions, let us know though comments on this post, or by tagging @IntuneSuppTeam on Twitter.

E-Documents as a Global Solution for Business Central

E-Documents as a Global Solution for Business Central

This article is contributed. See the original author and article here.

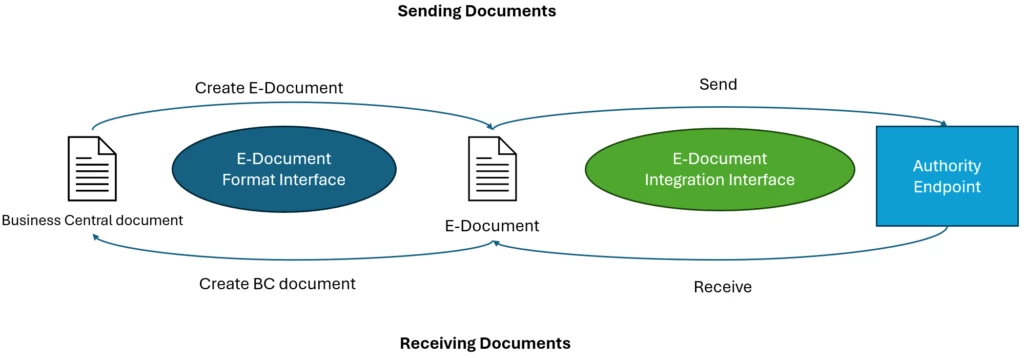
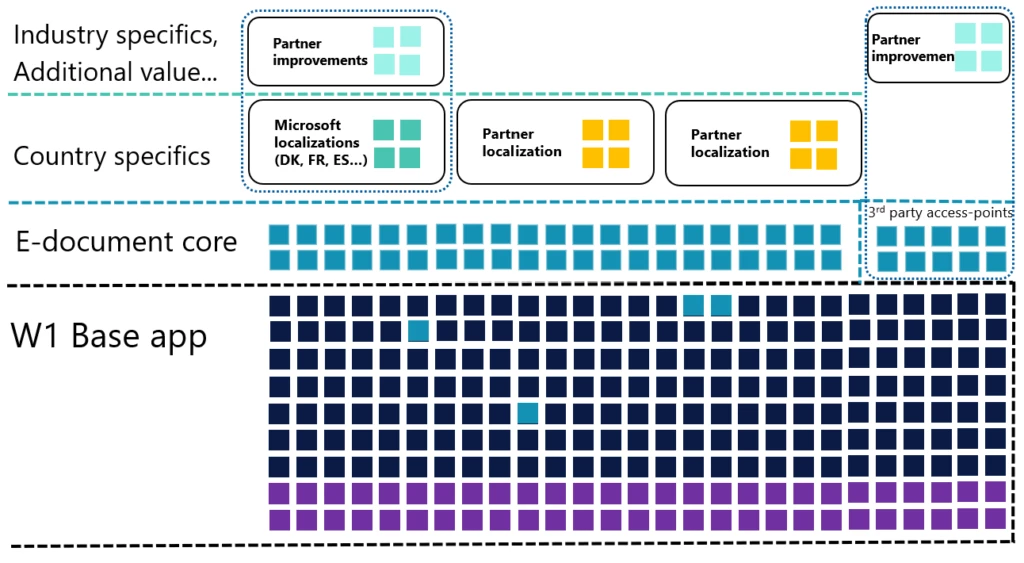
Business Central 2023 release wave 2 introduces a new global feature – Electronic Documents. Microsoft has crafted this as a foundational framework, providing a robust base for catering to localized requirements. This innovative approach allows Microsoft to efficiently deliver tailored localization apps for some countries. Furthermore, partners can leverage this model to craft their custom localizations. Given the unique e-document formats and distinct integration services prevalent in various countries, these localization apps are indispensable.

diagram

Why did Microsoft deliver it?

Before we delve into the world of E-Documents within Business Central, let’s acquaint you with an important new acronym – CTC, which stands for Continuous Transaction Control. This term signifies the imperative ‘real-time’ invoicing reporting and validation mandated by authorities. CTC encompasses a suite of digital control mechanisms to enhance tax collection and curb tax fraud. Electronic Invoicing stands as a key component of CTC, a model increasingly embraced by numerous countries.

We can easily conclude – this approach will become mandatory in many countries if it hasn’t already. The prospect of different solutions for each country poses challenges. Hence, we’ve developed one global extendable solution as an app, simplifying support for diverse countries.

Exploring the Scope of E-Invoicing Models

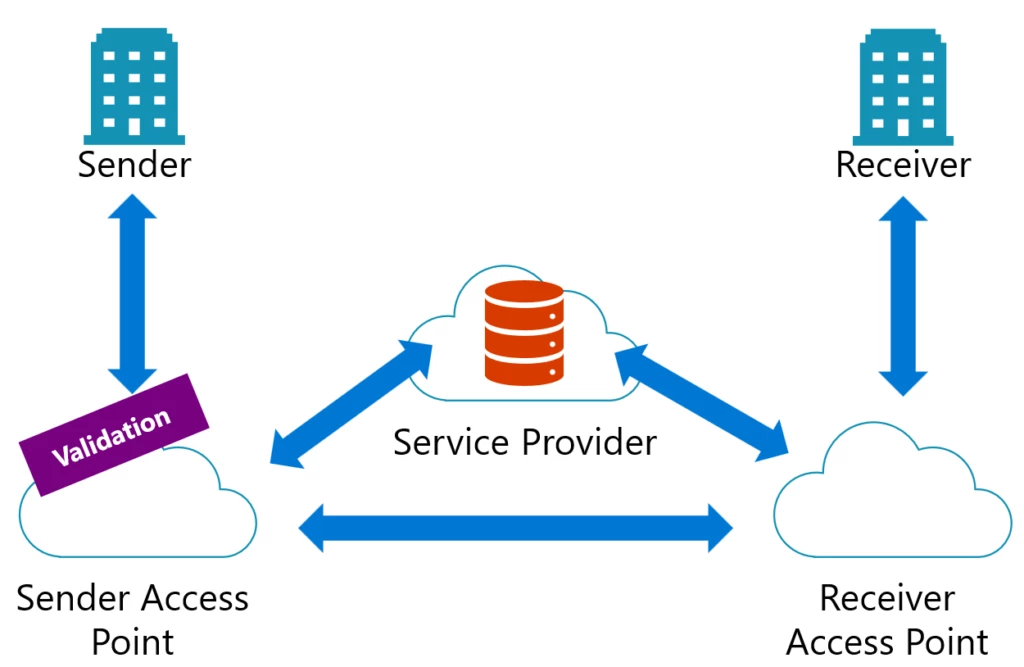
Understanding the landscape of E-invoicing can initially seem straightforward – creating an electronic file and transmitting it. However, the reality is more intricate. E-invoicing encompasses various models, including the 2-corner, 3-corner, and 4-corner frameworks. Each country retains autonomy to determine its preferred approach. Moreover, even in non-mandatory scenarios, businesses often opt for E-invoicing to streamline communication.

Our solution encompasses all the corner models mentioned here and facilitates additional messaging capabilities between access points, providing a comprehensive E-documents framework.

diagram

How do E-Documents Operate in Sales and Purchases?

E-Documents in Business Central facilitate seamless interaction in both sales and purchase processes. It’s a two-way system, enabling the transmission of electronic sales documents to customers while also receiving electronic documents from vendors. These electronic documents have their own distinct lifecycles, which may not always align with invoice timelines. To accommodate this, we’ve introduced a new entity, the E-Document, linked with the original document in Business Central. This entity hosts a unique information set, including statuses, logs, and potential error notifications or warnings.

Once the system is configured, posting a sales document triggers the automatic creation of an E-Document. Depending on your setup, it’s promptly dispatched to the designated service. You gain complete visibility into its status and can take additional actions as needed.

In the case of incoming purchase electronic documents, you have the flexibility to upload them to Business Central manually. However, if your access-point provider provides a document delivery service, you can configure a Job Queue for automated downloads and E-Documents creation. Here’s the magic: if you’ve mapped vendors’ items with yours through item-references or G/L accounts and there are no errors, the system will effortlessly generate purchase invoices with all the essential details. Your task? Just review and post them.

How to Expand This Functionality?

This framework has been created to speed up your productivity when building electronic invoicing applications by taking care of all the infrastructure work, like subscribing to different posting routines, writing custom mapping logic, logging, error handling, and running jobs in the background.

The framework is designed to improve your productivity in developing electronic invoicing applications. It handles essential infrastructure tasks such as subscribing to various posting routines, custom mapping logic, managing logs, handling errors, and running background jobs. This empowers you to direct your attention towards the specific electronic invoicing logic, including:

  • Exporting/Importing documents from Business Central to the local format mandated by the authority.
  • Establishing seamless integration with the authority’s endpoint for sending and receiving electronic documents.

To create your local E-Document:

  1. Create a new extension adding dependency to the E-Document Core application.
  2. Implement a document interface based on the specification mandated by the local authority, using designated endpoints for the sales: Check, Create, and CreateBatch, and GetBasicInfo and PrepareDocument when you expect to receive documents.
  3. Implement an integration interface to send/receive documents to the local authority automatically.
  4. Enhance user experience by implementing a setup wizard that gathers all necessary configuration details and obtains customer consent for data transmission. This streamlined process ensures a smoother onboarding experience for users.
diagram, schematic

More details with examples how to extend existing E-Document Core application can be found here.

The post E-Documents as a Global Solution for Business Central appeared first on Microsoft Dynamics 365 Blog.

Brought to you by Dr. Ware, Microsoft Office 365 Silver Partner, Charleston SC.

Solve case creation issues using the enhanced activity monitor tool 

Solve case creation issues using the enhanced activity monitor tool 

This article is contributed. See the original author and article here.

Digital contact centers need to create support cases automatically when they receive incoming emails, phone calls, and messages from customers. They rely on this automation to avoid manual efforts in creating cases so they can address customer issues promptly. The activity monitor view helps diagnose automatic case creation issues and ensures this automation runs smoothly. 

Today, Dynamics 365 Customer Service offers automatic record creation rules for creating support cases automatically based on the conditions defined by administrators. However, an incoming work item may not automatically convert to a case for multiple reasons. The activity monitor tool helps administrators diagnose those issues and provides the reason a work item was not converted to a case. Once they know the reason, administrators also need the system to provide them with suggestions on how to resolve the issues. Recent enhancements to the activity monitor tool provide recommendations to administrators with steps to avoid future case creation issues by making changes to the rule configuration.  

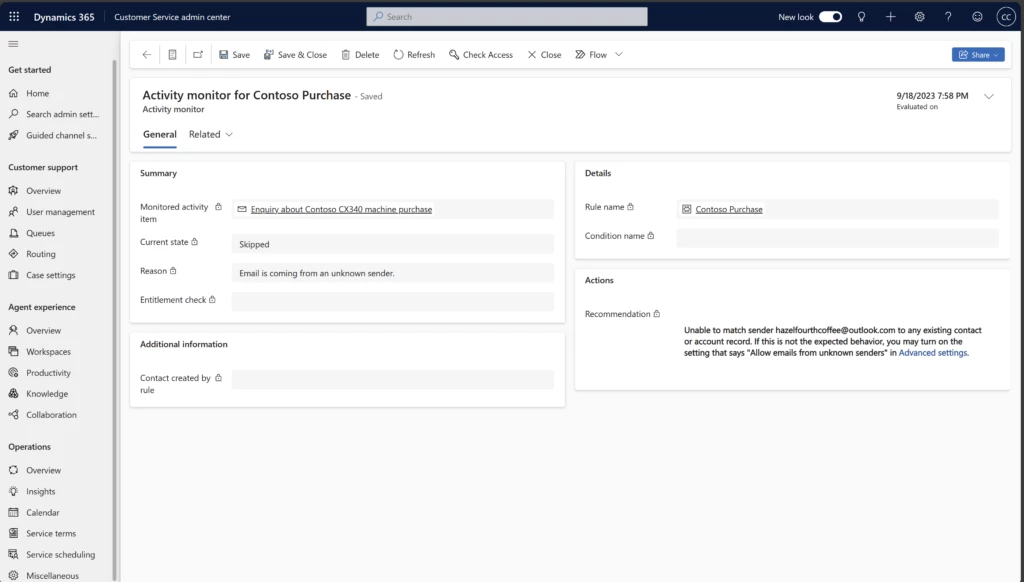
Now, administrators can view recommendations for each activity monitor event to see why case creation was skipped or failed and steps to resolve the issue. The activity monitor form for each event contains the resolution steps and direct links to the rule settings that they should change. This helps administrators diagnose and self-solve their issues quickly.  

Navigate to the activity monitor

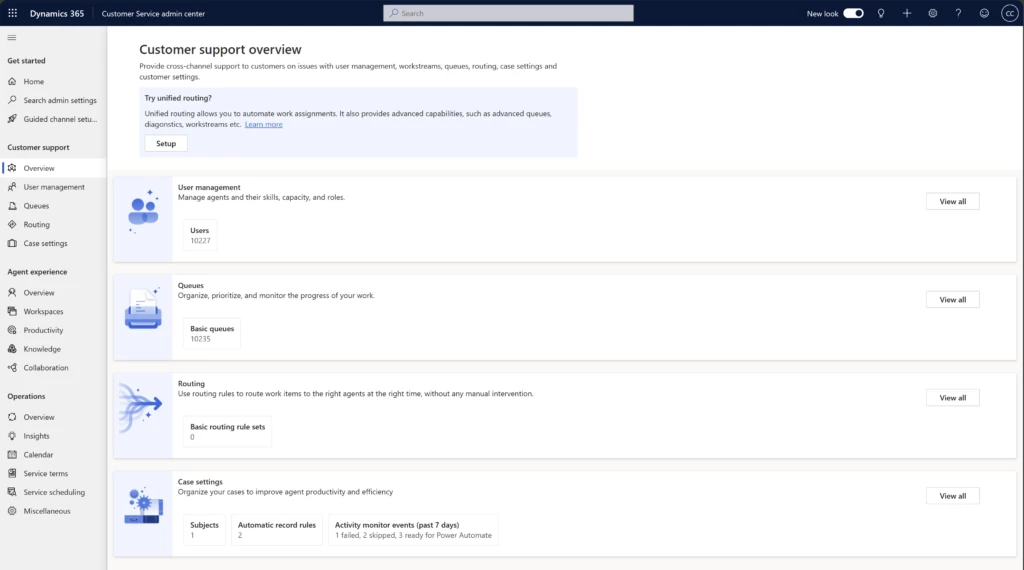
In the Customer Service admin center, administrators can view the status of events for the past 7 days. They can see skipped, failed, and successfully processed events by automatic record creation rules with the status as Ready for Power Automate.

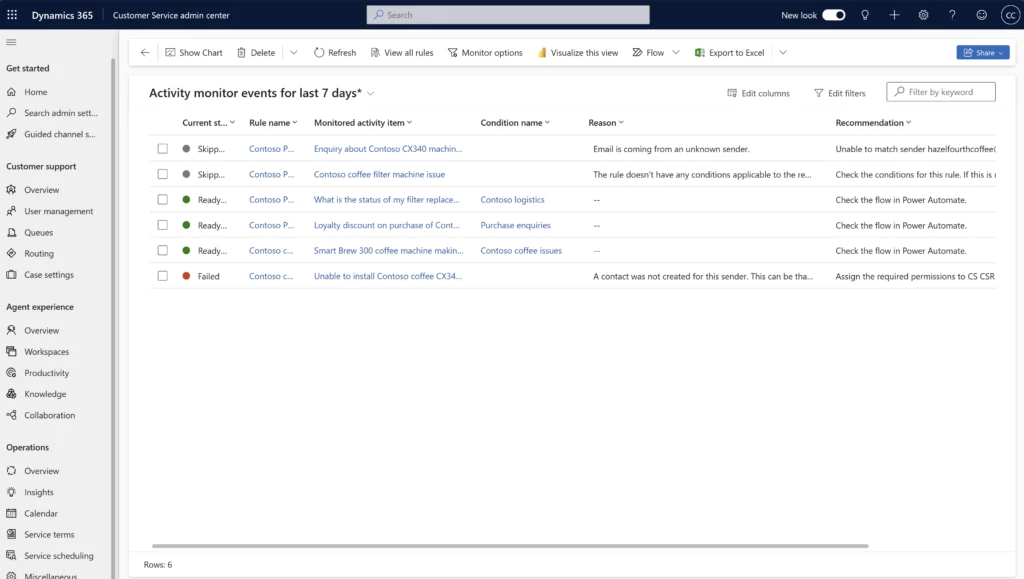
From here, administrators can navigate to the Activity monitor events for last 7 days view. This provides a grid view of the events processed in the past 7 days. It provides details like current state, rule name, and condition. Additionally, it contains the reasons and recommendations to resolve the issues if the state was skipped or failed. Admins can also view the Recommendations column in the existing All activity monitor events view. 

View the form for a specific activity

Administrators can double-click on any part of the event record to navigate to the Activity monitor form. The form shows the Actions section with the Recommendations field. This field explains why case creation was skipped or failed and the steps to take to resolve these issues. Some contain direct links to the Advanced settings of the relevant automatic record creation rule with suggestions for configuration changes. Administrators can directly navigate to these settings and make the required changes. Once they make the changes, any future work items that use automatic record creation rules will convert to cases. Note that the changes will not impact the work items sent to Dynamics before the admin changed the configuration.  

Learn more

Watch a quick video introduction.

Read the documentation: Manage activity monitor to review and track rules | Microsoft Learn 

The post Solve case creation issues using the enhanced activity monitor tool  appeared first on Microsoft Dynamics 365 Blog.

Brought to you by Dr. Ware, Microsoft Office 365 Silver Partner, Charleston SC.

Welcome to the 2024 Imagine Cup

Welcome to the 2024 Imagine Cup

This article is contributed. See the original author and article here.

MaddyEpstein_0-1697471041170.png


Welcome to the 2024 Imagine Cup, a student competition for visionary entrepreneurs building with AI. If you’re passionate about AI, technology, and entrepreneurship, this is your opportunity to unlock your startup’s potential and shine on the global stage. Here’s what you can expect on this exciting journey.


MaddyEpstein_1-1697471081656.png


Benefits of participating in Imagine Cup


  • Access to AI Technology: Immerse yourself in cutting-edge AI technology with USD1,000 of Azure credits and USD2,500 OpenAI credits. You’ll receive expert guidance to accelerate your startup’s AI journey, giving you a distinct advantage in crafting AI-driven solutions.


  • Expert Mentorship: Imagine Cup goes beyond mere technical guidance; it offers a comprehensive entrepreneurial ecosystem. Through personalized one-to-one guidance from technical and business mentors tailored to your specific needs as a founder, you’ll acquire the essential tools to hone your strategies and successfully navigate the challenges along your startup journey. From helping you leverage Microsoft’s industry-leading AI capabilities for your startup, to inspiring you with what is possible as an entrepreneur, your mentors will be trusted partners on your path to success.


  • Prizes and Global Recognition: Seize the opportunity to showcase your startup on a global stage at Microsoft Build! The Imagine Cup champion team will receive USD100,000, while the two runner-up teams will each earn USD50,000. Plus, the winning team secures an exclusive mentorship session with Microsoft Chairman and CEO, Satya Nadella!


Stages of the Competition


Now, let’s explore the stages of the 2024 Imagine Cup competition:


1. Qualifying: Build the Future with AI (Oct 16 – Jan 24)


Kickstart your Imagine Cup journey by submitting your innovative AI startup idea. Participants in this stage will gain access to Microsoft for Startups Founders Hub, receive USD1,000 in Azure credits, USD2,500 in OpenAI credits, access to self-paced training for technical and entrepreneurial skills. Remember, the earlier you submit to qualifying the earlier you get access to the credits to start building your Minimum Viable Product (MVP).


2. Minimum Viable Product (MVP) Submissions (Jan 26 – Feb 9)


This stage is dedicated to submitting your Minimum Viable Product (MVP), a mandatory step to advance in the competition. Learn more about what is required for your MVP through downloading the Imagine Cup Rules and Regulations.


3. Semifinals: Accelerate Your Growth (Feb 23 – April 12)


Congratulations to the teams who make it to the semifinals! In this stage, you will collaborate with seasoned mentors to refine your business plan and prototype, harnessing AI for your startup’s success. Semifinalists will enjoy networking opportunities, technical guidance, guidance for AI acceleration, personalized one-to-one technical and business mentorship, and access to Founders Hub Level 2, along with an additional USD4,000 in Azure credits.


4. World Championship: Showcase Your Business Globally (April 26 – Build)


Welcome to the pinnacle of Imagine Cup—the Imagine Cup World Championships! The top three teams compete on a global stage at Microsoft Build, showcasing the depth and promise of their startups. Step into the spotlight and demonstrate how technology can drive positive change.


This stage offers global stage visibility, the chance to win an exclusive mentorship session with Microsoft Chairman and CEO, Satya Nadella, and cash prizes of USD100,000 for the winning team and USD50,000 for the two runner-up teams.


How to get started


But that’s not all! As you embark on your Imagine Cup journey, consider starting with the Imagine Cup Cloud Skills Challenge. It’s your chance to learn essential AI, tech, and entrepreneurial skills for the competition.


Imagine Cup 2024 is your pathway to innovation, mentorship, and global recognition. Join us today and unleash your startup’s potential. Submit the proof of concept for your business by January 24. However, the sooner you apply, the sooner you gain access to your benefits.


Together, we’ll create a brighter future through AI-driven entrepreneurship. Along the way, connect with a vibrant community of changemakers and drive meaningful positive change through your journey as a founder.


Register for the 2024 Imagine Cup


Lesson Learned #444:Handling the “Row Value Expressions Exceeds Maximum Allowed” Error in SQL Server

This article is contributed. See the original author and article here.

Some days ago, we faced the following error message: “Msg 10738, Level 15, State 1, Line 2 The number of row value expressions in the INSERT statement exceeds the maximum allowed number of 1000 row values.” our customer is using ODBC Driver 18 for SQL Server and they got the previous message. With this complete error:  Error: (‘42000’, ‘[42000] [Microsoft][ODBC Driver 18 for SQL Server][SQL Server]The number of row value expressions in the INSERT statement exceeds the maximum allowed number of 1000 row values. (10738) (SQLExecDirectW)’).


Understanding the Error:


The error message you’re encountering, often referred to as “Row Value Expressions Exceeds Maximum Allowed,” occurs when you attempt to insert more than 1000 rows using a single INSERT statement. SQL Server has a built-in limitation that restricts the number of rows you can insert in one go to prevent performance and stability issues on the server.


Why Does It Happen?


This limitation exists to safeguard the server from processing excessively large insertions that could impact its performance negatively. By restricting the number of rows per INSERT statement, SQL Server can maintain a balance between data consistency and system resources.


Example of the script:


INSERT INTO MiTabla (ID, Edad) values
(1,50),(1,50),(1,50),(1,50),(1,50),(1,50),(1,50),(1,50),(1,50),(1,50),(1,50),(1,50),(1,50),(1,50),(1,50),(1,50),(1,50),(1,50),(1,50),(1,50),(1,50),(1,50),(1,50),(1,50),(1,50),(1,50),(1,50),(1,50),(1,50),(1,50),(1,50),(1,50),(1,50),(1,50),(1,50),(1,50),(1,50),(1,50),(1,50),(1,50),(1,50),(1,50),(1,50),(1,50),(1,50),(1,50),(1,50),(1,50),(1,50),(1,50),(1,50),(1,50),(1,50),(1,50),(1,50),(1,50),(1,50),(1,50),(1,50),(1,50),(1,50),(1,50),(1,50),(1,50),(1,50),(1,50),(1,50),(1,50),(1,50),(1,50),(1,50),(1,50),(1,50),(1,50),(1,50),(1,50),(1,50),(1,50),(1,50),(1,50),(1,50),(1,50),(1,50),(1,50),(1,50),(1,50),(1,50),(1,50),(1,50),(1,50),(1,50),(1,50),(1,50),(1,50),(1,50),(1,50),(1,50),(1,50),(1,50),(1,50),(1,50),(1,50),(1,50),(1,50),(1,50),(1,50),(1,50),(1,50),(1,50),(1,50),(1,50),(1,50),(1,50),(1,50),(1,50),(1,50),(1,50),(1,50),(1,50),(1,50),(1,50),(1,50),(1,50),(1,50),(1,50),(1,50),(1,50),(1,50),(1,50),(1,50),(1,50),(1,50),(1,50),(1,50),(1,50),(1,50),(1,50),(1,50),(1,50),(1,50),(1,50),(1,50),(1,50),(1,50),(1,50),(1,50),(1,50),(1,50),(1,50),(1,50),(1,50),(1,50),(1,50),(1,50),(1,50),(1,50),(1,50),(1,50),(1,50),(1,50),(1,50),(1,50),(1,50),(1,50),(1,50),(1,50),(1,50),(1,50),(1,50),(1,50),(1,50),(1,50),(1,50),(1,50),(1,50),(1,50),(1,50),(1,50),(1,50),(1,50),(1,50),(1,50),(1,50),(1,50),(1,50),(1,50),(1,50),(1,50),(1,50),(1,50),(1,50),(1,50),(1,50),(1,50),(1,50),(1,50),(1,50),(1,50),(1,50),(1,50),(1,50),(1,50),(1,50),(1,50),(1,50),(1,50),(1,50),(1,50),(1,50),(1,50),(1,50),(1,50),(1,50),(1,50),(1,50),(1,50),(1,50),(1,50),(1,50),(1,50),(1,50),(1,50),(1,50),(1,50),(1,50),(1,50),(1,50),(1,50),(1,50),(1,50),(1,50),(1,50),(1,50),(1,50),(1,50),(1,50),(1,50),(1,50),(1,50),(1,50),(1,50),(1,50),(1,50),(1,50),(1,50),(1,50),(1,50),(1,50),(1,50),(1,50),(1,50),(1,50),(1,50),(1,50),(1,50),(1,50),(1,50),(1,50),(1,50),(1,50),(1,50),(1,50),(1,50),(1,50),(1,50),(1,50),(1,50),(1,50),(1,50),(1,50),(1,50),(1,50),(1,50),(1,50),(1,50),(1,50),(1,50),(1,50),(1,50),(1,50),(1,50),(1,50),(1,50),(1,50),(1,50),(1,50),(1,50),(1,50),(1,50),(1,50),(1,50),(1,50),(1,50),(1,50),(1,50),(1,50),(1,50),(1,50),(1,50),(1,50),(1,50),(1,50),(1,50),(1,50),(1,50),(1,50),(1,50),(1,50),(1,50),(1,50),(1,50),(1,50),(1,50),(1,50),(1,50),(1,50),(1,50),(1,50),(1,50),(1,50),(1,50),(1,50),(1,50),(1,50),(1,50),(1,50),(1,50),(1,50),(1,50),(1,50),(1,50),(1,50),(1,50),(1,50),(1,50),(1,50),(1,50),(1,50),(1,50),(1,50),(1,50),(1,50),(1,50),(1,50),(1,50),(1,50),(1,50),(1,50),(1,50),(1,50),(1,50),(1,50),(1,50),(1,50),(1,50),(1,50),(1,50),(1,50),(1,50),(1,50),(1,50),(1,50),(1,50),(1,50),(1,50),(1,50),(1,50),(1,50),(1,50),(1,50),(1,50),(1,50),(1,50),(1,50),(1,50),(1,50),(1,50),(1,50),(1,50),(1,50),(1,50),(1,50),(1,50),(1,50),(1,50),(1,50),(1,50),(1,50),(1,50),(1,50),(1,50),(1,50),(1,50),(1,50),(1,50),(1,50),(1,50),(1,50),(1,50),(1,50),(1,50),(1,50),(1,50),(1,50),(1,50),(1,50),(1,50),(1,50),(1,50),(1,50),(1,50),(1,50),(1,50),(1,50),(1,50),(1,50),(1,50),(1,50),(1,50),(1,50),(1,50),(1,50),(1,50),(1,50),(1,50),(1,50),(1,50),(1,50),(1,50),(1,50),(1,50),(1,50),(1,50),(1,50),(1,50),(1,50),(1,50),(1,50),(1,50),(1,50),(1,50),(1,50),(1,50),(1,50),(1,50),(1,50),(1,50),(1,50),(1,50),(1,50),(1,50),(1,50),(1,50),(1,50),(1,50),(1,50),(1,50),(1,50),(1,50),(1,50),(1,50),(1,50),(1,50),(1,50),(1,50),(1,50),(1,50),(1,50),(1,50),(1,50),(1,50),(1,50),(1,50),(1,50),(1,50),(1,50),(1,50),(1,50),(1,50),(1,50),(1,50),(1,50),(1,50),(1,50),(1,50),(1,50),(1,50),(1,50),(1,50),(1,50),(1,50),(1,50),(1,50),(1,50),(1,50),(1,50),(1,50),(1,50),(1,50),(1,50),(1,50),(1,50),(1,50),(1,50),(1,50),(1,50),(1,50),(1,50),(1,50),(1,50),(1,50),(1,50),(1,50),(1,50),(1,50),(1,50),(1,50),(1,50),(1,50),(1,50),(1,50),(1,50),(1,50),(1,50),(1,50),(1,50),(1,50),(1,50),(1,50),(1,50),(1,50),(1,50),(1,50),(1,50),(1,50),(1,50),(1,50),(1,50),(1,50),(1,50),(1,50),(1,50),(1,50),(1,50),(1,50),(1,50),(1,50),(1,50),(1,50),(1,50),(1,50),(1,50),(1,50),(1,50),(1,50),(1,50),(1,50),(1,50),(1,50),(1,50),(1,50),(1,50),(1,50),(1,50),(1,50),(1,50),(1,50),(1,50),(1,50),(1,50),(1,50),(1,50),(1,50),(1,50),(1,50),(1,50),(1,50),(1,50),(1,50),(1,50),(1,50),(1,50),(1,50),(1,50),(1,50),(1,50),(1,50),(1,50),(1,50),(1,50),(1,50),(1,50),(1,50),(1,50),(1,50),(1,50),(1,50),(1,50),(1,50),(1,50),(1,50),(1,50),(1,50),(1,50),(1,50),(1,50),(1,50),(1,50),(1,50),(1,50),(1,50),(1,50),(1,50),(1,50),(1,50),(1,50),(1,50),(1,50),(1,50),(1,50),(1,50),(1,50),(1,50),(1,50),(1,50),(1,50),(1,50),(1,50),(1,50),(1,50),(1,50),(1,50),(1,50),(1,50),(1,50),(1,50),(1,50),(1,50),(1,50),(1,50),(1,50),(1,50),(1,50),(1,50),(1,50),(1,50),(1,50),(1,50),(1,50),(1,50),(1,50),(1,50),(1,50),(1,50),(1,50),(1,50),(1,50),(1,50),(1,50),(1,50),(1,50),(1,50),(1,50),(1,50),(1,50),(1,50),(1,50),(1,50),(1,50),(1,50),(1,50),(1,50),(1,50),(1,50),(1,50),(1,50),(1,50),(1,50),(1,50),(1,50),(1,50),(1,50),(1,50),(1,50),(1,50),(1,50),(1,50),(1,50),(1,50),(1,50),(1,50),(1,50),(1,50),(1,50),(1,50),(1,50),(1,50),(1,50),(1,50),(1,50),(1,50),(1,50),(1,50),(1,50),(1,50),(1,50),(1,50),(1,50),(1,50),(1,50),(1,50),(1,50),(1,50),(1,50),(1,50),(1,50),(1,50),(1,50),(1,50),(1,50),(1,50),(1,50),(1,50),(1,50),(1,50),(1,50),(1,50),(1,50),(1,50),(1,50),(1,50),(1,50),(1,50),(1,50),(1,50),(1,50),(1,50),(1,50),(1,50),(1,50),(1,50),(1,50),(1,50),(1,50),(1,50),(1,50),(1,50),(1,50),(1,50),(1,50),(1,50),(1,50),(1,50),(1,50),(1,50),(1,50),(1,50),(1,50),(1,50),(1,50),(1,50),(1,50),(1,50),(1,50),(1,50),(1,50),(1,50),(1,50),(1,50),(1,50),(1,50),(1,50),(1,50),(1,50),(1,50),(1,50),(1,50),(1,50),(1,50),(1,50),(1,50),(1,50),(1,50),(1,50),(1,50),(1,50),(1,50),(1,50),(1,50),(1,50),(1,50),(1,50),(1,50),(1,50),(1,50),(1,50),(1,50),(1,50),(1,50),(1,50),(1,50),(1,50),(1,50),(1,50),(1,50),(1,50),(1,50),(1,50),(1,50),(1,50),(1,50),(1,50),(1,50),(1,50),(1,50),(1,50),(1,50),(1,50),(1,50),(1,50),(1,50),(1,50),(1,50),(1,50),(1,50),(1,50),(1,50),(1,50),(1,50),(1,50),(1,50),(1,50),(1,50),(1,50),(1,50),(1,50),(1,50),(1,50),(1,50),(1,50),(1,50),(1,50),(1,50),(1,50),(1,50),(1,50),(1,50),(1,50),(1,50),(1,50),(1,50),(1,50),(1,50),(1,50),(1,50),(1,50),(1,50),(1,50),(1,50),(1,50),(1,50),(1,50),(1,50),(1,50),(1,50),(1,50),(1,50),(1,50),(1,50),(1,50),(1,50),(1,50),(1,50),(1,50),(1,50),(1,50),(1,50),(1,50),(1,50),(1,50),(1,50),(1,50),(1,50),(1,50),(1,50),(1,50),(1,50),(1,50),(1,50),(1,50),(1,50),(1,50),(1,50),(1,50),(1,50),(1,50),(1,50),(1,50),(1,50),(1,50),(1,50),(1,50),(1,50),(1,50),(1,50),(1,50),(1,50),(1,50),(1,50),(1,50),(1,50),(1,50),(1,50),(1,50),(1,50),(1,50),(1,50),(1,50),(1,50),(1,50),(1,50),(1,50),(1,50),(1,50),(1,50),(1,50),(1,50),(1,50),(1,50),(1,50),(1,50),(1,50),(1,50),(1,50),(1,50),(1,50),(1,50),(1,50),(1,50),(1,50),(1,50),(1,50),(1,50),(1,50),(1,50),(1,50),(1,50),(1,50),(1,50),(1,50),(1,50),(1,50),(1,50),(1,50),(1,50),(1,50),(1,50),(1,50),(1,50),(1,50),(1,50),(1,50),(1,50),(1,50),(1,50),(1,50),(1,50),(1,50),(1,50),(1,50),(1,50),(1,50),(1,50),(1,50),(1,50),(1,50),(1,50),(1,50),(1,50),(1,50),(1,50),(1,50),(1,50),(1,50),(1,50),(1,50),(1,50),(1,50),(1,50),(1,50),(1,50),(1,50),(1,50),(1,50),(1,50),(1,50),(1,50),(1,50),(1,50),(1,50),(1,50)


Solutions:


Now that we’ve established why this error occurs, let’s explore some potential solutions to address it:


Batched Insertions:


One straightforward approach to overcome this limitation is to divide your data into smaller batches and perform multiple INSERT statements. For example, if you need to insert 2000 rows, split them into two batches of 1000 rows each and execute two separate INSERT statements.

-- First batch
INSERT INTO MiTabla (ID, , Age)
VALUES
    -- 1000 rows here

-- Second batch
INSERT INTO MiTabla (ID, Age)
VALUES
    -- 1000 rows here


Use Temporary Tables or Staging Tables:


Another approach is to use temporary tables or staging tables to hold your data temporarily. You can insert your data into these tables in smaller chunks and then transfer the data to the target table using a series of INSERT INTO … SELECT statements.


-- Create a staging table
CREATE TABLE StagingTable (
    ID INT,
    Age INT
)

-- Insert data into the staging table in batches

-- Then transfer the data to the target table
INSERT INTO MiTabla (ID, Age)
SELECT ID, Age FROM StagingTable


Conclusion:


The “Row Value Expressions Exceeds Maximum Allowed” error in SQL Server serves as a safeguard to prevent excessive insertions in a single INSERT statement. By understanding why this error occurs and employing batched insertions or other strategies, you can efficiently manage and insert large datasets into your SQL Server database without encountering this limitation. You could find more information here: Table Value Constructor (Transact-SQL) – SQL Server | Microsoft Learn


Kusto NLog connector now supports Azure Data Explorer Free Clusters

Kusto NLog connector now supports Azure Data Explorer Free Clusters

This article is contributed. See the original author and article here.

Screenshot 2023-10-14 192356.png


Introduction


NLog is a popular logging framework used by developers to log messages from .NET applications. NLog, a robust logging framework, captures and stores critical information, providing essential insights for debugging and optimization.


Earlier in the summer we released the open-source NLog connector for Azure Data Explorer. Azure Data Explorer (ADX) is a fast and highly scalable data exploration service that can be used to store and analyze large volumes of data. 


In this blog post, we walk you through the latest enhancements in NLog connector for Azure Data Explorer which marks a significant leap forward in offering seamless integration with Azure Data Explorer for an unparalleled application behavior insights and monitoring.


In the latest connector update, a host of powerful features has been introduced. This includes seamless support for Free Azure Data Explorer Clusters and integration with KQL Database in Microsoft Fabric Real-Time Analytics. Now, developers can dive into the world of ADX without the need for an Azure account subscription or credit card. Simply create a free ADX account, and you’re all set to harness the full potential of your logs using an ADX cluster.


Leveraging the expressive power of Kusto Query Language (KQL), developers can uncover invaluable insights into their application’s behavior, performance metrics, error occurrences, and even detect anomalies. This newfound capability opens a world of possibilities for fine-tuning and optimizing applications based on data-driven decisions.


Moreover, bid farewell to the IngestionEndpoint property and embrace the power of Kusto Connection Strings. These strings serve as your all-access pass to a range of authentication modes, including the convenient User Prompt Authentication and the secure User Token Authentication.


Diving into the ADX Target Sample Application with latest updates


You can find the detailed initial setup steps in the previous blog post here: Getting started with NLog and Azure Data Explorer – Microsoft Community Hub


This will be like the previous blog but in context of Free Cluster and Connection string support.


Pre-requisites:


Steps


Create a table in Azure Data Explorer to store logs. The following command can be used to create a table with the name “ADXNLogSample”.


.create table ADXNLogSample (Timestamp:datetime, Level:string, Message:string, FormattedMessage:dynamic, Exception:string, Properties:dynamic)


Clone the NLog-ADX target git repo.


git clone https://github.com/Azure/azure-kusto-nlog-sink.git


Set the following environment variables in the sample application:


  • CONNECTION_STRING : Kusto ConnectionString of ADX cluster created.

  • Eg: Data Source=https://ingest-..kusto.windows.net;Fed=True

  • DATABASE: The name of the database to which data should be ingested into.


Simply build and run the application:


  • Install the ADX Target for NLog


The ADX Target for NLog is available as a NuGet package. To install it, open the Package Manager Console and enter the following command:


dotnet add package NLog.Azure.Kusto --version 2.0.1


Build the application and run it


  • Open a Powershell window, navigate to NLog ADX Target base folder and run the following command.   

    dotnet build


  • Once build got completed, navigate to src/Nlog.Azure.Kusto.Samples/ run the following command to run the sample application.

    dotnet run


  • This is making the sample application, open a login prompt in your default browser, where you need to enter your username and password.


asaharn_0-1697093574870.jpeg


  • The ingested log data can be verified by querying the created log table (ADXNLogSample in our case) by using the following KQL command.

    ADXNLogSample | take 10​


asaharn_1-1697093574880.png


Conclusion


The NLog Azure Data Explorer Target connector is a great tool for log management that allows developers to send their log messages to ADX for analysis and visualization. With the new features of the connector such as support for ADX free cluster and Microsoft Fabric cluster, developers can now use ADX without an Azure account or credit card. By using KQL queries, developers can gain insights into their application behavior, performance, errors, and anomalies. We hope this article has helped you understand how to use the new features of the connector and how to make sense of your logs using an ADX cluster.


Documentation: Ingest data with the NLog sink into Azure Data Explorer – Azure Data Explorer | Microsoft Learn


Open-Source Repository: Azure/azure-kusto-nlog-sink: Nlog custom target for storing logs to ADX (github.com)


NLog Kusto Connector Nuget: NuGet Gallery | NLog.Azure.Kusto 2.0.1