by Scott Muniz | Jul 22, 2020 | Alerts, Microsoft, Technology, Uncategorized
This article is contributed. See the original author and article here.
INTRODUCTION
While using Azure DevOps Continuous Integration and Continuous Delivery (CICD) pipelines, most of the documentation and articles show how to use Office 365 Command Line Interface (CLI) to upload, add and deploy the SPFx packages. It’s because Office 365 CLI is a cross-platform command line tool and thus you get the benefit of using either a Windows or a Linux machine as your build agent. To login with Office 365 CLI using username and password:
login --authType password --userName user@contoso.com --password pass@word1
There are ways to secure the password in Azure DevOps using variables or Azure Key Vault. However, enterprise organizations who are still not comfortable to use passwords and looking for other like certificates.
With this blog post I highlight two aspects:
- How to setup Office 365 CLI with Azure AD App and Certificate based authentication and
- How to login using O365 CLI and certificates in Azure DevOps YAML pipelines
You can find the documentation on how to use certificate to login using Office 365 CLI. This article goes into detailed steps complementing the documentation. I will also touch upon some issues that I faced while setting this up.
Note: Another advantage that you get from following these steps will be the ability to define fine grained permissions limited for the required for use case (Example: deploy to SPO app catalog).
CERTIFICATE GENERATION
- Create self-signed certificate of type Personal Information Exchange (PFX) or Privacy Enhanced Mail (PEM)
- For windows, install openssl client. I used: http://slproweb.com/products/Win32OpenSSL.html
Instructions are assuming openssl client is extracted to c:OpenSSL folder.
NOTE: After trying couple of openssl clients, I had success with this ssl client. I hope that saves some time for you in researching which client works. If you WSL enabled/configured, then this is a non-issue.
- Navigate to the OpenSSL bin directory.
- c:OpenSSLbin in our example.
- Right-click the openssl.exe file and select Run as administrator.
- Enter the following command to begin generating a certificate and private key
openssl req -x509 -sha256 -nodes -days 365 -newkey rsa:2048 -keyout privateKey.key -out certificate.cer
- You will then be prompted to enter applicable Distinguished Name (DN) information, totaling seven fields:
- Once completed, you will find the certificate.crt and privateKey.key files created under the OpenSSLbin directory.
- Create a new Personal Information Exchange (.PFX) file using the certificate and private key as inputs from above step.
openssl pkcs12 -export -out protected.pfx -inkey privateKey.key -in certificate.cer -password pass:pass@word1
NOTE: I’d would like to highlight and note that I spent many hours troubleshooting an issue related to this command. If you use double quotes for the password string as documented (Example: openssl pkcs12 -export -out protected.pfx -inkey privateKey.key -in certificate.cer -password pass:”pass@word1″ ), the quotes are also considered to be part of the password.
- At this point the protected.pfx file can be used to log in the Office 365 CLI. We will come back to this step later.
Artifacts from this section:
- Certificate.cer
- privateKey.key
- protected.pfx
AZURE AD APPLICATION REGISTRATION
- Creating AAD app is well documented in many articles, so I sparsely documented it here. Also, please check out Garry Tinder’s post which goes into details on how to create AAD app to log in using Office 365 CLI.
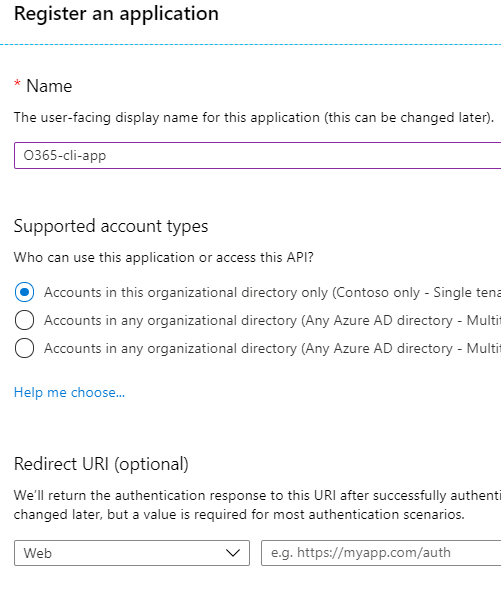
- Create new Azure AD App with a valid name. Leave all other fields/options as-is.

- Save the app id and tenant id.

- Give below “application” permissions to the app

NOTE: Microsoft Graph permission is not a prerequisite. Ignore it.
- Make sure the Admin Consent is provided for all the permissions.
- Go to “Certificates & Secrets” and choose “Upload certificate” to upload the certificate.cer file created in step 7 in first section.

NOTE: Instead of upload certificate, it’s also possible to manually update the manifest file.
- Save the thumbprint to use later.
Artifacts from this section:
- App Id
- Tenant ID
- Thumbprint
TEST LOCALLY
- Before we can use these artifacts in Azure DevOps pipeline, lets test locally to ensure the certificate is usable with Office 365 CLI login. We need to make the AAD App ID and the Tenant ID available to Office 365 CLI using environment variables. If you are looking to script this or looking for steps to do in other operating systems, I’d refer to Garry Tinder’s blog post.
- Add below environment variables on your PC.
- OFFICE365CLI_AADAPPID = App Id
- OFFICE365CLI_TENANT = Tenant ID

- Test your certificate by trying to login using O365 CLI in terminal window (PS or Command Win)
login --authType certificate --certificateFile C:OpenSSL-Win64binprotected.pfx --thumbprint 5D500FE3BTRUNCATED563173009BC --password pass@word1
Note: Change the certificateFile, thumbprint, password as per your environment
- Run some sample commands. Example:
- Status
- Spo app list

USE CERTIFICATE IN AZURE DEVOPS PIPELINE
- In this section, we will configure Azure DevOps repository so that the pipelines can use the certificate when logging with Office 365 CLI. Here is a demo repository on GitHub that contains two files:
- SPFX Package file (sppkg file)
- This is a sample SPFx application customizer extension that adds Azure Application Insights to SPO sites. Note: It can be any other SPFx package file.
- Azure-pipelines.yml
- YAML pipeline that uses the certificate to login using Office 365 CLI. This pipeline takes the SPFx package, uploads, deploys to SharePoint Online App Catalog site.
- First, we need to upload the certificate to the repository. Open your Azure DevOps (ADO) project. Go to Pipelines > Library page.
- Select “Secure files” tab. Use the + Secure file button to upload the pfx file.

- Below you can see the sample entries (script tasks) that you can use in your YAML pipelines to access the certificate from the secure files store.
- script: echo Building!

    - task: DownloadSecureFile@1

      name: caCertificate

      displayName: 'Download CA certificate'

      inputs:

        secureFile: 'protected.pfx'

    - script: |

        echo Found cert at $(caCertificate.secureFilePath)

 ##

    ## login to Office 365 CLI

 ##

    - script: o365 login $(o365_app_catalog_site_url) --authType certificate --certificateFile $(caCertificate.secureFilePath) --thumbprint $(cert_thumbprint) --password pass@word1

      displayName: Login to Office365
- When the pipeline executes the first time, you will see a prompt to approve the usage of the certificate. See below screenshot:


SAMPLE PIPELINE
Below you can see the Azure pipeline in full. You can access this pipeline on GitHub here.
trigger:
  branches:
    include:
      - '*'

variables:
  OFFICE365CLI_AADAPPID: '80fdc955-8677-4251-8d49-050d02071c15'
  OFFICE365CLI_TENANT: '216e190d-67e4-4a6e-98bd-15b8468e5928'
  o365_app_catalog_site_url: 'https://YOURTENANT.sharepoint.com/sites/APPCATALOGSITENAME'
  o365cli_app_catalog_scope: 'tenant'
  node_version: '10.x'
  cert_thumbprint: '5D500FE3B7543FCC61D4DCFD0C164563173009BC'
  spfx-pkg: 'azure-app-insights.sppkg'

pool:
  vmImage: ubuntu-latest

stages:
- stage: Build
  jobs:
  - job: BuildJob
    steps:
    - script: echo Building!
    - task: DownloadSecureFile@1
      name: caCertificate
      displayName: 'Download CA certificate'
      inputs:
        secureFile: 'protected.pfx'
    - script: |
        echo Found cert at $(caCertificate.secureFilePath)
    ##
    ## specify which node version to use
    ##
    - task: UseNode@1
      displayName: Set to Node.js $(node_version)
      inputs:
        version: $(node_version)
      condition: ne('$(node_version)', '')

    ##
    ## install Office 365 CLI
    ##
    - script: sudo npm install --global @pnp/office365-cli
      displayName: Install Office365 CLI

    ##
    ## login to Office 365 CLI
    ##
    - script: o365 login $(o365_app_catalog_site_url) --authType certificate --certificateFile $(caCertificate.secureFilePath) --thumbprint $(cert_thumbprint) --password pass@word1
      displayName: Login to Office365

    ##
    ## upload *.sppkg to the target app catalog
    ##
    - script: o365 spo app add --filePath $(spfx_pkg) --appCatalogUrl $(o365_app_catalog_site_url) --scope tenant --overwrite
      displayName: Upload SharePoint package to Site Collection App Catalog

    ##
    ##deploy the package
    ##
    - script: o365 spo app deploy --name $(spfx_pkg) --appCatalogUrl $(o365_app_catalog_site_url) --scope tenant
      displayName: Deploy SharePoint package
Thanks for reading. I hope this helps you out.
Disclaimer
The sample scripts are not supported under any Microsoft standard support program or service. The sample scripts are provided AS IS without warranty of any kind. Microsoft further disclaims all implied warranties including, without limitation, any implied warranties of merchantability or of fitness for a particular purpose. The entire risk arising out of the use or performance of the sample scripts and documentation remains with you. In no event shall Microsoft, its authors, or anyone else involved in the creation, production, or delivery of the scripts be liable for any damages whatsoever (including, without limitation, damages for loss of business profits, business interruption, loss of business information, or other pecuniary loss) arising out of the use of or inability to use the sample scripts or documentation, even if Microsoft has been advised of the possibility of such damages.
by Scott Muniz | Jul 22, 2020 | Alerts, Microsoft, Technology, Uncategorized
This article is contributed. See the original author and article here.
Final Update: Wednesday, 22 July 2020 18:22 UTC
We’ve confirmed that all systems are back to normal with no customer impact as of M/D, HH:MM UTC. Our logs show the incident started on M/D, HH:MM UTC and that during the <duration of incident> hours that it took to resolve the issue X% of customers experienced <impact statement & metrics>.
- Root Cause: The failure was due to <provide a transparent failure statement but don’t mention specific technologies>.
- Lessons Learned: <if there is chance of re-occurrence talk to the specifics on how we’ll resolve and plan to monitor & respond while risk is active><Talk to the learning that we pulled out of this incident and will apply to avoid these failure types in the future>
- Incident Timeline: X Hours & X minutes – M/D, HH:MM UTC through M/D, HH:MM UTC
We understand that customers rely on Application Insights as a critical service and apologize for any impact this incident caused.
-Sindhu
Initial Update: Wednesday, 22 July 2020 18:21 UTC
We are aware of issues within Application Insights and are actively investigating. Some customers may experience Data Gaps.
- Work Around: <none or details>
- Next Update: Before 07/22 21:30 UTC
We are working hard to resolve this issue and apologize for any inconvenience.
-Sindhu
Update: Wednesday, 22 July 2020 18:21 UTC
We continue to investigate issues within Application Insights. Root cause is not fully understood at this time. Some customers continue to experience <impact statement from a user perspective>. We are working to establish the start time for the issue, initial findings indicate that the problem began at <MM/DD ~HH:MM UTC>. We currently have no estimate for resolution.
- Work Around: <none or details>
- Next Update: Before 07/22 21:30 UTC
-Sindhu
by Scott Muniz | Jul 22, 2020 | Alerts, Microsoft, Technology, Uncategorized
This article is contributed. See the original author and article here.
Here are the updates to the Azure portal this month:
Compute>Linux
Storage>Storage Account
All categories
Intune
Let’s look at each of these updates in greater detail.
Compute>Linux
Simplification of the Linux + SSH Experience
In the VM create experience, SSH key is now the default authentication method instead of passwords for Linux images. Azure will now automatically generate a new SSH key pair for you instead of you having to use a third-party tool to create a key pair.

- Enter information to create your virtual machine, and after you click “create”, you will be prompted to download the private key pair, which you will need to connect to their VM via SSH

2. Go to the VM you created and select “SSH”, then open the SSH (terminal, PuTTy, etc.) client of your choice, making sure that you have read-only access to your private key.

3. Copy the file path where your private key is stored 4. Paste the command in your SSH client

When creating additional Linux VMs, you can reuse SSH key pairs as well instead of creating a new key each time.

Storage>Storage Account
Network Routing Preferences for Storage Accounts now in Public Preview
You can now configure a routing preference to direct network traffic for the default public endpoint of your Storage account using either the Microsoft global network or using the public internet.
- Optimize for premium network performance by using the Microsoft global network, which delivers low-latency path selection with high reliability and routes traffic through the point-of-presence closest to the client.
- Alternatively, route traffic through the point-of-presence closest to your storage account to lower network costs and minimize traversal over the Microsoft global network.
Routing configuration options for your Storage account also enable you to publish additional route-specific endpoints. Use these new public endpoints to override the routing preference specified for the default public endpoint by explicitly directing traffic over a desired path.
Routing preferences for Azure Storage is now available for preview in France South, North Central US, and the West Central US regions.
You can specify your routing preference for a storage account at Create time in the Networking tab.

You can also specify a routing preference for your storage account after creation in the Firewalls and Virtual Networks tab in Storage Account Manage.

Should you elect to public the individual route-specific endpoints, you can generate an SAS token that directs traffic along the network route you specify.

All Categories
New Dashboard Pinning Experience
Previously, users did not have the option to select a dashboard when pinning content. With the new pinning experience, users can now choose an existing dashboard or even create a new dashboard to pin their content to. This pinning experience can be invoked from any service that offers the pinning feature, as indicated by a pin icon.
- Go to any service that enables pinning. Take “All resources” for example.
- Click on the “pin” icon which opens the new pinning experience

3. From here you can pin to an existing dashboard (default) or create a new dashboard.
If you pin to an existing dashboard:
a. Select whether you want to pin to an existing private or shared dashboard in the “Type” section
b. Find the dashboard in dashboard dropdown – the default selection in the dropdown is your most recently accessed dashboard
c. Once you select the dashboard from the dropdown, click “Pin”

d, You will get a notification once the pinning has been completed. You can access the dashboard by clicking on the notification.
If you pin to a new dashboard:
a. Select “Create new”
b. Select whether you want to create a new private or shared dashboard
c. Fill in the required information

d. Once you’re done, click “Create and pin”. You will get a notification when the dashboard is successfully created and pinned to. You can access the dashboard by clicking on the notification. You can also access the pinned content by going to Dashboard in the left nav and finding the dashboard you’ve pinned the content to.
INTUNE
Updates to Microsoft Intune
The Microsoft Intune team has been hard at work on updates as well. You can find the full list of updates to Intune on the What’s new in Microsoft Intune page, including changes that affect your experience using Intune.
Azure portal “how to” video series
Have you checked out our Azure portal “how to” video series yet? The videos highlight specific aspects of the portal so you can be more efficient and productive while deploying your cloud workloads from the portal. Check out our most recently published video:
Next steps
The Azure portal has a large team of engineers that wants to hear from you, so please keep providing us your feedback in the comments section below or on Twitter @AzurePortal.
Sign in to the Azure portal now and see for yourself everything that’s new. Download the Azure mobile app to stay connected to your Azure resources anytime, anywhere.
See you next month!
by Scott Muniz | Jul 22, 2020 | Alerts, Microsoft, Technology, Uncategorized
This article is contributed. See the original author and article here.
The Azure Sphere Security Service is an integral part of Azure Sphere and brokers trust for device-to-cloud communication. When a customer creates a new tenant, the Azure Sphere Security Service issues a tenant certificate authority (CA) certificate to the customer. The tenant CA certificate, in turn, issues device certificates that the device uses to get OS updates and to upload telemetry. Tenant CA certificates have a lifetime of two years, which starts from tenant creation. The Azure Sphere Security Service will automatically renew tenant CAs approximately 60 days prior to expiry. If you use Azure Sphere tenant CA certificates to register in Azure IoT hub, Azure IoT Central, and any other relying party, you must register the new certificate so they recognize and authenticate your devices.
Renewal process
Tenant CA certificates will be automatically renewed. Automated renewal process begins approximately 60 days before the current certificate expires.
- A new tenant CA certificate is generated within 60 days prior to the expiration of the current active certificate.
- Approximately 30 days after the creation date of the newly generated CA certificate, it becomes the new active CA certificate and the current active CA certificate becomes inactive and retired. Once a tenant CA certificate has been retired, Azure Sphere device certificates will be issued from the new active CA certificate.
- Once the new tenant CA certificate is issued, it is ready for download. Using new commands available in the Azure Sphere Developer Command prompt, you can:
- Download certificates and certificate chains for the current and new certificates
- Download proof of possession certificates to verify the tenant CA certificate in Azure IoT Central and/or IoT Hub
- Get a list of available certificates and their details for an Azure Sphere tenant.
- A tenant CA certificate status will be one of three possible values, listed below along with a brief explanation of what each status means for you:
| Certificate status |
Description |
What does this mean for you? |
| Revoked |
An untrusted certificate |
This will not be used by the Azure Sphere Security Service |
| Active |
Current active certificate for the tenant |
This tenant CA certificate will issue device certificates |
| Inactive |
This state could mean one of the following. The certificate could be:
- Newly created certificate if “End Date” displayed by the command or “notAfter” in the certificate is approximately two years in the future
- Retired certificate if “End Date” displayed by the command or “notAfter” in the certificate is one to 60 days in the future
- Expired certificate if the “End Date” displayed by the command or “notAfter” in the certificate is in the past
|
The newly created certificate will become active approximately 30 days after it is created. Register this tenant CA certificate in Azure IoT Hub or IoT Central or any other third-party resources |
What do you need to do?
The newly generated certificate is not automatically re-registered in IoT Hub, IoT Central, or any other third-party resource. First, this new certificate must be downloaded. When downloading the certificate, ensure that the newly generated certificate is downloaded and not the currently active certificate. You can use the thumbprint to verify if you are using the correct certificate.
In Azure IoT hub and Azure IoT Central, registering the certificate involves a few simple steps:
- Tenant CA certificate must be first uploaded in the certificates section of IoT Hub or IoT Central.
- In the enrollments section of IoT Hub or IoT Central, the uploaded certificate can be configured as either the primary or secondary certificate. Do not remove any certificates that have not expired.
- The proof of possession certificate can be downloaded using the verification code generated by IoT Hub or IoT Central. Proof of possession certificate must then be uploaded in IoT Hub or IoT Central to complete the certificate registration process.
To avoid any interruption in service, you will have 30 days to register the new certificate in Azure IoT Hub, IoT Central, or any other third-party resource before the newly generated certificate becomes the active certificate.
NOTE: These steps require the 20.07 SDK, which is currently scheduled for release on the afternoon of July 29, 2020 (PST). We will update this post with links to documentation once the 20.07 SDK has been released.
Questions:
Q: Will my devices be updated even after the certificate auto renewal?
A: Your tenant CA certificates are auto renewed to ensure that your devices will continue to receive updates and uploading telemetry.
Q: Help! Rollover has happened to new cert, and my devices are now failing to connect to my services, how do I resolve?
A: You can still register the new certificate. The Azure Sphere Security Services may already be using the new certificate. Relying partners such as IoT central or IoT hub will fail to authenticate your device till the new tenant CA certificate is registered with them.
Q: Oh no! My tenant CA certificate has expired, and I didn’t realize I had to register the new certificate? What do I do?
A: Register your new certificate ASAP. The Azure Sphere Security Service will already be using the new certificate. Relying partners such as IoT central or IoT hub will fail to authenticate your device till the new tenant CA certificate is registered with them.
Documentation Resources:
by Scott Muniz | Jul 22, 2020 | Alerts, Microsoft, Technology, Uncategorized
This article is contributed. See the original author and article here.
This tutorial walks you through the process on how to load data from Always Encrypted enabled Azure SQL database using SQL Server Integration Services (SSIS) in Azure Data Factory.
Azure-SSIS integration runtime has built-in Microsoft ODBC Driver 13 for SQL Server. In this tutorial, we use SSIS ODBC source with Microsoft ODBC Driver 13 to load data from Azure SQL database. Details about ODBC driver setup, refer to using Always Encrypted with the ODBC Driver for SQL Server via Azure Key Vault built-in keystore provider.
- Follow the steps to configure Always Encrypted by using Azure Key Vault , Column Master Key (CMK) is now stored in Azure Key Vault.
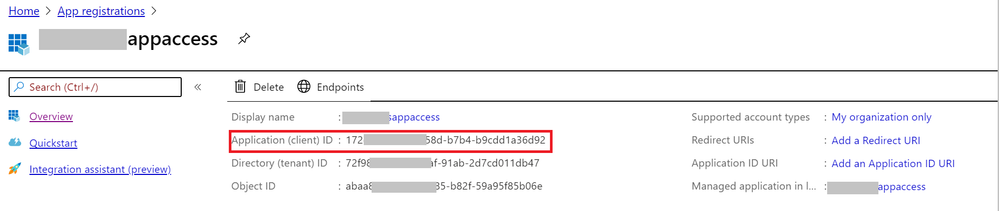
- Enable client application access to get the Application (client) ID and client secrete.


3. Grant the client application proper permissions (get, unwrapKey, and verify) in the Azure Key Vault.

- Create simple SSIS package in Visual Studio 2017 that uses an ODBC source and a flexible file destination. Configure connection string like below:
DRIVER={ODBC Driver 13 for SQL Server};SERVER= <EnterYourServer.database.windows.net>;uid=<myuser>; DATABASE=<mydatabase>;ColumnEncryption=Enabled;KeyStoreAuthentication=KeyVaultClientSecret; KeyStorePrincipalId=<Application (client) ID>;KeyStoreSecret=<client secrete>
Note:
Surround the value with { } when there are [ ] { ( ) , ; ? * = ! @ characters in the client secrete, and manually escape the interior } with a second }.
Example:
keystoresecret={)#|;_=&*{+>*-.&)$8?%}}|S|_^?|*=?.;o==_#-QA=&%};

- Execute package successfully in Visual Studio.
- Deploy project to SSIS in Azure Data Factory.

7. Author data factory pipeline with execute SSIS package activity, input password in connection manager parameter.

8. Execute data factory pipeline.
by Scott Muniz | Jul 21, 2020 | Alerts, Microsoft, Technology, Uncategorized
This article is contributed. See the original author and article here.
Build a Rover combining the best of Azure Sphere security with FreeRTOS
What you will learn
You will learn how to integrate a Real-time FreeRTOS application responsible for running a timing-sensitive ultrasonic distance sensor with the security and cloud connectivity of Azure Sphere.
#JulyOT
This is part of the #JulyOT IoT Tech Community series, a collection of blog posts, hands-on-labs, and videos designed to demonstrate and teach developers how to build projects with Azure Internet of Things (IoT) services. Please also follow #JulyOT on Twitter.
Source code and learning resources
Source code: Azure Sphere seeing eyed rover Real-time FreeRTOS sensors and Azure IoT.
Learning resources: Azure Sphere Developer Learning Path.
Learn more about Azure Sphere
Azure Sphere is a comprehensive IoT security solution – including hardware, OS, and cloud components – to actively protect your devices, your business, and your customers.
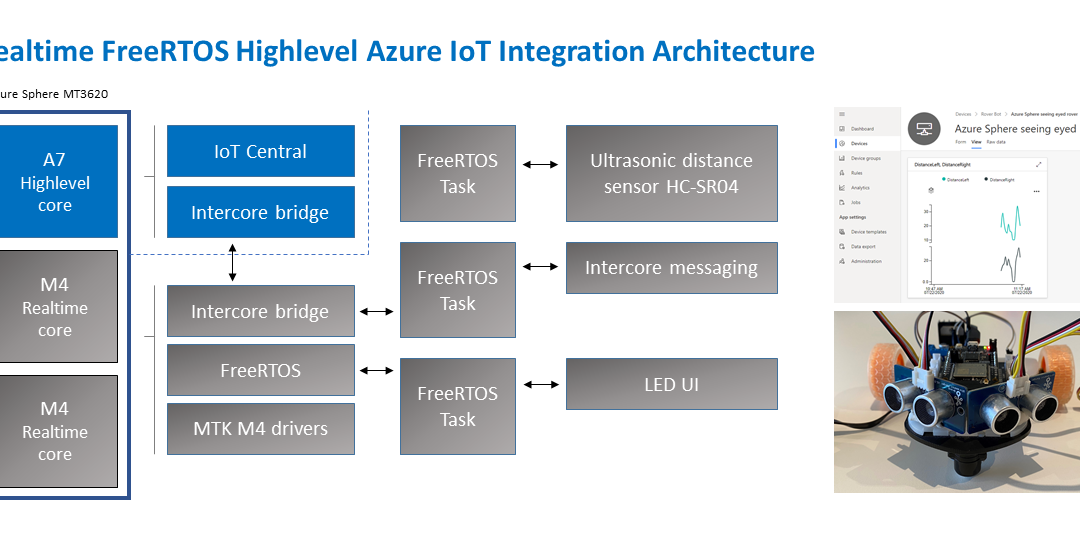
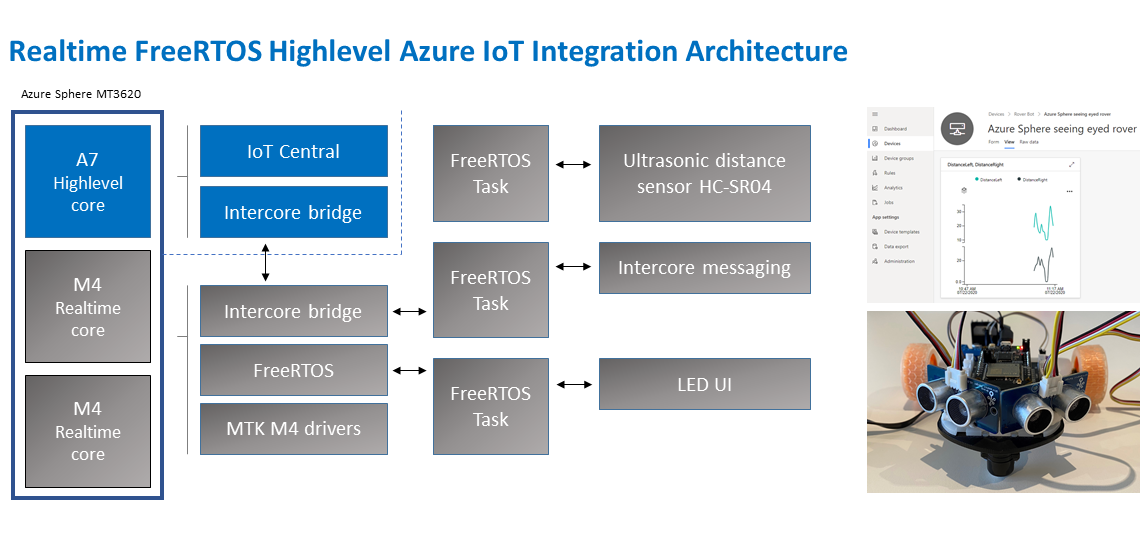
Application architecture
The application running on the Azure Sphere consists of two parts.
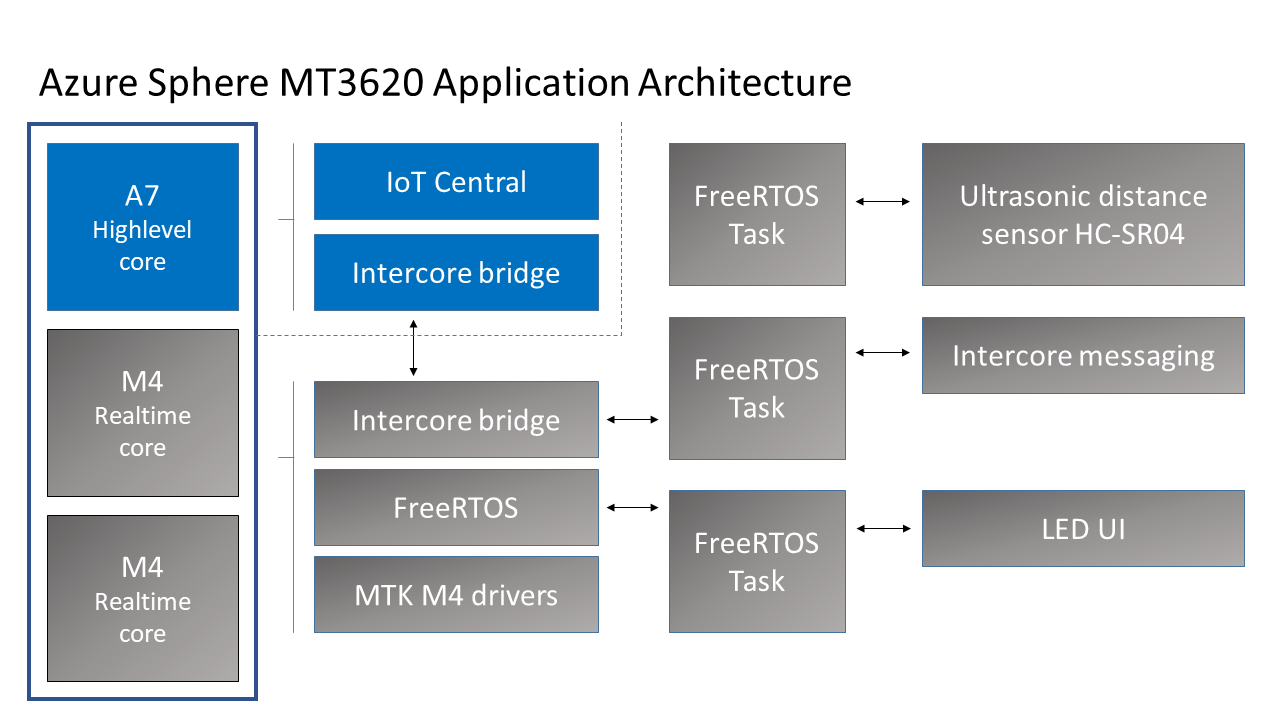
Real-time FreeRTOS Application
- The Real-time FreeRTOS application running on one of the M4 cores that is responsible for running the timing-sensitive HC-SR04 ultrasonic distance sensor.
- Distance is measured every 100 milliseconds so the rover can decide the best route.
- The sensor requires precise microsecond timing to trigger the distance measurement process, so it is a perfect candidate for running on the Real-time core as a FreeRTOS Task.
- Every 5 seconds a FreeRTOS Task sends distance telemetry to the Azure Sphere A7 High-level application.
Azure IoT High-level Application
- The application running on the Azure Sphere A7 High-level application core is responsible for less timing-sensitive tasks such as establishing WiFi/Network connectivity, negotiating security and connecting with Azure IoT Central, updating the device twin and send telemetry messages.
Extending
- I am thinking about extending this solution with a local TinyML module for smarter navigation.
Parts list

Azure IoT Central
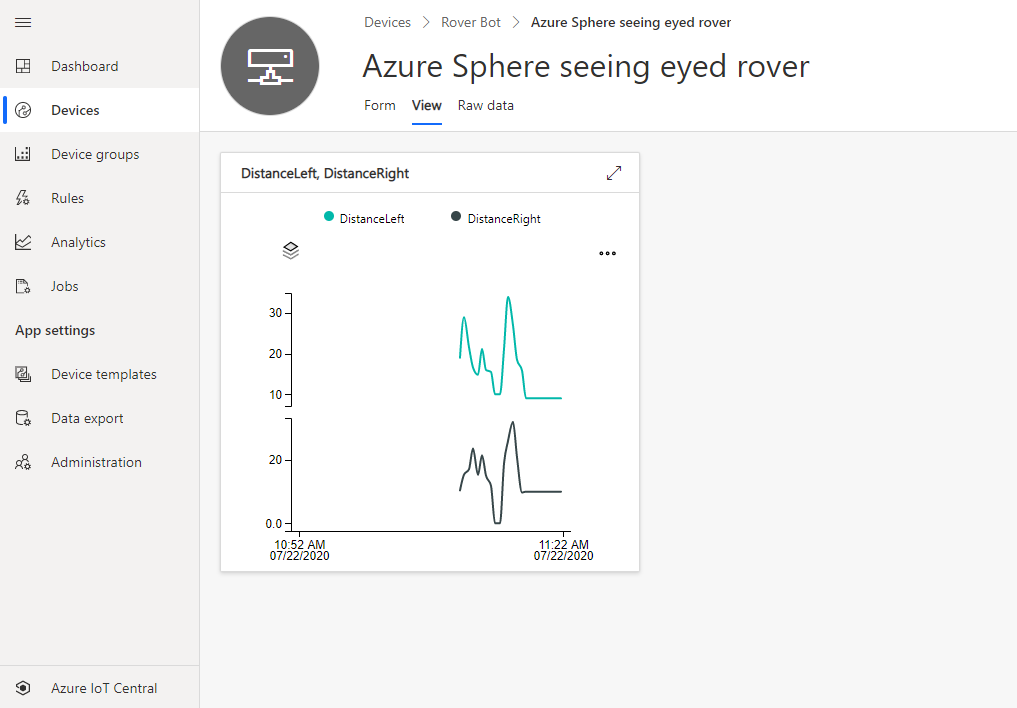
Azure IoT Central provides an easy way to connect, monitor, and manage your Internet of Things (IoT) assets at scale.
I created a free trial of Azure IoT Central and in no time I had the rover distance sensor charted and available for deeper analysis. By the way, you can continue to connect two devices for free to IoT Central after the trial period expires.
Extend and integrate Azure IoT Central applications with other cloud services
Azure IoT Central is also extensible using rules and workflows. For more information, review Use workflows to integrate your Azure IoT Central application with other cloud services
How to build the solution
- Set up your Azure Sphere development environment.
- Review Integrate FreeRTOS Real-time room sensors with Azure IoT.
- Learn how to connect and Azure Sphere to Azure IoT Central or Azure IoT Hub.
- The IoT Central Device Template Capabilities Model JSON file for this solution is included in the iot_central directory of this repo.
Have fun and stay safe and be sure to follow us on #JulyOT.

Recent Comments