by Scott Muniz | Aug 3, 2020 | Alerts, Microsoft, Technology, Uncategorized
This article is contributed. See the original author and article here.
In the past few months, we have worked on an improved integration of Microsoft Defender ATP alerts into Azure Sentinel. After an initial evaluation period, we are now ready to gradually roll out the new solution to all customers. The new integration will replace the current integration of MDATP alerts which is now in public preview (see details below). The changes will occur automatically on the 3rd of August and require no configuration from customers.
Improved alert details and context
The new integration has significant advantages in improved details and context, which are meant to facilitate and expedite triage and investigation of Microsoft Defender ATP incidents in Azure Sentinel. The integration will provide a more detailed view of each alert and is designed to capture changes on alert status over time. The upgrades include increased visibility into investigation and response information from MDATP as well as a link to provide an easy pivot to see the alert in the source portal. Finally, more information on entities is provided in a more concise format so analysts can have a broader picture of the involved entities.
It is important to note that the new integration does make minor changes to the structure of alerts from Microsoft Defender ATP. A summary of the changes is presented below (table 1), and a full description of the changes, together with a sample alert, can be found in the attached file. Any scheduled rules that use one of the changed fields might be affected.
A new MDATP API
The integration is based on the newly released MDATP Alerts API. Details on the new API can be found here.
Improved discoverability of the Sentinel integration in MDATP
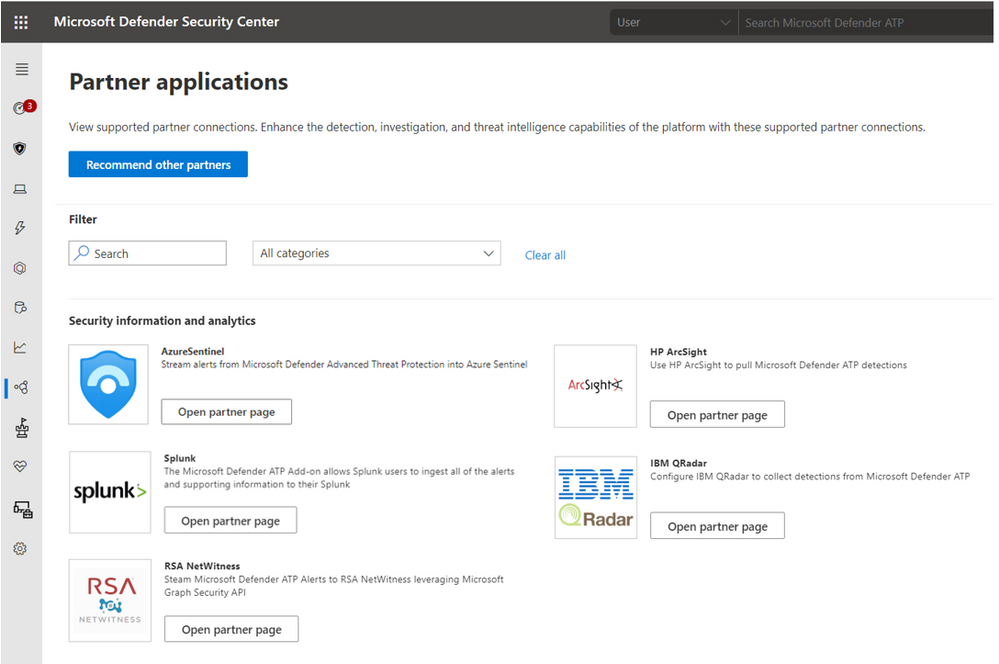
The Sentinel integration is now exposed in the Partner application section in Microsoft Defender ATP.

Additional Resources
Connecting Microsoft Defender ATP alerts to Sentinel – https://docs.microsoft.com/en-us/azure/sentinel/connect-microsoft-defender-advanced-threat-protection
MDATP API – https://docs.microsoft.com/en-us/windows/security/threat-protection/microsoft-defender-atp/get-alerts
Table 1 – summary of the alert schema changes
This table details the changes in the representation of MDATP alerts in the SecurityAlert table in Azure. The changes are in comparison to how MDATP alerts are now represented in Sentinel. Full description of the alert can be found in the attached file.
|
Description of Change
|
Sample Alert Data
|
|
Added: ExtendedProperties field. This field is an object containing the following details from MDATP:
– MDATP category
– Investigation ID
– Investigation state
– Incident ID
– Detection source
– Assigned to
– Determination
– Classification
– Action
|
{
“MicrosoftDefenderAtp.Category”: “SuspiciousActivity”,
“MicrosoftDefenderAtp.InvestigationId”: “10505”,
“MicrosoftDefenderAtp.InvestigationState”: “Running”,
“LastUpdated”: “05/25/2020 08:09:17”,
“IncidentId”: “135722”,
“DetectionSource”: “CustomerTI”,
“AssignedTo”: null,
“Determination”: null,
“Classification”: null,
“Action”: “zavidor was here”
}
|
|
Replaced: ExtendedLinks field – The new AlertLink column displays a link to the MDATP portal for each alert.
|
https://securitycenter.microsoft.com/alert/
da637259909307309588_-1180694960
|
|
Repurposed: AlertType field – shows the detection source (instead of a GUID of the alert in MDATP)
|
Before: 360fdb3b-18a9-471b-9ad0-ad80a4cbcb00
After: CustomerTI
|
|
Expanded: Entity field – More information on entities is surfaced.
For example, the host entity now holds the following details:
– HostName
– OSFamily
– OSVersion
– Type
– MdatpDeviceId
– FQDN
– AadDeviceId
– RiskScore
– HealthStatus
– LastSeen
– LastExternalIpAddress
– LastIpAddress
|
{
“$id”: “3”,
“HostName”: “real-e2etest-re”,
“OSFamily”: “Windows”,
“OSVersion”: “1809”,
“Type”: “host”,
“MdatpDeviceId”: “e84e634c8c5c2ca10db696cac544ea9ec41e784c”,
“FQDN”: “real-e2etest-re”,
“AadDeviceId”: null,
“RiskScore”: “Medium”,
“HealthStatus”: “ActiveDefault”,
“LastSeen”: “2020-05-
25T08:06:28.5181093Z”,
“LastExternalIpAddress”:
“20.185.104.143”,
“LastIpAddress”: “172.17.53.241”
},
|
by Scott Muniz | Aug 1, 2020 | Alerts, Microsoft, Technology, Uncategorized
This article is contributed. See the original author and article here.
Overview of Built-In RBAC roles in Azure API Management
Azure API Management relies on Azure Role-Based Access Control (RBAC) to enable fine-grained access management for API Management services and entities (for example, APIs and policies).
Reference Article: https://docs.microsoft.com/en-us/azure/api-management/api-management-role-based-access-control
As highlighted in the above article, Azure APIM provides a set of built-in RBAC roles for managing access to APIM services. These roles can be assigned at different scopes, which includes
- Subscription Level
- Resource Group Level
- Individual APIM service level
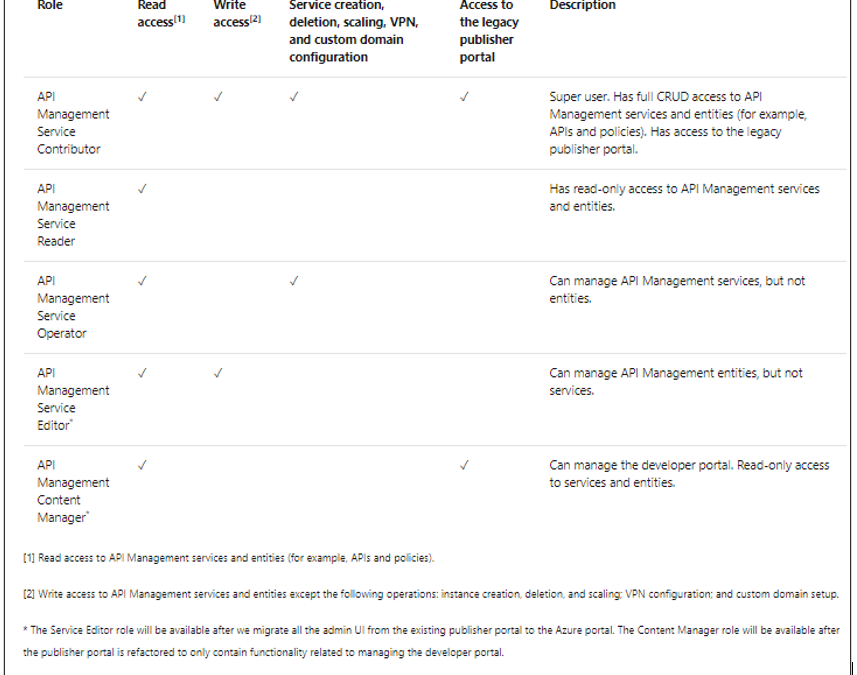
The following table provides a brief description of the built-in roles currently offered by Azure APIM. These roles can be assigned via Azure portal or other tools, including Azure PowerShell, Azure CLI, and REST API

Custom RBAC roles in Azure APIM
If the default built-in roles do not meet specific user requirements, you can create custom RBAC roles for providing a more granular access to either APIM services or any of their sub-components.
Custom Roles in Azure RBAC: https://docs.microsoft.com/en-us/azure/role-based-access-control/custom-roles
While creating a custom RBAC role, it is easier to follow the below approach in order to avoid complexities or discrepancies:
- Start with one of the built-in roles.
- Edit the attributes to add Actions, NotActions, or AssignableScopes.
- Save the changes as a new role.
- Assign the new role to the APIM services or APIM components (such as APIs, policies, et cetera).
The ARM (Azure Resource Manager) Resource Provider Operations article contains the list of permissions that can be granted on APIM level.
https://docs.microsoft.com/en-us/azure/role-based-access-control/resource-provider-operations#microsoftapimanagement
Let us consider a few scenarios where we envision the usage of custom RBAC roles to enable fine-tuned access to APIM services or their components.
Scenario 1: Deny users from deleting APIM services
RBAC roles that enable having complete write access to APIM services (such as API Management Service Contributor role) have provision for performing all management operations on an APIM service.
To avoid intentional/unintentional deletion of APIM services by any user having write access other than the APIM Administrator, you can create the below custom RBAC role for denying the operation Microsoft.ApiManagement/service/delete to users.
In this example, let us use the Azure Portal for modifying the built-in RBAC role Contributor and create a custom role for denying APIM service deletion action for all services under a particular Azure subscription. This custom role would allow users to perform all default owner operations except deleting APIM services in the subscription.
Step 1:
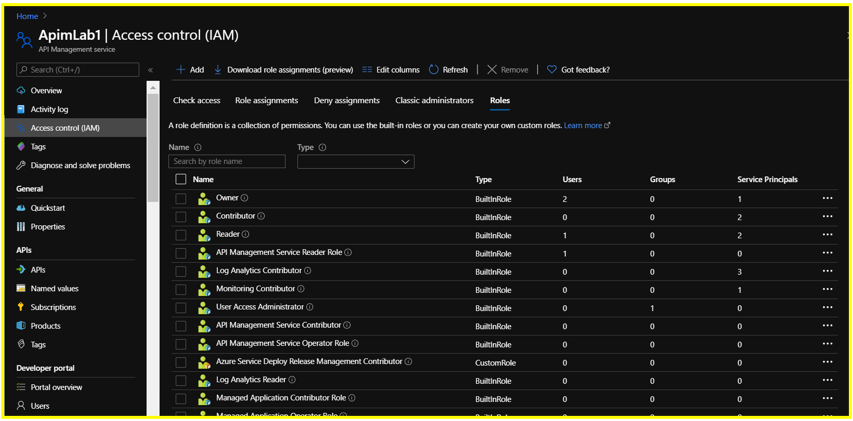
Maneuver to the Access Control (IAM) blade of a sample APIM service on the Azure Portal and click on the Roles tab. This would display the list of roles that are available for assignment.
Step 2:
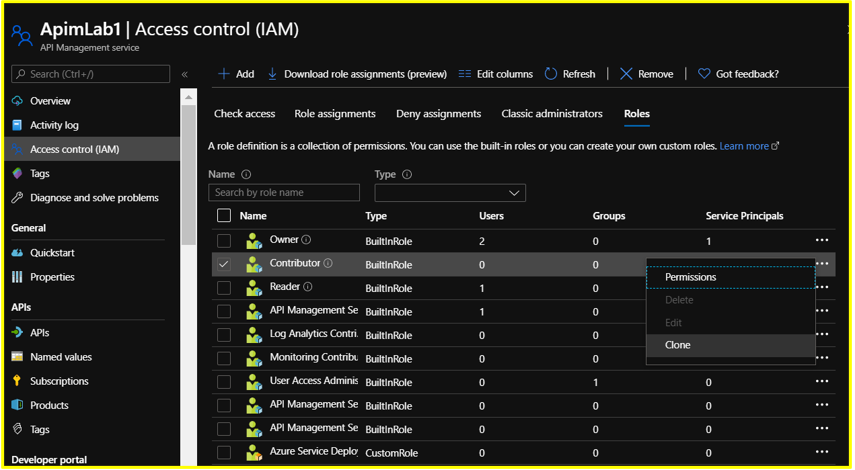
Search for the role you wish to clone (APIM Service Contributor in this case). At the end of the row, click the ellipsis (…) and then click Clone
Step 3: Configure the Basics section as follows
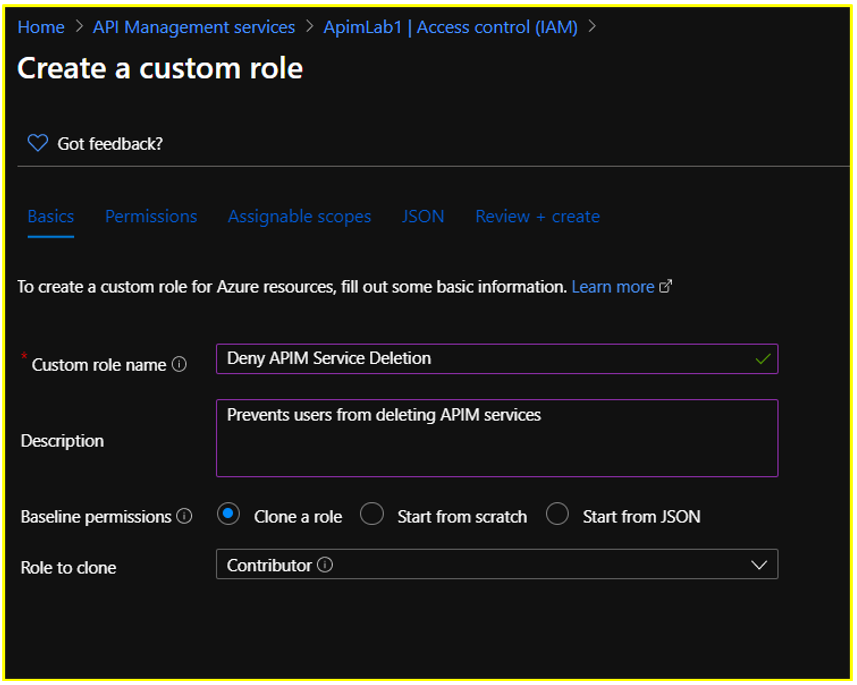
Step 4: Configure the Permissions section.
Retain the default permissions listed for this role.
Click on +Exclude Permissions and search for Microsoft API Management
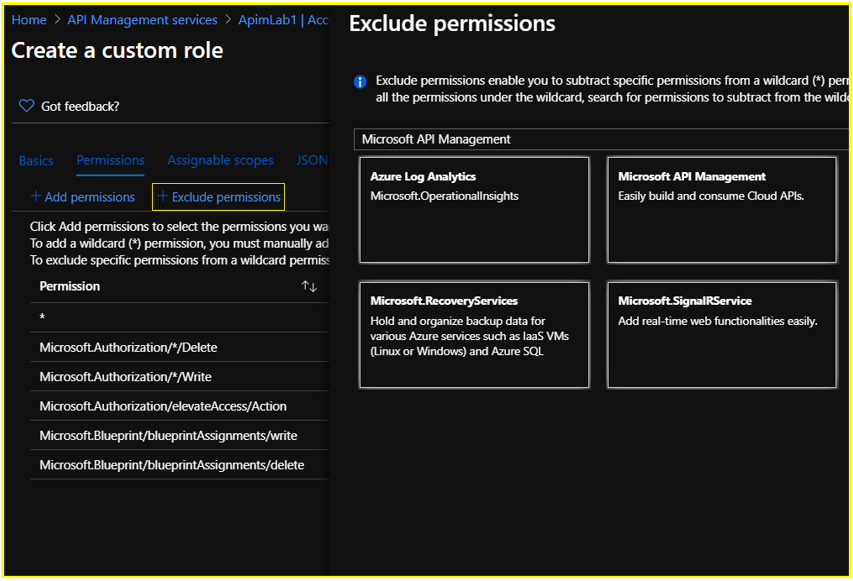
Under Not Actions, select the permission ‘Delete: Delete API Management Service instance’ under Microsoft.ApiManagement/service on the succeeding Permissions page and click the Add button.
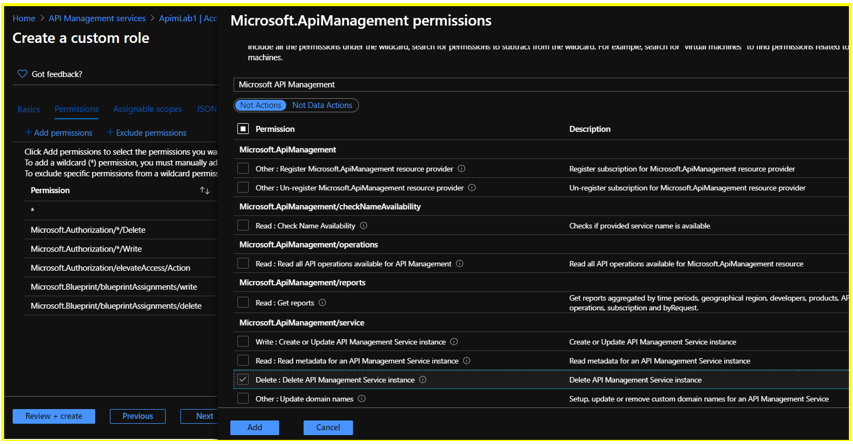
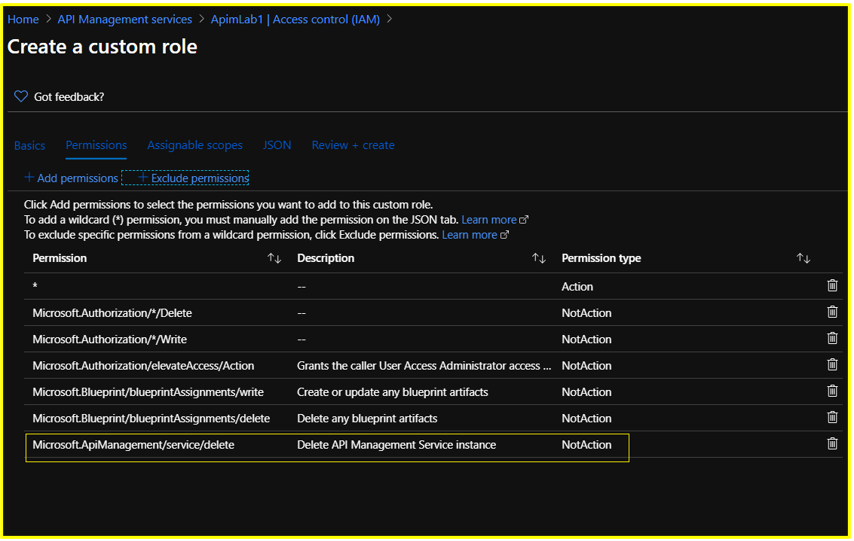
Step 5: Configure the Assignable Scopes section.
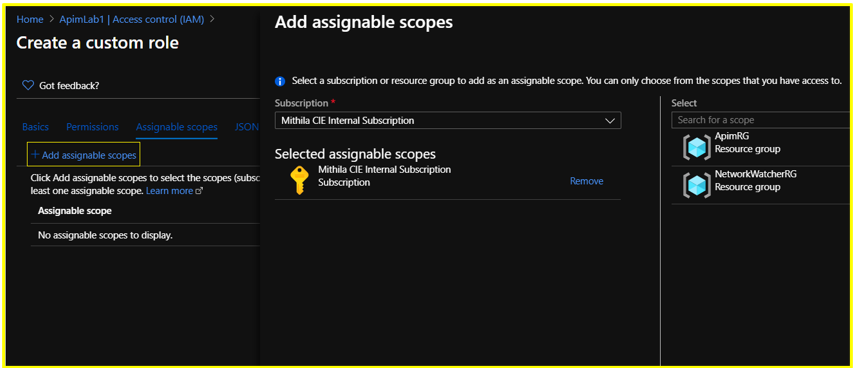
Delete the existing resource level scope. Click on +Add Assignable Scopes and set the scope to Subscription level. Click Add.
NOTE:
- Each Azure Active Directory can only have a maximum of 5000 custom roles.
Hence, for a custom role where the assignable scope is configured to be at resource level, you could consider replacing it with a subscription or resource group level scope to prevent exhausting your custom role limit.
Constraints associated with custom roles can be found documented in the below article:
https://docs.microsoft.com/en-us/azure/role-based-access-control/custom-roles#custom-role-limits
Step 6: In the JSON section, you could also Download your custom RBAC role in JSON format for future usage or reference.
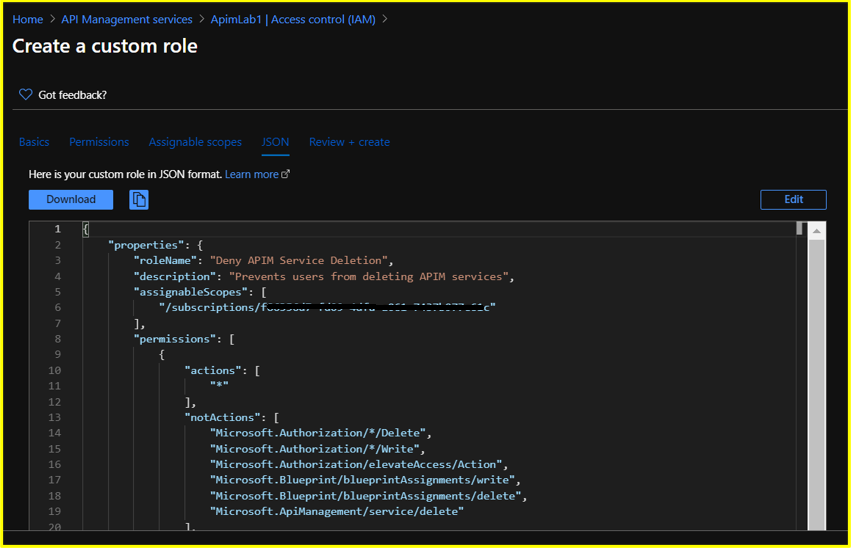
Step 7: Review the custom RBAC role details in the Review + Create section and click on Create.
It may take a few minutes for the custom role to be created and displayed under the list of available roles.
In this scenario, the newly created custom role would be available for assignment under the Roles section on the subscription’s Access Control (IAM) blade since the assignable scope was set at subscription level during creation.
NOTE:
- Post creation, custom roles appear on the Azure portal with an orange resource icon (Built-in roles appear with blue icons).
- Custom Roles would be available for assignment at the respective subscription, resource group or resource access control blade based on the assignable scope that has been configured during creation of the role.
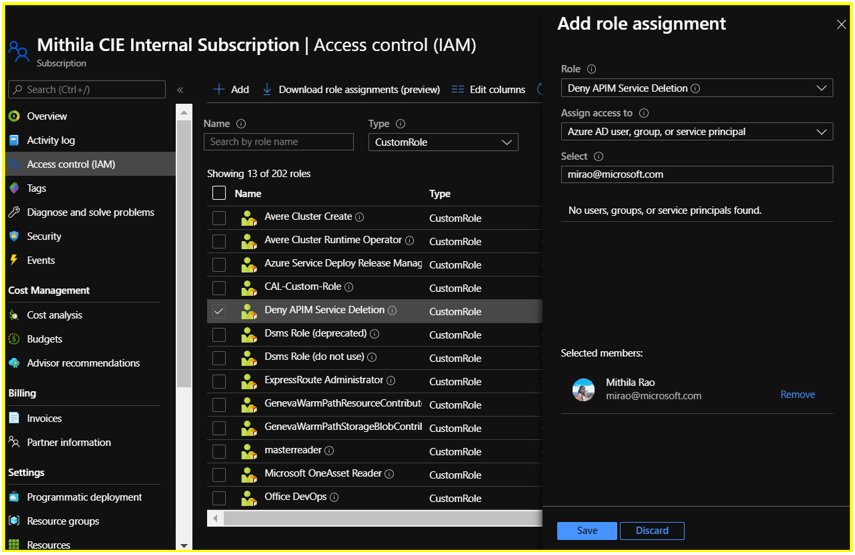
Step 8: Assign this custom role to a user. Any user having this role would be able to perform all the operations that are offered by default by the APIM Service Contributor role except deleting APIM services in the subscription.
Scenario 2: Deny users having Reader access from reading Product subscription keys
Let us consider the built-in APIM RBAC role ‘API Management Service Reader’ role for this scenario.
Users often have a misconception that only the APIM Administrators would be able to view the Product subscription keys on the Azure Portal. However, that is not the case.
The ability to read subscription keys from products (an action which is defined as Microsoft.ApiManagement/service/products/subscriptions/read) is allowed by default for users having the ‘API Management Service Reader Role’. Same is the case for navigating to the keys via APIs/subscriptions.
Hence, as a workaround, you can create a custom RBAC role in order to block the subscription keys – read action.
NOTE:
The action Microsoft.ApiManagement/service/users/keys/read does not correspond to reading subscription keys. The 2 actions are completely different.
Every user has two “secrets”, a primary and a secondary. These secrets are used to generate an encrypted SSO token that users can use to access the developer portal. These keys are not related to the subscription keys that users use to call the APIs. The /service/users/keys/read permission corresponds to the ability to read the user secrets, whereas the /service/products/subscriptions/read permission corresponds to reading subscription keys under products, which is allowed by default under the ‘API Management Service Reader’ role.
Additionally, the Microsoft.ApiManagement/service/users/subscriptions/read permission corresponds to the ability to read subscriptions associated with users via the “Users” blade on the Portal, which is also allowed by default under this role.
Here, we are creating and assigning a custom RBAC role using PowerShell for denying users having Read access over the APIM service from reading the subscription keys. Basically, this role denies users from performing the operation Microsoft.ApiManagement/service/products/subscriptions/read
The sample PowerShell script is as below:
$role = Get-AzRoleDefinition "API Management Service Reader Role"
$role.Id = $null
$role.Name = 'Deny reading subscription keys'
$role.Description = 'Denies users from reading product subscription keys'
$role.NotActions.Clear()
$role.NotActions.Add('Microsoft.ApiManagement/service/products/subscriptions/read')
$role.AssignableScopes.Clear()
$role.AssignableScopes.Add('/subscriptions/<subscription ID>/resourceGroups/<resource group name>/providers/Microsoft.ApiManagement/service/<service name>')
New-AzRoleDefinition -Role $role
New-AzRoleAssignment -ObjectId <object ID of the user account> -RoleDefinitionName 'Deny reading subscription keys' -Scope '/subscriptions/<subscription ID>/resourceGroups/<resource group name>/providers/Microsoft.ApiManagement/service/<service name>'
Known Limitations
- Current design does not allow RBAC permissions to be controlled at Product level for API creation/deletion.
For example, consider a scenario where users on the Azure Portal should have read and write access only over APIs that are associated with a particular Product. For this, you can configure an RBAC role where the assignable scope has been set at “Product” level and add the desired Actions and NotActions.
Now, even if you add the permission “Microsoft.ApiManagement/service/apis/*” at product scope, when the user who is assigned this role attempts creating a new API inside this Product, the operation would still fail.
If a user needs to create a new API in the service (irrespective of whether it is inside the same Product), they should be able to read all APIs in the service and have write permissions granted at the APIM service scope instead of Product scope.
This is because, when a user attempts to create a new API or add a new version/revision for an existing API, there is a validation check that happens in the background to verify if there is any other API in the service which is using the same path that the user is attempting to create. If the user performing this operation does not have permissions to read all APIs in the service, the operation would fail.
Hence, you would have to grant the user the permission to read all APIs in the service (granted at the service scope).
- Permissions to view APIM Diagnostics Logs cannot be configured at APIM scope.
For example, if user has configured streaming of APIM Diagnostic Logs to a Log Analytics Workspace and wishes to create a custom RBAC role only for viewing these diagnostic logs, it wouldn’t be possible to configure this role at the APIM scope. Since the log destination is Log Analytics, the permission has to be configured at the Log Analytics scope.
The APIM ARM operation “Microsoft.ApiManagement/service/apis/diagnostics/read” only controls access to the diagnostic configuration for the APIM service and not to the diagnostic telemetry that APIM streams to external resources such as Log Analytics/Application Insights, et cetera.
- Preventing users from accessing the Test Console for APIs on the Azure Portal cannot be achieved with a straight-forward approach.
This is because there are no APIM ARM operations that support actions corresponding to “Microsoft.ApiManagement/service/apis/operations/test”.
However, this limitation can be overcome if the API is protected by a subscription key. When the permission “Microsoft.ApiManagement/service/subscriptions/read” is denied to a user, the user cannot test an API protected by a subscription key since they wouldn’t be able to retrieve the subscription key required for testing the API operation.
A JSON sample for creating this custom role can be found attached below:
{
  "properties": {
    "roleName": "Deny Testing APIs",
    "description": "Deny Testing APIs",
    "assignableScopes": [
      "/subscriptions/<subscription ID>/resourceGroups/<resource group name>/providers/Microsoft.ApiManagement/service/<service name>"
    ],
    "permissions": [
      {
        "actions": [],
        "notActions": [
          "Microsoft.ApiManagement/service/subscriptions/read"
        ],
        "dataActions": [],
        "notDataActions": []
      }
    ]
  }
}
APPENDIX
- Tutorials for Creating Custom RBAC Roles:
a) Azure Portal Tutorial – https://docs.microsoft.com/en-us/azure/role-based-access-control/custom-roles-portal
b) PowerShell Tutorial – https://docs.microsoft.com/en-us/azure/role-based-access-control/tutorial-custom-role-powershell#create-a-custom-role
c) Azure CLI Tutorial – https://docs.microsoft.com/en-us/azure/role-based-access-control/tutorial-custom-role-cli
d) REST API Tutorial – https://docs.microsoft.com/en-us/azure/role-based-access-control/custom-roles-rest
e) ARM Template Tutorial and Sample – https://docs.microsoft.com/en-us/azure/role-based-access-control/custom-roles-template

by Scott Muniz | Jul 31, 2020 | Alerts, Microsoft, Technology, Uncategorized
This article is contributed. See the original author and article here.
What an action packed week with TWO great live conferences!
Create:Frontend A one of a kind live event from Microsoft about all things frontend.
.NET Conf: Focus on Microservices a free, livestream event that features speakers from the community and .NET teams that are working on designing and building microservice-based applications, tools and frameworks.
Content Round Up
How to Manage SharePoint via PowerShell – Part 1
Anthony Bartolo
In this 2-part series, we’re going to look at how we can manage SharePoint using PowerShell. This is highly focused on SharePoint Online, but if the cmdlets are available, it also applies to SharePoint on-premises. We’ll start with the basics, and then get some real-world scenarios scripts in part 2 to get you started with your daily management tasks. I’ll also you give some tips along the way to make your life easier.
How to Manage SharePoint via PowerShell – Part 2
Anthony Bartolo
In this 2-part series, we’re going to look at how we can manage SharePoint using PowerShell. This is highly focused on SharePoint Online, but if the cmdlets are available, it also applies to SharePoint on-premises. We’ll start with the basics, and then get some real-world scenarios scripts in part 2 to get you started with your daily management tasks. I’ll also you give some tips along the way to make your life easier.
ITOpsTalk: Traditional Failover Clustering in Azure
Pierre Roman
Review of announcements and their impact on running traditional Clusters in Azure
LearnTV: 92 & Pike w/ Jen Looper!
Chloe Condon
On this episode we chat with Jen Looper! 👩🏼?:school: Jen is a Cloud Advocate Lead on the Academic Team at Microsoft where she helps create curriculum, content, and experiences for educators, students, new learners looking to upskill in tech. We chat with Jen about Maya Mystery.
Abhishek Gupta
Welcome to part four of this blog series! So far, we have a Kafka single-node cluster with TLS encryption on top of which we configured different authentication modes (TLS and SASL SCRAM-SHA-512), defined users with the User Operator, connected to the cluster using CLI and Go clients and saw how easy it is to manage Kafka topics with the Topic Operator.
Using Graph Explorer Sample Data via REST
Todd Anglin
If you need a quick and easy way to access sample Graph data, you case use Graph Explorer via REST with the small “hack” discussed in this article.
React For Beginners workshop
Aaron Powell
React is a JavaScript library for creating high-performing, maintainable JavaScript applications and brings a fresh approach to thinking into the JavaScript community.
Being a declarative user interface library that is un-opinionated about the rest of your application it is easy to reason about it is simpler to learn and master the basics than a full application framework like Angular. Also thanks to the simple nature of React, the patterns and lessons you will learn are transferable to other libraries and frameworks.
A Guide to Running a Virtual Workshop
Aaron Powell
In this article I share my experience in delivering an online workshop as part of NDC Melbourne, what works (and what didn’t), the tech side of things and what is useful to know for anyone looking to run their own online workshop.
Demystifying ARM Templates – Variables
Frank Boucher
Variables are very useful in all king of scenarios to simplify things. Azure Resource Manager (ARM) templates aren’t an exception and the variable will offer great flexibility. In this chapter, we will explain how you can use variables inside your template to make them easier to read, or to use.
Learning-ARM tutorials
Frank Boucher
In this repository you will find a series of tutorial paired with videos to guide you through learning the best practice about Azure Resource manager (ARM) template.
Each video is featured in the same page as the content. The videos are part of Azure DevOps – DevOps Lab show.
How to use Azure Go SDK to manage Azure Data Explorer clusters
Abhishek Gupta
by Scott Muniz | Jul 31, 2020 | Alerts, Microsoft, Technology, Uncategorized
This article is contributed. See the original author and article here.
Greetings!
We’re back with another mailbag, this time focusing on your common questions regarding Azure AD Identity Protection. Security is always top of mind and Identity Protection helps you strike a balance between the usability required for end users to be productive while protecting access to resources. We’ve got some really great questions from folks looking to improve the effectiveness of their alerts and to increase their overall security posture. We even have a sample script for you! I’ll let Sarah, Rohini and Mark take it away.
—–
Hey y’all, Mark back again for another mailbag. You’ve been asking some really great questions around Azure AD Identity Protection. So good, in fact, I’ve kept putting this off for an embarrassingly long time. Then I called in for some help from some excellent feature PMs Sarah Handler and Rohini Goyal.
Question 1: I want to bulk dismiss a lot of Users that have risk. How can I do this?
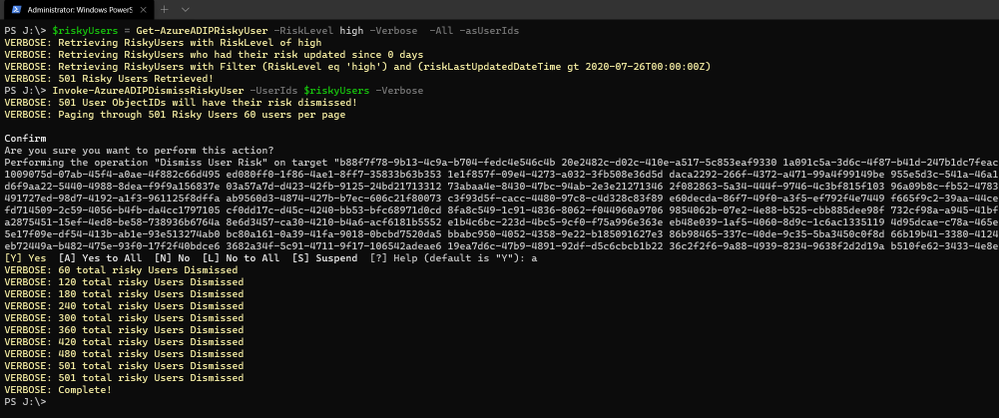
Make sure that before you bulk dismiss users, you’ve already remediated them or determined that they’re not at risk. Then we have a GraphAPI call you can make to dismiss the user risk. We’ve put together a little sample script to help you with doing bulk dismissal.
We’ve provided a sample PowerShell script and examples to enumerate risky users, filter the results, and dismiss the risk for the collection.

Question 2: How do we detect TOR or anonymous VPN? Is it based off exit node or are there ways to bypass this?
We detect anonymizers in a few ways. For Tor, we continually update the list of Tor exit nodes. For VPNs, we use various third-party intelligence to determine whether an anonymizer has been used.
Question 3: How should we handle false positives?
There are two ways to address false positives: giving feedback on false positive detections that occur and reducing the number of false positives that get generated. If while investigating risky sign-ins you find a detection to be a false positive, you should mark “confirm safe” on the risky sign-in. There are two ways to prevent false positives in Identity Protection. The first is to enable sign-in risk policies for your users. When a user is prompted for a sign-in risk policy with MFA and passes the MFA prompt, it gives feedback to the system that the legitimate user signed in and helps to familiarize the sign-in properties for future ones. The second is to mark common locations that you trust as trusted locations in Azure AD.
Question 4: What is the best practice for whitelisting known locations?
First, you want to make sure you’re putting in your public egress end points. This helps with our detection algorithms. We’ve recently increased the named locations to 195 named locations with 2,000 IP ranges per location. You can read more in our docs.
But we know that many times networking teams make changes and don’t notify the Azure AD Admins. It’s good to have a process to work through the Sign-In logs and look for IP ranges that are not part of your named locations and add those as well as remove IPs that no longer are your egress point.
Question 5: Does AAD Leaked credentials connect to Troy Hunt’s Have I been Pwned API? Do I need to supplement with other scans?
Leaked credentials detection does not connect to Troy Hunt’s “Have I been Pwned”. Troy does an excellent job with his service correlating and collecting public dumps. Leaked credentials alerts take into account those public dumps as well as non-public dumps we call out in our docs, more info here. If you want to supplement the Azure AD leaked credentials alerting with other feeds, that is entirely up to you.
Question 6: When I turn on Password Hash Sync does the leaked credential alert on existing ones or only on leaks going forward?
Leaked credentials will only detect on leaks going forward. When we find clear text username and passwords pairs, we don’t keep them. We process them through and delete them. We’ve updated our documentation to call this out and provided more info.
We hope you’ve found this post and this series to be helpful. For any questions you can reach us at AskAzureADBlog@microsoft.com , the Microsoft Forums and on Twitter @AzureAD , @MarkMorow, @Sue_Bohn, and @Alex_A_Simons
-Rohini Goyal, Sarah Handler and Mark Morowczynski
by Scott Muniz | Jul 31, 2020 | Alerts, Microsoft, Technology, Uncategorized
This article is contributed. See the original author and article here.
The release of 20.07 brought along a range of security enhancements and changes to Azure Sphere. As head of the Operating System Platform (OSP) Security team, I want to provide more insights into the efforts to keep Azure Sphere secure as a platform while being as transparent as possible about all the improvements made since our 20.04 release.
The OSP Security team I run for Azure Sphere worked with a diverse group of people and companies to have three separate red team events happen on the platform over the last few months; an internal Microsoft team, Trail of Bits, and the currently active Azure Sphere Security Research Challenge (ASSRC). These efforts are on top of the continued work done by the OSP team over the last three months to harden and further the security of the platform.
Trail of Bits performed a private red team exercise on the system and identified a number of risks that have been fixed for 20.07:
- The /proc file system on Linux is mounted rw giving the ability to write to /proc/self/mem allowing unsigned code execution, /proc/self/mem is now read-only
- The internal GetRandom() function failed to properly fill in buffers that have a length that is not a multiple of 4, all current usage is a multiple of 4 so no risk and code was changed to avoid future impacts
- The Sysctl Linux kernel configuration flags can be hardened, following values enabled
- kernel.kptr_restrict = 1 – limit Linux kernel pointer leakage
- kernel.dmesg_restrict = 1 – prevent access to dmesg to unprivleged processes
- fs.protected_hardlinks = 1 – users cannot create hardlinks unless they own the source file
- fs.protected_symlinks = 1 – symlinks are only followed when not in a world-writable directory, the owner of the symlink and follower match, or the directory owner and fsymlink owner match
- fs.protected_fifos = 2 – limit FIFO creation options when dealing with world writable directories
- fs.protected_regular = 2 – limit regular file creation options when dealing with world writable directories
- The internal security library for setting process information used to return success even if failed to set a process’ capabilities
- DNS name expansion leaked stack memory
- Null pointer dereferences in DMA memory for mtk3620 in the Linux kernel
- Better filtering of the content-type for GatewayD to limit cross-site scripting abuse
Although the ASSRC is still on-going it has provided a range of great findings by the participants, some of which overlapped ToB’s findings like a writable /proc/self/mem. The Linux kernel related issues identified by ToB were not fixed in 20.05 or 20.06 due to the massive Linux kernel uprgade from 4.9 to 5.4, this oversight will be handled better in the future.
Cisco Talos reported the first 2 findings that are fixed in 20.07, ptrace used to bypass the unsigned code execution protections and the Linux kernel message ring buffer being user accessible allowing for information leakage. Along with reporting the first two findings, Cisco Talos also reported the /proc/self/mem finding and found a double free in the azspio Linux kernel driver that have been fixed. Cisco has a blog post up detailing their efforts so far for the ASSRC.
As an excellent example of findings from the ASSRC effort, I would like to describe a specific attack chain that McAfee Advanced Threat Research found for the device that has been fixed for 20.07. This attack chain did require physical access to a device and could not be done remotely due to the steps involved.
- We have multiple environments that devices can be part of, two of them are pre-production and production. McAfee ATR was able to claim a device to both preproduction and production across separate tenants. Due to an oversight in signature handling for device capability images on the cloud, an attacker that claimed a device they did not own to pre-production was allowed to request a capability image for the device that was production signed. This allowed obtaining a capability image for a device and gaining access to a locked down device, this was corrected immediately.
- With the ability to get a capability image for a device, McAfee ATR could unlock a locked down device and also obtain the development capability allowing them to upload their own package to the device. An application package is a signed ASXIPFS image, our file system that is a variation of CramFS with the ability to execute from flash. The original file system code allowed for special inode filesystem entries which McAfee ATR used to create a special inode pointing to the MTD flash giving them read-only access to the on-device flash. 20.07 removes the ability to create any special inodes in the ASXIPFS image.
- Although the user controlled special inode pointing to flash is read-only due to how the file system image is mounted, McAfee ATR found a 0-day in the Linux kernel for the MTD_WRITE ioctl. The ioctl function failed to check permissions before executing the ioctl call allowing flipping bits in flash from 1 to 0 allowing McAfee ATR to use this vulnerability to rewrite the uid_map file for the device. This is patched on our Linux kernel for 20.07 and publicly fixed with https://lkml.org/lkml/2020/7/16/430.
- With the ability to modify flash, McAfee ATR rewrote the uid_map file that maps user IDs to applications to have an application with a maximum user ID where all bits in the user ID are set. The maximum ID resulted in the setresuid and setresgid function calls being passed -1. A -1 value to these functions is a special flag to indicate that the user id and group id should not be modified resulting in an application being ran as the sys user. The uid map parsing code no longer allows for a maxium user ID where all bits are set.
- Under normal operation, a system package can not be uninstalled, however an application running as sys is allowed to modify and change symlinks in various directories resulting in the ability to abuse symlink confusion on packages and force the azcore package to be uninstalled when the uninstaller thinks it is uninstalling another application. From there a user package can be installed in it’s place. Symlinks are no longer allowed in user application packages as of 20.07.
- The user application that replaces azcore does have the proper uid and gid set when executed however because the Linux kernel executes it the capability bits were never cleared out. The user replaced azcore is then able to call setuid(0) and become root on the device. This will be fixed in 20.08.
McAfee ATR did a fantastic job putting together this attack chain and finding a 0-day in the core Linux kernel itself to make it work. The attack chain exposed a weakness in the cloud and multiple weakenesses on the device including a previously unknown Linux kernel vulnerability.
While the above changes were done as a result of external red team findings, the Operating System Platform team continued improving the security of Azure Sphere.
One effort we’ve been working on is minimizing the ability to use ptrace unless in development mode. PTrace is needed by gdb to properly provide debug information however normal customer applications do not have a need for it. Having ptrace be available to customer applications allows an attacker to ptrace the process being attacked and inject unsigned code into memory for execution. 20.07 brings along a Linux kernel change where ptrace is no longer possible unless in development which also brings along a few extra enhancements as a side effect, the largest being that /proc no longer shows any other process pid and is further restricted of what a process can know about itself.
Another security enhancement is moving to wolfSSL 4.4.0 bringing along additional side channel attack hardening. Along with the wolfSSL upgrade is work to begin exposing access to supported wolfSSL functionality, the first set of functions allowing customers to directly call wolfSSL for establishing TLS client connections.
We have added more fuzzing across 5 different components and additional static code analysis tools including extra static analysis tools on every pull request into our repositories. If the static analysis fails then the PR can not be completed, this further strengthens the system by making it more difficult to check in easy to abuse coding flaws. As we expand to add features and functionality more fuzzers are built for parts of the system being updated. The addition of the new static analysis tool detected an off by one calculation in DHCP message handling that allowed reading an extra byte of data past the end of the buffer, this was corrected in 20.07.
You may have noticed that our last couple quality releases did not have a Linux kernel patch bump, this time was used to allow the Linux kernel team to upgrade the Linux kernel from 4.9 to 5.4.44. By doing so we capture Linux kernel security enhancements done between the versions along with keeping up-to-date on the latest changes.
String manipulation functions are a very common way for leaking the stack cookie along with being able to write it when string buffers are not properly null terminated. GLibC helps limit string buffer attacks by forcing the first byte of the stack cookie in memory to be 0 however we use musl on the device for libc. Musl initializes all bytes in the stack cookie instead of leaving the first byte in memory 0 allowing for the potential of stack cookie leaks and abuses. Our version of musl in 20.07 sets the first byte to 0 and the patch was provided to the maintainer incase they wish to add this security measure to musl.
On top of our own changes, MediaTek provided a new version of the firmware for their WiFi subsystem of their MT3620 that is now being used on the platform to deal with a range of issues.
As you can see, a wide range of security improvements have been made to the platform as we continue to strive to be the best in the field. We will continue to be transparent about our efforts and are devoted to being the most secure platform for IoT.
Jewell Seay
Azure Sphere OSP Security Team Lead

by Scott Muniz | Jul 31, 2020 | Alerts, Microsoft, Technology, Uncategorized
This article is contributed. See the original author and article here.

Reduce polygon count
Akihiro Oyamada is a Web Front-End Engineer at PixelGrid inc. in Tokyo, Japan. He specializes in huge product-based websites where CSS scalability and maintainability, as well as performance, are paramount. He is also a community leader as well as an expert in Web graphics technologies, such as SVG, Canvas and WebGL. For more, see his Twitter @yomotsu

Deploy WordPress on Azure Kubernetes Service
Dave Rendón has been a Microsoft Azure MVP for 6 consecutive years. As an IT professional with more than 10 years of experience, he has a strong focus on Microsoft technologies and moreover on Azure since 2010. He supports the business developers and sales teams at Kemp from a technical level. I also support the account managers by developing a firm understanding of their customer’s technical dilemma(s) and providing a sound technical solution. Follow him on Twitter: @DaveRndn

What Is Entity Framework In ASP.NET MVC?
Asma Khalid is an Entrepreneur, ISV, Product Manager, Full Stack .Net Expert, Community Speaker, Contributor, and Aspiring YouTuber. Asma counts more than 7 years of hands-on experience in Leading, Developing & Managing IT related projects and products as an IT industry professional. Asma is the first woman from Pakistan to receive the MVP award three times, and the first to receive C-sharp corner online developer community MVP award four times. See her blog here.

Sergio Govoni is a graduate of Computer Science from “Università degli Studi” in Ferrara, Italy. Following almost two decades at Centro Software, a software house that produces the best ERP for manufacturing companies that are export-oriented, Sergio now manages the Development Product Team and is constantly involved on several team projects. For the provided help to technical communities and for sharing his own experience, since 2010 he has received the Microsoft Data Platform MVP award. During 2011 he contributed to writing the book: SQL Server MVP Deep Dives Volume 2. Follow him on Twitter or read his blogs in Italian and English.

Mohamed El-Qassas is a Microsoft MVP, SharePoint StackExchange (StackOverflow) Moderator, C# Corner MVP, Microsoft TechNet Wiki Judge, Blogger, and Senior Technical Consultant with +10 years of experience in SharePoint, Project Server, and BI.
In SharePoint StackExchange, he has been elected as the 1st Moderator in the GCC, Middle East, and Africa, and ranked as the 2nd top contributor of all the time. Check out his
blog here.


Recent Comments