by Scott Muniz | Aug 12, 2020 | Azure, Microsoft, Technology, Uncategorized
This article is contributed. See the original author and article here.
Migrating your on prem server estate to Azure is something that you’ll often hear me talk about at events, or on this blog. And when I am talking about datacentre migrations, you’ll often hear me mention how Azure Migrate can help you on that journey, with your assessment and migrations needs. Recently, when I was presenting my “Start your data centre Migration Journey with Azure Migrate” at a recent user group talk I mentioned that Azure Migrate can help you migrate from other locations such as AWS, or GCP, etc, which prompted some discussion on how at the end of my session. And I wanted to share more about that. :grinning_face:
I’ve dealt with some companies that have already moved some resources into the cloud, but not into Azure and the companies strategy or direction has changed and they are looking to consolidate everything into Azure. So, their migration path and tooling has to not only support their on prem resources it needs to support the migration from the other cloud provider as well.
Azure Migrate introduced the functionality to assess physical servers in December 2019, which was to serve an ask customers, but it also allowed those that didn’t have access to the hypervisor level of their virtual machines to make use of Azure Migrate. And ultimately this is the functionality that allows you to use Azure Migrate to assess and migrate your virtual machines from AWS, GCP or another cloud provider into Azure.
In my previous blog post and video, I talked about assessing your AWS environment with Azure Migrate.
The video below shows you the process of using Azure Migrate to migrate your AWS virtual machines into Azure. You can watch the full video here or on Microsoft Channel 9.
You can find more information here:
I hope you enjoyed the video if you have any questions feel free to leave a comment.
by Scott Muniz | Aug 12, 2020 | Azure, Microsoft, Technology, Uncategorized
This article is contributed. See the original author and article here.
Authored by Grace Hsu
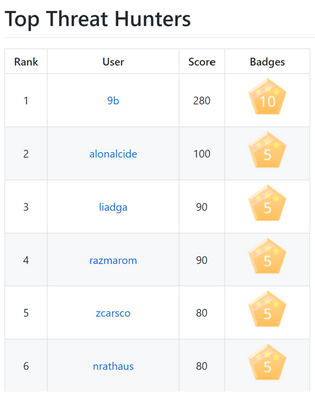
Calling all security enthusiasts! As threats evolve rapidly, the only way to stay ahead of adversaries is to join forces. Working together is critical to solve the common challenges we face. The Azure Sentinel Threat Hunters community provides opportunities for you to collaborate with other security experts, troubleshoot problems, share analytics and code, and continuously learn more about new innovations in the security space. To recognize the growing list of amazing contributors to our threat hunters community, we are excited to announce a new Azure Sentinel Github Leaderboard Program!
The Azure Sentinel Github repo is a one-stop shop for you to find, use and contribute to Azure Sentinel, including analytics rules and detections, exploration queries, workbooks, playbooks, and much more. The new leaderboard program enables us to showcase the Top 20 Threat Hunters, based on their previous GitHub contributions as well as the new value they add to Azure Sentinel!

Making any contribution in the categories listed on the Github wiki and submitting Github Issues will count towards the leaderboard. In addition to earning points to level up on the leaderboard, Threat Hunters will have the opportunity to redeem exclusive badges.
As you earn points and badges, you will unlock new Threat Hunter capabilities! Stay tuned for opportunities to learn and grow. To explore existing resources, check out the Tech Community Webinars and Security Ninja Trainings!
Learn more about the Azure Sentinel Leaderboard Program, view top contributors, and start making your way up the leaderboard by contributing to the GitHub repo!
by Scott Muniz | Aug 12, 2020 | Azure, Microsoft, Technology, Uncategorized
This article is contributed. See the original author and article here.
By Jaya Mathew, Richin Jain and Pritish Devurkar
In our previous blog, we outlined that Supervised Machine Learning (ML) models need labeled data, but majority of the data collected in the raw format lacks labels. So, the first step before building a ML model would be to get the raw data labeled by domain experts. To do so, we had outlined how Doccano is an easy tool for collaborative text annotation. However, not all data that gets collected is in text format, many a times we end up with a bunch of images but the end goal is again to build a Supervised ML model. Like stated previously, the first step would be to tag these images with specific labels. Image tagging as well as building and even deploying either a multi-class or a multi-label classifier can be done in a few simple steps using Azure Custom Vision.
What is Azure Custom Vision?
Azure Custom Vision is a cognitive service that enables the user to specify the labels for the images, build, deploy, and improve your image classifiers. The tool enables the user to easily label the images at the time of upload. Then the algorithm trains using these images and calculates the model performance metrics. The Custom Vision service is optimized to quickly recognize major differences between images, so the user can start prototyping the model with a small amount of data (50 images per label is generally considered a good start). Once the algorithm is trained, the user can test, retrain, and eventually use the newly trained model to classify new images according to the needs of their end application. The user also can also export the trained model for offline use.
Getting started:
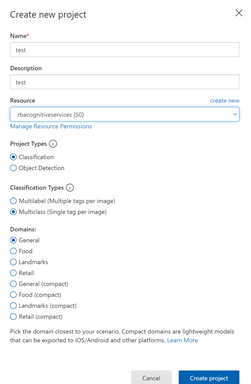
To get started, the user would need to first create an Azure account and then create a new project as shown below. During the initial setup, the user is to name their project, select a resource group and determine whether the project is a Classification/Object detection scenario. In this sample, we will get started with a ‘Classification’ project which is of type ‘Multiclass (single tag per image)’. Since our images are generic, we pick the Domains as being ‘General’.

Once the project is created, the user can define the tags upfront or as they upload the images. Images can be uploaded using the ‘Add Images’ option, which prompts the user to navigate to the location of the image and enables the user to tag and upload the image. Bulk import of images is also an option. You can also use the smart-labeled option after the model has been trained.

Continue to upload all the images available for classification and then tag all the images as shown below:

Once the user has successfully uploaded and tagged their images, the next step would be to train the classifier. The user can opt for either a quick/advanced training based on cost as well as time constraints. The quality of the classifier depends on the amount, quality, and variety of the labeled data provided as well as how balanced the overall dataset is.

After the training is complete, review the training results. The user can benchmark their model using the quick training option and then use more advanced training if the results are not satisfactory.

If the model performance is not satisfactory, the user can also add some more images per class and then retrain the model.
Once the model performance is deemed to be satisfactory, the user can test some more images using this option:

Now that you have built a classifier model, the user can use the Custom Vision service for image classification in production ready systems. To do so, the user would need to first publish the model which creates an endpoint for use in production ready systems. Overall based on our experience, Azure Custom Vision reduces the complexity involved in building and deploying a Custom Vision model.
References:
by Scott Muniz | Aug 12, 2020 | Azure, Microsoft, Technology, Uncategorized
This article is contributed. See the original author and article here.
It is harder than ever to bring multiple people from multiple countries together in one place right now.
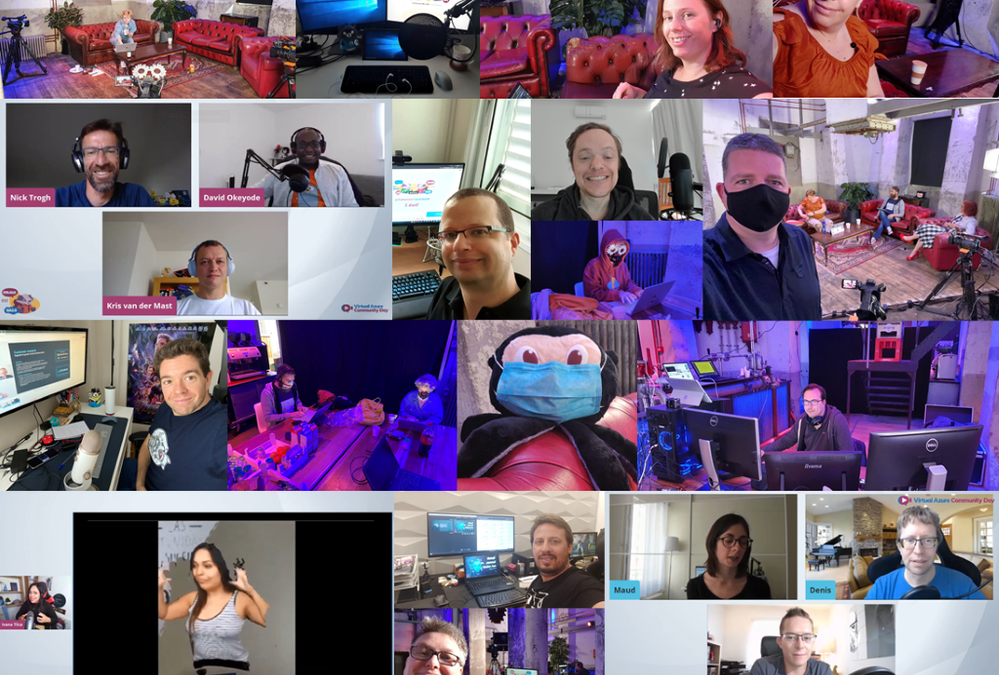
However, thanks to some “technical geekery” and organizing superpowers, this is exactly what took place when Azure lovers from around the world gathered online for 24 hours at the end of July.
The Virtual Azure Community Day is a multi-track, multi-cultural, and multi-discipline marathon which reunites Azure enthusiasts in the virtual world. The July 28 event produced almost 80 hours of content in six languages on the Azure Day platform. There, users could seamlessly switch between four tracks and interact in live chats. Moreover, 14 sessions were streamed live to Learn TV, 12 streams received interpretation into International Sign, and all streams were reproduced on YouTube and Twitch.
The effort to be as inclusive as possible paid off with the content reach exceeding more than 4 million. But beyond the numbers, the organizing team of Virtual Azure Community Day was most proud of the diverse line-up of speakers and emcees who shared their passion for Azure.
For example, African MVPs Oluwawumiju Oluwaseyi and Ayodeji Folarin say the event enabled them to present on their Azure experiences and learn from other international use cases. “We were very excited to work with fellow MVPs and Microsoft across the world because it exposes us to divergence in the knowledge and the different scenarios of Azure,” they say. “This keeps us on our toes to improve and optimize our current usage.”
International representation was also an important element to the Chinese representatives. Chinese Microsoft Azure and AI MVP Hao Hu says events like Virtual Azure Community Day help the nation’s Microsoft community overcome any social media obstacles to be seen and heard. “Global events like this or Azure Bootcamp and AI Bootcamp are a great chance to let global communities see us,” he says.
Meanwhile, this year was supposed to mark the debut international speeches of Nepalese Azure MVP Ravi Mandal. While the coronavirus impeded those plans, Ravi says he was excited to take his technical talks online at the marathon. “I immediately realized that this was for me because this would be the first talk I would give for an audience outside Nepal. Though online, it marks my first talk for international audiences!”
Similarly, multiple MVPs relished the chance to connect with other Azure fans regardless of location or language. “I love to work with these people, it’s always nice to rely on someone when you get stuck,” says Danish AI MVP Eva Pardi. Likewise, Portuguese OAS MVP Nuno Arias Silva says, “[At Microsoft] we all have different experiences and sharing is the most beautiful thing that we can do.”
“The world is smaller and smaller, and the walls between us are getting thinner and thinner,” Romanian Azure MVP Radu Vunvulea says. “The experience that I had with people from the Microsoft ecosystem was amazing.” This point is reinforced by Netherlands Azure MVP Sjoukje Zaal, who believes there was a major benefit to creating this event as one which was not bound by timezone restrictions.
“With the current state of affairs, I think having an easy way to share all of this content is the best support we could ask for,” says South African Windows Development MVP Gergana Young. This point is driven home by Japanese Microsoft Azure MVP Yuto Takei, who says: “It’s really amazing to see presentations in different languages taking place at the same time and lasting 24 hours!”
“Honestly, since I began my career I have been seeking for likeminded people – newbies, experts, gurus – so that I can exchange ideas, learn, practice, or simply discuss!” says Bulgarian AI MVP Ekaterina Marinova. “The MVPs, Microsoft employees, everybody within this mini world has the spirit and it is contagious.” Canadian Dev MVP Hamida Rebai agrees the event successfully integrated Azure users of all experience levels to enable the sharing of knowledge.
“For more than 10 years I have been part of different communities inside Microsoft,” says Argentine Ivana Tilca. “First I was a Microsoft student partner, then I worked at Microsoft, and now I have the opportunity to be an MVP – and it always felt like being at home,” she says.
The Virtual Azure Community Day organizing team – comprised of Henk Boelman, Suzanne Daniels, Nick Trogh, Olivier Leplus, Floor Drees, Lucie Simeckova, and Maud Levy – thank all who contributed on the day to make it possible, with special thanks to AI MVP Willem Meints.
Check out all the action from the event at the YouTube channel.

by Scott Muniz | Aug 12, 2020 | Azure, Microsoft, Technology, Uncategorized
This article is contributed. See the original author and article here.
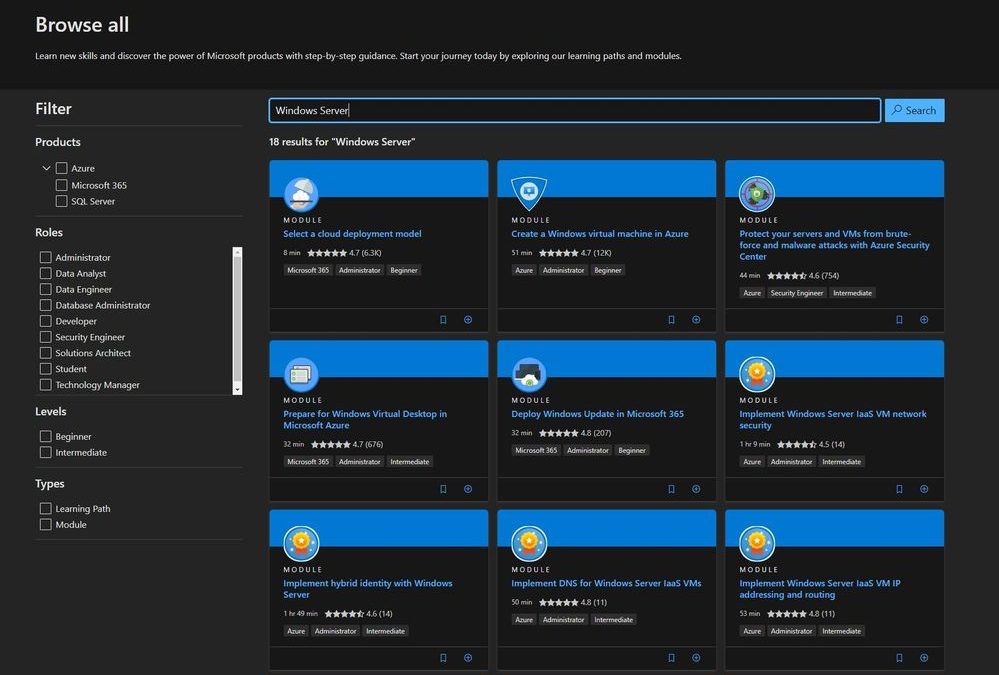
I am sure you already heard of Microsoft Learn. If you haven’t, Microsoft Learn is a free online learning platform around different technology. Whether you’re just starting or an experienced professional, the hands-on approach helps you arrive at your goals faster, with more confidence and at your own pace. In the last couple of days, we published a couple of new Microsoft Learn modules around Azure, Hybrid Cloud, and Windows Server for IT Pros. These modules help you to learn how you can leverage Microsoft Azure in a hybrid cloud environment to manage Windows Server.
 New Microsoft Learn Modules for Azure and Windows Server IT Pros
Manage hybrid workloads with Azure Arc
You will learn to describe Azure Arc, implement Azure Arc with on-premises server instances, deploy Azure policies with Azure Arc, and use role-based access control (RBAC) to restrict access to Log Analytics data.
After completing this module, you will be able to:
- Describe Azure Arc.
- Explain how to onboard on-premises Windows Server instances in Azure Arc.
- Connect hybrid machines to Azure from the Azure portal.
- Use Azure Arc to manage devices.
- Restrict access using RBAC.
Check out the learning module here.
Implement scale and high availability with Windows Server VM
You’ll learn how to implement scaling for virtual machine scale sets and load-balanced VMs. You’ll also learn how to implement Azure Site Recovery.
After completing this module, you will be able to:
- Describe virtual machine scale sets.
- Implement scaling.
- Implement load-balancing virtual machines.
- Implement Azure Site Recovery.
Check out the learning module here.
You’ll be able to implement Azure Monitor for IaaS VMs in Azure, implement Azure Monitor in on-premises environments, and use dependency maps.
After completing this module, you will be able to:
- Enable Azure Monitor for VMs.
- Monitor an Azure VM with Azure Monitor.
- Enable Azure Monitor in hybrid scenarios.
- Collect data from a Windows computer in a hybrid environment.
- Integrate Azure Monitor with Microsoft Operations Manager.
Check out the learning module here.
Manage Azure updates
You’ll be able to enable Azure Update Management, deploy updates, review an update assessment, and manage updates for your Azure VMs.
After completing this module, you will be able to:
- Describe Azure updates.
- Enable Update Management.
- Deploy updates.
- Review an update assessment.
- Manage updates for your Azure VMs.
Check out the learning module here.
Migrate on-premises Windows Server instances to Azure IaaS virtual machines
You’ll be able to plan a migration and select appropriate server migration tools. You will also learn how to use Azure Migrate, how to assess physical servers, and how to migrate those servers.
After completing this module, you will be able to:
- Plan your migration.
- Describe Azure Migrate.
- Migrate server workloads using Windows Server Migration Tools.
- Assess physical servers with Azure Migrate.
- Migrate on-premises servers to Azure.
Check out the learning module here.
Implement a hybrid file server infrastructure
You’ll learn about Azure Backup before learning to implement Recovery Vaults and Azure Backup Policies. You’ll learn to implement Windows IaaS VM recovery, perform backup and restore of on-premises workloads, and manage Azure VM backups.
After completing this module, you will be able to:
- Describe Azure Backup.
- Implement Recovery Vaults.
- Implement Azure Backup policies.
- Recover Windows IaaS VMs.
- Perform file and folder recovery.
- Perform backup and recovery of on-premises workloads.
- Explain how to manage Azure VM backups with Azure Backup.
Check out the learning module here.
I wish you happy learning and if you have any questions or ideas for new Microsoft Learn modules, let me know in the comments.
by Scott Muniz | Aug 12, 2020 | Azure, Microsoft, Technology, Uncategorized
This article is contributed. See the original author and article here.

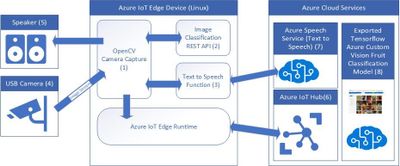
There are lots of applications for image recognition but what I had in mind when developing this application was a solution for vision impaired people scanning fruit and vegetables at a self-service checkout.
To find out more, head to [Creating an image recognition solution with Azure IoT Edge and Azure Cognitive Services](https://gloveboxes.github.io/Create-a-talking-image-recognition-solution-with-Azure-IoT-Edge-Azure-Cognitive-Services/)

Recent Comments