This article is contributed. See the original author and article here.
By Jaya Mathew, Richin Jain and Pritish Devurkar
In our previous blog, we outlined that Supervised Machine Learning (ML) models need labeled data, but majority of the data collected in the raw format lacks labels. So, the first step before building a ML model would be to get the raw data labeled by domain experts. To do so, we had outlined how Doccano is an easy tool for collaborative text annotation. However, not all data that gets collected is in text format, many a times we end up with a bunch of images but the end goal is again to build a Supervised ML model. Like stated previously, the first step would be to tag these images with specific labels. Image tagging as well as building and even deploying either a multi-class or a multi-label classifier can be done in a few simple steps using Azure Custom Vision.
What is Azure Custom Vision?
Azure Custom Vision is a cognitive service that enables the user to specify the labels for the images, build, deploy, and improve your image classifiers. The tool enables the user to easily label the images at the time of upload. Then the algorithm trains using these images and calculates the model performance metrics. The Custom Vision service is optimized to quickly recognize major differences between images, so the user can start prototyping the model with a small amount of data (50 images per label is generally considered a good start). Once the algorithm is trained, the user can test, retrain, and eventually use the newly trained model to classify new images according to the needs of their end application. The user also can also export the trained model for offline use.
Getting started:
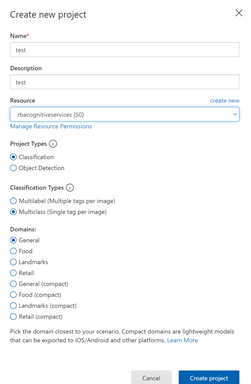
To get started, the user would need to first create an Azure account and then create a new project as shown below. During the initial setup, the user is to name their project, select a resource group and determine whether the project is a Classification/Object detection scenario. In this sample, we will get started with a ‘Classification’ project which is of type ‘Multiclass (single tag per image)’. Since our images are generic, we pick the Domains as being ‘General’.

Once the project is created, the user can define the tags upfront or as they upload the images. Images can be uploaded using the ‘Add Images’ option, which prompts the user to navigate to the location of the image and enables the user to tag and upload the image. Bulk import of images is also an option. You can also use the smart-labeled option after the model has been trained.

Continue to upload all the images available for classification and then tag all the images as shown below:

Once the user has successfully uploaded and tagged their images, the next step would be to train the classifier. The user can opt for either a quick/advanced training based on cost as well as time constraints. The quality of the classifier depends on the amount, quality, and variety of the labeled data provided as well as how balanced the overall dataset is.

After the training is complete, review the training results. The user can benchmark their model using the quick training option and then use more advanced training if the results are not satisfactory.

If the model performance is not satisfactory, the user can also add some more images per class and then retrain the model.
Once the model performance is deemed to be satisfactory, the user can test some more images using this option:

Now that you have built a classifier model, the user can use the Custom Vision service for image classification in production ready systems. To do so, the user would need to first publish the model which creates an endpoint for use in production ready systems. Overall based on our experience, Azure Custom Vision reduces the complexity involved in building and deploying a Custom Vision model.
References:
- https://docs.microsoft.com/en-us/azure/cognitive-services/custom-vision-service/home
- https://docs.microsoft.com/en-us/azure/cognitive-services/custom-vision-service/getting-started-build-a-classifier
- https://docs.microsoft.com/en-us/azure/cognitive-services/custom-vision-service/test-your-model
Brought to you by Dr. Ware, Microsoft Office 365 Silver Partner, Charleston SC.

Recent Comments