
by Scott Muniz | Sep 3, 2020 | Azure, Technology, Uncategorized
This article is contributed. See the original author and article here.
Art by Dana Moot II
The past summer has been a magical one for the game-loving members of the Azure Advocacy team, as we presented to you our three-part game series entitled the Azure Maya Mystery. If you haven’t been following along, you can read about its genesis and continuation right here on dev.to.
True to our mission as Advocates on the Academic Team, lead developers Jen and Chris wanted to sneak in a little educational content, and we hope you have enjoyed learning more about Maya glyphs this summer. Congratulations, by the time you complete Level 3, you will know the meaning of 13 ancient Maya glyphs!
The following content contains spoilers about gameplay!
Back in July, we introduced you, the intrepid explorer, to a text-based online experience where you were introduced to a mysterious pyramid you have found, deep in the jungle. As you circle its base, reading half-hidden glyphs, you discover the keys to climb its steep flight of steps to its entrance.
Using your knowledge gleaned from matching clues found in Microsoft Learn and the newly discovered glyphs, you discover a code needed to open the pyramid’s door. You use your learnings about Azure Static Web Apps to launch a chat window to discover part of the pyramid’s name, and then gain entry into the pyramid.
But suddenly, the floor collapses under your feet and you start to slide!
In August, you discovered Level 2, where you speak to a grumpy turtle, launch a web app using Node.js to gather necessary equipment, dive into a cenote, or underground spring, and salvage broken glyphs.
Fitting them back together, you are granted access to the main chamber by the turtle, who seems to be more than a simple reptilian ally.
Now, in the very last level of the Azure Maya Mystery game, you will be able to ascend to the pinnacle of the pyramid by helping complete the restoration of the pyramid and reach the summit. Along the way, you will learn the name of the pyramid and the identity of the goddess to whom it is dedicated.
Using a web app powered by a machine learning model for image recognition, you will gain insight into the full meaning of the three parts of the pyramid’s name. Discover its meaning, and unlock the entry to the summit, where you will be rewarded by the goddess presiding over the pyramid.

We hope you have enjoyed learning about our three technical foci over this summer: Azure Static Web Apps, Node.js, and Machine Learning. In addition, we hope you enjoyed the scavenger hunt we sent you on as you shuttled between Microsoft Learn and the Mystery! Finally, we hope you learned a little about Maya pyramids and glyphs and enjoyed the adventure.
Visit the third level of the Maya Mystery today, ascend to the summit, and earn your reward!
by Scott Muniz | Sep 3, 2020 | Uncategorized
This article is contributed. See the original author and article here.
Microsoft Learn is continually expanding its portfolio of free, online training you can work through at your own pace to skill up in a business role, or prepare for a Microsoft Certification. Every month, we announce the latest role-based learning paths. Begin or continue your journey to build skills and earn certification with Microsoft Learn. Browse the new learning paths and modules, and start one today. Need help figuring out where to begin and which training to take when? Check out the landing pages for Microsoft Power Platform and Dynamics 365.
The following learning paths were released in August 2020.
Power Platform
WinAutomation
These modules have been migrated from the Softomotive Academy. Check Microsoft Learn for additional learning paths next month.
|
Learning path
|
Role
|
Certification
|
|
Get started with WinAutomation
Four modules
|
App maker, Developer, Functional consultant, Administrator
|
Not currently part of an exam
|
|
Work with WinAutomation
Eight modules
|
App maker, Developer, Functional consultant
|
Not currently part of an exam
|
Power Virtual Agents
Dynamics 365
Business Central
Customer Service
by Scott Muniz | Sep 3, 2020 | Uncategorized
This article is contributed. See the original author and article here.

Today, we are proud to announce the general availability of the Lists app in Teams for all our commercial and GCC customers. As you might already know, Microsoft Lists, which we announced at Build 2020 is a Microsoft 365 app that helps you track information and organize your work. Lists are simple, smart, and flexible, so you can stay on top of what matters most to your team. Track patients, loans, issues, assets, routines, contacts, inventory and more using customizable views and smart rules and alerts to keep everyone in sync. With ready-made templates, you can quickly create lists from directly within Teams and access them on the Teams mobile app by accessing the Lists tab you added as a channel.
This feature is enabled in GCC by default. The Lists app in Teams includes 3 new industry-specific templates – Patients, Loans and Incidents which can be used by Government agencies. Find out more details in our main announcement post here.
About the Author
Ansuman Acharya
Hi All, I am Ansuman and work in the PM Team for Modern workplace Transformation. Think of me as a product manager owning the Lists in Teams experience and the application of Lists and List based solutions to industry vertical scenarios starting with healthcare. Some of you might recognize me from my previous stint in the security and compliance area for Microsoft Teams.
Follow Ansuman on Twitter | LinkedIn

by Scott Muniz | Sep 3, 2020 | Uncategorized
This article is contributed. See the original author and article here.
Today, we are proud to announce the general availability of the Lists app in Teams for all our commercial and GCC customers. As you might already know, Microsoft Lists, which we announced at Build 2020 is a Microsoft 365 app that helps you track information and organize your work. Lists are simple, smart, and flexible, so you can stay on top of what matters most to your team. Track patients, loans, issues, assets, routines, contacts, inventory and more using customizable views and smart rules and alerts to keep everyone in sync. With ready-made templates, you can quickly create lists from directly within Teams and access them on the Teams mobile app by accessing the Lists tab you added as a channel.
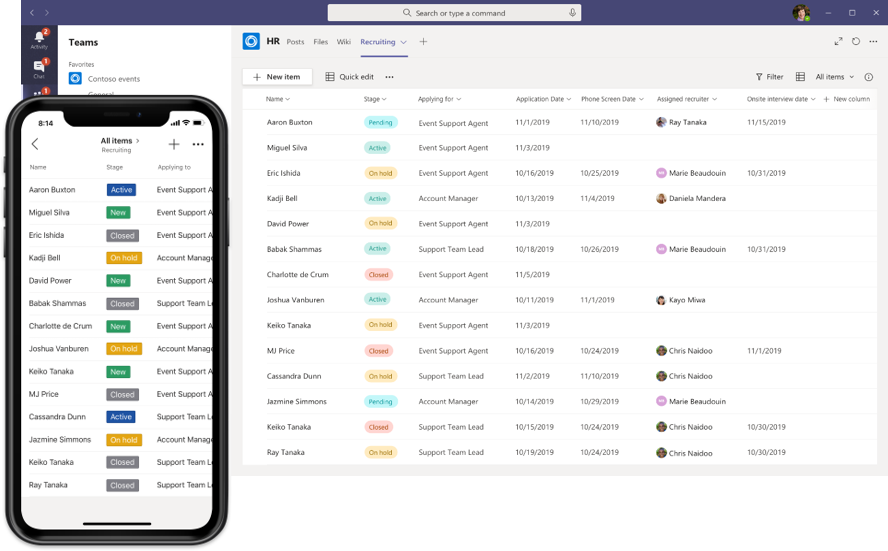
Introducing the Lists app in Teams
The vision of the Lists app in Teams is to bring all the collaboration and communication modalities to lists and list items, so it is easy to get work done.
 The new Lists app experience in Microsoft Teams, for mobile on the left and for Web and desktop on the right.
Lists in Teams is supported as a team based tab app built on top of the Microsoft Teams platform and supports the following features:
- New list creation from scratch, from templates (8 standard templates and 3 industry specific ones: Patients, Loans, and Incidents), from Excel table data and from an existing list.
- Importing existing team lists as new tabs.
- All standard list features that you can access in SharePoint web: column types, view formatting, Quick Edit, exporting to Excel, sorting, filtering, etc.
- The ability to have a channel conversation about a list item (see below for more details).
- All user actions on the list are audited and available in the Security and compliance center audit logging.
How do I get started?
To get started, simply go to any channel where you would like to start tracking a list and hit the “+” button to explore the tab gallery and select the Lists app. Once the tab is added you can either create a new list or bring in an existing list (from another team or an older SharePoint site, but not a personal list from Lists home) into the channel as a new tab.
 Create a new list inside Teams with conversations side-by-side. The above shows using the Asset manager template.
The Lists app in Teams includes 3 new industry-specific templates – Patients, Loans and Incidents. Team members start managing and tracking these key entities. Here are some examples of how these templates can be leveraged.
 Create a new list from within Microsoft Teams and choose from numerous ready-made templates, including the new industry-specific ones.
- Healthcare organizations can use the Lists app in Teams to support patient rounding, multi-discplinary huddles and discharge planning. The Patients template is an easy way for all health teams to track patient progress and keep in touch with their peers. If you have questions about storage of PHI in Teams, Lists, or Office 365, please see more documentation here.
- Government agencies can use the Lists app in Teams to track incidents and coordinated incident response. The Incidents template helps people quickly setup a list and get started.
- Loan officers at a morgtage broker or bank can use the Lists app to track a set of loans and informally collaborate on advancing a them to approval. The Loans template helps them get started with plenty of scope for further customization.
How do I start a conversation alongside a list item?
Once you have configured the tab and have a list with list items, you can start a conversation about an individual list item. Go to the details view (or form) for the list item by clicking into the title field and then click on conversation to start a conversation about the list item on the channel. With this feature, you can collaborate with your team about the list item (your key business entities) and get work done, faster.
Since the conversation is a channel message in Teams, all the messaging features like @mentions, rich text, giphies, stickers, emojis, mentions, tagging, and attachments are available for use! The conversation shows up in the right rail for the list item and also on the channel for those who might not have viewed the list as yet.
 You can chat side-by-side individual list items within Teams.
See more about getting started with the Lists app in Teams “Create a list in Microsoft Teams” click-thru demo. And do not forget to try the Lists app experience in the Teams mobile app to track your lists within Teams on the go. Just go to your Teams android or iOS mobile apps and go to the channel where you have added the Lists app and click on more and tap on the tab name to open up the list.

Learn more about the Lists app in Teams
If you are unable to see the Lists app in your channel, please contact your Teams Admin because applications in the Teams app store can be disabled or enabled by app permission policies. For more information, see the Manage the Lists app in Teams article. If you are looking for more resources and guidance, please review the help article here. For general help content and resources on Microsoft Lists, check out the Microsoft Lists resource center.
Note: Users of the existing SharePoint tab app in Teams that have pinned a list will see their experience inside the tab get upgraded to the latest Lists in Teams experience. This change will be rolling out today as well.
Millions of people use SharePoint lists and libraries every month in Microsoft 365 to track issues, manage inventory, report status, onboard new hires, build out event agendas, manage FAQs, and more. With flexible columns, forms, and views, you can build your own solution to meet your specific needs without knowing how to code. All these great capabilities now come to you inside the Lists app in Teams.
As always, thanks for taking the time to read about Lists in Teams! We’d love to hear any feedback or ideas you might have. Do submit suggestions on user voice. We are listening!
by Scott Muniz | Sep 3, 2020 | Uncategorized
This article is contributed. See the original author and article here.
For the pilot episode of the Power Healthcare Hour, Tail Wind Informatics previews an upcoming Sept 8th 2020 webinar “Data Strategy for Healthcare Systems.” Andy Walz and Ross McNeely review common challenges, strategic frameworks, and general advice for Healthcare industry data initiatives. For the second half of the show, opportunities to get more value out of Power BI licensing will be discussed. Learn more about Tail Wind Informatics’ webinar at this link. Follow the Power Healthcare Hour by subscribing to the YouTube channel or following the Twitter account https://twitter.com/PowerHealthcare.

by Scott Muniz | Sep 3, 2020 | Uncategorized
This article is contributed. See the original author and article here.
Imagine the following scenario, after a successful phishing campaign, an attacker finds themselves with an active shell on one of your non-sensitive employee’s devices. Using Living-off-the-Land (LotL) tactics (employing built in tools and commands), the attacker starts identifying their next targets and configuration weaknesses to leverage to comprise them. One such vulnerability might be the infamous print spooler bug.
The print spooler bug…
As published on the security conference DerbyCon at (2018), the print spooler bug is a way to gain elevated credentials (a sensitive computer account Kerberos ticket in this case) by exploiting two distinct configurations.
- A privileged device with the “print spooler” service running.
- A victim device configured for Unconstrained Kerberos delegation.
Using these two configurations in tandem, an attacker can “request” the sensitive device Kerberos ticket using the print spooler service through the victim’s device; and because unconstrained Kerberos delegation is enabled, that request will contain the highly sought-after Kerberos authentication ticket (TGT) that allows the attacker to impersonate the domain controller computer account – pretty bad, right?

*Image from https://adsecurity.org/?p=4056
What can you do?
As part of Azure ATP, we introduced the Identity Security Posture assessment that automatically looks for these kinds of risky configurations in your on-premises environment. This assessment and the recommendation are now integrated in Microsoft Secure Score, makes creating a mitigation plan for these recommended actions easier than ever. To view the recommendations you can use the following steps:
- Go to the Microsoft Secure Score portal.
- Use filters to show the relevant product or tags.
- Locate the relevant improvement actions for mitigating the print spooler bug, create an action plan using the built–in options or click “Manage” to find out which entities have risky configurations and what actions are needed to re-configure them to remediate the issue.

Once mitigated, Microsoft Secure Score will reflect the actions taken by increasing your score and mark these improvement actions as “Completed”.
Now, let’s consider another scenario.
After mitigating the print spooler bug , you discover another improvement action called “Stop clear text credential exposure”. After clicking the “Manage” button to access the assessment to view additional details, you discover that a sensitive entity and an accompanying device are authenticating over LDAP simple bind. To make matters even worse, the exposed user is also sensitive (belonging to the Domain admin group)

You then realize that if an attacker can get onto your network, they can “sniff” the transmitted credentials that are in clear text and gain elevated credentials.
To further investigate this case, you will need additional details regarding this type of unsecure communication such as:
- What processes are causing this behavior?
- Are any of them part of a critical application?
- What should I do next?
The hunt is on…
To answer these questions, let’s utilize one of MTP’s cool features called Advanced hunting which is now also enriched with Azure ATP activities alongside other security products such as Microsoft Defender ATP, Cloud App Security and Azure AD, and data from Office 365.
We’ll start by going to the Advanced hunting page in the new M365 security portal and from there, we now have access to all the different types of hunting data available for us, including two main tables relevant for this task:
- IdentityLogonEvents – all logon events generated by Azure ATP including the LDAP Cleartext type
- DeviceNetworkEvents – All networking events generated by Microsoft Defender ATP including LDAP queries generated toward the domain controllers using port 389.
To get started, we can write a query, joining detected logon sessions and network events from both these tables, resulting in a consolidated result that includes the all the unsecure logon activities and their initiating process names.

Using the query result, we can construct a cohesive story:
“On Aug 05, Testuser2 used the LDP.exe executable to generate an unsecure authentication using LDAP Simple Bind from Client5.”
We now have the relevant details to create a full remediation plan for this activity, such as simply blocking LDP.exe or configuring the application to require a more secure authentication while blocking insecure authentications at the domain level.
Conclusion
And there you have it! Using Azure ATP’s Identity Security Posture assessment with Microsoft Secure Score and Advanced hunting, we can build a simple mitigation plan for our organization’s security weak spots, making it that much harder for the bad guy the get in
For more information about Identity Security Posture assessments and MTP, see
* Learn more about Identity security posture assessments.
* Learn more about Microsoft Secure Score
* Azure ATP activities in advanced hunting
Or Tsemah, Senior Product Manager, Azure ATP.
by Scott Muniz | Sep 3, 2020 | Azure, Technology, Uncategorized
This article is contributed. See the original author and article here.
Initial Update: Thursday, 03 September 2020 10:34 UTC
We are aware of issues with Data Latency within Application Insights and Log Analytics in West Europe region and are actively investigating. Some customers may experience intermittent data latency, data gaps and incorrect alert activation.
- Work Around: None
- Next Update: Before 09/03 14:00 UTC
We are working hard to resolve this issue and apologize for any inconvenience.
-Sandeep
by Scott Muniz | Sep 3, 2020 | Uncategorized
This article is contributed. See the original author and article here.
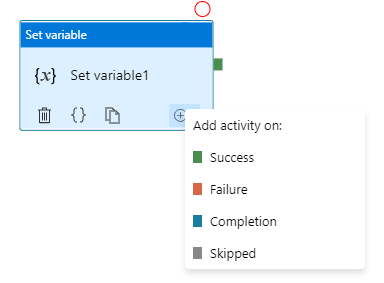
Azure Data Factory orchestration allows conditional logic and enables user to take different based upon outcomes of a previous activity. In total we allows four conditional paths: Upon Success (default pass), Upon Failure, Upon Completion, and Upon Skip. Using different paths allow users to build robust pipelines and incorporates error handling in their ETL/ELT logic.

Here are two common error handling pattern we see customers use:
- TRY-CATCH block. Define the business logic, and only defines Upon Failure path to catch any error from previous activities

- DO-IF-ELSE block. Define the business logic, and depends on the outcome of the activity, enacts either Upon Success path or Upon Failure path

Both are valid ways to incorporate error handling into the pipeline. However, upon pipeline execution, they may show different outcomes. Approach #1, TRY-CATCH, shows pipeline succeeds if Upon Failure path clears, where as approach #2, DO-IF-ELSE show pipeline failed if Upon Failure path is enacted.
Technical reasons for the difference is that, Azure Data Factory defines pipeline success and failures as follows:
- Evaluate outcome for all leaves activities. If a leaf activity was skipped, we evaluate its parent activity instead
- Pipeline result is success if and only if all leaves succeed
Applying the logic to previous examples.
- In approach #1 TRY-CATCH block:
- when previous activity succeeds: the node activity, Upon Failure, is skipped and its parent node succeeds, so overall pipeline succeeds
- when previous activity fails: the node activity, Upon Failure, enacted and overall pipeline succeeds if Upon Failure path succeeds
- In approach #2 DO-IF-ELSE block:
- when previous activity succeeds: one node activity, Upon Success, succeeded, and the other node activity, Upon Failure, is skipped and its parent node succeeds; so overall pipeline succeeds
- when previous activity fails: one node activity, Upon Success, is skipped and its parent node failed; so overall pipeline failed
Here is a table summarizing the difference
| Approach |
Error Handling Defines |
When Activity Succeeds |
When Activity Fails |
| TRY-CATCH |
Only Upon Failure path |
Pipeline shows Success |
Pipeline shows Success |
| DO-IF-ELSE |
Upon Failure and Upon Success paths |
Pipeline shows Success |
Pipeline shows Failure |

by Scott Muniz | Sep 2, 2020 | Uncategorized
This article is contributed. See the original author and article here.
Pre-requirements:
Before we start, please read these document about Duplicate Detection, Partitioned queues and topics and Message Sessions
From the above Pre-requirements, we learn the followings
- Enabling Duplicate detection helps to ensure that a duplicate message, which has the same message Id cannot be sent into a messaging entity during a specified time.
- Service Bus Partitions enable queues and topics or message entities to be partitioned across multiple message brokers and messaging stores. Enable partitioning the overall throughput will separate to different partition. Partition key can be used in some scenarios, such as sessions or transactions, require messages to be stored in a specific partition.
- Microsoft Service Bus Session enable joint and ordered handling of unbounded sequences of messages. There are two patterns of it , first out and request-response pattern. Any sender can create a session when submitting messages into a topic or queue by setting the SessionId property to some application-defined identifier that is unique to the session.
So, from these above knowledges, we know that Azure Service Bus Queue and Topic/Subscription can enable for Duplicate Detection, Partitions and Sessions. But what’s the relationship between them?
From the meaning of Duplication detection, we know that there is a MessageId of each message. Definition of MessageId is shown below
“If the queue or topic has the RequiresDuplicateDetection property set to true and the SessionId or PartitionKey properties are not set, then the MessageId property value serves as the partition key”
This means the duplicate detection only can work when SessionID or PartitionKey are not be set. Is that a correct statement? Let’s do a test!
Test Entities:
Queues:
There are three queue I used, testqueue, testqueue2, testqueue3. At first time all of them have 0 messages.

- testqueue: Enable Batched Operation, Requires Duplicate Detection. And set duplicate detection for 10 mins.

- testqueue2: Enable Batched Operation, Requires Duplicate Detection, Requires Session

- testqueue3: Enable Batched Operation, Requires Duplicate Detection, Requires Session, Enable Partition

My Program:
Here is the code. The different in this program used in each time, just the BrokeredMessage SessionID and PartitionKey that in red color.
The Session ID here set with a random value. From the above document, when enable both Partition key and Session ID, the value of them need to be same. Otherwise Service Bus returns an invalid operation exception.
class Program
{
static string connectionString = [ConnectionString];
static string queueName = “testqueue3”;// testqueue,testqueue2
static void Main(string[] args)
{
MainAsync();
}
static void MainAsync()
{
QueueClient sendClient = QueueClient.CreateFromConnectionString(connectionString, queueName);
//create a sender on the queue
var session = Guid.NewGuid().ToString();
var partitionKey = session;
sendClient.SendBatch(Enumerable.Range(0, 10).Select(n =>
{
Console.WriteLine(“test my message n{0}”, session);
BrokeredMessage test = new BrokeredMessage(“Hello World!”) { SessionId = session, , PartitionKey = session, MessageId = “deadbeef-dead-beef-dead-beef” + n };
return test;
}
));
}
}
Test Round 1:
To find the message, I sent 10 message each time first.
- testqueue (Enable Batched Operation, Requires Duplicate Detection): send 10 messages first, then immediately send another same 10 messages, it still displays 10 messages.

- testqueue2(Enable Batched Operation, Requires Duplicate Detection, Requires Session): send 10 messages first, and send another same 10 messages, here also display 10 messages.

- testqueue3(Enable Batched Operation, Requires Duplicate Detection, Requires Session, Enable Partition): Add new message twice the message count turn to 20.

You can see in the list there are message with duplicate MessageId.

Then I checked for same MessageId “deadbeef-dead-beef-dead-beef0” , and I found they have different Partition Keys.


Here are these three queues result in this test.

The above test about messages sent in duplicate detection duration. How about we wait for 10 mins to check after the duplicate detection time?
Test Round 2
After 10 mins, I sent 1000 messages again twice. The result shows, testqueue and testqueue2 have 1000 included the 10 messages sent before. For testqueue3, there are 2020 messages.

Test Result Summary
- From the first round test result, it indicates that messages with same MessageId can be detected as duplication in a non-partitioned entity within specified duplicate detection duration (10 mins).
- However with partitioned entity, duplicate messages which has same MessageId may not be detected as duplication due to they can end up in a different partition. In conclusion, messages can only be detected as duplication within the specified duplicate detection duration when they are landed in the same partition, i.e. same partition key
- For the second test with 1000 message were sent twice, it indicates that the duplicate duration detect only works for the specified duration. After the duplicate detection period, the Messages with same MessageId can be sent to the same Service Bus messaging entity.
by Scott Muniz | Sep 2, 2020 | Azure, Microsoft, Technology, Uncategorized
This article is contributed. See the original author and article here.
One of the challenges of large scale data analysis is being able to get the value from data with least effort. Doing that often involves multiple stages: provisioning infrastructure, accessing or moving data, transforming or filtering data, analyzing and learning from data, automating the data pipelines, connecting with other services that provide input or consume the output data, and more. There are quite a few tools available to solve these questions, but it’s usually difficult to have them all in one place and easily connected.
If this article was helpful or interesting to you, follow @lenadroid on Twitter.
Introduction
This is the first article in this series, which will cover what Azure Synapse is and how to start using it with Azure CLI. Make sure your Azure CLI is installed and up-to-date, and add a synapse extension if necessary:
$ az extension add --name synapse
What is Azure Synapse?
In Azure, we have Synapse Analytics service, which aims to provide managed support for distributed data analysis workloads with less friction. If you’re coming from GCP or AWS background, Azure Synapse alternatives in other clouds are products like BigQuery or Redshift. Azure Synapse is currently in public preview.
Serverless and provisioned capacity
In the world of large-scale data processing and analytics, things like autoscale clusters and pay-for-what-you-use has become a must-have. In Azure Synapse, you can choose between serverless and provisioned capacity, depending on whether you need to be flexible and adjust to bursts, or have a predictable resource load.
Native Apache Spark support
Apache Spark has demonstrated its power in data processing for both batch and real-time streaming models. It offers a great Python and Scala/Java support for data operations at large scale. Azure Synapse provides built-in support for data analytics using Apache Spark. It’s possible to create an Apache Spark pool, upload Spark jobs, or create Spark notebooks for experimenting with the data.
SQL support
In addition to Apache Spark support, Azure Synapse has excellent support for data analytics with SQL.
Other features
Azure Synapse provides smooth integration with Azure Machine Learning and Spark ML. It enables convenient data ingestion and export using Azure Data Factory, which connects with many Azure and independent data input and output sources. Data can be effectively visualized with PowerBI.
At Microsoft Build 2020, Satya Nadella announced Synapse Link functionality that will help get insights from real-time transactional data stored in operational databases (e.g. Cosmos DB) with a single click, without the need to manage data movement.
Get started with Azure Synapse Workspaces using Azure CLI
Prepare the necessary environment variables:
$ StorageAccountName='<come up with a name for your storage account>'
$ ResourceGroup='<come up with a name for your resource group>'
$ Region='<come up with a name of the region, e.g. eastus>'
$ FileShareName='<come up with a name of the storage file share>'
$ SynapseWorkspaceName='<come up with a name for Synapse Workspace>'
$ SqlUser='<come up with a username>'
$ SqlPassword='<come up with a secure password>'
Create a resource group as a container for your resources:
$ az group create --name $ResourceGroup --location $Region
Create a Data Lake storage account:
$ az storage account create
  --name $StorageAccountName
  --resource-group $ResourceGroup
  --location $Region
  --sku Standard_GRS
  --kind StorageV2
The output of this command will be similar to:
{- Finished ..
  "accessTier": "Hot",
  "creationTime": "2020-05-19T01:32:42.434045+00:00",
  "customDomain": null,
  "enableAzureFilesAadIntegration": null,
  "enableHttpsTrafficOnly": false,
  "encryption": {
    "keySource": "Microsoft.Storage",
    "keyVaultProperties": null,
    "services": {
      "blob": {
        "enabled": true,
        "lastEnabledTime": "2020-05-19T01:32:42.496550+00:00"
      },
      "file": {
        "enabled": true,
        "lastEnabledTime": "2020-05-19T01:32:42.496550+00:00"
      },
      "queue": null,
      "table": null
    }
  },
  "failoverInProgress": null,
  "geoReplicationStats": null,
  "id": "/subscriptions/<subscription-id>/resourceGroups/Synapse-test/providers/Microsoft.Storage/storageAccounts/<storage-account-name>",
  "identity": null,
  "isHnsEnabled": null,
  "kind": "StorageV2",
  "lastGeoFailoverTime": null,
  "location": "eastus",
  "name": "<storage-account-name>",
  "networkRuleSet": {
    "bypass": "AzureServices",
    "defaultAction": "Allow",
    "ipRules": [],
    "virtualNetworkRules": []
  },
  "primaryEndpoints": {
    "blob": "https://<storage-account-name>.blob.core.windows.net/",
    "dfs": "https://<storage-account-name>.dfs.core.windows.net/",
    "file": "https://<storage-account-name>.file.core.windows.net/",
    "queue": "https://<storage-account-name>.queue.core.windows.net/",
    "table": "https://<storage-account-name>.table.core.windows.net/",
    "web": "https://<storage-account-name>.z13.web.core.windows.net/"
  },
  "primaryLocation": "eastus",
  "provisioningState": "Succeeded",
  "resourceGroup": "<resource-group-name>",
  "secondaryEndpoints": null,
  "secondaryLocation": "westus",
  "sku": {
    "capabilities": null,
    "kind": null,
    "locations": null,
    "name": "Standard_GRS",
    "resourceType": null,
    "restrictions": null,
    "tier": "Standard"
  },
  "statusOfPrimary": "available",
  "statusOfSecondary": "available",
  "tags": {},
  "type": "Microsoft.Storage/storageAccounts"
}
Retrieve the storage account key:
$ StorageAccountKey=$(az storage account keys list
  --account-name $StorageAccountName
  | jq -r '.[0] | .value')
Retrieve Storage Endpoint URL:
$ StorageEndpointUrl=$(az storage account show
  --name $StorageAccountName
  --resource-group $ResourceGroup
  | jq -r '.primaryEndpoints | .dfs')
You can always check what your storage account key and endpoint are by looking at them, if you’d like:
$ echo "Storage Account Key: $StorageAccountKey"
$ echo "Storage Endpoint URL: $StorageEndpointUrl"
Create a fileshare:
$ az storage share create
  --account-name $StorageAccountName
  --account-key $StorageAccountKey
  --name $FileShareName
Create a Synapse Workspace:
$ az synapse workspace create
  --name $SynapseWorkspaceName
  --resource-group $ResourceGroup
  --storage-account $StorageAccountName
  --file-system $FileShareName
  --sql-admin-login-user $SqlUser
  --sql-admin-login-password $SqlPassword
  --location $Region
The output of the command should show the successful creation:
{- Finished ..
  "connectivityEndpoints": {
    "dev": "https://<synapse-workspace-name>.dev.azuresynapse.net",
    "sql": "<synapse-workspace-name>.sql.azuresynapse.net",
    "sqlOnDemand": "<synapse-workspace-name>-ondemand.sql.azuresynapse.net",
    "web": "https://web.azuresynapse.net?workspace=%2fsubscriptions%<subscription-id>%2fresourceGroups%2fS<resource-group-name>%2fproviders%2fMicrosoft.Synapse%2fworkspaces%<synapse-workspace-name>"
  },
  "defaultDataLakeStorage": {
    "accountUrl": "https://<storage-account-name>.dfs.core.windows.net",
    "filesystem": "<file-share-name>"
  },
  "id": "/subscriptions/<subscription-id>/resourceGroups/<resource-group-name>/providers/Microsoft.Synapse/workspaces/<synapse-workspace-name>",
  "identity": {
    "principalId": "<principal-id>",
    "tenantId": "<tenant-id>",
    "type": "SystemAssigned"
  },
  "location": "eastus",
  "managedResourceGroupName": "<managed-tesource-group-id>",
  "name": "<synapse-workspace-name>",
  "provisioningState": "Succeeded",
  "resourceGroup": "<resource-group-name>",
  "sqlAdministratorLogin": "<admin-login>",
  "sqlAdministratorLoginPassword": <admin-password>,
  "tags": null,
  "type": "Microsoft.Synapse/workspaces",
  "virtualNetworkProfile": null
}
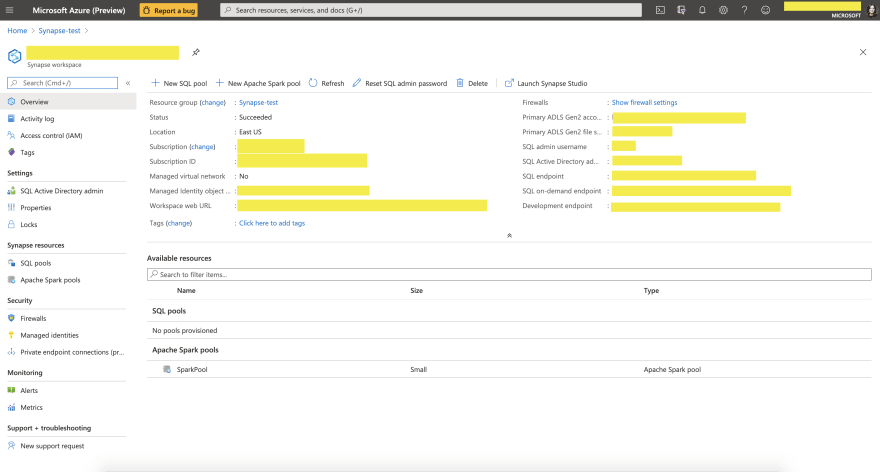
After you successfully created these resources, you should be able to go to Azure Portal, and navigate to the resource called $SynapseWorkspaceName within $ResourceGroup resource group. You should see a similar page:

What’s next?
You can now load data and experiment with it in Synapse Data Studio, create Spark or SQL pools and run analytics queries, connect to PowerBI and visualize your data, and many more.
Stay tuned for next articles to learn more! Thanks for reading!
If this article was interesting to you, follow @lenadroid on Twitter.

Recent Comments