This article is contributed. See the original author and article here.
Six months ago, we introduced Microsoft Dynamics 365 Copilot, the world’s first AI Copilot natively built for customer relationship management (CRM) and enterprise resource planning (ERP) applications. Since then, more than 63,000 organizations have experienced Copilot features in Microsoft Dynamics 365 and Microsoft Power Platform first-hand, empowering marketing, sales, and customer service teams in new ways to improve experiences across the customer journey.
Copilot is designed to help people do their very best work—and we’re seeing real value to support this vision. Today, I’m excited to share the most widely used scenarios and performance metrics from employees at Microsoft and leading organizations using Copilot capabilities across the customer journey. These stories and insights showcase what’s possible when employees are assisted by AI in the flow of work—helping them to boost productivity, perform tasks more efficiently, and focus on what matters most.
Transforming customer experience in the age of AI
Sellers, service agents, and marketers share a common goal: developing exceptional customer experiences that ultimately impact the bottom line. In July, we introduced the next wave of Copilot and AI capabilities to deliver connected customer experiences—from within Microsoft Dynamics 365 Sales and Microsoft Dynamics 365 Customer Insights, all the way through to the customer interactions in Outlook and Microsoft Teams powered by Microsoft Sales Copilot. With Dynamics 365 Copilot and Microsoft Sales Copilot, marketers can use everyday language to create relevant and targeted campaigns and brainstorm creative copy; sellers can move from one customer call and email to the next with relevant context on the opportunity at their fingertips; and service agents can become super agents with the help of AI to serve up relevant information to close customer cases more quickly.
Assisted by Dynamics 365 Copilot, Microsoft Support team resolves more cases faster, with less effort
At Microsoft, we’re also leading our own AI-first transformation and, since April, have been using Copilot capabilities in Microsoft Dynamics 365 Customer Service within our Customer Service and Support (CSS) team—one of the largest customer service organizations in the world. Today, we can share how Copilot has impacted the way agents work to resolve support cases, and the impact on their efficiency and productivity.
Microsoft’s Office of the Chief Economist, in partnership with the Dynamics 365 product group, evaluated how Copilot in Dynamics 365 Customer Service has impacted agent productivity since April. The initial results shared here reflect those of 11.5K agents, with 6.5K agents who used Copilot and the control group of 5K agents who did not use Copilot.
The findings demonstrate how Copilot can support agents of all experience levels in their workflows to increase efficiency and quality of customer engagements. Key results included:
Expedited agent onboarding. High turnover rates are common for service teams across industries, placing a burden on organizations to onboard new agents to be productive quickly. Copilot has been particularly effective in helping newer agents who don’t have years of experience or institutional experience get up to speed and find relevant information more quickly, the study found. Specifically, for low-severity chat cases in one area of our commercial support business, we observed a 12 percent reduction in average handle time—the time actively spent on resolving a customer case.
More cases resolved faster—without peer assistance. In the most productive scenario, the study found that in one support business, 10 percent of cases that normally require collaboration with peers were resolved independently. This means fewer customers had to experience being put on hold.
Direct feedback from Microsoft Support agents reveals how Copilot improves interactions with customers:
“Just wanted to share my gratitude to Copilot as a person who always struggles to wrap up wording before sharing with the customer—amazing time and pain saver for me!”
“[A] customer switched language mid-chat from English to Spanish. Copilot enabled me to continue to solve the problem regardless of the language shift.”
“I used Copilot to help a customer and got CSAT [customer satisfaction score] 5 out of 5. Their feedback was, ‘Very informative and to the point.’”
While the study captures just the first few months of AI-assisted service within the Microsoft Support organization, the results should encourage other organizations looking to optimize service operations with AI. The findings offer a glimpse of efficiencies and productivity gains that other organizations might experience when using Copilot. Read more details about the Microsoft Support team’s experience with Copilot on Microsoft Source. For the full story and video testimonial about the team’s transformation journey, check out the case study.
In addition to performance metrics, Microsoft employees provide feedback to the development team, helping to ensure every new capability provides the best possible benefit for users. This step is crucial as we roll out new features across Dynamics 365 Copilot—including a feature available today. Copilot summarization, now generally available, helps agents to quickly review the details of a case without sifting through notes, chat transcripts, and emails. This feature generates automatic conversation summaries, helping service agents to quickly understand highlights of a case—such as key customer problems and steps that agents took to resolve the case.
The Copilot summarization feature joins a host of upcoming Copilot capabilities for service teams, from the call center to field service professionals. View the release plans for Dynamics 365 Customer Service and Microsoft Dynamics 365 Field Service for details.
Service organizations expect Copilot to help deliver new levels of agent productivity and customer experiences
In addition to the early results from the Microsoft Support team, we’re hearing directly from leading organizations getting an early start with Copilot in Dynamics 365 Customer Service.
Prada Group, a global leader in luxury brands, is using Copilot to improve experiences for its discerning customers. “We’re excited to be one of the early adopters of the new Dynamics 365 Copilot AI tool,” shared Francesco De Giampaulis, Global Client Service & e-Commerce Payment Gateways and Anti-Fraud Manager, Prada Group. “By integrating it with our Knowledge Base and other internal sources, Copilot will assist our Client Service Advisors speeding up the onboarding process, offering a fast and smooth assistance to our customers, saving time searching for answers and focusing on providing a great experience, including suggestions for the right product or look.”
One of the leading investment management and advisory services, Vanguard Group, shared its initial experiences with Copilot. “Vanguard is utilizing Dynamics 365 Customer Service to support its agents in client service and knowledge management scenarios, as well as a custom bot to manage customer inquiries via its website,” explained Grant Pharez, Microsoft Dynamics 365 Specialist at Vanguard. “We are seeing promising results in testing the generative AI capabilities in these applications to help our customer care teams and self-service customer applications deliver exceptional service.”
Sellers reach new levels of productivity with Microsoft Sales Copilot
Concurrent to the Microsoft Support team’s experience, Microsoft deployed Microsoft Sales Copilot (previously Viva Sales) to 10,000 sellers within its sales organization. Early results show that 85 percent of surveyed sellers report completing one or more tasks faster, and 70 percent claim that Microsoft Sales Copilot helps them improve productivity.
Organizations like Securitas, a leading provider of custom security and guarding solutions, are noting the ability for sellers to focus time on what matters most. “Opportunity summary in Microsoft Sales Copilot is a huge and important leap in our direction to save more time for our sales personnel,” said Philip Eklund, Vice President, Client Engagement Services, Securitas. “With this capability in the hands of our sellers, they can spend more time equipping organizations with best-in-class security solutions to help make our world a safer place.”
Sellers using Microsoft Sales Copilot benefit from AI capabilities that help streamline the workday. Features slated for general availability in September and October include AI-generated preparation notes for customer conversations and opportunity and lead summaries. In addition, Microsoft Sales Copilot improves teamwork and knowledge sharing, providing sellers with collaboration spaces in Teams that integrate with CRM data and contact cards that surface CRM records directly in Microsoft 365 apps. View the release notes for Dynamics 365 Sales and Microsoft Sales Copilot for details. Get the e-book, “The AI Advantage: Driving Sales Performance with Next-Generation Tools”, which details how AI supports sales teams throughout the day.
Marketers surface deeper insights, optimize customer journeys with Copilot
Like sales and service professionals, marketing teams using Copilot in Dynamics 365 Customer Insights report tangible business benefits. TTEC Digital, a global customer experience (CX) technology and services company and Microsoft Gold Partner, shared how Copilot democratizes marketing tasks. According to Karl Phenix, VP at TTEC Digital, “Copilot in Customer Insights makes marketing employees more comfortable in doing complex tasks such as segmentation, which previously required specialists such as data scientists.” Karl added that “Copilot frees up time by generating emails in minutes, so marketing employees can do more to drive sales activities and accelerate the pipeline.”
Copilot features now generally available help marketers to deliver a consistent brand narrative and customer experience. Marketers can craft email content by prompting Copilot to curate content, change the tone and voice, or adjust the length of the copy. Available in preview, marketers can also create customer journeys simply by describing actions at each step, such as: “When a contact registers for an event, send a thank you email.” In fact, 59 percent of Dynamics 365 Customer Insights customers* have used Copilot when creating segments and 36 percent of customers used Copilot to ask questions to uncover customer and business insights. View the release notes for more details.
Start transforming customer experiences with Dynamics 365
Dynamics 365 is a complete suite of CRM and ERP applications that helps you manage your businesses across sales, marketing, service, finance, and supply chain.
Dynamics 365 Copilot is the world’s first AI copilot integrated into CRM and ERP applications in the cloud. Unlike other solutions, generative AI features are included in Dynamics 365 subscriptions for enterprise customers at no additional charge.
View the Dynamics 365 licensing guide to choose options that suit your business, and contact your Microsoft representative to learn more about the value and return on investments, as well as the latest offers—including a limited-time 26 percent savings on subscription pricing for Dynamics 365 Sales Premium.
If you are a Dynamics 365 customer, use Copilot capabilities today. Visit the Dynamics 365 release planner to view features coming soon and available to try now.
Copilot in Dynamics 365 and Power Platform
Copilot features are empowering marketing, sales, and customer service teams in new ways.
This article is contributed. See the original author and article here.
Global retailers, manufacturers, and distributors continue to face the new normal of doing business today: economic volatility, unpredictable customer spending, and operational complexities. As we gear up for the holiday season, businesses that are agile and responsive will be poised to capture market demand and deliver an exceptional end-to-end customer experience. Adopting modern technology solutions can introduce agility to key processes overnight, and leaders should look across their supply chain functions to identify levers for maximum impact.
Supply chain technology leaders recognize that competitiveness—and in some cases, an organization’s survival—demands digital parity, if not leadership, so they now openly embrace exploratory IT investments.1
One of those levers is warehouse management, a market that IDC reports grew at a compound annual rate of 14 percent in 2023.2 By embracing modern, robotic, and AI-enhanced warehouse management solutions (WMS), organizations can drive meaningful results across the business in a relatively quick time-to-value.
In this post, we’ll explore why warehouse management solutions are needed and how Microsoft and Dynamics 365 enable customers to navigate ongoing disruptions, optimize inventory levels, and deliver on time with ease.
Navigate supply chain uncertainties with technology
While the early days of the COVID-19 pandemic are behind us, retailers and operators are still navigating the new normal, which includes:
Growing labor constraints.
Demand volatility.
Multichannel distribution.
Storage capacity challenges.
Permeation of AI into core processes.
In the face of these challenges, there is an opportunity for businesses to embrace uncertainties with technology and maximize levers like distribution capacity, improved employee and warehouse productivity, and consistent operations during volatile times. Legacy enterprise resource planning (ERP) systems are often disjointed and lead to a delay in real-time insights and optimization.
What is a modern WMS?
A modern warehouse management system helps businesses manage and optimize key warehouse operations like inventory tracking and shipping coordination through an open and composable framework. It can integrate with multiple systems and platforms and helps support end-to-end business processes, from ERP to customer relationship management. For businesses that want to stay competitive in an ever-expanding fulfillment economy, a modern WMS meets those challenges with an agile, digitally connected solution that reduces costs through maximizing resources like employees, machinery and storage.2
Modern warehouse management solutions can help improve real-time visibility into inventory levels, provide the ability to automate and streamline operations, and drive greater efficiency across the organization.
Adopting a modern WMS can contribute to these outputs:
Reduced costs through improved inventory turns and optimized storage space.
Improved customer satisfaction via on-time and in-full delivery and improved fill rates.
Business growth and agility to meet unexpected customer demand and product development.
Automation and enhanced productivity to free up your employees’ time to focus on what’s next.
The benefits of a modern WMS
1. Reduced costs
Golden State Foods (GSF) is an industry leader that produces liquid products like sauces, dressings, and condiments for customers like McDonald’s and Chick-fil-A. With a 25 year-old legacy ERP system, GSF chose Dynamics 365 ERP solution’s Supply Chain Management and Finance to help create a modern, common platform with centralized reporting and more standardized processes to facilitate opening a new plant.
“We chose Dynamics 365 because we need modern technology that will evolve with us.”
–Carol Fawcett: Corporate Vice President and Chief Information Officer, GSF
With Dynamics 365 Supply Chain Management, GSF’s warehouse management processes were completely modernized. Dynamics 365 is being used to receive, put away, and consume inventory for production; report inventory as finished; store it in finished goods warehouses; and select it for shipment for customer orders. It prints standard barcode labels that are used at customers’ distribution centers for fast and accurate traceability—a considerable improvement from previous processes. This end-to-end visibility helps GSF operations managers improve inventory turns and make better decisions about production restraints and forecasting. With improved forecasting, GSF can reduce waste, optimize inventory, and increase its efficiency across its plants.
2. Improved customer satisfaction
Bedrosians Tile & Stone is one of the largest porcelain tile and stone importers and distributors in the United States, with 40 retail locations worldwide. It’s 30 year-old legacy ERP system impacted demand planning and forecasting, which was critical for Bedrosians’ massive 10,000-item inventory. Without accurate demand planning and forecasting, Bedrosians was reactive and vulnerable to market whims.
Like many retailers, Bedrosians saw customer demand skyrocket during the COVID-19 pandemic. Annual spending on home improvements grew, but without accurate demand forecasting, Bedrosians struggled to find that “just right” inventory on hand formula, often finding itself understocked or overstocked. With lead times as long as six months or more, the need to have accurate inventory levels—and visibility into them—couldn’t be more important.
Bedrosians’ legacy ERP impacted its ability to optimize inventory placement and as such, the company was at risk of promising products they couldn’t deliver or losing sales opportunities while inventory was in transit. Bedrosians chose Dynamics 365 ERP solutions to help optimize financial, inventory, purchasing, and planning capabilities to better streamline the movement of their globally sourced inventory. What used to be a manual guessing game has turned into an automated, scientific forecast based on historical data and industry trends. This ensures Bedrosians can capitalize on sales opportunities, despite months-long lead times, and deliver an on-time and in-full customer experience.
“Implementing Dynamics 365 has been a game-changer for our business. It has improved our operation and financial management. Real-time visibility, optimized procurement, and streamlined order processing has resulted in increased sales, improved margins, and a more efficient supply chain and positioned us for sustained growth in a competitive market.”
–Nirbhay Gupta: CIO, Bedrosians Tile & Stone
3. Business growth and agility
Barnas Hus is Norway’s leading children and baby products retailer, with both e-commerce and 28 physical stores. Working with a Microsoft partner, KPMG, Barnas Hus set out to face its supply chain challenges that were hindering its business growth, such as lack of visibility and inconsistent accuracy in its legacy ERP system. Barnas Hus embraced a modern, cloud-powered platform enabled by Dynamics 365. This technology-focused improvement helped the company transform its warehouse management, inventory control, production planning, and more—setting Barnas Hus up to meet growing customer demand.
Once they had made the shift, Barnas Hus opened a new state-of-the-art warehouse that utilizes autonomous robotics to accurately pick, sustainably pack, and trace every product. The modern warehouse management system improved inventory visibility and freed up employees to spend time with customers. The best part? The ease of implementation led to a quick time to demonstrate value and Barnas Hus saw its biggest month ever in revenue.
Michael Hill is a leading jeweler based in Australia with operations in New Zealand, Canada, and the United States. When the pandemic hit, its 300 stores were facing temporary closures and the company confronted logistic complications that forced expensive, indirect, and inefficient shipments to its customers worldwide. Michael Hill’s legacy ERP system was inflexible and lacked visibility and accuracy.
The international jeweler moved quickly to avoid harm to its business and its brand. It rapidly deployed Dynamics 365 and almost immediately began providing increased visibility into inventory availability across its supply chain. This gave Michael Hill the ability to treat each of its stores as a warehouse location, which seamlessly allowed customers to order items online with the option to pick up at the site of their choice or ship direct from that location. It also vastly reduced the manual labor previously required from Michael Hill employees to ensure fulfillment.
“We use the ship-from-store capability in Dynamics 365 to fulfill demand from many locations, rather than requiring human intervention whenever stock is transferred. That helps us reduce how many hops it takes to put a piece into the hands of the customers, and that’s our end game—a better experience.”
–Matt Keays: Chief Information Officer, Michael Hill
By implementing Dynamics 365 as its warehouse management system, Michael Hill was able to deliver agile flow solutions that freed up its employees to focus on more strategic initiatives such as loyalty programs and trialing new fulfillment models.
Learn more about Dynamics 365 solutions
To compete and thrive in market conditions today, organizations should look to adopt modern warehouse management solutions to better prepare for uncertainty, increased demand, and disruptive conditions. While legacy ERP systems are complex, Microsoft partners and Dynamics 365 solutions provide quick time-to-value and provide the agility and automation required for growth.
GARTNER is a registered trademark and service mark of Gartner, Inc. and/or its affiliates in the U.S. and internationally, and HYPE CYCLE is a registered trademark of Gartner, Inc. and/or its affiliates and are used herein with permission. All rights reserved.
This article is contributed. See the original author and article here.
Today, we are excited to announce the general availability of Conditional Access overview dashboard and templates. Conditional Access protects thousands of organizations across the globe daily and customers often ask us about best practices and how to improve security coverage. Conditional Access overview dashboard and templates empower Microsoft Entra ID customers to gain insights into their security posture, assess the impact of individual policies, and simplify deployment of Microsoft’s recommendations.
I’ve invited Krishna Venkit and Lisa Huang-North, product managers on the Identity Security team to share more details about these two features.
Best Regards,
Nitika Gupta
Group Product Manager, Identity Security
Microsoft Identity Division
————————————————————
Hi everyone!
The Conditional Access overview is a built-in dashboard that offers a comprehensive view of your Conditional Access posture. As an administrator, it provides a concise summary of your policies,identifies any gaps in your policy coverage, and provides valuable insights based on sign-in activity within your tenant. This feature enables you to swiftly pinpoint areas where you can enhance the enforcement of Zero Trust principles, ultimately bolstering your defense mechanisms.
Figure 1 Conditional Access overview
The dashboard is now the default landing page of Conditional Access. As the first entry point into Conditional Access, the overview page lets you quickly create new policies using one of the Conditional Access templates which capture commonly used policies and best practices.
The dashboard also offers the following insights and reporting capabilities:
The “See all unprotected sign-ins” link under the Users tile helps you rapidly identify users that are signing in without the protections of a Conditional Access policy.
Figure 2 Sign-ins without CA coverage during the last 7 days
The ‘See all non-compliant devices’ and ‘See all unmanaged devices’ links under the Devices tile help you identify device compliance gaps.
Figure 3 Non-compliant devices
You can discover the top 10 most accessed apps without Conditional Access coverage using the coverage tab and go one step further and identify the users without coverage for that app by clicking on the numbers in the ‘Users without coverage’ column.
Figure 4: Top accessed applications without CA coverage
You can discover security alerts generated based on sign-in activity in your tenant and take quick action on the alerts by deploying recommended zero trust conditional access policies using the Conditional Access templates. Speaking of which, let’s take a brief walkthrough of Conditional Access templates.
Conditional Access templates are a pre-defined set of conditions and controls that provide a convenient method to deploy new policies aligned with Microsoft recommendations. Customers are assured that their policies reflect modern best practices for securing corporate assets, promoting secure, optimal access for their hybrid workforce.
Conditional Access templates are organized across five scenarios:
Secure foundation
Zero Trust
Remote work
Protect administrators
Emerging threats
Organizations can choose from 16 predefined Conditional Access templates based on their specific needs. Here is an example!
With the “Require phishing-resistant multifactor authentication for admins” Conditional Access template, customers can reduce the risk of compromise and phishing attacks on privileged users. This powerful template usesConditional Access authentication strengths to help you choose the right authentication method requirements for specific scenarios, making it easier than ever for organizations to move their most critical users towards more secure, modern, and strong authentication.
This article is contributed. See the original author and article here.
This post is authored by Gerry Murray, Marketing and Sales Technology Research Director, IDC; and coauthored by Carlena Neely, Product Marketing Manager, Business Applications, Microsoft.
Dynamics 365 AI
Learn about the latest AI breakthroughs with Microsoft Sales Copilot.
Delving into the realm of customer-centric strategies, IDC analyst Gerry Murray casts a visionary light on the transformative influence of generative AI (Gen AI) on sales and service. Murray’s perspective resonates powerfully with the groundbreaking nature of Gen AI, which is reshaping customer interactions into a new era of efficiency and effectiveness.
Gen AI isn’t just another technology; it’s a strategic leap that orchestrates seamless data and workflows across marketing, sales, and service touchpoints. Gerry Murray emphasizes its potential to eliminate mundane tasks, such as drafting emails and preparing for meetings, while providing real-time support during crucial interactions. It is also extremely exciting to have covered the addition of Microsoft Sales Copilot, providing a more streamlined and AI-powered selling experience.
The true potential of Gen AI infused in tools such as Microsoft Sales Copilot unfolds when it seamlessly integrates with other applications such as CRM systems, Microsoft 365, and Microsoft Teams, presenting a harmony that minimizes risks while maximizing benefits. This strategic synergy aligns with industry best practices and fosters an environment of innovation.
Gen AI transcends the realm of ordinary tools; it’s an enabler propelling business toward an era of seamless experiences and unparalleled efficiency.
AI-powered customer and seller experiences
Customers have extremely high expectations for a vendor’s ability to personalize everything about their experiences pre- and post-sale. Consumers expect each touchpoint in their journey to be informed and enhanced by all the previous touchpoints. Business buyers have the same expectations, but they take much more work on the part of sellers to fulfill as everything about the B2B sales process is far more complex than B2C. In both cases, the days of relying on customers to continually explain the context of their situation to the next point of contact are over.
To achieve today’s new level of continuity, the data from every touchpoint needs to be available to every other system within brand and regulatory policy. Giving all customer-facing functions equal insights into behaviors such as social sentiment, sales engagement, purchase histories, late payments, product returns, and support consumption can greatly improve business performance across the board. That improvement requires the underlying infrastructure supporting front-office applications to enable the customer’s data to be available to service them wherever they go next, which is a daunting challenge for large enterprises with fragmented data silos.
Generative AI (Gen AI) for front office applications can manage the data and workflow triggers between customer interactions across marketing, sales, and service enabling these employees to be more helpful faster, which in turn raises customer satisfaction, advocacy, and lifetime value.
Generative AI for sales
AI-powered role-based assistants can help sales reps increase productivity and personalize every customer interaction so they can close more deals. Gen AI can be present in the tools sellers use daily such as Outlook, Microsoft Teams, or Microsoft Dynamics 365 Sales, and connects to other CRM systems. AI alleviates the tedium and time sinks of endless click loops through menus, drop downs, pick lists, and check boxes. The impact on employee experience will be significant as AI will enable sellers to:
Get auto-generated opportunity summaries including status, progress, and highlights of key changes.
Create contextual emails that utilize customer CRM data to pull in product, customer, and opportunity information.
Prepare for customer meetings with a summary view including account information, recent notes, highlights of any issues or concerns, customer news, and more.
Get real-time tips and suggested answers during video meetings prompted by competitor or brand mentions by the customers to stay ready to handle objections.
Augmenting the front office with insight
But AI in and of itself is not enough, as it requires a great deal of data. To help organizations increase the speed of acting on customer insights and orchestrating personalized customer journeys, data infrastructure must offer both customer data platform and customer journey orchestration capabilities as a single solution and continue investments into real-time marketing.
The most effective way to optimize the benefits of AI and minimize the risks at the same time is to put AI in the context of other applications. This approach makes AI effective at completing repetitive tasks for customer-facing employees in marketing, sales, commerce, merchandising, point of sale, customer service and support, call center, loyalty, and so forth, all functions in which decision quality and cycle time are essential to customer satisfaction. Microsoft Dynamics 365 Copilot can eliminate repetitive tasks such as:
Drafting messages and project plans.
Scheduling and summarizing sales calls.
Creating, testing, and fine-tuning audience segments.
Matching brand guidelines for emails, forms, and event registration pages using natural language to deliver a consistent brand narrative and customer experience.
Orchestrating customer journeys across marketing, sales, and service, so customer actions can be responded to appropriately and quickly, generating sales leads or increasing customer satisfaction.
AI significantly impacts customer-facing employees, improving their experience and enabling them to focus on higher-value tasks. It accelerates decision-making, improves productivity, and enhances the coordination of interactions with customers across various touchpoints.
Enhancing business efficiency
Gen AI is new and evolving at warp speed. IDC expects there to be a great deal of innovation in terms of future capabilities and a wide range of use cases across multiple front-office functions. Examples of how Gen AI can enhance work processes for sales and marketing include:
Additional sales use cases for Gen AI could include request for proposal (RFP) creation and response, upselling recommendations, price optimization, contract generation and review, account planning, territory optimization, and more.
In marketing, Gen AI can describe their customer segment in their own words to create a target segment with the query assist feature. Marketers can also use Gen AI to get inspiration for email campaign content based on a simple request. Gen AI can make suggestions based on key topics entered by the marketer and the organization’s existing marketing emails, as well as from a range of internet sources to increase the relevance of generated ideas. Additional use cases could include fine-tuned segmentation, send time optimization, content generation, testing and optimization, attribution, media mix modeling, and more.
IDC conclusion
Gen AI is one of the most significant technological advances of the last decade, it is as much of a quantum leap as the graphical user interface, the Internet, and smartphones. Gen AI is a major advancement for line-of-business people who can now explain what they want to do to an AI assistant instead of having to learn how to do it in a graphical user interface (GUI) that might involve hundreds of mouse clicks on menu calls, dialog boxes, drop downs, radio buttons, application switching, and so forth.
Learn more about the latest AI breakthroughs with Microsoft Sales Copilot on the Dynamics 365 AI webpage.
This article is contributed. See the original author and article here.
Utilizando Log Analytics para monitorar logs de auditoria do Azure RedHat OpenShift
Introdução
Por padrão, os clusters Azure Red Hat OpenShift possuem uma forma de monitorar os logs de auditoria através do OpenShift Logging, que envolve a instalação do OpenShift Elasticsearch Operator e OpenShift Cluster Logging. Embora essa solução seja eficiente, ela não permite a integração com o Azure Monitor, a solução de monitoramento da Microsoft, nem a centralização dos logs de auditoria de diversos clusters em um único local.
Para demonstrarmos uma solução personalizada, é necessário possuir um cluster Azure Red Hat OpenShift. Caso você não possua um cluster, é possível seguir o tutorial Criando um cluster Azure Red Hat OpenShift e lembre-se de utilizar a opção do pull secret para baixar as imagens da RedHat Pull Secret
Fluent Bit é um sistema de coleta e encaminhamento de registros e logs (logs de eventos e mensagens) desenvolvido como parte do ecossistema Fluentd. É uma solução leve e eficiente projetada para coletar, filtrar e encaminhar logs em ambientes distribuídos.
Azure Red Hat OpenShift
Após a criação do cluster, vamos analisar as pastas que estão os logs de auditoria do cluster.
Faça o login no cluster, você pode pegar o endereço do cluster no portal do Azure, na aba Overview do cluster criado e clicando no botão Connect
Clique na URL e utilize o username kubeadmin como user e o password como senha.
Instalando o Fluent Bit no cluster
Para fazer a instalação no Azure Red Hat OpenShift, precisamos setar o security context constraints (SCC), para isso você precisa estar logado via cli e ter um usuário com permissão de cluster-admin.
Por padrão a instalação do Fluent Bit os DaemonSets são instalados somente nos workers nodes, mas para ter acesso aos logs de auditoria, precisamos fazer a instalação somente no master node, para isso, vamos criar um arquivo chamado values.yaml com o seguinte conteúdo:
# kind — DaemonSet or Deployment
kind: DaemonSet
# replicaCount — Only applicable if kind=Deployment
replicaCount: 1
image:
repository: cr.fluentbit.io/fluent/fluent-bit
# Overrides the image tag whose default is {{ .Chart.AppVersion }}
tag: “latest-debug”
pullPolicy: Always
# Configure podsecuritypolicy
# Ref: https://kubernetes.io/docs/concepts/policy/pod-security-policy/
# from Kubernetes 1.25, PSP is deprecated
# See: https://kubernetes.io/blog/2022/08/23/kubernetes-v1-25-release/#pod-security-changes
# We automatically disable PSP if Kubernetes version is 1.25 or higher
podSecurityPolicy:
create: false
annotations: {}
openShift:
# Sets Openshift support
enabled: true
# Creates SCC for Fluent-bit when Openshift support is enabled
securityContextConstraints:
create: true
annotations: {}
resources: {}
# limits:
# cpu: 100m
# memory: 128Mi
# requests:
# cpu: 100m
# memory: 128Mi
## only available if kind is Deployment
ingress:
enabled: false
className: “”
annotations: {}
# kubernetes.io/ingress.class: nginx
# kubernetes.io/tls-acme: “true”
hosts: []
# – host: fluent-bit.example.tld
extraHosts: []
# – host: fluent-bit-extra.example.tld
## specify extraPort number
# port: 5170
tls: []
# – secretName: fluent-bit-example-tld
# hosts:
# – fluent-bit.example.tld
## only available if kind is Deployment
autoscaling:
vpa:
enabled: false
annotations: {}
# List of resources that the vertical pod autoscaler can control. Defaults to cpu and memory
controlledResources: []
# Define the max allowed resources for the pod
maxAllowed: {}
# cpu: 200m
# memory: 100Mi
# Define the min allowed resources for the pod
minAllowed: {}
# cpu: 200m
# memory: 100Mi
updatePolicy:
# Specifies whether recommended updates are applied when a Pod is started and whether recommended updates
# are applied during the life of a Pod. Possible values are “Off”, “Initial”, “Recreate”, and “Auto”.
updateMode: Auto
## How long (in seconds) a pods needs to be stable before progressing the deployment
##
minReadySeconds:
## How long (in seconds) a pod may take to exit (useful with lifecycle hooks to ensure lb deregistration is done)
##
terminationGracePeriodSeconds:
priorityClassName: “”
env: []
# – name: FOO
# value: “bar”
# The envWithTpl array below has the same usage as “env”, but is using the tpl function to support templatable string.
# This can be useful when you want to pass dynamic values to the Chart using the helm argument “–set =”
# https://helm.sh/docs/howto/charts_tips_and_tricks/#using-the-tpl-function
envWithTpl: []
# – name: FOO_2
# value: “{{ .Values.foo2 }}”
#
# foo2: bar2
## https://docs.fluentbit.io/manual/administration/configuring-fluent-bit/classic-mode/configuration-file
config:
service: |
[SERVICE]
Daemon Off
Flush {{ .Values.flush }}
Log_Level {{ .Values.logLevel }}
Parsers_File parsers.conf
Parsers_File custom_parsers.conf
HTTP_Server On
HTTP_Listen 0.0.0.0
HTTP_Port {{ .Values.metricsPort }}
Health_Check On
## https://docs.fluentbit.io/manual/pipeline/inputs
inputs: |
[INPUT]
Name tail
Path /var/log/kube-apiserver/*.log
multiline.parser docker, cri
Tag audit.kube-apiserver.*
DB /tmp/kube_apiserver.db
Mem_Buf_Limit 50MB
Refresh_Interval 10
Skip_Empty_Lines On
Buffer_Chunk_Size 5M
Buffer_Max_Size 50M
Skip_Long_Lines Off
[INPUT]
Name tail
Path /var/log/openshift-apiserver/*.log
multiline.parser docker, cri
Tag audit.openshift-apiserver.*
DB /tmp/openshift-apiserver.db
Mem_Buf_Limit 50MB
Refresh_Interval 10
Skip_Empty_Lines On
Buffer_Chunk_Size 5M
Buffer_Max_Size 50M
Skip_Long_Lines Off
[INPUT]
Name tail
Path /var/log/oauth-apiserver/*.log
multiline.parser docker, cri
Tag audit.oauth-apiserver.*
DB /tmp/oauth-apiserver.db
Mem_Buf_Limit 50MB
Refresh_Interval 10
Skip_Empty_Lines On
Buffer_Chunk_Size 5M
Buffer_Max_Size 50M
Skip_Long_Lines Off
## https://docs.fluentbit.io/manual/pipeline/filters
filters: |
[FILTER]
Name kubernetes
Match kube.*
Merge_Log On
Keep_Log Off
K8S-Logging.Parser On
K8S-Logging.Exclude On
## https://docs.fluentbit.io/manual/pipeline/outputs
outputs: |
[OUTPUT]
Name stdout
Match *
## https://docs.fluentbit.io/manual/administration/configuring-fluent-bit/classic-mode/upstream-servers
## This configuration is deprecated, please use `extraFiles` instead.
upstream: {}
## https://docs.fluentbit.io/manual/pipeline/parsers
customParsers: |
[PARSER]
Name docker_no_time
Format json
Time_Keep Off
Time_Key time
Time_Format %Y-%m-%dT%H:%M:%S.%L
# This allows adding more files with arbitary filenames to /fluent-bit/etc by providing key/value pairs.
# The key becomes the filename, the value becomes the file content.
extraFiles: {}
# upstream.conf: |
# [UPSTREAM]
# upstream1
#
# [NODE]
# name node-1
# host 127.0.0.1
# port 43000
# example.conf: |
# [OUTPUT]
# Name example
# Match foo.*
# Host bar
# The config volume is mounted by default, either to the existingConfigMap value, or the default of “fluent-bit.fullname”
volumeMounts:
– name: config
mountPath: /fluent-bit/etc/fluent-bit.conf
subPath: fluent-bit.conf
– name: config
mountPath: /fluent-bit/etc/custom_parsers.conf
subPath: custom_parsers.conf
Se desejar comparar o arquivo que está sendo criado com o arquivo oficial do Fluent Bit, você pode acessar o repositório do Fluent Bit, o arquivo yaml acima também tem a configuração para as pastas abaixo de logs do Azure Red Hat OpenShift que usam a tag [INPUT].
/var/log/kube-apiserver
/var/log/openshift-apiserver
/var/log/oauth-apiserver
Nessa configuração acima estão também estamos usando a imagem com a tag “latest-debug”, com essa tag é possível ver os logs do Fluent Bit no console do pod após a instalação do Fluent Bit no cluster, para isso basta executar o comando abaixo:
ls /var/log/kube-apiserver

ls /var/log/openshift-apiserver

ls /var/log/oauth-apiserver
Para realizar a instalação, esteja na mesma pasta em que o arquivo values.yaml foi criado e execute o comando abaixo.
Logo após instalado, vá ao dashboard do seu cluster, selecione workloads e pods na aba lateral e selecione o project como logging, você deve ter a mesma quantidade de pods que o cluster tem de worker nodes, no meu caso são três workers nodes.
Com a configuração atual estamos somente lendo os arquivos de logs e mostrando no terminal.
Criando um Log Analytics workspace
Para enviarmos os logs para o Azure Monitor precisamos criar um Log Analytics workspace, para isso acesse siga os passos
Após a criação do Log Analytics workspace e acesse o mesmo e na menu lateral nos settings clique no Agents.
Salve o Workspace ID e o Primary Key, pois vamos usar os mesmo para a nova configuração.
Agora precisamos adicionar mais um output na configuração do ConfigMap do Fluent Bit.
Vá no ConfigMap(fluent-bit) e adicione o output abaixo no final do arquivo e clique no salvar.
Após criar a secret você pode verificar a mesma rodando o comando abaixo.
kubectl get secret fluentbit-secret -n logging
Agora precisamos adicionar secret no DaemonSet, para isso vá no menu lateral e selecione DaemonSets e clique no fluent-bit e selecione Enviroments
Clique no Add from ConfigMap or Secret
Adicione as environments SharedKey e WorkspaceId e no Select a resource , selecione o Secret que foi criado anteriormente fluent-bit-secret, deixe igual a imagem abaixo e clique no save.
Para que a nova configuração seja aplicada, é necessário excluir os Pods atuais; execute o comando abaixo.
Após deletar os pods, você pode verificar que os novos pods já estão sendo criados com a nova configuração, para isso execute o comando abaixo.
kubectl get pods -l app.kubernetes.io/instance=fluent-bit  -n logging

# Utilize o nome do primeiro de pod que aparecer e execute o comando abaixo para ver os logs do pod.

kubectl logs fluent-bit-xxxx -n logging  | grep “customer_id=”
Vai mostrar os logs como abaixo, mostrando que o output para o Log Analytics workspace a foi enviado com sucesso.
Vizualizando os logs de auditoria no Log Analytics workspace
Entre no portal da azure, busque na barra de pesquisa do Log Analytics workspace e na lista selecione o Log Analytics workspace que foi criado nos passos anteriores.
No menu lateral selecione logs como na imagem abaixo.
Vai abrir uma tela de queries e feche a mesma.
Em tables, abra custom logs e deve ter uma tabela com no nome AuditOpenshift_CL
Vá no campo e coloque o comando abaixo e clique no Run
AuditOpenshift_CL |

take 100
Após rodar o comando, irá mostrar todos os logs de auditoria que estão sendo enviados para o Log Analytics workspace
Conclusão
Em resumo, o Fluent Bit é uma ferramenta poderosa para coletar e enviar logs para o Log Analytics Workspace da Azure. Com a configuração correta, você pode coletar logs de vários serviços e aplicativos em execução em seu cluster Kubernetes(OpenShift) e enviá-los para o Log Analytics Workspace para análise e monitoramento. Além disso, o Fluent Bit é altamente configurável e pode ser personalizado para atender às suas necessidades específicas. Esperamos que este guia tenha sido útil para você começar a usar o Fluent Bit em seu ambiente Kubernetes(OpenShift).
This article is contributed. See the original author and article here.
Introduction
Microsoft Fabric is a powerful unified analytics solution that allows users to seamlessly connect to various data sources, including Azure Databricks, and create insightful reports and visualizations without the need to move the data.
In this tutorial, we’ll show you step-by-step how to connect to Azure Databricks generated Delta Tables and create a report in Microsoft Fabric.
By the end of this tutorial, you’ll have the knowledge needed to read Azure Databricks generated Delta Tables from a Microsoft Fabric using Notebook and SQL query. You will also learn how to create a Power BI report that can help drive business decisions. So, let’s get started!
Prerequisites
Before you connect, complete these steps:
An Azure Databricks workspace
An ADLS Gen2 account to store delta table and a parquet file
Enter the connection details (sign in if required) and select Next.
In this case, I am using ‘Organization Account’ Authentication kind and hence need to sign in.
Field
Details
Connection
Existing connections for the specified storage location will appear in the drop-down. If none exist, create a new connection.
Connection name
The Azure Data Lake Storage Gen2 connection name.
Authentication kind
The supported models are: Organizational account, Account Key, Shared Access Signature (SAS), and Service principal. For more information, see ADLS shortcuts.
Enter the Shortcut Name and Sub path details and then click Create.
Field
Details
Shortcut Name
Name of your shortcut
URL
The Azure Data Lake Storage Gen2 URL from the last page.
Sub Path
The directory where the delta table resides.
The shortcut pointing to the delta table (fact_internet_sales) created in the last section will now appear as a delta table under Tables in the Explorer pane.
Click on the table (fact_internet_sales) and the data in the table will show up.
Read the data from Notebook – Lakehouse mode
The data in the table can now be queried directly from the notebook in Fabric.
Right-click on the table or click on ellipses (…) next to the table, click Open in notebook and then New notebook.
New notebook will appear with the query automatically generated to read the data in the table.
Select the Run Cell button or press Ctrl+Enter to execute the query and view the data.
Read the data using SQL – SQL Endpoint mode
The data in the table can also be queried directly using T-SQL query in Fabric.
Browse to the SQL Endpoint created as part of Lakehouse provisioning from your workspace.
After opening SQL Endpoint from the workspace, expand the database, schema and tables folder in the object Explorer to see all tables listed.
Right-click on the table (fact_internet_sales) or click on ellipses (…) next to the table, click New SQL Query and then Select TOP 100 rows.
The script will be automatically generated and executed to show the data in the table or click on Run to execute the query.
Visualise the data in Fabric using Power BI
The data in delta table can now be accessed and analysed in Power BI. You can either create a new dataset or use the default dataset created as part of lakehouse provisioning for a new report. For more information, see Direct Lake in Power BI and Microsoft Fabric
Using new dataset
If you are in the Lakehouse mode, click on New Power BI dataset.
If you are in the SQL endpoint mode, click on New Power BI dataset from Reporting tab.
In the New Dataset dialog, select the table to be included in the dataset and click Confirm.
The dataset is automatically saved in the workspace, and then opens the dataset. In the web modelling experience page, click on New Report
In the report authoring page, drag or select the attributes from Data pane to the left-hand side pane to be included in the visualization.
Using default dataset
Select your workspace and open the default dataset.
On the dataset page, click on Start from scratch to create a new report.
In the report authoring page, drag or select the attributes from Data pane to the left-hand side pane to be included in the visualization.
Summary
In conclusion, this guide provides a seamless solution for accessing Azure Databricks generated delta tables from Microsoft Fabric and visualizing the data in Power BI without the need to move the data. By following the steps outlined in this guide, you can easily connect to your delta tables and extract valuable insights from your data. With the power of Azure Databricks and Microsoft Fabric combined, you can take your data analysis to the next level and make informed decisions that drive business success.
Give it a try and let me know if this was helpful.
This article is contributed. See the original author and article here.
Microsoft MVPs continue to help the community by sharing their profound technical knowledge and demonstrating leadership. In this article, we spotlight Rudy Ooms, an Enterprise Mobility MVP from the Netherlands, and explore his insightful troubleshooting story that made a significant impact in addressing a real-world challenge.
Rudy found a question in the Microsoft Management Customer Connection Program (MM CCP) regarding the 0x800705B4 error. The individual posting the question referenced a previous blog post by Rudy where he shared the same error, however, it was not exactly the same case. Therefore, he quickly decided to step in to help the person who posted this question.
“The moment I noticed the question popping up in the MM CCP, I became aware of the fact that the problem he was experiencing wasn’t a simple one and was giving him and his company a lot of issues and headaches. So, at that point in time, I really needed to help him out. When taking a closer look at the issue, I quickly understood that the Microsoft support desk could find it difficult to solve this case. Why? If you can’t reproduce it yourself it can become difficult to solve it and that’s where I come in”.
The issue was the device sync issue that impacted on new Autopilot enrollments due to error 0x800705b4. Rudy promptly set up his test device, started troubleshooting with his familiar tool Fiddler, went through a lot of trial and error such as using the SyncML tool, and he discovered that an illegal XML character was the culprit. By removing the assignment of the policy and the autopilot settings within the registry, he successfully mitigated the issue and made devices sync and new enrollments worked smoothly. For a comprehensive insight into his challenges and the adjustments he undertook, we highly recommend delving into the detailed narrative on his blog post. Rudy mentions that he helped another individual on the WinAdmins Discord channel facing the exact same issue.
“After digging into the issue and finding the culprit within 24 hours yeah that felt pretty good,” Rudy is looking back on his contribution. Despite the lack of access to the questioner’s company’s tenants, the reason behind the early resolution of the situation was his desire to help, as well as his ability to improve his own troubleshooting skills by identifying the cause of the problem. This experience taught him a couple of things, ”It reminds me that you can learn new stuff every day… even when you thought you knew everything about SYNCML. And the MS community is strong and always willing to help – and so am I!”
The Product Group at Microsoft recognizes this wonderful troubleshooting story. Juanita Baptiste, Senior Program Manager, said of Rudy’s and the rest of the MVP community’s contributions, “The MVP community is more than just customers to bounce ideas off of. They are experts in their areas and cover more scenarios than we think. I have changed the design specs and features based on feedback from this community and it’s helped us build a better product. We can’t help everyone at the level of detail that MVPs (like Rudy) does, but the fact that they have each other for support and is an immense help to us!”
This story is the best practice of helping each other as a community. Whether you are an MVP or not, everyone has the ability to help others by sharing unique expertise and experience. Next, it is your turn. For example, the following sites (not limited to just the following, of course) can help you make a difference right away, starting today!
This article is contributed. See the original author and article here.
We’ve heard a lot about GitHub Copilot, but maybe more specifically about LLMs, large language models and how they can be used to generate code. You might even have used ChatGPT.
GitHub Copilot chat, is a product built by GitHub, it relies on a specific type of LLm a so called codex model and integrates with your IDE. It’s a bit like a pair programmer, but one that has seen a lot of code and can help you write it.
So what will we do today? We’ll use GitHub Copilot chat to solve a problem. The problem we have is Rock Paper Scissors. It’s a small game that most people knows the rules to. It’s also an interesting problem as it’s small and contained, but still has some complexity to it.
Where do we start? The interesting part here is that there are many ways to start which I discovered speaking to my colleague Cynthia. What we’re doing today is based on the excellent challenge module by Cynthia.
– Domain description. In this version, we write a domain descriptions with all rules and concepts in it and feed that to our AI pair programmer.
– One comment at a time. Here, we write a comment and gradually work our towards a solution. In this approach we tackle one concept and rule at a time.
For the sake of this article, we’ll use the domain description approach.
Solving the problem: use domain description
Luckily for us, the training module already have a domain description, here it is:
Game rules:

Rock beats scissors (breaking it).
Scissors beat paper (cutting it).
Paper beat rock (wrapping it).
The minigame is multiplayer and the computer plays the role of your opponent and chooses a random element from the list of elements

Interaction with the player:

The console is used to interact with the player.
The player can choose one of the three options: rock, paper, or scissors.
The player can choose whether to play again.
The player should be warned if they enter an invalid option.
The player is shown their score at the end of the game.
Validation of user input:

At each round, the player must enter one of the options in the list and be informed if they won, lost, or tied with the opponent.
The minigame must handle user inputs, putting them in lowercase and informing the user if the option is invalid.
By the end of each round, the player must answer whether they want to play again or not.
1. Create a new file called rockpaperscissor.py and paste the domain description at the top like so:
# rockpaperscissor.py
# Game rules:
# Rock beats scissors (breaking it).
# Scissors beat paper (cutting it).
# Paper beat rock (wrapping it).
# The minigame is multiplayer and the computer plays the role of your opponent and chooses a random element from the list of elements
# Interaction with the player:
# The console is used to interact with the player.
# The player can choose one of the three options: rock, paper, or scissors.
# The player can choose whether to play again.
# The player should be warned if they enter an invalid option.
# The player is shown their score at the end of the game.
# Validation of user input:
# At each round, the player must enter one of the options in the list and be informed if they won, lost, or tied with the opponent.
# The minigame must handle user inputs, putting them in lowercase and informing the user if the option is invalid.
# By the end of each round, the player must answer whether they want to play again or not.
# game loop where the player and computer selects rock, paper, or scissors, round is repeated until player quits by typing "quit"
Now we’ve provided context to Copilot in two ways, both by providing a domain description and by providing a file name *rockpaperscissor.py*. In the next step, let’s see what Copilot can do for us.
1. Type the following code:
quit = False
while
Here’s where I stopped typing code because Copilot suggested the following:
not quit:
and for every Enter I pressed, Copilot suggested code. So after having typed Enter a number of times and accepting all completions I arrived at this code:
quit = False
    while not quit:
        # player input
        player = input("rock, paper, or scissors? ")
        # computer input
        import random
        computer = random.choice(["rock", "paper", "scissors"])
        # game logic
        if player == computer:
            print("tie")
        elif player == "rock":
            if computer == "paper":
                print("computer wins")
            else:
                print("player wins")
        elif player == "paper":
            if computer == "scissors":
                print("computer wins")
            else:
                print("player wins")
        elif player == "scissors":
            if computer == "rock":
                print("computer wins")
            else:
                print("player wins")
        else:
            print("invalid input")
        # ask player if they want to play again
        play_again = input("play again? (y/n) ")
        if play_again == "n":
            quit = True
        elif play_again == "y":
            quit = False
        else:
            print("invalid input")
            quit = True
Improve the code, step 1
This code works, but it’s not the greatest code to look at. It doesn’t keep track of scores and it’s not very readable. So let’s see if we can improve it.
Open the the Chat component by selecting it at the bottom left of your left side menu (looks like a chat window). In it, type the prompt “improve code”. It should generate a response like so:
One improvement you could make is to add a score counter for the player and computer, so that the player can see their score at the end of the game. Here's an updated version of the code with a score counter:
followed by the code:
# Game rules:

# Rock beats scissors (breaking it).
# Scissors beat paper (cutting it).
# Paper beat rock (wrapping it).
# The minigame is multiplayer and the computer plays the role of your opponent and chooses a random element from the list of elements
# Interaction with the player:

# The console is used to interact with the player.
# The player can choose one of the three options: rock, paper, or scissors.
# The player can choose whether to play again.
# The player should be warned if they enter an invalid option.
# The player is shown their score at the end of the game.
# Validation of user input:

# At each round, the player must enter one of the options in the list and be informed if they won, lost, or tied with the opponent.
# The minigame must handle user inputs, putting them in lowercase and informing the user if the option is invalid.
# By the end of each round, the player must answer whether they want to play again or not.

# initialize score counters
player_score = 0
computer_score = 0

# game loop where the player and computer selects rock, paper, or scissors, round is repeated until player quits by typing "quit"
quit = False
while not quit:
    # player input
    player = input("rock, paper, or scissors? ")
    # computer input
    import random
    computer = random.choice(["rock", "paper", "scissors"])
    # game logic
    if player == computer:
        print("tie")
    elif player == "rock":
        if computer == "paper":
            print("computer wins")
            computer_score += 1
        else:
            print("player wins")
            player_score += 1
    elif player == "paper":
        if computer == "scissors":
            print("computer wins")
            computer_score += 1
        else:
            print("player wins")
            player_score += 1
    elif player == "scissors":
        if computer == "rock":
            print("computer wins")
            computer_score += 1
        else:
            print("player wins")
            player_score += 1
    else:
        print("invalid input")
    # ask player if they want to play again
    play_again = input("play again? (y/n) ")
    if play_again == "n":
        quit = True
    elif play_again == "y":
        quit = False
    else:
        print("invalid input")
        quit = True

# print final scores
print("player score:", player_score)
print("computer score:", computer_score)
In the above code, we’ve added a score counter for the player and computer, so that the player can see their score at the end of the game. We’ve also added a print statement to print the final scores.
Improve the code, step 2, use your know-how as a developer
What else can we do? At this point, we can start to refactor the code. An improvement we can do is to add a so called rule matrix. A rule matrix is a matrix that contains all the rules of the game. It’s a bit like a lookup table. Let’s provide that as a prompt to Copilot.
Here’s what we’re typing in Copilot chat:
improve code by adding a rule matrix to compare player and computer choices
which results in the following output from Copilot:
    # Game rules:

# Rock beats scissors (breaking it).
# Scissors beat paper (cutting it).
# Paper beat rock (wrapping it).
# The minigame is multiplayer and the computer plays the role of your opponent and chooses a random element from the list of elements
# Interaction with the player:

# The console is used to interact with the player.
# The player can choose one of the three options: rock, paper, or scissors.
# The player can choose whether to play again.
# The player should be warned if they enter an invalid option.
# The player is shown their score at the end of the game.
# Validation of user input:

# At each round, the player must enter one of the options in the list and be informed if they won, lost, or tied with the opponent.
# The minigame must handle user inputs, putting them in lowercase and informing the user if the option is invalid.
# By the end of each round, the player must answer whether they want to play again or not.

# initialize score counters
player_score = 0
computer_score = 0

# rule matrix
rules = {
    "rock": {"rock": "tie", "paper": "lose", "scissors": "win"},
    "paper": {"rock": "win", "paper": "tie", "scissors": "lose"},
    "scissors": {"rock": "lose", "paper": "win", "scissors": "tie"}
}

# game loop where the player and computer selects rock, paper, or scissors, round is repeated until player quits by typing "quit"
quit = False
while not quit:
    # player input
    player = input("rock, paper, or scissors? ")
    # computer input
    import random
    computer = random.choice(["rock", "paper", "scissors"])
    # game logic
    if player not in rules:
        print("invalid input")
    else:
        result = rules[player][computer]
        if result == "win":
            print("player wins")
            player_score += 1
        elif result == "lose":
            print("computer wins")
            computer_score += 1
        else:
            print("tie")
    # ask player if they want to play again
    play_again = input("play again? (y/n) ")
    if play_again == "n":
        quit = True
    elif play_again == "y":
        quit = False
    else:
        print("invalid input")
        quit = True

# print final scores
print("player score:", player_score)
print("computer score:", computer_score)
Now, you see how the code looks a lot better, no more nested if statements. We’ve also added a rule matrix (technically it added a dictionary not a matrix, but it’s still a big improvement over the code that was there before) to compare player and computer choices. Of course, we can still improve the code. For example, we can add a function to print the final scores. We should also add tests and documentation before we call it a day.
Conclusion
Sometimes using an AI assistant may look like magic, we could give it a full domain description. That could be a valid approach if the problem is small enough. Even then you need to improve the code in stages.
Another learning is that the more knowledge you have of code in general and the problem domain, the better you can guide the AI assistant to arrive at the solution you want.
Compare the difference between the first and last attempt, the last attempt is much better, don’t you think?
AI assistants aren’t here to replace us YET, but to help us solve problems, we still need to guide, we still need to know what we’re doing. But they can help us solve problems faster and better.
This article is contributed. See the original author and article here.
Intellectual property (IP) theft can wreak havoc on the supply chain and defense, stripping away an organization’s, or nation’s, competitive advantage. Hackers don’t necessarily pose the biggest threat to IP. Insider threats from employees, contractors and partners pose just as big a threat (some might argue bigger) from both accidental and deliberate data loss. While IP comes in many common forms, such as documents and spreadsheets, but images and CAD files pose just as big a risk and are more difficult to protect with traditional security tools. It is possible to protect and watermark CAD files stored and shared in Microsoft 365 applications to help prevent data loss and IP theft and meet Defense compliance requirements such as CMMC. Read on to learn more.
WHAT ARE CAD FILES?
If you’re not familiar with them, computer-aided design (CAD) files are used for designing models or architecture plans in a 2D or 3D rendering. CAD files are used for creating architectural designs, building plans, floor plans, electrical schematics, mechanical drawings, technical drawings, blueprints, or for special effects in movies. They are used by every organization related to any type of manufacturing or construction, including those who manufacture tools and equipment for other manufacturers.
2D CAD files are drawings that mimic ‘old school’ drafting work. Most often these still exist as blueprints for structures where the height isn’t as critical for the design or is a standard dimension, however the layout within that 2-dimensional space is critical. For example, how do we fit our desks, chairs, tables, etc., into that space? The problem with portraying complicated 3-dimensional objects like machine parts in only 2 dimensions is that they need to be rendered from multiple angles so that all critical dimensions are portrayed properly. This used to result in a lot of drawings of the same part, but from different angles.
3D files on the other hand can be portrayed in 3 dimensions and can be rotated in space and even ‘assembled’ with other parts. This can help Engineers discover issues (such as a pipe or shaft that has been accidentally routed through another part) much more quickly so they can be resolved long before production begins.
Much like image files, there are several types of CAD file extensions (.DWG, .DXF, .DGN, .STL) and the file type is dependent on the brand of software used to create them.
CHALLENGES TO CAD FILE PROTECTION
Since most CAD files contain intellectual property or IP, protecting them is critical to protect competitive advantage, avoid malicious theft/corporate espionage and stop sharing with unauthorized audiences. Depending on the industry, different regulations and protection policies may also need to be applied to protect CAD files. For example, in the defense industry, file that contain controlled unclassified information (CUI) must be classified and labelled as CUI under CMMC 2.0, NIST 800-17, and NIST 800-53 regulations.
Out of the box tools are often limited in their ability to classify and tag CAD files to meet the stringent requirements. Additionally, CAD files are often shared and collaborated on using file shares or even file sharing and collaboration tools like SharePoint, and Teams. Without the ability to properly classify and tag information Defense suppliers are at risk of losing valuable Government and Defense contracts to accidental sharing or malicious users.
5 TIPS TO PROTECT CAD FILES IN M365
Protecting CAD files is no different to protecting any other sensitive documents in your care. We recommend you:
Identify Sensitive CAD Files – The first step to any data protection strategy is knowing where your sensitive CAD files exist. If you don’t, you should consider using a scanning tool to find any files and apply appropriate protections.
Restrict Access – Ensure only users and partners who require access sensitive CAD are authorized to do so. Then follow tip #3.
Restrict Actions Authorized Users Can Take – Just because a user should be able to access a document, should they have carte blanche? For example, should they be able to edit it, download it or share it? Should they be able to access it on a public Wi-Fi or at an airport? You need to be able to apply fine grain access and usage controls to prevent data misuse and loss.
Digitally Watermark files to provide a visual reminder of the sensitivity level of files and add information about the user for tracking purposes in the event of a leak. For Defense applications you’ll want to add CUI markings to your watermark such as a CUI Designation Indicator.
Track Access – Keep an audit log of access and actions authorized users have taken with sensitive CAD files (print, save, download, email, etc.) and have a process in place to identify any suspicious activity (multiple downloads, access in the middle of the night, from a suspicious IP address, etc.).
DYNAMICALLYCLASSIFY, PROTECT AND WATERMARK CAD FILES WITH NC PROTECT
NC Protect from Microsoft Partner and MISA member, archTIS, provides advanced data-centric security across Microsoft applications to enhance information protection for cloud, on-premises and hybrid environments. The platform empowers enterprises to automatically find, classify and secure sensitive data, and determine how it can be accessed, used and shared with granular control using attribute-based access control (ABAC) and security policies.
NC Protect offers a range of unique capabilities to restrict access to, protect and watermark CAD files, as well as other documents, in Microsoft’s document management and collaboration application. Capabilities include:
Classification
NC Protect automatically applies Microsoft Information Protection (MIP) sensitivity labels based on the contents of the file.
Apply additional meta data or classification as required. For example, tag files as CUI.
Encryption
NC Protect leverages Microsoft Information Protection (MIP) sensitivity labels and Rights Management System (RMS) to encrypt CAD and other files.
Encrypt files at rest or in motion (e.g., email attachments)
Watermarking
Watermark CAD files with any attributes such as user name, date, time, etc. to deter photographing and remind users of the sensitivity of the file.
Automatically embed CUI Designator data into a 2D or 3 D CAD file as a secure digital watermark including: Name, Controlled BY, Category, Distribution/Limited Dissemination Control, and POC.
Add CUI designator markings.
Restrict Access & Actions
Protected CAD files can only be opened and modified by authorized users based on predefined policies.
Force read-only access for internal and guest users with a built-in Secure Viewer to prevent Copy, Paste, Print, Save As and Download capabilities.
Policies can also control if and who protected CAD files can be shared with.
Hide sensitive CAD files from the document view of unauthorized users in file sharing applications.
Tracking
Track access to all protected files as well as actions users have taken with the file.
Export user actions and logs to Microsoft Sentinel, Splunk or a CSV file for further analysis and upstream actions.
Supported Platforms & File types:
Protects CAD file across all Microsoft 365 applications: SharePoint, Teams, OneDrive, Exchange email, Office 365, as well as SharePoint Server and Windows file shares.
EASY TO CONFIGURE ACCESS, PROTECTION AND WATERMARK POLICES
Applying these policies and controls with NC Protect from archTIS is easy to do using the product’s built-in policy builder.
EASY TO CONFIGURE ACCESS, PROTECTION AND WATERMARK POLICES
For example, the policy below allows NC Protect to deny any guests users the ability to see that CAD files even exist within the network. With this policy activated, a guest will not see a dwg file – even if it resides in a container or Team that they have full access to. Consider how easy it is to share access to SharePoint, OneDrive and Teams with external users and how critical collaboration with external vendors can be for the business.
Users often place sensitive data into places that they don’t realize are accessible by people outside of the organization. This policy allows NC Protect to apply a blanket restriction on guests and mitigate the potential loss of sensitive intellectual property.
For more granular protection, the policy below forces any users who are not part of the Engineering Department to be limited to read only access to CAD files. Even if someone from the Engineering group gives them access to these files, if their department is not Engineering NC Protect will automatically invoke the Secure Reader when they try to open them. In this case the department attribute is being used, but NC Protect can use any attribute such as existing group memberships, title or any other custom attribute to determine how users can interact with these files.
NC Protect’s built-in Secure Reader enforces ‘true read only’ access. Users can’t download, copy or even print a protected file. NC Protect can also watermark the CAD file (or any other type of file) so if a user screenshots the drawing, the photo will contain their name, date and ‘CONFIDENTIAL’ as seen in the image below.
About the author
Irena Mroz, Chief Marketing Officer, archTIS
As CMO, Irena Mroz is responsible for leading archTIS’ product marketing, branding, demand generation and public relations programs. A technical cybersecurity marketer, Mroz has spent her 25+ year career empowering start-ups and public software companies to exceed growth objectives through successful product positioning, demand generation, high profile events and product evangelism. Mroz holds a Bachelor of Science in Mass Communications from Boston University’s College of Communication.
About archTIS
archTIS is a global provider of innovative software solutions for the secure collaboration of sensitive information. The company’s award-winning data-centric information security solutions protect the world’s most sensitive content in government, defense, supply chain, enterprises and regulated industries through attribute-based access and control (ABAC) policies. archTIS’ complementary NC Protect software enhances Microsoft security capabilities with fine-grain, dynamic ABAC policies to control access to and add unique data protection capabilities to secure sensitive data across Microsoft 365 apps, SharePoint on-premises and Windows file shares. The company is a Microsoft Partner and a member of the Microsoft Intelligent Security Association. For more information, visit archtis.com or follow @arch_tis.
This article is contributed. See the original author and article here.
At Microsoft Inspire 2023, we announced that we are bringing together Microsoft Dynamics 365 Marketing and Microsoft Dynamics 365 Customer Insights into one offer, enabling organizations to unify and enrich their customer data to deliver personalized, connected, end-to-end customer journeys across sales, marketing, and service. We are retaining the existing “Dynamics 365 Customer Insights” name to encompass this new offer of both applications. Today, we’re excited to share that the new Dynamics 365 Customer Insights is now generally available for purchase.
For our existing Dynamics 365 Marketing and Dynamics 365 Customer Insights customers, this change signals an acceleration into our “better together” story, where we’ll continue to invest in new capabilities that will enable stronger, insights-based marketing, making it easier for marketers and data analysts to glean insights from customer data. Beginning September 1, 2023, customers who had the previous license for Marketing and/or Customer Insights will only see a product name change in the product; there will be no changes to the core product functionality due to the consolidation of the two products.
The new Customer Insights offers your organization flexibility to meet your business needs, with access to both the customer data platform (Customer Insights—Data) and real-time marketing with customer journey orchestration (Customer Insights—Journeys). The new pricing enables customers to unlock access to both applications and then buy the capacity they need. This gives you, our customers, the power of choice—where you can start with one or both applications and further invest in the capabilities that you’d like to scale. If you’re an existing customer of Microsoft Dynamics 365 Sales or Microsoft Dynamics 365 Customer Service, you can use Customer Insights as the foundation of your customer experience (CX) stack by achieving greater customer understanding and orchestrating contextual customer journeys across every touchpoint of the business.
Achieve greater personalization with Copilot in Dynamics 365 Customer Insights
With the Customer Insights customer data platform, you can gain a holistic view of your customers, anticipate needs, and discover growth opportunities. And with real-time marketing and journey orchestration, you can deliver personalized, in-the-moment customer-triggered engagements that are relevant and contextual. With Copilot in Customer Insights, you can save time by using natural language to create or enhance target segments. You can also nurture creativity by turning topics into suggested copy, helping marketers move from concept to completion faster.
With the power of Copilot in Dynamics 365 Customer Insights, included at no additional cost, your data analysts and marketers can be more productive and increase their focus on personalizing the customer journey.
Our latest investments in copilot capabilities include the ability to:
Get help with content development by providing a short list of key points, and tailor with a tone of voice that matches your brand and campaign. Utilize the generated content suggestions as-is or build upon them in email, social posts, and more.
Customer success with Dynamics 365 Customer Insights: Lynk & Co
Let’s take a look at an organization that is using Dynamics 365 Customer Insights today.
Lynk & Co is a Sweden-based company that is transforming the way people use cars by offering a simple and flexible experience where customers can choose to buy, borrow, or subscribe to a vehicle. With ambitions to disrupt the automobile industry and launch its business in seven markets in less than two years, Lynk & Co needed to quickly build an infrastructure that could support multi-channel customer engagement and drive highly personalized experiences. The company chose Microsoft Dynamics 365 for its out-of-the-box and customizable tools and the ability it provided to build in modules to create unique processes and prioritize specific customer experiences. Within 18 months, Lynk & Co was able to ramp up a significant digital presence in Belgium, France, Germany, Italy, Netherlands, Spain, and Sweden, as well as open social clubs designed to bring the company’s online brand to life through community-focused events.
The company uses Dynamics 365 Customer Insights to capture actionable customer data and link it with operational data within its cars. This is helping the company create seamless, highly personalized experiences for every customer from their first engagement to every time they use the app, drive a car, have service, or visit a club. It also makes it easy to support customers if they want to move from simply borrowing a car, to a monthly subscription, or to a car purchase.
With the customer journey orchestration features in Dynamics 365 Customer Insights, customers get personalized messaging and image content. Beyond that, the system sends right-timed information on specific-to-the-customer club event invitations. These events vary from country to country but have included everything from unplugged live music nights and art openings to meet-ups for running and cycling groups, community talks on social issues, or workshops on how to upcycle old sneakers.
Engagement data from these events feeds back into the platform to further personalize member experiences across all lines of business, across all communication channels—and helps Lynk & Co learn and iterate.
Learn more and get started today with Dynamics 365 Customer Insights
To learn more about Dynamics 365 Customer Insights, take the guided tour or start a free 30-day trial. If you have questions about the merging of Dynamics 365 Marketing and the previous Dynamics 365 Customer Insights, including pricing, please reference the FAQ on Microsoft Learn. If you missed Inspire 2023, you can watch the session by Emily He (Corporate Vice President, Business Applications Marketing), on demand, to see the announcements for Business Applications, including the latest innovations in Dynamics 365 Customer Insights.
The new Dynamics 365 Customer Insights
We’re bringing together Marketing and Customer Insights into one offer.


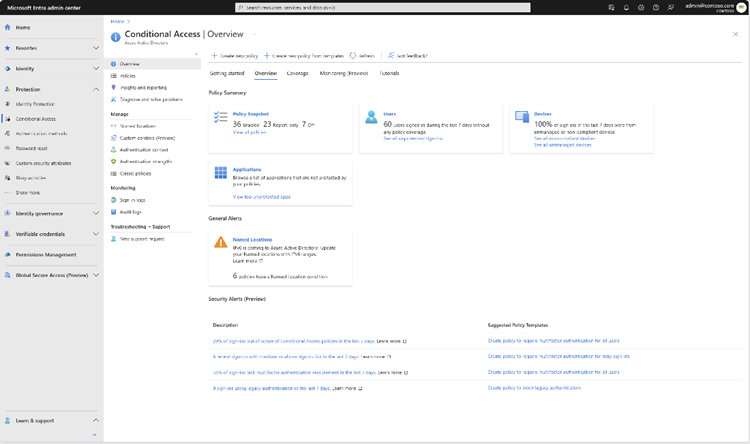


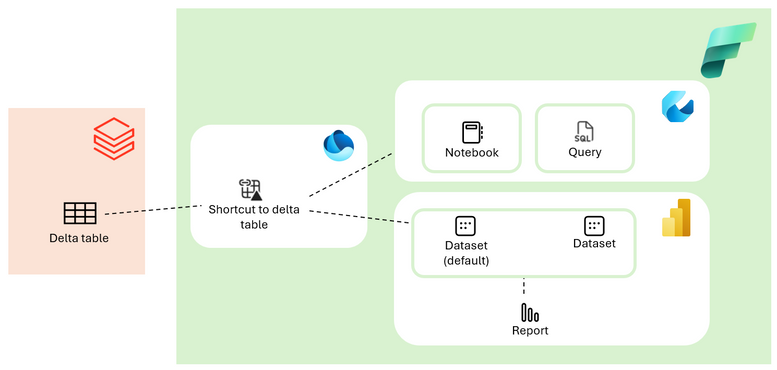


Recent Comments