by Scott Muniz | Sep 14, 2020 | Azure, Technology, Uncategorized
This article is contributed. See the original author and article here.
Introduction
This is Andrew Coughlin and I am a Customer Engineer at Microsoft focusing on Azure IaaS. In this blog I will focus on how to upload a custom windows Hyper-V image for generation 2 virtual machines in Azure. Support for generation 2 virtual machines in Azure was released on November 4, 2019, these systems use UEFI boot, SCSI, supported on VMs that support premium storage compared to generation 1 which use PCAT boot, IDE and are available on all VM sizes. Generation 2 VMs provide for OS disk size greater than 2TB in size and build larger VMs, up to 12TBs. To get additional information about generation 2 virtual machines in Azure please visit this post.
If you have ever uploaded a custom image in Azure in the past you will notice the process is very similar.
Prerequisites
- Review the Support for generation 2 VMs on Azure.
- Install Azure PowerShell as documented here.
- Create Hyper-V Gen 2 machine to be used as the image.
- Prepare your Windows Hyper-V image is documented here.
- Convert VHDX to VHD as documented here.
- Download and Install azcopy as documented here.
- Sign in with Azure as documented here.
- Select Azure subscription to upload image as documented here.
Upload Hyper-V Image to Managed Disk
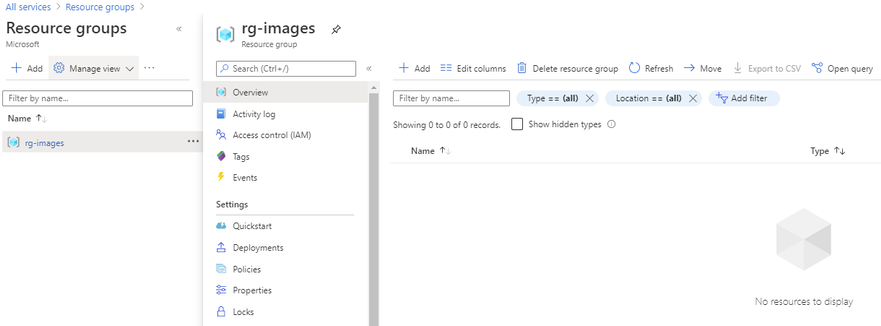
First you want to determine which resource group the image will reside in or if you will create a new resource group. As a reminder a resource group is a container that holds related solutions: virtual machines, storage accounts, disks virtual networks, etc. for your Azure solutions. A resource group can include all resources for your solutions or only those resources that you want to be managed together. For documentation on how to create a new resource group, this can be found on this page. In this example I’m going to use the resource group called “rg-images”.

First, we need to open an elevated PowerShell command prompt.

Next, we will set some variables as we will need these throughout the process, in this example. We are going to be creating this image in Central US, with the image name W2K19-Image-V2, in the resource group called rg-images, with a disk image called W2K19-Image-V2.
- $location = ‘Central US’
- $imageName = ‘W2K19-Image-V2’
- $rgName = ‘rg-images’
- $diskname = ‘W2K19-Image-V2’

Next, we want to create an empty managed disk, you will type the following commands:
$vhdSizeBytes = (Get-Item "<full File Path>").length

$diskconfig = New-AzDiskConfig -SkuName 'Standard_LRS' -OsType 'Windows' -UploadSizeInBytes $vhdSizeBytes -Location $location -CreateOption 'Upload'

New-AzDisk -ResourceGroupName $rgName  -DiskName $diskname -Disk $diskconfig

NOTE: You can replace the Standard_LRS, with Premium_LRS or StandardSSD_LRS. At the writing of this blog Ultra disks are currently not supported.
Next, we need to confirm the disk status is equal to “ReadyToUpload”, you will type the following:
$disk = Get-AzDisk -ResourceGroupName $rgName -DiskName $diskname

$disk.DiskState

NOTE: The disk status must be set to “ReadyToUpload”, if it is not you need to check what was typed in the “New-AzDiskConfig” command.
Now we want to create the writable shared access signature (SAS) for the managed disk we just created. Then we will get the disk status and make sure it is equal to “ActiveUpload”, to do this you will type the following:
$diskSas = Grant-AzDiskAccess -ResourceGroupName $rgName -DiskName $diskname -DurationInSecond 86400 -Access 'Write'

$disk = Get-AzDisk -ResourceGroupName $rgName -DiskName $diskname

$disk.DiskState

Now we are ready to upload our disk to Azure, to do this you will type the following and wait for the process to complete:
cd <location of Azcopy>

.azcopy.exe copy "<location of vhd>" $diskSas.AccessSAS --blob-type PageBlob

When the upload is completed you will get the following results:

After the upload has completed, you will revoke access from the disk as this is not needed, you will type the following:
Revoke-AzDiskAccess -ResourceGroupName $rgName -DiskName $diskname

Create Image from Managed Disk
We now have the managed disk uploaded to the cloud. The next step is to create an image from that managed disk. When the image is created, we want to make sure to specify this image will be a V2 image. To do this you will type the following:
$imageConfig = New-AzImageConfig -Location $location -HypervGeneration V2

$imageConfig = Set-AzImageOsDisk -Image $imageConfig -OsState Generalized -OsType Windows -ManagedDiskId $disk.Id

$image = New-AzImage -ImageName $imageName -ResourceGroupName $rgName -Image $imageConfig

Verify in the portal that our image is now created from our managed disk. We can now start provisioning generation 2 virtual machines with this image.

Conclusion
There you have it, we have just uploaded a custom windows image and now we can use that image to deploy generation 2 virtual machines in your Azure environment. Thank you for taking the time to read this blog, I hope this helps you and see you next time.
Disclaimer
The sample scripts are not supported under any Microsoft standard support program or service. The sample scripts are provided AS IS without warranty of any kind. Microsoft further disclaims all implied warranties including, without limitation, any implied warranties of merchantability or of fitness for a particular purpose. The entire risk arising out of the use or performance of the sample scripts and documentation remains with you. In no event shall Microsoft, its authors, or anyone else involved in the creation, production, or delivery of the scripts be liable for any damages whatsoever (including, without limitation, damages for loss of business profits, business interruption, loss of business information, or other pecuniary loss) arising out of the use of or inability to use the sample scripts or documentation, even if Microsoft has been advised of the possibility of such damages.

by Scott Muniz | Sep 14, 2020 | Uncategorized
This article is contributed. See the original author and article here.
 Kudos to @nitya for creating the Serverless September 2020 artwork (used as the cover image here). Feel free to use the image for any content (article, tweet, post or similar) you create.
Serverless September is our once in a year opportunity to keep talking about Serverless to our friends without feeling bad about it. To make things more exciting, we get the entire month of September, for 30 days, to tell the community how we are using Serverless.
Throughout September, we’re adding new content about building serverless APIs, using durable functions for event sourcing, automating day-to-day tasks and more to #ServerlessSeptember Content Collection on dev.to. On Fridays @madebygps and @codebeast live stream hacking the best and the most interesting bits of Serverless.
Keep an eye on our #ServerlessSeptember Content Collection that is updated every day with new content on dev.to.
by Scott Muniz | Sep 13, 2020 | Uncategorized
This article is contributed. See the original author and article here.
Microsoft has recently revealed an ARM Template DSL (Domain Specific Language), called Bicep to help devs build ARM templates quicker and easier.
There are several ways of provisioning resources onto Azure – via Azure Portal, or PowerShell or Azure CLI, or Azure SDKs in different languages, which all leverages Azure Resource Manager REST APIs. ARM template is one popular approach for DevOps engineers. However, many DevOps engineers have been providing feedback that ARM template is hard to learn and deploy at scales, as it can be tricky. Therefore, field experts like Microsoft MVPs have suggested many best practices about authoring ARM templates and share them through Azure Quickstart Templates or their own social platform. But it’s still the big hurdle to get through.
As of this writing, it’s v0.1, which is a very early preview. It means there will be many improvements until it becomes v1.0 including some potential breaking changes. Throughout this post, I’m going to discuss its expressions and how it can ease the ARM template authoring fatigues.
The sample .bicep file used for this post can be fount at this GitHub repository.
DO NOT USE BICEP ON YOUR PRODUCTION UNTIL IT GOES TO V0.3
ARM Template Skeleton Structure
ARM template is a JSON file that follows a specific format. A basic template looks like:
  {
    "$schema": "https://schema.management.azure.com/schemas/2019-04-01/deploymentTemplate.json#",
    "contentVersion": "1.0.0.0",
    "parameters": {},
    "functions": {},
    "variables": {},
    "resources": [],
    "outputs": {}
  }
Those parameters, variables, resources and outputs attributes are as nearly as mandatory, so Bicep supports those attributes first. Due to this JSON syntax, there have been several issues for authoring.
- First, it’s easy to incorrectly write the JSON template once the resource goes complex.
- Second, due to this complex structure, the readability gets dramatically reduced.
- Third but not the last,
parameters, variables, resources and outputs MUST be defined within their declared sections, respectively, which is not as flexible as other programming languages.
But Bicep has successfully sorted out those issues. Let’s have a look how Bicep copes with it.
Bicep Parameters
Parameters in Bicep can be declared like below. Every attribute is optional, by the way.
  param myParameter string {
    metadata: {
      description: 'Name of Virtual Machine'
    },
    secure: true
    allowed: [
      'abc'
      'def'
    ]
    default: abc
  }
The simplest form of the parameters can be like below. Instead of putting the metadata for the parameter description within the parameter declaration, we can simply use the comments (line #1). Also, instead of setting the default value inside the parameter declaration, assign a default value as if we do it in any programming language (line #7). Of course, we don’t have to set a default value to the parameter (line #8).
  // Resource name
  param name string

  // Resource suffix
  param suffix string

  param location string = resourceGroup().location
  param locationCode string
On the other hands, to use secure or allowed attribute, the parameter should be declared as an object form (line #3-5).
  param virtualMachineAdminUsername string

  param virtualMachineAdminPassword string {
    secure: true
  }

  param virtualMachineSize string {
    allowed: [
      'Standard_D2s_v3'
      'Standard_D4s_v3'
      'Standard_D8s_v3'
    ]
    default: 'Standard_D8s_v3'
  }
Note that the parameter declaration is all about what type of value we will accept from outside, not what the actual value will be. Therefore, it doesn’t use the equal sign (=) for the parameter declaration, except assigning its default value.
Bicep Variables
While the parameters accept values from outside, variables define the values to be used inside the template. The variables are defined like below. We can use all of existing ARM template functions to handle strings. But as Bicep supports string interpolations and ternary conditional operators, we can replace many concat() functions and if() functions with them (line #2-3).
  var metadata = {
    longName: '{0}-${name}-${locationCode}${coalesce(suffix, '') == '' ? '': concat('-', suffix)}'
    shortName: '{0}${replace(name, '-', '')}${locationCode}${coalesce(suffix, '') == '' ? '' : suffix}'
  }

  var storageAccount = {
    name: replace(metadata.shortName, '{0}', 'st')
    location: location
  }
Note that, unlike the parameters, the variables use the equal sign (=) because it assigns a value to the variable.
Bicep Resources
Bicep declares resources like below.
  resource st 'Microsoft.Storage/storageAccounts@2017-10-01' = {
    name: storageAccount.name
    location: storageAccount.location
    kind: 'StorageV2'
    sku: {
      name: 'Standard_LRS'
    }
  }

  resource vm 'Microsoft.Compute/virtualMachines@2018-10-01' = {
    name = resourceName
    location = resourceLocation
    ...
    properties: {
      ...
      diagnosticsProfile: {
        bootDiagnostics: {
          enabled: true
          storageUri: st.properties.primaryEndpoints.blob
        }
      }
    }
  }
There are several things worth noting.
- The format to declare a resource is similar to the parameter. The parameter declaration looks like
param <identifier> <type>. The resource declaration looks similar to resource <identifier> <type>.
- However, the resource type section is way different from the parameter declaration. It has a definite format of
<resource namespace>/<resource type>@<resource API version> (line #1).
- I prefer to using the
providers() function as I can’t remember all the API versions for each resource.
- But using the
providers() function is NOT recommended. Instead, the API version should be explicitly declared. To find out the latest API version, use the following PowerShell command.
  $resourceType = @{ Label = "Resource Type"; Expression = { $_.ResourceTypes[0].ResourceTypeName } }
  $apiVersion = @{ Label = "API Version"; Expression = { $_.ResourceTypes[0].ApiVersions[0] } }
  Get-AzResourceProvider `
      -ProviderNamespace  `
      -Location  | `
      Select-Object $resourceType, $apiVersion | `
      Sort-Object -Property "Resource Type" | `
      Where-Object { $_."Resource Type" -eq "" }
- Bicep automatically resolves the dependencies between resources by using the resource identifier.
- For example, the Storage Account resource is declared first as
st, then st is referred within the Virtual Machine declaration (line #19).
- On the other hands, in the ARM template world, we should explicitly declare resources within the
dependsOn attribute to define dependencies.
You might have found an interesting fact while authoring Bicep file.
- ARM templates should rigorously follow the schema to declare parameters, variables and resources. Outside its respective section, we can’t declare them.
- On the other hands, Bicep is much more flexible with regards to the location where to declare parameters, variables and resources.
- We can simply declare
param, var and resource wherever you like, within the Bicep file, then it’s automagically sorted out during the build time.
Bicep Installation and Usage
As mentioned above, Bicep has just started its journey, and its version is v0.1, meaning there are a lot of spaces for improvements. Therefore, it doesn’t have a straightforward installation process. But follow the installation guide, and you’ll be able to make it. Once the installation completes, run the following command to build the Bicep file.
bicep build ./azuredeploy.bicep
Rough Comparison to ARM Template Authoring
Let’s compare the result between the original ARM template and Bicep-built ARM template. Both work the same, but the original file has 415 lines of code while Bicep-generated one cuts to 306 lines of the code. In addition to this, Bicep file itself is even as short as 288 lines of code. If I refactor more by simplifying all the variables, the size of the Bicep file will be much shorter.
So far, we have had a quick look at the early preview of the Bicep project. It was pretty impressive from the usability point of view and has improved developer experiences way better. Interested in trying out Bicep? You can take a first look with the Bicep Playground!
This article was originally published on Dev Kimchi.
by Scott Muniz | Sep 11, 2020 | Uncategorized
This article is contributed. See the original author and article here.
News this week includes:
Microsoft Ignite preparation is in full swing, with several resources on how what to expect from Microsoft Search, Yammer, Humans of IT and more.
Microsoft Endpoint Manager announces support for Surface Duo devices
Azure Sphere OS update 20.09 now available for compatibility testing
@Victor Ivanidze is our Member of the Week, and a great contributor in the Office 365 community.
View the Weekly Roundup for Sept 7-11th in Sway and attached PDF document.

by Scott Muniz | Sep 11, 2020 | Uncategorized
This article is contributed. See the original author and article here.
This article was written by Gabi Stein from Microsoft’s EDU Engagement Team. Gabi is a Program Manager for Modern Learning Experiences.
Power Automate is one of Microsoft’s best kept secrets, but it’s time for all to know the power of this amazing tool! Power Automate can be broken down into three main pieces: connectors, flows, and power apps.
Connectors: Are the application actions that you want to put together to make your life easier.
Flows: Are the actual pieces being put together, so two or more connectors = one flow
PowerApps: Power apps bring everything together and combine with the user interface (UI) to create a custom app that you can add to your Team.
Take a look at some of the examples below to get ideas for just a few of the innovative ways you can leverage Power Automate!
Tracking health in Teams Posts:
Health tracking can be used among high school teachers, higher ed teachers, and higher ed students to view what types of messages are being sent in your team’s channels. When a new message is posted, have it sent to an excel sheet to build custom reports such as: Seeing what channels have the most messages or building word clouds to surface common themes in your data. In addition, you can add the HTML to text connector to remove HTML tags from your analysis.

Get updates from the data you have in Power BI
If you have important data in Power BI, but don’t always remember to check, you can have the data come to you with this simple flow! You can combine the available Power BI alert functions to automatically post an Adaptive Card as a reminder to yourself or send a message to a specific channel. Check out this helpful article for setting up data alerts in Power BI: https://docs.microsoft.com/en-us/power-bi/create-reports/service-set-data-alerts

Send lost email to yourself in Teams:
As an educator or administrator, it’s easy to get overwhelmed with emails and manage all the messages that need attention in Teams and Outlook. Using Power Automate, you can have emails sent by parents go to a specific folder and simultaneously send yourself a reminder message in Teams to remember to chech those messages later. This is just one of many use cases for this handy app.

Daily Reminder Emails/Teams Notes
Do you have any daily tasks that you need to remind yourself about? Use Power Automate to send yourself a message in Teams, email or both! A lot of educators use this feature to remember to view the previous day’s data, but it can be used for any reminder you can think of!

In addition to the flows mentioned here, checkout what Power Automate has in their education templates: https://us.flow.microsoft.com/en-us/collections/education/. If you have ideas for flows you would like to build or need assistance putting one together, please let our team know. We would love to collaborate with you! Just send me an email and we will get back to you right away.
by Scott Muniz | Sep 11, 2020 | Uncategorized
This article is contributed. See the original author and article here.
ADF Data Flows Expression Builder is getting some new enhancements next week. Here’s a sneak peek at some of what’s coming!

Join @daperlov and @Mark Kromer next week for our YouTube Live Stream where we’ll walk through these updates in detail.
- New “Locals” feature where you can now define a variable that is scoped to your current transformation allowing you to reuse logic that used to require you to copy that formula multiple times inside your expressions. Another current technique is to use Derived Columns to generate synthetic columns that were not meant for loading into your destination and were used in this “temporary” way. Now you can use locals to store data that won’t propagate outside of the current scope.
- Now you can edit directly inside Derived Column transformation text boxes without the Expression Builder automatically launching. Typing or editing your formulas directly will also include standard validation and enables copy & paste without needing to open the Expression Builder. This means that the Clone button has moved to the top of the column list as well as a new Open Expression Builder option.

- We are closing in on our 1-year anniversary of the GA of Data Flows in ADF and we gathered a ton of feedback from our community that we consolidated into these updates including making the experience full-screen and adding inline function help. We hope that you will find these changes make for a more productive and enjoyable experience in ADF data flows as we’ve recognized that the bulk of time spent in ADF by our data flow ETL developers ends up being inside the Expression Builder.
by Scott Muniz | Sep 11, 2020 | Uncategorized
This article is contributed. See the original author and article here.
After upgrading the asp.net core application to asp.net core 3.1 version, application is not able to read the “ASPNETCORE_ENVIRONMENT” variable from local environment and getting defaulted to web.config values.
ASPNETCORE_ENVIRONMENT value is set as Development in Web.config.

ASPNETCORE_ENVIRONMENT value is set as Production in local environment of Azure App Service application setting.

ANCM is Preferring value set in Web.config over the local environment variable in Azure App service application setting.

Solution:
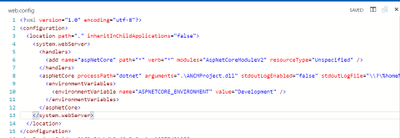
We need to add a switch “ANCM_PREFER_ENVIRONMENT_VARIABLES” and set as “true” to allow ANCM to prefer the local environment over the Web.config values. Below is the screenshot of app service app settings.

If the switch is added in both Web.config and local environment and both of them are set to “true” then web.config “ASPNETCORE_ENVIRONMENT” will take precedence.
After setting “ANCM_PREFER_ENVIRONMENT_VARIABLES” as “true” in App service App settings, ANCM is preferring the local environment variable “ASPNETCORE_ENVIRONMENT” which is set to production .

For more information about these changes, please refer below Github issues.
https://github.com/dotnet/aspnetcore/pull/20006
https://github.com/dotnet/aspnetcore/issues/19450
by Scott Muniz | Sep 11, 2020 | Azure, Technology, Uncategorized
This article is contributed. See the original author and article here.
Microsoft is updating Azure services in a phased manner to use TLS certificates from a different set of Certificate Authorities (CAs) beginning August 13, 2020 and concluding approximately on October 26, 2020. We expect that most Azure IoT customers will not be impacted; however, your application may be impacted if you explicitly specify a list of acceptable CAs (a practice known as “certificate pinning”). This change is limited to services in public Azure cloud and no sovereign cloud like Azure China.
This change is being made because the current CA certificates do not comply with one of the CA/Browser Forum Baseline requirements. This was reported on July 1, 2020 and impacts multiple popular Public Key Infrastructure (PKI) providers worldwide. Today, most of the TLS certificates used by Azure services are issued from the “Baltimore CyberTrust Root” PKI.
The following services used by Azure IoT devices will remain chained to the Baltimore CyberTrust Root*, but their TLS server certificates will be issued by new Intermediate Certificate Authorities (ICAs) starting October 5, 2020:
- Azure IoT Hub
- Azure IoT Hub Device Provisioning Service (DPS)
- Azure Storage Services
If any client application or device has pinned to an Intermediate CA or leaf certificate rather than the Baltimore CyberTrust Root, immediate action is required to prevent disruption of IoT device connectivity to Azure.
* Other Azure service TLS certificates may be issued by a different PKI.
Certificate Renewal Summary
The table below provides information about the certificates that are being rolled. Depending on which certificate your device or gateway clients use for establishing TLS connections, action may be needed to prevent loss of connectivity.
|
Certificate
|
Current
|
Post Rollover (Oct 5, 2020)
|
Action
|
|
Root
|
Thumbprint: d4de20d05e66fc53fe1a50882c78db2852cae474
Expiration: Monday, May 12, 2025, 4:59:00 PM
Subject Name:
CN = Baltimore CyberTrust Root
OU = CyberTrust
O = Baltimore
C = IE
|
Not Changing
|
None
|
|
Intermediates
|
Thumbprints:
CN = Microsoft IT TLS CA 1
Thumbprint: 417e225037fbfaa4f95761d5ae729e1aea7e3a42
—————————————————-
CN = Microsoft IT TLS CA 2
Thumbprint: 54d9d20239080c32316ed9ff980a48988f4adf2d
—————————————————-
CN = Microsoft IT TLS CA 4
Thumbprint: 8a38755d0996823fe8fa3116a277ce446eac4e99
—————————————————-
CN = Microsoft IT TLS CA 5
Thumbprint: Ad898ac73df333eb60ac1f5fc6c4b2219ddb79b7
—————————————————-
Expiration: Friday, May 20, 2016 5:52:38 AM
Subject Name:
OU = Microsoft IT
O = Microsoft Corporation
L = Redmond
S = Washington
C = US
|
Thumbprints:
CN = Microsoft RSA TLS CA 01
Thumbprint: 417e225037fbfaa4f95761d5ae729e1aea7e3a42
—————————————————-
CN = Microsoft RSA TLS CA 02
Thumbprint: b0c2d2d13cdd56cdaa6ab6e2c04440be4a429c75
—————————————————-
Expiration: Tuesday, October 8, 2024 12:00:00 AM;
Subject Name:
O = Microsoft Corporation
C = US
|
Required
|
|
Leaf (IoT Hub)
|
Thumbprint: 8b1a359705188c5577cb2dcd9a06331807c0bb97
Expiration: Friday, March 19, 2021 6:15:48 PM
Subject Name:
CN = *.azure-devices.net
|
Thumbprint: Coming soon
Expiration: Coming soon
Subject Name:
CN = *.azure-devices.net
|
Required
|
|
Leaf (DPS)
|
Thumbprint: f568f692f3274ecbb479c94272d6f3344a3f0247
Expiration: Friday, March 19, 2021 5:58:35 PM
Subject Name:
CN = *.azure-devices-provisioning.net
|
Thumbprint: Coming soon
Expiration: Coming soon
Subject Name:
CN = *.azure-devices-provisioning.net
|
Required
|
Note: Both the intermediate and lea certificates are expected to change frequently. We recommend not taking dependencies on them and instead pinning the root certificate as it rolls less frequently.
Action Required
- If your devices depend on the operating system certificate store for getting these roots or use the device/gateway SDKs as provided, then no action is required.
- If your devices pin the Baltimore root CA among others, then no action is required related to this change.
- If your device interacts with other Azure services (e.g. IoT Edge -> Microsoft Container Registry), then you must pin additional roots as provided here.
- If your devices use a connection stack other than the ones provided in an Azure IoT SDK, and pin any intermediary or leaf TLS certificates instead of the Baltimore root CA, then immediate action is required:
- To continue without disruption due to this change, Microsoft recommends that client applications or devices pin the Baltimore root –
- Baltimore Root CA
(Thumbprint: d4de20d05e66fc53fe1a50882c78db2852cae474)
- To prevent future disruption, client applications or devices should also pin the following roots:
- Microsoft RSA Root Certificate Authority 2017
(Thumbprint: 73a5e64a3bff8316ff0edccc618a906e4eae4d74)
- Digicert Global Root G2
(Thumbprint: df3c24f9bfd666761b268073fe06d1cc8d4f82a4)
- To continue pinning intermediaries, replace the existing certificates with the new intermediates CAs:
- Microsoft RSA TLS CA 01
(Thumbprint: 703d7a8f0ebf55aaa59f98eaf4a206004eb2516a)
- Microsoft RSA TLS CA 02
(Thumbprint: b0c2d2d13cdd56cdaa6ab6e2c04440be4a429c75)
- To minimize future code changes, also pin the following ICAs:
- Microsoft Azure TLS Issuing CA 01
(Thumbprint: 2f2877c5d778c31e0f29c7e371df5471bd673173)
- Microsoft Azure TLS Issuing CA 02
(Thumbprint: e7eea674ca718e3befd90858e09f8372ad0ae2aa)
- Microsoft Azure TLS Issuing CA 05
(Thumbprint: 6c3af02e7f269aa73afd0eff2a88a4a1f04ed1e5)
- Microsoft Azure TLS Issuing CA 06
(Thumbprint: 30e01761ab97e59a06b41ef20af6f2de7ef4f7b0)
- If your client applications, devices, or networking infrastructure (e.g. firewalls) perform any sub root validation in code, immediate action is required:
- If you have hard coded properties like Issuer, Subject Name, Alternative DNS, or Thumbprint of any certificate other than the Baltimore Root CA, then you will need to modify this to reflect the properties of the newly pinned certificates.
- Note: This extra validation, if done, should cover all the pinned certificates to prevent future disruptions in connectivity.
Validation
We recommend performing some basic validation to mitigate any unintentional impact to your IoT infrastructure connecting to Azure IoT Hub and DPS. We will be providing a test environment for your convenience to try out before we roll these certificates in production environments. The connection strings for this test environment will be updated here soon.
A successful TLS connection to the test environment indicates a positive test outcome – that your infrastructure will work as is with these changes. The test connection strings contain invalid keys, so once the TLS connection has been established, any run time operations performed against these services will fail. This is by design since these resources exist solely for customers to validate their TLS connectivity. The test environment will be available until all public cloud regions have been updated.
Support
If you have any technical questions on implementing these changes, with the options below and a member from our engineering team will get back to you shortly.
- Issue Type: Technical
- Service: Internet of Things/IoT SDKs
- Problem type: Connectivity
- Problem subtype: Unable to connect
Additional Information
- IoT Show: To know more about TLS certificates and PKI changes related to Azure IoT, please check out the IoT Show:
- Microsoft wide communications: To broadly notify customers, Microsoft had sent a Service Health portal notification on Aug 3rd, 2020 and released a public document that include timelines, actions that need to be taken, and details regarding the upcoming changes to our Public Key Infrastructure (PKI).
by Scott Muniz | Sep 11, 2020 | Uncategorized
This article is contributed. See the original author and article here.
We will have our Service Fabric Community Q&A call for this month on Sep 17th 10am PDT.
Starting Aug 2020, we introduced a framework for our monthly community session. In addition to our normal Q&A in each community call we will focus on topics related to various components of the Service Fabric platform, provide updates to roadmap, upcoming releases, and showcase solutions developed by customers that benefit the community.
Agenda:
- Service Fabric Backup Explorer(Preview)
- Service Fabric Roadmap
- Q&A
Join us to learn about roadmap and ask us any questions related to Service Fabric, containers in Azure, etc. This month’s Q&A features one session on:
As usual, there is no need to RSVP – just navigate to the link to the call and you are in.
by Scott Muniz | Sep 11, 2020 | Uncategorized
This article is contributed. See the original author and article here.
This last week, I found an interesting issue. Our customer exported a database to bacpac file using SQLPackage .NET Core.
To import the data to another SQL Server, our customer tried to use SQLPackage for Windows but, they got an error reading the bacpac file with the following error message: File contains corrupted data.
During our investigation we found that we have a known issue using SQLPackage for Windows to import a bacpac file that was created using SQLPackage .NET Core. As a workaround, download SQLPackage .NET Core software in your Windows Server Machine and execute it instead of SQLPackage for Windows or SQL Server Management Studio.
We hope to have the fix very soon.
Enjoy!

Recent Comments