This article is contributed. See the original author and article here.
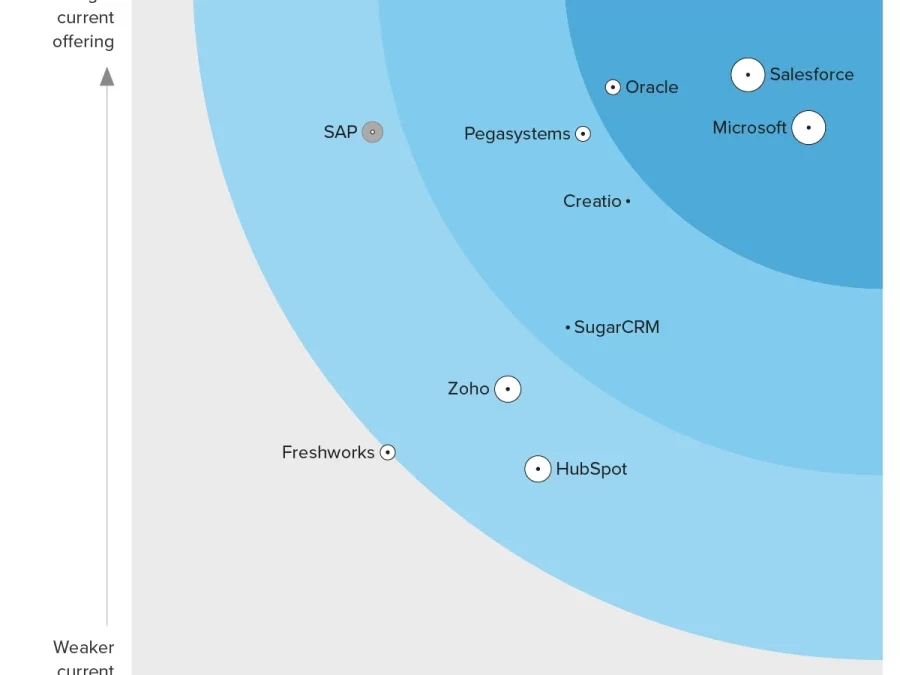
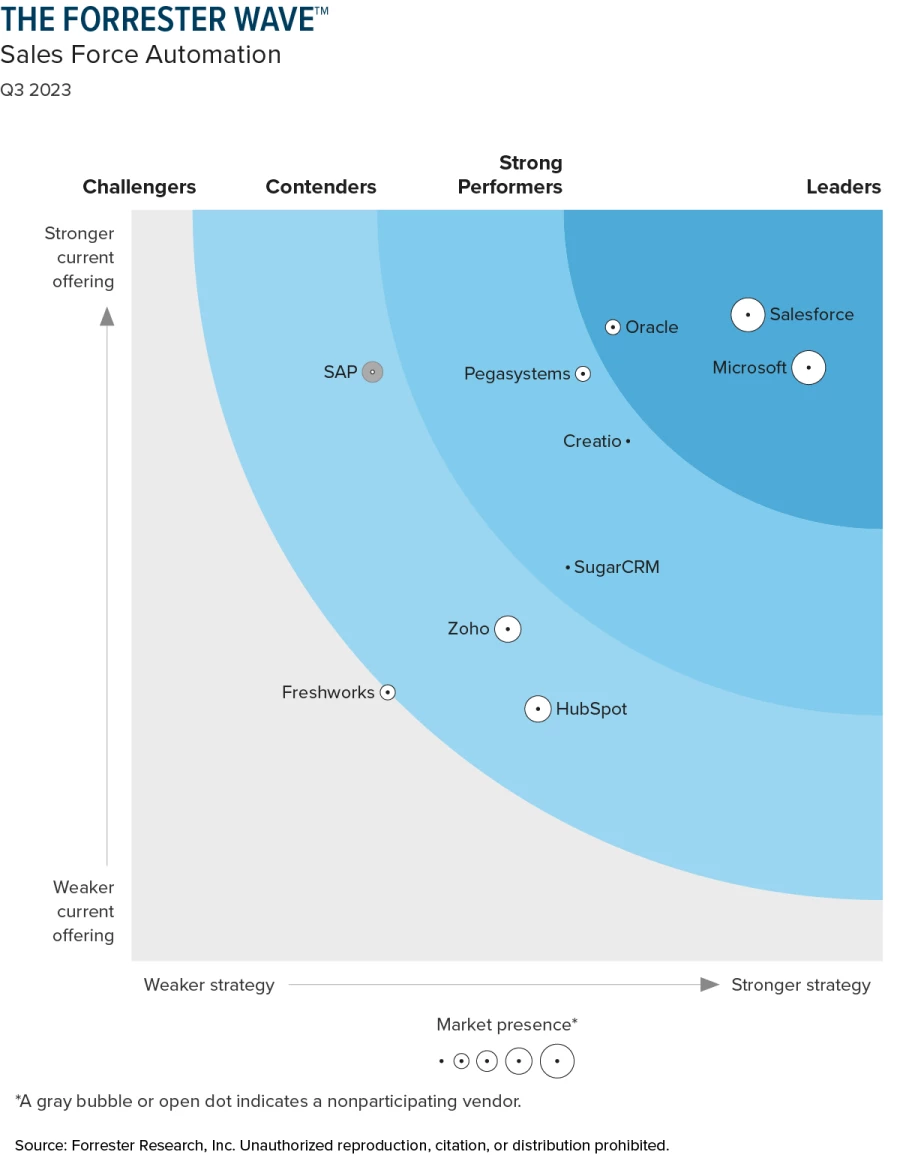
Selling is all about relationships. We hear a lot these days about the disconnect that our increasingly digital world can create. But at Microsoft, we believe that digital tools, especially those powered by generative AI and real-time insights, can help strengthen sellers’ relationships with their customers. We’re continually investing in Microsoft Dynamics 365 Sales to enable sellers to engage with their customers more meaningfully. We are pleased to announce that Microsoft has been named a Leader in The Forrester WaveTM: Sales Force Automation, Q3 2023 report, with top scores possible in the Vision, Innovation, and Roadmap criteria for our sales force automation (SFA) platform.
Reducing complexity to drive seller success
The role of a seller has only grown more complex. A process that used to involve a couple of phone calls and face-to-face meetings now includes everything from targeted emails to impromptu online chats. Organizations rely on everything from digital sellers to field sellers to customer success champions to ensure their customers are supported end-to-end throughout the sales journey. Especially with hybrid workplaces and shrinking travel budgets, sellers need assistance from technology to build connections—between colleagues, across multiple data sources, and with customers.
The challenge is that sellers need to build these connections and foster relationships without sacrificing productivity. According to the Microsoft Work Trend Index, sellers spend more than 66 percent of their day managing email, leaving only about a third of their time for actual sales activities. Our answer is to provide simple solutions—focusing on collaboration, productivity, AI, and insights—to help sellers focus on closing deals. As Forrester states in its report, “Dynamics [365 Sales] showcases how SFA and office productivity solutions work together.” We believe this is what has earned our position as a Leader: we built solutions to give sellers access to real-time customer insights, subject matter experts, relevant data across different sources, and important customer and account information right in their app of choice—no context switching necessary.
Dynamics 365 Sales works natively with Microsoft Teams to create open lines of communication for collaborating and aligning on work items across marketing, sales, and service departments. Additionally, copilot capabilities bring next-generation AI and customer relationship management (CRM) platform updates into collaborative apps like Outlook and Teams, unlocking productivity for sellers whether they are working in Dynamics 365 Sales or Microsoft 365 apps. By helping to eliminate manual data entry, meeting summarization, and other cumbersome processes, Dynamics 365 Sales ensures sellers have more time to create and nourish their customer connections, ultimately driving sales.
Providing insights that improve customer retention—and grow revenue
Referring to Microsoft, Forrester also reports that “Embedded insights are a highlight of the product”—something that Microsoft customer, DP World, knows well. DP World is the leading provider of worldwide, end-to-end supply chain and logistics. DP World implemented Dynamics 365 Sales to help the company diversify and scale after an acquisition that was driving new demand and traffic to the company. Dynamics 365 Sales provides its sellers predictive lead scoring and prioritized worklists based on AI, giving full visibility into its sales funnels and helping it effectively qualify leads and opportunities. This reduced DP World’s sales cycle, enabling five times more proactive sales and two times greater customer retention.
Learn more about sales
We’re excited to have been recognized as a Leader in The Forrester Wave and are committed to providing innovative sales force automation platform capabilities to help our customers accomplish more.
Microsoft named a Leader
We received top scores in The Forrester Wave™: Sales Force Automation, Q3 2023.
Contact your Microsoft representative to learn more about the value and return on investments, as well as the latest offers—including a limited-time 26 percent savings on subscription pricing—for Dynamics 365 Sales Premium.
This article is contributed. See the original author and article here.
Introduction
Containers technologies are no longer something new in the industry. It all started focusing on how to deploy reproducible development environments but now you can find many other fields where applying containers, or some of the underlying technologies used to implement them, are quite common.
I will not cover here Azure Container Instances nor Azure Kubernetes Services. For an example of the latter you can browse this article NDv4 in AKS. ACI will be explained in another article.
Currently there are many options available when working with containers, Linux seasoned engineers quite likely have worked with LXC; later Docker revolutionized the deployment of development environments, more recently other alternatives like Podman have emerged and are now competing for a place in many fields.
However, in HPC, we have been working for some years with two different tools, Shifter as the first fully focused containers project for supercomputers and Singularity. I will show you how to use Singularity in HPC clusters running in Azure. I will also explain how to use Podman for running AI workloads using GPUs in Azure VMs.
Running AI workloads using GPU and containers
Running AI workloads do not need the presence of GPUs, but almost all the frameworks for machine learning/deep learning are designed to make use of them. So, I will assume GPU compute resources are required in order to run any AI workload.
There are many ways of taking advantage of GPU compute resource within containers. For example, you can run the whole container in privileged mode in order to get access to all the hardware available in the host VM, some nuances must be highlighted here because privileged mode cannot grant more permissions than those inherent to the user running the container. This means running a container as root in privileged mode is way different than running the container as a regular user with less privileges.
The most common way to get access to the GPU resources is via nvidia-container-toolkit, this package contains a hook in line with OCI standard (see references below) providing direct access to GPU compute resources within the container.
I will use a regular VM using Nvidia T4 Tesla GPU (NC8as_T4_v3) running RHEL 8.8. Let’s get started.
These are all the steps required to run AI workloads using containers and GPU resources in a VM running in Azure:
A VM using any family of N-series (for AI workloads like machine learning, deep learning, etc… NC or ND are recommended) and a supported operating system.
Install CUDA drivers and CUDA toolkit if required. You can omit this if you are using DSVM images from Marketplace, these images come with all required drivers preinstalled.
Install your preferred container runtime environment and engine to work with containers.
Install nvidia-container-toolkit.
Run a container using any image with the tools required to check the GPU usage like nvidia-smi command. Using any container from NGC is more than recommended to avoid additional steps.
Create the image with your code or commit the changes in a running container.
I will start with step 2 because I’m sure there is no need to explain how to create a new VM with N-series.
Installing CUDA drivers
There is no specific restriction about which CUDA release must be installed. You have the freedom to choose the latest version from Nvidia website, for example.
Let’s check if the drivers are installed correctly by using nvidia-smi command:
[root@hclv-jsaelices-nct4-rhel88 ~]# nvidia-smi
Fri Nov  3 17:41:03 2023
+---------------------------------------------------------------------------------------+
| NVIDIA-SMI 535.104.12             Driver Version: 535.104.12   CUDA Version: 12.2     |
|-----------------------------------------+----------------------+----------------------+
| GPU  Name                 Persistence-M | Bus-Id        Disp.A | Volatile Uncorr. ECC |
| Fan  Temp   Perf          Pwr:Usage/Cap |         Memory-Usage | GPU-Util  Compute M. |
|                                         |                      |               MIG M. |
|=========================================+======================+======================|
|   0  Tesla T4                       Off | 00000001:00:00.0 Off |                  Off |
| N/A   51C    P0              30W /  70W |      2MiB / 16384MiB |      7%      Default |
|                                         |                      |                  N/A |
+-----------------------------------------+----------------------+----------------------+

+---------------------------------------------------------------------------------------+
| Processes:                                                                            |
|  GPU   GI   CI        PID   Type   Process name                            GPU Memory |
|        ID   ID                                                             Usage      |
|=======================================================================================|
|  No running processes found                                                           |
+---------------------------------------------------------------------------------------+
Installing container runtime environment and engine
As I commented in the introduction, Podman will be our main tool to run containers. By default, Podman will use runc as the runtime environment, runc adheres to OCI standard so no additional steps to make sure nvidia-container-toolkit will work in our VM.
$ sudo dnf install -y podman
I won’t explain here all the benefits of using Podman against Docker. I’ll just mention Podman is daemonless and a most modern implementation of all technologies required to work with containers like control groups, layered filesystems and namespaces to name a few.
Let’s verify Podman was successfully installed using podman info command:
Podman fully supports OCI hooks and that is precisely what nvidia-container-toolkit provides. Basically, OCI hooks are custom actions performed during the lifecycle of the container. It is a prestart hook that is called when you run a container providing access to the GPU using the drivers installed in the host VM. The already created repository is also providing this package so let’s install it using dnf:
$ sudo dnf install -y nvidia-container-toolkit
Podman is daemonless so no need to add the runtime using nvidia-ctk runtime configure, but, in this case, an additional step is required to generate the CDI configuration file:
$ sudo nvidia-ctk cdi generate --output=/etc/cdi/nvidia.yaml
$ nvidia-ctk cdi list
INFO[0000] Found 2 CDI devices
nvidia.com/gpu=0
nvidia.com/gpu=all
Running containers for AI workloads
Now, we have all the environment ready for running new containers for AI workloads. I will make use of NGC images from Nvidia to save time and avoid the creation of custom ones. Please, keep in mind some of them are quite big so make sure you have enough space in your home folder.
Let’s start with an Ubuntu 20.04 image with CUDA already installed on it:
[jsaelices@hclv-jsaelices-nct4-rhel88 ~]$ podman run --security-opt=label=disable --device=nvidia.com/gpu=all nvcr.io/nvidia/cuda:12.2.0-devel-ubuntu20.04

==========
== CUDA ==
==========

CUDA Version 12.2.0

Container image Copyright (c) 2016-2023, NVIDIA CORPORATION & AFFILIATES. All rights reserved.

This container image and its contents are governed by the NVIDIA Deep Learning Container License.
By pulling and using the container, you accept the terms and conditions of this license:
https://developer.nvidia.com/ngc/nvidia-deep-learning-container-license

A copy of this license is made available in this container at /NGC-DL-CONTAINER-LICENSE for your convenience.
Another example running the well-known DeviceQuery tool that comes with CUDA toolkit:
[jsaelices@hclv-jsaelices-nct4-rhel88 ~]$ podman run --security-opt=label=disable --device=nvidia.com/gpu=all nvcr.io/nvidia/k8s/cuda-sample:devicequery-cuda11.7.1-ubuntu20.04
/cuda-samples/sample Starting...

 CUDA Device Query (Runtime API) version (CUDART static linking)

Detected 1 CUDA Capable device(s)

Device 0: "Tesla T4"
  CUDA Driver Version / Runtime Version          12.2 / 11.7
  CUDA Capability Major/Minor version number:    7.5
  Total amount of global memory:                 15948 MBytes (16723214336 bytes)
  (040) Multiprocessors, (064) CUDA Cores/MP:    2560 CUDA Cores
  GPU Max Clock rate:                            1590 MHz (1.59 GHz)
  Memory Clock rate:                             5001 Mhz
  Memory Bus Width:                              256-bit
  L2 Cache Size:                                 4194304 bytes
  Maximum Texture Dimension Size (x,y,z)         1D=(131072), 2D=(131072, 65536), 3D=(16384, 16384, 16384)
  Maximum Layered 1D Texture Size, (num) layers  1D=(32768), 2048 layers
  Maximum Layered 2D Texture Size, (num) layers  2D=(32768, 32768), 2048 layers
  Total amount of constant memory:               65536 bytes
  Total amount of shared memory per block:       49152 bytes
  Total shared memory per multiprocessor:        65536 bytes
  Total number of registers available per block: 65536
  Warp size:                                     32
  Maximum number of threads per multiprocessor:  1024
  Maximum number of threads per block:           1024
  Max dimension size of a thread block (x,y,z): (1024, 1024, 64)
  Max dimension size of a grid size    (x,y,z): (2147483647, 65535, 65535)
  Maximum memory pitch:                          2147483647 bytes
  Texture alignment:                             512 bytes
  Concurrent copy and kernel execution:          Yes with 3 copy engine(s)
  Run time limit on kernels:                     No
  Integrated GPU sharing Host Memory:            No
  Support host page-locked memory mapping:       Yes
  Alignment requirement for Surfaces:            Yes
  Device has ECC support:                        Disabled
  Device supports Unified Addressing (UVA):      Yes
  Device supports Managed Memory:                Yes
  Device supports Compute Preemption:            Yes
  Supports Cooperative Kernel Launch:            Yes
  Supports MultiDevice Co-op Kernel Launch:      Yes
  Device PCI Domain ID / Bus ID / location ID:   1 / 0 / 0
  Compute Mode:


deviceQuery, CUDA Driver = CUDART, CUDA Driver Version = 12.2, CUDA Runtime Version = 11.7, NumDevs = 1
Result = PASS
You can see in these examples that I’m running those containers with my user without root privileges (rootless environment) with no issues, and that is because of that option passed to the podman run command, –security-opt=label=disable. This command is used to disable all SELinux labeling. This is performed this way for the sake of this article’s length. I could use a SELinux policy created with Udica or use the one that comes with Nvidia (nvidia-container.pp) but I preferred to disable the labeling for these specific samples.
Now it is time to try running specific frameworks for AI using Python. Let’s try with Pytorch:
[jsaelices@hclv-jsaelices-nct4-rhel88 ~]$ podman run --rm -ti --security-opt=label=disable --device=nvidia.com/gpu=all pytorch/pytorch
root@7cb030cc3b47:/workspace# python
Python 3.10.13 (main, Sep 11 2023, 13:44:35) [GCC 11.2.0] on linux
Type "help", "copyright", "credits" or "license" for more information.
>>> import torch
>>> torch.cuda.is_available()
True
>>>
As you can see PyTorch framework can see the GPU and would be able to run any code using GPU resources without any issue.
I won’t create any custom image as suggested in the last step described previously. That can be a good exercise for the reader, so it is your turn to test your skills running containers and using GPU resources.
Running HPC workloads using containers
Now it is time to run HPC applications in our containers. You can also use podman to run those, in fact there is an improvement over podman developed jointly by NERSC and Red Hat called Podman-HPC but, for this article, I decided to use Singularity which is well-know in HPC field.
For this section, I will run some containers using Singularity in a cluster created with CycleCloud using HB120rs_v3 size for the compute nodes. For the OS, I’ve chosen Almalinux 8.7 HPC image from Azure Marketplace.
I will install Singularity manually but this can be automated using cluster-init in CycleCloud.
Installing Singularity in the cluster
In Almalinux 8.7 HPC image epel repository is installed by default so you can easily install singularity with a single command:
I won’t explain all the pros and cons when using Singularity over other containers alternatives. I will just highlight some of the security features provided by Singularity and, especially, the format of the image used (Singularity Image Format, SIF) during the examples.
One of the biggest advantages of using Singularity is the size of the images, SIF is a binary format and is very compact comparing to regular layered Docker images. See below an example of the image of OpenFOAM:
[jsaelices@slurmhbv3-hpc-2 .singularity]$ ls -lh openfoam-default_latest.sif
-rwxrwxr-x. 1 jsaelices jsaelices 349M Nov  3 18:00 openfoam-default_latest.sif
Docker is using a layered format that is substantially bigger in size:
[root@slurmhbv3-hpc-1 ~]# docker images
REPOSITORY                 TAG       IMAGE ID       CREATED        SIZE
opencfd/openfoam-default   latest    dc7161e16205   3 months ago   1.2GB
Running MPI jobs with Singularity
Singularity is fully compatible with MPI and there are 2 different ways to submit an MPI job with SIF images.
I will use the bind method for its simplicity but you can also use the hybrid method if binding volumes between the host and the container is not desirable.
Let’s create a simple definition file called mydefinition.def (similar to Dockerfile or Containerfile):
Here, I’m just using the Almalinux image from Docker Hub, copying the MPI application, defining some useful environment variables and a few simple commands to execute when the container is called without any parameter.
[jsaelices@slurmhbv3-hpc-1 ~]$ cat slurmhbv3-hpc-1-2-singularity-mpi
Hello world: rank 0 of 4 running on slurmhbv3-hpc-1
Hello world: rank 1 of 4 running on slurmhbv3-hpc-1
Hello world: rank 2 of 4 running on slurmhbv3-hpc-2
Hello world: rank 3 of 4 running on slurmhbv3-hpc-2
With this example this article ends.
You’ve seen how to run containers, how to make use of GPU and run AI workloads in a simple and effective way. You’ve also learnt how to run Singularity containers and MPI jobs easily. You can use all this material as a starting point to extend your knowledge and apply it to more complex tasks. Hope you enjoyed it.
This article is contributed. See the original author and article here.
We are happy to announce the general availability of the User Interface (UI) for the Azure Virtual Desktop Web Client. The new UI offers a cleaner, more modern look and feel. With this update, you can
Switch between Light and Dark Mode
View your resources in a grid or list format
Reset web client settings to their defaults
How to access it
The new client is toggled on by default on the web client, and the “preview” caption has now been removed from the toggle.
This article is contributed. See the original author and article here.
Just a decade ago, few people seemingly knew or cared about firmware. But with the increasing interconnectedness of devices and the rise of cybersecurity threats, there’s a growing awareness of firmware as the foundational software that powers everything from smartphones to smart TVs.
Traditionally developed using the C language, firmware is essential for setting up a device’s basic functions. As a globally recognized standard, UEFI — Unified Extensible Firmware Interface enables devices to boot with fundamental security features that contribute to the security posture of modern operating systems.
Call for greater firmware security
As the security of our device operating systems gets more sophisticated, firmware needs to keep up. Security is paramount, but it shouldn’t compromise speed or user-friendliness. The goal is clear – firmware that’s both fast and secure.
What does this modern approach look like? Let’s start by looking at the key challenges:
Evolving threat landscape: As operating systems become more secure, attackers are shifting their focus to other system software, and firmware is a prime target. Firmware operates at a very foundational level in a device, and a compromise here can grant an attacker deep control over a system.
Memory safety in firmware: Many firmware systems have been historically written in languages like C, which, while powerful, do not inherently protect against common programming mistakes related to memory safety. These mistakes can lead to vulnerabilities such as buffer overflows, which attackers can exploit.
Balance of speed and security: Firmware needs to execute quickly. However, increasing security might introduce execution latency, which isn’t ideal for firmware operations.
Rust in the world of firmware
When it comes to modern PC firmware, Rust stands out as a versatile programming language. It offers flexibility, top-notch performance, and most importantly, safety. While C has been a go-to choice for many, it has its pitfalls, especially when it comes to errors that might lead to memory issues. Considering how crucial firmware is to device safety and operation, any such vulnerabilities can be a goldmine for attackers, allowing them to take over systems.[1] That’s where Rust shines. It’s designed with memory safety in mind, without the need for garbage collection, and has strict rules around data types and parallel operations. This minimizes the probability of errors that expose vulnerabilities, making Rust a strong choice for future UEFI firmware development.
Unlocking new possibilities with Rust
Rust is not just another programming language; it’s a gateway to a wealth of resources and features that many firmware developers might have missed out on in the past. For starters, Rust embraces a mix of object-oriented, procedural, and functional programming approaches and offers flexible features like generics and traits, making it easier to work with different data types and coding methods. Many complex data structures that must be hand-coded in C are available “for free” as part of the Rust language. But it’s not just about versatility and efficiency. Rust’s tools are user-friendly, offering clear feedback during code compilation and comprehensive documentation for developers. Plus, with its official package management system, developers get access to tools that streamline coding and highlight important changes. One of those features is Rust’s use of ‘crates’ – these are like ready-to-use code packages that speed up development and foster collaboration among the Rust community.
Making the move from C to Rust
Rust stands out for its emphasis on safety, meaning developers often don’t need as many external tools like static analyzers, which are commonly used with C. But Rust isn’t rigid; if needed, it allows for exceptions with its “unsafe code” feature, giving developers some flexibility. One of Rust’s advantages is how well it interacts with C. This means teams can start using Rust incrementally, without having to abandon their existing C code. So, while Rust offers modern advantages, it’s also mindful of the unique requirements of software running directly on hardware — without relying on the OS or other abstraction layers. Plus, it offers compatibility with C’s data structures and development patterns.
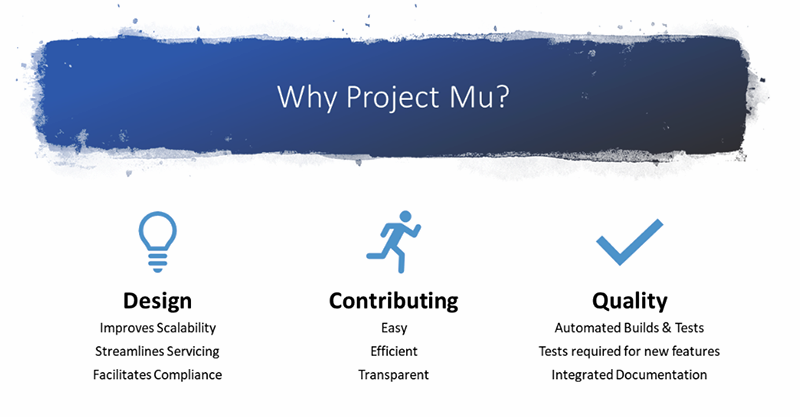
The Trio: Surface, Project Mu and Rust
Surface with Windows pioneered the implementation of Project Mu in 2018 as an open-source UEFI core to increase scalability, maintainability, and reusability across Microsoft products and partners. The idea was simple but revolutionary, fostering a more collaborative approach to reduce costs and elevate quality. It also offers a solution to the intricate business and legal hurdles many partners face, allowing teams to manage their code in a way that respects legal and business boundaries. A major win from this collaboration is enhanced security; by removing unnecessary legacy code, vulnerabilities are reduced. From its inception, Surface has been an active contributor, helping Project Mu drive innovation and improve the ecosystem.
Pioneering Rust adoption through Project Mu and Surface
Surface and Project Mu are working together to drive adoption of Rust into the UEFI ecosystem. Project Mu has implemented the necessary changes to the UEFI build environment to allow seamless integration of Rust modules into UEFI codebases. Surface is leveraging that support to build Rust modules in Surface platform firmware. With Rust in Project Mu, Microsoft’s ecosystem benefits from improved security transparency while reducing the attack surface of Microsoft devices due to Rust’s memory safety benefits. Also, by contributing firmware written in Rust to open-sourced Project Mu, Surface participates in an industry shift to collaboration with lower costs and a higher security bar. With this adoption, Surface is protecting and leading the Microsoft ecosystem more than ever.
Building together: Surface’s commitment to the Rust community
Surface and Project Mu plan to participate in the open Rust development community by leveraging and contributing to popular crates and publishing new ones that may be useful to other projects. A general design strategy is to solve common problems in a generic crate that can be shared and integrated into the firmware. Community crates, such as r-efi for UEFI, have already been helpful during early Rust development.
Getting Started
Project Mu has made it easier for developers to work with Rust by introducing a dedicated container in the Project Mu Developer Operations repository (DevOps repo). This container is equipped with everything needed to kickstart Rust development. As more Rust code finds its way into Project Mu’s repositories, it will seamlessly integrate with the standard Rust infrastructure in Project Mu, and the dedicated container provides an easy way to immediately take advantage of it.
The Project Mu Rust Build readme details how to begin developing with Rust and Project Mu. Getting started requires installing the Rust toolchain and Cargo make as a build runner to quickly build Rust packages. Refer to the readme for guidance on setting up the necessary build and configuration files and creating a Rust module.
Demonstrating Functionality
QEMU is an open-source virtual machine emulator. Project Mu implements open-source firmware for the QEMU Q35 platform in its Mu Tiano Platforms repository. This open virtual platform is an easily accessible demonstration vehicle for Project Mu features. In this case, UEFI (DXE) Rust modules are already included in the platform firmware to demonstrate their functionality (and test it in CI).
Looking ahead
With the expansion of firmware code written in Rust, Surface looks forward to leveraging the Project Mu community to help make our firmware even more secure. To get involved with Project Mu, review the documentation and check out the Github repo. Regularly pull updates from the main repo, keep an eye on the project’s roadmap, and stay engaged with the community to remain informed about changes and new directions.
This article is contributed. See the original author and article here.
Microsoft Learn offers you the latest resources to ensure you have what you need to prepare for exams and reach your skilling goals. Here we share some important updates about Security content, prep videos, certifications, and more.
Exam Readiness Zone: preparing for Exams SC-100, SC-200, and SC-300
Now, you can leverage the Exam Readiness Zone, our free exam prep resource available on Microsoft Learn for your next Security certification! View our expert-led exam prep videos to help you identify the key knowledge and skills measured on exams and how to allocate your study time. Each video segment corresponds to a major topic area on the exam.
During these videos, trainers will point out objectives that many test takers find difficult. In these videos, we include example questions and answers with explanations.
For technical skilling, we now have videos available for the following topics:
Are you thinking of adopting the upcoming Security Copilot? This challenge will help you prepare, as it includes the security operations analyst skills required to tune up your platform and get it ready for Security Copilot.
Complete the challenge within 30 days and you can be eligible to earn a 50% discount on the Certification exam.
The Exam SC-400 evaluates your proficiency in performing the following technical tasks: implementing information protection, implementing DLP, implementing data lifecycle and records management, monitoring and investigating data and activities through Microsoft Purview, and managing insider and privacy risks in Microsoft 365.
The Microsoft Learn Community offers a variety of ways to connect and engage with each other and technical experts. One of the core components of this experience are the learning rooms, a space to find connections with experts and peers.
This article is contributed. See the original author and article here.
Efficiently managing a contact center requires a fine balance between workforce engagement and customer satisfaction. The ability to create agent-specific capacity profiles in Dynamics 365 Customer Service empowers administrators and supervisors to fine-tune the work allocation based on an agent’s experience and expertise, optimizing agent performance and delivering tailored customer service.
Understand capacity profiles
Capacity profiles are at the core of Dynamics 365 Customer Service, defining the type and amount of work agents can handle, ensuring equitable work distribution. Profiles are even more beneficial when agents are blended across various channels. Agent-specific capacity profiles take this a step further, enabling customized work limits for individual agents based on their proficiency. Let’s explore this capability with an example.
A real-world scenario: Casey’s challenge
Meet Casey, a Customer Service administrator at Contoso Bank who aims to maximize the efficiency of her customer service team. She wants senior agents to handle more responsibilities, giving junior agents the time to focus on training and skill development.
Casey decides to use agent-specific capacity profiles for credit card inquiries in the North America region. She sets up a “Credit Card NAM” profile with a default limit of two concurrent conversations. She assigns it to Kiana, a seasoned agent, and Henry, a junior agent who recently joined Contoso.
Customize capacity limits
Casey recognizes that Kiana’s seniority and expertise warrant a different limit. With agent-specific capacity profiles, she can easily update Kiana’s limit to handle three conversations at a time. The immediate benefit of this approach is apparent. This balance allows junior agents like Henry to invest more time in training and development while experienced agents like Kiana manage a higher workload efficiently.
Flexibility in action
In the dynamic world of customer service, circumstances can change rapidly. Contoso Bank faces an unexpected surge in insurance-related queries. Casey needs to adapt to this evolving scenario promptly and this is where agent-specific capacity profiles truly shine.
Casey has Kiana take on the additional insurance queries alongside her credit card queries. She assigns the “Insurance” profile to Kiana. She also resets Kiana’s work limit for the “Credit Card NAM” profile back to the default amount, providing her the bandwidth to handle the increased workload efficiently.
The result: Optimal efficiency
This example showcases the flexibility and real-time adaptability that agent-specific capacity profiles offer. Casey is empowered to make agile and precise work distribution decisions, ensuring that agents’ expertise and experience are utilized optimally.
Conclusion
In the world of customer service, where every interaction matters, this feature is a game-changer. It helps organizations reduce agent stress, elevate customer satisfaction, and offer a flexible solution for modern customer service management. By embracing this feature, businesses can ensure that their customer service is optimized for excellence, regardless of changing circumstances.
This article is contributed. See the original author and article here.
Creating and deploying Docker containers to Azure resources manually can be a complicated and time-consuming process. This tutorial outlines a graceful process for developing and deploying a Linux Docker container on your Windows PC, making it easy to deploy to Azure resources.
This tutorial emphasizes using the user interface to complete most of the steps, making the process more reliable and understandable. While there are a few steps that require the use of command lines, the majority of tasks can be completed using the UI. This focus on the UI is what makes the process graceful and user-friendly.
In this tutorial, we will use a Python Flask application as an example, but the steps should be similar for other languages such as Node.js.
Prerequisites:
Before you begin, you’ll need to have the following prerequisites set up:
WSL 2 installation
WSL provides a great way to develop your Linux application on a Windows machine, without worrying about compatibility issues when running in a Linux environment. We recommend installing WSL 2 as it has better support with Docker. To install WSL 2, open PowerShell or Windows Command Prompt in administrator mode, enter below command:
wsl –install
And then restart your machine.
You’ll also need to install the WSL extension in your Visual Studio Code.
Python 3 installation
Run “wsl” in your command prompt. Then run following commands to install python 3.10 (if you use Python 3.5 or a lower version, you may need to install venv by yourself):
To create an image for your application in WSL, you’ll need Docker Desktop for Windows. Download the installer from below Docker website and run the downloaded file to install it.
To develop your project in Visual Studio Code in WSL, you need to click the bottom left blue button:
Then select “Connect to WSL” or “Connect to WSL using Distro”:
2. Install some extensions for Visual Studio Code
Below two extensions have to be installedafteryou connect Visual Studio Code to WSL.
The Docker extension can help you create Dockerfile automatically and highlight the syntax of Dockerfile. Please search and install via Visual Studio Code Extension.
To deploy your container to Azure in Visual Studio Code, you also need to have Azure Tools installed.
3. Create your project folder
Click “Terminal” in menu, and click “New Terminal”:
Then you should see a terminal for your WSL.
I use a quick simple Flask application here for example, so I run below command to clone its git project:
After you install Python 3 and create project folder. It is recommended to create your own project python environment. It makes your runtime and modules easy to be managed.
To setup your Python Environment in your project, you need to run below commands in the terminal:
cd msdocs-python-flask-webapp-quickstart

python3 -m venv .venv
Then after you open the folder, you will be able to see some folders are created in your project:
Then if you open the app.py file, you can see it used the newly created python environment as your python environment:
If you open a new terminal, you also find the prompt shows that you are now in new python environment as well:
Then run below command to install the modules required in the requirement.txt:
pip install -r requirements.txt
5. Generate a Dockerfile for your application
To create a docker image, you need to have a Dockerfile for your application.
You can use Docker extension to create the Dockerfile for you automatically. To do this, enter ctrl+shift+P and search “Dockerfile” in your Visual Studio Code. Then select “Docker: Add Docker Files to Workspace”
You will be required to select your programming languages and framework(It also supports other language such as node.js, java, node). I select “Python Flask”.
Firstly, you will be asked to select the entry point file. I select app.py for my project.
Secondly, you will be asked the port your application listens on. I select 80.
Finally, you will be asked if Docker Compose file is included. I select no as it is not multi-container.
A Dockefile like below is generated:
Note:
If you do not have requirements.txt file in the project, the Docker extension will create one for you. However, itDOES NOTcontain all the modules you installed for this project. Therefore, it is recommended to have the requirements.txt file before you create the Dockerfile. You can run below command in the terminal to create the requirements.txt file:
pip freeze > requirements.txt
After the file is generated,please add “gunicorn” in the requirements.txtif there is no “gunicorn” as the Dockerfile use it to launch your application for Flask application.
Please review the Dockerfile it generated and see if there is anything need to modify.
You will also find there is a .dockerignore file is generated too. It contains the file and the folder to be excluded from the image. Please also check it too see if it meets your requirement.
6. Build the Docker Image
You can use the Docker command line to build image. However, you can also right-click anywhere in the Dockefile and select build image to build the image:
Please make sure that you have Docker Desktop running in your Windows.
Then you should be able to see the docker image with the name of the project and tag as “latest” in the Docker extension.
7. Push the Image to Azure Container Registry
Click “Run” for the Docker image you created and check if it works as you expected.
Then, you can push it to the Azure Container Registry (ACR). Click “Push” and select “Azure”.
You may need to create a new registry if there isn’t one. Answer the questions that Visual Studio Code asks you, such as subscription and ACR name, and then push the image to the ACR.
8. Deploy the image to Azure Resources
Follow the instructions in the following documents to deploy the image to the corresponding Azure resource:
This article is contributed. See the original author and article here.
In this technical article, we will delve into an interesting case where a customer encountered problems related to isolation levels in Azure SQL Managed Instance. Isolation levels play a crucial role in managing the concurrency of database transactions and ensuring data consistency. We will start by explaining isolation levels and providing examples of their usage. Then, we will summarize and describe the customer’s problem in detail. Finally, we will go through the analysis of the issue.
Isolation Level
Isolation level is a property of a transaction that determines how data is accessed and modified by concurrent transactions. Different isolation levels provide different guarantees about the consistency and concurrency of the data. SQL Server and Azure SQL Managed Instance support five isolation levels: read uncommitted, read committed, repeatable read, snapshot, and serializable. The default isolation level for both platforms is read committed.
Read uncommitted allows a transaction to read data that has been modified by another transaction but not yet committed. This can lead to dirty reads, non-repeatable reads, and phantom reads. Read committed prevents dirty reads by only allowing a transaction to read data that has been committed by another transaction. However, it does not prevent non-repeatable reads or phantom reads. Repeatable read prevents non-repeatable reads by locking the data that has been read by a transaction until the transaction ends. However, it does not prevent phantom reads. Snapshot prevents both non-repeatable reads and phantom reads by using row versioning to provide a consistent view of the data as it existed at the start of the transaction. Serializable prevents all concurrency anomalies by locking the entire range of data that is affected by a transaction until the transaction ends.
The isolation level can be set for each connection using the SET TRANSACTION ISOLATION LEVEL statement or using the IsolationLevel property of the .NET TransactionScope class. The isolation level can also be overridden for individual statements using table hints such as (NOLOCK) or (READCOMMITTED).
Problem Description
The customer reported that they observed unexpected transaction isolation level changes when running distributed transactions using .NET Transaction Scope on Azure SQL Managed Instance, while the same application was behaving differently when using On premise SQL Server.
The customer was opening two connections to the same database under one transaction scope, one at a time, and they observed the transaction isolation level got reset after the second connection had been opened. For example, if they set the isolation level to repeatable read for the first connection, it would be changed to read committed for the second connection. This caused inconsistency and concurrency issues in their application.
The following code snippet illustrates the scenario:
TransactionOptions transactionOptions = new TransactionOptions
{
                IsolationLevel = System.Transactions.IsolationLevel.ReadUncommitted
};

string connectionStr = "Data Source=testwest.com;Initial Catalog=test;User id=sa;Password=;Connection Timeout=0";

using (TransactionScope ts = new TransactionScope(TransactionScopeOption.Required, transactionOptions))
{
                using (SqlConnection connection1 = new SqlConnection(connectionStr))
                {
                                SqlCommand cmd = new SqlCommand("SELECT transaction_isolation_level FROM sys.dm_exec_sessions where session_id = @@SPID", connection1);
                                connection1.Open();
                                SqlDataReader rs = cmd.ExecuteReader();
                                rs.Read();
                                Console.WriteLine(rs.GetInt16(0));
                                connection1.Close();
                }

                using (SqlConnection connection2 = new SqlConnection(connectionStr))
                {
                                SqlCommand cmd = new SqlCommand("SELECT transaction_isolation_level FROM sys.dm_exec_sessions where session_id = @@SPID", connection2);
                                connection2.Open();
                                SqlDataReader rs = cmd.ExecuteReader();
                                rs.Read();
                                Console.WriteLine(rs.GetInt16(0));
                                connection2.Close();
                }

                ts.Complete();
}
The customer stated that they are not using the “Pooling” parameter in their connection string, which means that connection pooling is enabled by default.
Problem Analysis
We investigated the issue and found that the root cause was related to how connection reset works on Azure SQL Managed Instance and cloud in general, compared to On-premise SQL Server.
Connection reset is a mechanism that restores the connection state to its default values before reusing it from the connection pool. Connection reset can be triggered by various events, such as closing the connection, opening a new connection with a different database name or user ID, or executing sp_reset_connection stored procedure.
One of the connection state attributes that is affected by connection reset is the transaction isolation level. Resetting the connection on Azure SQL Managed Instance will always reset the transaction isolation level to the default one, which is read committed. This is not true for on-premise SQL Server, where resetting the connection will preserve the transaction isolation level that was set by the application.
This difference in behavior is due to how Azure SQL Managed Instance implements distributed transactions using MSDTC (Microsoft Distributed Transaction Coordinator). MSDTC requires that all connections participating in a distributed transaction have the same transaction isolation level. To ensure this requirement, Azure SQL Managed Instance resets the transaction isolation level to read committed for every connection that joins a distributed transaction.
Since the customer is opening and closing the connection to the same database twice, only one physical connection will be created. The driver will use the same connection for both query executions, but the connection will be reset before being reused. The first connection reset will happen when the first connection is closed, and the second connection reset will happen when the second connection is opened under the same transaction scope. The second connection reset will override the isolation level that was set by the application for the first connection.
This explains why the customer observed unexpected transaction isolation level changes when running distributed transactions using .NET Transaction Scope on Azure SQL Managed Instance.
Conclusion
First and foremost, it is beneficial to emphasize that this is an expected behavior from a design perspective. The customer is advised to either disable connection pooling or explicitly set the transaction isolation level for every opened connection.
To disable connection pooling, they can add “Pooling=false” to their connection string. This will create a new physical connection for every logical connection, and avoid the connection reset issue. However, this will also increase the overhead of opening and closing connections, and reduce the scalability and performance of the application.
To explicitly set the transaction isolation level for every opened connection, they can use the SET TRANSACTION ISOLATION LEVEL statement or the IsolationLevel property of the .NET TransactionScope class. This will ensure that the isolation level is consistent across all connections participating in a distributed transaction, regardless of the connection reset behavior. For example, they can modify their code snippet as follows:
using (TransactionScope scope = new TransactionScope(TransactionScopeOption.Required, new TransactionOptions { IsolationLevel = IsolationLevel.RepeatableRead }))

{

    using (SqlConnection conn1 = new SqlConnection(connectionString))

    {

        conn1.Open();

        // Set the isolation level explicitly

        SqlCommand cmd1 = new SqlCommand("SET TRANSACTION ISOLATION LEVEL REPEATABLE READ", conn1);

        cmd1.ExecuteNonQuery();

        // Execute some queries on conn1

    }


    using (SqlConnection conn2 = new SqlConnection(connectionString))

    {

        conn2.Open();

        // Set the isolation level explicitly

        SqlCommand cmd2 = new SqlCommand("SET TRANSACTION ISOLATION LEVEL REPEATABLE READ", conn2);

        cmd2.ExecuteNonQuery();

        // Execute some queries on conn2

    }


    scope.Complete();

}
For additional information about database isolation settings, you can review the below documents.
I hope this article was helpful for you, please feel free to share your feedback in the comments section.
Disclaimer Please note that products and options presented in this article are subject to change. This article reflects isolation level settings for Azure SQL Managed Instance in October, 2023.
This article is contributed. See the original author and article here.
In this blog article, we will cover how to prevent and deny the automated backup retention days for Azure SQL database to be lower than X number of days.
We have received some service requests from customers that would like to ensure that they have for example 14 days as a retention period for their automated backup and would like to do this using a custom policy since they have multiple databases.
You can follow the steps below to create a custom policy and ensure this:
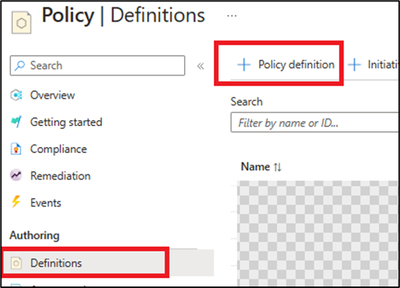
1) From the Azure portal, access Azure policy, then definitions blade.
2) Create a new policy definition.
3) Add the definition location (which subscription will be hosting this policy), Name, and description.
4) Set the category to use existing and select SQL (as below):
5) Then add the below policy definition into the rule field:
Note: you can adjust the below format to have tags or parameters as needed, also the below example is set to 14 days as retention period days.
Now since the policy definition has been created, you can add an assignment that refers to which resource will have this policy applied on.
From Azure policies page, and access definitions blade -> select the created custom policy, and click assign policy (you can assign on the Subscription level or a specific resource group depending on your business requirements).
After the assignment, if you try to have the retention backup days below 14 days, you can expect the below error:
Disclaimer Please note that products and options presented in this article are subject to change. This article reflects automated backups retention days custom policy for Azure SQL Database in October, 2023.
Closing remarks
I hope this article was helpful for you, please like it on this page and share it through social media. Please feel free to share your feedback in the comments section below.
I hope this article was helpful for you, please feel free to share your feedback in the comments section.
This article is contributed. See the original author and article here.
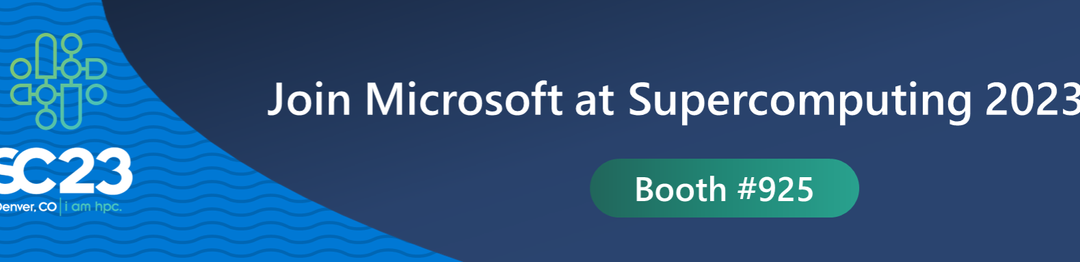
Come visit Microsoft at Supercomputing 2023 (SC23) November 12 – 17 where we’ll deep dive into high-performance computing (HPC) and AI solutions during an exciting week of sessions, hands on experiences and peer connections. Learn how to unlock your AI and HPC innovation!
Held in Denver, Colorado this year, SC is an international conference for high-performance computing, networking, storage, and analysis. Here you can expand your knowledge, enrich your experiences, and network with others in the HPC community. Offering an unparalleled mix of thousands of scientists, engineers, researchers, educators, programmers, and developers, this is the event HPC enthusiasts.
Visit Microsoft at Booth #925, right near the entrance to the exhibitor hall.
Engage with Microsoft Azure HPC and AI experts and our amazing partners.
Learn the latest advancements during our in-booth sessions.
Get hands-on with our demo pods for HPC, AI and Quantum.
Enjoy our hardware bar featuring our newest technology.
Take a break in our lounge area and enjoy coffee served by Artly, the barista bot.
And enter for a chance to win Surface Earbuds along with other cool stuff!
Beyond our booth, join us for lightning sessions at Booth #2195 and after-hour events for food and fun!
Keep reading for all the details.
It simply would not be a Microsoft booth without a session theatre. Attend a session presented by Microsoft and partner experts in Booth #925 to learn the latest advancements for HPC and AI. Engage and ask questions.
Monday night
7:15 pm – 7:35 pm
Performance of Azure AI Infrastructure for Large Language Models at Scale
Azure empowers intelligent services like CoPilot and ChatGPT that have captured the world’s imagination. These services, facilitating various applications like Microsoft Office 365, chatbots and search engines with generative AI, owe their magic to Large Language Models (LLMs). In this session, we will explain the performance of Azure AI Infrastructure for LLMs through public benchmarking.
8:15 pm – 8:35 pm
Reduce CAE Simulation Time with TotalCAE on Azure
TotalCAE on Azure reduces simulation times for CAE applications by up to 80% in just a few clicks for hundreds of CAE applications. See how easy it is to adopt the latest Azure HPC technologies without being an IT expert. Case studies of how innovative companies receiving HPCwire 2023 nominations with TotalCAE are using Azure to accelerate their designs.
In this session, Dr. Alexis Mills, Chemist and Microsoft Machine Learning Engineer, will present Azure Quantum Elements and explore how advancements in cloud technologies, artificial intelligence, high performance computing, and quantum computing are accelerating progress for scientists around the world. Dr. Mills will also be joined by a special guest from Pacific Northwest National Lab, Dr. Wendy Shaw, to highlight how Azure Quantum Elements will be used to help them accelerate their discoveries.
11:15 am – 11:35 am
Supercomputing on Azure for AI Workloads with Massive Scale and Performance
Join us as Microsoft dives into the latest Azure supercomputing capabilities and performance.
12:15 pm-12:35 pm
Ansys and Azure: Accelerating Innovation with HPC Leadership
Learn how Ansys advances engineering simulation solutions with Microsoft Azure’s HPC cloud infrastructure. In the first half of 2024, Ansys will be releasing a powerful new platform to simply the successful migration of Ansys workloads to Azure to take advantage of its industry leading HPC capabilities. This platform is called Ansys Access on Microsoft Azure and will enable customers to easily and optimally deploy Ansys simulation in their own Azure enrollments. This talk will cover the broad range of Ansys solvers that are being optimized on Azure, go through some benchmarks and performance plots, and touch on roadmap of different pathways to Azure cloud.
1:15 pm -1:35pm
Enabling Access to HPC in Academic Medical Centers
HPC is critical to research that takes place in academic medical centers. Yet many university HPC centers struggle to serve the diverse needs of medical research. Biomedical research codes change frequently and have changing hardware requirements, are bursty, and often are run on sensitive data that must be carefully protected under standards such as HIPAA. We describe how Rescale, a cloud-based HPC platform, can be used by academic researchers to conduct research with enterprise-level governance and financial controls with Microsoft Azure. We will also demonstrate Rescale Essentials, a free platform edition of Rescale that can be used through the API to submit jobs via scheduler-like interfaces or simple web portals.
2:15 pm – 2:35 pm
NVIDIA and Microsoft
4:15 pm – 4:35 pm
AMD and Microsoft: Together We Advance Cloud HPC
Wednesday
10:15 am -10:35 am
How AMD and Microsoft Built a Powerful Cloud System on Open Source Software
Learn more about the AMD ROCm software stack and how it powers some of the largest implementations of AI applications today—including workloads on the Microsoft Explorer system. We will highlight the advantages of the AMD ROCm open ecosystem and ongoing collaboration between AMD and Microsoft.
11:15 am – 11:35 am
What’s New: The latest Azure AI Infrastructure innovation with AMD
12:15 pm – 12:35 pm
Virtual Human Modeling On Azure – Case Studies about Heart, Brain, and Liver Simulations on the UberCloud Platform
In the past few years, UberCloud and Dassault supercomputers built with Azure HPC performed several challenging human modeling projects in the cloud. Projects were dealing with Drug-induced Arrhythmias of a Human Heart, Neuromodulation in Schizophrenia, Artificial Aortic Heart Valves, Personalized Left Atrial Appendage Occluder Device, Repairing Cardiac Valve Leakage Using Machine Learning, and Multiscale Multiphysics Living Liver Simulations.
1:15 pm – 1:35 pm
What’s New: The latest Azure AI Infrastructure innovation with NVIDIA
2:15 pm – 2:35 pm
Achievement Unlocked- Weather Forecasting in the Cloud
This talk tells the story of the Met Office’s world class weather and climate science and their transformational journey in partnership with Microsoft.
3:15 pm – 3:35 pm
The Future of Networking with Azure Quantum
4:15 pm – 4:35 pm
NVIDIA and Microsoft
Thursday
10:15 am – 10:35 am
Hybrid HPC Powering NOAA’s Multi-cloud and AI/ML Workloads
GDIT is a large HPC systems integrator for the Federal Government. NOAA’s vision promotes an accelerated transformation to the cloud, urging a culture that embraces agility, learning, innovation, and cloud native architecture. Parallel Works and GDIT enable NOAA researchers with an intuitive platform to run weather models like Unified Forecasting system reanalysis, and Earth Prediction Innovation models using Azure services. The increasing use of AI and ML workloads for this work will be discussed.
Get hands-on with HPC, AI and Quantum demos in Booth #925.
HPC demo | AI demo | Quantum demo | NVIDIA, Rescale, Ansys and other partner demos
Thursday
HPC demo | AI demo | Quantum demo
Discover the latest Azure and partner HPC and AI technology at our hardware bar in Booth #925.
Events are entertaining but also tiring! Stop by Booth #925 for a place to relax and enjoy a good cup of coffee served by Artly, the barista bot!
Here from Azure HPC and AI experts during our lightning sessions in Booth #2195.
Tuesday
12:45 pm – 1:00 pm
Wednesday
1:30 pm – 1:45 pm
Thursday
10:30 am – 10:45 am
Driving the AI Revolution with Azure Supercomputing
We will discuss the growth of AI, especially LLMs and generative AI, and the supercomputing making this possible. Azure HPC provides purpose-built supercomputing infrastructure to support training/tuning of foundational AI models, plus HPC infrastructure to support inferencing as consumers in all industries use AI models to assist their everyday productivity.
You’re invited to attend our after-hour events for networking, drinks, food, and fun! Sign up today.
Tuesday, Nov 14
7:00 pm – 9:00 pm
Special Networking Evening with Microsoft and AMD
Join Microsoft and AMD for an evening of connections, delicious food and cocktails. Space is limited. Contact AzureHPCEvents@microsoft.com to reserve your spot today! Location provided during registration.
Wednesday, Nov 15
11:30 am-1:00 pm
Luncheon Hosted by Microsoft and Rescale
Join Microsoft and Rescale for an informative lunch session. Discover how hybrid cloud HPC is empowering the next generation of scientists and engineers and enjoy a locally curated Southwestern lunch. Space is limited. Contact AzureHPCEvents@microsoft.com to reserve your spot today! Location provided during registration.
Wednesday, Nov 15
6:30 pm – 8:30 pm
Dinner with Microsoft and NVIDIA
Join Microsoft and NVIDIA for a European-inspired meal curated with local ingredients and network with peers. This event is by invite-only.


Recent Comments