This article is contributed. See the original author and article here.
Microsoft has separated all Czech-specific functionalities into distinct applications as part of the delocalization process of the Czech version of Dynamics 365 Business Central. The process intended to pave the way for the seamless integration of Czech local functionalities on top of the Worldwide (W1) version of the Business Central.
Technical Overview
Business Central has been undergoing major changes over the past few years and one of the strategy areas is application modularization, that includes localization layers. This led to critical changes in the Czech localization layer, which has now been converted into a suite of distinct localization apps. The suite contains the following apps: Core Pack, Advance Pack, Banking documents, Cash Desk, Compensation, Advance Payments, and Fixed Assets.
To ensure that both old and new Czech functionalities work in parallel in that transition period. Microsoft made sure that the old code integrated into the Base Application was gradually cleaned up. The last step is to remove Czech specific fields from the Czech Base Application.
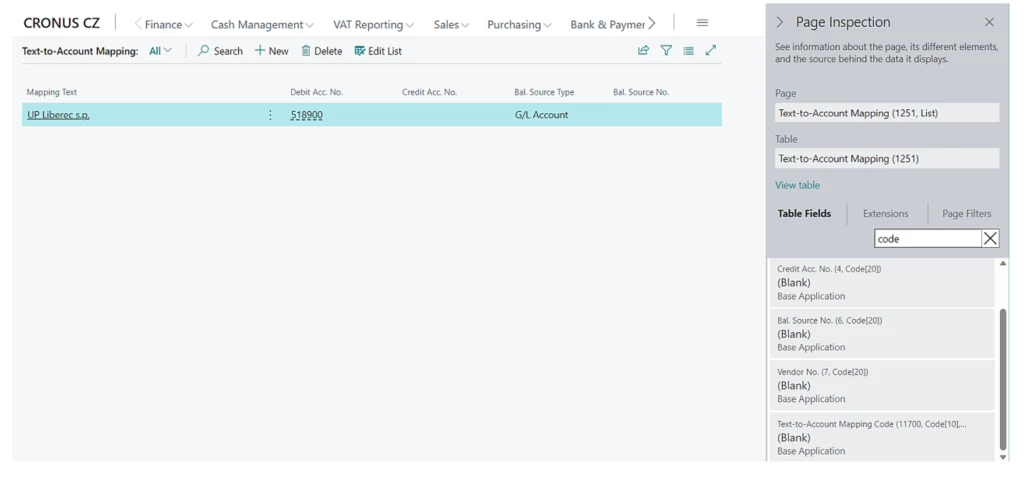
In the next major release of Business Central 2023 wave 2 (version 23), the following Czech-specific fields will be removed from the tables, while primary keys will be updated:
Table 1251 “Text-to-Account Mapping”, field 11700 Text-to-Account Mapping Code: Code[10]
Action Required: Upgrade to Business Central 2023 Release Wave 2
To ensure a successful upgrade to Business Central 2023 release wave 2 (version 23) Czech, perform a forced synchronization of the database schema. Microsoft will ensure a seamless upgrade process for users of the online version of Business Central. However, for those upgrading to this version using Business Central on-premises, it is necessary to set the “schemaUpdateMode” parameter in CZ Base Application to “ForceSync” to synchronize the data model.
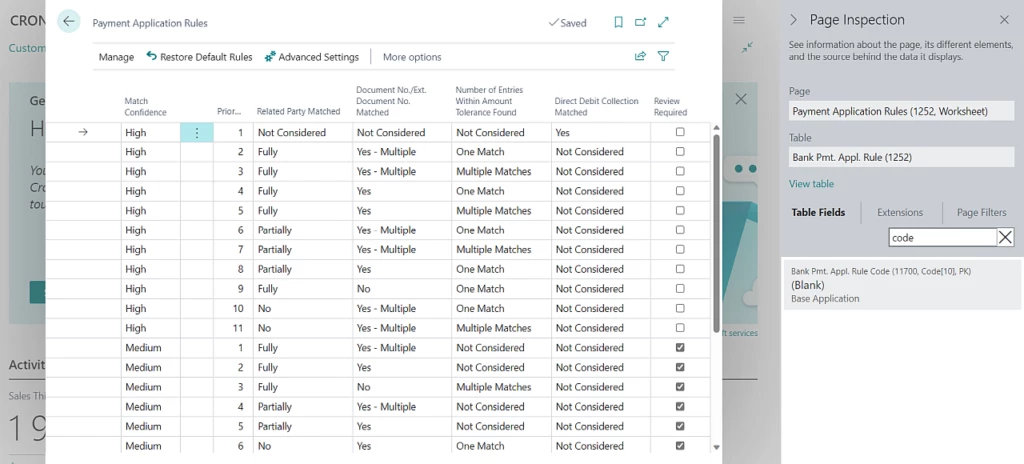
Users who are upgrading to the on-premises version of Business Central 2023 release wave 2 (version 23) Czech and higher must verify that there are no duplicate records in both tables 1251 “Text to Account Mapping” and 1252 “Bank Payment Application Rule” after the Czech fields have been removed from the primary key. This can be accomplished either by manually deleting the data or by upgrading to any version of BC 22.x where data modifications will be included as part of the upgrade procedures. It is highly recommended to back up the data in these tables before proceeding.
Summary
Czech-specific fields that were previously part of the primary key in Table 1251 “Text to Account Mapping,” specifically Field 11700 “Text-to-Account Mapping Code,” and in Table 1252 “Bank Payment Application Rule,” “Bank Payment Application Rule Code,” will be removed in this new version.
“Although it is a beginner-level document provided by Microsoft, it is difficult for all beginners to read such documents. Therefore, as someone who is also learning C# for the first time, I have organized the contents of this document into a video. I hope that beginner C# learners can learn C# more easily and enjoyably, and I want to share this content with many people.”
(In Korean, MS에서 제공하는 초급자 문서이지만, 모든 초급자는 이러한 문서 조차 읽기 어렵습니다. 그래서 저도 C#을 처음 배운다는 입장에서 해당 문서의 내용을 영상으로 정리하였습니다. C# 초급 입문자가 조금 더 쉽고, 즐겁게 C#을 배울 수 있기를 희망하며 이 컨텐츠를 많은 사람들에게 알리고자 합니다.)
“If we develop our own application that maintains unique usernames and passwords, the administrative burden becomes significant when adding or removing users across multiple applications. We also have to handle situations where a user forgets their email address. Alternatively, we can delegate this responsibility to a centralized ID provider, but many ID providers are very expensive. However, Microsoft’s authentication and authorization system is very affordable and easy to implement. Therefore, it’s content that many people should be aware of.”
(In Japanese, 独自のユーザー名とパスワードの情報を保持するアプリケーションを自分たちで開発した場合、複数のアプリケーションにまたがってユーザーを追加・削除するときに管理上の負担が大きくなります。またメールアドレスをユーザーが忘れた場合の対処も自分たちでしなくてはなりません。代わりにその責任を一元化された ID プロバイダーに委任できますが、多くの ID プロバイダーは非常に高額です。しかし、Microsoft の認証認可システムは非常に安価であり、簡単に実装もできます。そのため、多くの人に知ってもらいたいコンテンツです。)
Yutaro Tamai, Enterprise Mobility, Windows and Devices MVP, Japan
“In this eta, managing Windows devices is required for cloud-native management approach. This is good content to learn about device setup through Windows Autopilot. Why not start by getting familiar with Windows Autopilot and deepening your understanding of the latest device setup methods?”
(In Japanese: Windows デバイスの管理もクラウド ネイティブの管理手法が求められる時代です。その中で、Windows Autopilot によるデバイス セットアップの手法を学ぶに良いコンテンツです。まずは、Windows Autopilot に触れ、最新のデバイス セットアップの手法に理解を深めてみませんか。)
This article is contributed. See the original author and article here.
We are honored to announce that Gartner® has recognized Microsoft as a Leader in the 2023 Gartner® Magic Quadrant™ for Unified Communications as a Service (UCaaS)—this is the fifth consecutive year we’ve received this recognition.
This article is contributed. See the original author and article here.
Greetings, Azure enthusiasts and PostgreSQL pros! As November draws to a close, we’re excited to unveil the latest enhancements to Azure Database for PostgreSQL Flexible Server. This month, we’ve rolled out a suite of features that bolster your database’s security, optimize storage scalability, and streamline the migration process, among other improvements. Join us as we delve into these November highlights that are set to elevate your Azure PostgreSQL experience.
Feature Highlights of the Month:
Server Logs for Azure PostgreSQL Flexible Server.
Support for TLS Version 1.3 – Enhanced Connectivity Security.
Introducing Pre-Migration Validations for Single Server to Flexible Server Migration Tool.
Enhanced User and Role Migration Capabilities in Azure Postgres Flexible Server.
Microsoft Defender support **
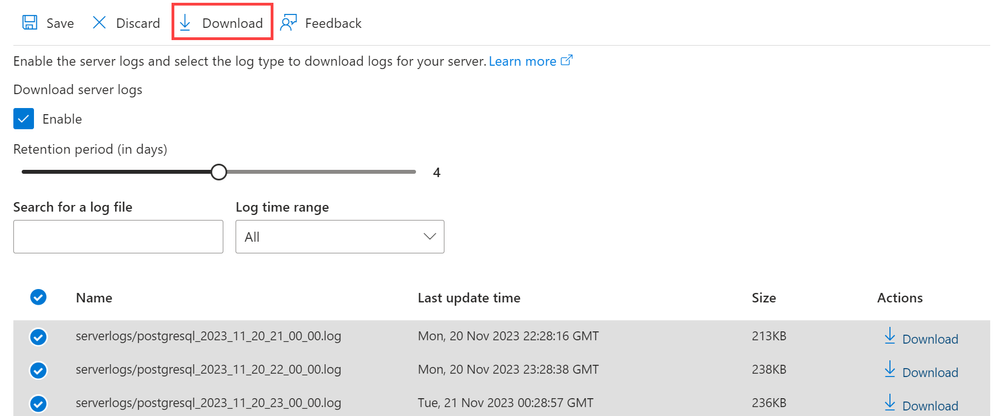
Server Logs for Azure PostgreSQL Flexible Server
In the November update, we have introduced a significant enhancement to the Server Logs feature for Azure Database for PostgreSQL – Flexible Server. This feature is crucial for monitoring, troubleshooting, and gaining detailed insights into your server activities. Key aspects of this updated feature include:
Easy Enablement: Initially disabled by default, you can now easily enable / disable server logs through the Azure portal.
Customizable Retention Period: Configure the retention period for your logs, with options ranging from 1 to 7 days.
Convenient Log Access and Download: Once enabled and logs are generated, they can be readily accessed and downloaded from the Azure portal or via Azure CLI (command-line interfaces), providing a straightforward way to analyze server activities.
Support for TLS Version 1.3 – Enhanced Connectivity Security
This November, we’re excited to announce the support for TLS version 1.3, the most secure and current version of the TLS protocol, for Azure Database for PostgreSQL – Flexible Server. This update is crucial in strengthening the security of client-server communications. Here’s what this enhancement entails:
Advanced Security Protocol: By setting `ssl_min_protocol_version` to 1.3, Azure Database for PostgreSQL – Flexible Server now mandates the use of TLS 1.3 for all client connections. This ensures that the data transmitted between clients and the server is protected using the latest and most secure encryption standards.
Improved Connection Security: TLS 1.3 not only offers enhanced security but also provides improved performance during the encryption process, making your database interactions both safer and more efficient.
With the support for TLS version 1.3, Azure Database for PostgreSQL – Flexible Server takes a significant leap forward in ensuring the highest standards of security and reliability for your database communications. For more details on this feature, please refer Azure PostgreSQL TLS versions.
Introducing Pre-Migration Validations for Single Server to Flexible Server Migration Tool
Single to Flexible server migration just got easier! We are excited to introduce the Pre-Migration Validation feature for the Single Server to Flexible Server Migration tool. After a thorough analysis of past migrations, the team identified that a considerable number of attempts faced setup-related hurdles. To tackle this, Pre-Migration Validation has been crafted to thoroughly check the readiness of both your source and target servers. The process is neatly integrated into the Azure Portal experience, offering you flexibility to:
Validate – Examines server and database preparedness for the migration.
Migrate – Proceeds directly to migration without prior validations.
Validate and Migrate – Combines both steps, triggering migration only if validation passes without critical issues.
Each rule within the validation set is designed to return a status of ‘Succeeded’, ‘Failed’, or ‘Warning’, providing clear indicators of your migration path and any obstacles that may need your attention. This feature not only enhances the predictability of migrations but also significantly reduces stress by preemptively addressing potential issues. We are committed to evolving this tool, with more comprehensive validation rules in the pipeline to ensure your databases are primed for migration. For a deep dive into Pre-Migration Validations and to get started, explore our detailed documentation Pre-Migration Validations.
Enhanced User and Role Migration Capabilities in Azure Postgres Flexible Server
We’ve further upgraded the Azure Postgres Flexible Server Migration tool by adding the ability to automatically migrate users, roles, permissions, and ownerships from a Single Server to Flexible Server. Post successful migration you will observe the following:
All users/roles from your source server have been copied to the target server.
Database ownership and its associated objects are consistently maintained between the source and target servers.
Permissions, including GRANT/REVOKE, on all database objects are identical on the target server compared to the source server.
This new feature underscores our commitment to making the transition to Flexible Server as seamless and accurate as possible. To make the most of these features, please refer to our customer guide.
Microsoft Defender support
In our ongoing effort to enhance database security, we are proud to introduce Microsoft Defender for Cloud support for Azure Database for PostgreSQL Flexible Server. This new feature brings a robust layer of security to your database operations:
Proactive Anomaly Detection: It actively monitors unusual access and query patterns, helping to identify potential security threats before they escalate.
Real-Time Security Alerts: On detecting any anomalous activities, the system generates comprehensive alerts. These are accessible through Defender for Cloud’s security alerts page and provide essential details about the detected threats.
Guided Resolution Steps: Each alert is accompanied by recommended actions for investigating and mitigating the threat, thereby enabling quick and effective resolution.
Integration with Microsoft Sentinel: For deeper security analysis, the feature offers seamless integration with Microsoft Sentinel, expanding your capabilities for managing database security.
This feature represents a significant step forward in safeguarding your databases against evolving cyber threats and ensuring a secure environment for your critical data on Azure.
** this feature is scheduled to be available in December.
Ignite Feature Spotlight: Azure Database for PostgreSQL Flexible Server Enhancements
This November, Microsoft Ignite unveiled several exciting enhancements to Azure Database for PostgreSQL Flexible Server, solidifying its position as an enterprise-ready, fully managed PostgreSQL service. Here is a snapshot of the key features announced:
Postgres 16 Support: Now generally available, Flexible Server supports PostgreSQL 16, providing users with the latest database features and improvements. Learn more about Postgres 16 in Flexible Server.
Near-Zero Downtime Scaling: Scale your compute and storage resources with less than 30 seconds of downtime, enabling more dynamic adjustment to workload demands. Discover Near Zero Downtime Scaling.
pgvector 0.5.1 Support: General availability of pgvector 0.5.1 allows for storing AI-generated embeddings and performing similarity searches, enhancing AI (ARTIFICIAL INTELLIGENCE) capabilities within the database. Explore pgvector in Azure Database for PostgreSQL.
New Extensions – azure_storage & tds_fdw: Load and export data between Azure storage and PostgreSQL with the azure_storage extension. Access Microsoft SQL data seamlessly within PostgreSQL using tds_fdw. Learn about Postgres extension support.
Premium SSD (solid state hard drives) v2: A new storage offering supporting up to 80K IOPS (input/output per second) and 64 TB storage capacity, adjustable to workload requirements. Introducing Premium SSD v2.
Azure_AI Extension: Integrate Azure OpenAI directly with PostgreSQL for AI-powered app development using simple SQL. Read Integration with Azure OpenAI.
Private Link: Enhance security with Private Link, allowing private network database connections without exposure to the public internet. Using Private Link with Flexible Server.
Multi-Region Disaster Recovery (GeoDR): Achieve high availability and disaster recovery with GeoDR, allowing failover across regions under a single virtual endpoint. Introducing Multi-Region Disaster Recovery.
IOPS Separation for Premium SSD v1: Tailor your storage configuration to your workload’s specific IOPS and size requirements. Read Storage IOPS Separation.
Long-Term Backup Retention: Meet compliance standards and bolster disaster recovery strategies with backup retention for up to 10 years. Explore Long-term backup retention details.
As we wrap up this November recap, we also find ourselves reflecting on the incredible journey throughout 2023. It’s been a year filled with substantial growth, innovation, and community engagement in the realm of Azure Database for PostgreSQL Flexible Server. Each update and enhancement we’ve shared today not only marks the progress of this month but also contributes to the cumulative advancements we’ve achieved this year.
As the holiday season approaches, we want to take a moment to express our deepest gratitude for your ongoing support and engagement. Your feedback and involvement have been instrumental in shaping the evolution of our services. On behalf of the entire Azure Postgres Team, we wish you a joyful and safe holiday season.
Happy holidays, and here’s to a new year filled with more success and breakthroughs! Stay connected with us and keep an eye on this space for more updates. We cherish your thoughts and experiences, so please don’t hesitate to share them in the comments below. Your insights are invaluable to us.
This article is contributed. See the original author and article here.
As the calendar turns its page to a new year, the roles of chief financial officers (CFOs) and finance teams take center stage as they review business performance and tackle updating strategic plans. The fresh new year of 2024 will bring with it a multitude of opportunities, challenges, and transformative possibilities for financial leaders navigating the ever-evolving landscape of the global economy. In this dynamic arena, where precision meets strategy, the CFO becomes the architect of fiscal success, and finance teams are the craftspersons shaping the financial future of their organizations. And yet, many leaders struggle with the complexity involved in navigating uncertainties, taking advantage of emerging trends, and driving business performance. We’re introducing the latest advancements in our enterprise resource planning (ERP) portfolio that address these challenges to simplify how you activate business insights at every level of your organization.
Microsoft Dynamics 365 Finance
Begin your AI-guided business performance management journey today.
Let’s break this down based on the following top business performance management challenges we’ve heard from our customers as they turn to their planning, analytics, and insights tools, then we’ll cover our new year’s resolutions for each.
Data accuracy, consistency, and integration: Poor data quality, reconciliation processes, and the integration of disparate data sources hinder accurate analysis and planning. Resolve to create a connected enterprise in 2024; our new business process-centric data models in the business performance analytics capabilities of Microsoft Dynamics 365 Finance will pave the way.
Complexity for users: Financial planning and analytics (FP&A) and corporate performance management solutions often have a steep learning curve, lack a user-friendly design, and are difficult for users to navigate. Resolve to empower your teams with easy-to-use tools; our business performance planning capabilities in Microsoft Dynamics 365 Finance, generally available on December 31, 2023, will help.
Total cost of ownership: Most financial management and ERP solutions do not include business performance management capabilities as part of their core solution, and these tools need to be purchased separately, which minimizes who can use them. Resolve to lower your total cost of ownership, while maximizing business performance management; our new Dynamics 365 Finance Premium offering will provide an easy way to acquire and deploy advanced business management capabilities.
Resolution 1: Create a single source of truth for planning, analytics, and insights, making it easy to get started.
Unlocking the true potential of your finance department requires addressing the common data-related challenges and tool limitations that hinder productivity, and getting actionable business performance insights in a timely manner.
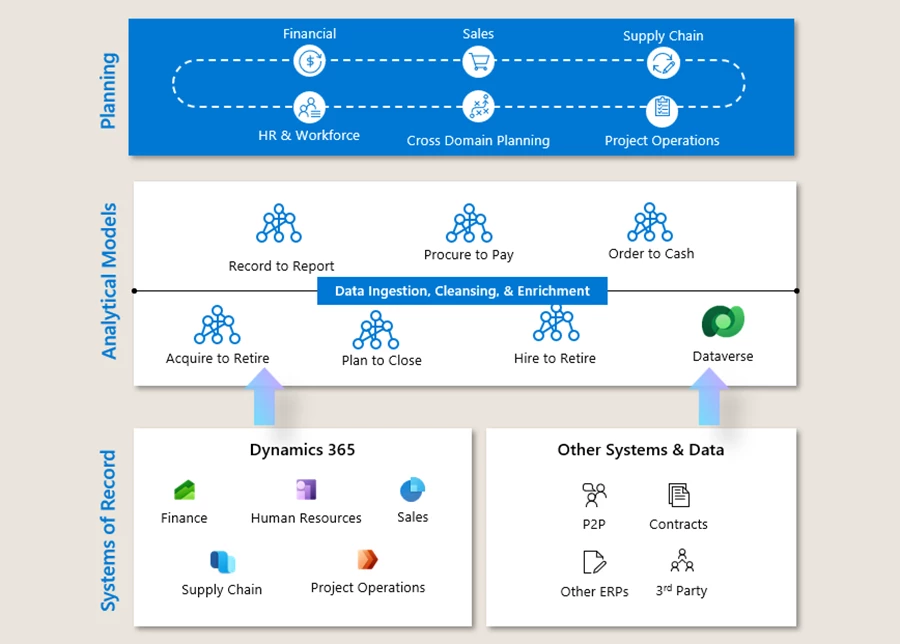
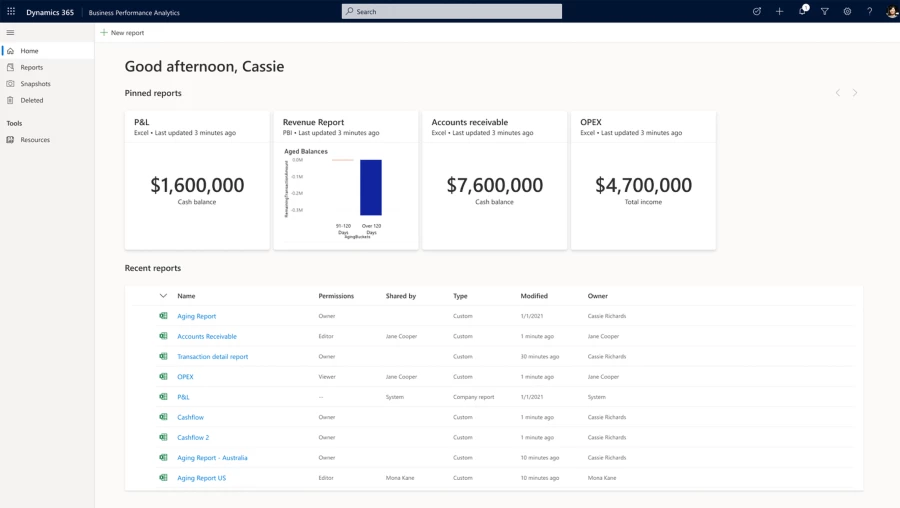
We introduced business performance analytics in February 2023 to help you analyze and improve business performance by unifying data from Microsoft Dynamics 365, Microsoft Dataverse, and other sources into an easy-to-use, business process-centric data model. You can use business performance analytics to create reports, dashboards, and insights that help you make informed decisions and optimize your operational workflow.
Business performance analytics aims to revolutionize how finance departments handle complex data by streamlining data ingestion, cleansing, and enrichment. By automating data hygiene, teams can reduce manual work, minimize reliance on IT, and lay the foundation for advanced capabilities like copilot and AI.
Create a unified data model for better planning, analytics, and insights.Analytics dashboard from Dynamics 365 Finance
Business performance analytics capabilities are currently available in preview and your administrator can request installation; your current Dynamics 365 Finance licenses allow you to try it out today.
Resolution 2: Empower people with planning and analytics tools that are easy to use.
Finance teams often face challenges with outdated data and complex tools, resulting in slow, manual processes when extracting integral information. The complexity of analytical tools often demands advanced data science skills or falls short with outdated features, hindering the discovery of valuable insights crucial for enhancing business performance. In the pursuit of agile decision-making, finance leaders must overcome these hurdles and ensure access to robust, timely insights that drive action.
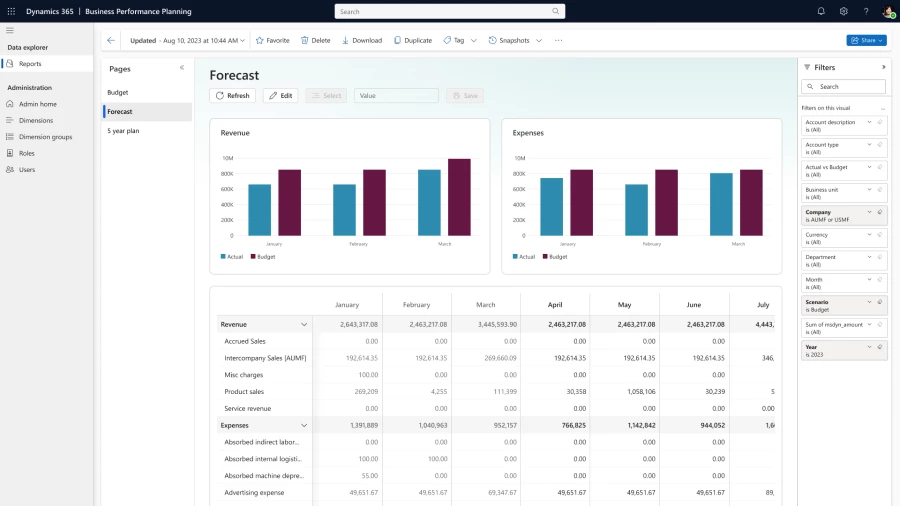
We introduced our vision for extended planning and analysis (xP&A) back on May 31, 2023. On December 31, 2023, we’ll deliver on this vision with the general availability (GA) of business performance planning capabilities that equip our Dynamics 365 Finance customers with a comprehensive view of financial and operational performance. These capabilities simplify and automate planning, budgeting, forecasting, reporting, and analytics by integrating with familiar Microsoft Power BI and Excel environments.
Create strategic financial plans with Dynamics 365 Finance.
Your administrator will be able to access these capabilities for installation after the GA date from the Power Platform admin center.
Resolution 3: Optimize costs while ensuring people have the tools they need and that they’re easy to buy.
The total cost of ownership for many business performance management solutions can be notably high due to various factors such as initial software licensing fees, implementation costs, and customization expenses. Integration challenges with existing systems may necessitate additional resources, and the need for skilled personnel to manage and optimize the solution can incur ongoing labor costs.
Our approach is to include planning, analytics, and insights as capabilities within Dynamics 365 Finance, while providing interoperability with familiar tools like Excel and Microsoft Power BI. This strategy allows our customers to minimize the high costs associated with many FP&A and xP&A solutions. This ensures that individual users have access to the capabilities they need to successfully complete their work, while not having to pay for unnecessary functionalities. We’re introducing a new offering to help realize this goal. Dynamics 365 Finance Premium will equip users with the tools needed to build advanced financial plans, budgets, analytics, and insights. This license will only be needed for roles within the organization that are responsible for creating strategic plans, budgets, reports, and insights. Welcome to a new era of financial empowerment, where success is not just measured but strategically crafted.
Modernize business performance management
In navigating the complexities of today’s economic landscape, CFOs recognize the indispensable need for advanced planning and analytical tools to effectively steer their organizations through uncertainties, foster innovation, and ensure both short-term resilience and long-term prosperity. With these new capabilities in Dynamics 365 Finance, CFOs can empower finance and business leaders with the essential tools to not only anticipate risks but also drive strategic innovation. In the face of modern economic challenges, more advanced corporate performance management becomes essential for financial leaders, offering a robust foundation to fortify their organizations, ensuring they not only weather the current storms but emerge stronger and more resilient for the challenges of tomorrow.
We’ve made planning and analytics easy for customers to get started, in familiar tools that are easy for finance users to use, and we’ve made the buying process simple with the Dynamics 365 Finance Premium offering. Ensure your organization is ready to adopt the new business performance planning capabilities and start 2024 with a better view of your strategic plans.
Learn more about Dynamics 365 Finance
Begin your AI-guided business performance management journey today. Learn more about Dynamics 365 Finance and our finance solutions to get a better understanding of how this new offering will add additional business performance management capabilities for our customers.
This article is contributed. See the original author and article here.
We’re excited to spotlight our Microsoft Security Experts Discussion Space—a dedicated community designed for cybersecurity practitioners to connect, share insights, and learn together. As we embark on this journey, we want to provide some tips on how you can kickstart and actively participate in discussions, fostering a vibrant and collaborative community of practice.
Getting Started: Tips for Users
Explore Community Topics: Engage in discussions on a variety of topics, such as delving into Defender Experts features, crafting advanced hunting queries, or leveraging Graph API for automation. These are just starting points—feel free to suggest and explore your own areas of interest.
Ask Questions: Don’t hesitate to ask questions, whether you’re a beginner seeking guidance or an expert looking for a fresh perspective. Our community is here to help.
Share Your Expertise: If you have experience in a particular area, share your insights and tips. Your knowledge can be incredibly valuable to others.
Engage in Conversations: Participate in ongoing discussions by providing feedback, sharing your experiences, or offering alternative viewpoints. Engaging with others is key to building a thriving community.
Let’s Get the Conversation Going!
To kick things off, we invite you to check out our most recent thread regarding Sentinel Automation based on Defender Experts Notifications (DENs). This community is a space for collaboration, and your input shapes its growth. Remember, a vibrant community is built on active participation. So, let’s ignite conversations, share knowledge, and make this tech community a hub of inspiration and expertise!
This article is contributed. See the original author and article here.
In past roles, I spent hundreds of hours with colleagues developing our annual strategic plan. We created committees, subcommittees, and teams to identify priorities and initiatives grounded to the organization’s mission and vision. We would ambitiously set our goals for the year and even identify success metrics. While intentions were good, our strategic outcomes always fell short.
Why? This conventional approach took too long, lacked accountability and the rigid planning cycle inhibited our ability to adapt to changing organization needs and shifting priorities. We got stuck in the “set and forget” cycle of setting goals at the beginning of the year and never knowing if our everyday activities at the individual contributor and team levels even rolled up to those institutional goals.
At Microsoft we recognize a defined set of corporate goals not only instills a sense of purpose, accountability, and agility but also helps companies mitigate uncertainty.
How do we escape the organizational goal-setting rut?
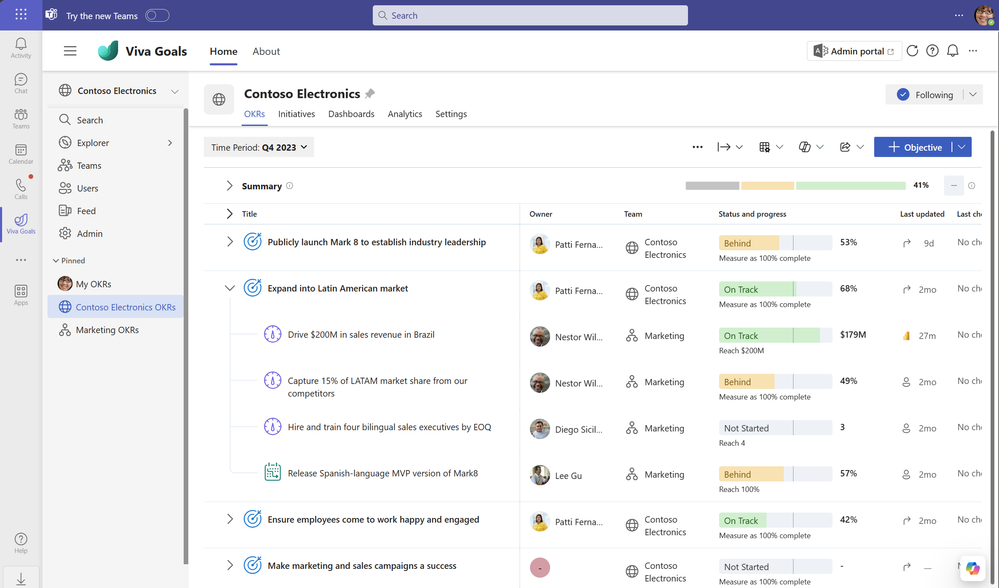
In today’s environment when organizations are required to operate faster and more efficiently, having an adaptable goal planning and management processes are essential. Microsoft Viva Goals is a goal management solution that helps ease goal planning and management. Viva Goals helps companies escape the goal-setting rut with capabilities to communicate goals across the organization, measure progress, and realign priorities as needed.
CAI, a global consulting firm, shared how Microsoft Viva Goals helped boost their business agility and enable operational alignment by streamlining its goal planning and management processes. Historically CAI relied on disparate Excel spreadsheets, making it difficult to align strategies across the company. Viva Goals provided them with one centrally managed solution that readily supported an adaptable goal setting strategy. With Viva Goals, CAI was able to move away from Excel spreadsheets and a conventional, linear approach.
“We don’t create a traditional business plan now. We use Viva Goals with our customer-facing project teams to manage progress, align strategy, and create accountability to high-level objectives.”
– Richard Tree: Chief Operating Officer, CAI
Today they are successfully setting business goals, objectives and key results (OKRs) and aligning teams to organizational priorities while at the same time delivering consistent and high-quality services to their customers. They are able to stay agile and responsive to their customers’ needs by modernizing their approach to goal setting.
Read more about CAI’s Viva Goals journey to learn how they were able to boost business agility and operational alignment by adoption an OKR framework.
Bridging the gap between goal setting strategy and execution
Another issue companies face in their goal setting journey is a disconnect between strategy and execution. Commonly, corporate goals are set at the leadership level and not communicated to business units and teams within a company. This makes it hard for individuals to know if their work is impacting the company’s bottom line.
To bridge this gap and help break the “set and forget” cycle, Viva Goals enables leaders to send regular updates across the organization, teams, and even individual views. With better transparency, internal teams are able to align priorities so they can achieve results together.
Microsoft customer, OC Tanner, discussed their journey from goal setting strategy to successful execution with Viva Goals. Regarded as a manufacturing leader and pioneer of the employee recognition industry, they realized that to maintain their leadership position, they needed clear and concise goals communicated across the organization. They chose Viva Goals to help them focus on the most critical priorities.
“Viva Goals helps us keep OKRs established and aligned for the appropriate planning periods and creates visibility across the entire team.”
– Jason Andersen: Vice President of Product, O.C. Tanner
Today OC Tanner incorporates OKRs into all planning and collaborative processes. Viva Goals also plays a key role in their semiannual and quarterly planning processes, which have helped to align everyone on their tasks and ensure their work is laddering up to the big picture. In short, OC Tanner successfully bridged the gap between strategy and execution with Viva Goals.
Read more about how OC Tanner was able to create “unity in focus” with Viva Goals.
Adapting a continuous goal-management framework
Consistent with my own planning experience described in the introduction, many organizations find goal setting arduous. To help better understand the goal setting challenges, Microsoft commissioned a study by Forrester Consulting, 2023 State Of Goal Setting Report.
One of the findings Forrester reported was that although goal setting provides structure and a common vision, the lack of organization wide visibility to corporate goals can hinder teams from meeting their goals. In addition, Forrester also reported that company leaders who regularly revisit and set goals to align with the rhythm of business, were not doing so at other levels of the organization. This also results in employees feeling disconnected and unmotivated with the goal setting process.
At Microsoft, we believe a continuous goal-setting planning lifecycle is an important component to success. The continuous planning cycle involves shorter planning cycles, ability to measure and report progress, analyze performance using scenario-based models, adjust priorities as needed, and repeat for the next evaluation cycle. This approach allows companies to make necessary adjustments to meet their corporate goals and help keep everyone focused on the right work.
Viva Goals provides companies with the tools to define agile processes and framework for planning, measuring, analyzing and adjusting priorities as needed. With the ability to connect to the project management and data tools employees use regularly, such as Azure Dev Ops, Microsoft Project, Microsoft Planner and Power BI, Viva Goals can provide visibility into how progress on daily work is impacting goals.
Using next generation AI from Copilot, Viva Goals helps power organizations to streamline the entire goal management process from start to finish. Whether it be quarterly or monthly planning cycles, Viva Goals enables companies to readily measure, analyze and adjust goals on a regular basis. For more information on how Viva Goals supports continuous planning lifecycle, watch Viva Goals video.
Aligning OKRs across the organization leads to stronger engagement and motivation
In July 2023 we hosted a Viva Goals webinar, “Where are we going?”: How to chart your Viva Goals journey, where we asked more than 100 participants what their biggest goal setting challenge was. Not surprisingly, alignment was the top answer.
Sample responses from participants in our July 2023 webinar
In our experience it’s not just getting alignment at the onset of the goal setting process, it’s also maintaining alignment across the organization. Microsoft customer, Svea Solar, relies on Viva Goals to help employees connect to the company’s founding purpose from the moment they are hired.
“We use Viva Goals to demystify what’s important for each function and get people up to speed faster.”
– Wilhelm Kugelberg: Strategy & Business Development Manager, Svea Solar
Sharing corporate goals provides new hires understand with what they need to do and, more importantly, why their work is important. Svea Solar quickly noticed that aligning employees on OKRs from the moment they are hired, led to stronger engagement and motivation to focus on the right things.
Consistent with Svea Solar’s experience, at Microsoft we also recommend a top-down alignment for stronger impact. Just as important is cross-functional alignment within and across groups to help reduce redundancies as well as leverage the power of meaningful collaboration to achieve operational excellence.
Read more about how Viva Goals helped Svea Solar achieve more and drive efficiency by defining distinct goals.
Viva Goals empowers teams
Effective goal setting not only can lead to stronger alignment, but also empowers teams to work together for greater impact. Goal setting requires commitment, communication, and top-down alignment. In addition, it also requires communication and transparency so employees at all levels understand their contributions and impact. Viva Goals provides companies with the capabilities to be successful in their goal setting journey.
For successful adoption across your organization here are some best practices we have learned in our own journey:
Get executive buy-in to the process and commitment to provide clarity on vision and overall objectives.
Identify OKR champions to scale to and coach individual teams for consistent quality standard. At Microsoft, our OKR champions helped ensure a reasonable number of OKRs are selected for each team which fostered teams to focus on a few items for stronger impact.
Develop and manage organizational OKRs as an outcome of continuous strategic planning cycles and not as a separate, distinct activity. At Microsoft, our OKR champions meet monthly to share best practices and ensure teams are creating clear OKRs on high-level objectives.
Adjust OKRs and priorities on a regular basis with dynamic goal-management practices.
Provide visibility at all levels so leadership team can see progress towards objectives and individual contributors have visibility into how their work contributes to objectives.
To better support your goal setting journey, technology plays a key role in helping to ease the process. Viva Goals provides visibility into organization objectives, enables transparency for both leaders and individual contributors, offers a dashboard to readily measure progress, and integrates with Microsoft ecosystem tools such as Teams, Outlook, PowerBI, Excel and PowerPoint, for easier communication, reporting, and integration.
For questions on Viva Goals, leave us a comment or question below. We are happy to answer your questions on Viva Goals.
For more information on Viva Goals, check out these resources
This article is contributed. See the original author and article here.
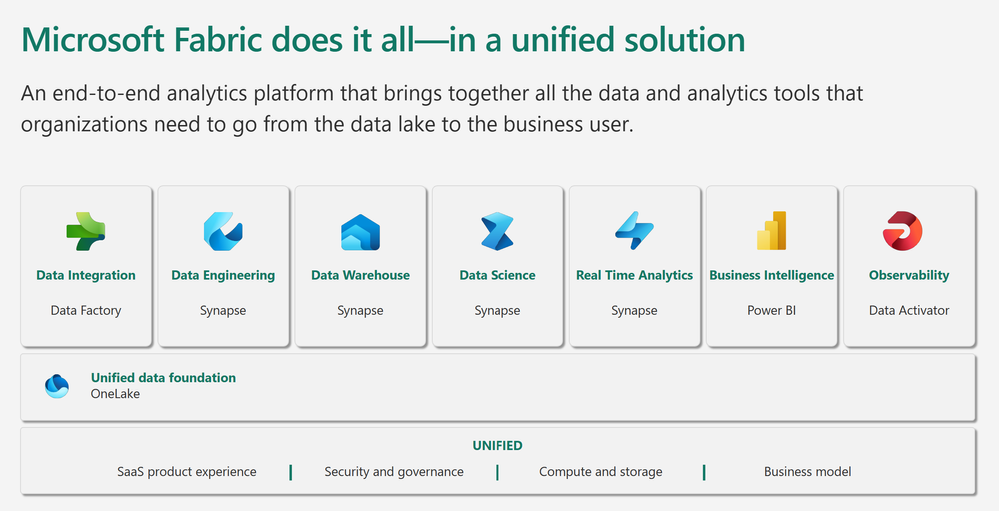
Microsoft Fabric is an all-in-one analytics solution for enterprises that covers everything from data movement to data science, Real-Time Analytics, and business intelligence .It offers a comprehensive suite of services, including data lake, data engineering, and data integration, all in one place. This makes it an ideal platform for technical students and entrepreneurial developers looking to streamline their data engineering and analytics workflows.
High-Level Overview of Microsoft Fabric
Microsoft Fabric brings together new and existing components from Power BI, Azure Synapse, and Azure Data Factory into a single integrated environment. These components are then presented in various customized user experiences.Fabric brings together experiences such as Data Engineering, Data Factory, Data Science, Data Warehouse, Real-Time Analytics, and Power BI onto a shared SaaS foundation.
This integration provides several advantages :
An extensive range of deeply integrated analytics in the industry.
Shared experiences across experiences that are familiar and easy to learn.
Developers can easily access and reuse all assets.
A unified data lake that allows you to retain the data where it is while using your preferred analytics tools.
Centralized administration and governance across all experiences.
Benefits of Learning and Using Microsoft Fabric
Learning and using Microsoft Fabric can provide numerous benefits. Here are a few key ones: Simplicity: With Fabric, you don’t need to piece together different services from multiple vendors. Instead, you can enjoy a highly integrated, end-to-end, and easy-to-use product that is designed to simplify your analytics needs. Efficiency: Fabric allows creators to concentrate on producing their best work, freeing them from the need to integrate, manage, or understand the underlying infrastructure that supports the experience. Scalability: Microsoft Fabric is a powerful platform that offers scalability, resilience, simplified development, fault tolerance, and support for microservices, making it an ideal choice for businesses aiming to stay agile and competitive in today’s digital landscape.
Microsoft Learn Resources for Microsoft Fabric
Microsoft Learn offers a variety of resources to help you get started with Microsoft Fabric. Here are a few key ones:
Get started with Microsoft Fabric – Training: This learning path includes 11 modules that cover everything from an introduction to end-to-end analytics using Microsoft Fabric to administering Microsoft Fabric.
Microsoft Fabric documentation: This comprehensive documentation provides an overview of Microsoft Fabric, its capabilities, and how to use it.
So, whether you’re a technical student looking to expand your skillset or an entrepreneurial developer aiming to streamline your data workflows, Microsoft Fabric is definitely worth considering.


Recent Comments