This article is contributed. See the original author and article here.
Hello, dear readers! My name is Hélder Pinto and I am sharing here some tips about how to leverage NSG Flow Logs and Traffic Analytics to improve your Azure network security hygiene and, at the end, simplify your NSG rules and, more importantly, uncover security vulnerabilities.
Introduction
Traffic Analytics is an Azure-native service that allows you to get insights about the Azure Virtual Network flows originated by or targeted to your applications. For example, identifying network activity hot spots, security threats or network usage patterns is made very easy by navigating over the several ready-made Traffic Analytics dashboards. This service depends on the Flow Logs generated by the network activity evaluated by Network Security Group (NSG) rules. Whenever a network flow tries to go from A to B in your network, it generates a log for the NSG rule that allows/denies the flow. Traffic Analytics is not enabled by default and you must turn it on for each NSG. You can read more details about Traffic Analytics here.
Traffic Analytics dashboards are built on top of the logs that are collected at least every hour into a Log Analytics workspace. If you drill down some of its charts, you’ll notice that everything depends on the AzureNetworkAnalytics_CL custom log table. Of course, these flow logs can be used for other purposes besides feeding Traffic Analytics dashboards. In this article, I’ll demonstrate how to leverage Traffic Analytics logs to improve your Azure network security hygiene and, at the end, simplify your NSG rules and, more importantly, uncover security vulnerabilities.
The problem
When managing NSGs, inbound/outbound rules are added/updated as new services are onboarded into the Virtual Network. Sometimes, rules are changed temporarily to debug a failing flow. Meanwhile, services and network interfaces are decommissioned, temporary rules are not needed anymore, but too frequently NSG rules are not updated after those changes. As time goes by, it is not uncommon to find NSG rules for which we don’t know the justification at all or, in many cases, containing IP address-based sources/destinations that are not easy to identify. As a result, motivated by the fear of breaking something, we let those rules hanging around.
This negligence in network security hygiene sometimes originates vulnerabilities that have a dire impact in your Azure assets. Some examples:
An outbound allow rule for Azure SQL that is not needed anymore and that can be exploited for data exfiltration.
A deny rule that is never hit because someone inserted a permissive allow rule with higher priority.
An RDP allow rule for a specific source/destination that is never hit because, again, someone added a higher priority rule that suppresses its effect.
Even if some unneeded NSG rule is innoxious, it is a general best practice to keep your Azure resources as optimized and clean as possible – the cleaner your environment, the more manageable it is.
NSG Optimization Workbook
Based on Azure Resource Graph and on the AzureNetworkAnalytics_CL Log Analytics table generated by Traffic Analytics, I built an Azure Monitor workbook that helps you spot NSG rules that haven’t been used for a given period, i.e., good candidates for cleanup or maybe a symptom that something is wrong with your NSG setup.
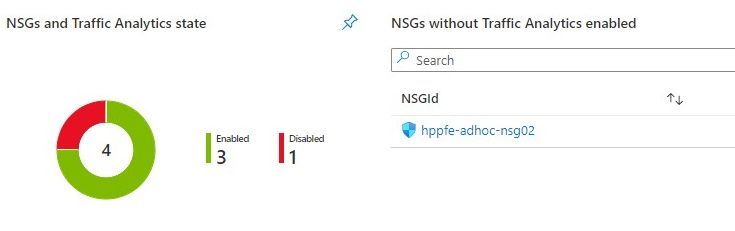
The workbook starts by showing you:
which NSGs do not have Traffic Analytics enabled – this means no visibility over their flows.
which NSGs have been inactive, i.e., not generating any flow logs – maybe these NSGs were associated to subnets or network interfaces that were decommissioned.
Workbook tiles with a summary of Traffic Analytics state in all NSGs
Workbook tile listing NSGs that have not been generating flow logs (inactive)
If you scroll down a bit more, you’ll also get details about NSG rules that have been inactive for the period specified as parameter. These rules are not generating NSG Flow Logs and this may be a symptom of some misconfiguration or, at least, of some lack of security hygiene.
Workbook tile with a list of NSG rules that have not been used by network traffic
If you select a rule from the list, you get statistics about other rules in the same NSG that are generating flows, which may give you a hint for the reason why that rule has not generated any log lately.
Workbook tile with the statistics for all the NSG rules that have generating traffic for the NSG where the inactive rule sits in
Deploying the Workbook
The NSG Optimization workbook can be found at the address below:
For instructions on how to setup a workbook, check the Azure Monitor documentation. Once in Azure Monitor Workbooks, you must create a new Workbook and, in edit mode, click on the Advanced Editor button (see picture below) and replace the gallery template code by the one you find in the GitHub URL above. After applying the workbook code, you should see the dashboard described in this article. The workbook looks quite simple but the logic behind is somewhat complex and, depending on the volume of your NSG Flow Logs and on the NSG activity time range you chose, it may take a while to fully load each table. Don’t forget to save your workbook!
Screenshot of the Workbooks user interface for creating a new workbook from existing code
Screenshot of the Workbooks user interface for applying and saving a new workbook from existing code
Conclusion
As we saw in this article, keeping a good network security hygiene may save you from troubles. Some of these potential issues come out of unneeded or obsolete network security rules defined in your NSGs. The NSG Optimization Workbook here described will help you uncover NSGs or NSG rules that have not been used over a specific time range, based on Traffic Analytics logs. An NSG rule that has not generated flow logs is probably a symptom of some misconfiguration. So, go turn on Traffic Analytics, deploy the NSG Optimization Workbook and give a start to your NSG spring cleanup! :smiling_face_with_smiling_eyes:
This article is contributed. See the original author and article here.
Which community project do you maintain?
yo teams
How does it help people?
yo teams helps developers kickstart their Teams extensibility projects by providing an easy way to create the first Teams App all the way to scaffolding a solution that can be deployed, scaled and maintained.
What have you been working on lately?
yo teams is continuously evolving based on feedback and real-world feedback and experience from the community. As of lately we’ve been focused on making it easier and faster to create a project and at the same keep a high level of flexibility for those developers who wants to control and manage everything themselves.
What do you do at work?
I’m the global innovation lead for Modern Workplace at Avanade
Why are you a part of the M365 community?
Because I learn new stuff all the time – the benefits of a community is the diversity of different voices and opinions. This eventually makes me become better in what I do, and I hope that others learn from what I do.
What was you first community contribution?
My first true open source community contribution was in the form of a web part for SharePoint 2007/WSS 3.0, called the ChartPart
One tip for someone who’d like to start contributing
Just do it. You never know what you might learn and who you might learn to know.
This article is contributed. See the original author and article here.
Pssst! You may notice the Round Up looks different – we’re rolling out a new, concise way to show you what’s been going on in the Tech Community week by week.
Instead of scrolling through every blog posted here, you can scroll through and see every blog on our blog pagehere.
This article is contributed. See the original author and article here.
In the previous post, I introduced the very early stage of Project Bicep. At that time, it was the version of 0.1.x, but now it’s updated to 0.3.x. You can use it for production, and many features keep being introduced. Throughout this post, I’m going to discuss new features added since the last post.
While Bicep CLI works as a stand-alone tool, it’s been integrated with Azure CLI from v2.20.0 and later. Therefore, you can run bicep in either way.
    # Bicep CLI

    bicep build azuredeploy.bicep
    # Azure CLI

    az bicep build –file azuredeploy.bicep
NOTE: Although Bicep CLI could build multiple files by v0.2.x, it’s now only able to build one file at a time from v0.3.x. Therefore, if you want to build multiple files, you should do it differently. Here’s a sample PowerShell script, for example.
Because of the Azure CLI integration, you can also provision resources through the bicep file like below:
    # ARM template file

    az deployment group create

        –name

        –resource-group

        –template-file azuredeploy.json

        –parameters @azuredeploy.parameters.json
    # Bicep file

    az deployment group create

        –name

        –resource-group

        –template-file azuredeploy.bicep

        –parameters @azuredeploy.parameters.json
Bicep Decompiling
From v0.2.59, Bicep CLI can convert ARM templates to bicep files. It’s particularly important because still many ARM templates out there have been running and need maintenance. Run the following command for decompiling.
    # Bicep CLI

    bicep decompile azuredeploy.json
    # Azure CLI

    az bicep decompile –file azuredeploy.json
NOTE: If your ARM template contains a copy attribute, bicep can’t decompile it as of this writing. In the later version, it should be possible.
Decorators on Parameters
Writing parameters has become more articulate than v0.1.x, using the decorators. For example, there are only several possible SKU values of a Storage Account available, so using the @allowed decorator like below makes the code better readability.
You can use ternary operations for attributes. What if you can conditionally declare a resource itself using conditions? Let’s have a look. The following code says if the location is only Korea Central, the Azure App Service resource can be provisioned.
While ARM templates use both copy attribute and copyIndex() function for iterations, bicep uses the for…in loop. Have a look at the code below. You can declare Azure App Service instances using the array parameter through the for…in loop.
    param webapps array = [

      ‘dev’

      ‘test’

      ‘prod’

    ]
    // Use array only

    resource webapp ‘Microsoft.Web/sites@2020-12-01’ = [for name in webapps: {

      name: ‘my-webapp-${name}’

      …

    }]
You can also use both array and index at the same time.
    // Use both array and index

    resource webapp ‘Microsoft.Web/sites@2020-12-01’ = [for (name, index) in webapps: {

      name: ‘my-webapp-${name}-${index + 1}’

      …

    }]
Instead of the array, you can use the range() function in the loop.
    // Use range

    resource webapp ‘Microsoft.Web/sites@2020-12-01’ = [for i in range(0, 10): {

      name: ‘my-webapp-${index + 1}’

      …

    }]
Please note that you MUST use the array expression ([…]) outside the for…in loop because it declares the array of the resources. Bicep will do the rest.
Modules
Personally, I love this part. While ARM templates use the linked template, bicep uses the module keyword for modularisation. Here’s the example for Azure Function app provisioning. For this, you need at least Storage Account, Consumption Plan and Azure Functions resources. Each resource can be individually declared as a module, and the orchestration bicep file calls each module. Each module should work independently, of course.
output id string = fncapp.id
output name string = fncapp.name
Modules Orchestration
Here’s the orchestration bicep file to combine modules. All you need to do is to declare a module, refer to the module location and pass parameters. Based on the references between modules, dependencies are automatically calculated.
NOTE: Unfortunately, as of this writing, referencing to external URL is not supported yet, unlike linked ARM templates.
So far, we’ve briefly looked at the new features of Project Bicep. As Bicep is one of the most rapidly growing toolsets in Azure, keep using it for your resource management.
This article was originally published on Dev Kimchi.
This article is contributed. See the original author and article here.
Header picture for article “What I (as a non dev) learned as I created my first Power App”
I like to share my very own experiences while building my first canvas app. I have no tech background and at the beginning I thought that I could never do it. But now, looking back, I’ve learned so many things. Not only about functions and Power Apps syntax, but about the process of building apps, learning from failure and community.
I hope you find that helpful, get inspiration or learn anything from it.
Let’s dive into the topic, without any further delay: Here are 9 things I’ve learned while building my first canvas app. Why only 9? Why not 10? Because I want to leave room for improvement ;)
1. Canvas App vs Model driven app
The first question I had for myself was “Do I want to build a model driven app or a canvas app”? And since I had no idea at all, I tried to go for a model driven app. The app will be modelled around your data, so it sounds like this would be a lot easier than starting from scratch, right?
For several cases that remains true, but actually it depends from which mindset you’re coming. If you’re familiar with your data and have an idea about how data may be presented within an app, model driven apps are your way to go. It makes it really easy to design an app with little clicks.
BUT
If you come from a non-tech background, like I did, maybe a canvas app is the better choice. I had a very clear image in my mind, how the app was supposed to look and perform. If you start with a model driven app you must customize it heavily until it suits your needs/ideas. And I actually found out, that while customizing it, I was deleting and editing connections, that came automatically. And then everything broke. Nothing worked anymore and it left me so frustrated.
For me it was so much easier to start with a canvas app. There is nothing there, just the plain white canvas. And that had two very important effects:
1. I was forced to build the app step by step and let it grow over time.
2. I learned how the connections, items and bits worked from the very beginning.
Let’s get into those two aspects a little bit deeper, shall we?
2. Scavenger Hunt. Build your app bit by bit
If you build your app step by step you are forced to think about an MVP in the very beginning. I don’t talk about the Microsoft Most Valuable Player, but a Minimal Viable Product. Ask yourself: What is the basic functionality that my app needs to work? That is a very important question at the beginning. After you’ve created your MVP you can add functionality and features step by step.
And that leads to a much more fulfilling learning experience. You will have multiple tiny success experiences and your confidence will grow. You will get the feeling, while your app grows and gets more functionality, it will become YOUR baby. Your thing, that you created out of nothing. There’s hardly a related feeling.
3. It’s Trial and Error all the time
Start with a canvas app and add functionality piece by piece. If something doesn’t work, you know exactly what you did, before it broke (at least in theory). That makes troubleshooting so much easier. If you start with a model driven app, you have no idea where to even begin with looking for possible problems.
But in your own canvas app, you can recreate the steps you’ve taken, before something stopped working.
And you will experience this over and over again: It’s trial and error. Get comfortable with the feeling, that this may be long way. Frustration and anger are natural parts of this and it’s perfectly fine. When you solved a problem that seems impossible to even understand at the beginning, that’s the moment when you really learn how these things work.
Get used to it and embrace failure as THE way of learning.
4. You’re constantly reading Microsoft Docs. All the time
Usually I have an idea in my mind, what I want my app to do. Then I start to google, if this is even possible, I’ll find the right function and read onMicrosoft Docshow this works. I try it out. Doesn’t’ work? Back to Microsoft Docs. Are all the circumstances okay? Did you use the same data source as MS docs describes it? Try it out again. Still not working? Back to reading MS docs.
Actually, I found myself more time reading instructions, than really working in my app, but that is part of the process, too. Even people who are familiar with Power Apps and are deep into the topic have to check up things again and again. MS docs has (nearly) all the information you need to make this work. It’s all in there, but you have to be prepared to dig into this. Really deep.
5. Knowing about the Power Apps Community is crucial
MS docs may have the answer to your problem, but quite often I couldn’t find the right answer, or I didn’t understand the answer at all (no tech background, remember?). That is frustrating. So much.
But you can be sure about one thing: Somebody has been at exactly that point, where you are right now. And that’s where community comes into play. There are so many amazing people out there who love to share their knowledge, give you hints and tricks. There are blogs, video tutorials, the Power Apps community forum and an endless list of other sources, where you can get help.
Next to MS docs this is the most useful source of information, by far. Quite often these people don’t give you a plain manual but describe their problem and their solution. That makes it easier to understand it yourself.
6. Find someone who can take you by hand
MS docs and the community are awesome. Hands down. But I found myself in a couple of situations where I wasn’t really able to explain my problem (I didn’t know this at this point yet). And that would make even the best manual/explanation/tutorial useless.
THIS CRAP ISN’T WORKING AND I DON’T KNOW WHY. I DON’T EVEN KNOW WHERE TO GET HELP ANYMORE
I’ve screamed something like this a thousand times, I swear. At least. And do you know what helps? If you can talk to someone, who’s been there. If you struggle to solve your problem on your own (even with a good tutorial at hand), reach out and talk to people. Even better, if you can show them what’s not working and where you are at the moment.
If you spend some time building your app you sometimes struggle to see the obvious. A view from someone uninvolved is so important. I found myself emotionally involved and too frustrated to remain calm and clear. My view was too narrow and too focused to see new ways to the solution.
And quite often I shared my screen with someone and before I even explained my problem, the other person knew what was wrong. I was just buried too deep into my problems and views.
And believe me, there are far more people out there, who are happy to take your hand and show you a couple if things than you may believe. I had to overcome myself to ask not only for help, but for people showing me how things work. But the member of the communities are eager to help. Shall I tell you, why so many of them are happy, if they can help you and show you stuff?
If you teach, you’ll learn. If you explain something to somebody else, you are forced to explain it in a way that the other person understands. And therefore, you must learn, how to describe things from different perspectives. Teachers don’t just give away their knowledge, they’re gaining experience and get deeper into the topic themselves.
It’s a win-win situation.
7. Always insert, create, make!
“Nothing will work, unless you do!” – Maya Angelou
Try things out. Insert a function, create a button, make things work. As I mentioned earlier, building an app is trial and error and therefore you have to do something. Every action you make, everything that you try out, makes you better. Makes you understand more things. Lets you learn.
So, before you google and read for ours, go out there and try things out. Yes, it may be frustrating, but that is part of the learning process and it’s actually good for you.
If you are building a canvas app, you can undo every step you take, so there is actually little risk to try things out. Click and see, what happens. It will teach you a lot.
Here is a little trick that I found especially useful: Always make a button. What do I mean by that? For every new function I want to try out I make a new button. It doesn’t look good, but it gives me the possibility to test a functionality in an own, separated environment. There are no other functions on that button but the one I want to test. If it works, I copy the code and paste it into the place, where I originally wanted it.
8. Form follows function. Make it work, then make it pretty
I think this point should be obvious from what I explained earlier, but this was hard for me to learn. You take care of the functionality first; then you work on the looks and the interface. Of course I wanted to create a pretty app right away, but that didn’t work out at all.
I ended up with a lot of different buttons, shapes and text all over the place. But everything worked.
From this point on I had all the possibilities to make it pretty and didn’t need to worry about any functionality anymore. That was a relieving point while creating my first app.
If you focus on the functionality first, you focus on the backend first (frontend: the layer the user sees and uses; backend: the functionality layer that no user should ever see). When the backend works, you can take care about the frontend.
You have a lot of possibilities to make a working app look nice. The other way around, getting a nice-looking app to work is way more difficult.
Compare frontend and Backend
9. Give back to the community. Tell others, what and how you did it
Maybe that is one of the most important parts. I talked a lot about the community, about resources to learn online, about getting help from the community. And all of this only works, if there’s content to learn from.
I guess many people might feel intimidated because their first app doesn’t look that beautiful or offers not that much of functionality.
But that doesn’t matter.
You created something, you learned something and you should be proud of it, so tell people about it. There are many, many people who want to hear about it. And those are thankful for the opportunity to learn from you and your experiences. There are many people out there, just starting, just as you did. Help them, teach them, learn from that experience.
The community thrives from content that is at every level of expertise. Your experiences matters and can help a lot of people.
Give a little bit back, because I’m sure you needed help as well.
That is how we all progress and grow. That is community
This article is contributed. See the original author and article here.
Special thanks to @edilahav for collaborating on this blog post with me!
In this blog post, we will review the new Azure Sentinel data streams for Azure Active Directory non-interactive, service principal, and managed identity logins. We will also share the new security content we built and updated in the product, which includes analytics rules for the detection part and workbooks to assist our customers to deal with this blind spot.
The shift to the cloud and the rise of automation tasks and service-to-service integration have contributed to a dramatic increase in the use of managed applications, service principals, and managed identities.
These new security objects perform login activity which is not captured in Azure Active Directory’s traditional sign-in logs.
The updated Azure Active Directory data connector now brings these important sign-in events into Azure sentinel.
What are non-interactive logins?
Non-interactive user sign-ins are sign-ins that were performed by a client app or an OS component on behalf of a user. Like interactive user sign-ins, these sign-ins are done on behalf of a user. Unlike interactive user sign-ins, these sign-ins do not require the user to supply an Authentication factor. Instead, the device or client app uses a token or code to authenticate or access a resource on behalf of a user. In general, the user will perceive these sign-ins as happening in the background of the user’s activity.
Some activity that is captured in these logs:
A client app uses an OAuth 2.0 refresh token to get an access token.
A client uses an OAuth 2.0 authorization code to get an access token and refresh token.
A user performs single sign-on (SSO) to a web or Windows app on an Azure AD joined PC.
A user signs in to a second Microsoft Office app while they have a session on a mobile device using FOCI (Family of Client IDs).
Why is it so important to monitor and detect activities in this area?
Some examples that highlight why it’s so important to collect, and get visibility into these logs as part of your detections and hunting:
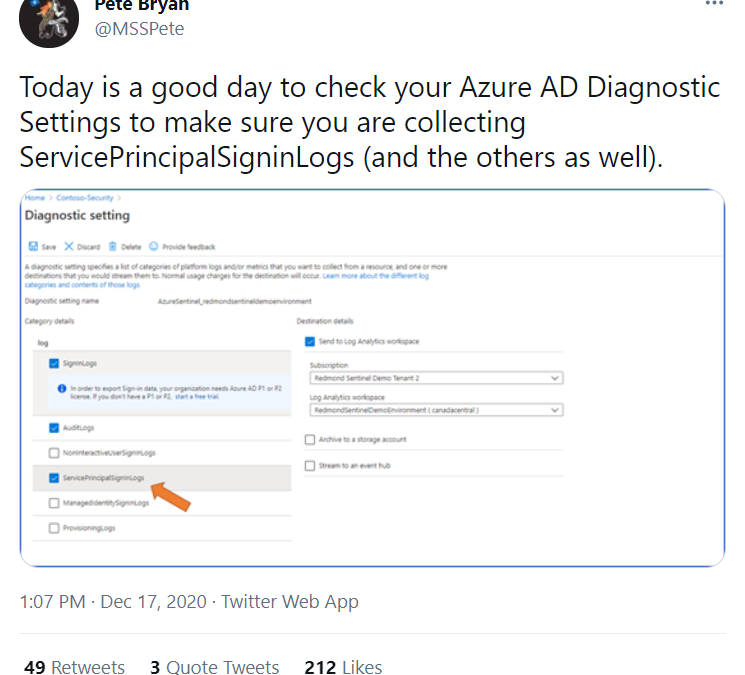
SolarWinds campaign – As part of our learning on the SolarWinds campaign investigation, we used these logs in the hunting phase to check if the malicious actor used a sensitive app to gain “Data Access”.
I’m sharing a Tweet from one of our senior security researchers from the days of the investigation:
“Audit the creation and use of service principal and application credentials. Sparrow will detect modifications to these credentials. Look for unusual application usage, such as dormant or forgotten applications being used again. Audit the assignment of credentials to applications that allow non-interactive sign-in by the application. Look for unexpected trust relationships that have been added to Azure AD. (Download the last 30 days of non-interactive sign-ins from the Azure portal or use Azure Sentinel.)”
What is the benefit of collecting these new log streams into Azure Sentinel?
Azure Sentinel is a cloud-native SIEM that offers rich security content around these new log streams to bring security value to customers that enable it.
Some of the content we offer:
Analytics Rules
@shainw from the MSTIC team updated 24 analytics rules that perform correlations of non-interactive logins with traditional logins and search for anomalies and suspicious activities.
Workbooks
@ShaharAviv updated the Azure Active Directory sign-in workbook and created a coherent view that aggregates these 2 types of logins activity.
This article is contributed. See the original author and article here.
Head pic for article “Start debugging your Power App”
Make troubleshooting and understanding single elements easier.
They exist. Those little moments that drive you crazy. Things simply don’t work; they don’t work the way you imagined and you almost despair because it just doesn’t want to go on. Or they break. I swear I didn’t touch anything, yet all of a sudden, my functions are broken. WHAT THE HECK???
I’ve built a few apps by now and I always realize that I have a different view and approach than classic developers. I’m a citizen developer, with no IT knowledge and no technical background, and I’ve learned some useful techniques while building apps that I benefit from with every app. Really, with every app.
I have talked to many people and found that these little tips and tricks can save you a lot of nerves and a lot of frustration. If you haven’t read my blog about9 things I wish I learned before I build my first Power App, you should check it out, but this one here is the next step. It’s not only about troubleshooting and debugging, but some of those tips will also just keep you sane or teach you good habits that will make your app building experience easier.
So, let’s lift our troubleshoot and debugging experience on the next level
Keep calm and let’s build apps.
1. Duplicate your screen
Remember my tip to build your app step by step? If you don’t add all the functionality at once, your app grows over time. At some point your pretty satisfied with your app but you want to try out new things and add others.
If you don’t know how some functions work exactly, always duplicate your screen, before adding new things.
While building your app and adding new functions, you need to add things, you need to delete others to make it work. And you don’t want to mess with the progress you’ve made so far.
A duplicated screen is like an additional save game slot, just to make sure. If you break everything, you can always go back.
Duplicate your screen before trying out new things
2. Use debug label
Label are a life saver in Power Apps. They literally make things visible. Let me show you an example. I have a time app and I control the timer with a variable calledUhr_tickt. If it’s set to true, the clock is ticking, if it’s set to false it isn’t. The “Go!” button sets the variable to true, the stop button sets it to false.
While testing your app and adding a new functionality, I tried to make the Reset button work and had a hard time figuring out, why it wasn’t working. Quite often it was because my variableUhr-ticktwasn’t set the correct way. Is my timer not starting, because theUpdateContextfunction for my variable wasn’t working or was it something else?
That’s when I added a debug label. It’s a simple label that shows you the status of your variable. This way you can actually see, what’s happening in the background, making debugging and troubleshooting so much easier.
Demonstrating how debug label can give you information of the state of a varible
3. Build a button
Build a button to test a function. If it works, include it in your desired function.
I’ve said this a million times before, but it is the most helpful habit, ever. If you want to add a new functionality, don’t put it on top of that main function you have. Insert a button and try the new functionality on that button. If it works, add it to the place where you want to have it.
But if it doesn’t work, you will never wonder where the error is.
4. Snap to align
Okay, this one is a mini tipp: Did you ever try to align some buttons or elements and the snap to align functionality drives you crazy? Often it helps to arrange your elements but sometimes it’s your worst enemy.
Did you know, that you can disable this function by holding the Alt-Key while placing elements?
5. Use more Excel
Whaaaat? More Excel, are you sure? Okay, hear me out. Did you know, that Power FX (the syntax used in Power Apps) is based to Excel functionalities.
I’m pretty sure you’ve seen that If-Statement before, haven’t you? That is because Power FX is designed for people who are familiar with Excel functions.
But how can we make use of it?
I often have a hard time trying to visualize how my data sources work. If I want to write a functionalVLOOKUPfunction, I need to see my tables. That can be difficult with Power Apps because your tables may be anywhere. Somebody gave me the tip to try out difficult functions (AN: like nested if-functions) (another AN: Try to avoid nested if-functions at ALL costs) in Excel. When they work you can replace the fields in your formula with the fields you need in your Power App.
6. …but it worked a minute ago
Do you know that: You swear you haven’t touched anything, yet all of sudden nothing works anymore? I’ve been there too, and still am from time to time. It happens. Here’s what you do, first thing:
Check your connections. Are they all working fine? No? Go fix them.
Did you just change anything in your data source? Are you sure? Update them anyway.
Did that help already? Good, I thought so.
Check your connections and data sources every once in a while. If you add another column to that SharePoint list and didn’t update your data source….well. It’s a common pitfall, just remember to check those things.
Something else about data sources. If you use SharePoint or Excel in your OneDrive (and yes, both can be very valid data sources, don’t let any “IT pro” tell you something different), consider that not everyone in your organization has access to those. If you published and shared your app, ask yourself if everyone who wants to use it has access to the data source you used.
7. Name the elements you use, as you build them
Develop the habit of re-naming your screens and elements as you build them. That will keep you a lot of frustration and time. Especially if you have multiple screens, apps can become crowdy. So every time you add another function or you want to try something new, unnamed elements can not only cause unnecessary extra work to find the right element you’re looking for. It can also be frustrating, when you keep adding the wrong elements to your function and that causes it to not work. It can be a serious source of errors.
a bunch of unnamed labels and elements
Which label shows you variable and which is just some explanatory text?
8. Learn what the result view is
I haven’t used it for too long because nobody explained it to me. But this a so important to understand in order to learn what it needs for functions to work properly. If you click on functions you can get two important views. The result view and the data type.
By clicking onOffice365Userthe formular bar shows you the original record with all elements.
If it’s not showing at first, click on the little arrow next to the function.
If it’s not showing at first, click on the little arrow next to the function.
This way you can see, what kind of records are stored and what data you can work with.
If you click on the next part of the functionDisplayNamePower Apps will show you what this function does AND what data type you get.
That helps you understanding complex formulars (try it with a filter function to examine what it does) and also how to work with the data. Do you know the error message “This formula expects data of the type value”? If a functions give you data type text, like in theOffice365Usersexample above, you can’t use it in a function that needs a value to work. Here is a comparison between theNow()and theToday()function. The output looks similar, but it’s different data types.DateTimeis some else thanDate.
Difference of functions Now and Today
Difference of functions Now and Today
The formular bar shows it to you, which might help you debugging your app and functions.
9. Dear Diary….
Document what you just learned. Like a learning diary. You will need this knowledge later and you can recycle bits and pieces you’ve once build again and again. Already countless times I was relieved to have written down insights and functions. That way, I can always check back to see how they work. This saves me a lot of time and above all frustration.
Also, the brain processes things differently when you not only think about them but write them down. This additional occupation with learning content consolidates what you just learned.
10. The world gains beauty through all its colors
If you want to make your app pretty and professional (I recommend Luise Freese’s latest blog “How to beautify your Power Apps” on that) you want to use more then the set of standard colors. But I can be a lot of work to paste all the color codes in every single element you have in your app.
But it’s very handy to set your colors in labels to make sure you can quickly use the correct colors.
Set up a label for every color you want to use and set the Color value as you like. To not get confused later on, set the Text value to something clear, likeBackgroundColororIconColorand remember to rename the labels in the Tree view as well (see tipp #7).
Now, whenever you want to use that color you don’t need to remember or copy the Hexcode, but just set the value to your color label by usingIconColor.Color.
Quick, easy and you will always use the correct color without much effort.
Two labels for my most used colors
Fill value of the Rectangle_background
Color value of the Icon_heart
Here you see the Fill and Color values, set by the labels we defined earlier.
There we have it. That are 10 tipps on how to start debugging your app.
Do you like them? Do you have more tipps for me? I’m always happy to get new ideas and hints because I am far from being an expert and I’m always learning
This article is contributed. See the original author and article here.
Initial Update: Saturday, 24 April 2021 04:08 UTC
We are aware of issues within Application Insights and are actively investigating. Some customers may experience data access issue and delayed or missed alerts in East US region.
Work Around: None
Next Update: Before 04/24 06:30 UTC
We are working hard to resolve this issue and apologize for any inconvenience. -Vyom
This article is contributed. See the original author and article here.
Good news! Introducing the new Community Mentors Application integration with Teams. This new integration will help you enhance team collaboration, learning, and productivity by creating real-time access to knowledge sharing via micro-mentorship.
Technology and mentorship
Technology can be used to make mentorship more accessible, efficient, and effective, but ultimately,more human. The community mentors application was first introduced three years ago as a mobile app — back when we thought finding a mentor should be as easy as calling a ridesharing service. Today, with many of us spending our days collaborating in Microsoft Teams on our desktop, we’re excited to announce the new Community Mentors Application for Teams.
Built for the way you work
With the Community Mentors App for Teams, you can now:
Easily onboard and activate new members
Discover new connections
Seek real-time guidance and mentorship
Build your network
Drive your own learning and development
Getting started
It is extremely straightforward to download and provides access to the same great features that you experience in the web and mobile app versions. Here’s how to get started:
Click the 3 dots on the bottom right of Teams and search Tribute and add.
Login (one time only! ** reminder: our community’s name is Microsoft Humans of IT)
Get started connecting!
Looking to share your impact at as mentor or to share with your manager your activity to improve your skills?
We now have a downloadable activity report that shows the number of mentorships you have been involved with as well as the feedback from your mentee and mentors. You can locate this report under your profile.
As always you can continue to use the desktop or mobile versions as well. The login instructions are listed below.
Step 3: Use your HoIT login credentials to login to the Community Mentors App. Note: In the field that says “Enter Your Community Name”, please fill in “Microsoft Humans of IT”.
Mobile Application
Click to download on iOS and Android, or simply scan the QR codes below!
Important Note: Make sure you’re on the latest version to get access to all the newest features. The latest version is 3.1 (read more here).
Step 3: Use your HoIT login credentials to login to the Community Mentors App. Note: In the field that says “Enter Your Community Name”, please fill in “Microsoft Humans of IT”.
Scan these QR codes to get the direct link to download our Community Mentors mobile app
Thanks, everyone, for your interest in the Community Mentors Program! As you know, a big part about mentorship is about the fit – that’s why we’ve launched the Community Mentors mobile app so that you’re in the driver’s seat of your own mentorship journey.
Just getting started on the app?
Watch our walkthrough demo to learn how to navigate the Community Mentors mobile app where we empower Humans of IT like you to get mentored and be mentored by other tech professionals around the world! In this video, we will walk you through how the app works, and ways you can get all set up so you can dive into the world of mentoring!
Have ideas on new features you’d like to see, or experiences to add? Submit your ideas here, or feel free to drop us a note at msftcmp@microsoft.com.
Become a mentor/mentee on our Community Mentors app today!
This article is contributed. See the original author and article here.
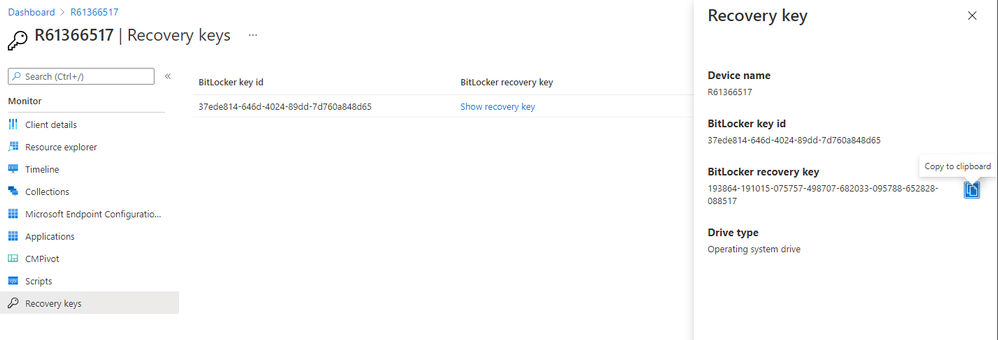
Update 2104 for the Technical Preview Branch of Microsoft Endpoint Configuration Manager has been released. You can now get BitLocker recovery keys for a tenant-attached device from the Microsoft Endpoint Manager admin center. For example, a help desk technician who doesn’t have access to Configuration Manager could use the web-based admin center to help an end user get a recovery key for their device. Since this feature is still in preview, you need to access it from the Admin center preview option from the Configuration Manager console of the technical preview branch.
Tenant Attach: Historical inventory data in resource explorer – Resource explorer can display a historical view of the device inventory in the Microsoft Endpoint Manager admin center. Since this feature is still in preview, you’ll need to access it from the Admin center preview option from the Configuration Manager console of the technical preview branch.
Tenant attach: Offboarding – While we know customers get enormous value by enabling tenant attach, there are rare cases where you might need to offboard a hierarchy. For example, you may need to offboard following a disaster recovery scenario where the on-premises environment was removed. Starting with Technical Preview 2104, you can now offboard a selected hierarchy.
Support layered keyboard driver during OS deployment – Based on your feedback, this release adds support for layered keyboard drivers during OS deployment. This driver specifies other types of keyboards that are common with Japanese and Korean languages.
Run software updates evaluation from deployment status – You can now right-click and notify devices to run a software updates evaluation cycle from the software update deployment status. You can target a single device under the Asset Details pane or select a group of devices based on their deployment status.
Improvements to Support Center – Starting in this technical preview, the Content view in the Support Center Client Tools has been renamed to Deployments. From Deployments, you can review all of the deployments currently targeted to the device. The new view is grouped by Category and Status. The view can be sorted and filtered to help you find the deployments you’re interested in. Select a deployment in the results pane to display more information in the details pane.
Improvements to CMTrace – This release includes multiple performance improvements to the CMTrace log viewer. Configuration Manager automatically installs this tool in several locations. If you have a copy of CMTrace in another location, consider removing it and using a copy in one of the default paths or updating it to the latest version.
PowerShell release notes preview – These release notes summarize changes to the Configuration Manager PowerShell cmdlets in technical preview version 2104.
Update 2104 for Technical Preview Branch is available in the Microsoft Endpoint Configuration Manager Technical Preview console. For new installations, the 2103 baseline version of Microsoft Endpoint Configuration Manager Technical Preview Branch is available on the Microsoft Evaluation Center. Technical Preview Branch releases give you an opportunity to try out new Configuration Manager features in a test environment before they are made generally available.
We would love to hear your thoughts about the latest Technical Preview! Send us feedback about product issues directly from the console and continue to share and vote on ideas about new features in Configuration Manager.
 Workbook tile listing NSGs that have not been generating flow logs (inactive)
 Workbook tile with a list of NSG rules that have not been used by network traffic
 Workbook tile with the statistics for all the NSG rules that have generating traffic for the NSG where the inactive rule sits in
 Screenshot of the Workbooks user interface for creating a new workbook from existing code
 Screenshot of the Workbooks user interface for applying and saving a new workbook from existing code


![[ANNOUNCEMENT] Community Mentors App Update: Introducing the new Tribute app for Teams](https://www.drware.com/wp-content/uploads/2021/04/fb_image-1036.png)
.png")
.png")


Recent Comments