by Contributed | Apr 28, 2021 | Technology
This article is contributed. See the original author and article here.
As more and more enterprises embrace Azure, complete end-to-end automation for standing up workloads in the cloud is one of the most important steps to running at scale. The latest release (2020-09-01) of the Microsoft.Subscription resource provider enables subscription creation via templates. To get started you first need to ensure billing agreements are in place and you can find details on that process here. Once this is done, a new subscription can be created for the proper workload and billing account. Once created, the subscription can be referred to with an alias throughout your code or templates.
Here’s a look at a subscription resource in a template:
"resources": [
    {
        "scope": "/",
        "type": "Microsoft.Subscription/aliases",
        "apiVersion": "2020-09-01",
        "name": "[parameters('subscriptionAlias')]",
        "properties": {
            "workload": "[parameters('subscriptionWorkload')]",
            "displayName": "[parameters('subscriptionDisplayName')]",
            "billingScope": "[tenantResourceId('Microsoft.Billing/billingAccounts/enrollmentAccounts', parameters('billingAccount'), parameters('enrollmentAccount'))]"
        }
    }
]
Of particular note is the “scope” property. Subscriptions are a tenant level resource in Azure and must be PUT to the tenant scope which the property allows.
The prereqs for creating subscriptions is to identify the billing scope for the subscription. You can find more information about billing scopes in this doc. A sample script for looking up billing information can be found here.
The next step, when using templates for subscription creation, is to determine the scope for the template deployment itself. All templates are deployed to a specific scope; most commonly this is a resourceGroup, but template deployments can be done at the subscription, managementGroup or tenant scope as well. The scope of the deployment does not need to match the scope of the resources that are deployed though it often does. For our template sample, we’ll describe a scenario, or rather tenant, where no subscriptions (or resourceGroups) exist and we’ll deploy to a managementGroup. It doesn’t matter which managementGroup we choose for the deployment because the subscription itself will be created at the tenant scope and placed in the default managementGroup, unless a different one is specified. If this is still a little confusing, just focus on the subscription resource itself. This resource must be deployed to the tenant scope and the examples will show how to use the “scope” property to indicate that.
Note, that you must have permissions to create template deployments at the scope you target. Also, the permission to deploy a template at a scope does not automatically give permissions to create any other resource, so you do need to ensure that you have the necessary permissions to create the resources in your template, if any, as well. That should cover everything about permission.
A QuickStart sample for deploying a subscription can be found here. The command for deploying this template is just like deploying any other template and following our example would be:
New-AzManagementGroupDeployment -ManagementGroupId (Get-AzContext).Tenant.id -Location westeurope -TemplateFile azuredeploy.json -TemplateParameterFile myParameters.json
This will deploy the template to the “root” managementGroup for the tenant. Again, remember that you must have permission to deploy to that scope, in this case the root managementGroup. If you don’t have that permission, you can deploy the template to any other managementGroup, subscription or resourceGroup. Also a reminder that even though the subscription is created at the tenant scope, the template deployment does not need to match that scope.
So far, this is a very simple example, but you can also create a subscription and deploy resources to that subscription in the same template. There is a little more orchestration required here because you’re actually targeting multiple scopes within the same template. And, in order to target the subscription, you need the subscriptionId or GUID that was assigned to the subscription when it was created. This next sample will perform each of these steps:
- Create the subscription (this is shown in the previous sample)
- Retrieve the subscriptionId from the newly created alias
"outputs": {
    "subscriptionId": {
        "type": "string",
        "value": "[reference(parameters('subscriptionAlias')).subscriptionId]"
    }
}
3. Pass that subscriptionId to the next deployment in the template
"type": "Microsoft.Resources/deployments",
"apiVersion": "2020-10-01",
"name": "[concat('nested-createResourceGroup-', parameters('resourceGroupName'))]",
"location": "[parameters('location')]",
"properties": {
    "expressionEvaluationOptions": {
        "scope": "inner"
    },
    "mode": "Incremental",
    "parameters": {
        "subscriptionId": {
            // this cannot be referenced directly on the subscriptionId property of the deployment so needs to be nested one level
            "value": "[reference(resourceId('Microsoft.Resources/deployments', concat('createSubscription-', parameters('subscriptionAlias')))).outputs.subscriptionId.value]"
        },
...
4. Create a new deployment in the new subscription that creates the resourceGroup
{
    "type": "Microsoft.Resources/deployments",
    "apiVersion": "2020-10-01",
    "name": "[concat('createResourceGroup-', parameters('resourceGroupName'))]",
    "subscriptionId": "[parameters('subscriptionId')]",
    "location": "[parameters('location')]",
    "properties": { ... }
...
And then finally deploy the resources to that resourceGroup.
That’s more complex than just creating a subscription because all of the orchestration is handled within a single template.
If your scenario requires a different scope of deployment or more steps then you may not want to include in that single template. If I wanted to break this down into multiple steps for orchestration in a pipeline it can be as simple as two steps.
Step 1 – Create the Subscription
Performing this step separately can be useful if you do not want to provide a user or service principal with permission to create template deployments at a given scope. Once the subscription is created, the principal that created the subscription is an owner of that subscription and can deploy templates to that newly created subscription. This means that the only permission the principal needs outside of the subscription, is the permission to create one.
At this writing, the Azure PowerShell does not have a built-in command to create a subscription but you can always invoke any Azure REST api using the Invoke-AzRestMethod. This script shows how to do that to create a subscription through an alias resource using the following command.
.Create-SubscriptionAlias.ps1 -aliasName "newSub" -DisplayName "demo subscription" -billingAccount "1234567" -enrollmentAccount "654321" -workLoad DevTest
You need to set the correct parameter values for the billingAccount and enrollmentAccount which you can discover using this script from the top of this article.
Step 2 – Deploy the template.
Next, keeping with our greenfield scenario, where the subscription is created in the same workflow or pipeline that deploys this next template, we’ll create a subscription-level deployment. If we were running an automated pipeline, this sample would be a good example for the next step. The sample will create a new resourceGroup in the subscription, lock it and assign a principal access to that resourceGroup. From here you could deploy resources to the subscription (or resourceGroup) or simply make it available for the principal to use.
That’s a quick overview of how to leverage this new capability, in just a few scenarios, that you can use to automate new workloads in Azure. Let me know how it goes or if you have any questions about automating subscription creation in your environments.
by Contributed | Apr 28, 2021 | Technology
This article is contributed. See the original author and article here.
Initial Update: Wednesday, 28 April 2021 11:33 UTC
We are aware of issues within Log Analytics and are actively investigating. Some customers may experience data access and delayed or missed Log Search Alerts in West US region.
- Work Around: None
- Next Update: Before 04/28 16:00 UTC
We are working hard to resolve this issue and apologize for any inconvenience.
-Soumyajeet
by Contributed | Apr 28, 2021 | Technology
This article is contributed. See the original author and article here.
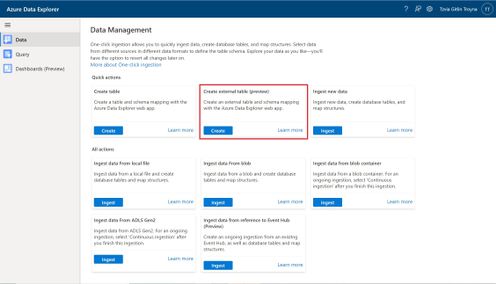
An external table is a schema entity that references data stored outside the Azure Data Explorer database. Azure Data Explorer Web UI can create external tables by taking sample files from a storage container and creating schema based on these samples. You can then analyze and query data in external tables without ingestion into Azure Data Explorer. For information about different ways to create external tables, see create and alter external tables in Azure Storage or Azure Data Lake.
One of the most common scenarios for External table is with historian data (e.g. data that need to be stored due to legal requirements, log records for longer retention period, etc.) that need to be query rarely.
Please read create an external table document for detailed explanation, here are some highlighted points.
1. at the Source Page, In Link to source, enter the SAS URL of your source container. You can add up to 10 sources (You can remove the 10 limitation by using the create external table command at the Query page). The first source container will display files below the File filters. In a later step, you will use one of these files to generate the table schema.
2. At the Schema Page, in the right-hand side of the tab, you can preview your data. On the left-hand side, you can add partitions to your table definitions to access the source data more quickly and achieve better performance.
3. At the Summary Page, you can query this table using the query buttons or with external_table() function. For more information on how to query external tables, see Querying an external table.

by Contributed | Apr 27, 2021 | Technology
This article is contributed. See the original author and article here.
The new Exchange admin center (EAC) is a modern, accessible, web-based management portal for managing Exchange Online that is based on the Microsoft 365 admin center experience. The new EAC is simple and accessible, and it enables you perform tasks like restoring mailboxes, migrating data, and much more.
Since entering Public Preview in June 2020, over half a million admins around the world have used it. We thrived on the feedback of our early adopters and we have steadily improved the new EAC with the help from a great community of early users.
Today, we are excited to announce that the new EAC is now generally available for customers (including GCC customers) in 10 languages. With this announcement, we are also releasing a new dashboard, new usability features, and several intelligent reports to help admins be more productive in their work. The new EAC is expected to be available to customers in GCC High at the end of May 2021, and to customers in DoD at the end of June 2021.
Here are some highlights:
- Personalized Dashboard, Reports, Insights – The new EAC offers actionable insights and includes reports for mail flow, migration, and priority monitoring.
- Azure Cloud Shell – Cloud Shell is a browser-accessible shell that provides a command-line experience built with Azure management tasks in mind. It enables admins to choose a shell experience that best suits their workstyle.
- Mailbox management and recover deleted items – Recipient management is one of the most crucial tasks that admins perform. The new EAC now includes easier mailbox management.
- Modern, simplified management of Groups – The new EAC also enables you to create and manage 4 types of groups: Microsoft 365 Groups, distribution lists, mail-enabled security groups, and dynamic distribution lists.
- Migration – The new EAC supports various kinds of migrations, including cross-tenant migrations for M&A scenarios, and automation Google Workspace/G-Suite migrations.
- Left navigation panel – The new EAC also includes a new left navigation panel to make it easier to find features.
You can access EAC today at https://admin.exchange.microsoft.com.
To learn more, check out https://docs.microsoft.com/en-us/exchange/exchange-admin-center.
Take a tour of the new EAC at https://www.microsoft.com/en-us/videoplayer/embed/RE4FqDa.
by Contributed | Apr 27, 2021 | Technology
This article is contributed. See the original author and article here.
Final Update: Wednesday, 28 April 2021 02:39 UTC
We’ve confirmed that all systems are back to normal with no customer impact as of 04/27, 02:10 UTC. Our logs show the incident started on 04/27, 01:46 UTC and that during the 24 minutes that it took to resolve the issue 5% of customers experienced
data access issues and delayed or missed alerts in South East Australia.- Root Cause: Engineers determined that backend storage device became unhealthy.
- Mitigation: Engineers determined that the service is auto recovered by Azure platform.
- Incident Timeline: 24 minutes – 04/27, 01:46 UTC through 04/27, 02:10 UTC
We understand that customers rely on Azure Log Analytics as a critical service and apologize for any impact this incident caused.
-Vincent

by Contributed | Apr 27, 2021 | Technology
This article is contributed. See the original author and article here.
Welcome to your single resource for ways to learn and communities to join to always stay up-to-date on Azure Storage.
Microsoft Learn
Azure Storage Learning Paths & Modules
Explore Azure Storage in-depth through guided paths and learn how to accomplish a specific task through individual modules.

Technical Videos
Azure Storage on the Microsoft Azure YouTube Channel

Azure Storage Documentation
Check out technical documentation, frequently asked questions, and learning resources on the Azure Storage Documentation page.

Azure Storage Blogs
Stay up to date on the latest news, product updates and announcements on the Azure Storage blog.

Azure Storage Tech Community
Share best practices, get the latest news, and learn from experts about Azure Storage here.

Azure Storage Partners
Discover the wide range of Azure Storage partner solutions that enable advanced scenarios on top of Azure Storage services.

With all these resources and content, we are excited see what you build with Azure Storage!
by Contributed | Apr 27, 2021 | Technology
This article is contributed. See the original author and article here.
According to a recent study, cloud misconfigurations take an average 25 days to fix. This number can even be higher if you are managing the cloud security posture across multiple providers without having an aggregate visualization of the current security state of all cloud workloads. Not only it becomes a challenge to understand the current security state, but also to manage multiple dashboards and prioritize which issues should be resolved first.
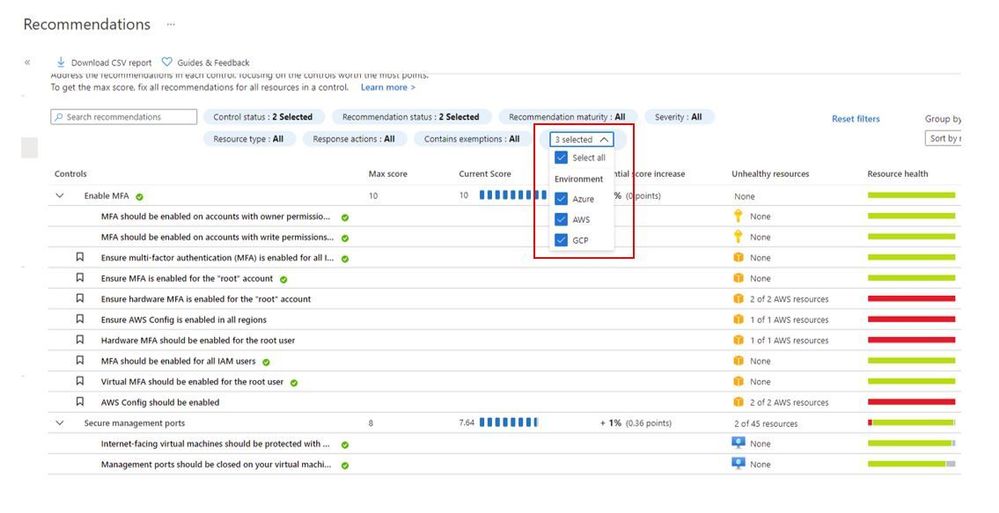
When you upgrade Azure Security Center free tier to Azure Defender you will be able to connect to AWS and GCP using native Azure Defender connectors. Once you connect to each cloud provider, you will be able to use the Security Recommendations to quickly filter the environment and see only the recommendations that are relevant for the cloud provider that you want, as shown below:
You can also quickly identify resources on each cloud provider by using the Inventory dashboard, by using the Cloud Environment filter as shown below:

In addition to all that, you can also take advantage of centralized automation by leveraging the Workflow Automation feature to automate response for security recommendations generated in Azure, AWS or GCP.
Cloud security posture management and workload protection
The security recommendations are relevant for the cloud security posture management scenario, which means that you drive the enhancement of your security posture across multiple cloud providers by remediating those recommendations. However, this is not the only scenario available for multi-cloud, you can also use the following Azure Defender plans to enhance your workload protection. When planning cloud workload protection for workloads in AWS and GCP, make sure to first enable the VMs to use Azure Arc, once you do that, the following Azure Defender plans will be available across Azure, AWS and GCP:
The potential alerts generated by workloads protected by those plans is going to be surfaced in the Security Alerts dashboard in Azure Defender. Which means that you again will have a single dashboard to visualize alerts across different cloud providers. These alerts can be streamed to your SIEM platform using Continuous Export feature in Azure Security Center.
Design considerations
Prior to implementing your multi-cloud adoption using Azure Defender, it is important to consider the following aspects:
When connecting with AWS
- An account is onboarded to a subscription, the subscription has to have Azure Defender for Servers enabled
- The VMs under this account will automatically be onboarded to Azure using Azure Arc, and will be covered by Defender (list of supported OS)
- Arc cost is inclusive with Defender (you won’t pay twice)
- To receive the security recommendations, you will need to enable AWS Security Hub on the accounts you want to onboard
- Security Hub is a paid service that can vary depending on how many accounts and regions it’s enabled on (please refer to AWS official pricing)
When connecting with GCP
- Same requirement for Defender enabled on the subscription
- Servers are not onboarded automatically, and will need to be onboarded through Arc (Arc onboarding guide)
- To receive security recommendations, you will need to enable GCP Security Command Center
- Google Security Command Center have two pricing tiers: standard (free) and premium
- Free tier includes ~12 recommendations, premium around 120
- Premium tier costs 5% of annual spending in GCP, please refer to GCP official pricing)
Additional Resources
The resources below will be useful for you to implement this multi-cloud capability in Azure Defender:
Reviewer
Or Serok Jeppa, Program Manager
by Contributed | Apr 27, 2021 | Technology
This article is contributed. See the original author and article here.
Active geo-replication for Azure SQL Hyperscale now in preview
Business continuity is a key requirement to implement any business-critical system, not having a disaster recovery plan in place can put organizations at great financial loss, reputation damage and customer churn.
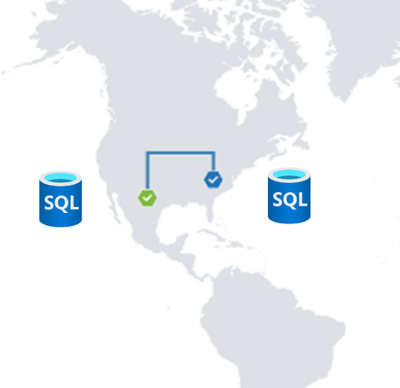
We are excited to announce the preview release of Active geo-replication for Azure SQL Database Hyperscale tier. Azure SQL geo-replication feature provides the availability to create a readable secondary database in the same or in different region, in the case of regional disaster, failover to the secondary can initiated to have business continuity.
Hyperscale service tier supports 100 TB of database size, rapid scale (out and up) and nearly instantaneous database backups, removing the limits traditionally seen in cloud databases.
How Geo-replication works for Hyperscale?
When creating a geo-replica for Hyperscale all data is copied from the primary to a different set of page servers. A geo-replica does not share page servers with the primary, even if they are in the same region. This provides the necessary redundancy for geo-failovers.
Current preview limitations:
- Only one geo-secondary in the same or a different region
- Only forced failover supported
- Using a geo-replica as the source database for Database Copy, or as the primary for another geo-secondary is not supported
- Restore database from geo-secondary not supported
- Currently no support for Auto-failover groups
We are working on addressing these limitations to have Hyperscale with the same Active geo-replication capabilities that we have for other Azure SQL service tiers including Auto-failover groups support.
Available regions
Active Geo-replication for Hyperscale will be supported in all regions where Azure SQL Hyperscale is supported.
Quick Start
a. Configure from Portal using the Geo Replication blade

b. Configure using Azure CLI
c. Configure using Powershell
To learn more,
https://aka.ms/activegeoreplication
https://docs.microsoft.com/en-us/azure/azure-sql/database/service-tier-hyperscale
by Contributed | Apr 27, 2021 | Technology
This article is contributed. See the original author and article here.
Hello and welcome back to another blog post about new improvements with Microsoft Exact Data Match (EDM). I am going to first cover improvements launching today and upcoming, then I will circle back on some previously released improvements.
First up and launching today, is the ability to test the EDM based SITs just like you can currently do with all other SITS (All clouds)! Being able to do a quick test to ensure you got your EDM SITs correctly setup and that your data was correctly imported can help you get going rapidly. There are a lot of moving parts in EDM: schema, data uploads, SITs / rule package, and then policy setup. Trying to troubleshoot a SIT and a DLP Policy relying on EDM SIT at the same time is difficult. This will enable you to confirm EDM is working as expected before moving to use it in your DLP or auto labeling rules, and help you keep any required troubleshooting focused by excluding what you know is working correctly.
Figure 1. Choose EDM SIT
 Figure 2. Select Test
 Figure 3. Upload file containing test data
 Figure 4. Review test results
The ability to apply a sensitivity label to content automatically using EDM Sensitive Information Types (SIT) will be coming soon (initially Commercial Cloud only)! This will allow compliance admins to be able to scan the companies SharePoint Online and OneDrive for Business repositories and apply sensitivity labels, with or without encryption, to some of the most important and highly sensitive data they hold.
While automatic labeling using regular Sensitive Information Types is functionality that has been available for some time, bulk labeling using this type of content detection can lead to some false positives, and while false positives may not be a big issue when occurring in front of a user that can notice and fix an incorrect labeling action, this is considerably more problematic when it’s done in bulk over a large number of documents without interactive human supervision. This is where EDM shines: its ability to detect matches to specific, actual sensitive data with minimal or no false positives is a great match for this scenario. This is important for our Regulated Industry customers, like my Health and Life Sciences (HLS) customers. Electronic Medical Records (EMR) contain extremely sensitive information about every single patient a medical facility, company or doctor has had contact with. Strict regulations and certifications standards such as HIPAA and HITRUST, require close control of Personal Health Information (PHI) and being able to easily identify and label data at rest will help everyone!
Another new feature that is in Public Preview right now is the use of Customer Key for Microsoft 365 at the tenant level to protect additional elements in your tenant including your EDM sensitive information tables. This is a broad preview and includes many more data points than just EDM, but that protection of EDM data is included in this preview shows it is now a first-class citizen in the Microsoft Compliance world.
The next two items are being covered together, Improved Auditability and Upload Notifications are GA (All clouds). This gives the Compliance admins to ability to audit and be alerted when these EDM related activities happen:

Figure 5. EDM Audit Activities
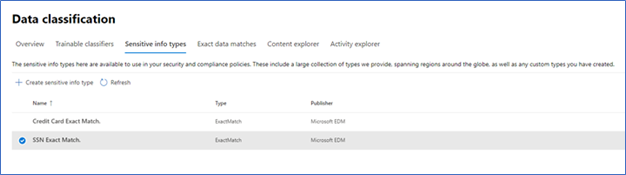
Along with the Sensitive Information Type activities:

Figure 6. SIT Audit Activities
To check out the new auditing features, I decided to do some cleanup of an EDM datastore I setup for fun and created a new EDM datastore and SITs. Now let’s go check out what this looks like in the Audit logs.

Figure 7. Audit Items
As you can see above, starting from the bottom up are the actions I took yesterday related to SITs. Now let’s take a closer look at some of these. One way to take a closer look is to download the results. In Figure 5 you can see the Export item at the top left.

Figure 8. Sample export of audit items
You can also select one of the alerts to look at in in the interface.

Figure 9. Sample details of Audit Item
Audit data should appear in the log between 30 minutes and 2 hours. This data is also available as part of the Office 365 Management Activity API reference | Microsoft Docs.
I think this covers it for today. If you would like to learn more about EDM you can check out my previous blogs, Implementing Microsoft Exact Data Match (EDM) Part 1 – Microsoft Tech Community and Enhancements to Microsoft Exact Data Match – Microsoft Tech Community.
by Contributed | Apr 27, 2021 | Technology
This article is contributed. See the original author and article here.
Intro
Azure Log Analytics is a managed service that collects logs from various sources, to store and analyze on a central workspace. Azure Monitor Private Links are direct, private routes that can be set up between an Azure VNet and select workspaces, so that logs from the VNet can be securely sent to the relevant workspaces, over the Microsoft backbone, without reaching public networks. Relying on private links allows a VNet to block traffic to public endpoints, to handle the risk of data exfiltration (data “leaking” out of the VNet).
Up until recently, using private links for Azure Monitor required an exception – allowing VNet traffic to reach a public storage account that is used by Log Analytics VM agents. As of April 19, 2021, a new improvement provides a private link connection to that storage account, effectively allowing a true block of VNet traffic to public endpoints, entirely.
What are solution packs? What is this storage account?
Monitoring solutions are pre-built monitoring tools designed to address specific monitoring needs. They can be installed on a Log Analytics workspace to provide curated log collection and monitoring experiences, such as collecting and analyzing security logs, networking logs, update management, or others.
What a solution is installed on a workspace, the workspace agents need to download specific components to start collecting the relevant logs. These components are called solution packs, AKA management packs.
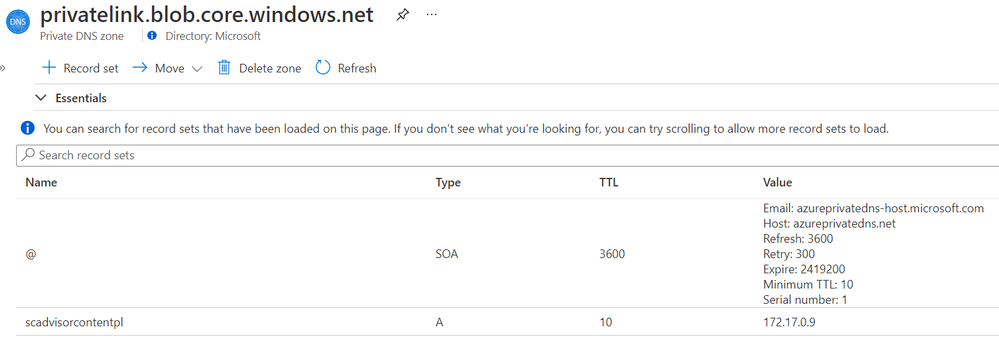
Solution packs are stored on a central, designated storage account named “scadvisorcontent” for public access, and “scadvisorcontentpl” for private link access (these names differ on sovereign clouds). To install and use solution packs, agents require continuous access to that storage account, both for the initial download and setup of solutions, as for fetching later updates.
How can I access the storage over a Private Link?
Private Link setups created at or after April 19, 2021 also have a new DNS zone created for blob.core.windows.net. which maps to the above storage account, using a private address. If you Private Link setup was created prior to that date, re-create your AMPLS and the Private Endpoint connected to it to reach the agents’ storage account over your private link.
Example DNS mapping to scadvisorcontentpl
Feedback
We appreciate your feedback! comment on this blog post and let us know what you think of this feature.

Recent Comments