This article is contributed. See the original author and article here.
Final Update: Wednesday, 28 April 2021 14:52 UTC
We’ve confirmed that all systems are back to normal with no customer impact as of 04/28, 14:30 UTC. Our logs show the incident started on 04/28, 13:40 UTC and that during the 50 minutes that it took to resolve the issue some customers may have received failure notifications when performing service management operations – such as create, update, delete – for workspaces hosted in all Australia regions. Customers may have also experienced that deletion of automation accounts and linking automation account with workspace may have failed. Performing queries against the workspaces may also have failed.
Root Cause: We determined that a recent deployment task failed to complete causing impact to service management operations for the service.
Incident Timeline: 50 minutes – 04/28, 13:40 UTC through 04/28, 14:30 UTC
We understand that customers rely on Azure Log Analytics as a critical service and apologize for any impact this incident caused.
This article is contributed. See the original author and article here.
This blog is part one of a three-part series detailing the journey we’re on to simplify configuration of threat protection capabilities in Office 365 to enable best-in class protection for our customers.
Effective security is a never-ending battle to achieve balance between security and productivity. If we apply too many security controls to an environment, we limit the ability of its users to function efficiently. And if we err on the side of restraint, we do not hinder users in any way, but we leave the door open to threats. Email security is complex and ever-changing. With over 90 percent of threats surfacing through email, it’s critical that organizations are empowered to configure security tools in a way that works for their environment.
Configuration is key
We’re committed to offering Office 365 customers the best email protection by continually focusing on improving the effectiveness of our solutions both within Exchange Online Protection (EOP) as well as Defender for Office 365. EOP has a rich legacy of policy granularity and customizations that help customers meet their unique needs. As we’ve built and innovated on Microsoft Defender for Office 365, we have applied those same principles to the new advanced protection capabilities we offered as part of Defender for Office 365, while still respecting many of the EOP settings.
This deeply customizable protection stack within Office 365 has allowed customers over the years to implement policies and rules that fulfill an endless list of requirements. The drawback here, however, is that as customizations are added, they require regular review, upkeep, modifications, and even removal over time. In the absence of that continued focus, there is a high risk of creating an overall reduced state of protection. And while that might sound counter-intuitive, we see this very often. Here are some examples of how these configurations can inadvertently get out of hand:
An organization in Europe had configured 198 domains to be allowed to bypass our filters
A firm in India had over 900 URLs stipulated to bypass by our detonation service per week
An enterprise in Asia had over 50,000 known phishing URLs configured to bypass our filters
In each of these cases, the result was an increase in phishing campaigns making their way to end users. And these are just a few examples of what we see as a widespread problem – custom policies and configurations put in place with perhaps the best of intentions but without considering the immediate or long-term security impact of creating them or keeping them in place permanently.
Across Office 365, we estimate that 20% of phishing mails are delivered to user mailboxes as a result of poorly configured (often legacy) policies that haven’t been revisited for a long time. It was clear that we needed to help customers through this. It wasn’t sufficient that we educate customers of the problem, we had to actively help with getting customers to a more secure state. That started a series of efforts for the past many months that have resulted in capabilities, tools and changes in the product that we’ll walk you through in this blog series. But before we get into it, it might help to get a better appreciation for how the problem arises in the first place.
How did we get here?
The natural question to ask is, how did we arrive at a place where customer configuration could be a problem?
Historical settings can age
In some ways, Exchange Online represents the final frontier. The promise of the cloud is a world where upgrades to Exchange no longer occur every few years. Over the lifespan of Exchange, many customers have migrated with existing mail flow configurations and transport rules from Exchange 2010, to Exchange 2013, and ultimately ending up with Exchange Online in Office 365. Many of our customers reading this may have relied on Exchange versions long before Exchange 2010!
And these configurations and rules may have been implemented at a time where the worst thing that could happen as a result of an overly permissive policy was a spam email getting through. All of that has changed over the past few years.
New attack scenarios
Just as technology has evolved, so have attackers. A lot has changed since we first launched our advanced email security solution in 2015. Since then, email borne attacks have been increasing exponentially both in volumes and complexity. We’ve seen phishing evolve to become only the entry point for much more sophisticated attacks, like business email compromise. We’ve seen attackers pivot away from malware in favor of attacks that help them establish persistence through account compromise and external forwarding. We know that attackers are savvy cybercriminals that will continue to evolve their techniques to take advantage of email users. And one common path they look to exploit are these aging and overly permissive controls or poorly protected pockets within the organization.
New security controls
As the threat landscape evolves, so do our protections. Microsoft Defender for Office 365 employs a multi-layered protection stack that is always being updated to meet the needs of our customers. As we introduce new capabilities and make improvements to existing ones, it’s important that our customers are able to take advantage of these capabilities. That sometimes requires frequent evaluation of settings to ensure the latest protections are turned on. Failing that discipline, it’s possible that the latest protections are not being applied to all users in the organization.
Naturally, these three challenges signify the importance of secure posture. It’s more important than ever that configuring protection against threats is easy to achieve and maintain.
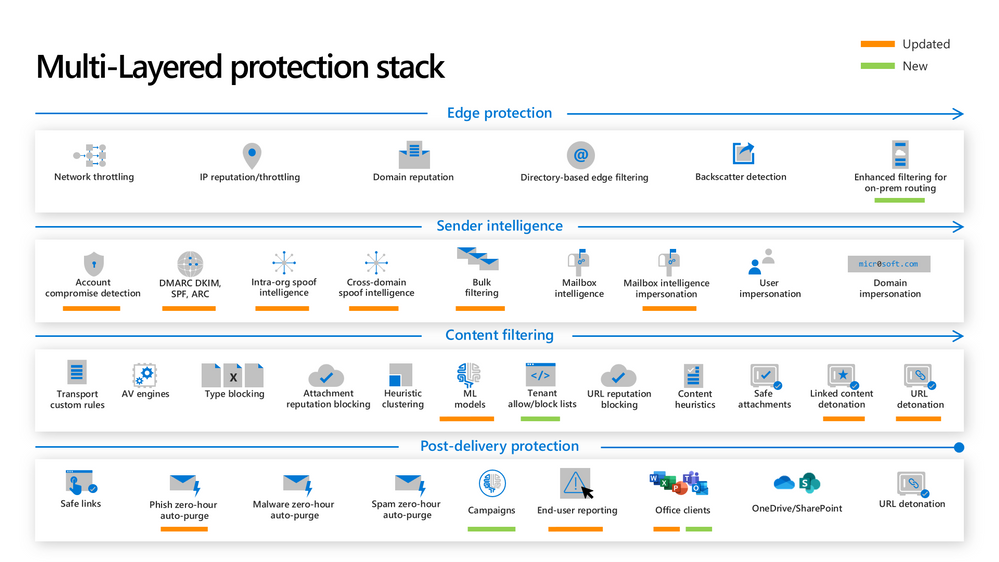
Figure 1: The new and updated layers of the Defender for Office 365 protection stack
So how can we solve this problem?
Over the past many months, we’ve been on an aggressive journey to eliminate misconfigurations across Office 365 – to give customers the right tools to achieve secure posture simply and maintain these configurations over time. There are two broad categories of focus:
Eliminating overly permissive configurations
First, it’s critical that these (often) legacy settings or other inadvertent rules and policies don’t come in the way of us being able to keep users protected.
Preventing inadvertent gaps in protection coverage
Second, we want to make sure that organizations can easily protect all their users with the very best of protections that we offer as and when we make them available. This is critical in a fast-changing threat landscape where we’re constantly innovating to ensure users are protected.
As we’ve approached tackling both classes of problems, we’ve applied the following principles:
Give customers the awareness and tools to get secure
Actively help customers ‘get to secure’ through changes in the product
Help customers with the right tools/guardrails to stay secure.
Through this blog series we’ll show how we’re applying all three principles to help customers.
What we have accomplished so far
We’ve been hard at work over the last year to achieve these goals of raising awareness on configuration gaps and preventing these gaps from inhibiting effective threat protection. I want to share with you some of the enhancements we’ve released.
Preset Security Policies
In order to help customers understand the impact of misconfigurations, we needed to do something fundamental – we had to establish what the ideal configuration looked like. Last year we released preset security policies for Exchange Online Protection and Defender for Office 365. These policies provide a simplified method to apply all of the recommended spam, malware, and phishing policies to users across your organization. Since different organizations have different security needs, we released these presets in multiple variations, and allow customers to apply our standard or our strict presets to their users as they see fit.
We’ve seen tremendous adoption of preset security policies since they launched in 2020, with over 18,000 tenants enabling a preset policy in their environment. Preset security policies not only give customers a choice, but they also help them stay up to speed with changing recommendations as the threat landscape evolves. To learn more about preset security policies, check out our documentation.
Figure 2: Preset policies can be applied to users, groups, or domains.
Configuration Analyzer
Once we’d established the ideal configuration based on our own recommendations, we needed to give customers the ability to identify the instances where their configurations deviate from our recommended settings, and a way to adopt these recommendations easily.
In 2019, we launched ORCA, the Office 365 Recommended Configuration Analyzer. ORCA gives customers a programmatic way to compare their current configuration settings against recommendations via PowerShell. As a result of the overwhelming success of ORCA, last year we built Configuration Analyzer right into the product. Customers can now view policy discrepancies right from within the admin portal, and can even choose to view recommended adjustments to reach our standard or our strict recommendations.
We’ve seen incredible adoption of the configuration analyzer as well, with 290,000 policy changes made across more than 26,000 tenants since we launched the capability last year! With a few clicks, policies can be updated to meet the recommended settings, and as a result, it’s never been easier to keep email security configurations up to date. Learn more about configuration analyzer here.
Figure 3: Configuration Analyzer shows policies that do not meet our recommended settings.
Overrides Reports and Alerts
You’ll hear us refer to overrides frequently throughout this series. We define overrides as tenant level or user level configurations that instruct Office 365 to deliver mail even when the system has determined that the message is suspicious or contains malicious content. Examples of overrides could be an Exchange transport rule that bypasses filtering for a specific range of IP addresses, or a user level policy like an allowed sender or domain at the mailbox level.
The thing to understand about overrides is that they represent scenarios where policies are properly configured, but other settings have neutralized their effect. It’s important that we allow organizations to customize their Office 365 environment to meet their needs, but that doesn’t mean we feel comfortable allowing malicious content like malware or phish to land in the inbox of users.
We’ve added a view to the Threat protection status report that allows you to view overrides across your environment. By filtering the report to view data by Message Override, you can view overrides over time by type of override, like Exchange transport rule or user safe sender, and you can dig deeper in the details table to identify the causes of these overrides.
Figure 4: The Threat protection status report shows overrides by type and date
What comes next?
We’ve shared in this blog the steps we’ve taken to shed light on configuration gaps, and to help customers understand the impact configurations have on their environment. In the next blog, we will share details about the capabilities we are building to eliminate the legacy override problem, and what you can do to minimize the impact these overrides have on security posture.
Do you have questions or feedback about Microsoft Defender for Office 365? Engage with the community and Microsoft experts in the Defender for Office 365 forum.
This article is contributed. See the original author and article here.
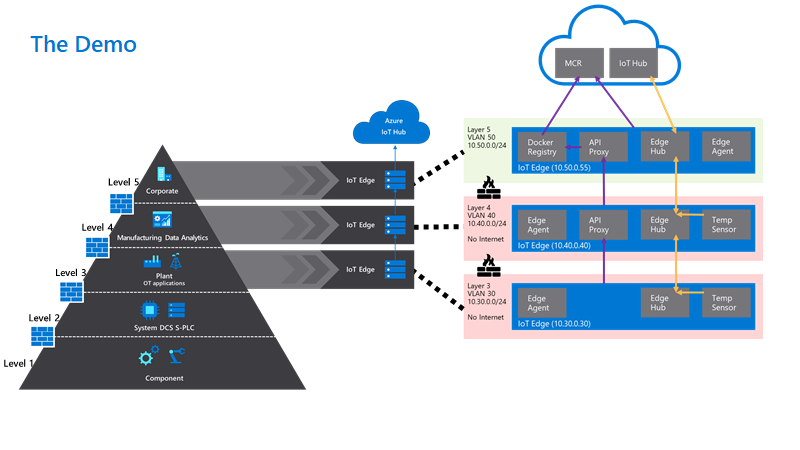
Using a hierarchy of IoT Edge devices in manufacturing scenarios lets customers keep their existing infrastructure but at the same time customers can benefit from being able to fully address, manage and control the IoT edge devices on the factory floor, even if they are completely disconnected from the Internet.
This helps to address critical challenges in the implementation of Industrial IoT such as the balance between security and business value, as well as how to effectively implement new technology within the context of a legacy infrastructure.
One of the established concepts in operational technology is the ISA-95 standard and the Purdue model of control. These define the models, interactions and relationships between systems in well understood layers. These layers are in turn used to define the network infrastructure, with strict interfaces between layers controlled by firewalls.
Azure IoT Edge in a nested hierarchy is ideally placed to address many of these requirements and help you to build secure and manageable edge solutions within established structures.
On top of that, we would advise you to use a set of best practices that the Azure IoT Services have to offer, namely:
Securing communications
Use Root CA X.509 certificates to authenticate and secure communications between parent and child devices, as well as to the IoT Hub.
Use existing company public key infrastructure if possible, for managing your certificates with dedicated intermediate certificates for signing the edge certificates.
Consider a separate intermediate certificate outside the enterprise chain of trust to sign the edge CA certificates.
Deployment management
Tag your devices in the Device Twins to identify a target group of devices via queries
Use automatic deployments and jobs to apply the same configuration to a set of devices
Use layered deployments to extend the capabilities of some devices without having to change configurations for all devices in the fleet
Connectivity resilience
Store and forward messages if the devices are separated from the network on the device using the Time To Live Setting in Device Twin
Certificates for a hierarchy of edge devices
To establish communication and authentication between the devices and the cloud, Industrial IoT companies often prefer using certificate-based authentication instead of using symmetric keys. We also recommend using X.509 based authentication with a chain extending to a trusted root CA for added security in productive environments.
On top of using a certificate for the authentication to the cloud, you would be required to use certificates to establish trust between the parent and child devices for transparent gateway operations.
Even in a nested scenario, every IoT Edge device needs to have its own unique device identity in the IoT Hub. Crucially, this means that you would usually generate two sets of certificates for each device:
An optional device client certificate and key for each device to identify and authenticate the device to the IoT Hub. Alternatively, this could be a symmetric key and the user is free to mix authentication modes within the nested hierarchy.
A required signing CA certificate, so that the edge can sign its own workload client certificates. These are used to secure connections between the different components on an IoT Edge device or between an IoT Edge device and any leaf devices in a nested hierarchy. This concept is further explained in our documentation.
On the layer 4 device, the respective part of the files would look like the following. Look closely at the naming differences to understand the different certificate sets:
If you need more details how to apply the certificates to the devices and to IoT Hub, check out the GitHub.
Using layered deployments to roll out configurations at scale
Instead of setting the modules and deployment manifests manually for each IoT Edge device, it is recommended to use automatic deployments for a fleet of devices and especially in production scenarios. In a nested edge scenario, we have seen particular value in the use of layered deployments to fine tune workloads.
Deployments are rolled out to device populations by matching user defined target conditions, for example device twin properties or tags, in a strict priority order.
Layered Deployments can be used to expand the deployment to include additional modules or override configurations on top of a base deployment manifest.
Tags are very useful to group a set of devices by using the Device Twin or Module Twin of IoT Edge Devices.
Our devices have the following tags set to true in their device twins.
Level 5 – Top Layer Gateway
Level 4 – Lower Layer Gateway
Level 3 – Lower Layer Device
Tag Names
topnestededge
tempsensor
nestededge
nestedgateway
tempsensor
nestededge
tempsensor
In detail we have the following configuration:
One base deployment manifest for the top layer Gateway (layer 5) for devices where topnestededge=true. This is a basic deployment manifest with the system modules and the API proxy module needed for nested operations. Since this has an internet connection we get obtain images directly from the Microsoft Container Registry (MCR).
One layered deployment manifest for the layer 5 edge devices to deploy the Simulated Temperature also from the MCR. This targets device with both tags.tempsensor=true AND tags.topnestededge=true
One base deployment manifest for the lower layer devices (layer 3 + 4) with tag nestededge. This only contains the system modules with an image that points to $upstream. This tells the edge runtime to pull images from the parent edge device.
One layered deployment manifest for the lower layer 4 Edge Device to deploy the IoTEdgeAPIProxy from $upstream. This applies to all devices with tag nestedgateway.
One layered deployment manifest for the lower layer 3 + 4 Edge Devices to deploy the Simulated Temperature Sensor from $upstream.
In IoT Hub, all deployments together look like the following:
Some other examples of layered deployments are also available in the GitHub.
Use the Module Twin or Direct Methods to send commands and desired configurations to lower-layer devices
As we have created IoT Hub Device Identities for all devices, we are able to control these devices from the cloud directly.
If we would like to update the Module Twin of our Level 3 device, for example, we would change the desired property for the respective module to enable it.
On top of that, we can also send direct methods directly from the cloud to a lower layer device. The message will be received by the top layer device and be routed through the edgeHubs of each device in the hierarchy until it reaches its designated device.
While sending direct methods to a lower layer device is a good way to directly control even disconnected devices, it requires the lower layer device to be connected to and discoverable by a parent device.
But what happens if a lower-layer device would go offline due to a networking failure of its parent?
What happens to the up – and downstream data flow on the lower levels?
How do the devices recover if the connection between the layers is separated?
In a nested hierarchy, each device has a dependency on its parent devices for connectivity. If the network connection is severed on a device in a given layer, then all devices that are residing in lower layers will also be unable to continue sending messages.
In our example, if the network connection of the layer 4 device is disconnected, both the layer 4 device and layer 3 device recognize this, and the normal store and forward functionality of the Edge Hub starts buffering. Layer 5 remains unaware and continues sending its messages to the IoT Hub. Once the network connections are re-established, each device automatically sends their queued messages in the original order. The time of how long a message should be stored is defined as the TTL (“Time To Live”) in the Module Identity twin for edgeHub of each device. The standard TTL setting is 7200 seconds or two hours.
If fine tuning is required the both the TTL and the priority of messages can also be defined in the routing rules for the edgeHub. The actual number of messages able to be stored on the device of course depends on the disk size of the device.
Device twin updates, cloud-to-device messages and direct method calls that are targeting a device that is temporarily offline, will also be queued in the IoT Hub whilst the edge is offline. They will be sent on, as long as the device reappears within the defined TTL period for C2D or the timeout for a direct method. This needs to considered in the solution design to avoid potential message loss or undesired operations occurring after they are still needed. The most robust way of communicating configuration, operational parameters and status remains the device or module twins.
We have walked through the practical application of nesting IoT Edge devices in industrial IoT and shown some best practice in managing the complexity in managing many heterogenous workloads on the edge. For more technical detail please visit the linked GitHub repository.
Want to try out and deploy a simulated purdue network model using IoT Edge? Look at this Github!
Stay informed. For the latest updates on new releases, tools, and resources, stay tuned to this blog and follow us @MSIoTDevs on Twitter.
This article is contributed. See the original author and article here.
Claire Bonaci
You’re watching the Microsoft us health and life sciences, confessions of health geeks podcast, a show the offers Industry Insight from the health geeks and data freaks of the US health and life sciences industry team. I’m your host, Claire Bonaci. On episode two of the three part patient experience series guest host, Antoinette Thomas discusses health plan member experience with our Director of population health, Amy Burke.
Toni Thomas
Amy, thank you for joining. As we get started, it would be great to share a little bit about yourself with our guests.
Amy Berk
Wonderful, thank you so much for having me, Toni. So I am the new director of Population Health at Microsoft, I bring forth clinical and operational experience in the population health realm or ecosystem, I started my career as a nurse. So I am a clinican by background. And after graduate school, I embarked on a career in consulting, I’d been a healthcare consultant for 15 years. And the span of my work is cross payers and providers, looking at innovation of care delivery models, working domestically and internationally, working in the public and private sectors. So I feel that my experience is broad, but also very focused on population health.
Toni Thomas
So I’m really glad to be working with you. And as the person that’s really responsible for developing the point of view on experience for health and life sciences, I think it’s really important to, you know, work with all my colleagues on the industry, industry team across their subject matter to make sure we’re developing a holistic view of experience. And so if you would, um, can you share a little bit about traditional member experience? And what drives improvement of that experience inside health plan or per the purview of health plan? And the second part of that question is, does consumerism play a role?
Amy Berk
So thank you so much for that question. Toni, I’ve had some time to think about that question. And, in my mind, the traditional role of the member in a health plan is one that was very reactive versus proactive. We have care managers that are reaching out to engage our members in these programs. Oftentimes, members aren’t even aware of these programs. So how can the health plan really be more keen on outreach and targeting members for these type of programs, health care management, behavioral health programs, pharmacy programs, etc. You know, and even in the role, or probably even in the traditional realm of care management, it has been very much a telephonic model, and how much how much impact we have over the telephone versus how can we engage our members through digital mechanisms, digital modalities, pardon me, like virtual, like digital, etc. So really, you know, harnessing in on engaging that member more through more creative technologies, and I would say also, that it empowers the member, then to really have a responsibility to, you know, take care of themselves, right We are, we are putting the member in, in a place of power to really be able to, you know, engage to be proactive with their own healthcare. And I forgot to mention, but this is an important part as well, in terms of, you know, what’s out there in terms of remote patient monitoring. So, you know, really putting the onus on them to take care of their health in a way that they haven’t done before, and that, that spans across the entire continuum of health. And I would say even the, the entire continuum of demographics, through age and culture and gender, etc. So I think it’s really a good place for any consumer to be right now. Because consumers today have choices like they hadn’t had before. You can go on the internet and consumers can look up and, and really have a clear picture and understanding and knowledge of their disease course of their condition. They have, you know, knowledge of who their providers are against other providers, they can now look up price transparency, is becoming very prominent in terms of being able to look up costs. So that’s very important to consumers today. And I think that, you know, putting our consumers at the heart of what we do, both from a chronic care management perspective, as well as a member satisfaction perspective becomes quite important.
Toni Thomas
So in the hospital world, and the clinic world, we have, you know, the H caps measurements that measure how satisfied a patient might be with within certain realms of that experience. How, how do health plans, how do health plans solicit feedback from their members to understand how satisfied they are with the experience that they’re having within their care management program are within the health plan itself.
Amy Berk
So there are a couple of ways in which that happens. So there are h caps that applied to the member experience and a health plan also stars. So that’s a CMS quality measure for Medicare programs, member satisfaction is actually now weighted most heavily in those star measures. And thirdly, then, you know, through surveys that are solicited to members, through their net promoter scores, etc, that become quite relevant in terms of measuring member satisfaction.
Toni Thomas
That’s great, because I know some of the the listening audience might be Microsoft health and life science field sales teams who are really trying to understand a little bit more about how satisfaction is rated. So that’s helpful to them in their daily jobs, like certainly to understand specifically the star ratings that you referenced. Something that I’m personally interested in, and I think our audience would be interested in is the comparison or contrast between what healthcare system patient experiences and I think most people understand that, and health plan member experience, so if you could, you know, give a little bit of that picture of what that looks like, that’d be helpful.
Amy Berk
so I would say that, you know, a patient versus a member, if we want to put it in that perspective, a patient is often going to the hospital, for reasons in which they need to be taken care of. And they become a guest at that hospital in that, you know, they’re, they’re being taken care of by nurses, and there are physicians there that are treating them with protocols, etc. You know, and often this is in a place of sickness versus in health, right, so a patient is sick. And, you know, that in itself brings in a cadre of, of emotions and experiences of that patient in the hospital, right, where once that patient goes out of the hospital is discharged from the hospital, rather, their disposition to a post acute facility or to home. And they’re within an environment that, you know, they’re now on the road to recovery, and they’re well, and, you know, they’re getting healthy or healthier, shall I say. And it goes back to that first comment, which I said, where the member has more, I would say, power, more, you know, ability to manage their condition, right. And this of work becomes so important for our care managers that are out there to take a proactive approach with our members to engage them better in their care. So they can have that opportunity to self manage their care for better outcomes. So you know, now it’s more proactive, and I would say where I said, The patient is a guest of the hospital and that everything is directed by this interdisciplinary care team in, you know, how they deliver care. Now, it becomes a little bit different of a shift to now the care management team, the interdisciplinary team is a is a guest to that member’s home, even when the person or the member goes to see the provider. There’s it’s still a different dynamic, right? Because I think that that member is at the heart in the center of making key decisions and shared decision making. And that applies to to the provider side, right, there should be shared decision making in the hospital setting as well. But I think it’s even more elevated in the post acute setting in that members are on their way to becoming healthy. And a member has control over that pathway, more so than a patient, if that makes sense.
Toni Thomas
I think that’s really profound. And it’s it’s also very interesting, Amy because some of the things I’ve been doing a lot of reading and research on agency and like a personal agency. And I think what we’re seeing right now with patients, consumers, customers members is that They’re exhibiting more personal agency than they ever have before. People who study this aren’t really certain as to why that might be. I don’t think there’s one reason for it, I think there’s a multitude of reasons I’m having access to information technology. And also the fact that we have been living 12 months inside of a pandemic, where they really feel that they have to take control over their own health, their own wellness, their own decision making. And so what I’m starting to see in the provider or the healthcare systems, space is really kind of this movement that you were referencing about. Being a collaborator with someone in their health, health, knowing that person personally, to offer the guidance that they need to make the decisions about their health. So I’m really starting to see healthcare systems want to move in that direction, especially on how they’re communicating with patients, either who are trying to make appointments, or soliciting some advice on hospitals. And it’s just really interesting paradigm shift. So I’m excited to see what happens there. I think it’s important. And then lastly, what important lessons can the healthcare system world and the plan world learn from one another to improve this experience?
Amy Berk
Yeah, so thank you for that question. And this, again, centers around, we have to focus in on patient member centric care, and what that means and including the member in terms of or the patient, what matters most to them. In terms of their care journey, I would also say that, you know, we have to think about our patients slash members holistically. So we shouldn’t be focusing in on one disease we should be focusing in on if that person has co morbidities if that person has gaps in terms of social determinants of health, behavioral health, post pandemic, I mean, the, the crisis of mental health, as it has never been before is is a pandemic in itself, right. So, you know, really honing in on not just one disease or one condition or even that person’s clinical picture, but we have to think more broadly, in terms of that person holistically, right, and bring through those social determinants that have impact on their health outcomes, behavioral health, emotions, and, you know, and needs. So I would, I would say, that’s very important, and that spans across both provider and member and, you know, holistically, culturally, clinically, etc.
Toni Thomas
So that brings us to the end of our time together. But I do want to say I always enjoy speaking with you and asking you questions because I, I learn so much from you, Amy and I, I’ve learned things that will help me make me better in my job and also allow me to help the customers that I’m out there serving. So I really, really thank you for joining us for this session and contributing to patient experience. We thank you so much.
Claire Bonaci
Thank you all for watching. Please feel free to leave us questions or comments below and check back soon for more content from the HLS industry team.
New College Lanarkshire is one of the largest colleges in Scotland, operating across Lanarkshire and East Dunbartonshire, we have 3 main campuses and 3 satellite campuses. Created in 2012 following the merger of Coatbridge College, Cumbernauld College and Motherwell College, we have more than 10,000 students enrolled on a mix of full-time, part-time, evening, and commercial courses.
We offer more than 600 courses across six faculties: Care & Science; Engineering & Automotive; Service Industries; Business, Social Science & Sport; Supported Learning; and Computing & Creative Industries.
The College was named ‘Best in the UK’ at the WorldSkills UK trade skills competition in Birmingham in November 2013, 2014, 2016 and 2019, in addition to finishing in the top three places in 2015, 2017 and 2018 and are recognised as a WorldSkills Centre of Excellence.
The Faculty of Computing and Creative Industries has a diverse portfolio embracing Computing, Sound Technology, Music Performance, Film & TV, Photography, Art & Design, Acting and Musical Theatre.
In computing, we offer courses ranging from beginners to BSc Computer Networking in partnership with University of the West of Scotland. The majority of our qualifications are awarded by the Scottish Qualifications Authority and the most popular qualification, HNC Computing (equivalent to 1st year BSc) is currently going through long overdue redevelopment which will give us more flexibility than we currently have.
As a team, we became aware of the Microsoft Learn for Educators (MSLE) curricula in June 2020 when most of the team attended Azure Fundamentals AZ-900 training, following this, and several calls with Andrew Bettany and Clare Riley from Microsoft UK, who assisted us in setting up Azure Lab Services, it was suggested that we join the MSLE Institutional programme, which we confirmed in December 2020.
Since then, a number of our staff have been delivering Azure Fundamentals AZ-900 and Azure AI Fundamentals AI-900 to principally our HNC and HND students, up until that point the students had little knowledge or experience of cloud technologies, I have also been delivering AZ-900 training to lecturers from two other colleges in Scotland.
This year, purely due to timing, we were unable to fully integrate the courses into the curriculum, however, we have offered them as add-on courses very successfully. At the moment we are planning for complete integration of at least AZ-900 into our Higher National Certificate courses next academic year.
With more than 10,000 students enrolled, the college is dedicated to continuous improvement, has invested in the latest technology and facilities across its campuses and is a leader in developing UK skills.
We are expecting to start delivering AZ-900 to local unemployed people in the next couple of weeks and are currently advertising the courses through a Scottish scheme known as the Flexible Workforce Development Fund, this is a fund created for SMEs to take advantage of the apprenticeship levy by accessing training up to the value of £5000.
In our experience since starting this process, the impact has been huge, the students are very much enjoying the courses and are engaging with us out with their normal class times to take extra classes in AZ-900 and AI-900. They have been giving us excellent feedback which goes to reinforce the idea that we (and Microsoft) are getting it right with an excellent balance of theory and practical through the labs, I have included a couple of students’ comments below
“When I first heard of the Cloud, I was interested because of how mysterious it seemed, but now that I am learning about it, it fascinates me more and more each day.” Tomas McHendry
“I think as students at the moment we are lucky to have people like Charlie and the other lecturers fighting for the evolution in education we need.” Karen Skinner
What we have learned as a college and as a team, is that if we want to do justice to our students and their aspirations, we need to move from what has essentially been a pilot programme this year to a fully integrated programme next year and beyond.
One of the greatest benefits of our engagement in the MSLE programmes has been the opportunity for staff development, previously it was very difficult for computing lecturers to access quality CPD, partly due to cost and partly due to timetabling, the MSLE programmes have made this easier by removing the largest part of the problem, the cost. As a result, most of my team are studying for at least one Microsoft Fundamentals course.
This does not end with MS Fundamentals, the college is in the process of creating a “CPD Academy”. It is my plan to leverage many more parts of Microsoft Learn to upskill non-technical teaching staff, students and our professional services staff as detailed in the learning pathways in “Digital Capabilities for a Cloud First, Mobile First Education”
Our short term goals have been achieved and considerably surpassed, so focusing on the medium term, my goal is for students to leave our college as “cloud natives”, so next year we plan to move our software development to cloud based using Azure and the associated tools. Moving on further, we are looking at delivering beyond the fundamentals so that the students can graduate with “Associate” qualifications.
We have various new initiatives under way as a result of our work with Microsoft, we are in the planning stages of a number of projects in order to take Microsoft Learn to a wider and more gender-neutral audience and greatly enhance our students’ employability.
The first project is centred around Computer Vision by creating an app in partnership with the college’s hairdressing staff and students, designed to enable students to identify hairstyles from photos (their own or downloaded). Part of the aim of the project is to engage the mostly female hairdressing students with ICT through AI.
The second project is aimed at improving our student’s employability. A major employer and Azure user in Scotland has offered to assist us in moving our software, project management, IT infrastructure and security to a DevOps model, similar to theirs and access to live anonymised data to work with. They have also offered that once we get under way, they will offer students paid internships between years 1 & 2, hopefully leading to employment. The organisations Cloud Manager stated that
“If you can sit a student in front of me for an interview and they can demonstrate that they can develop a data application in Azure and send the results over a VPN to another platform, I’ll employ them on the spot”
This article is contributed. See the original author and article here.
Later this year, Microsoft will launch a new Publisher program to modernize our Dynamics 365 Business Central ISV approach to support a cloud-first strategy. This new approach will ensure all future customers can choose Dynamics 365 Business Central online, while also finding the right apps on Microsoft AppSource to meet their unique requirements. This change will require ISVs to have a cloud-first strategy by the end of 2022 for their solutions listed as Microsoft AppSource apps.
The new Publisher program replaces the Registered Solution Program (RSP) and the Certified for Microsoft Dynamics (CfMD) program, which will be deprecated after being in place for more than a decade.
We’ll share details about the new Publisher program closer to launch. In the meantime, the following guidance will ensure that you are ready to transition:
Publishers with a cloud-first strategy in place are set up for success. ISVs who have modernized their existing C/AL solutions by converting them into AL and full extensions, and published those Apps to Microsoft AppSource, will be more competitive. These publishers will be able to adapt faster and can focus more on their prospects and customers, instead of writing code.
The Publisher program will reward partners with a cloud-first strategy by freeing them from program fees or additional test efforts, outside of what is required for publishing to Microsoft AppSource.
This policy doesn’t mean publishers are required to have a cloud-only approach. If partners comply with the cloud-first approach, they’ll be able to easily implement Business Central online, on-premises, and partner-hosted apps.
Better serve your customers by bringing existing Dynamics NAV or Dynamics 365 Business Central code-customized solutions into Microsoft AppSource. As of April 2021, Microsoft AppSource hosts almost 1,500 apps specifically built for Dynamics 365 Business Central. Over the past few years, hundreds of our partners have embraced this transition and incorporated a cloud-first strategy. Those who have transitioned to Microsoft AppSource have shared with us how they and their customers benefited from that investment.
To remain competitive, relevant, and provide digital transformation strategies to customers, we are asking all our partners to embark on a modernization journey. If there is a strong business case to continue selling to new customers, then you should avoid further delay and bring your apps to Microsoft AppSource.
From September 2022 onward, we will introduce gradually increasing fees for publishers whose resellers have sold on-premises solutions to new customers without an equivalent cloud-based solution. The fees will only be applied to sales in countries where the Dynamics 365 Business Central online service is available. Solutions registered to existing customer licenses before the program cut-off date will not be impacted by program fees. However, adding new non-AppSource solutions after the cut-off date will be impacted.
Avoid fees by creating a transition plan now. The longer you wait to bring your solutions into Microsoft AppSource, the more fees you will incur.
This change also means that publishers now have a shared responsibility with their resellers to only resell cloud-first solutions to new customers.
Just like the RSP and CfMD programs, the new Publisher program is designed to drive customer-obsession behavior, not revenue, and promote a cloud-first strategy for publishers. Our objective is to ensure customers can choose cloud deployments without exception.
Next steps
Further details about the program will be shared in the coming months. We understand that our partners are in different stages of their modernization journey. We’ve put together learning and coaching resources to support you in your transition journey. Please reach out to your regional operational center if you have any questions or concerns. We’ll connect you with the best resource to further your path forward.
This article is contributed. See the original author and article here.
In this blog post, I will show you how you can set up, configure and customize Windows Sandbox in Windows 10 using advanced Windows Sandbox config files. Windows Sandbox is based on Hyper-V technology and allows you to spin up an isolated, temporary desktop environment where you can run untrusted software.
What is Windows Sandbox
Windows Sandbox provides a lightweight desktop environment to run applications in isolation safely. Software installed inside the Windows Sandbox environment remains “sandboxed” and runs separately from the host machine.
A sandbox is temporary. When it’s closed, all the software and files and the state are deleted. You get a brand-new instance of the sandbox every time you open the application.
Software and applications installed on the host aren’t directly available in the sandbox. If you need specific applications available inside the Windows Sandbox environment, they must be explicitly installed within the environment.
Windows Sandbox has the following properties:
Part of Windows: Everything required for this feature is included in Windows 10 Pro and Enterprise. There’s no need to download a VHD.
Pristine: Every time Windows Sandbox runs, it’s as clean as a brand-new installation of Windows.
Disposable: Nothing persists on the device. Everything is discarded when the user closes the application.
Secure: Uses hardware-based virtualization for kernel isolation. It relies on the Microsoft hypervisor to run a separate kernel that isolates Windows Sandbox from the host.
Efficient:Uses the integrated kernel scheduler, smart memory management, and virtual GPU.
You can learn more about Windows Sandbox on Microsoft Docs and if you are interested in how Windows Sandbox works, check out the Windows architecture here.
How to install Windows Sandbox
To get started with Windows Sandbox, you will need to have the following prerequisites:
Windows 10 Pro, Enterprise or Education build 18305 or later (Windows Sandbox is currently not supported on Home SKUs)
64-bit architecture
Virtualization capabilities enabled in BIOS
At least 4 GB of RAM (8 GB recommended)
At least 1 GB of free disk space (SSD recommended)
At least two CPU cores (four cores with hyperthreading recommended)
You can install Windows Sandbox as an additional feature in the Control Panel or by simply running the following PowerShell command as administrator:
After running that command, you will need to restart your computer, and after the reboot, you can start using the Windows Sandbox directly from the Start menu.
Customize Windows Sandbox with Configuration Files
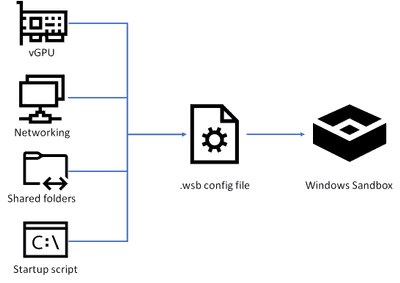
By default, Windows Sandbox spins up a default image. However, in many cases, you want to spin up a customized environment with already preinstalled tools or access to local files. For that, you can use config files that allow you to customize the sandbox during startup. The sandbox configuration files are formatted as XML and use the .wsb file extension.
Customize Windows Sandbox with Configuration Files
Today, you can configure four different settings to configure the Windows Sandbox.
vGPU (virtualized GPU): Enable or disable the virtualized GPU. If vGPU is disabled, the sandbox will use Windows Advanced Rasterization Platform (WARP).
Networking: Enable or disable network access within the sandbox.
Mapped folders: Share folders from the host withreadorwritepermissions. Note that exposing host directories may allow malicious software to affect the system or steal data.
Logon command: A command that’s executed when Windows Sandbox starts.
Audio input: Shares the host’s microphone input into the sandbox.
Video input: Shares the host’s webcam input into the sandbox.
Protected client: Places increased security settings on the RDP session to the sandbox.
Printer redirection: Shares printers from the host into the sandbox.
Clipboard redirection: Shares the host clipboard with the sandbox so that text and files can be pasted back and forth.
Memory in MB: The amount of memory, in megabytes, to assign to the sandbox.
To create a configuration file, open your editor of choice and create a file with the file extension “.wsb”. Now you can start building the config using XML.
Windows Sandbox Configuration Files WSB Files
Let’s start with a simple configuration file, which mounts the Downloads folder of the local machine into the Windows Sandbox as read-only. This allows you to use the files from your Downloads folder in your Sandbox. However, the Sandbox cannot write back to that folder.
In addition, we also use the Command part to open up the explorer.exe with the mounted Downloads folder when the Windows Sandbox starts.
I saved this as “Sandbox Map Download Folder.wsb“. To start Windows Sandbox with the configuration file, double click the configuration file or open it up in the console.
Windows Sandbox Configuration Files start from Windows Terminal
After that, Windows Sandbox will open with the mounted Downloads folder.
Windows Sandbox Mounted Folder
Another example I want to share here is how you can run a script to modify or installed software. In this case, I want to have a Windows Sandbox with Visual Studio Code installed. For that, I use the folder option to mount a folder with a script, and within that script, I have the installation commands. After the Windows Sandbox has started, it will run the script from the mounted folder using the command option.
REM Download VSCode
curl -L "https://update.code.visualstudio.com/latest/win32-x64-user/stable" --output C:usersWDAGUtilityAccountDesktopvscode.exe

REM Install and run VSCode
C:usersWDAGUtilityAccountDesktopvscode.exe /verysilent /suppressmsgboxes
These are just some of the examples of how you can customize your Windows Sandbox environments. If you want to learn more, check out Microsoft Docs.
Make Visual Studio Code handle .wsb file with XML
By default, editors don’t necessarily know about the wsb file extension and that this includes XML syntax. In Visual Studio Code, you can open up the Settings (JSON) and add the following to the files.associations.
Visual Studio Code
In the JSON settings, search forfiles.associations. Note: The searched section might be there or not.
If it is not there, add the following:
"files.associations": {
      "*.wsb": "xml"
}
Conclusion
I hope this provides you with a short overview of how you can customize the Windows Sandbox. I am interested in what customization you are running. If you have any questions, feel free to leave a comment or share your customization.
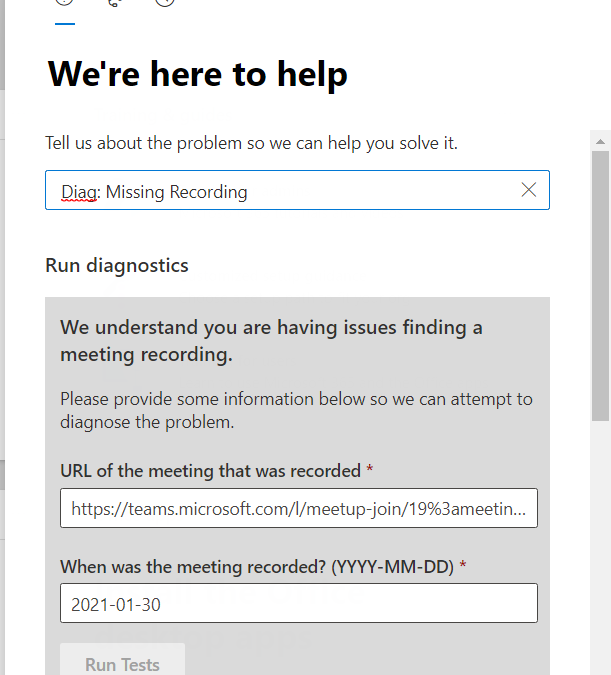
This new Diagnostic can find missing Meeting Recordings in the event they are lost or misplaced. To access the Diagnostic in your M365 Admin Portal, type Diag: Missing Recording into the Need Help or New Service Request description box:
Notice that the Diagnostic requires a Meeting Join URL, one way to get that is from the Meeting details page in the Teams client. Find the Meeting Chat, then click on the three lines top right:
And then you can copy the link:
From there, you simply need the Date the meeting occurred. Note that we only keep Meeting Recording telemetry for 30 days, so if the meeting recording is older than 30 days, you’ll need to try one of the manual methods in the troubleshooting article linked above.
Enter your meeting join URL and date in YYYY-MM-DD format:
And then click on Run Tests. In my case, here is the result:
And this indicates that my Meeting Recording was saved to OneDrive, and provides a link to our troubleshooting article with instructions on how to go find it in OneDrive. The Diagnostic can detect if the user’s storage is still Stream as well, and those instructions (how to find the recording file in Stream) are there too. For this example, here’s where I found my missing recording:
We hope this Diagnostic is helpful in situations where the Meeting Recording file can’t be found after a meeting. Please give it a try and let us know how it went in the comments below.
This article is contributed. See the original author and article here.
This post is co-authored with Yulin Li, Yinhe Wei, Qinying Liao, Yueying Liu, Sheng Zhao
Voice is becoming increasingly popular in providing useful and engaging experiences for customers and employees. The Text-to-Speech (TTS) capability of Speech on Azure Cognitive Services allows you to quickly create intelligent read-aloud experience for your scenarios.
In this blog, we’ll walk through an exercise which you can complete in under two hours, to get started using Azure neural TTS voices and enable your apps to read content aloud. We’ll provide high level guidance and sample code to get you started, and we encourage you to play around with the code and get creative with your solution!
What is read-aloud
Read-aloud is a modern way to help people to read and consume content like emails and word documents more easily. It is a popular feature in many Microsoft products, which has received highly positive user feedback. A few latest examples:
Play My Emails: In outlook iOS, users can listen to their incoming email during the commute to the office. They can choose from a female and a male voice to read the email aloud, anytime their hands may be busy doing other things.
Edge read aloud: In recent chromium-based edge browser, people can listen to the web pages or pdf documents when they are doing multi-tasking. The read-aloud voice quality has been enhanced with Azure neural TTS, which becomes the ‘favorite’ feature to many (Read the full article).
Immersive reader is a free tool that uses proven techniques to improve reading for people regardless of their age or ability. It has adopted Azure neural voices to read aloud content to students.
Listen to Word documents on mobile. This is an eyes-off, potentially hands-off modern consumption experience for those who want to do multitask on the go. In specific, this feature supports a longer listening scenario for document consumption, now available with Word on Android and iOS.
With all these examples and more, we’ve seen clear trending of providing voice experiences for users consuming content on the go, when multi-tasking, or for those who tend to read in an audible way. With Azure neural TTS, it is easy to implement your own read-aloud that is pleasant to listen to for your users.
The benefit of using Azure neural TTS for read-aloud
Azure neural TTS allows you to choose from more than 140 highly realistic voices across 60 languages and variants that enables fluid, natural-sounding speech, with rich customization capabilities available at the same time.
High AI quality
Why is neural TTS so much better? Traditional TTS is a multi-step pipeline, and a complex process. Each step could involve human, expert rules or individual models. There is no end-to-end optimization in between, so the quality is not optimal. The AI based neural TTS voice technology has simplified the pipeline into three major components. Each component can be modeled by advanced neural deep learning networks: a neural text analysis module, which generates more correct pronunciations for TTS to speak; a neural acoustic model, like uni-TTS which predicts prosody much better than the traditional TTS, and a neural vocoder, like hifiNet which creates audios in higher fidelity.
With all these components, Azure neural TTS makes the listening experience much more enjoyable than the traditional TTS. Our studies repeatedly show that the read-aloud experience integrated with the highly natural voices on the Azure neural TTS platform can significantly increase the time that people spend on listening to the synthetic speech continuously, and greatly improve the effectiveness of their consumption of the audio content.
Broad locale coverage
Usually, the reading content is available in many different languages. To read aloud more content and reach more users, TTS needs to support various locales. Azure neural TTS now supports more than 60 languages off the shelf. Check out the details in the full language list.
By offering more voices across more languages and locales, we anticipate developers across the world will be able to build applications that change experiences for millions. With our innovative voice models in the low-resource setting, we can also extend to new languages much faster than ever.
Rich speaking styles
Azure neural TTS provides you a rich choice of different styles that resonate your content. For example, the newscast style is optimized for news content reading in a professional tone. The customer service style supports you to create a more friendly reading experience for conversational content focusing on customer support. In addition, various emotional styles and role-play capabilities can be used to create vivid audiobooks in synthetic voices.
Here are some examples of the voices and styles used for different types of content.
Language
Content type
Sample
Note
English (US)
Newscast
Aria, in the newscast style
English (US)
Newscast
Guy, in the general/default style
English (US)
Conversational
Jenny, in the chat style
English (US)
Audiobook
Jenny, in multiple styles
Chinese (Mandarin, simplified)
Newscast
Yunyang, in the newscast style
Chinese (Mandarin, simplified)
Conversational
Yunxi, in the assistant style
Chinese (Mandarin, simplified)
Audiobook
Multiple voices used: Xiaoxiao and Yunxi
Different styles used: lyrical, calm, angry, disgruntled, angry, embarrassed, with different style degrees applied
These styles can be adjusted using SSML, together with other tuning capabilities, including rate, pitch, pronunciation, pauses, and more.
Powerful customization capabilities
Besides the rich choice of prebuilt neural voices, Azure TTS provides you a powerful capability to create a one-of-a-kind custom voice that can differentiate your brand from others. Using Custom Neural Voice, you can build a highly realistic voice using less than 30 minutes of audio as training data. You can then use your customized voices to create a unique read-aloud experience that reflects your brand identity or resonate the characteristics of your content.
Next, we’ll walk you through the coding exercise of developing the read-aloud feature with Azure neural TTS.
How to build read-aloud features with your app
It is incredibly easy to add the read-aloud capability using Azure neural TTS to your application with the Speech SDK. Below we describe two typical designs to enable read-aloud for different scenarios.
In this design, the client directly interacts with Azure TTS using the Speech SDK. The following steps with the JavaScript code sample provide you the basic process to implement the read-aloud.
Step 1: create synthesizer
First, create the synthesizer with the selected language and voices. Make sure you select a neural voice to get the best quality.
const config = SpeechSDK.SpeechConfig. fromAuthorizationToken(“YourAuthorizationToken”, “YourSubscriptionRegion”);
config.SpeechSynthesisVoiceName = voice;         config.SetSpeechSynthesisOutputFormat(SpeechSynthesisOutputFormat.Riff24Khz16BitMonoPcm);
const player = new SpeechSDK.SpeakerAudioDestination();
var audioConfig  = SpeechSDK.AudioConfig.fromSpeakerOutput(player);
var synthesizer = new SpeechSDK.SpeechSynthesizer(config, audioConfig);
Then you can hook up the events from the synthesizer. The event will be used to update the UX while the read-aloud is on.
player.onAudioEnd = function (_) {
          window.console.log("playback finished");
  };
Step 2: Collect word boundary events
The word boundary event is fired during synthesis. Usually, the synthesis speed is much faster than the playback speed of the audio. The word boundary event is fired before you get the corresponding audio chunks. The application can collect the event and the time stamp information of the audio for your next step.
    synthesizer.wordBoundary = function (s, e) {
          window.console.log(e);
          wordBoundaryList.push(e);
        };
Step 3: Highlight word boundary during audio playback
You can then highlight the word as the audio plays, using the code sample below.
    setInterval(function () {
        if (player !== undefined) {
          const currentTime = player.currentTime;
          var wordBoundary;
          for (const e of wordBoundaryList) {
            if (currentTime * 1000 > e.audioOffset / 10000) {
              wordBoundary = e;
            } else {
              break;
            }
          }
          if (wordBoundary !== undefined) {
            highlightDiv.innerHTML = synthesisText.value.substr(0, wordBoundary.textOffset) +
                    "" + wordBoundary.text + "" +
                    synthesisText.value.substr(wordBoundary.textOffset + wordBoundary.wordLength);
          } else {
            highlightDiv.innerHTML = synthesisText.value;
          }
        }
      }, 50);
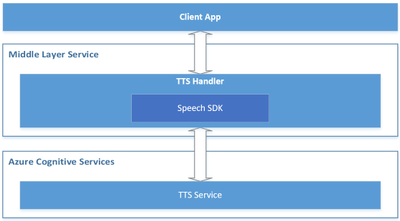
In this design, the client interacts with a middle layer service, which then interacts with Azure TTS through the Speech SDK. It is suitable for below scenarios:
It is required to put the authentication secret (e.g., subscription key) on the server side.
There could be additional related business logics such as text preprocessing, audio postprocessing etc.
There is already a service to interact with the client application.
Below is a reference architecture for such design:
Reference architecture design for the server-side read-aloud
The roles of each component in this architecture are described below.
Azure Cognitive Services – TTS: the cloud API provided by Microsoft Azure, which converts text to human-like natural speech.
Middle Layer Service: the service built by you or your organization, which serves your client app by hosting the cross-device / cross-platform business logics.
TTS Handler: the component to handle TTS related business logics, which takes below responsibilities:
Wraps the Speech SDK to call the Azure TTS API.
Receives the text from the client app and makes preprocessing if necessary, then sends it to the Azure TTS API through the Speech SDK.
Receives the audio stream and the TTS events (e.g., word boundary events) from Azure TTS, then makes postprocessing if necessary, and sends them to the client app.
Client App: your app running on the client side, which interacts with end users directly. It takes below responsibilities:
Sends the text to your service (“Middle Layer Service”).
Receives the audio stream and TTS events from your service (“Middle Layer Service”), and plays the audio to your end users, with UI rendering like real-time text highlight with the word boundary events.
Comparing to the client-side read-aloud design, the server-side read-aloud is a more advanced solution. It can cost higher but is more powerful to handle more complicated requirements.
Recommended practices for building a read-aloud experience
The section above shows you how to build a read-aloud feature in the client and service scenarios. Below are some recommended practices that can help to make your development more efficient and improve your service experience.
Segmentation
When the content to read is long, it’s a good practice to always segment your reading content to sentences or short paragraphs in each request. Such segmentation has several benefits.
The response is faster for shorter content.
Long synthesized audio will cost more memory.
Azure speech synthesis API requires the synthesized audio length to be less than 10 minutes. If your audio exceeds 10 minutes, it will be truncated to 10 minutes.
Using the Speech SDK’s PullAudioOutputStream, the synthesized audio in each turn could be easily merged into one stream.
Streaming
Streaming is critical to lower the latency. When the first audio chunk is available, you can start the playback or start to forward the audio chunks immediately to your clients. The Speech SDK provides PullAudioOutputStream, PushAudioOutputStream, Synthesizing event, and AudioDateStream for streaming. You can select the one that best suites the architecture of your application. Find the samples here.
Besides, with the stream objects of the Speech SDK, you can get the seek-able in-memory audio stream, which works easily for any downstream services.
Tell us your experiences!
Whether you are building a voice-enabled chatbot or IoT device, an IVR solution, adding read-aloud features to your app, converting e-books to audio books, or even adding Speech to a translation app, you can make all these experiences natural sounding and fun with Neural TTS.
Let us know how you are using or plan to use Neural TTS voices in this form. If you prefer, you can also contact us at mstts [at] microsoft.com. We look forward to hearing about your experience and developing more compelling services together with you for the developers around the world.


Recent Comments