by Contributed | May 6, 2021 | Technology
This article is contributed. See the original author and article here.
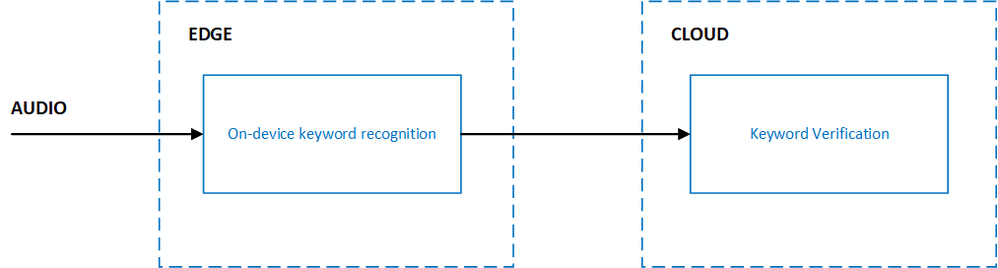
Voice activation enables your end-users to interact with your product completely hands-free. With products that are ambient in nature, like smart speakers, users can say a specific keyword to have the product respond with just their voice. This type of end-to-end voice-based experience can be achieved with keyword recognition technology, which is designed with multiple stages that span across the edge and cloud:
Custom Keyword allows you to create on-device keyword recognition models that are unique and personalized to your brand. The models will process incoming audio for your customized keyword and let your product respond to the end-user when the keyword is detected. When integrating your models with the Speech SDK, and Direct Line Speech or Custom Commands, you automatically get the benefits of the Keyword Verification service. Keyword Verification reduces the impact of false accepts from on-device models with robust models running on Azure.
When creating on-device models with Custom Keyword, there is no need for you to provide any training data. Our latest neural TTS can generate audio in life-like quality and in diverse speakers with multi-speaker base models. Neural TTS is available in 60 locales and languages. Custom Keyword makes use of this technology to generate training data specific to your keyword and specified pronunciations, eliminating the need for you to collect and provide training data.
The most common use case of keyword recognition is with voice assistants. For example, “Hey Cortana” is the keyword for the Cortana assistant. Frictionless user experiences for voice assistants often require the use of microphones that are always listening and keyword recognition acts as a privacy boundary for the end-user. Sensitive and personal audio data can be processed completely on-device until the keyword is believed to be heard. Once this occurs, the gate to stream audio to the cloud for further processing can be opened. Cloud processing often includes both Speech-to-Text and Keyword Verification.

The Speech SDK provides seamless integration between the on-device keyword recognition models created using Custom Keyword and the Keyword Verification service such that you do not need to provide any configuration for the Keyword Verification service. It will work out-of-the-box.
Let’s walk through how to create on-device keyword recognition models using Custom Keyword, with some tips along the way:
- Go to the Speech Studio and Sign in or, if you do not yet have a speech subscription, choose Create a subscription.
- On the Custom Keyword portal, click New project. Provide a name for your project with an optional description. Select the language which best represents what you expect your end-users to speak in when saying the keyword.

- Select your newly created project from the list and click Train model. Provide a name for your model with an optional description. For the keyword, provide the word or short phrase you expect your end-users to say to voice activate your product.

Below are a few tips for choosing an effective keyword:
- It should take no longer than two seconds to say.
- Words of 4 to 7 syllables work best. For example, “Hey Computer” is a good keyword. Just “Hey” is a poor one.
- Keywords should follow common pronunciation rules specific to the native language of your end-users.
- A unique or even a made-up word that follows common pronunciation rules might reduce false positives. For example, “computerama” might be a good keyword
- Custom Keyword will automatically create candidate pronunciations for your keyword. Listen to each pronunciation by clicking the play button next to it. Unselect any pronunciations that do not match the pronunciation you expect your end-users to say.
Tip: It is important to be deliberate about the pronunciations you select to ensure the best accuracy characteristics. For example, choosing more pronunciations than needed can lead to higher false accept rates. Choosing too few pronunciations, where not all expected variations are covered, can lead to lower correct accept rates.

Choose the type of model you would like to generate. To make your keyword recognition journey as effortless as possible, Custom Keyword allows you to create two types of models, both of which do not require you to provide any training data:
Basic – Basic models are designed to be used for demo or rapid prototyping purposes and can be created within just 15 minutes.
Advanced – Advanced models are designed to be used for product integration with improved accuracy characteristics. These models can take up to 48 hours to be created. Remember, you do not need to provide any training data! Advanced models leverage our Text-to-Speech technology to generate training data specific to your keyword and improve the model’s accuracy.
Click Train, and your model will start training. Keep an eye out in your email as you will receive a notification once the model is trained. You can then download the model and integrate with the Speech SDK.
Tip: You can also test the model directly within the Custom Keyword portal in your browser by using the Testing tab. Choose your model and click Record. You may have to provide microphone access permissions. Now you can say the keyword and see when the model has recognized it!

For more information on how to use your newly created keyword recognition models with the Speech SDK, read Create Keyword quickstart – Speech service – Azure Cognitive Services | Microsoft Docs.

by Contributed | May 6, 2021 | Technology
This article is contributed. See the original author and article here.
In the past year or so, I’ve been knee-deep in Azure Synapse. I have to say, it’s been a super popular platform in Azure. Many clients are either migrating to Azure Synapse from SQL Server, data warehouse appliances or implementing net new solutions on Synapse Analytics.
One of the most asked questions or subjects that are top of mind revolves around security. As company move sensitive data to the cloud, checks and balances need to be in place to meet security requirements and the first thing that comes up is: does my data flow through the internet?
When it comes down to private endpoints, virtual networks, private and public IPs, things start getting complex…
So let’s try to make sense of all this.
Note, I will not be doing a deep dive into networking as there are people that are more knowledgeable on this subject. But, I will try to clarify to the best of my abilities
Network security
In order to expand on the topic of security and network traffic, we need to dive into network security.
This topic can be broken down in a few categories:
- Firewall
- Virtual network
- Data exfiltration
- Private endpoint
Firewall
Bing defines firewall as “… a security device that monitors and filters incoming and outgoing network traffic based on an organization’s previously established security policies. … A firewall’s main purpose is to allow non-threatening traffic in and to keep dangerous traffic out.”
In the context of Azure Synapse, it will allow you to grant or deny access to your Synapse workspace based on IP addresses. This can be effectively used to block traffic to your workspace via the internet. Normally, firewalls would control both outbound and inbound traffic, but in this case, it’s inbound only.
I’ll cover outbound later when talking about managed virtual network and data exfiltration.
When creating your workspace, you have the option to allow ALL IP address through.
IP Filtering
If you enable this option, you’ll end up with the following rule added:
 IP Filtering Rules
Note, if you don’t enable this, you will NOT be able to connect to your workspace right away. Best to keep it enabled, then go back and modify / tweak it.
See this documentation from Microsoft on Synapse workspace IP Firewall rules
Virtual Network
Virtual network will give you network isolation against other workspaces. This is accomplished by enabling the “Enable managed virtual network” option during the deployment of the workspace.
 Enable Managed Virtual Network
Alert, you can only enable this option during the creation of your workspace.
The great thing about this is it gives you all the benefits of having your workspace in a virtual network without the need to manage it. Look it up here for more details on benefits.
Data Exfiltration
Another benefit of enabling managed virtual network and private endpoints, which we’re tackling next, is that you’re now protected against data exfiltration.
Definition: occurs when malware and/or a malicious actor carries out an unauthorized data transfer from a computer. It is also commonly called data extrusion or data exportation.
In the context of Azure, protection agains data exfiltration guards against malicious insiders accessing your Azure resources and exfiltrating sensitive data to locations outside of your organization’s scope.
In addition to enabling the managed virtual network option, you can also specify which Azure Active Directory tenant your workspace can communicate with.
 Specify AD Tenant
Check out this documentation on data exfiltration with Synapse
Private Endpoints
Microsoft defines Private Endpoints as “Azure Private Endpoint is a network interface that connects you privately and securely to a service powered by Azure Private Link. Private Endpoint uses a private IP address from your VNet, effectively bringing the service into your VNet.”
In short, you can access a public service using a private endpoint.
Every Synapse workspace comes with a few endpoints which are used to connect to from various applications:
 Synapse workspace endpoints
Dedicated SQL endpoint |
Used to connect to the Dedicated SQL Pool from external applications like Power BI, SSMS |
Serverless SQL endpoint |
Used to connect to the Serverless SQL Pool from external applications like Power BI, SSMS |
Development endpoint |
This is used by the workspace web UI as well as DevOps to execute and publish artifacts like SQL scripts, notebook. |
workspace web URL |
Used to connect to the Synapse Studio web UI |
If we take the dedicated SQL endpoint for example and we add private endpoint. What’s basically happening is when you connect to it, your request goes through a redirection to a private IP.
If you do a nslookup to the SQL endpoint, you can see it routes to the private endpoint:
nslookup synapseblog-ws.sql.azuresynapse.net
 Traceroute Output
Managed Private Endpoints
Synapse uses a managed VNET / Subnet (i.e. not a customer’s one) and exposes private endpoints in customers’ vnets as needed. This is the reason you never pick a VNET in the wizard during the creation.
Since that VNET belongs to Microsoft and is managed, it is isolated by itself. It therefore requires private endpoints from other PaaS to be created into it.
It is similar to how the managed VNET feature of Azure Data Factory operates
I have a diagram outlining all this later.
When you create a new Synapse workspace, you’ll notice in the Synapse Studio, under the manage hub, security section and managed private endpoint that 2 private endpoints were created by default.
 Managed Private Endpoint
Note, for the curious that noticed the private endpoint blade in Azure portal for the Synapse resource and wondering what that’s about, I’ll cover that next.
When you deploy a Synapse workspace in a managed virtual network, you need to tell Synapse how to communicate with other Azure PaaS (Platform As A Service)
Therefore, these endpoints are required by Synapse’s orchestration (the studio UI, Synapse Pipeline, etc.) to communicate with the 2 SQL pools; dedicated and serverless… This will make more sense once you see the detailed architecture diagram.
:police_car_light: Alert, one common issue I see people facing is their Spark pools not being able to read files on the storage account. This is because you need to manually create a managed service endpoint the storage account.
Check out this documentation to see how: How to create a managed private endpoint
Private Endpoint Connections
Now that we’ve covered managed private endpoints, you’re probably asking yourself why you have a private endpoint connection blade in the Azure portal for your Synapse workspace.
 Private Endpoint Blade in Portal
Where managed private endpoints allows the workspace to connect to other PaaS services outside of its managed virtual network, private endpoint connections allow for everyone and everything to connect to Synapse endpoints using a private endpoint.
You will need to create a private endpoint for the following:
|
|
|---|
Dedicated SQL endpoint |
Select the SQL sub resource during the creation. |
Serverless SQL endpoint |
Select the SqlOnDemand sub resource during the creation |
Development endpoint |
Select the DEV sub resource during the creation. |
Private Link Hub
You might’ve noticed in the list of private endpoint, we only had 3 of them while your workspace has 4 endpoints. That’s because the studio workspace web URL will need a Private Link Hub to setup the secured connection.
Check out this document for instructions on how to set this up.
Connect to Azure Synapse Studio using Azure Private
Time to put it all together!
Now that we’ve covered firewalls, managed private endpoint, private endpoint connections and private link hub, let’s take a look how it looks when you deploy a secured end to end Synapse workspace.
 Azure Synapse Detailed Diagram
This architecture assumes the following:
You have two storage accounts, one for the workspace file system (this is required by Synapse deployment), the another, to store any audits and logs.
For each of the storage accounts, you’ve disabled access from all networks and enabled the firewall to block internet traffic.
Now let’s break this diagram down.
Synapse workspace
 Synapse Workspace architecture
The virtual network created as part of the managed vNet workspace deployment. This vNet is managed by Microsoft and cannot be seen in the Azure portal’s resource list.
It contains the compute for the self-hosted integration runtime and the compute for the Synapse Dataflow.
Any spark pools will create virtual machines behind the scene. These will also be hosted inside the managed virtual network (vNet).
The Serverless SQL pool is a multi-tenant service and will not be physically deployed in the vNet but you can communicate with the service via private endpoints.
Same as the Serverless SQL pools, it’s a multi-tenant service and will not be physically deployed in the vNet but will communicate with the service via private endpoints.
Remember the two managed private endpoints created when you deployed your new Synapse workspace? This is why they’re created.
Synapse Studio
 Actual Synapse Workspace architecture
The workspace studio UI is a single page application (SPA) and is created as part of the Synapse workspace deployment.
Utilizing an Azure Synpase Link Hub, you’re able to create a private endpoint into the customer’s owned vNet.
Users can connect to the Studio UI using this private endpoint.
Executions like notebooks or SQL scripts made from the Studio web interface will submit commands via the DEV private endpoint and ran on the appropriate pool.
Note, the web app for the UI will not be visible and is managed by Microsoft
Storage Accounts and Synapse
 Storage Accounts Private Endpoints
For each workspace created, you will need to specify a storage account / file system with hierarchical name space enabled in order for Synapse to store its metadata.
When your storage account is configured to limit access to certain vNets, endpoints are needed to allow the connection and authentication. Similar to how Synapse needs private endpoints to communicate with the storage account, any external systems or people that need to read or write to the storage account will require a private endpoint.
Every storage accounts that you connect to your Synapse workspace via linked services will need a managed private endpoint like we mentioned previously. This applies to each service within the managed vNet.
Optional: You can use another storage account to store any logs or audits.
Note, logs and audits cannot use storage accounts with hierarchical namespace enabled. Hence the reason why we have 2 storage accounts in the diagram.
The SQL pools, which are multi-tenant services, talk to the Storage over public IPs but use trusted service based isolation. However, going over public IPs doesn’t mean data is going to the internet. Azure networking implements cold potato routing, so traffic stays on Azure backbone as long as the two entities communicating are on Azure. This can be configured within the storage account networking configuration.
 Storage Account Trusted MSI
Or can also be set during the Synapse workspace creation.
 Storage Account Trusted MSI
Definition: In commercial network routing between autonomous systems which are interconnected in multiple locations, hot-potato routing is the practice of passing traffic off to another autonomous system as quickly as possible, thus using their network for wide-area transit. Cold-potato routing is the opposite, where the originating autonomous system holds onto the packet until it is as near to the destination as possible.
Private endpoints in customer-owned vNet
Like I mentioned previously for the storage accounts, private endpoints need to be created in the customer’s vNet for the following:
- Dedicated SQL Pool
- Serverless SQL Pool
- Dev
Like you can see here:
 Private Endpoints created in the portal
Conclusion
Hope this helps clarifying some of the complexities of deploying a secured Synapse workspace and that you understand the nuances of each private endpoint.
The last piece of the puzzle that can cause issues would be authentication and access control.
I can’t recommend strongly enough that you go through this documentation which outlines all the steps you need to take.
How to set up access control for your Synapse workspace
Thanks!

by Scott Muniz | May 6, 2021 | Security
This article was originally posted by the FTC. See the original article here.
When you buy a new smartphone, computer, home appliance, or other product, you may not always think about whether it can be fixed if it breaks or has an issue. But here’s the thing: some manufacturers prevent you from fixing the things you buy. They might do things like gluing in batteries, limiting the availability of spare parts, and not giving you the repair instructions and software to help figure out the problem.
The FTC released a report today about repair restrictions and how they limit your ability to fix products that break. The report suggests what the FTC, lawmakers, and manufacturers can do to make it easier for you to fix the things that you own.
But there are some things that you can do yourself. Before you buy, do some research online to find out:
- What is the average lifespan of the product?
- What is likely to go wrong with it if it breaks?
- How hard will it be to fix the problem?
Here’s something else to know, in case you find yourself in this situation. Let’s say you took a product to an independent repair shop to fix or maintain it. Then later you go to the product’s manufacturer for a repair — but one not related to the earlier fix. If that repair is covered by your warranty, and if your warranty hasn’t expired, the manufacturer can’t refuse to make the repair.
If you’re told that your warranty was voided or that it will be voided because of independent repair, we want to hear about it. Report it to the FTC at ReportFraud.ftc.gov.
Brought to you by Dr. Ware, Microsoft Office 365 Silver Partner, Charleston SC.
by Scott Muniz | May 6, 2021 | Security, Technology
This article is contributed. See the original author and article here.
Cisco has released security updates to address vulnerabilities in multiple Cisco products. A remote attacker could exploit some of these vulnerabilities to take control of an affected system. For updates addressing lower severity vulnerabilities, see the Cisco Security Advisories page.
CISA encourages users and administrators to review the following Cisco advisories and apply the necessary updates:
• Cisco SD-WAN vManage Software Vulnerabilities cisco-sa-sd-wan-vmanage-4TbynnhZ
• Cisco HyperFlex HX Command Injection Vulnerabilities cisco-sa-hyperflex-rce-TjjNrkpR
• Cisco SD-WAN Software vDaemon Denial of Service Vulnerability cisco-sa-sdwan-dos-Ckn5cVqW
• Cisco SD-WAN vEdge Software Buffer Overflow Vulnerabilities cisco-sa-sdwan-buffover-MWGucjtO
• Cisco SD-WAN vManage Software Authentication Bypass Vulnerability cisco-sa-sdw-auth-bypass-65aYqcS2
• Cisco Small Business 100, 300, and 500 Series Wireless Access Points Vulnerabilities cisco-sa-sb-wap-multi-ZAfKGXhF
• Cisco Enterprise NFV Infrastructure Software Command Injection Vulnerability cisco-sa-nfvis-cmdinj-DkFjqg2j
• Cisco Unified Communications Manager IM & Presence Service SQL Injection Vulnerabilities cisco-sa-imp-inj-ereCOKjR
• Cisco AnyConnect Secure Mobility Client for Windows DLL and Executable Hijacking Vulnerabilities cisco-sa-anyconnect-code-exec-jR3tWTA6

by Contributed | May 6, 2021 | Technology
This article is contributed. See the original author and article here.
The is the first blog in a series to address long term advanced hunting capabilities using the streaming API. The primary focus will be data from Microsoft Defender for Endpoint, followed up later with posts on other data tables (i.e., Microsoft Defender for Office).
2020 saw one of the biggest supply-chain attacks in the industry (so far) with no entity immune to its effects. Over 6 months later, organizations continue to struggle with the impact of the breach – hampered by the lack the visibility and/or the retention of that data to fully eradicate the threat.
Fast-forward to 2021, customers filled some of the visibility gap with tools like an endpoint detection and response (EDR) solution. Assuming all EDR tools are all equal (they’re not), organizations could move data into a SIEM solution to extend retention and reap the traditional rewards (i.e., correlation, workflow, etc.). While this would appear to be good on paper, the reality is that keeping data for long periods of time in the SIEM is expensive.
Are there other options? Pushing data to cold storage or cheap cloud containers/blobs is a possible remedy, however what supply chain attacks have shown us is that we need a way for data to be available for hunting – data stored using these methods often require data to be hydrated before it is usable (i.e., querying) which often comes at a high operational cost. This hydration may also come over with caveats, the most prevalent one being that restored data and current data often resides on different platforms, requiring queries/IP to be re-written.
In summary, the most ideal solution would:
- Retain data for an organization’s required length of time.
- Make hydration quick, simple, scalable, and/or, always online.
- Reduce or eliminate the need for IP (queries, investigations, …) to be recreated.
The solution
Azure Data Explorer (ADX) offers a scalable and cost-effective platform for security teams to build their hunting platforms on. There are many methods to bring data to ADX but this post will be focused be the event-hub which offers terrific scalability and speed. Data from Microsoft 365 Defender (M365D – security.microsoft.com), Microsoft’s XDR solution, more specifically data from the EDR, Microsoft Defender For Endpoint (MDE – securitycenter.windows.com) will be sent to ADX to solve the aforementioned problems.
Solution architecture:
Using Microsoft Defender For Endpoint’s streaming API to an event-hub and Azure Data Explorer, security teams can have limitless query access to their data.
Questions and considerations:
- Q: Should I go from Sentinel/Azure Monitor to the event-hub (continuous export) or do I go straight to the event hub from source?
A: Continuous export currently only supports up to 10 tables and carries a cost (TBD). Consider going directly to the event-hub
IF detection and correlations are not important (if they are, go to Azure Sentinel) and cost/operational mitigation is paramount.
- Q: Are all tables supported in continuous export?
A: Not yet. The list of supported tables can be found here.
- Q: How long do I need to retain information for? How big should I make the event-hub? + + +
A: There are numerous resources to understand how to size and scale. Navigating through this document will help you at least understand how to bring data in so sizing can be done with the most accurate numbers.
Prior to starting, here are several “variables” which will be referred to. To eliminate effort around recreating queries, keep the table names the same.
- Raw table for import: XDRRaw
- Mapping for raw data: XDRRawMapping
- Event-hub resource ID: <myEHRID>
- Event-Hub name: <myEHName>
- Table names to be created:
- DeviceRegistryEvents
- DeviceFileCertificateInfo
- DeviceEvents
- DeviceImageLoadEvents
- DeviceLogonEvents
- DeviceFileEvents
- DeviceNetworkInfo
- DeviceProcessEvents
- DeviceInfo
- DeviceNetworkEvents
Step 1: Create the Event-hub
For your initial event-hub, leverage the defaults and follow the basic configuration. Remember to create the event-hub and not just the namespace. Record the values as previously mentioned – Event–hub resource ID and event-hub name.
Step 2: Enable the Streaming API in XDR/Microsoft Defender for Endpoint to Send Data to the Event-hub
Using the previously noted event-hub resource ID and name and follow the documentation to get data into the event-hub. Verify the event-hub has been created in the event-hub namespace.
 Create the event-hub namespace AND the event-hub. Record the resource ID of the namespace and name of the event-hub for use when creating the streaming API.
Step 3: Create the ADX Cluster
As with the event-hub, ADX clusters are very configurable after-the-fact and a guide is available for a simple configuration.
Step 4: Create a Data Connection to Microsoft Defender for Endpoint
Prior to creating the data connection, a staging table and mapping need to be configured. Navigate to the previously created database and select Query or from the cluster, select query, and make sure your database is highlighted.
Use the code below into the query area to create the RAW table with name XDRRaw:
//Create the staging table (use the above RAW table name)
.create table XDRRaw (Raw: dynamic)
The following will create the mapping with name XDRRawMapping:
//Pull the elements into the first column so we can parse them (use the above RAW Mapping Name)
.create table XDRRaw ingestion json mapping 'XDRRawMapping' '[{"column":"Raw","path":"$","datatype":"dynamic","transform":null}]'
With the RAW staging table and mapping function created, navigate to the database, and create a new data connection in the “Data Ingestion” setting under “Settings”. It should look as follows:
 Create a data connection only after you have created the RAW table and the mapping.
NOTE: THE XDR/Microsoft Defender for Endpoint streaming API supplies multiple tables of data so using MULTILINE JSON is the data format.
If all permissions are correct, the data connection should create without issue… Congratulations! Query the RAW table to review the data sources coming in from the service with the following query:
//Here’s a list of the tables you’re going to have to migrate
XDRRaw
| mv-expand Raw.records
| project Properties=Raw_records.properties, Category=Raw_records.category
| summarize by tostring(Category)
NOTE: Be patient! ADX has a ingests in batches every 5 minutes (default) but can be configured lower however it is advised to keep the default value as lower values may result in increased latency. For more information about the batching policy, see IngestionBatching policy.
Step 4: Ingest Specified Tables
The Microsoft Defender for Endpoint data stream enables teams to pick one, some, or all tables to be exported. Copy and run the queries below (one at a time in each code block) based on which tables are being pushed to the event-hub.
DeviceEvents
//Create the parsing function
.create function with (docstring = "Filters data for Device Events for ingestion from XDRRaw", folder = "UpdatePolicies") XDRFilterDeviceEvents()
{
XDRRaw
 | mv-expand Raw.records
 | project Properties=Raw_records.properties, Category=Raw_records.category
 | where Category == "AdvancedHunting-DeviceEvents"
 | project
TenantId = tostring(Properties.TenantId),AccountDomain = tostring(Properties.AccountDomain),AccountName = tostring(Properties.AccountName),AccountSid = tostring(Properties.AccountSid),ActionType = tostring(Properties.ActionType),AdditionalFields = tostring(Properties.AdditionalFields),AppGuardContainerId = tostring(Properties.AppGuardContainerId),DeviceId = tostring(Properties.DeviceId),DeviceName = tostring(Properties.DeviceName),FileName = tostring(Properties.FileName),FileOriginIP = tostring(Properties.FileOriginIP),FileOriginUrl = tostring(Properties.FileOriginUrl),FolderPath = tostring(Properties.FolderPath),InitiatingProcessAccountDomain = tostring(Properties.InitiatingProcessAccountDomain),InitiatingProcessAccountName = tostring(Properties.InitiatingProcessAccountName),InitiatingProcessAccountObjectId = tostring(Properties.InitiatingProcessAccountObjectId),InitiatingProcessAccountSid = tostring(Properties.InitiatingProcessAccountSid),InitiatingProcessAccountUpn = tostring(Properties.InitiatingProcessAccountUpn),InitiatingProcessCommandLine = tostring(Properties.InitiatingProcessCommandLine),InitiatingProcessFileName = tostring(Properties.InitiatingProcessFileName),InitiatingProcessFolderPath = tostring(Properties.InitiatingProcessFolderPath),InitiatingProcessId = tostring(Properties.InitiatingProcessId),InitiatingProcessLogonId = tostring(Properties.InitiatingProcessLogonId),InitiatingProcessMD5 = tostring(Properties.InitiatingProcessMD5),InitiatingProcessParentFileName = tostring(Properties.InitiatingProcessParentFileName),InitiatingProcessParentId = tostring(Properties.InitiatingProcessParentId),InitiatingProcessSHA1 = tostring(Properties.InitiatingProcessSHA1),InitiatingProcessSHA256 = tostring(Properties.InitiatingProcessSHA256),LocalIP = tostring(Properties.LocalIP),LocalPort = tostring(Properties.LocalPort),LogonId = tostring(Properties.LogonId),MD5 = tostring(Properties.MD5),MachineGroup = tostring(Properties.MachineGroup),ProcessCommandLine = tostring(Properties.ProcessCommandLine),ProcessId = tostring(Properties.ProcessId),ProcessTokenElevation = tostring(Properties.ProcessTokenElevation),RegistryKey = tostring(Properties.RegistryKey),RegistryValueData = tostring(Properties.RegistryValueData),RegistryValueName = tostring(Properties.RegistryValueName),RemoteDeviceName = tostring(Properties.RemoteDeviceName),RemoteIP = tostring(Properties.RemoteIP),RemotePort = tostring(Properties.RemotePort),RemoteUrl = tostring(Properties.RemoteUrl),ReportId = tostring(Properties.ReportId),SHA1 = tostring(Properties.SHA1),SHA256 = tostring(Properties.SHA256),TimeGenerated = todatetime(Properties.Timestamp),Timestamp = todatetime(Properties.Timestamp),SourceSystem = tostring(Properties.SourceSystem),Type = tostring(Properties.Type), customerName = tostring(Properties.Customername)
}

//Create the table for DeviceEvents
.set-or-append DeviceEvents <| XDRFilterDeviceEvents()

//Set to autoupdate
.alter table DeviceEvents policy update
@'[{"IsEnabled": true, "Source": "XDRRaw", "Query": "XDRFilterDeviceEvents()", "IsTransactional": true, "PropagateIngestionProperties": true}]'
DeviceFileEvents
//Create the parsing function
.create function with (docstring = "Filters data for DeviceFileEvents for ingestion from XDRRaw", folder = "UpdatePolicies") XDRFilterDeviceFileEvents()
{
XDRRaw
 | mv-expand Raw.records
 | project Properties=Raw_records.properties, Category=Raw_records.category
 | where Category == "AdvancedHunting-DeviceFileEvents"
 | project
TenantId = tostring(Properties.TenantId),ActionType = tostring(Properties.ActionType),AdditionalFields = tostring(Properties.AdditionalFields),AppGuardContainerId = tostring(Properties.AppGuardContainerId),DeviceId = tostring(Properties.DeviceId),DeviceName = tostring(Properties.DeviceName),FileName = tostring(Properties.FileName),FileOriginIP = tostring(Properties.FileOriginIP),FileOriginReferrerUrl = tostring(Properties.FileOriginReferrerUrl),FileOriginUrl = tostring(Properties.FileOriginUrl),FileSize = tostring(Properties.FileSize),FolderPath = tostring(Properties.FolderPath),InitiatingProcessAccountDomain = tostring(Properties.InitiatingProcessAccountDomain),InitiatingProcessAccountName = tostring(Properties.InitiatingProcessAccountName),InitiatingProcessAccountObjectId = tostring(Properties.InitiatingProcessAccountObjectId),InitiatingProcessAccountSid = tostring(Properties.InitiatingProcessAccountSid),InitiatingProcessAccountUpn = tostring(Properties.InitiatingProcessAccountUpn),InitiatingProcessCommandLine = tostring(Properties.InitiatingProcessCommandLine),InitiatingProcessFileName = tostring(Properties.InitiatingProcessFileName),InitiatingProcessFolderPath = tostring(Properties.InitiatingProcessFolderPath),InitiatingProcessId = tostring(Properties.InitiatingProcessId),InitiatingProcessIntegrityLevel = tostring(Properties.InitiatingProcessIntegrityLevel),InitiatingProcessMD5 = tostring(Properties.InitiatingProcessMD5),InitiatingProcessParentFileName = tostring(Properties.InitiatingProcessParentFileName),InitiatingProcessParentId = tostring(Properties.InitiatingProcessParentId),InitiatingProcessSHA1 = tostring(Properties.InitiatingProcessSHA1),InitiatingProcessSHA256 = tostring(Properties.InitiatingProcessSHA256),InitiatingProcessTokenElevation = tostring(Properties.InitiatingProcessTokenElevation),IsAzureInfoProtectionApplied = tostring(Properties.IsAzureInfoProtectionApplied),MD5 = tostring(Properties.MD5),MachineGroup = tostring(Properties.MachineGroup),PreviousFileName = tostring(Properties.PreviousFileName),PreviousFolderPath = tostring(Properties.PreviousFolderPath),ReportId = tostring(Properties.ReportId),RequestAccountDomain = tostring(Properties.RequestAccountDomain),RequestAccountName = tostring(Properties.RequestAccountName),RequestAccountSid = tostring(Properties.RequestAccountSid),RequestProtocol = tostring(Properties.RequestProtocol),RequestSourceIP = tostring(Properties.RequestSourceIP),RequestSourcePort = tostring(Properties.RequestSourcePort),SHA1 = tostring(Properties.SHA1),SHA256 = tostring(Properties.SHA256),SensitivityLabel = tostring(Properties.SensitivityLabel),SensitivitySubLabel = tostring(Properties.SensitivitySubLabel),ShareName = tostring(Properties.ShareName),TimeGenerated =todatetime(Properties.Timestamp),Timestamp = todatetime(Properties.Timestamp),InitiatingProcessParentCreationTime = todatetime(Properties.InitiatingProcessParentCreationTime),InitiatingProcessCreationTime = todatetime(Properties.InitiatingProcessCreationTime),SourceSystem = tostring(Properties.SourceSystem),Type = tostring(Properties.Type)
}

//create table
.set-or-append DeviceFileEvents <| XDRFilterDeviceFileEvents()

//Set to autoupdate
.alter table DeviceFileEvents policy update
@'[{"IsEnabled": true, "Source": "XDRRaw", "Query": "XDRFilterDeviceFileEvents()", "IsTransactional": true, "PropagateIngestionProperties": true}]'
DeviceLogonEvents
//Create the parsing function
.create function with (docstring = "Filters data for DeviceLogonEvents for ingestion from XDRRaw", folder = "UpdatePolicies") XDRFilterDeviceLogonEvents()
{
XDRRaw
 | mv-expand Raw.records
 | project Properties=Raw_records.properties, Category=Raw_records.category
 | where Category == "AdvancedHunting-DeviceLogonEvents"
 | project
TenantId = tostring(Properties.TenantId),AccountDomain = tostring(Properties.AccountDomain),AccountName = tostring(Properties.AccountName),AccountSid = tostring(Properties.AccountSid),ActionType = tostring(Properties.ActionType),AdditionalFields = tostring(Properties.AdditionalFields),AppGuardContainerId = tostring(Properties.AppGuardContainerId),DeviceId = tostring(Properties.DeviceId),DeviceName = tostring(Properties.DeviceName),FailureReason = tostring(Properties.FailureReason),InitiatingProcessAccountDomain = tostring(Properties.InitiatingProcessAccountDomain),InitiatingProcessAccountName = tostring(Properties.InitiatingProcessAccountName),InitiatingProcessAccountObjectId = tostring(Properties.InitiatingProcessAccountObjectId),InitiatingProcessAccountSid = tostring(Properties.InitiatingProcessAccountSid),InitiatingProcessAccountUpn = tostring(Properties.InitiatingProcessAccountUpn),InitiatingProcessCommandLine = tostring(Properties.InitiatingProcessCommandLine),InitiatingProcessFileName = tostring(Properties.InitiatingProcessFileName),InitiatingProcessFolderPath = tostring(Properties.InitiatingProcessFolderPath),InitiatingProcessId = tostring(Properties.InitiatingProcessId),InitiatingProcessIntegrityLevel = tostring(Properties.InitiatingProcessIntegrityLevel),InitiatingProcessMD5 = tostring(Properties.InitiatingProcessMD5),InitiatingProcessParentFileName = tostring(Properties.InitiatingProcessParentFileName),InitiatingProcessParentId = tostring(Properties.InitiatingProcessParentId),InitiatingProcessSHA1 = tostring(Properties.InitiatingProcessSHA1),InitiatingProcessSHA256 = tostring(Properties.InitiatingProcessSHA256),InitiatingProcessTokenElevation = tostring(Properties.InitiatingProcessTokenElevation),IsLocalAdmin = tostring(Properties.IsLocalAdmin),LogonId = tostring(Properties.LogonId),LogonType = tostring(Properties.LogonType),MachineGroup = tostring(Properties.MachineGroup),Protocol = tostring(Properties.Protocol),RemoteDeviceName = tostring(Properties.RemoteDeviceName),RemoteIP = tostring(Properties.RemoteIP),RemoteIPType = tostring(Properties.RemoteIPType),RemotePort = tostring(Properties.RemotePort),ReportId = tostring(Properties.ReportId),TimeGenerated = todatetime(Properties.Timestamp),Timestamp = todatetime(Properties.Timestamp),InitiatingProcessParentCreationTime = todatetime(Properties.InitiatingProcessParentCreationTime),InitiatingProcessCreationTime = todatetime(Properties.InitiatingProcessCreationTime),SourceSystem = tostring(Properties.SourceSystem),Type = tostring(Properties.Type)
}

//create table
.set-or-append DeviceLogonEvents <| XDRFilterDeviceLogonEvents()

//Set to autoupdate
.alter table DeviceLogonEvents policy update
@'[{"IsEnabled": true, "Source": "XDRRaw", "Query": "XDRFilterDeviceLogonEvents()", "IsTransactional": true, "PropagateIngestionProperties": true}]'
DeviceRegistryEvents
//Create the parsing function
.create function with (docstring = "Filters data for DeviceRegistryEvents for ingestion from XDRRaw", folder = "UpdatePolicies") XDRFilterDeviceRegistryEvents()
{
XDRRaw
 | mv-expand Raw.records
 | project Properties=Raw_records.properties, Category=Raw_records.category
 | where Category == "AdvancedHunting-DeviceRegistryEvents"
 | project
TenantId = tostring(Properties.TenantId),ActionType = tostring(Properties.ActionType),AppGuardContainerId = tostring(Properties.AppGuardContainerId),DeviceId = tostring(Properties.DeviceId),DeviceName = tostring(Properties.DeviceName),InitiatingProcessAccountDomain = tostring(Properties.InitiatingProcessAccountDomain),InitiatingProcessAccountName = tostring(Properties.InitiatingProcessAccountName),InitiatingProcessAccountObjectId = tostring(Properties.InitiatingProcessAccountObjectId),InitiatingProcessAccountSid = tostring(Properties.InitiatingProcessAccountSid),InitiatingProcessAccountUpn = tostring(Properties.InitiatingProcessAccountUpn),InitiatingProcessCommandLine = tostring(Properties.InitiatingProcessCommandLine),InitiatingProcessFileName = tostring(Properties.InitiatingProcessFileName),InitiatingProcessFolderPath = tostring(Properties.InitiatingProcessFolderPath),InitiatingProcessId = tostring(Properties.InitiatingProcessId),InitiatingProcessIntegrityLevel = tostring(Properties.InitiatingProcessIntegrityLevel),InitiatingProcessMD5 = tostring(Properties.InitiatingProcessMD5),InitiatingProcessParentFileName = tostring(Properties.InitiatingProcessParentFileName),InitiatingProcessParentId = tostring(Properties.InitiatingProcessParentId),InitiatingProcessSHA1 = tostring(Properties.InitiatingProcessSHA1),InitiatingProcessSHA256 = tostring(Properties.InitiatingProcessSHA256),InitiatingProcessTokenElevation = tostring(Properties.InitiatingProcessTokenElevation),MachineGroup = tostring(Properties.MachineGroup),PreviousRegistryKey = tostring(Properties.PreviousRegistryKey),PreviousRegistryValueData = tostring(Properties.PreviousRegistryValueData),PreviousRegistryValueName = tostring(Properties.PreviousRegistryValueName),RegistryKey = tostring(Properties.RegistryKey),RegistryValueData = tostring(Properties.RegistryValueData),RegistryValueName = tostring(Properties.RegistryValueName),RegistryValueType = tostring(Properties.RegistryValueType),ReportId = tostring(Properties.ReportId),TimeGenerated = todatetime(Properties.Timestamp),Timestamp = todatetime(Properties.Timestamp),InitiatingProcessParentCreationTime = todatetime(Properties.InitiatingProcessParentCreationTime),InitiatingProcessCreationTime = todatetime(Properties.InitiatingProcessCreationTime),SourceSystem = tostring(Properties.SourceSystem),Type = tostring(Properties.Type)
}

//create table
.set-or-append DeviceRegistryEvents <| XDRFilterDeviceRegistryEvents()

//Set to autoupdate
.alter table DeviceRegistryEvents policy update
@'[{"IsEnabled": true, "Source": "XDRRaw", "Query": "XDRFilterDeviceRegistryEvents()", "IsTransactional": true, "PropagateIngestionProperties": true}]'
DeviceImageLoadEvents
//Create the parsing function
.create function with (docstring = "Filters data for DeviceImageLoadEvents for ingestion from XDRRaw", folder = "UpdatePolicies") XDRFilterDeviceImageLoadEvents()
{
XDRRaw
 | mv-expand Raw.records
 | project Properties=Raw_records.properties, Category=Raw_records.category
 | where Category == "AdvancedHunting-DeviceImageLoadEvents"
 | project
TenantId = tostring(Properties.TenantId),ActionType = tostring(Properties.ActionType),AppGuardContainerId = tostring(Properties.AppGuardContainerId),DeviceId = tostring(Properties.DeviceId),DeviceName = tostring(Properties.DeviceName),FileName = tostring(Properties.FileName),FolderPath = tostring(Properties.FolderPath),InitiatingProcessAccountDomain = tostring(Properties.InitiatingProcessAccountDomain),InitiatingProcessAccountName = tostring(Properties.InitiatingProcessAccountName),InitiatingProcessAccountObjectId = tostring(Properties.InitiatingProcessAccountObjectId),InitiatingProcessAccountSid = tostring(Properties.InitiatingProcessAccountSid),InitiatingProcessAccountUpn = tostring(Properties.InitiatingProcessAccountUpn),InitiatingProcessCommandLine = tostring(Properties.InitiatingProcessCommandLine),InitiatingProcessFileName = tostring(Properties.InitiatingProcessFileName),InitiatingProcessFolderPath = tostring(Properties.InitiatingProcessFolderPath),InitiatingProcessId = tostring(Properties.InitiatingProcessId),InitiatingProcessIntegrityLevel = tostring(Properties.InitiatingProcessIntegrityLevel),InitiatingProcessMD5 = tostring(Properties.InitiatingProcessMD5),InitiatingProcessParentFileName = tostring(Properties.InitiatingProcessParentFileName),InitiatingProcessParentId = tostring(Properties.InitiatingProcessParentId),InitiatingProcessSHA1 = tostring(Properties.InitiatingProcessSHA1),InitiatingProcessSHA256 = tostring(Properties.InitiatingProcessSHA256),InitiatingProcessTokenElevation = tostring(Properties.InitiatingProcessTokenElevation),MD5 = tostring(Properties.MD5),MachineGroup = tostring(Properties.MachineGroup),ReportId = tostring(Properties.ReportId),SHA1 = tostring(Properties.SHA1),SHA256 = tostring(Properties.SHA256),TimeGenerated = todatetime(Properties.Timestamp),Timestamp = todatetime(Properties.Timestamp),InitiatingProcessParentCreationTime = todatetime(Properties.InitiatingProcessParentCreationTime),InitiatingProcessCreationTime = todatetime(Properties.InitiatingProcessCreationTime),SourceSystem = tostring(Properties.SourceSystem),Type = tostring(Properties.Type)
}

//create table
.set-or-append DeviceImageLoadEvents <| XDRFilterDeviceImageLoadEvents()

//Set to autoupdate
.alter table DeviceImageLoadEvents policy update
@'[{"IsEnabled": true, "Source": "XDRRaw", "Query": "XDRFilterDeviceImageLoadEvents()", "IsTransactional": true, "PropagateIngestionProperties": true}]'
DeviceNetworkInfo
//Create the parsing function
.create function with (docstring = "Filters data for DeviceNetworkInfo for ingestion from XDRRaw", folder = "UpdatePolicies") XDRFilterDeviceNetworkInfo()
{
XDRRaw
 | mv-expand Raw.records
 | project Properties=Raw_records.properties, Category=Raw_records.category
 | where Category == "AdvancedHunting-DeviceNetworkInfo"
 | project
TenantId = tostring(Properties.TenantId),ConnectedNetworks = tostring(Properties.ConnectedNetworks),DefaultGateways = tostring(Properties.DefaultGateways),DeviceId = tostring(Properties.DeviceId),DeviceName = tostring(Properties.DeviceName),DnsAddresses = tostring(Properties.DnsAddresses),IPAddresses = tostring(Properties.IPAddresses),IPv4Dhcp = tostring(Properties.IPv4Dhcp),IPv6Dhcp = tostring(Properties.IPv6Dhcp),MacAddress = tostring(Properties.MacAddress),MachineGroup = tostring(Properties.MachineGroup),NetworkAdapterName = tostring(Properties.NetworkAdapterName),NetworkAdapterStatus = tostring(Properties.NetworkAdapterStatus),NetworkAdapterType = tostring(Properties.NetworkAdapterType),ReportId = tostring(Properties.ReportId),TimeGenerated = todatetime(Properties.Timestamp),Timestamp = todatetime(Properties.Timestamp),TunnelType = tostring(Properties.TunnelType),SourceSystem = tostring(Properties.SourceSystem),Type = tostring(Properties.Type)
}

//create table
.set-or-append DeviceNetworkInfo <| XDRFilterDeviceNetworkInfo()

//Set to autoupdate
.alter table DeviceNetworkInfo policy update
@'[{"IsEnabled": true, "Source": "XDRRaw", "Query": "XDRFilterDeviceNetworkInfo()", "IsTransactional": true, "PropagateIngestionProperties": true}]'
DeviceProcessEvents
//Create the parsing function
.create function with (docstring = "Filters data for DeviceProcessEvents for ingestion from XDRRaw", folder = "UpdatePolicies") XDRFilterDeviceProcessEvents()
{
XDRRaw
 | mv-expand Raw.records
 | project Properties=Raw_records.properties, Category=Raw_records.category
 | where Category == "AdvancedHunting-DeviceProcessEvents"
 | project
TenantId = tostring(Properties.TenantId),AccountDomain = tostring(Properties.AccountDomain),AccountName = tostring(Properties.AccountName),AccountObjectId = tostring(Properties.AccountObjectId),AccountSid = tostring(Properties.AccountSid),AccountUpn= tostring(Properties.AccountUpn),ActionType = tostring(Properties.ActionType),AdditionalFields = tostring(Properties.AdditionalFields),AppGuardContainerId = tostring(Properties.AppGuardContainerId),DeviceId = tostring(Properties.DeviceId),DeviceName = tostring(Properties.DeviceName),FileName = tostring(Properties.FileName),FolderPath = tostring(Properties.FolderPath),InitiatingProcessAccountDomain = tostring(Properties.InitiatingProcessAccountDomain),InitiatingProcessAccountName = tostring(Properties.InitiatingProcessAccountName),InitiatingProcessAccountObjectId = tostring(Properties.InitiatingProcessAccountObjectId),InitiatingProcessAccountSid = tostring(Properties.InitiatingProcessAccountSid),InitiatingProcessAccountUpn = tostring(Properties.InitiatingProcessAccountUpn),InitiatingProcessCommandLine = tostring(Properties.InitiatingProcessCommandLine),InitiatingProcessFileName = tostring(Properties.InitiatingProcessFileName),InitiatingProcessFolderPath = tostring(Properties.InitiatingProcessFolderPath),InitiatingProcessId = tostring(Properties.InitiatingProcessId),InitiatingProcessIntegrityLevel = tostring(Properties.InitiatingProcessIntegrityLevel),InitiatingProcessLogonId = tostring(Properties.InitiatingProcessLogonId),InitiatingProcessMD5 = tostring(Properties.InitiatingProcessMD5),InitiatingProcessParentFileName = tostring(Properties.InitiatingProcessParentFileName),InitiatingProcessParentId = tostring(Properties.InitiatingProcessParentId),InitiatingProcessSHA1 = tostring(Properties.InitiatingProcessSHA1),InitiatingProcessSHA256 = tostring(Properties.InitiatingProcessSHA256),InitiatingProcessTokenElevation = tostring(Properties.InitiatingProcessTokenElevation),LogonId = tostring(Properties.LogonId),MD5 = tostring(Properties.MD5),MachineGroup = tostring(Properties.MachineGroup),ProcessCommandLine = tostring(Properties.ProcessCommandLine),ProcessCreationTime = todatetime(Properties.ProcessCreationTime),ProcessId = tostring(Properties.ProcessId),ProcessIntegrityLevel = tostring(Properties.ProcessIntegrityLevel),ProcessTokenElevation = tostring(Properties.ProcessTokenElevation),ReportId = tostring(Properties.ReportId),SHA1 = tostring(Properties.SHA1),SHA256 = tostring(Properties.SHA256),TimeGenerated = todatetime(Properties.Timestamp),Timestamp = todatetime(Properties.Timestamp),InitiatingProcessParentCreationTime = todatetime(Properties.InitiatingProcessParentCreationTime),InitiatingProcessCreationTime = todatetime(Properties.InitiatingProcessCreationTime),SourceSystem = tostring(Properties.SourceSystem),Type = tostring(Properties.Type)
}

//create table
.set-or-append DeviceProcessEvents <| XDRFilterDeviceProcessEvents()

//Set to autoupdate
.alter table DeviceProcessEvents policy update
@'[{"IsEnabled": true, "Source": "XDRRaw", "Query": "XDRFilterDeviceProcessEvents()", "IsTransactional": true, "PropagateIngestionProperties": true}]'
DeviceFileCertificateInfo
//Create the parsing function
.create function with (docstring = "Filters data for DeviceFileCertificateInfo for ingestion from XDRRaw", folder = "UpdatePolicies") XDRFilterDeviceFileCertificateInfo()
{
XDRRaw
 | mv-expand Raw.records
 | project Properties=Raw_records.properties, Category=Raw_records.category
 | where Category == "AdvancedHunting-DeviceFileCertificateInfo"
 | project
TenantId = tostring(Properties.TenantId),CertificateSerialNumber = tostring(Properties.CertificateSerialNumber),CrlDistributionPointUrls = tostring(Properties.CrlDistributionPointUrls),DeviceId = tostring(Properties.DeviceId),DeviceName = tostring(Properties.DeviceName),IsRootSignerMicrosoft = tostring(Properties.IsRootSignerMicrosoft),IsSigned = tostring(Properties.IsSigned),IsTrusted = tostring(Properties.IsTrusted),Issuer = tostring(Properties.Issuer),IssuerHash = tostring(Properties.IssuerHash),MachineGroup = tostring(Properties.MachineGroup),ReportId = tostring(Properties.ReportId),SHA1 = tostring(Properties.SHA1),SignatureType = tostring(Properties.SignatureType),Signer = tostring(Properties.Signer),SignerHash = tostring(Properties.SignerHash),TimeGenerated = todatetime(Properties.Timestamp),Timestamp = todatetime(Properties.Timestamp),CertificateCountersignatureTime = todatetime(Properties.CertificateCountersignatureTime),CertificateCreationTime = todatetime(Properties.CertificateCreationTime),CertificateExpirationTime = todatetime(Properties.CertificateExpirationTime),SourceSystem = tostring(Properties.SourceSystem),Type = tostring(Properties.Type)
}

//create table
.set-or-append DeviceFileCertificateInfo <| XDRFilterDeviceFileCertificateInfo()

//Set to autoupdate
.alter table DeviceFileCertificateInfo policy update
@'[{"IsEnabled": true, "Source": "XDRRaw", "Query": "XDRFilterDeviceFileCertificateInfo()", "IsTransactional": true, "PropagateIngestionProperties": true}]'
DeviceInfo
//Create the parsing function
.create function with (docstring = "Filters data for DeviceInfo for ingestion from XDRRaw", folder = "UpdatePolicies") XDRFilterDeviceInfo()
{
XDRRaw
 | mv-expand Raw.records
 | project Properties=Raw_records.properties, Category=Raw_records.category
 | where Category == "AdvancedHunting-DeviceInfo"
 | project
TenantId = tostring(Properties.TenantId),AdditionalFields = tostring(Properties.AdditionalFields),ClientVersion = tostring(Properties.ClientVersion),DeviceId = tostring(Properties.DeviceId),DeviceName = tostring(Properties.DeviceName),DeviceObjectId= tostring(Properties.DeviceObjectId),IsAzureADJoined = tostring(Properties.IsAzureADJoined),LoggedOnUsers = tostring(Properties.LoggedOnUsers),MachineGroup = tostring(Properties.MachineGroup),OSArchitecture = tostring(Properties.OSArchitecture),OSBuild = tostring(Properties.OSBuild),OSPlatform = tostring(Properties.OSPlatform),OSVersion = tostring(Properties.OSVersion),PublicIP = tostring(Properties.PublicIP),RegistryDeviceTag = tostring(Properties.RegistryDeviceTag),ReportId = tostring(Properties.ReportId),TimeGenerated = todatetime(Properties.Timestamp),SourceSystem = tostring(Properties.SourceSystem),Type = tostring(Properties.Type)
}

//create table
.set-or-append DeviceInfo <| XDRFilterDeviceInfo()

//Set to autoupdate
.alter table DeviceInfo policy update
@'[{"IsEnabled": true, "Source": "XDRRaw", "Query": "XDRFilterDeviceInfo()", "IsTransactional": true, "PropagateIngestionProperties": true}]'
DeviceNetworkEvents
//Create the parsing function
.create function with (docstring = "Filters data for DeviceNetworkEvents for ingestion from XDRRaw", folder = "UpdatePolicies") XDRFilterDeviceNetworkEvents()
{
XDRRaw
 | mv-expand Raw.records
 | project Properties=Raw_records.properties, Category=Raw_records.category
 | where Category == "AdvancedHunting-DeviceNetworkEvents"
 | project
TenantId = tostring(Properties.TenantId),ActionType = tostring(Properties.ActionType),AdditionalFields = tostring(Properties.AdditionalFields),AppGuardContainerId = tostring(Properties.AppGuardContainerId),DeviceId = tostring(Properties.DeviceId),DeviceName = tostring(Properties.DeviceName),InitiatingProcessAccountDomain = tostring(Properties.InitiatingProcessAccountDomain),InitiatingProcessAccountName = tostring(Properties.InitiatingProcessAccountName),InitiatingProcessAccountObjectId = tostring(Properties.InitiatingProcessAccountObjectId),InitiatingProcessAccountSid = tostring(Properties.InitiatingProcessAccountSid),InitiatingProcessAccountUpn = tostring(Properties.InitiatingProcessAccountUpn),InitiatingProcessCommandLine= tostring(Properties.InitiatingProcessCommandLine),InitiatingProcessFileName = tostring(Properties.InitiatingProcessFileName),InitiatingProcessFolderPath = tostring(Properties.InitiatingProcessFolderPath),InitiatingProcessId = tostring(Properties.InitiatingProcessId),InitiatingProcessIntegrityLevel = tostring(Properties.InitiatingProcessIntegrityLevel),InitiatingProcessMD5 = tostring(Properties.InitiatingProcessMD5),InitiatingProcessParentFileName = tostring(Properties.InitiatingProcessParentFileName),InitiatingProcessParentId = tostring(Properties.InitiatingProcessParentId),InitiatingProcessSHA1 = tostring(Properties.InitiatingProcessSHA1),InitiatingProcessSHA256 = tostring(Properties.InitiatingProcessSHA256),InitiatingProcessTokenElevation = tostring(Properties.InitiatingProcessTokenElevation),LocalIP = tostring(Properties.LocalIP),LocalIPType = tostring(Properties.LocalIPType),LocalPort = tostring(Properties.LocalPort),MachineGroup = tostring(Properties.MachineGroup),Protocol = tostring(Properties.Protocol),RemoteIP = tostring(Properties.RemoteIP),RemoteIPType = tostring(Properties.RemoteIPType),RemotePort = tostring(Properties.RemotePort),RemoteUrl = tostring(Properties.RemoteUrl),ReportId = tostring(Properties.ReportId),TimeGenerated = todatetime(Properties.Timestamp),Timestamp = todatetime(Properties.Timestamp),InitiatingProcessParentCreationTime = todatetime(Properties.InitiatingProcessParentCreationTime),InitiatingProcessCreationTime = todatetime(Properties.InitiatingProcessCreationTime),SourceSystem = tostring(Properties.SourceSystem),Type = tostring(Properties.Type)
}

//create table
.set-or-append DeviceNetworkEvents <| XDRFilterDeviceNetworkEvents()

//Set to autoupdate
.alter table DeviceNetworkEvents policy update
@'[{"IsEnabled": true, "Source": "XDRRaw", "Query": "XDRFilterDeviceNetworkEvents()", "IsTransactional": true, "PropagateIngestionProperties": true}]'
Step 5: Review Benefits
With data flowing through, select any device query from the security.microsoft.com/securitycenter.windows.com portal and run it, “word for word” in the ADX portal. As an example, the following query shows devices creating a PNP device call:
DeviceEvents
| where ActionType == "PnpDeviceConnected"
| extend parsed=parse_json(AdditionalFields)
| project className=parsed.ClassName, description=parsed.DeviceDescription, parsed.DeviceId, DeviceName
In addition to being to reuse queries, if you are also using Azure Sentinel and have XDR/Microsoft Defender for Endpoint data connected, try the following:
- Navigate to your ADX cluster and get copy the scope. It will be formatted as <clusterName>.<region>/<databaseName>:
 Retrieve the ADX scope for external use from Azure Sentinel.NOTE: Unlike queries in XDR/Microsoft Defender for Endpoint and Sentinel/Log Analytics, queries in ADX do NOT have a default time filter. Queries run without filters will query the entire database and likely impact performance.
- Navigate to an Azure Sentinel instance and place the query together with the adx() operator:
adx("###ADXSCOPE###").DeviceEvents
| where ActionType == "PnpDeviceConnected"
| extend parsed=parse_json(AdditionalFields)
| project className=parsed.ClassName, description=parsed.DeviceDescription, parsed.DeviceId, DeviceName
For example:

NOTE: As the ADX operator is external, auto-complete will not work.
Notice the query will complete completely but not with Azure Sentinel resources but rather the resources in ADX! (This operator is not available in Analytics rules though)
Summary
Using the XDR/Microsoft Defender for Endpoint streaming API and Azure Data Explorer (ADX), teams can very easily achieve terrific scalability on long term, investigative hunting, and forensics. Cost continues to be another key benefit as well as the ability to reuse IP/queries.
For organizations looking to expand their EDR signal and do auto correlation with 3rd party data sources, consider leveraging Azure Sentinel, where there are a number of 1st and 3rd party data connectors which enable rich context to added to existing XDR/Microsoft Defender for Endpoint data. An example of these enhancements can be found at https://aka.ms/SentinelFusion.
Additional information and references:
Special thanks to @Beth_Bischoff, @Javier Soriano, @Deepak Agrawal, @Uri Barash, and @Steve Newby for their insights and time into this post.
by Contributed | May 6, 2021 | Technology
This article is contributed. See the original author and article here.
2020 saw one of the biggest supply-chain attacks in the industry (so far) with no entity immune to its effects. Over 6 months later, organizations continue to struggle with the impact of the breach – hampered by the lack the visibility and/or the retention of that data to fully eradicate the threat.
Fast-forward to 2021, customers filled some of the visibility gap with tools like an endpoint detection and response (EDR) solution. Assuming all EDR tools are all equal (they’re not), organizations could move data into a SIEM solution to extend retention and reap the traditional rewards (i.e., correlation, workflow, etc.). While this would appear to be good on paper, the reality is that keeping data for long periods of time in the SIEM is expensive.
Are there other options? Pushing data to cold storage or cheap cloud containers/blobs is a possible remedy, however what supply chain attacks have shown us is that we need a way for data to be available for hunting – data stored using these methods often require data to be hydrated before it is usable (i.e., querying) which often comes at a high operational cost. This hydration may also come over with caveats, the most prevalent one being that restored data and current data often resides on different platforms, requiring queries/IP to be re-written.
In summary, the most ideal solution would:
- Retain data for an organization’s required length of time.
- Make hydration quick, simple, scalable, and/or, always online.
- Reduce or eliminate the need for IP (queries, investigations, …) to be recreated.
The solution
Azure Data Explorer (ADX) offers a scalable and cost-effective platform for security teams to build their hunting platforms on. There are many methods to bring data to ADX but this post will be focused be the event-hub which offers terrific scalability and speed. Data from Microsoft 365 Defender (M365D – security.microsoft.com), Microsoft’s XDR solution, more specifically data from the EDR, Microsoft Defender For Endpoint (MDE – securitycenter.windows.com) will be sent to ADX to solve the aforementioned problems.
Solution architecture:
Using Microsoft Defender For Endpoint’s streaming API to an event-hub and Azure Data Explorer, security teams can have limitless query access to their data.
Questions and considerations:
- Q: Should I go from Sentinel/Azure Monitor to the event-hub (continuous export) or do I go straight to the event hub from source?
A: Continuous export currently only supports up to 10 tables and carries a cost (TBD). Consider going directly to the event-hub
IF detection and correlations are not important (if they are, go to Azure Sentinel) and cost/operational mitigation is paramount.
- Q: Are all tables supported in continuous export?
A: Not yet. The list of supported tables can be found here.
- Q: How long do I need to retain information for? How big should I make the event-hub? + + +
A: There are numerous resources to understand how to size and scale. Navigating through this document will help you at least understand how to bring data in so sizing can be done with the most accurate numbers.
Prior to starting, here are several “variables” which will be referred to. To eliminate effort around recreating queries, keep the table names the same.
- Raw table for import: XDRRaw
- Mapping for raw data: XDRRawMapping
- Event-hub resource ID: <myEHRID>
- Event-Hub name: <myEHName>
- Table names to be created:
- DeviceRegistryEvents
- DeviceFileCertificateInfo
- DeviceEvents
- DeviceImageLoadEvents
- DeviceLogonEvents
- DeviceFileEvents
- DeviceNetworkInfo
- DeviceProcessEvents
- DeviceInfo
- DeviceNetworkEvents
Step 1: Create the Event-hub
For your initial event-hub, leverage the defaults and follow the basic configuration. Remember to create the event-hub and not just the namespace. Record the values as previously mentioned – Event–hub resource ID and event-hub name.
Step 2: Enable the Streaming API in XDR/Microsoft Defender for Endpoint to Send Data to the Event-hub
Using the previously noted event-hub resource ID and name and follow the documentation to get data into the event-hub. Verify the event-hub has been created in the event-hub namespace.
Create the event-hub namespace AND the event-hub. Record the resource ID of the namespace and name of the event-hub for use when creating the streaming API.
Step 3: Create the ADX Cluster
As with the event-hub, ADX clusters are very configurable after-the-fact and a guide is available for a simple configuration.
Step 4: Create a Data Connection to Microsoft Defender for Endpoint
Prior to creating the data connection, a staging table and mapping need to be configured. Navigate to the previously created database and select Query or from the cluster, select query, and make sure your database is highlighted.
Use the code below into the query area to create the RAW table with name XDRRaw:
//Create the staging table (use the above RAW table name)
.create table XDRRaw (Raw: dynamic)
The following will create the mapping with name XDRRawMapping:
//Pull the elements into the first column so we can parse them (use the above RAW Mapping Name)
.create table XDRRaw ingestion json mapping 'XDRRawMapping' '[{"column":"Raw","path":"$","datatype":"dynamic","transform":null}]'
With the RAW staging table and mapping function created, navigate to the database, and create a new data connection in the “Data Ingestion” setting under “Settings”. It should look as follows:
Create a data connection only after you have created the RAW table and the mapping.
NOTE: THE XDR/Microsoft Defender for Endpoint streaming API supplies multiple tables of data so using MULTILINE JSON is the data format.
If all permissions are correct, the data connection should create without issue… Congratulations! Query the RAW table to review the data sources coming in from the service with the following query:
//Here’s a list of the tables you’re going to have to migrate
XDRRaw
| mv-expand Raw.records
| project Properties=Raw_records.properties, Category=Raw_records.category
| summarize by tostring(Category)
NOTE: Be patient! ADX has a ingests in batches every 5 minutes (default) but can be configured lower however it is advised to keep the default value as lower values may result in increased latency. For more information about the batching policy, see IngestionBatching policy.
Step 4: Ingest Specified Tables
The Microsoft Defender for Endpoint data stream enables teams to pick one, some, or all tables to be exported. Copy and run the queries below (one at a time in each code block) based on which tables are being pushed to the event-hub.
DeviceEvents
//Create the parsing function
.create function with (docstring = "Filters data for Device Events for ingestion from XDRRaw", folder = "UpdatePolicies") XDRFilterDeviceEvents()
{
XDRRaw
 | mv-expand Raw.records
 | project Properties=Raw_records.properties, Category=Raw_records.category
 | where Category == "AdvancedHunting-DeviceEvents"
 | project
TenantId = tostring(Properties.TenantId),AccountDomain = tostring(Properties.AccountDomain),AccountName = tostring(Properties.AccountName),AccountSid = tostring(Properties.AccountSid),ActionType = tostring(Properties.ActionType),AdditionalFields = tostring(Properties.AdditionalFields),AppGuardContainerId = tostring(Properties.AppGuardContainerId),DeviceId = tostring(Properties.DeviceId),DeviceName = tostring(Properties.DeviceName),FileName = tostring(Properties.FileName),FileOriginIP = tostring(Properties.FileOriginIP),FileOriginUrl = tostring(Properties.FileOriginUrl),FolderPath = tostring(Properties.FolderPath),InitiatingProcessAccountDomain = tostring(Properties.InitiatingProcessAccountDomain),InitiatingProcessAccountName = tostring(Properties.InitiatingProcessAccountName),InitiatingProcessAccountObjectId = tostring(Properties.InitiatingProcessAccountObjectId),InitiatingProcessAccountSid = tostring(Properties.InitiatingProcessAccountSid),InitiatingProcessAccountUpn = tostring(Properties.InitiatingProcessAccountUpn),InitiatingProcessCommandLine = tostring(Properties.InitiatingProcessCommandLine),InitiatingProcessFileName = tostring(Properties.InitiatingProcessFileName),InitiatingProcessFolderPath = tostring(Properties.InitiatingProcessFolderPath),InitiatingProcessId = tostring(Properties.InitiatingProcessId),InitiatingProcessLogonId = tostring(Properties.InitiatingProcessLogonId),InitiatingProcessMD5 = tostring(Properties.InitiatingProcessMD5),InitiatingProcessParentFileName = tostring(Properties.InitiatingProcessParentFileName),InitiatingProcessParentId = tostring(Properties.InitiatingProcessParentId),InitiatingProcessSHA1 = tostring(Properties.InitiatingProcessSHA1),InitiatingProcessSHA256 = tostring(Properties.InitiatingProcessSHA256),LocalIP = tostring(Properties.LocalIP),LocalPort = tostring(Properties.LocalPort),LogonId = tostring(Properties.LogonId),MD5 = tostring(Properties.MD5),MachineGroup = tostring(Properties.MachineGroup),ProcessCommandLine = tostring(Properties.ProcessCommandLine),ProcessId = tostring(Properties.ProcessId),ProcessTokenElevation = tostring(Properties.ProcessTokenElevation),RegistryKey = tostring(Properties.RegistryKey),RegistryValueData = tostring(Properties.RegistryValueData),RegistryValueName = tostring(Properties.RegistryValueName),RemoteDeviceName = tostring(Properties.RemoteDeviceName),RemoteIP = tostring(Properties.RemoteIP),RemotePort = tostring(Properties.RemotePort),RemoteUrl = tostring(Properties.RemoteUrl),ReportId = tostring(Properties.ReportId),SHA1 = tostring(Properties.SHA1),SHA256 = tostring(Properties.SHA256),TimeGenerated = todatetime(Properties.Timestamp),Timestamp = todatetime(Properties.Timestamp),SourceSystem = tostring(Properties.SourceSystem),Type = tostring(Properties.Type), customerName = tostring(Properties.Customername)
}

//Create the table for DeviceEvents
.set-or-append DeviceEvents <| XDRFilterDeviceEvents()

//Set to autoupdate
.alter table DeviceEvents policy update
@'[{"IsEnabled": true, "Source": "XDRRaw", "Query": "XDRFilterDeviceEvents()", "IsTransactional": true, "PropagateIngestionProperties": true}]'
DeviceFileEvents
//Create the parsing function
.create function with (docstring = "Filters data for DeviceFileEvents for ingestion from XDRRaw", folder = "UpdatePolicies") XDRFilterDeviceFileEvents()
{
XDRRaw
 | mv-expand Raw.records
 | project Properties=Raw_records.properties, Category=Raw_records.category
 | where Category == "AdvancedHunting-DeviceFileEvents"
 | project
TenantId = tostring(Properties.TenantId),ActionType = tostring(Properties.ActionType),AdditionalFields = tostring(Properties.AdditionalFields),AppGuardContainerId = tostring(Properties.AppGuardContainerId),DeviceId = tostring(Properties.DeviceId),DeviceName = tostring(Properties.DeviceName),FileName = tostring(Properties.FileName),FileOriginIP = tostring(Properties.FileOriginIP),FileOriginReferrerUrl = tostring(Properties.FileOriginReferrerUrl),FileOriginUrl = tostring(Properties.FileOriginUrl),FileSize = tostring(Properties.FileSize),FolderPath = tostring(Properties.FolderPath),InitiatingProcessAccountDomain = tostring(Properties.InitiatingProcessAccountDomain),InitiatingProcessAccountName = tostring(Properties.InitiatingProcessAccountName),InitiatingProcessAccountObjectId = tostring(Properties.InitiatingProcessAccountObjectId),InitiatingProcessAccountSid = tostring(Properties.InitiatingProcessAccountSid),InitiatingProcessAccountUpn = tostring(Properties.InitiatingProcessAccountUpn),InitiatingProcessCommandLine = tostring(Properties.InitiatingProcessCommandLine),InitiatingProcessFileName = tostring(Properties.InitiatingProcessFileName),InitiatingProcessFolderPath = tostring(Properties.InitiatingProcessFolderPath),InitiatingProcessId = tostring(Properties.InitiatingProcessId),InitiatingProcessIntegrityLevel = tostring(Properties.InitiatingProcessIntegrityLevel),InitiatingProcessMD5 = tostring(Properties.InitiatingProcessMD5),InitiatingProcessParentFileName = tostring(Properties.InitiatingProcessParentFileName),InitiatingProcessParentId = tostring(Properties.InitiatingProcessParentId),InitiatingProcessSHA1 = tostring(Properties.InitiatingProcessSHA1),InitiatingProcessSHA256 = tostring(Properties.InitiatingProcessSHA256),InitiatingProcessTokenElevation = tostring(Properties.InitiatingProcessTokenElevation),IsAzureInfoProtectionApplied = tostring(Properties.IsAzureInfoProtectionApplied),MD5 = tostring(Properties.MD5),MachineGroup = tostring(Properties.MachineGroup),PreviousFileName = tostring(Properties.PreviousFileName),PreviousFolderPath = tostring(Properties.PreviousFolderPath),ReportId = tostring(Properties.ReportId),RequestAccountDomain = tostring(Properties.RequestAccountDomain),RequestAccountName = tostring(Properties.RequestAccountName),RequestAccountSid = tostring(Properties.RequestAccountSid),RequestProtocol = tostring(Properties.RequestProtocol),RequestSourceIP = tostring(Properties.RequestSourceIP),RequestSourcePort = tostring(Properties.RequestSourcePort),SHA1 = tostring(Properties.SHA1),SHA256 = tostring(Properties.SHA256),SensitivityLabel = tostring(Properties.SensitivityLabel),SensitivitySubLabel = tostring(Properties.SensitivitySubLabel),ShareName = tostring(Properties.ShareName),TimeGenerated =todatetime(Properties.Timestamp),Timestamp = todatetime(Properties.Timestamp),InitiatingProcessParentCreationTime = todatetime(Properties.InitiatingProcessParentCreationTime),InitiatingProcessCreationTime = todatetime(Properties.InitiatingProcessCreationTime),SourceSystem = tostring(Properties.SourceSystem),Type = tostring(Properties.Type)
}

//create table
.set-or-append DeviceFileEvents <| XDRFilterDeviceFileEvents()

//Set to autoupdate
.alter table DeviceFileEvents policy update
@'[{"IsEnabled": true, "Source": "XDRRaw", "Query": "XDRFilterDeviceFileEvents()", "IsTransactional": true, "PropagateIngestionProperties": true}]'
DeviceLogonEvents
//Create the parsing function
.create function with (docstring = "Filters data for DeviceLogonEvents for ingestion from XDRRaw", folder = "UpdatePolicies") XDRFilterDeviceLogonEvents()
{
XDRRaw
 | mv-expand Raw.records
 | project Properties=Raw_records.properties, Category=Raw_records.category
 | where Category == "AdvancedHunting-DeviceLogonEvents"
 | project
TenantId = tostring(Properties.TenantId),AccountDomain = tostring(Properties.AccountDomain),AccountName = tostring(Properties.AccountName),AccountSid = tostring(Properties.AccountSid),ActionType = tostring(Properties.ActionType),AdditionalFields = tostring(Properties.AdditionalFields),AppGuardContainerId = tostring(Properties.AppGuardContainerId),DeviceId = tostring(Properties.DeviceId),DeviceName = tostring(Properties.DeviceName),FailureReason = tostring(Properties.FailureReason),InitiatingProcessAccountDomain = tostring(Properties.InitiatingProcessAccountDomain),InitiatingProcessAccountName = tostring(Properties.InitiatingProcessAccountName),InitiatingProcessAccountObjectId = tostring(Properties.InitiatingProcessAccountObjectId),InitiatingProcessAccountSid = tostring(Properties.InitiatingProcessAccountSid),InitiatingProcessAccountUpn = tostring(Properties.InitiatingProcessAccountUpn),InitiatingProcessCommandLine = tostring(Properties.InitiatingProcessCommandLine),InitiatingProcessFileName = tostring(Properties.InitiatingProcessFileName),InitiatingProcessFolderPath = tostring(Properties.InitiatingProcessFolderPath),InitiatingProcessId = tostring(Properties.InitiatingProcessId),InitiatingProcessIntegrityLevel = tostring(Properties.InitiatingProcessIntegrityLevel),InitiatingProcessMD5 = tostring(Properties.InitiatingProcessMD5),InitiatingProcessParentFileName = tostring(Properties.InitiatingProcessParentFileName),InitiatingProcessParentId = tostring(Properties.InitiatingProcessParentId),InitiatingProcessSHA1 = tostring(Properties.InitiatingProcessSHA1),InitiatingProcessSHA256 = tostring(Properties.InitiatingProcessSHA256),InitiatingProcessTokenElevation = tostring(Properties.InitiatingProcessTokenElevation),IsLocalAdmin = tostring(Properties.IsLocalAdmin),LogonId = tostring(Properties.LogonId),LogonType = tostring(Properties.LogonType),MachineGroup = tostring(Properties.MachineGroup),Protocol = tostring(Properties.Protocol),RemoteDeviceName = tostring(Properties.RemoteDeviceName),RemoteIP = tostring(Properties.RemoteIP),RemoteIPType = tostring(Properties.RemoteIPType),RemotePort = tostring(Properties.RemotePort),ReportId = tostring(Properties.ReportId),TimeGenerated = todatetime(Properties.Timestamp),Timestamp = todatetime(Properties.Timestamp),InitiatingProcessParentCreationTime = todatetime(Properties.InitiatingProcessParentCreationTime),InitiatingProcessCreationTime = todatetime(Properties.InitiatingProcessCreationTime),SourceSystem = tostring(Properties.SourceSystem),Type = tostring(Properties.Type)
}

//create table
.set-or-append DeviceLogonEvents <| XDRFilterDeviceLogonEvents()

//Set to autoupdate
.alter table DeviceLogonEvents policy update
@'[{"IsEnabled": true, "Source": "XDRRaw", "Query": "XDRFilterDeviceLogonEvents()", "IsTransactional": true, "PropagateIngestionProperties": true}]'
DeviceRegistryEvents
//Create the parsing function
.create function with (docstring = "Filters data for DeviceRegistryEvents for ingestion from XDRRaw", folder = "UpdatePolicies") XDRFilterDeviceRegistryEvents()
{
XDRRaw
 | mv-expand Raw.records
 | project Properties=Raw_records.properties, Category=Raw_records.category
 | where Category == "AdvancedHunting-DeviceRegistryEvents"
 | project
TenantId = tostring(Properties.TenantId),ActionType = tostring(Properties.ActionType),AppGuardContainerId = tostring(Properties.AppGuardContainerId),DeviceId = tostring(Properties.DeviceId),DeviceName = tostring(Properties.DeviceName),InitiatingProcessAccountDomain = tostring(Properties.InitiatingProcessAccountDomain),InitiatingProcessAccountName = tostring(Properties.InitiatingProcessAccountName),InitiatingProcessAccountObjectId = tostring(Properties.InitiatingProcessAccountObjectId),InitiatingProcessAccountSid = tostring(Properties.InitiatingProcessAccountSid),InitiatingProcessAccountUpn = tostring(Properties.InitiatingProcessAccountUpn),InitiatingProcessCommandLine = tostring(Properties.InitiatingProcessCommandLine),InitiatingProcessFileName = tostring(Properties.InitiatingProcessFileName),InitiatingProcessFolderPath = tostring(Properties.InitiatingProcessFolderPath),InitiatingProcessId = tostring(Properties.InitiatingProcessId),InitiatingProcessIntegrityLevel = tostring(Properties.InitiatingProcessIntegrityLevel),InitiatingProcessMD5 = tostring(Properties.InitiatingProcessMD5),InitiatingProcessParentFileName = tostring(Properties.InitiatingProcessParentFileName),InitiatingProcessParentId = tostring(Properties.InitiatingProcessParentId),InitiatingProcessSHA1 = tostring(Properties.InitiatingProcessSHA1),InitiatingProcessSHA256 = tostring(Properties.InitiatingProcessSHA256),InitiatingProcessTokenElevation = tostring(Properties.InitiatingProcessTokenElevation),MachineGroup = tostring(Properties.MachineGroup),PreviousRegistryKey = tostring(Properties.PreviousRegistryKey),PreviousRegistryValueData = tostring(Properties.PreviousRegistryValueData),PreviousRegistryValueName = tostring(Properties.PreviousRegistryValueName),RegistryKey = tostring(Properties.RegistryKey),RegistryValueData = tostring(Properties.RegistryValueData),RegistryValueName = tostring(Properties.RegistryValueName),RegistryValueType = tostring(Properties.RegistryValueType),ReportId = tostring(Properties.ReportId),TimeGenerated = todatetime(Properties.Timestamp),Timestamp = todatetime(Properties.Timestamp),InitiatingProcessParentCreationTime = todatetime(Properties.InitiatingProcessParentCreationTime),InitiatingProcessCreationTime = todatetime(Properties.InitiatingProcessCreationTime),SourceSystem = tostring(Properties.SourceSystem),Type = tostring(Properties.Type)
}

//create table
.set-or-append DeviceRegistryEvents <| XDRFilterDeviceRegistryEvents()

//Set to autoupdate
.alter table DeviceRegistryEvents policy update
@'[{"IsEnabled": true, "Source": "XDRRaw", "Query": "XDRFilterDeviceRegistryEvents()", "IsTransactional": true, "PropagateIngestionProperties": true}]'
DeviceImageLoadEvents
//Create the parsing function
.create function with (docstring = "Filters data for DeviceImageLoadEvents for ingestion from XDRRaw", folder = "UpdatePolicies") XDRFilterDeviceImageLoadEvents()
{
XDRRaw
 | mv-expand Raw.records
 | project Properties=Raw_records.properties, Category=Raw_records.category
 | where Category == "AdvancedHunting-DeviceImageLoadEvents"
 | project
TenantId = tostring(Properties.TenantId),ActionType = tostring(Properties.ActionType),AppGuardContainerId = tostring(Properties.AppGuardContainerId),DeviceId = tostring(Properties.DeviceId),DeviceName = tostring(Properties.DeviceName),FileName = tostring(Properties.FileName),FolderPath = tostring(Properties.FolderPath),InitiatingProcessAccountDomain = tostring(Properties.InitiatingProcessAccountDomain),InitiatingProcessAccountName = tostring(Properties.InitiatingProcessAccountName),InitiatingProcessAccountObjectId = tostring(Properties.InitiatingProcessAccountObjectId),InitiatingProcessAccountSid = tostring(Properties.InitiatingProcessAccountSid),InitiatingProcessAccountUpn = tostring(Properties.InitiatingProcessAccountUpn),InitiatingProcessCommandLine = tostring(Properties.InitiatingProcessCommandLine),InitiatingProcessFileName = tostring(Properties.InitiatingProcessFileName),InitiatingProcessFolderPath = tostring(Properties.InitiatingProcessFolderPath),InitiatingProcessId = tostring(Properties.InitiatingProcessId),InitiatingProcessIntegrityLevel = tostring(Properties.InitiatingProcessIntegrityLevel),InitiatingProcessMD5 = tostring(Properties.InitiatingProcessMD5),InitiatingProcessParentFileName = tostring(Properties.InitiatingProcessParentFileName),InitiatingProcessParentId = tostring(Properties.InitiatingProcessParentId),InitiatingProcessSHA1 = tostring(Properties.InitiatingProcessSHA1),InitiatingProcessSHA256 = tostring(Properties.InitiatingProcessSHA256),InitiatingProcessTokenElevation = tostring(Properties.InitiatingProcessTokenElevation),MD5 = tostring(Properties.MD5),MachineGroup = tostring(Properties.MachineGroup),ReportId = tostring(Properties.ReportId),SHA1 = tostring(Properties.SHA1),SHA256 = tostring(Properties.SHA256),TimeGenerated = todatetime(Properties.Timestamp),Timestamp = todatetime(Properties.Timestamp),InitiatingProcessParentCreationTime = todatetime(Properties.InitiatingProcessParentCreationTime),InitiatingProcessCreationTime = todatetime(Properties.InitiatingProcessCreationTime),SourceSystem = tostring(Properties.SourceSystem),Type = tostring(Properties.Type)
}

//create table
.set-or-append DeviceImageLoadEvents <| XDRFilterDeviceImageLoadEvents()

//Set to autoupdate
.alter table DeviceImageLoadEvents policy update
@'[{"IsEnabled": true, "Source": "XDRRaw", "Query": "XDRFilterDeviceImageLoadEvents()", "IsTransactional": true, "PropagateIngestionProperties": true}]'
DeviceNetworkInfo
//Create the parsing function
.create function with (docstring = "Filters data for DeviceNetworkInfo for ingestion from XDRRaw", folder = "UpdatePolicies") XDRFilterDeviceNetworkInfo()
{
XDRRaw
 | mv-expand Raw.records
 | project Properties=Raw_records.properties, Category=Raw_records.category
 | where Category == "AdvancedHunting-DeviceNetworkInfo"
 | project
TenantId = tostring(Properties.TenantId),ConnectedNetworks = tostring(Properties.ConnectedNetworks),DefaultGateways = tostring(Properties.DefaultGateways),DeviceId = tostring(Properties.DeviceId),DeviceName = tostring(Properties.DeviceName),DnsAddresses = tostring(Properties.DnsAddresses),IPAddresses = tostring(Properties.IPAddresses),IPv4Dhcp = tostring(Properties.IPv4Dhcp),IPv6Dhcp = tostring(Properties.IPv6Dhcp),MacAddress = tostring(Properties.MacAddress),MachineGroup = tostring(Properties.MachineGroup),NetworkAdapterName = tostring(Properties.NetworkAdapterName),NetworkAdapterStatus = tostring(Properties.NetworkAdapterStatus),NetworkAdapterType = tostring(Properties.NetworkAdapterType),ReportId = tostring(Properties.ReportId),TimeGenerated = todatetime(Properties.Timestamp),Timestamp = todatetime(Properties.Timestamp),TunnelType = tostring(Properties.TunnelType),SourceSystem = tostring(Properties.SourceSystem),Type = tostring(Properties.Type)
}

//create table
.set-or-append DeviceNetworkInfo <| XDRFilterDeviceNetworkInfo()

//Set to autoupdate
.alter table DeviceNetworkInfo policy update
@'[{"IsEnabled": true, "Source": "XDRRaw", "Query": "XDRFilterDeviceNetworkInfo()", "IsTransactional": true, "PropagateIngestionProperties": true}]'
DeviceProcessEvents
//Create the parsing function
.create function with (docstring = "Filters data for DeviceProcessEvents for ingestion from XDRRaw", folder = "UpdatePolicies") XDRFilterDeviceProcessEvents()
{
XDRRaw
 | mv-expand Raw.records
 | project Properties=Raw_records.properties, Category=Raw_records.category
 | where Category == "AdvancedHunting-DeviceProcessEvents"
 | project
TenantId = tostring(Properties.TenantId),AccountDomain = tostring(Properties.AccountDomain),AccountName = tostring(Properties.AccountName),AccountObjectId = tostring(Properties.AccountObjectId),AccountSid = tostring(Properties.AccountSid),AccountUpn= tostring(Properties.AccountUpn),ActionType = tostring(Properties.ActionType),AdditionalFields = tostring(Properties.AdditionalFields),AppGuardContainerId = tostring(Properties.AppGuardContainerId),DeviceId = tostring(Properties.DeviceId),DeviceName = tostring(Properties.DeviceName),FileName = tostring(Properties.FileName),FolderPath = tostring(Properties.FolderPath),InitiatingProcessAccountDomain = tostring(Properties.InitiatingProcessAccountDomain),InitiatingProcessAccountName = tostring(Properties.InitiatingProcessAccountName),InitiatingProcessAccountObjectId = tostring(Properties.InitiatingProcessAccountObjectId),InitiatingProcessAccountSid = tostring(Properties.InitiatingProcessAccountSid),InitiatingProcessAccountUpn = tostring(Properties.InitiatingProcessAccountUpn),InitiatingProcessCommandLine = tostring(Properties.InitiatingProcessCommandLine),InitiatingProcessFileName = tostring(Properties.InitiatingProcessFileName),InitiatingProcessFolderPath = tostring(Properties.InitiatingProcessFolderPath),InitiatingProcessId = tostring(Properties.InitiatingProcessId),InitiatingProcessIntegrityLevel = tostring(Properties.InitiatingProcessIntegrityLevel),InitiatingProcessLogonId = tostring(Properties.InitiatingProcessLogonId),InitiatingProcessMD5 = tostring(Properties.InitiatingProcessMD5),InitiatingProcessParentFileName = tostring(Properties.InitiatingProcessParentFileName),InitiatingProcessParentId = tostring(Properties.InitiatingProcessParentId),InitiatingProcessSHA1 = tostring(Properties.InitiatingProcessSHA1),InitiatingProcessSHA256 = tostring(Properties.InitiatingProcessSHA256),InitiatingProcessTokenElevation = tostring(Properties.InitiatingProcessTokenElevation),LogonId = tostring(Properties.LogonId),MD5 = tostring(Properties.MD5),MachineGroup = tostring(Properties.MachineGroup),ProcessCommandLine = tostring(Properties.ProcessCommandLine),ProcessCreationTime = todatetime(Properties.ProcessCreationTime),ProcessId = tostring(Properties.ProcessId),ProcessIntegrityLevel = tostring(Properties.ProcessIntegrityLevel),ProcessTokenElevation = tostring(Properties.ProcessTokenElevation),ReportId = tostring(Properties.ReportId),SHA1 = tostring(Properties.SHA1),SHA256 = tostring(Properties.SHA256),TimeGenerated = todatetime(Properties.Timestamp),Timestamp = todatetime(Properties.Timestamp),InitiatingProcessParentCreationTime = todatetime(Properties.InitiatingProcessParentCreationTime),InitiatingProcessCreationTime = todatetime(Properties.InitiatingProcessCreationTime),SourceSystem = tostring(Properties.SourceSystem),Type = tostring(Properties.Type)
}

//create table
.set-or-append DeviceProcessEvents <| XDRFilterDeviceProcessEvents()

//Set to autoupdate
.alter table DeviceProcessEvents policy update
@'[{"IsEnabled": true, "Source": "XDRRaw", "Query": "XDRFilterDeviceProcessEvents()", "IsTransactional": true, "PropagateIngestionProperties": true}]'
DeviceFileCertificateInfo
//Create the parsing function
.create function with (docstring = "Filters data for DeviceFileCertificateInfo for ingestion from XDRRaw", folder = "UpdatePolicies") XDRFilterDeviceFileCertificateInfo()
{
XDRRaw
 | mv-expand Raw.records
 | project Properties=Raw_records.properties, Category=Raw_records.category
 | where Category == "AdvancedHunting-DeviceFileCertificateInfo"
 | project
TenantId = tostring(Properties.TenantId),CertificateSerialNumber = tostring(Properties.CertificateSerialNumber),CrlDistributionPointUrls = tostring(Properties.CrlDistributionPointUrls),DeviceId = tostring(Properties.DeviceId),DeviceName = tostring(Properties.DeviceName),IsRootSignerMicrosoft = tostring(Properties.IsRootSignerMicrosoft),IsSigned = tostring(Properties.IsSigned),IsTrusted = tostring(Properties.IsTrusted),Issuer = tostring(Properties.Issuer),IssuerHash = tostring(Properties.IssuerHash),MachineGroup = tostring(Properties.MachineGroup),ReportId = tostring(Properties.ReportId),SHA1 = tostring(Properties.SHA1),SignatureType = tostring(Properties.SignatureType),Signer = tostring(Properties.Signer),SignerHash = tostring(Properties.SignerHash),TimeGenerated = todatetime(Properties.Timestamp),Timestamp = todatetime(Properties.Timestamp),CertificateCountersignatureTime = todatetime(Properties.CertificateCountersignatureTime),CertificateCreationTime = todatetime(Properties.CertificateCreationTime),CertificateExpirationTime = todatetime(Properties.CertificateExpirationTime),SourceSystem = tostring(Properties.SourceSystem),Type = tostring(Properties.Type)
}

//create table
.set-or-append DeviceFileCertificateInfo <| XDRFilterDeviceFileCertificateInfo()

//Set to autoupdate
.alter table DeviceFileCertificateInfo policy update
@'[{"IsEnabled": true, "Source": "XDRRaw", "Query": "XDRFilterDeviceFileCertificateInfo()", "IsTransactional": true, "PropagateIngestionProperties": true}]'
DeviceInfo
//Create the parsing function
.create function with (docstring = "Filters data for DeviceInfo for ingestion from XDRRaw", folder = "UpdatePolicies") XDRFilterDeviceInfo()
{
XDRRaw
 | mv-expand Raw.records
 | project Properties=Raw_records.properties, Category=Raw_records.category
 | where Category == "AdvancedHunting-DeviceInfo"
 | project
TenantId = tostring(Properties.TenantId),AdditionalFields = tostring(Properties.AdditionalFields),ClientVersion = tostring(Properties.ClientVersion),DeviceId = tostring(Properties.DeviceId),DeviceName = tostring(Properties.DeviceName),DeviceObjectId= tostring(Properties.DeviceObjectId),IsAzureADJoined = tostring(Properties.IsAzureADJoined),LoggedOnUsers = tostring(Properties.LoggedOnUsers),MachineGroup = tostring(Properties.MachineGroup),OSArchitecture = tostring(Properties.OSArchitecture),OSBuild = tostring(Properties.OSBuild),OSPlatform = tostring(Properties.OSPlatform),OSVersion = tostring(Properties.OSVersion),PublicIP = tostring(Properties.PublicIP),RegistryDeviceTag = tostring(Properties.RegistryDeviceTag),ReportId = tostring(Properties.ReportId),TimeGenerated = todatetime(Properties.Timestamp),SourceSystem = tostring(Properties.SourceSystem),Type = tostring(Properties.Type)
}

//create table
.set-or-append DeviceInfo <| XDRFilterDeviceInfo()

//Set to autoupdate
.alter table DeviceInfo policy update
@'[{"IsEnabled": true, "Source": "XDRRaw", "Query": "XDRFilterDeviceInfo()", "IsTransactional": true, "PropagateIngestionProperties": true}]'
DeviceNetworkEvents
//Create the parsing function
.create function with (docstring = "Filters data for DeviceNetworkEvents for ingestion from XDRRaw", folder = "UpdatePolicies") XDRFilterDeviceNetworkEvents()
{
XDRRaw
 | mv-expand Raw.records
 | project Properties=Raw_records.properties, Category=Raw_records.category
 | where Category == "AdvancedHunting-DeviceNetworkEvents"
 | project
TenantId = tostring(Properties.TenantId),ActionType = tostring(Properties.ActionType),AdditionalFields = tostring(Properties.AdditionalFields),AppGuardContainerId = tostring(Properties.AppGuardContainerId),DeviceId = tostring(Properties.DeviceId),DeviceName = tostring(Properties.DeviceName),InitiatingProcessAccountDomain = tostring(Properties.InitiatingProcessAccountDomain),InitiatingProcessAccountName = tostring(Properties.InitiatingProcessAccountName),InitiatingProcessAccountObjectId = tostring(Properties.InitiatingProcessAccountObjectId),InitiatingProcessAccountSid = tostring(Properties.InitiatingProcessAccountSid),InitiatingProcessAccountUpn = tostring(Properties.InitiatingProcessAccountUpn),InitiatingProcessCommandLine= tostring(Properties.InitiatingProcessCommandLine),InitiatingProcessFileName = tostring(Properties.InitiatingProcessFileName),InitiatingProcessFolderPath = tostring(Properties.InitiatingProcessFolderPath),InitiatingProcessId = tostring(Properties.InitiatingProcessId),InitiatingProcessIntegrityLevel = tostring(Properties.InitiatingProcessIntegrityLevel),InitiatingProcessMD5 = tostring(Properties.InitiatingProcessMD5),InitiatingProcessParentFileName = tostring(Properties.InitiatingProcessParentFileName),InitiatingProcessParentId = tostring(Properties.InitiatingProcessParentId),InitiatingProcessSHA1 = tostring(Properties.InitiatingProcessSHA1),InitiatingProcessSHA256 = tostring(Properties.InitiatingProcessSHA256),InitiatingProcessTokenElevation = tostring(Properties.InitiatingProcessTokenElevation),LocalIP = tostring(Properties.LocalIP),LocalIPType = tostring(Properties.LocalIPType),LocalPort = tostring(Properties.LocalPort),MachineGroup = tostring(Properties.MachineGroup),Protocol = tostring(Properties.Protocol),RemoteIP = tostring(Properties.RemoteIP),RemoteIPType = tostring(Properties.RemoteIPType),RemotePort = tostring(Properties.RemotePort),RemoteUrl = tostring(Properties.RemoteUrl),ReportId = tostring(Properties.ReportId),TimeGenerated = todatetime(Properties.Timestamp),Timestamp = todatetime(Properties.Timestamp),InitiatingProcessParentCreationTime = todatetime(Properties.InitiatingProcessParentCreationTime),InitiatingProcessCreationTime = todatetime(Properties.InitiatingProcessCreationTime),SourceSystem = tostring(Properties.SourceSystem),Type = tostring(Properties.Type)
}

//create table
.set-or-append DeviceNetworkEvents <| XDRFilterDeviceNetworkEvents()

//Set to autoupdate
.alter table DeviceNetworkEvents policy update
@'[{"IsEnabled": true, "Source": "XDRRaw", "Query": "XDRFilterDeviceNetworkEvents()", "IsTransactional": true, "PropagateIngestionProperties": true}]'
Step 5: Review Benefits
With data flowing through, select any device query from the security.microsoft.com/securitycenter.windows.com portal and run it, “word for word” in the ADX portal. As an example, the following query shows devices creating a PNP device call:
DeviceEvents
| where ActionType == "PnpDeviceConnected"
| extend parsed=parse_json(AdditionalFields)
| project className=parsed.ClassName, description=parsed.DeviceDescription, parsed.DeviceId, DeviceName
In addition to being to reuse queries, if you are also using Azure Sentinel and have XDR/Microsoft Defender for Endpoint data connected, try the following:
- Navigate to your ADX cluster and get copy the scope. It will be formatted as <clusterName>.<region>/<databaseName>:
Retrieve the ADX scope for external use from Azure Sentinel.NOTE: Unlike queries in XDR/Microsoft Defender for Endpoint and Sentinel/Log Analytics, queries in ADX do NOT have a default time filter. Queries run without filters will query the entire database and likely impact performance.
- Navigate to an Azure Sentinel instance and place the query together with the adx() operator:
adx("###ADXSCOPE###").DeviceEvents
| where ActionType == "PnpDeviceConnected"
| extend parsed=parse_json(AdditionalFields)
| project className=parsed.ClassName, description=parsed.DeviceDescription, parsed.DeviceId, DeviceName
For example:
NOTE: As the ADX operator is external, auto-complete will not work.
Notice the query will complete completely but not with Azure Sentinel resources but rather the resources in ADX! (This operator is not available in Analytics rules though)
Summary
Using the XDR/Microsoft Defender for Endpoint streaming API and Azure Data Explorer (ADX), teams can very easily achieve terrific scalability on long term, investigative hunting, and forensics. Cost continues to be another key benefit as well as the ability to reuse IP/queries.
For organizations looking to expand their EDR signal and do auto correlation with 3rd party data sources, consider leveraging Azure Sentinel, where there are a number of 1st and 3rd party data connectors which enable rich context to added to existing XDR/Microsoft Defender for Endpoint data. An example of these enhancements can be found at https://aka.ms/SentinelFusion.
Additional information and references:
Special thanks to @Beth_Bischoff, @Javier Soriano, @Deepak Agrawal, @Uri Barash, and @Steve Newby for their insights and time into this post.
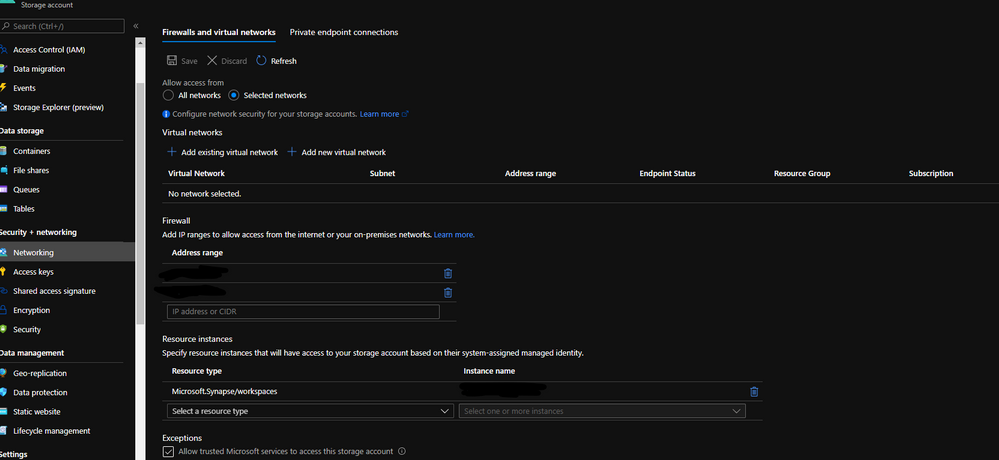
by Contributed | May 6, 2021 | Technology
This article is contributed. See the original author and article here.
This is a step-by-step example of how to use MSI while connecting from Spark notebook based on a support case scenario. This is for beginners in Synapse with some knowledge of the workspace configuration such as linked severs.
Scenario: The customer wants to configure the notebook to run without using the AAD configuration. Just using MSI.
Here you can see, synapse uses Azure Active Directory (AAD) passthrough by default for authentication between resources, the idea here is to take advantage of the linked server synapse configuration inside of the notebook.
Ref: https://docs.microsoft.com/en-us/azure/synapse-analytics/spark/apache-spark-secure-credentials-with-tokenlibrary?pivots=programming-language-scala
_When the linked service authentication method is set to Managed Identity or Service Principal, the linked service will use the Managed Identity or Service Principal token with the LinkedServiceBasedTokenProvider provider._
The purpose of this post is to help step by step how to do this configuration:
Requisites:
- Permissions: Synapse ( literally the workspace) MSI must have the RBAC – Storage Blob Data Contributor permission on the Storage Account.
- It should work with or without the firewall enabled on the storage. I mean firewall enable is not mandatory.
Follow my example with firewall enabled on the storage
When you grant access to trusted Azure services inside of the storage networking, you will grant the following types of access:
- Trusted access for select operations to resources that are registered in your subscription.
- Trusted access to resources based on system-assigned managed identity.

Step 1:
Open Synapse Studio and configure the Linked Server to this storage account using MSI:

Test the configuration and see if it is successful.
Step 2:
Using config set point the notebook to the linked server as documented:
val linked_service_name = “LinkedServerName”
// replace with your linked service name
// Allow SPARK to access from Blob remotely
val sc = spark.sparkContext
spark.conf.set(“spark.storage.synapse.linkedServiceName”, linked_service_name)
spark.conf.set(“fs.azure.account.oauth.provider.type”, “com.microsoft.azure.synapse.tokenlibrary.LinkedServiceBasedTokenProvider”)
//replace the container and storage account names
val df = “abfss://Container@StorageAccount.dfs.core.windows.net/”
print(“Remote blob path: ” + df)
mssparkutils.fs.ls(df)
In my example, I am using mssparkutils to list the container.
You can read more about mssparkutils here: Introduction to Microsoft Spark utilities – Azure Synapse Analytics | Microsoft Docs
Additionally:
Following references permissions to Synapse workspace :
That is it!
Liliam UK Engineer
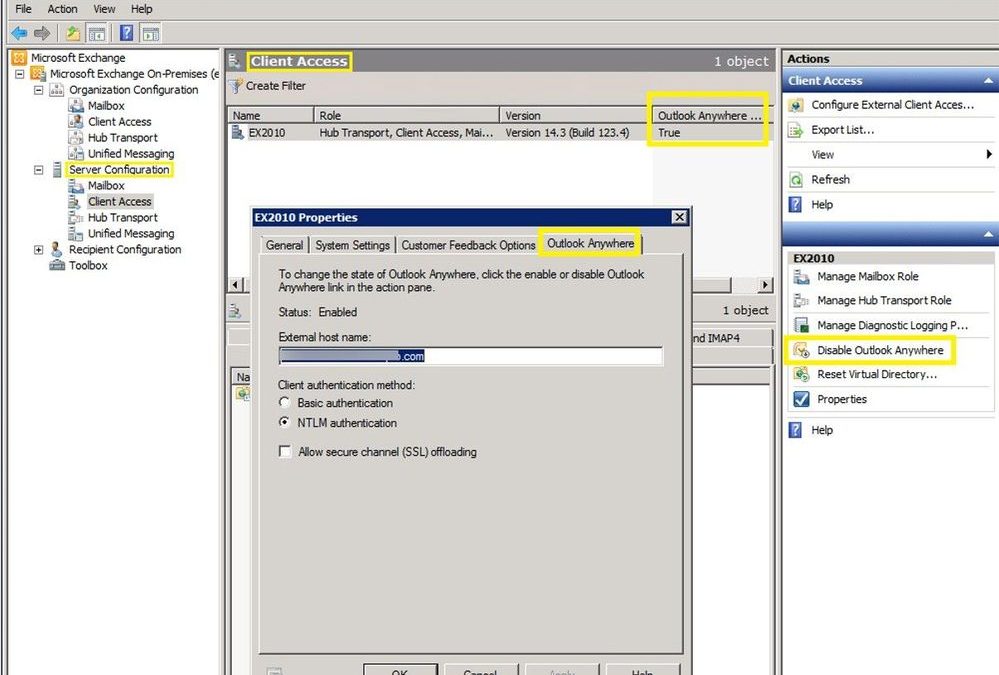
by Contributed | May 6, 2021 | Technology
This article is contributed. See the original author and article here.
The public folder (PF) migration endpoint in Exchange Online contains information needed to connect to the source on-premises public folders in order to migrate them to Office 365. PF migration endpoint can be based on either Outlook Anywhere (for Exchange 2010 public folders) or MRS (for Exchange 2013 and newer public folders).
In this blog post, we discuss PF migration endpoints for Exchange 2010 on-premises public folders. While Exchange 2010 is not supported, we have seen cases where customers still have these legacy Exchange servers and are working on their migrations.
To migrate Exchange 2010 PFs to Exchange Online you would typically follow our documented procedure. If you are reading this post, we assume that you are stuck at Step 5.4, specifically with the New-MigrationEndpoint -PublicFolder cmdlet. If this is the case, this article can help you troubleshoot and fix these issues. Some of this knowledge is getting difficult to find!
Exchange 2010 public folders are migrated to Exchange Online using Outlook Anywhere as a connection protocol. The migration endpoint creation will fail if there are issues with the way Outlook Anywhere is configured or if there are any issues with connecting to public folders using Outlook Anywhere (another sign of this is that Outlook clients cannot access on-premises public folders from an external network).
This means that from a functional perspective, you have an issue either with Outlook Anywhere or with the PF database (assuming that the steps you used to create the PF endpoints were correct).
Let’s look at the steps to troubleshoot PF migration endpoint creation.
Ensure Outlook Anywhere is configured correctly and is working fine
Outlook Anywhere uses RPC over HTTP. Before enabling Outlook Anywhere on the Exchange server, you need to have a Windows Component called RPC over HTTP (see reference here).
The next step is to check if Outlook Anywhere is enabled and configured correctly. You can run Get-OutlookAnywhere |FL in the Exchange Management Shell or use the Exchange Management Console to see if it is enabled (you would have a disable option if currently enabled):

This is a good and complete article on how to manage Outlook Anywhere.
If Outlook Anywhere is published on Exchange 2013 and servers, it must be enabled on each Exchange 2010 server hosting a public folder database.
Checking Outlook Anywhere configuration:
- External hostname must be set and reachable over the Internet or at least reachable by Exchange Online IP Addresses. Check your firewall rules and public DNS and verify that your users can connect to Exchange on-premises server using Outlook Anywhere (RPC/HTTP) from an external network. You can use Test-MigrationServerAvailability from Exchange Online PowerShell (as explained later in this article) to verify connectivity from EXO to on-premises but keep in mind that when you do this you will be testing only with the EXO outbound IP address used at that moment. This is not necessarily enough to ensure you are allowing the entire IP range used by Exchange Online. Another tool you can use for verifying public DNS and connection to on-premises RPCProxy is the Outlook Connectivity test on Microsoft Remote Connectivity Analyzer. Please note that the outbound IP addresses for this tool (mentioned in Remote Connectivity Analyzer Change List (microsoft.com) are different from the Exchange Online outbound IP addresses, so having a passed test result here does not mean your on-premises Exchange server is reachable by Exchange Online.
- Ensure you have a valid third-party Exchange Certificate for Outlook Anywhere.
- Check that authentication method (Basic / NTLM) is correct on Outlook Anywhere on the RPC virtual directory. Make sure you use the exact Authentication configured in Get-OutlookAnywhere when you build the New-MigrationEndpoint -PublicFolder cmdlet.
- Verify that your registry keys are correct:
The ValidPorts setting at HKLMSoftwareMicrosoftRPCRPCProxy should cover 6001-6004 range:

If you don’t have these settings for ValidPorts and ValidPorts_AutoConfig_Exchange, then you might want to reset the Outlook Anywhere virtual directory on-premises (by disabling and re-enabling Outlook Anywhere and restarting MSExchangeServiceHost). You should do this reset outside of working hours as Outlook Anywhere connectivity to the server will be affected.
As a last resort (if you still don’t see Valid Ports configured automatically), try to manually set them both to the following value: <ExchangeServerNetBIOS> :6001-6004; <ExchangeServerFQDN> :6001-6004; like in the image above. If the values are reverted automatically, then you need to troubleshoot the underlying Outlook Anywhere problem.
The PeriodicPollingMinutes key at HKEY_LOCAL_MACHINESystemCurrentControlSetServicesMSExchangeServiceHostRpcHttpConfigurator – by default the value is (15). It should not be set to 0.

The Rpc/HTTP port key for Store service is set to 6003 under HKEY_LOCAL_MACHINESYSTEMCurrentControlSetservicesMSExchangeISParametersSystem

Verify that your Exchange services are listening on ports 6001-6004. From a command prompt on the Exchange server, run these 2 commands:
netstat -anob > netstat.txt
notepad netstat.txt
In the netstat.txt file, search for ports :6001, :6002, :6003 and :6004 and make sure no services other than Exchange are listening on these ports. Example:

Note: We already assume that services like MSExchangeIS, MSExchangeRPC, MSExchangeAB, W3Svc, etc. are up and running on the Exchange server; you can use Test-ServiceHealth to double check. Also, in IIS manager verify that the Default Web Site and Default Application Pool are started. Finally, verify that your PF database is mounted.
Verify that you are able to resolve both the NetBIOS and FQDN names of the Exchange server(s) hosting the PF database. In my examples above, Ex2010 is the NetBIOS name and Ex2010.miry.lab is the FQDN of my Exchange server.
Verify that users can connect to public folders using Outlook
Let’s say you have you verified that Outlook Anywhere is configured and working fine but you are still unable to create a PF migration endpoint. Configure an Outlook profile for a mailbox in the source on-premises environment (preferably the account specified as source credential) from external network machine and verify that the account can retrieve public folders.
I checked all these, but I still have problems!
We will now get into the next level of troubleshooting section but most of the times, if you managed to cover the above section, you should be fine with creating the PF migration endpoint. If not, let’s dig in further:
Check Outlook Anywhere connectivity test in ExRCA
Use EXRCA and run the Outlook Anywhere test using an on-premises mailbox as SourceCredential.
The tool will identify Outlook Anywhere issues (RPC/HTTP protocol functionality and connectivity on ports 6001, 6002 and 6004, Exchange certificate validity, if your external hostname is a resolvable name in DNS, TLS versions compatible with Office 365, and network connectivity).
Save the output report as an HTML file and follow the suggestions given to address them.
If you are filtering the connection IPs, add the Remote Connectivity Analyzer IP addresses (you can find them in this page here) to your allow list and try the Outlook connectivity test again. Most importantly, ensure that you allow all Exchange Online IP addresses to connect to your on-premises servers.
You can use the Outlook Connectivity test with or without Autodiscover. Here is an example of how to populate the Remote Connectivity Analyzer fields for this test if you want to bypass Autodiscover:

Use the Test-MigrationServerAvailability to test both PF and Outlook Anywhere Connectivity
Test-MigrationServerAvailability command simulates Exchange Online servers connecting to your source server and indicates any issues found.
Connect-ExchangeOnline
Test-MigrationServerAvailability -PublicFolder -RPCProxyServer $Source_OutlookAnywhereExternalHostName -Credentials $Source_Credential -SourceMailboxLegacyDN $Source_RemoteMailboxLegacyDN -PublicFolderDatabaseServerLegacyDN $Source_RemotePublicFolderServerLegacyDN -Authentication $auth
For example, I ran this at 3:03 PM UTC+2 on May 1, 2021. The timestamp is very important to know as we will be checking these specific requests from Exchange Online to Exchange on-premises servers by looking at the IIS and optionally FREB logs, HTTPerr logs and eventually HTTPProxy logs (if the front end is an Exchange 2013 or Exchange 2016 Client Access server). Details on how to retrieve and analyze these logs are in the next section.


Gather Verbose Error from the New-MigrationEndpoint -PublicFolder cmdlet
This step is very important in order to narrow down the issue you are facing, as a detailed error message can tell us where to look further (for example you would troubleshoot an Access Denied error differently from Server Unavailable). You need to make sure you are constructing the command to create the PF migration endpoint correctly.
For this, we go first to the Exchange Management Shell on-premises and copy-paste the following values to Exchange Online PowerShell variables. Examples from my lab:
Exchange Online PowerShell Variable
|
Exchange On-Premises Value
|
$Source_RemoteMailboxLegacyDN
|
Get-Mailbox <PF_Admin>).LegacyExchangeDN
|
$Source_RemotePublicFolderServerLegacyDN
|
(Get-ExchangeServer <PF server>).ExchangeLegacyDN
|
$Source_OutlookAnywhereExternalHostName
|
(Get-OutlookAnywhere).ExternalHostName
|
$auth
|
(Get-OutlookAnywhere).ClientAuthenticationMethod
|
$Source_Credential
|
Credentials of the on-premises PF Admin Account: User Logon Name (pre-Windows2000) in format DOMAINADMIN and password. Must be member of Organization Management group in Exchange on-premises.
|
Then, connect to Exchange Online PowerShell and run this:
# command to create the PF Migration Endpoint
$PfEndpoint = New-MigrationEndpoint -PublicFolder -Name PublicFolderEndpoint -RPCProxyServer $Source_OutlookAnywhereExternalHostName -Credentials $Source_Credential -SourceMailboxLegacyDN $Source_RemoteMailboxLegacyDN -PublicFolderDatabaseServerLegacyDN $Source_RemotePublicFolderServerLegacyDN -Authentication $auth

Supposing you have an error at New-MigrationEndpoint, you would run the following commands to get the verbose error:
# command to get serialized exception for New-MigrationEndpoint error
start-transcript
$Error[0].Exception |fl -f
$Error[0].Exception.SerializedRemoteException |fl –f
stop-transcript
When you run the commands to start/ stop the transcript, you will get the path of the transcript file so that you can review it in a program like Notepad.
Cross-checking on-premises logs at the times you do these tests
IIS logs for Default Web Site (DWS): %SystemDrive%inetpublogsLogFilesW3SVC1 – UTC Timezone
If you don’t find the IIS logs in the default location, check this article to see the location of your IIS logging folder.
After you run Test-MigrationServerAvailability or New-MigrationEndpoint -PublicFolder in Exchange Online PowerShell, go to each CAS and see if you have any RPCProxy traffic in IIS logs at the timestamp corelated with Test-MigrationServerAvailability that would come from Exchange Online. Search for /rpc/rpcproxy.dll entries in Notepad++, for example.
For my Test-MigrationServerAvailability at 3:03 (UTC+2 time zone), I have 2 entries for RPC, port 6003 UTC time zone (13:03):

As you can see, only 401 entries are logged (indicating a successful test). This is because the 200 requests are ‘long-runners’ and are not usually logged in IIS. The 401 entries for port 6003 are a good indicator that these requests from Exchange Online reached IIS on your Exchange server.
If RPC traffic is not found in the IIS logs at the timestamp of the Test-MigrationServerAvailability (for example, MapiExceptionNetworkError: Unable to make connection to the server. (hr=0x80040115, ec=-2147221227), then you likely need to take a network trace on the CAS and if possible on your firewall / reverse proxy when you do test-MigrationServerAvailability.
Now is a good moment to consider the network devices you have in front of your CAS. Do you have load balancer or a CAS array; do you have CAS role installed on the PF server? Collect a network trace on the CAS.
Also check if you have any entries / errors for RPC in HTTPerr logs (if you don’t see it in the IIS logs):
HTTPerr logs: %SystemRoot%System32LogFilesHTTPERR – Server Timezone
Finally, check the Event Viewer. Filter the log for Errors and Warnings and look for events correlated with the timestamp of the failure or related to public folders databases and RPC over HTTP.
Enable failed request tracing (FREB)
Follow this article to enable failed request tracing. If required to write something in the status code, you can put for example a range of 200-599. Then, reproduce the issue and gather the logs from %systemdrive%inetpublogsFailedReqLogFilesW3SVC1

NOTE: Once you have reproduced the problem, revert the changes (uncheck Enable checkbox under Configure Failed Request Tracing). Not disabling this will cause performance problems!
Getting a MapiExceptionNoAccess error?
During a New-MigrationEndpoint or Test-MigrationServerAvailability test you might see a specific (common) error; we wanted to give you some tips on what to do about it.
Error text:
MapiExceptionNoAccess: Unable to make connection to the server. (hr=0x80070005, ec=-2147024891)
What it means:
This is an ‘Access Denied’ error for the PF admin and can happen when credentials or authentication is wrong.
Things to check:
- The correct authentication method is used (either Basic or NTLM).
- You are providing source credentials in domainusername format.
- The source credential provided is a member of Organization Management role group.
- As a troubleshooting best practice, it is recommended to create a new admin account (without copying the old account), make it a member of the Organization Management group, and try creating the PF migration endpoint using that account.
- Run the Outlook Connectivity test on Remote Connectivity Analyzer for domainadmin account and fix any reported errors.
- Check and fix any firewall/reverse proxy issues in the path before the Exchange server.
Thank you for taking the time to read this, and I hope you find it useful!
I would like to give special thanks to the people contributing to this blog post: Bhalchandra Atre, Brad Hughes, Trea Horton and Nino Bilic.
Mirela Buruiana
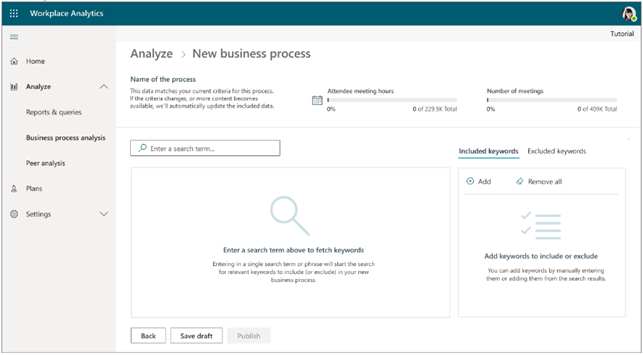
by Contributed | May 6, 2021 | Technology
This article is contributed. See the original author and article here.
The Workplace Analytics team is excited to announce our feature updates for May 2021. (You can see past blog articles here). This month’s update describes the following new features:
- Collaboration metrics with Teams IM and call signals
- Metric refinements
- Analyze business processes
- New business-outcome playbooks
- More focused set of query templates
- Workplace Analytics now supports mailboxes in datacenters in Germany
Collaboration metrics with Teams IM and call data
In response to customer feedback and requests, we are including data from Teams IMs and Teams calls in several collaboration and manager metrics. Queries that use those metrics will now give clearer insights about team collaboration by including this data from Teams. This change will help leaders better understand how collaboration in Microsoft Teams impacts wellbeing and productivity. It’s now possible to analyze, for example, the change in collaboration hours as employees have begun to use Teams more for remote work, or the amount of time that a manager and their direct report spend a Teams chat.
Changed metrics
The inclusion of Teams data changes the following metrics, organized by query:
In Person and Peer analysis queries
Collaboration hours
Working hours collaboration hours
After hours collaboration hours
Collaboration hours external
Email hours
After hours email hours
Working hours email hours
Generated workload email hours
Call hours
After hours in calls
Working hours in calls
In Person-to-group queries
Collaboration hours
Email hours
In Group-to-group queries
Collaboration hours
Email hours
For complete descriptions of these and all metrics that are available in Workplace Analytics, see Metric descriptions.
Metric refinements
In addition to adding Teams data to the metrics listed in the preceding section, we’ve made some other improvements to the ways that we calculate metrics, and we’ve added new metric filter options, as described here:
- Integration of Microsoft Teams chats and calls into metrics – In the past, the Collaboration hours metric simply added email hours and meeting hours together, but in reality, these activities can overlap. Collaboration hours now reflects the total impact of different types of collaboration activity, including emails, meetings, and – as of this release – Teams chats and Teams calls. Collaboration hours now captures more time and activity and adjusts the results so that any overlapping activities are only counted once.
- Improved outlier handling for Email hours and Call hours – When data about actual received email isn’t available, Workplace Analytics uses logic to impute an approximation of the volume of received mail. We are adjusting this logic to reflect the results of more recent data science efforts to refine these assumptions. Also, we had received reports about measured employees with extremely high measured call hours. This was a result of “runaway calls” where the employee joined a call and forgot to hang up. We have capped call hours to avoid attributing excessive time for these scenarios.
- Better alignment of working hours and after-hours metrics – Previously, because of limitations attributing certain types of measured activity to specific time of day, after-hours email hours plus Working hours email hours and after-hours collaboration hours plus Working hours collaboration hours did not add up to total Email hours or Collaboration hours. We have improved the algorithms for these calculations to better attribute time for these metrics, resulting in better alignment between working hours and after-hours metrics.
- New metric filter options – We’ve added new participant filter options to our email, meeting, chat, and call metrics for Person queries: “Is person’s manager” and “Is person’s direct report.” These new options enable you to filter activity where all, none, or at least one participant includes the measured employee’s direct manager or their direct report. You can use these new filters to customize any base metric that measures meeting, email, instant message, or call activity (such as Email hours, Emails sent, Working hours email hours, After hours email hours, Meeting hours, and Meetings).
Analyze business processes
When you and your co-workers perform an organized series of steps to reach a goal, you’ve participated in a business process. In this feature release, we are providing the ability to analyze business processes — for example, to measure their cost in time and money. In doing so, we are proviadditional analytical capabilities to customers who would like to study aspects such as time spent on particular tasks (such as sales activities or training & coaching activities), the nature of collaboration by geographically diverse teams, branch-office work in response to corporate-office requests, and so on.
For example, your business might conduct an information-security audit from time to time. Your CFO or CIO might want to know whether too little, too much, or just the right amount of time is being spent on these audits, and whether the right roles of employees have been participating in them. You analyze a real-world business processes such as this by running Workplace Analytics meeting or person queries. And now, as you do this, you can use a digital “business process” as a filter. It’s these business-process filters that you define in the new business—process analysis feature.
The new business-process analysis feature of Workplace Analytics
For more information about business-process analysis in Workplace Analytics, see Business processes analysis.
New business-outcome playbooks
We’ve published four new analyst playbooks that introduce advanced analyses with Workplace Analytics and guide you in how to create and implement them. These playbooks will help you with the following use cases:
- Boost employee engagement – By joining engagement and pulse survey data with Workplace Analytics data, it’s now easier to uncover insights and opportunities around ways of working, employee wellbeing, manager relationships, and teams and networks.
- Improve customer focus and sales enablement – Improve the collaboration effectiveness of your salesforce by augmenting Workplace Analytics with CRM data.
- Enhance operational effectiveness – Identify areas to improve operational effectiveness, including business processes and organizational activity, through process analysis.
- Take insights to action – Drive behavioral change by using Workplace Analytics and MyAnalytics together.

Each playbook provides a framework for conducting the analysis, sample outputs based on real work, and best practices for success to help you uncover opportunities more quickly and create valuable change. You can access the new playbooks through the Resource playbooks link in the Help menu of Workplace Analytics:

More focused set of query templates
To more clearly highlight the high-value and modern query templates that we offer in Workplace Analytics, we have focused the set of available query templates.
Over the past few years, we’ve released numerous query templates that help you solve new business problems and access rich insights. Unfortunately, so many templates appeared that it became challenging to differentiate them and choose the right one for your task. This month, we have removed some of the templates to make it easier to select and run the latest and greatest templates available.
Don’t worry though; the results of queries that you’ve already run, even from retired templates, will continue to appear on the Results page, and any Power BI templates that you’ve already set up will continue to run as expected.

The new, more focused set of available query templates
For more information about Workplace Analytics queries, see Queries overview.
Workplace Analytics supports mailboxes in the Germany Microsoft 365 datacenter geo location
now offers full Workplace Analytics functionality for organizations whose mailboxes are in the Germany Microsoft 365 datacenter geo location. (Workplace Analytics now supports every Microsoft 365 datacenter geo location other than Norway and Brazil, which are expected to gain support soon.) See Environment requirements for more information about Workplace Analytics availability and licensing.
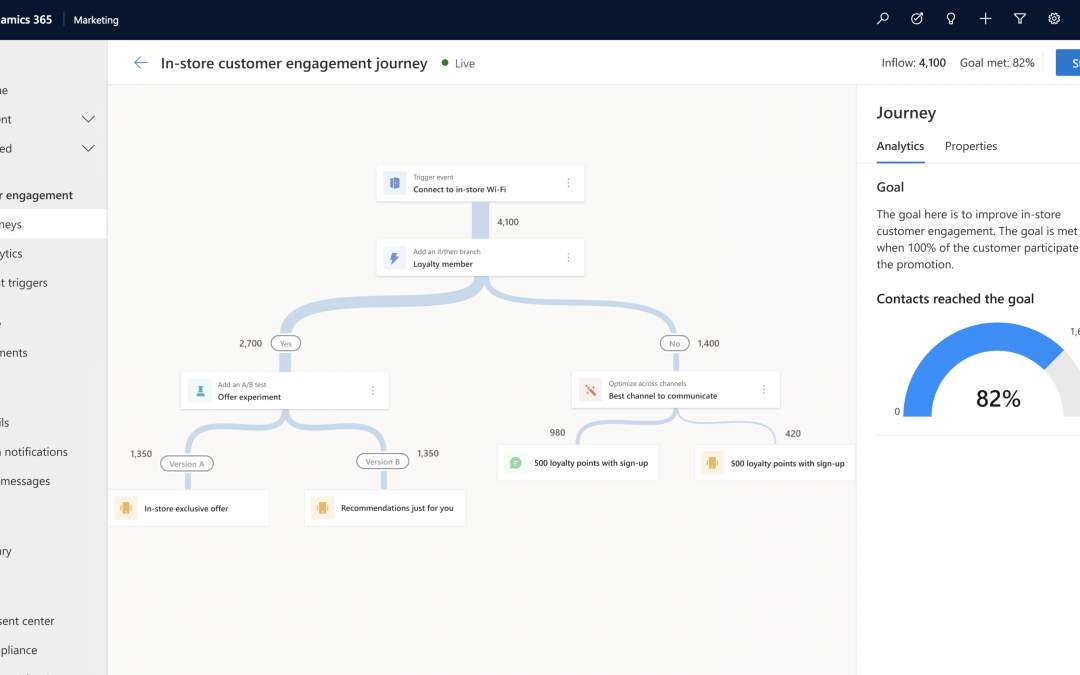
by Contributed | May 6, 2021 | Dynamics 365, Microsoft 365, Technology
This article is contributed. See the original author and article here.
All businesses operate in a competitive environment and customer experience (CX) is top of mind as we rise to today’s challenges of finding ways to differentiate, delivering on business goals and meeting increasing customer demands. Customers expect great experiences from the companies they interact with and companies that deliver superior experiences build strong bonds with their customers and perform better.
Microsoft Dynamics 365 Marketing is the secret weapon that will help you elevate your CX game across every department of your company, whether it’s marketing being tasked with driving growth, or the sales department optimizing in-store and online sales, or the customer service department driving retention, upsell and personalized care. With AI-assistance, business users can build event-based journeys that reach customers across multiple touchpoints, growing relationships from prospects, through sales and support.
Today marks a monumental event for Dynamics 365 Marketing: the much-anticipated real-time customer journey orchestration features are making their preview debut! Rich new features empower customer experience focused organizations to:
- Engage customers in real time.
- With features such as event-based customer journeys, custom event triggers, and SMS and push notifications, organizations can design, predict, and deliver content across the right channels in the moment of interaction, enabling hyper-personalized customer experiences.
- Win customers and earn loyalty faster.
- Integrations with Dynamics 365 apps make real-time customer journeys a truly end-to-end experience.
- Personalize customer experiences with AI.
- Turn insights into relevant action with AI-driven recommendations for content, channels, segmentation, and analytics.
- Customer Insights segment and profile integration allows organizations to build deep 1:1 personalization.
- Grow with a unified, adaptable platform.
- Easily customize and connect with tools you already use.
- Efficiently manage compliance requirements and accessibility guidelines.
Some of Dynamics 365 Marketing’s standout features are listed below. To read about all of the new features, check out the real-time customer journey orchestration user guide or see a demo of the real-time marketing features in action from Microsoft Ignite 2021.
1. Real-time, event-based customer journey orchestration
Looking for a better way to engage your audience over pre-defined segment-based marketing campaigns? Look to moments-based interactions that allow you to react to customers’ actions in real time with highly personalized content for each individual customer. These moments-based customer-led journeys are easy to create with our new intuitive customer journey designer which is infused with AI-powered capabilities throughout. You can orchestrate holistic end-to-end experiences for your customers that engage other connected departments in your company such as customer service, sales, commerce systems, and more. What’s even better? You don’t need a team of data scientists or developers to implement these journeys let the app do the heavy lifting for you. Use point-and-click toolbox in the designer to create each step in the journey, and AI-guided features to create, test, and ensure your message is delivered in the right channel for each individual customer.
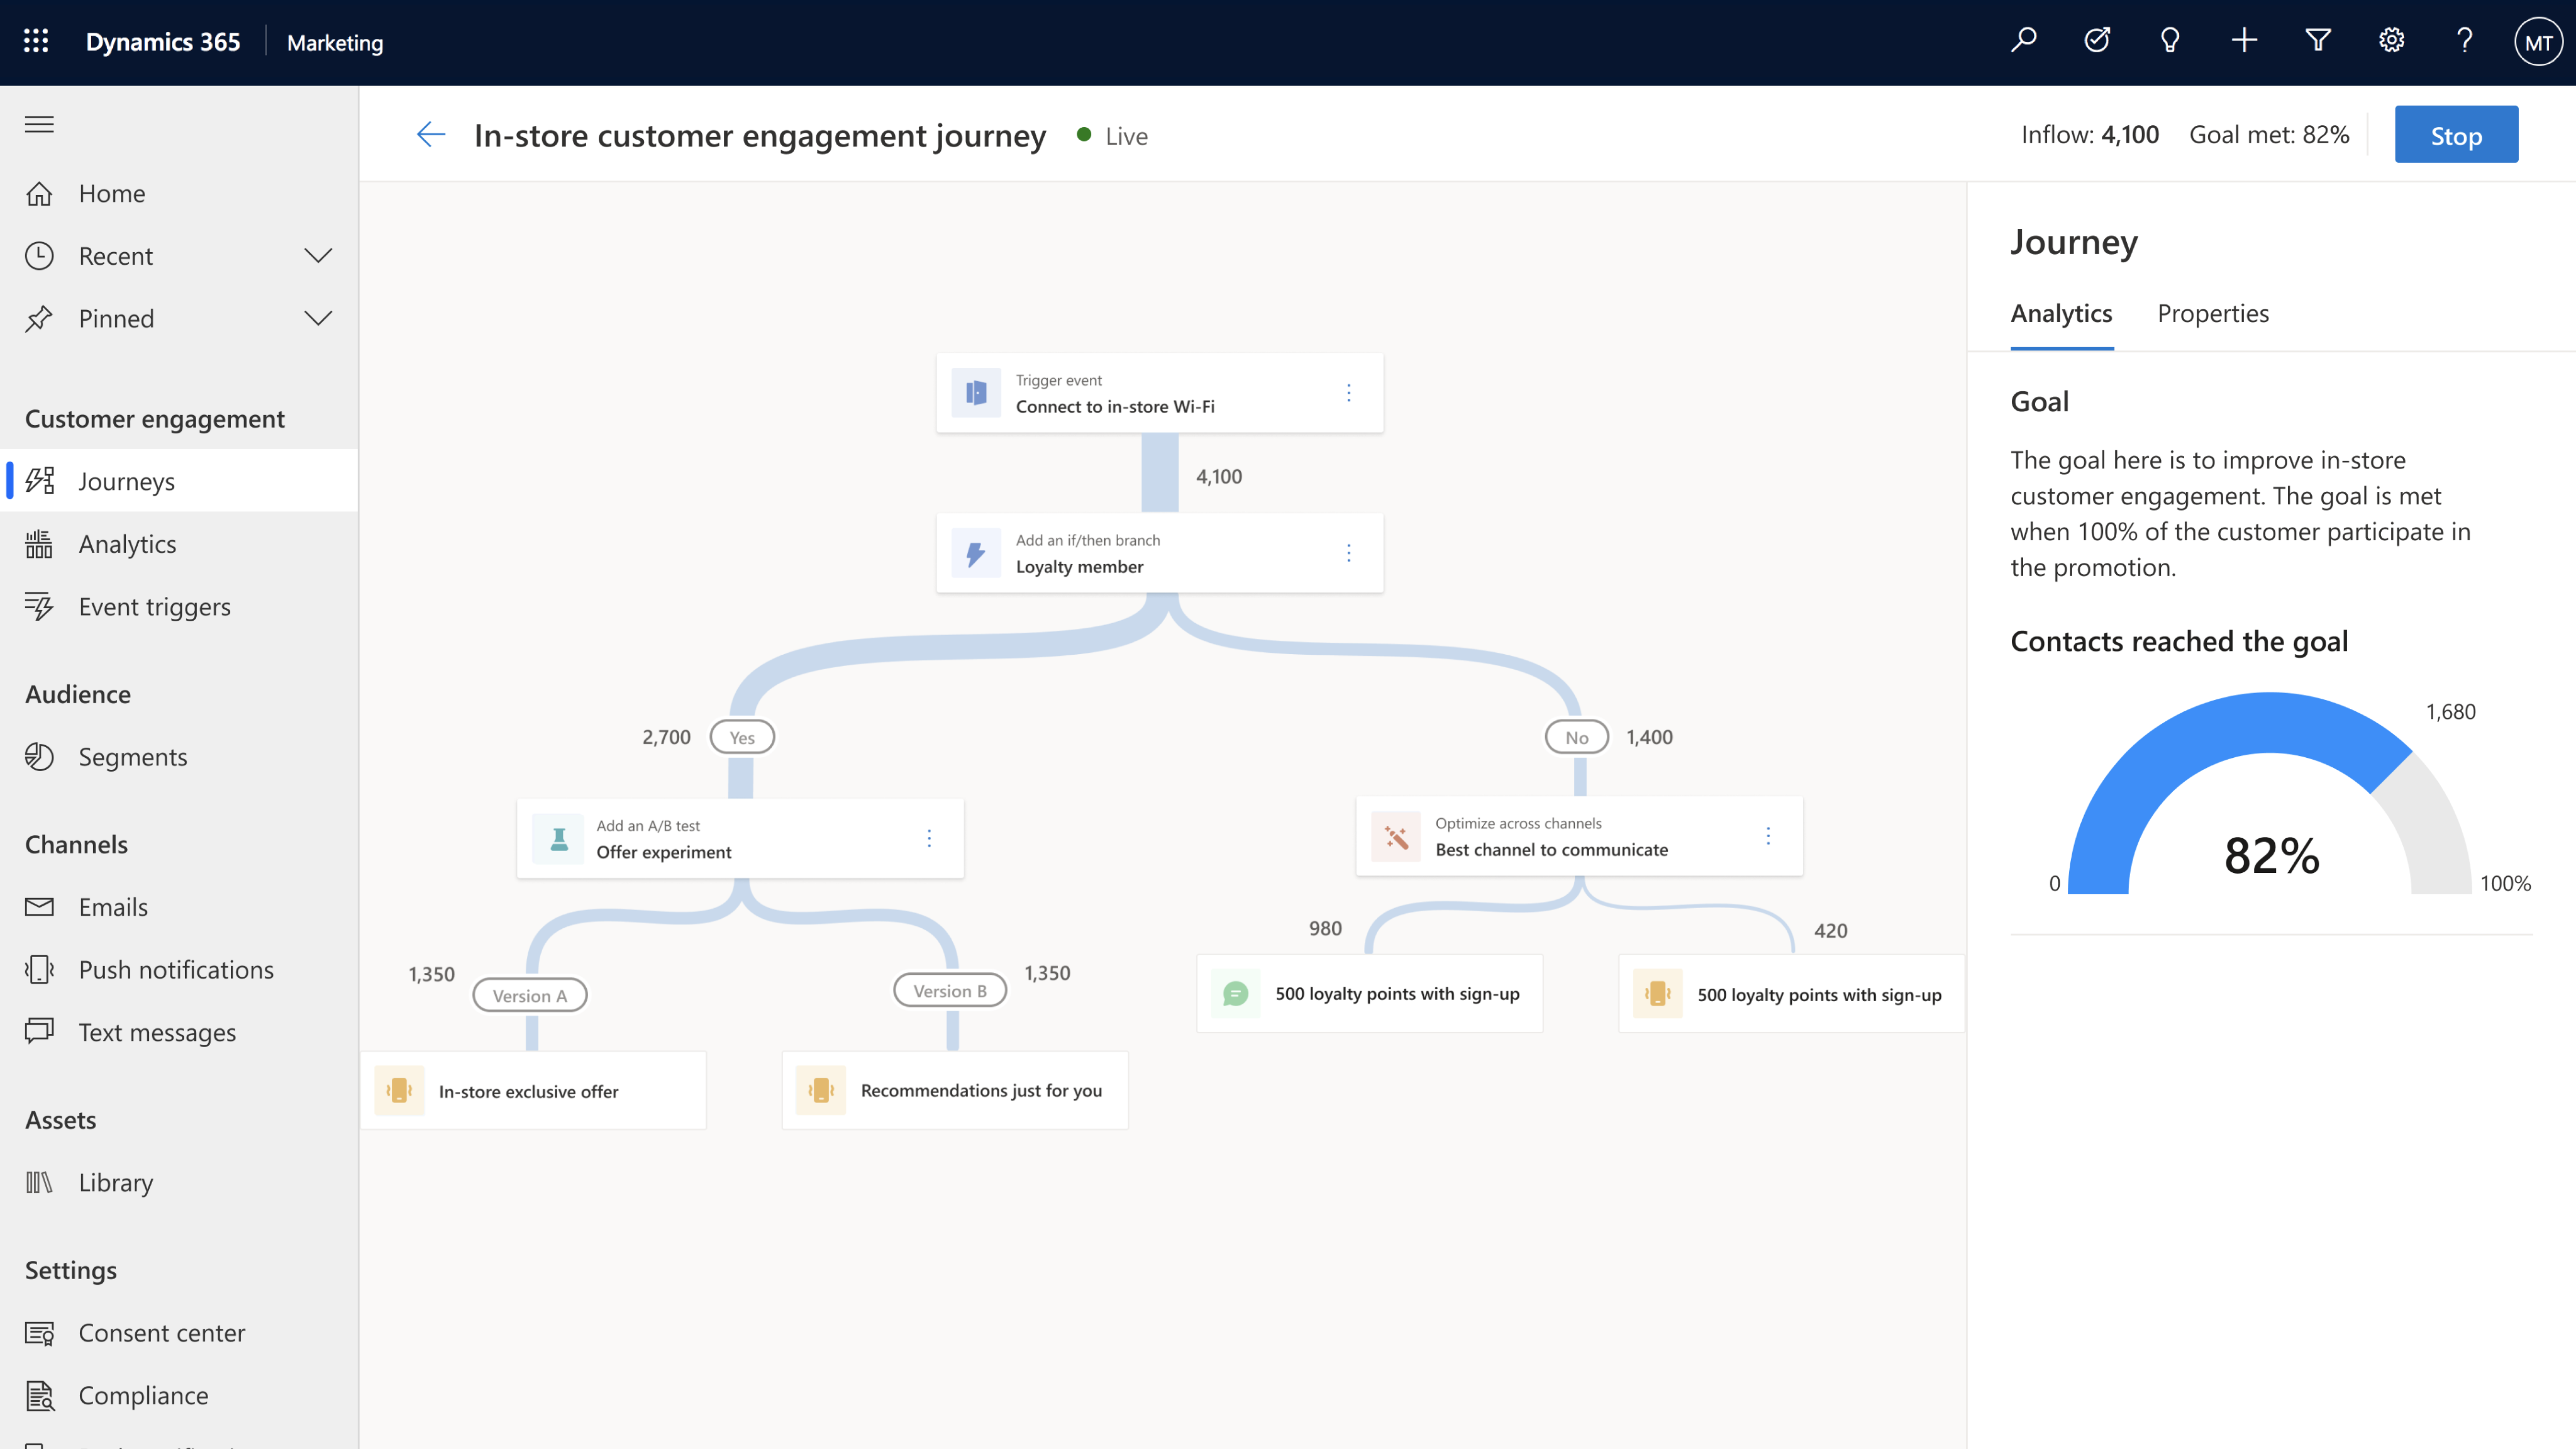
2. Event catalog with built-in and custom events for triggering customer journeys
Journeys created with Dynamics 365 Marketing are customer led, they can start (or stop) when an event is triggered and can be executed in real time. “Events” are activities that your customer performs, including digital activities like interacting on your website, or physical ones like walking into a store and logging onto the Wi-Fi. Event triggers are the powerhouses behind the scenes that make it all happen, and you can create them quickly and easily by using built-in events from the intuitive event trigger catalog or creating custom events that are specific to your business.
By strategically using event triggers you can break down silos between business functions. Gone are the days of tone-deaf, disconnected communications from different departments, now you can deliver a congruous end-to-end experience for each of your customers.
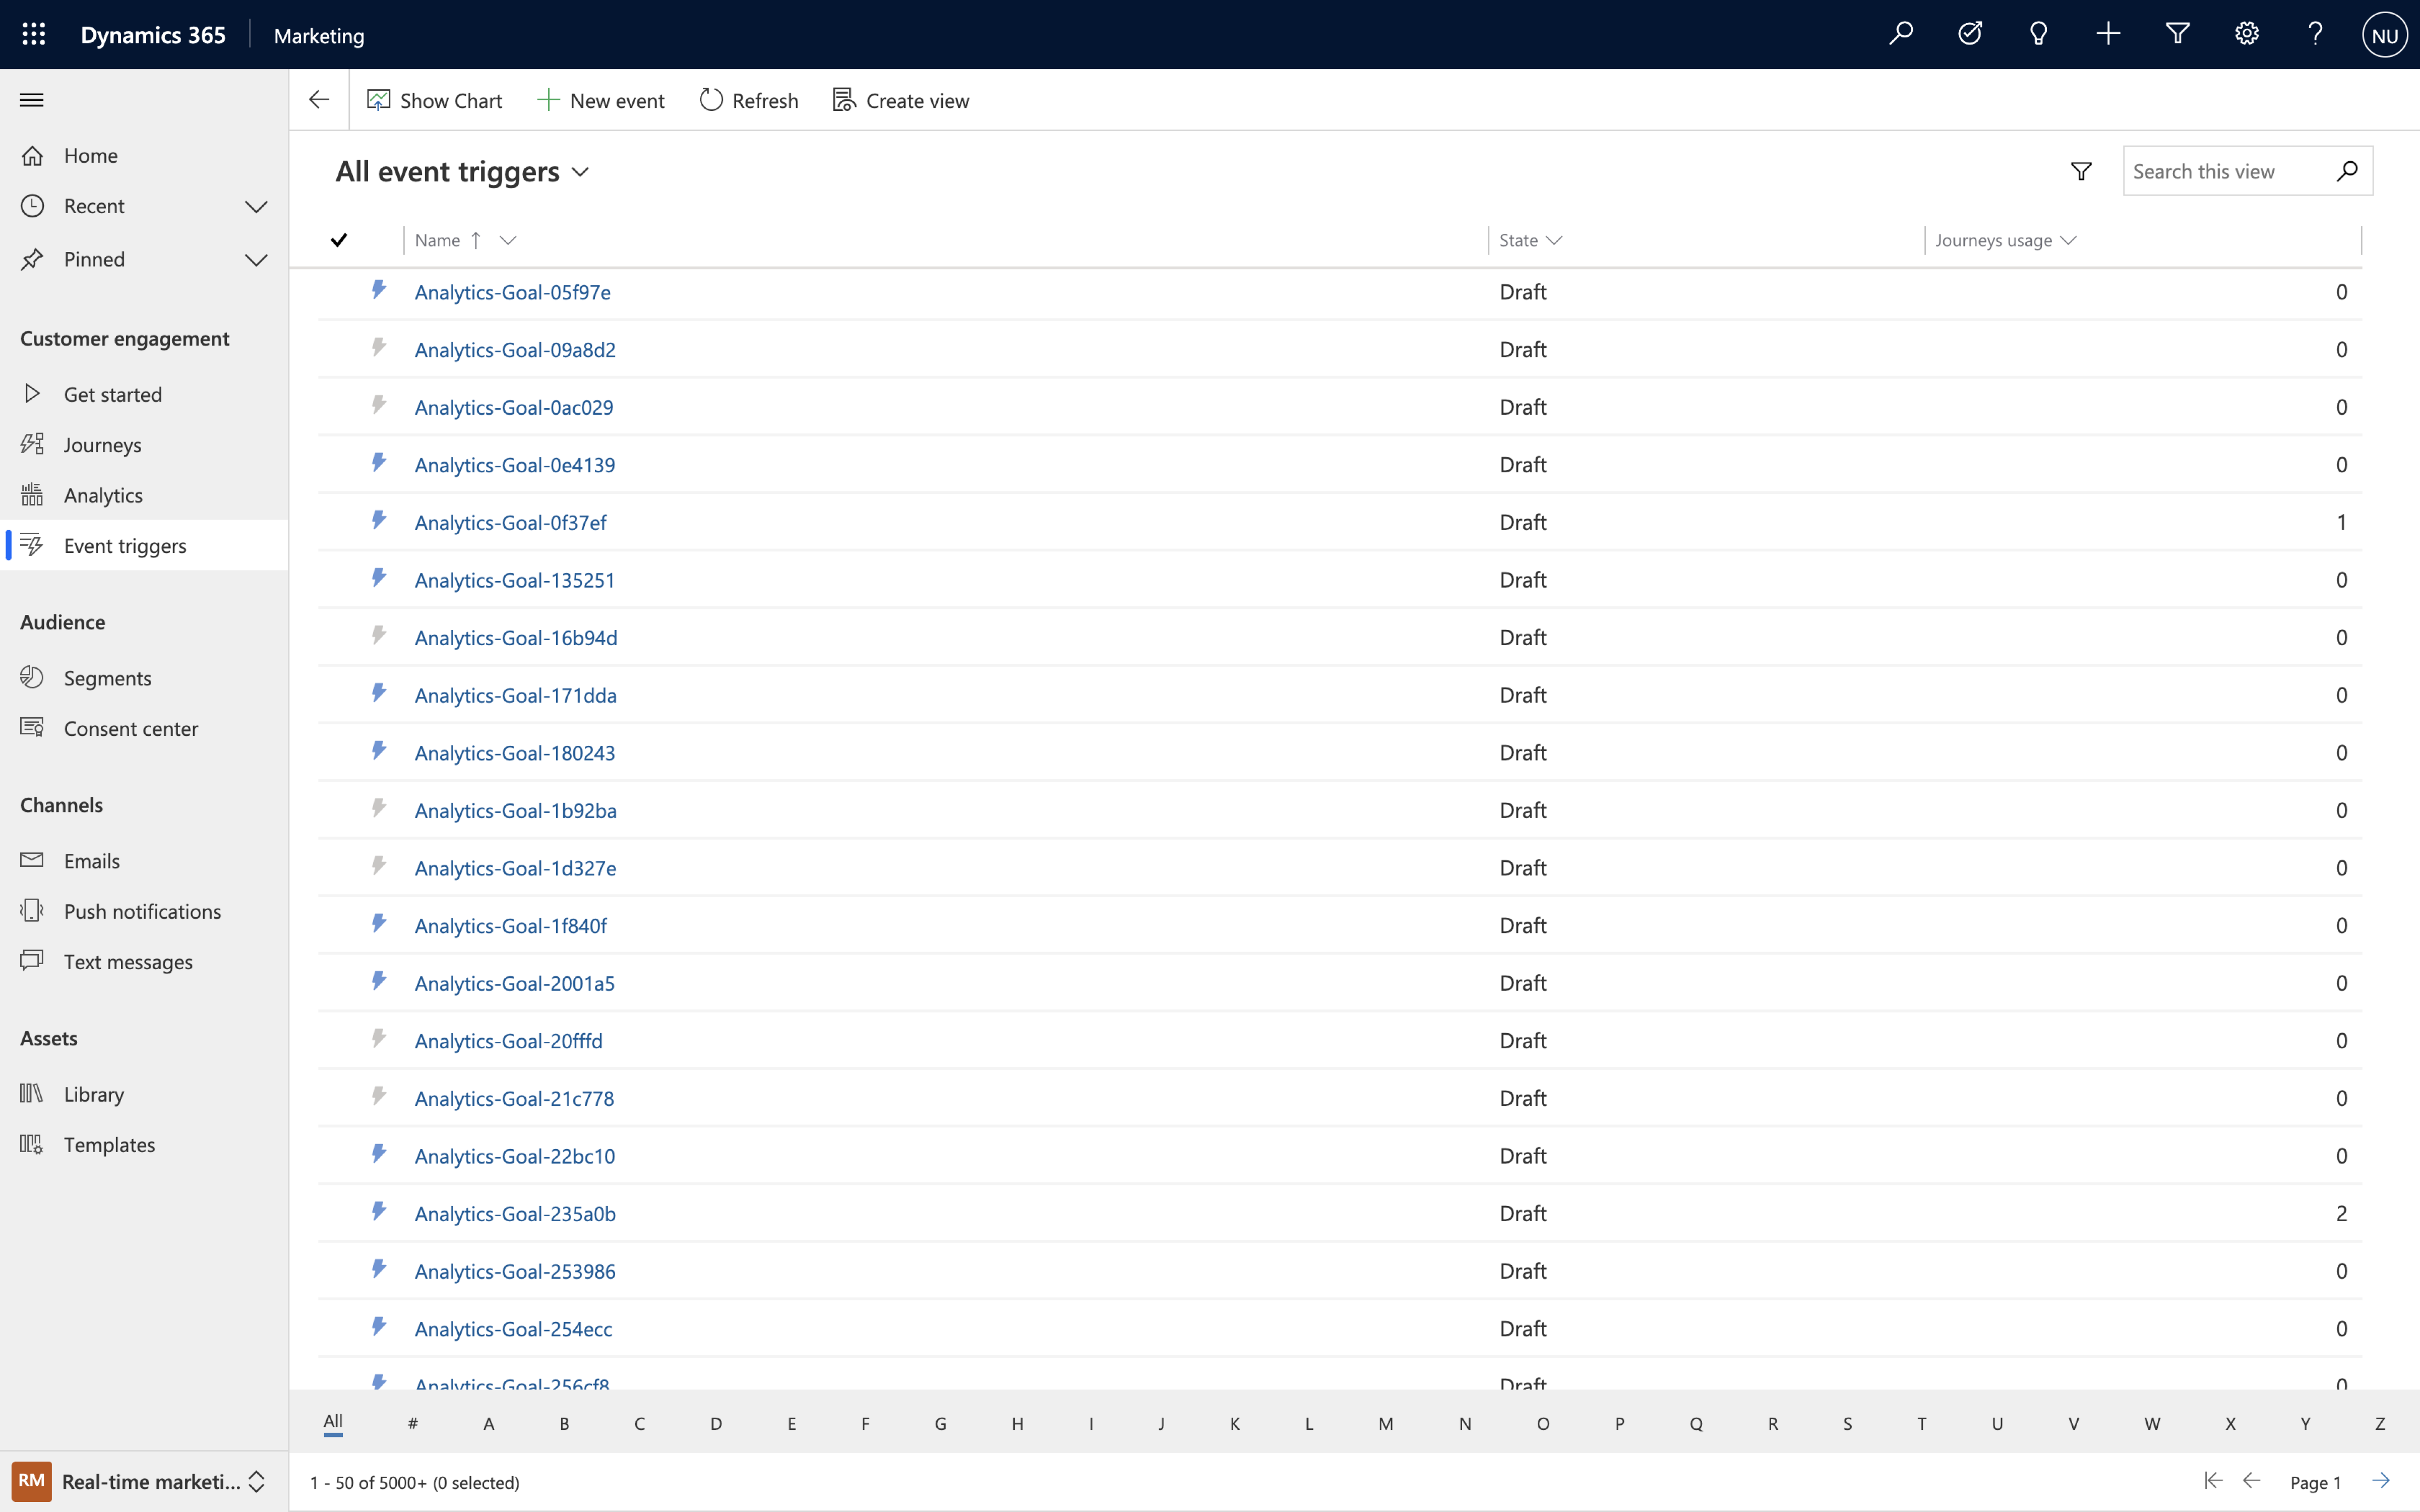
3. Hyper-personalize customer journeys using data and insights from Dynamics 365 Customer Insights
Dynamics 365 Marketing goes beyond a typical marketing automation tool by leveraging the power of data, turning that data into insights, and activating it. Microsoft’s customer data platform, Dynamics 365 Customer Insights, makes it easy to unify customer data, augment profiles and identify high-value customer segments. You can use this profile and segment data in Dynamics 365 Marketing to fine tune your targeting and further refine your journeys so that you can drive meaningful interactions by engaging customers in a personalized way.
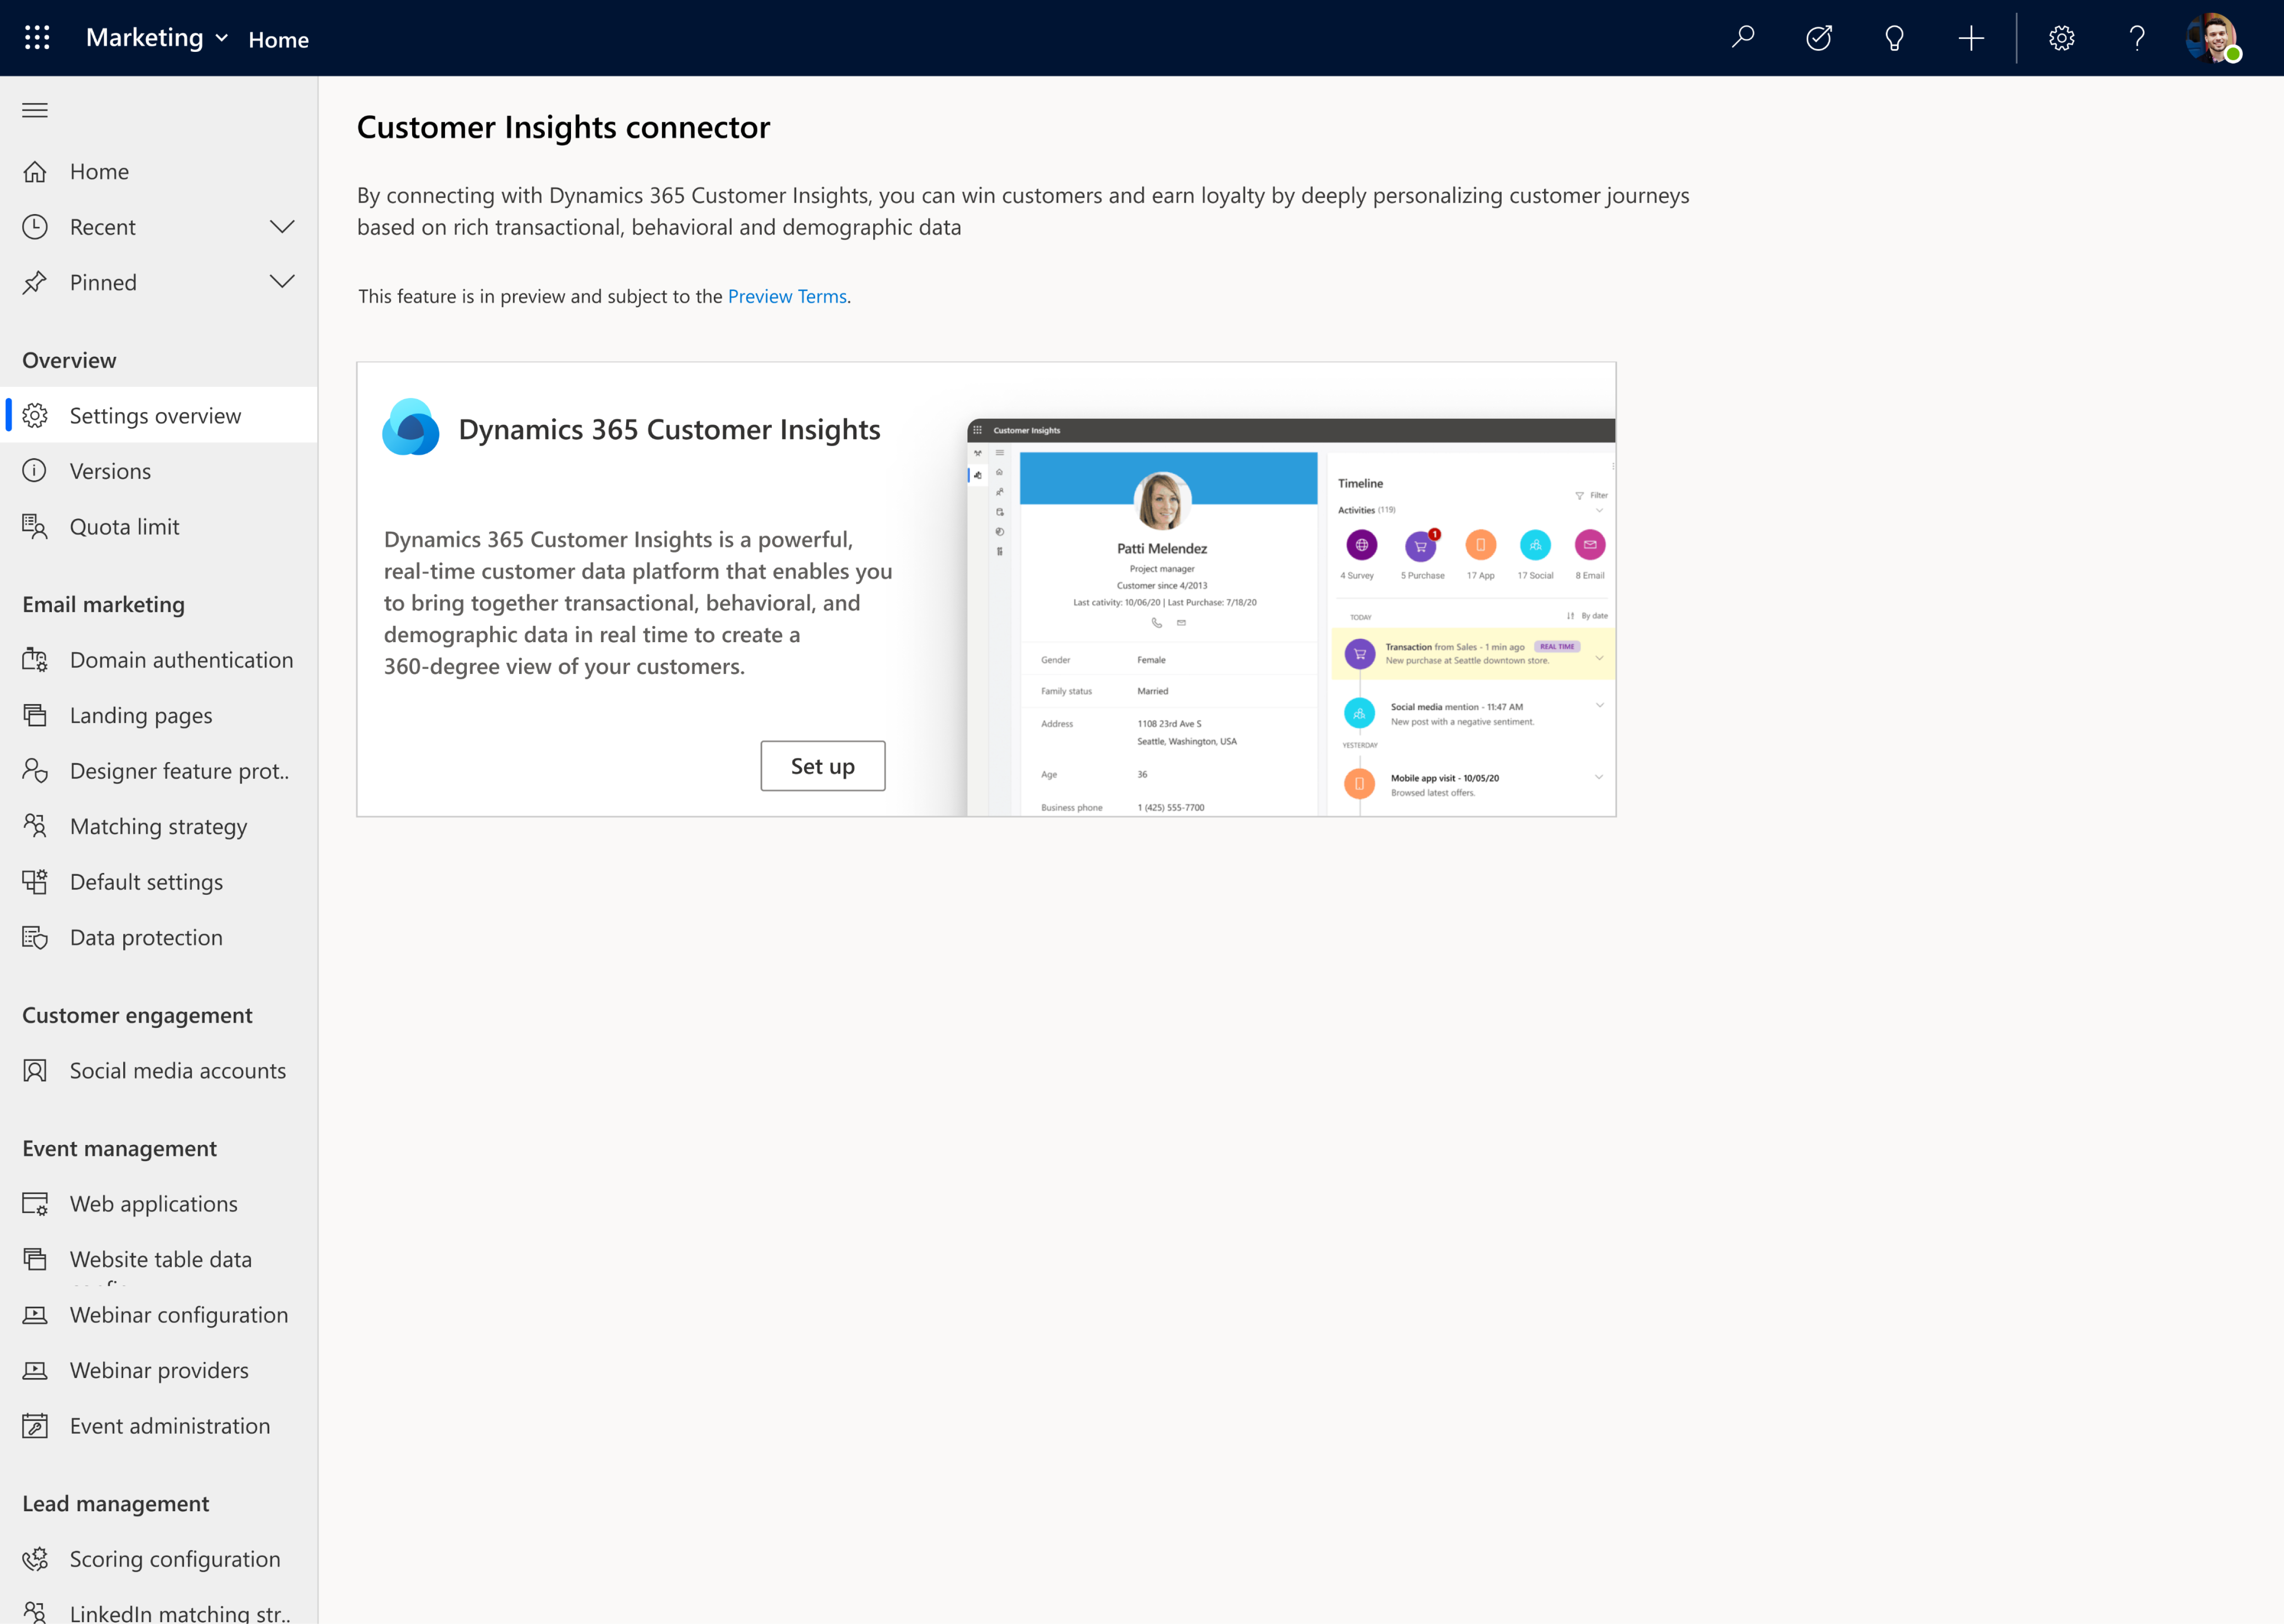
4. Author personalized emails quickly and easily using the new email editor
The completely new, intuitive, and reliable Dynamics 365 Marketing email editor helps you to produce relevant emails with efficiency and ease. The modern layout with the redesigned toolbox and property panes makes everything simpler to find. Personalization is also streamlined just click the “Personalization” button to navigate through all available data so you can customize your messages with speed and ease.
You can also take advantage of new AI-powered capabilities within the editor like AI-driven recommendations to help you to find the best media to complement the content in your messages. We make it easy to create professional emails with advanced dynamic content resulting in messages that better resonate with your customers.

5. Create and send personalized push notifications and SMS messages
Because email is not the only channel to reach your customers, we have also streamlined personalization across SMS messages and push notifications and made both editors easy and intuitive to use so you can create beautiful, customized messages to keep your customers engaged throughout transactional communications, marketing campaigns, and customer service communications. Using these additional channels enables you to react to customer interactions across touchpoints.
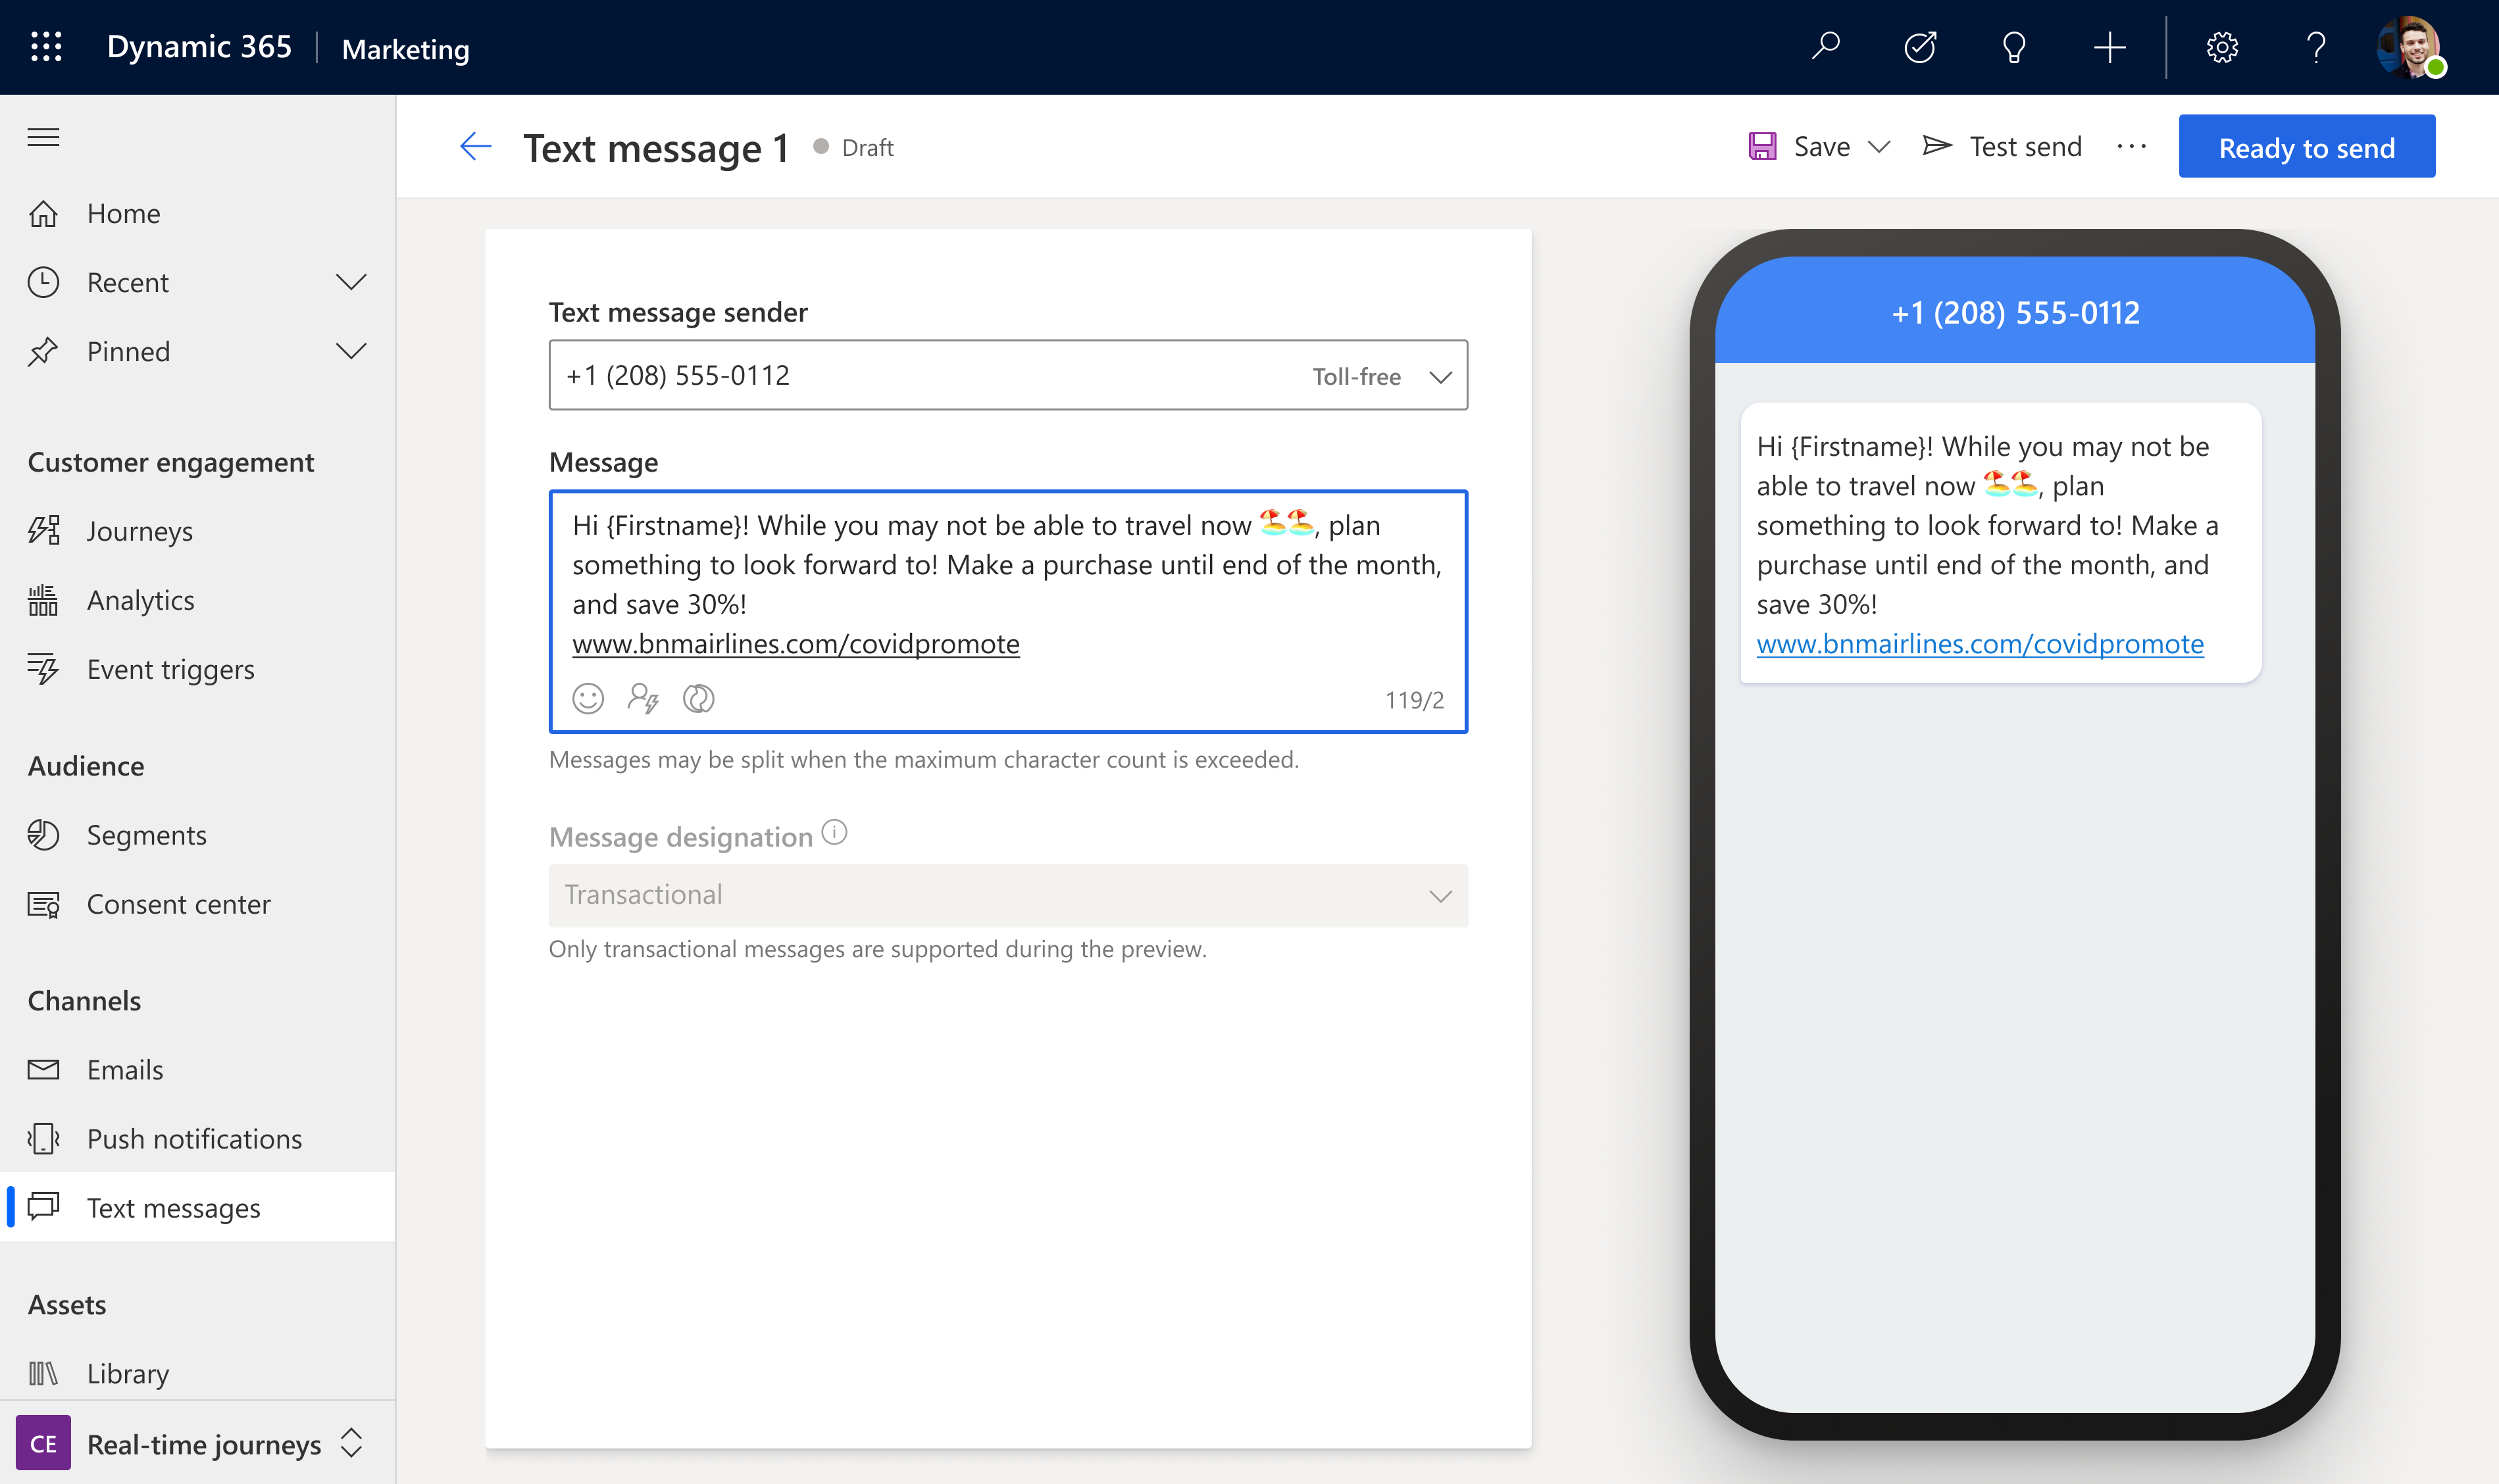
6. Search, manage, and tag your digital assets with a new centralized asset library
The new centralized asset library is the cherry on top of all channel content creation within Dynamics 365 Marketing. The new centralized library lets you upload files then AI automatically tags them for you. You can then search, update and add or delete images. No matter where you’re accessing the centralized library from, you’ll have access to the latest assets for your company helping you to build successful multitouch experiences for your customers.
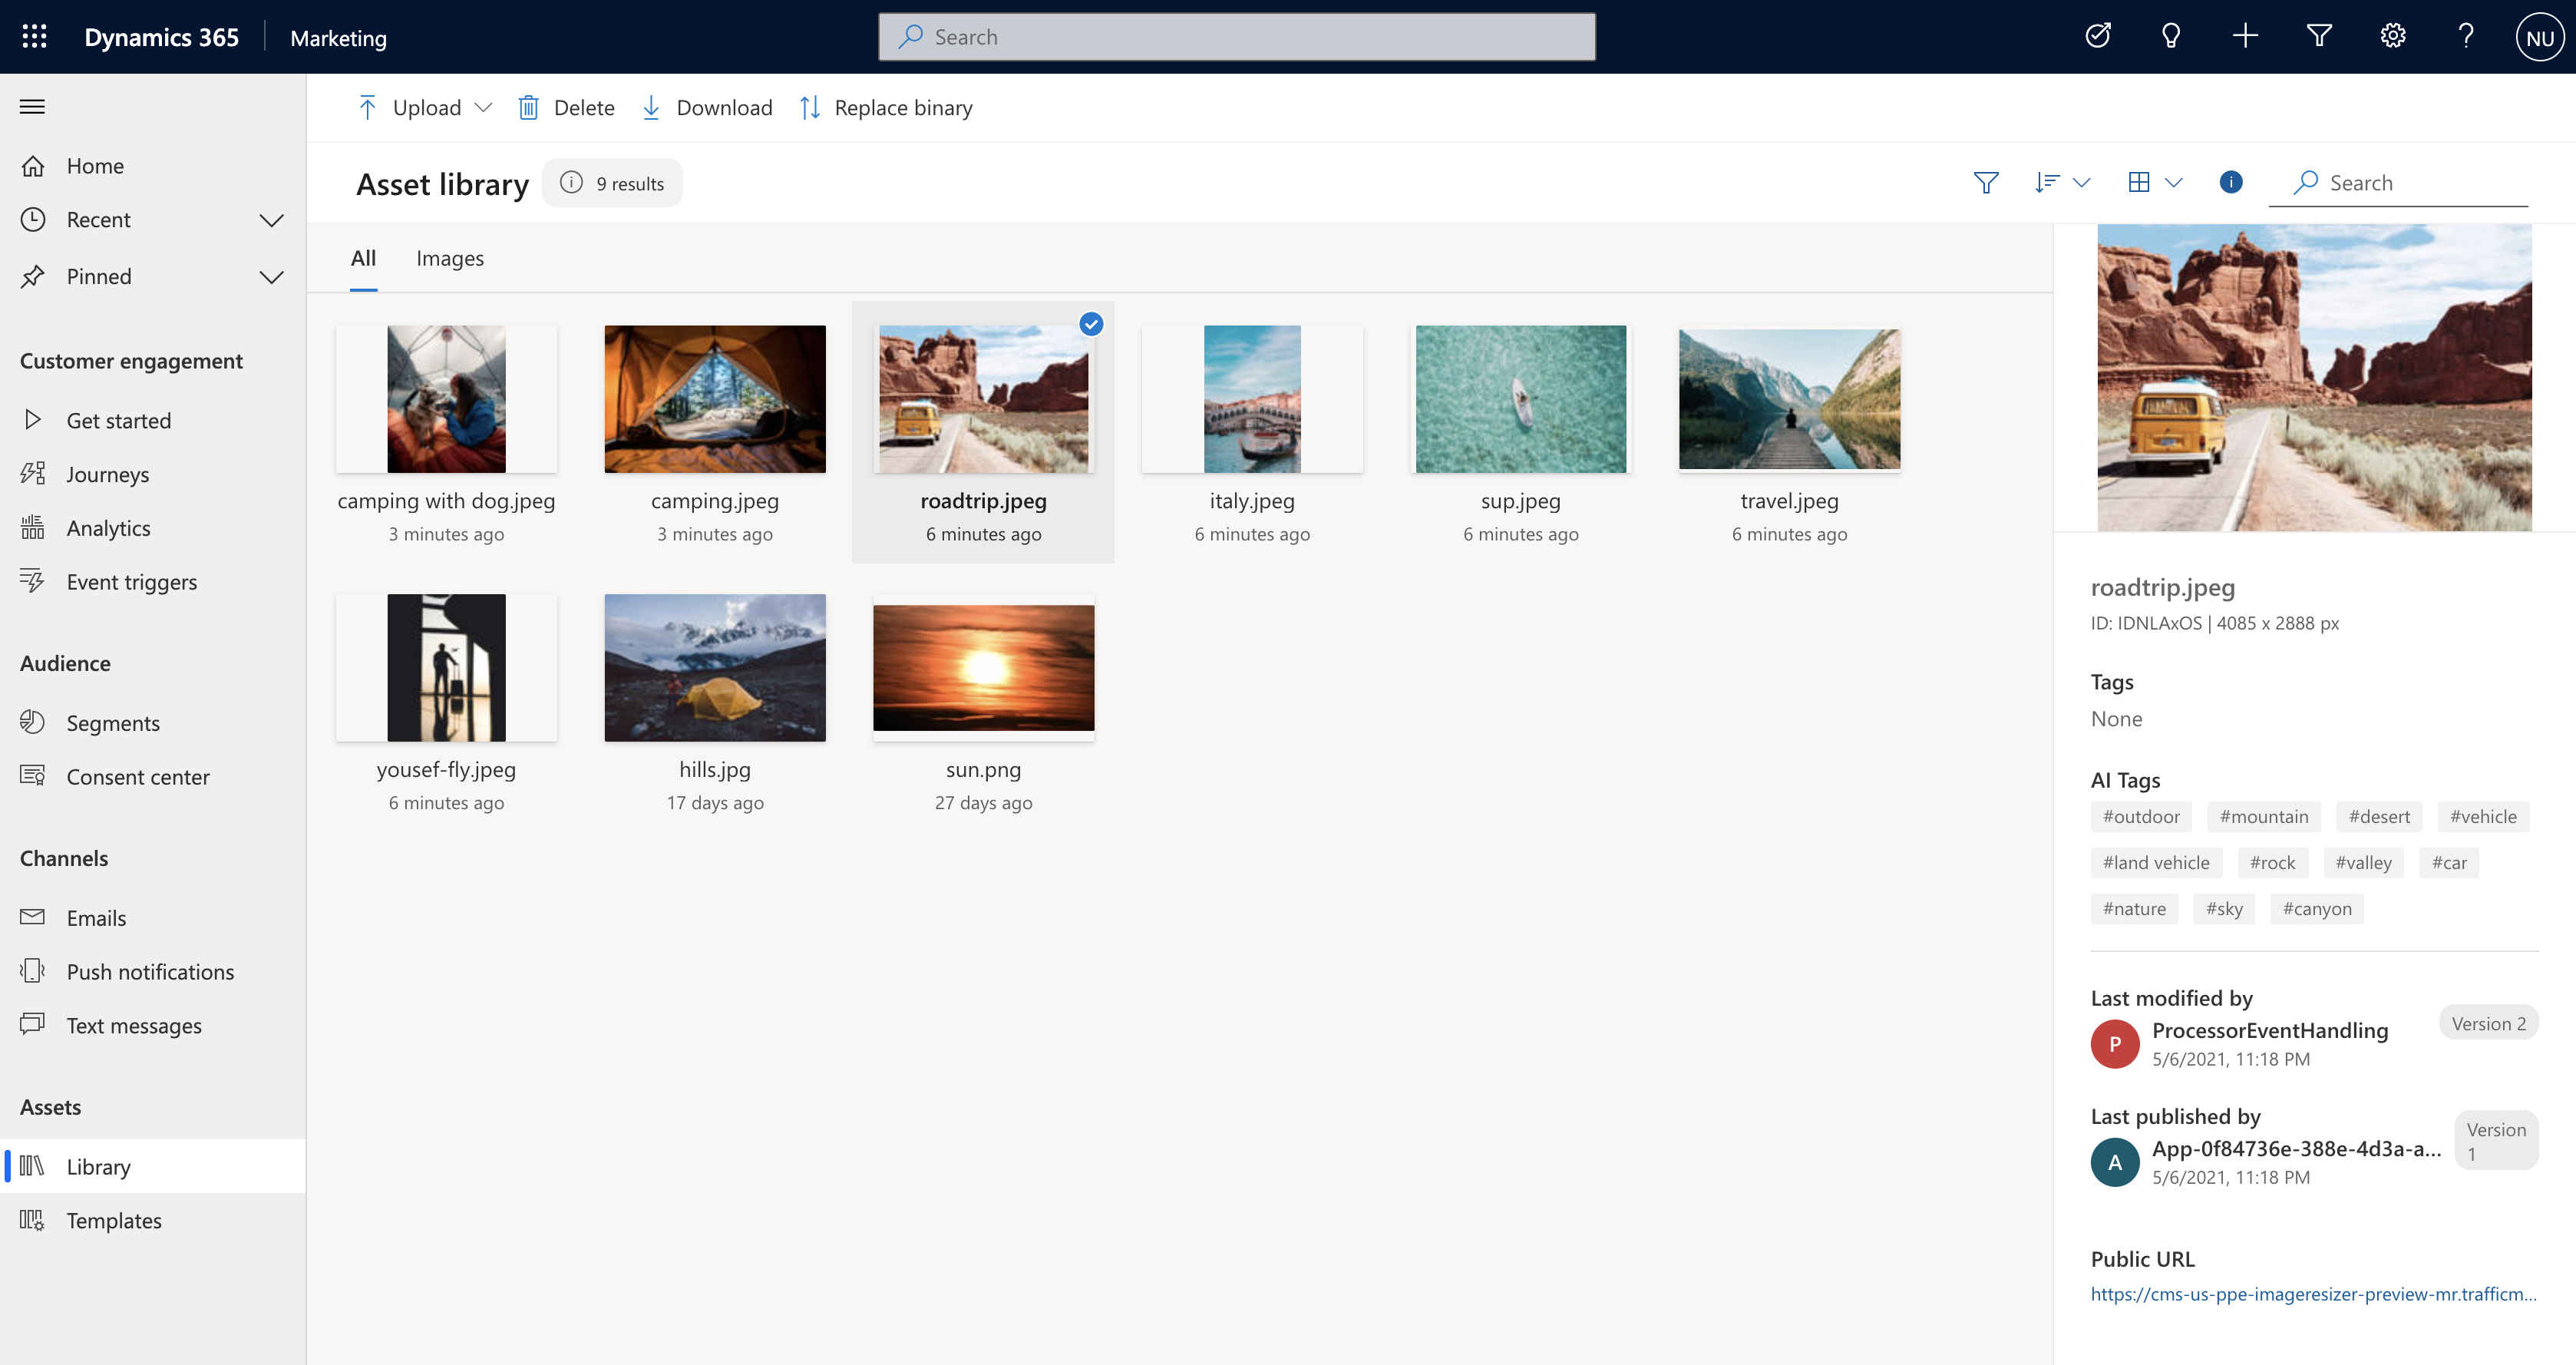
7. Improve journey effectiveness with a built-in cross-journey aggregate dashboard
At the end of the day, you want to know if your customer journey is meeting its objectives. Dynamics 365 Marketing not only helps you to easily set the business and user-behavior goals for your customer journeys, it tracks progress towards those goals and gives you a clear dashboard with the results so you can troubleshoot areas of friction or see what’s working so you can recreate that same approach in other journeys. The new built-in analytics dashboard also makes it easy to view results and act upon cross-journey insights to further optimize individual journeys.
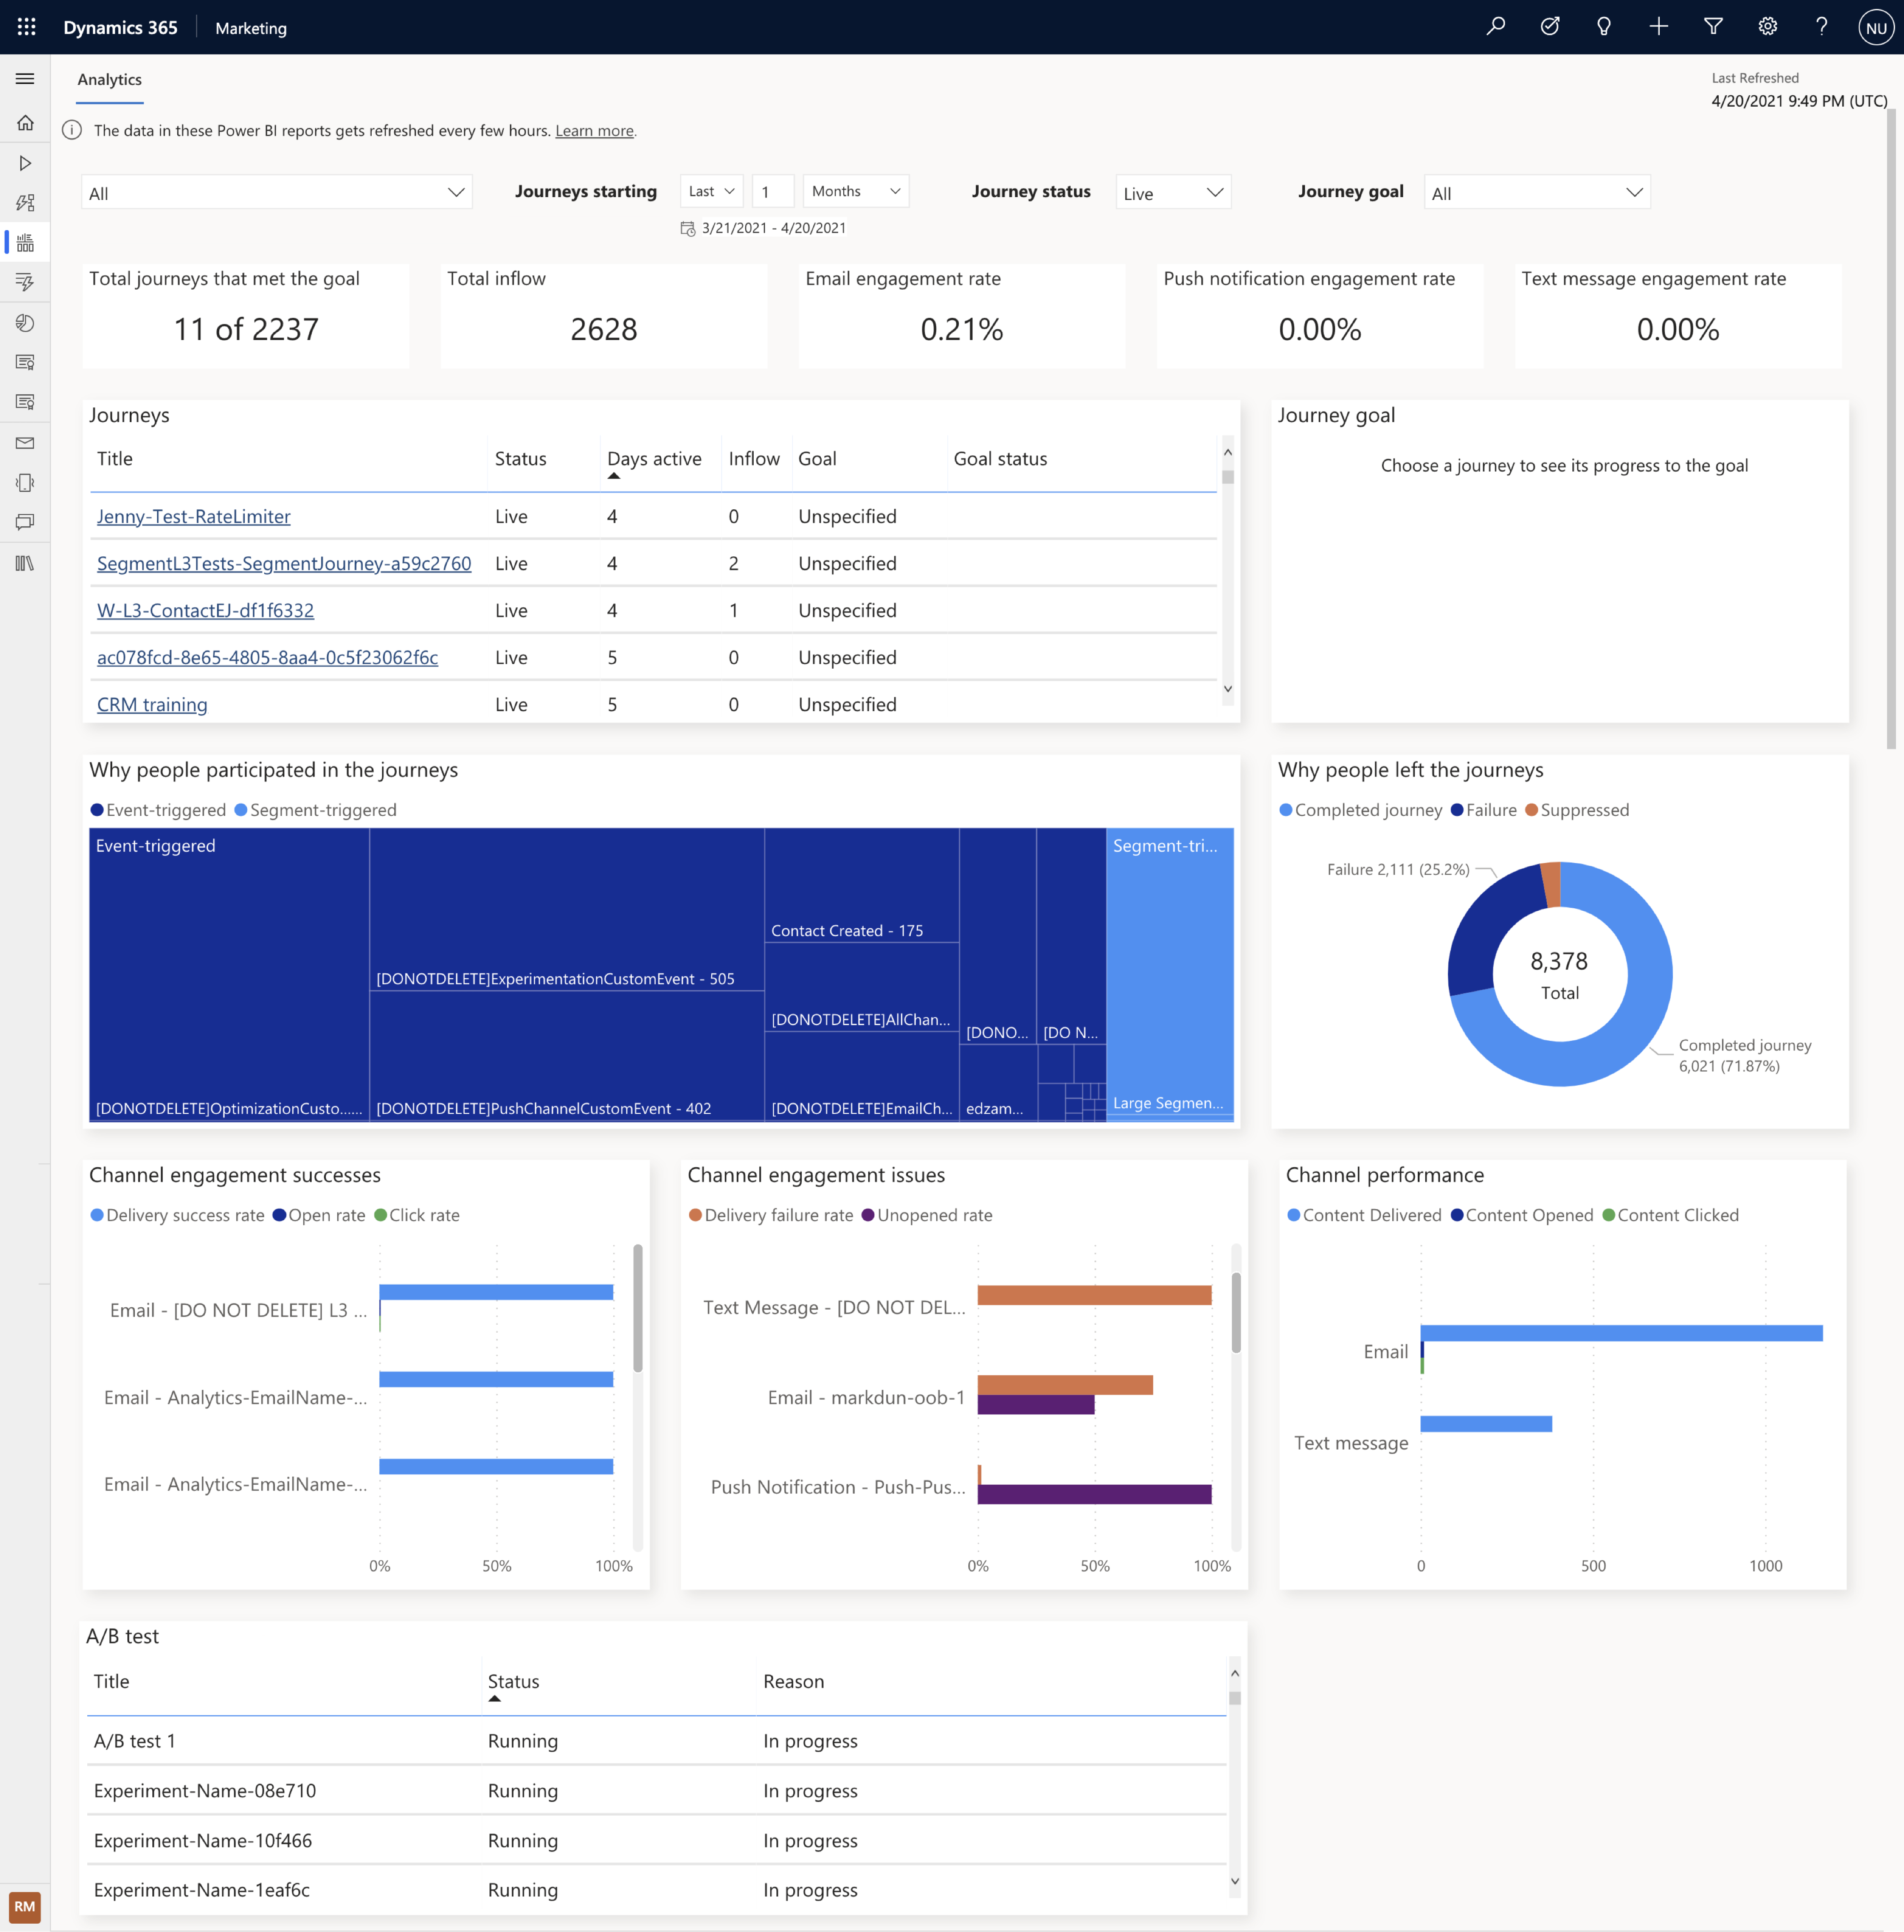
These preview capabilities are now available to customers who have environments located in the U.S. datacenter, and will be available to customers with environments located in the Europe datacenter starting early next week. When you log into the product, a notification banner will let you know when the preview capabilities are available for you to install. You can install these from the settings area of your app. If you are not a Dynamics 365 Marketing customer yet, get started with a Dynamics 365 Marketing free trial to evaluate them.
We look forward to hearing from you about the release wave 1 updates for Dynamics 365 Marketing and stay tuned, we have a lot more coming!
The post Microsoft Dynamics 365 Marketing customer journey orchestration preview now available appeared first on Microsoft Dynamics 365 Blog.
Brought to you by Dr. Ware, Microsoft Office 365 Silver Partner, Charleston SC.


Recent Comments