by Contributed | May 14, 2021 | Technology
This article is contributed. See the original author and article here.
One of my favorite features of (the now General Available) Azure Static Web Apps (SWA) is that in the Standard Tier you can now provide a custom OpenID Connect (OIDC) provider. This gives you a lot more control over who can and can’t access your app.
In this post, I want to look at how we can use Auth0 and an OIDC provider for Static Web Apps.
For this, you’ll need an Auth0 account, so if you don’t already have one go sign up and maybe have a read of their docs, just so you’re across everything.
Creating a Static Web App
For this demo, we’ll use the React template, but what we’re covering isn’t specific to React, it’ll be applicable anywhere.
Once you’ve created your app, we’re going to need to setup a configuration file, so add staticwebapp.config.json to the repo root.
This config file is used for controlling a lot of things within our SWA, but the most important part for us is going to be the auth section. Let’s flesh out the skeleton for it:
{
    "auth": {
        "identityProviders": {
            "customOpenIdConnectProviders": {}
        }
    }
}
Great! Now it’s time to setup Auth0.
Creating an Auth0 application
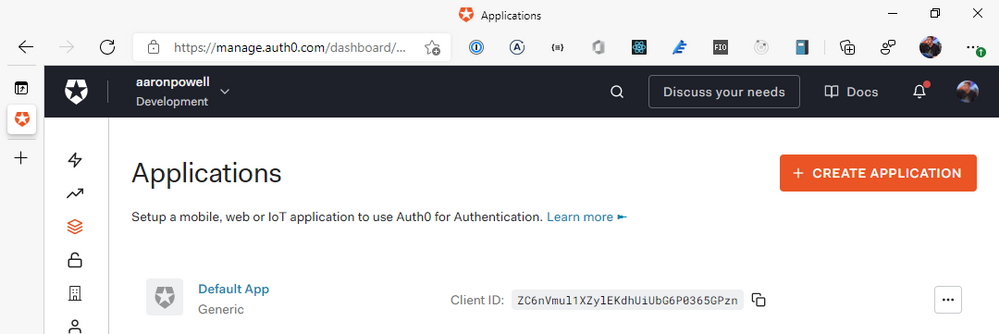
Log into the Auth0 dashboard and navigate through to the Applications section of the portal:
From here, we’re going to select Create Application, give it a name and select Regular Web Applications as the application type. You might be tempted to select the SPA option, given that we’re creating a JavaScript web application, but the reason we don’t use that is that SWA’s auth isn’t handled by your application itself, it’s handled by the underlying Azure service, which is a “web application”, that then exposes the information out that you need.

With your application created, it’s time to configure it. We’ll skip the Quick Start options, as we’re really doing something more custom. Instead, head to Settings as we are going to need to provide the application with some redirect options for login/logout, so that SWA will know you’ve logged in and can unpack the basic user information.
For the Sign-in redirect URIs you will need to add https://<hostname>/.auth/login/auth0 for the Application Login URI, https://<hostname>/.auth/login/auth0/callback for Allowed Callback URLs and for Allowed Logout URLs add https://<hostname>/.auth/logout/auth0/callback. If you haven’t yet deployed to Azure, don’t worry about this step yet, we’ll do it once the SWA is created.
Quick note – the auth0 value here is going to be how we name the provider in the staticwebapp.config.json, so it can be anything you want, I just like to use the provider name so the config is easy to read.
Scroll down and click Save Changes, and it’s time to finish off our SWA config file.
Completing our settings
With our Auth0 application setup, it’s time to complete our config file so it can use it. We’ll add a new configuration under customOpenIdConnectProviders for Auth0 and it’ll contain two core pieces of information, the information on how to register the OIDC provider and some login information on how to talk to the provider.
Inside registration, we’ll add a clientIdSettingName field, which will point to an entry in the app settings that the SWA has. Next, we’ll need a clientCredential object that has clientSecretSettingName that is the entry for the OIDC client secret. Lastly, we’ll provide the openIdConnectConfiguration with a wellKnownOpenIdConfiguration endpoint that is https://<your_auth0_domain>/.well-known//openid-configuration.
The config should now look like this:
{
    "auth": {
        "identityProviders": {
            "customOpenIdConnectProviders": {
                "auth0": {
                    "registration": {
                        "clientIdSettingName": "AUTH0_ID",
                        "clientCredential": {
                            "clientSecretSettingName": "AUTH0_SECRET"
                        },
                        "openIdConnectConfiguration": {
                            "wellKnownOpenIdConfiguration": "https://aaronpowell.au.auth0.com/.well-known/openid-configuration"
                        }
                    }
                }
            }
        }
    }
}
I use AUTH0_ID and AUTH0_SECRET as the names of the items I’ll be putting into app settings.
All this information will tell SWA how to issue a request against the right application in Auth0, but we still need to tell it how to make the request and handle the response. That’s what we use the login config for. With the login config, we provide a nameClaimType, which is a fully-qualified path to the claim that we want SWA to use as the userDetails field of the user info. Generally speaking, you’ll want this to be http://schemas.xmlsoap.org/ws/2005/05/identity/claims/name, but if there’s a custom field in your response claims you want to use, make sure you provide that. The other bit of config we need here is what scopes to request from Auth0. For SWA, you only need openid and profile as the scopes, unless you’re wanting to use a nameClaimType other than standard.
Let’s finish off our SWA config:
{
    "auth": {
        "identityProviders": {
            "customOpenIdConnectProviders": {
                "auth0": {
                    "registration": {
                        "clientIdSettingName": "AUTH0_ID",
                        "clientCredential": {
                            "clientSecretSettingName": "AUTH0_SECRET"
                        },
                        "openIdConnectConfiguration": {
                            "wellKnownOpenIdConfiguration": "https://aaronpowell.au.auth0.com/.well-known/openid-configuration"
                        }
                    },
                    "login": {
                        "nameClaimType": "http://schemas.xmlsoap.org/ws/2005/05/identity/claims/name",
                        "scopes": ["openid", "profile"]
                    }
                }
            }
        }
    }
}
With the config ready you can create the SWA in Azure and kick off a deployment (don’t forget to update the Auth0 app with the login/logout callbacks). When the resource is created in Azure, copy the Client ID and Client secret from Auth0 and create app settings in Azure using the names in your config and the values from Auth0.
Using the provider
Once the provider is registered in the config file, it is usable just like the other providers SWA offers, with the login being /.auth/login/<provider_name>, which in this case the provider_name is auth0. The user information will then be exposed as standard to both the web and API components.
If you’re building a React application, check out my React auth helper and for the API there is a companion.
Conclusion
I really like that with the GA of Static Web Apps we are now able to use custom OIDC providers with the platform. This makes it a lot easier to have controlled user access and integration with a more complex auth story when needed. Setting this up with Auth0 only takes a few lines of config.
You can check out a full code sample on my GitHub and a live demo here (but I’m not giving you my Auth0 credentials :squinting_face_with_tongue:).
by Contributed | May 13, 2021 | Technology
This article is contributed. See the original author and article here.
One of the most common ways to benefit from AI services in your apps is to utilize Speech to Text capabilities to tackle a range of scenarios, from providing captions for audio/video to transcribing phone conversations and meetings. Speech service, an Azure Cognitive Service, offers speech transcription via its Speech to Text API in over 94 language/locales and growing.
In this article we are going to show you how to integrate real-time speech transcription into a mobile app for a simple note taking scenario. Users will be able to record notes and have the transcript show up as they speak. Our Speech SDK supports a variety of operating systems and programming languages. Here we are going to write this application in Java to run on Android.
Common Speech To Text scenarios
The Azure Speech Service provides accurate Speech to Text capabilities that can be used for a wide range of scenarios. Here are some common examples:
- Audio/Video captioning. Create captions for audio and video content using either batch transcription or realtime transcription.
- Call Center Transcription and Analytics. Gain insights from the interactions call center agents have with your customers by transcribing these calls and extracting insights from sentiment analysis, keyword extraction and more.
- Voice Assistants. Voice assistants using the Speech service empowers developers to create natural, human-like conversational interfaces for their applications and experiences. You can add voice in and voice out capabilities to your flexible and versatile bot built using Azure Bot Service with the Direct Line Speech channel, or leverage the simplicity of authoring a Custom Commands app for straightforward voice commanding scenarios.
- Meeting Transcription. Microsoft Teams provides live meeting transcription with speaker attribution that make meetings more accessible and easier to follow. This capability is powered by the Azure Speech Service.
- Dictation. Microsoft Word provides the ability to dictate your documents powered by the Azure Speech Service. It’s a quick and easy way to get your thoughts out, create drafts or outlines, and capture notes.
How to build real-time speech transcription into your mobile app
Prerequisites
As a basis for our sample app we are going to use the “Recognize speech from a microphone in Java on Android” GitHub sample that can be found here. After cloning the cognitive-services-speech-sdk GitHub repo we can use Android Studio version 3.1 or higher to open the project under samples/java/android/sdkdemo. This repo also contains similar samples for various other operating systems and programming languages.
In order to use the Azure Speech Service you will have to create a Speech service resource in Azure as described here. This will provide you with the subscription key for your resource in your chosen service region that you need to use in the sample app.
The only thing you need to try out speech recognition with the sample app is to update the configuration for speech recognition by filling in your subscription key and service region at the top of the MainActivity.java source file:
//
// Configuration for speech recognition
//

// Replace below with your own subscription key
private static final String SpeechSubscriptionKey = "YourSubscriptionKey";
// Replace below with your own service region (e.g., "westus").
private static final String SpeechRegion = "YourServiceRegion";
You can leave the configuration for intent recognition as-is since we are just interested in the speech to text functionality here.
After you have updated the configuration, you can build and run your sample. Ideally you run the application on an Android phone since you will need to have a microphone input.
Trying out the sample
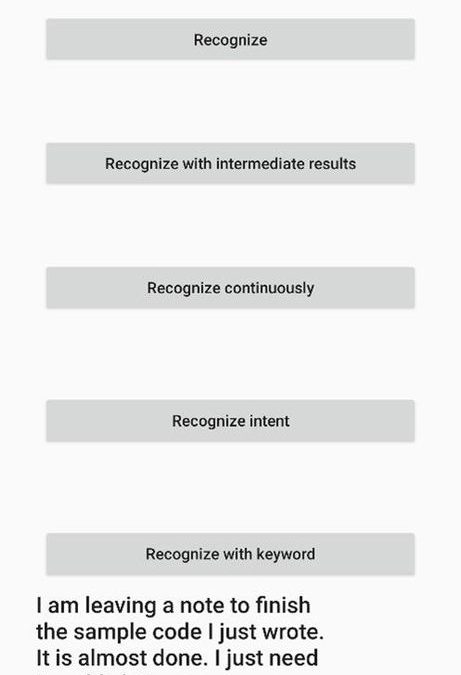
On first use, the application will ask you for the needed application permissions. Then the sample application provides a few options for you to use. Since we want users to be able to capture a longer note we will use the Recognize continuously option.
With this option the recognized text will show up at the bottom of the screen as you speak, and you can speak for a while with some longer pauses in between. Recognition will stop when you hit the stop button. So, this will allow you to capture a longer note.
This is what you should see when you try out the application:

Code Walkthrough
Now that you have this sample working and you have tried it out, let’s look at the key portions of the code that are needed to get the transcript. These can all be found in the MainActivity.java source file.
First in the onCreate function we need to ask for permission to access the microphone, internet, and storage:
int permissionRequestId = 5;

// Request permissions needed for speech recognition
ActivityCompat.requestPermissions(MainActivity.this, new String[]{RECORD_AUDIO, INTERNET, READ_EXTERNAL_STORAGE}, permissionRequestId);
Next, we need to create a SpeechConfig that provides the subscription key and region so we can access the speech service:
// create config
final SpeechConfig speechConfig;
try {
    speechConfig = SpeechConfig.fromSubscription(SpeechSubscriptionKey, SpeechRegion);
} catch (Exception ex) {
    System.out.println(ex.getMessage());
    displayException(ex);
    return;
}
The main work to recognize the spoken audio is done in the recognizeContinuousButton function that gets invoked when the Recognize continuously button is pressed and the onClick event is triggered:
///////////////////////////////////////////////////
// recognize continuously
///////////////////////////////////////////////////
recognizeContinuousButton.setOnClickListener(new View.OnClickListener() {
First a new recognizer is created providing information about the speechConfig we created earlier as well as the audio Input from the microphone:
audioInput = AudioConfig.fromStreamInput(createMicrophoneStream());
reco = new SpeechRecognizer(speechConfig, audioInput);
Besides getting the audio stream from a microphone you could also use audio from a file or other stream for example.
Next two event listeners are registered. The first one is for the Recognizing event which signals intermediate recognition results. These are generated as words are being recognized as a preliminary indication of the recognized text. The second one is the Recognized event which signals the completion of a recognition. These will be produced when a long enough pause in the speech is detected and indicate the final recognition result for that part of the audio.
reco.recognizing.addEventListener((o, speechRecognitionResultEventArgs) -> {
    final String s = speechRecognitionResultEventArgs.getResult().getText();
    Log.i(logTag, "Intermediate result received: " + s);
    content.add(s);
    setRecognizedText(TextUtils.join(" ", content));
    content.remove(content.size() - 1);
});

reco.recognized.addEventListener((o, speechRecognitionResultEventArgs) -> {
    final String s = speechRecognitionResultEventArgs.getResult().getText();
    Log.i(logTag, "Final result received: " + s);
    content.add(s);
    setRecognizedText(TextUtils.join(" ", content));
});
Lastly recognition is started using startContinuousRecognitionAsync() and a stop button is displayed.
final Future<Void> task = reco.startContinuousRecognitionAsync();
setOnTaskCompletedListener(task, result -> {
    continuousListeningStarted = true;
    MainActivity.this.runOnUiThread(() -> {
        buttonText = clickedButton.getText().toString();
        clickedButton.setText("Stop");
        clickedButton.setEnabled(true);
    });
});
When the stop button is pressed recognition is stopped by calling stopContinuousRecognitionAsync():
if (continuousListeningStarted) {
    if (reco != null) {
        final Future<Void> task = reco.stopContinuousRecognitionAsync();
        setOnTaskCompletedListener(task, result -> {
            Log.i(logTag, "Continuous recognition stopped.");
            MainActivity.this.runOnUiThread(() -> {
                clickedButton.setText(buttonText);
            });
            enableButtons();
            continuousListeningStarted = false;
        });
    } else {
        continuousListeningStarted = false;
    }

    return;
}
That is all that is needed to integrate Speech to Text into your application.
Next Steps:
![[Guest Blog] From Publishing to Power Apps: Making a Career Change into Tech](https://www.drware.com/wp-content/uploads/2021/05/fb_image-107.jpeg)
by Contributed | May 13, 2021 | Technology
This article is contributed. See the original author and article here.
This blog was written by Lisa Crosbie, Microsoft Business Applications MVP. Lisa shares how it feels to go from expert to novice, building a network from scratch, learning through a firehose, and why superpower skills are the most important thing.
When you make a mid-life career change, the first time you hear someone introduce their credentials by saying “I’ve been doing this for 20 years” is very confronting. That’s the moment you take stock and realise you may never get to say that, and it’s time to get brave and creative and establish your expertise and credentials in other ways.
When I was a kid, I wanted to be a librarian. Beyond that, I never really had any idea what I wanted to be when I “grew up” and I struggled with how I could ever make a career choice when I was equally interested in and good at both STEM and languages. After an unenthusiastic start with maths and computer science at university, I majored in linguistics and fulfilled my childhood dream of becoming a librarian, and then moved into my new dream career of book publishing.
I had an incredibly fulfilling career, working my way through the ranks to a senior management role. I spent 15 years at Oxford University Press, a dream come true for a long-time language and dictionary nerd. In my first role there, I got paid to visit bookshops and talk about dictionaries all day; now an incredible story of a different time, and a role that was and will always be a career highlight for me. Books were my first love. Even after all that time, the excitement of being in that place where such incredible books were made never wore off.
Unfortunately, my timing was less than perfect, having reached a mid-life career peak in an industry I loved but which was suffering death by a thousand cuts. Books will never die, but the onset of digital and new competitors meant costs went up as revenue stagnated and I found myself almost entirely focused on finding savings and efficiencies. I had stopped learning and growing and was struggling to see the future of my career. Many people talk about career change in mid-life, but very few do it – it’s a tough leap to make. By that stage of life, you’ve established yourself in a field, you have a network and a reputation, a family and/or financial commitments, and a relatively comfortable position of expertise.
I had a now or never moment, and the full support of my family. Life had taught me that there were no guarantees, and that you need to seize the moment when you can. So, I chose now.
 Farewell gifts on my last day at Oxford University Press
  My staff decorated my office with memes on my last day
I took a massive leap that made no sense on paper, resigning from my big job and taking a contract role with the Dynamics 365 partner who had been our consultants. A year later I jumped right into the deep end at Barhead Solutions, just as Power Apps were gaining traction, and Dynamics 365 was getting major investment. The timing for my second career choice could not have been better, riding the wave of massive growth and innovation in Microsoft Business Applications. I took the approach of “say yes and figure it out” and started learning through a firehose. Going from expert to novice is unsettling and scary. I was so far out of my comfort zone, but I found resourcefulness and creativity beyond what I knew I was capable of. I joined conversations online and found myself part of a community of extraordinary people, building an entirely new network from scratch. I had awesome colleagues who were willing to help and share, and I wasn’t afraid to ask “dumb” questions.
 Community and excitement – Microsoft Business Applications Summit 2019
  Learning and Teaching: Running App in a Day
When I was considering career change, I read a lot of advice on finding my transferrable skills. The reality is that you have no idea what’s valuable in your desired new industry, or the terminology for it, until you get there. I wish I could go back and tell my previous self that “I came from the customer side” was the magic phrase to open doors.
Rather than transferrable skills, the real thing to focus on in changing careers is your “superpower” skills. What do you take for granted that might be rare in your new industry? When you work for the world’s largest dictionary publisher, great communication skills are pretty much an entry requirement, but in tech, they have helped me stand out. I have done more proofreading and writing in tech than I ever did in my former career.
I discovered my other superpower skill is my love of learning – a constant desire, ability, and commitment to learn a lot, quickly, often in my free time. When I first landed outside my comfort zone, I had a steep learning curve. Once I learned how to be comfortable outside my comfort zone (another superpower skill) I deliberately put myself on that steep learning curve over and over again. I looked back on my notes this week at jobs I was considering applying for in 2017. There is one there called “Technical Evangelist”, with my annotation ruling it out because it was too technical. That is now my day job.
 The learning journey – preparing for my first tech exam over dumplings
Now 5 years in, I no longer find it confronting that I can’t say I’ve been doing this for 20 years, because I have found my strength in being uniquely me. In fact, I do have 20 years’ experience – skills in leadership, creativity, problem solving, collaboration, and building trust, just applied in completely different ways.
Best of all, there is still so much learning to do and so much to explore in this huge world outside my comfort zone, and that’s a very good place to be.
by Contributed | May 13, 2021 | Technology
This article is contributed. See the original author and article here.
Engaged communities are stronger communities. This is the ethos behind Code for South Florida, a Miami nonprofit that facilitates community feedback between governments and citizens with tech.
The group brings the area’s tech enthusiasts together to create solutions that support the youth and improve quality of life, in partnership with government departments, nonprofit organizations and colleges.
Regarded as the largest public interest technology non-profit in the state, the group leverages public code and data to build prototypes and support data collaborations that make life better for the inhabitants of South Florida.
Ultimately, Code for South Florida seeks to elevate the voices of all who call the region home.
AI MVP and Miami native Noelle Silver says there is new momentum in South Florida that is embracing technology and its potential for social good.
“There are so many people hungry to learn and get into tech but few programs available and affordable to them,” Noelle says. “The Code for South Florida community was created to help more people by combining technology and the government.”
“I was raised in Miami and was not afforded the opportunity to learn about tech or coding. I had to leave and attend a university to get that exposure. I am now back, after travelling the country and working for Amazon, Microsoft, and IBM over the years.”
“South Florida is home to many underrepresented groups and this community serves them all. It allows for people to learn to code in their native language, to find like-minded, career-focused peers and create a social and professional network that will serve them for years.”
Connection and communication are vital to open-source communities like Code for South Florida. Noelle points to recent initiatives like Tech Hub Tech Talk – an educational series that inspires people to get involved in the Miami and South Florida tech scene – and the creation of Open Government and Haitians in Tech – smaller groups that help developers find a support network to call their own – in successfully uniting the many communities of Code for South Florida.
“What I love most about this community is its focus on connecting people together who can further inspire, contribute, and build a local culture of public service and technology,” Noelle says.
“I want to use the Code for South Florida initiative to help bring the idea of technical careers to junior and senior highs across the region. I am using Microsoft Learn as a platform for helping anyone who wants to learn to get the skills they need.”
The biggest challenge, Noelle says, is “trying to be heard above the noise and get this message to more people. This is where the MVP community can help!”
If you have a project you need help with or want to create a new initiative with the tech talent in South Florida, the community has a network of volunteers and staff ready to support. To join the group or for more information visit the Code for South Florida website.
by Contributed | May 13, 2021 | Technology
This article is contributed. See the original author and article here.
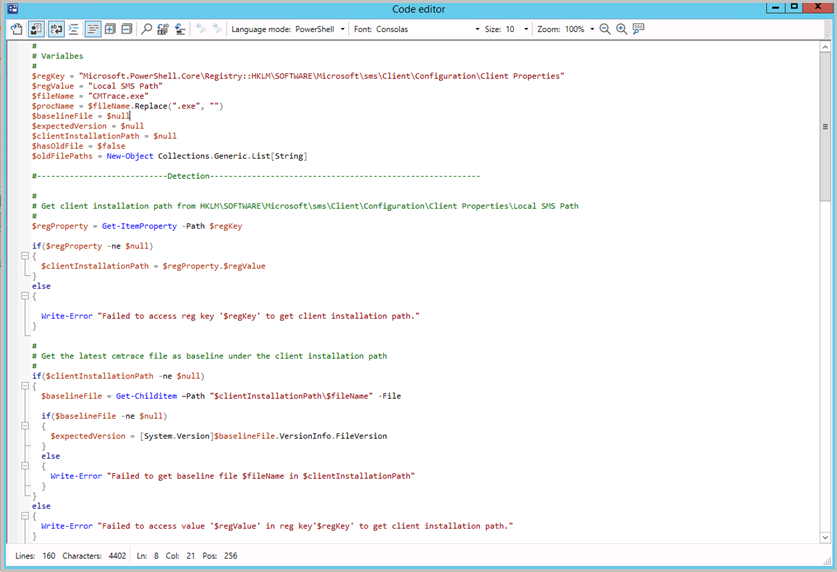
Update 2105 for the Technical Preview Branch of Microsoft Endpoint Configuration Manager has been released. Building on improvements in Configuration Manager 2010 for syntax highlighting and code folding, you now have the ability to edit scripts in an enhanced editor. The new editor supports syntax highlighting, code folding, word wrap, line numbers, and find and replace. The new editor is available in the console wherever scripts and queries can be viewed or edited.
Enhanced code editor in ConfigMgr console
For more information, see Enhanced Code Editor.
This preview release also includes:
Select VM size for CMG – When you deploy a cloud management gateway (CMG) with a virtual machine scale set, you can now choose the virtual machine (VM) size. The following three options are available:
- Lab: B2s
- Standard: A2_v2. This option continues to be the default setting.
- Large: D2_v3
This control gives you greater flexibility with your CMG deployment. You can adjust the size for test labs or if you support large environments.
Support Center dark and light themes – The Support Center tools now offer dark and light modes. Choose to use the system default color scheme, or override the system default by selecting either the dark or light theme.
Updated client deployment prerequisite – The Configuration Manager client requires the Microsoft Visual C++ Redistributable component (vcredist_x*.exe). When you install the client, it automatically installs this component if it doesn’t already exist. Starting in this release, it now uses the Microsoft Visual C++ 2015-2019 Redistributable version 14.28.29914.0. This version improves stability in Configuration Manager client operations.
Change to internet access requirements – To simplify the internet access requirements for Configuration Manager updates and servicing, this technical preview branch release downloads from configmgrbits.azureedge.net. This endpoint is already required, so should already be allowed through internet filters. With this change, the existing internet endpoint for technical preview releases is no longer required: cmupdatepackppe.blob.core.windows.net.
PowerShell release notes preview – These release notes summarize changes to the Configuration Manager PowerShell cmdlets in technical preview version 2105.
For more details and to view the full list of new features in this update, check out our Features in Configuration Manager technical preview version 2105 documentation.
Update 2105 for Technical Preview Branch is available in the Microsoft Endpoint Configuration Manager Technical Preview console. For new installations, the 2103 baseline version of Microsoft Endpoint Configuration Manager Technical Preview Branch is available on the Microsoft Evaluation Center. Technical Preview Branch releases give you an opportunity to try out new Configuration Manager features in a test environment before they are made generally available.
We would love to hear your thoughts about the latest Technical Preview! Send us feedback about product issues directly from the console and continue to share and vote on ideas about new features in Configuration Manager.
Thanks,
The Configuration Manager team
Configuration Manager Resources:
Documentation for Configuration Manager Technical Previews
Try the Configuration Manager Technical Preview Branch
Documentation for Configuration Manager
Configuration Manager Forums
Configuration Manager Support
by Contributed | May 13, 2021 | Technology
This article is contributed. See the original author and article here.
As part of our continued efforts to help customers be successful with Exchange Online, Microsoft has detected that some customers are using an unsupported journaling configuration by pointing their journaling alternate mailbox to an Exchange Online mailbox. With the enforcement of mailbox receiving limits as announced in our February blog post, this may result in loss of journaling non-delivery reports, as cloud-hosted mailboxes will be throttled when they exceed the limit of 3600 messages received per rolling hour. We urge all customers to validate their journaling configuration and ensure they will not be affected.
Using an Exchange Online mailbox as a journaling alternate mailbox
Journaling in Exchange Online allows administrators to set an alternate journaling mailbox. This mailbox will accept non-delivery reports (also known as NDRs or bounce messages) if the primary journaling mailbox is unavailable, to catch undelivered journal reports and allow for re-sending when the journaling mailbox becomes available.
As the documentation states, the alternate journaling mailbox cannot be an Exchange Online mailbox. Cloud mailboxes are subject to our Exchange Online service limits and unsuitable for journaling.
How can I tell if I am affected?
Tenant administrators can check their configuration via the classic Exchange admin center. Navigate to the Journal Rules section and find the email address configured for non-delivery reports. If no address is configured or if the address is not an Exchange Online mailbox, administrators do not need to take action. If the address for journaling NDRs is set to an Exchange Online mailbox, administrators need to change this setting in order to avoid impact.
What do I do if I am affected?
Microsoft’s recommendation is to leverage our Microsoft 365 compliance solutions rather than journaling messages to another location. This suite of solutions provides data protection, data loss prevention, and data governance capabilities to meet customers’ diverse regulatory and compliance requirements.
If journaling is still needed, administrators should double check their settings and switch the alternate journaling address to a non-Exchange Online mailbox. Customers are urged to validate their configuration and take action by May 31st to avoid potential disruption.
Thank you for your attention to this!
The Exchange Transport team and the Microsoft 365 Information Governance team

by Contributed | May 13, 2021 | Technology
This article is contributed. See the original author and article here.
Microsoft Build is just around the corner and we’re excited to announce our Humans of IT sessions lineup! We’ll be bringing a compilation of stories where humanity and technology intersect all in one track so that you can discover how to empower your community, build meaningful careers, be more productive and achieve more!
We know this is the post you’ve been waiting for.
The Humans of IT community will be speaking at Microsoft Build 2021! Join us during our 5 Humans of IT sessions at Build 2021! Register today!
5 Sessions You Don’t Want to Miss at Microsoft Build 2021
Tuesday, May 25th 9:30-10:00am PDT: Microsoft Teams bot technology: Enables easier access to information and helps solve communication gaps between HR and employees
Speakers: Thao Le, Brian Costea, Nirupa Kalathur, Kamila Rawat, Angela Donohue
Join this session to hear more about how Microsoft is providing a technology platform and IT solutions that are human-centered. Learn about advancements in Microsoft Teams that impact lives on a personal level by developing tools that help improve mental well-being, and on the professional level by bridging communication gaps and enabling easier access to information. We will be demoing the BabyBot to give you even further insight into this new tool and its benefits.
Tuesday, May 25th, 2:30-3:00pm PDT: Code for good with GiveCamp
Speakers: Jay Harris, Chris Koeing
Have you ever wanted to use your coding skills to help others? GiveCamp gives people the opportunity to do just that and give back through coding! In this session, we’ll discuss how this idea for GiveCamp came to life, how they use tech to help non-profits, and how you can get involved.
Wednesday, May 26th 6:30-7:00am PDT: Stuck no more: Removing the anguish from languishing
Speakers: Christopher Gill
May is Mental Health Awareness Month, but it can still be easy to feel overwhelmed, anxious, or like you are generally not functioning at full capacity. Let’s learn together about a term called “languishing” and some ways you can utilize tech to rediscover yourself and your enthusiasm! In this session, Chris will discuss how to achieve risk reduction and share tips on how to avoid toxic positivity while creating small and measurable bite-sized goals.
Wednesday, May 26th 11:00-11:30am PDT: Planting the seeds for community: How Microsoft Developers Community began in Haiti
Speakers: Leomaris Reyes, Leslie Gordian
Join this session to learn how MVPs from Dominican Republic went to Haiti to create the first Microsoft Developers Community in Haiti. Hear about their story, what inspired them, and how they made it happen.
Thursday, May 27th 3:00-3:30am PDT: Mentoring grassroot technologist and transforming unreached communities
Speakers: Kolaru Adeola, Clement Dike, Ayodeji Folarin, Bettirose Ngugi, David Okeyode, O Oluwawumiju, Samuel Omodadepo
Join us in this session on embracing the passion of grassroot communities, and hear how people from completely different backgrounds are all working towards the same goal of transforming the future of tech in Africa. Learn from the stories of empowered youths, non-IT professionals, and technologists and how they change their perceptions to embrace the digital change.
See you at Microsoft Build 2021, #HumansofIT- Register online to secure your virtual seat today!
#HumansofIT
#MSBuild
#CommunityRocks
#ConnectionZone
by Scott Muniz | May 13, 2021 | Security, Technology
This article is contributed. See the original author and article here.
WordPress versions between 3.7 and 5.7.1 are affected by a security vulnerability. An attacker could exploit this vulnerability to take control of an affected system.
CISA encourages users and administrators to review the WordPress Security Release and upgrade to WordPress 5.7.2.

by Contributed | May 13, 2021 | Technology
This article is contributed. See the original author and article here.
Be inspired at ESPC21 Online.
You’ll find expert-led tutorials (workshops), visionary keynotes, and informative breakout sessions, delivered by the world’s best independent Microsoft 365 experts including many Microsoft leaders and employees from the product teams.
Be Inspired at ESPC21 Online. ESPC is a chance to escape your daily routine and take the time to focus on you and your professional development.
Take time to learn, ask questions and engage with fellow delegates via 1:1 chats or group networking to discover top tricks and helpful insights. Hear directly from the individuals behind your favourite products, discover the latest innovations and engage in live session Q&A’s with each speaker to get your urgent questions answered. Session schedule lists times in CEST; recordings will be available to watch post conference for All-Access ticket holders.
Book now
Jeff Teper (CVP), Karuana Gatimu (Principal PM manager), and Charles Lamanna (CVP) will be giving keynotes that spans the globe and topics, plus Microsoft speakers delivering breakout sessions among thought leaders and members of the community from around the world. Review all Microsoft keynotes and sessions below and start your world journey today.
ESPC21 Online offers you affordable, world-class Microsoft 365 learning at your fingertips, from wherever you are. Tune in live or catch up on-demand across 100+ sessions covering SharePoint, Microsoft Viva, Microsoft Teams, Microsoft 365 adoption, Microsoft Search, AI, Governance, SharePoint Syntex, Teams admin, Cloud operations, Intranets, Power Platform, and more.
Microsoft keynotes, breakout sessions, and tutorials (workshops)
 Hear from the best of the best – Microsoft Product Team members, RDs, MVPs, MCMs and independent experts.
Microsoft keynotes
Microsoft tutorial (workshops) (pre-event workshop)
Microsoft breakout sessions
Shout out to community members Sarah McNamara, Kevin Monaham and the #ESPC21 team for putting together the event, corralling all speakers and content, and for supporting and promoting the knowledge and expertise to promote the world-class Microsoft 365 tech community around the world.
Cheers,
Mark “Euro” Kashman
by Contributed | May 13, 2021 | Technology
This article is contributed. See the original author and article here.
As the data estate in your organization grows, it becomes imperative to manage the quality of data and govern the data to avoid duplicates, inconsistencies, and missing information. With different versions of data available across different departments, locations, and systems, it can be difficult to maintain a single source of truth. A classic example is a bank where a customer who has a credit card with the bank still receives offers to open a new credit card. This happens because the customer service department in bank is not integrated with the credit card department and the customer data is duplicated in both places. Hence, the role of Master Data Management (MDM) is even more significant than ever before.
We are happy to announce the integration of Profisee MDM with Azure Purview to establish governance standards, policies and enforce the same on the master data.
What is Profisee MDM?
Profisee is a master data management software that allows unlimited users, records, and data domains. Its MDM solution is geared towards business data stewards. Profisee’ s golden record management engine (GRM) can match, cleanse, de-duplicate, and verify performance of records numbering in the millions.
Profisee MDM solution provides business users with easy access and management of the definitions, descriptions, and associations that describe master data application. As a master data solution evolves, Profisee automatically synchronizes metadata changes, ensuring stakeholders always have the most up to date information.
Azure Purview – Profisee Integration
You can now push master data model from Profisee to Purview where the master data entities can be enriched using governance processes in Purview i.e., adding ownership, tagging glossary terms etc. Once the master data is enriched in Purview, this information is then retrieved in Profisee so that it can be reviewed and enforced in Profisee. In a nutshell, master data in Profisee is validated, cleansed, and standardized using governance output from Purview.
High level capabilities for this integration include:
- Use enriched Purview catalog data entities for master data modelling in Profisee.
- Use Purview data catalog and business glossary for data stewardship in Profisee.
Get started today:
We are looking forward to hearing, how Azure Purview and Profisee Integration helped unlock the Master data management (MDM) experiences in your organization.
- Create an Azure Purview account now and start understanding your data supply chain from raw data to business insights with free scanning for all your SQL Server on-premises and Power BI online
- Check out Azure Purview full documentation and get started today.
- Learn about Profisee MDM + Azure.
- Learn more about Profisee running natively in Azure.

Recent Comments