by Contributed | May 17, 2021 | Technology
This article is contributed. See the original author and article here.
Hi, Jonas here!
Or as we say in the north of Germany: “Moin Moin!”
I am a Senior Customer Engineer based in Germany and over the years I created several configuration items I use as part of a Microsoft Endpoint Configuration Manager (MECM / ConfigMgr) baseline to detect configuration changes in the environment.
In this blog post I will describe each config item and how you can benefit from them to detect changes before significant issues arise.
TL;DR
If you are just looking for the download link for the ConfigMgr baseline and items, here you go: LINK
If you are familiar with configuration items and baselines you might want to skip the next section and start with “Why use a baseline for site systems?”.
Or jump to each item directly:
Item1: CI-Validate-HINV-MaxMIFSize
Item2: CI-Validate-SINV-MaxFileSize
Item3: CI-Validate-SINV-ExceedSizeLimit
Item4: CI-Validate-HINV-ExceedSizeLimit
Item5: CI-Validate-DP-Pxe-Settings
Item6: CI-Validate-LegacyCardinality
Item7: CI-Validate-Configuration.mof
Item8: CI-Validate-IIS-Logfiles
Item9: CI-Validate-WSUS-AppPoolConfig
Item10: CI-Validate-DefaultClientSetting-HINV-Classes
Item11: CI-Validate-WSUS-Subscription
Feel free to check out my other articles at: https://aka.ms/JonasOhmsenBlogs
How does a ConfigMgr baseline work?
ConfigMgr configuration items and baselines are around for a while and most customers use them to detect and or remediate issues on ConfigMgr clients.
If you are not familiar with the concept of a configuration item and baseline, let me give you a brief introduction.
A configuration item will test a certain state, either by checking the existence of a file, folder, registry entry or registry value for example (not a complete list of options).
A configuration item can also contain a custom script to test more complex states which extends the functionality of the default tests.
In addition each item can contain a remediation step to revert a state back to a desired state. Setting a registry value to 1 in case a test detected a 0 for example.
It can also contain a detection method to only run the test if a certain condition has met. Like a condition for the existence of a specific service for example.
Each configuration item needs to be part of a baseline which can be deployed to a collection and then evaluated on ConfigMgr clients.
The test results / compliance state will be sent back to the ConfigMgr site and the results can either be seen in the console or via different reports.
If you want to know more you will find the documentation here: LINK
Why use a baseline for site systems?
There are good reasons to use a baseline for all the changes you do to your ConfigMgr site systems:
- Each configuration item could be seen as a documentation entry
- Newly added servers will be tested and any missing changes will be visible via the baseline
- Any configuration drifts can be detected before they result in bigger issues
- Some default settings might get reset after a ConfigMgr upgrade and a configuration item can help to detect such changes
Rule of thumb:
Whenever you configure something outside the ConfigMgr console create a configuration item for the reasons above.
How to import
Either download the baseline and the items from the GitHub repository or clone the repository or use the ConfigMgr Community hub to import the items.
Imported from the Community hub the baseline and items can be used directly.
When downloaded from Github first unpack the files and use the ConfigMgr console to import the cab file.
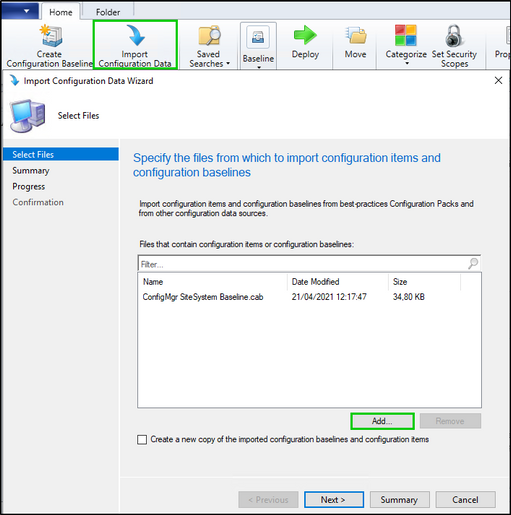
Open the ConfigMgr console and navigate to: “Assets and Compliance”, “Compliance Settings” and ”Configuration Baselines”.
Click on “Import Configuration Data” and add the cab file.
Accept the publisher message and follow the wizard to import the baseline and items.
Prerequisites to use the baseline and items
There are three prerequisites to use the described configuration items.
First:
Compliance settings needs to be enabled via a client setting by setting “Enable compliance evaluation on clients” to “Yes“

Second:
PowerShell scripts should be able to run without signing except you want to sign each script of each item yourself. In that case you can leave the setting in its default state: “All Signed” otherwise it needs to be set to “Bypass”.

Third:
Whenever you add one of the configuration items described below to a configuration baseline make sure to set the “Purpose” to the value “Optional”.
That setting ensures the correct reporting of the detection part of each item.
(See section Detection of each item for more details)

List of configuration items
In this section I describe a list of items I often use.
Each item has a detection script and will only run tests on systems where a test makes sense or where a certain test is possible at all. Each item has a “Detection” section with more details about the detection logic.
The detection logic means you can simply deploy a baseline with all items to all ConfigMgr servers and the detection makes sure each test runs only on the right systems.
Adjust each item as needed for your environment and as described in the “Customizations” sections of each item description.
Item1: CI-Validate-HINV-MaxMIFSize
This item is one of the simpler ones and makes use of the default test for registry values to test the “Max MIF Size” for hardware inventory (HINV) files. If the HINV file exceeds 5MB the file cannot be imported by default. If the setting has been changed to support bigger file sizes use the item to make sure it stays that way.

Item1: Detection:
The item will only run its test if the registry path exists.
Item1: Remediation:
The item can also remediate the setting if desired.
Item1: Customizations:
Change the “Compliance Rule” to the value you use in your environment.
Item2: CI-Validate-SINV-MaxFileSize
This item does the same as: “CI-Validate-HINV-MaxMIFSize” but for Software Inventory files. Detection, remediation and customizations are also identical but specific to Software Inventory.
Item3: CI-Validate-SINV-ExceedSizeLimit
This item will compare each file size of files in folder: “inboxesauthsinv.boxbad” with the maximum allowed file size set here: “HKLM:SOFTWAREMicrosoftSMSCOMPONENTSSMS_SOFTWARE_INVENTORY_PROCESSOR” – “Max File Size”.
In case the item detects any large files there are three options to reduce the file size:
- Try to reduce the number of folders to be scanned by Software Inventory
- Exclude specific folders via the Skpswi.dat file. More details can be found here: LINK
- Or increase the max file size value (should be the last option)
Item3: Detection:
The item will only run its test if the registry path exists.
Item3: Remediation:
The item can also remediate the setting if desired.
Item3: Customizations:
No customizations required.
Item4: CI-Validate-HINV-ExceedSizeLimit
This item does the same as: “CI-Validate-HINV-ExceedSizeLimit” but for Hardware Inventory files. Detection, remediation and customizations are also identical but specific to Hardware Inventory.
In most cases some WMI classes on some machines hold more data than normal which can lead to larger files.
Terminal servers with multiple loggon on users for example might report more user specific data.
In that case try to exclude some WMI classes for specific systems to limit the amount of Hardware Inventory data.
To exclude a certain Hardware Inventory classe from specific systems you would need to disable the class in the “Default Client Setting”. Then enable the one class via a custom setting for all systems except the ones you don’t need the class from.
(Item10 might help to stay compliant with what you have defined in your environment)
Item5: CI-Validate-DP-Pxe-Settings
This item can be used to validate the registry settings to manipulate TFTP window and block size.
Read more about the settings here.
Item5 Detection:
The item will only run on Pxe enabled Distribution Points.
Item5 Remediation:
The item can also remediate the settings if desired.
Item5 Customizations:
Change the “Compliance Rule” to the values you use in your environment.
Item6: CI-Validate-LegacyCardinality
This item will validate the setting to use legacy cardinality for ConfigMgr console queries by testing the value of “UseLegacyCardinality” located at: “HKLMSOFTWAREMicrosoftSMSProviders”
Read more about the feature here: LINK
Item6 Detection:
The item will only run on SMS Provider systems.
Item6 Remediation:
The item can also remediate the setting if desired.
Item6 Customizations:
Change the “Compliance Rule” to the value you use in your environment.
Item7: CI-Validate-Configuration.mof
This item can be used to detect changes to the configuration.mof file.
The file can be used to extend the hardware inventory (HINV) and is often used for customer specific scenarios.
A script will calculate the file hash and the item will compare the hash with a known value. That helps to detect any changes to the file.
Keep in mind that the file can also change during a ConfigMgr update.
Item7 Detection:
The item will only run on servers on which the configuration.mof exists.
Item7 Remediation:
The item does not contain any remediation parts.
Item7 Customizations:
Run the following script on a site server to get the hash of the file in your environment and change the value of the compliance rule accordingly.
$configPath = "{0}{1}" -f (Split-Path -Path $env:SMS_LOG_PATH -Parent), "inboxesclifiles.srchinvconfiguration.mof"
$fileHash = Get-FileHash -Path "$configPath" -Algorithm SHA256
Write-Output $fileHash.Hash

Item8: CI-Validate-IIS-Logfiles
This item will test for IIS logfiles older than seven days and can be used to also delete them by using the remediation part of the item.
The embedded script will test
Item8 Detection:
The item will only run on servers with an installed IIS webserver.
Item8 Remediation:
The remediation script can delete files older than seven days.
Item8 Customizations:
Change the discovery and remediation script via the “Edit Script” button and change the value of variable $logFileMaxAgeInDays to the desired value.

Item9: CI-Validate-WSUS-AppPoolConfig
This item will run several tests against the WSUS website and is intended to make sure each WSUS server follows the best practices.
The WSUS best practices documentation can be found HERE

Item9 Detection:
The item will only run on servers with an installed WSUS server role.
Item9 Remediation:
The item does not contain any remediation parts.
Item9 Customizations:
Not every test might be needed in your environment. The WSUS-Content… tests for example are only needed when WSUS is configured to use a shared database and shared content storage.
Simply delete the tests/settings you might not need and adjust the compliance rules or each test to your needs.
Item10: CI-Validate-DefaultClientSetting-HINV-Classes
This item is the most complicated one and can be used to validate the activated hardware inventory (HINV) classes of the default client setting or any custom setting.
The idea is to detect any removed or added classes to the HINV part of a client setting. Like the added “Battery” class as shown in the screenshot below for example.
Keep in mind that any ConfigMgr upgrade might also change/extend the HINV part of the default client setting.

Item10 How it works
The config item will run a script to compare a known HINV class state with the current HINV class state of a given client setting. If it detects any differences it will report each added or removed item as a critical change.
If you want to test multiple client settings you would need to copy the configuration item and change the settings as described in the following section.
Item10 Configuration item setup
The following steps are necessary to adjust the configuration item and script to your environment.
Step 1
Copy the script out of the configuration item or from the Github repository and save it on a CAS or Primary Site server.
In most cases it will be necessary to change the script to be able to compare the settings of the given environment. It is therefore designed to run as part of a configuration item or as a standalone script.
Step 2
Run the script with administrative rights and without any parameters to compare a known list of active HINV classes of the “Default Client Setting”.
Note: Do not run the script in the PowerShell ISE you might get strange results when changing some parameters.
It should either return the word “Compliant” or a list like this:

The script should contain the default classes of a ConfigMgr 2010 installation.
So, “Compliant” would mean you have not changed anything and the default classes are selected.
A list like the one shown above would mean you are either not on ConfigMgr 2010 or you changed the settings in the past or my initial known class list of the script is simply not complete.
Step 3
If the output of the script is the word “Compliant” you could use the script and therefore the configuration item without any changes to detect future changes of HINV classes.
But if you get a list back, the script needs to be changed to compare what has been set in your environment.
You do that by running the script with the parameter -OutPutMode ‘CreateScript’.
That will copy the script to the same location as the original script but will change the known HINV class list to the state of your environment.
It will have a name like this:
[original script name]-[client setting name]-[Date].ps1
Note: I could have used an external configuration file to read the data for comparison, but I didn’t want to rely on external data. That’s why everything is part of the script and the reason for the “CreateScript” option.
Step 4
Run the new script without any parameters to test it. It should output the word “Compliant” since it now contains the current state.
Step 5
Copy the contents of the new script and replace the existing script of the configuration item as shown in the screenshot below.
Click on “Settings”, “Edit Script…” and “Clear” to clear the existing script.
“Open…” the new script and add it to the configuration item.


Step 6
If you would like to compare HINV classes of custom client settings run the script with the parameters -ClientSettingsName ‘Name of custom client setting’ and the parameter -OutPutMode ‘CreateScript’.
The script will then generate a new script containing all the classes of your custom client setting. It will also change the default value of the parameter:
-ClientSettingsName to the name of the custom client setting to be able to run without the need to provide extra parameter values.
Item10 Detection:
The item will only run on site servers.
Item10 Remediation:
The item does not contain any remediation parts.
Item10 Other parameters:
As mentioned before the script can also be used as a standalone script for documentation purposes for example.
The following actions are possible via the -OutputMode parameter:
“CompareData”
CompareData is the default value and will output the difference between the known classes and the current active classes of a given client setting.
“ShowData”
ShowData will open two GridViews. One for all available inventory classes and one with the active classes for the selected client setting.
“ExportAsCSV”
Will create two csv files in the same directory as the script.
One for all available inventory classes and one with the active classes for the selected client setting.
“CreateScript”
Creates a new script with the current HINV Class state for a given client setting.
Run “Get-Help .Compare-ClientSettingHINVClasses.ps1 -Detailed” to get more help with the available options.
Item11: CI-Validate-WSUS-Subscription
This item works the same way as the one before (CI-Validate-DefaultClientSetting-HINV-Classes) but is intended to compare a known list of activated WSUS update categories and products as shown in the screenshot below.
The item will detect any changes and can therefore help you either activate a newly synched product or revert any unwanted changes.

Item11 Detection:
The item will only run site servers.
Item11 Remediation:
The item does not contain any remediation parts.
Item11 Customizations:
The script has a limited set of update categories and products and will therefore output a long list of differences when you run it on a primary or CAS without any parameters.
But the script has also the option to use the -OutPutMode ‘CreateScript’ parameter to create a new script with the settings of your environment.
Use the same method to import the new script (containing your settings) into the configuration item as described in Step 5 of “CI-Validate-DefaultClientSetting-HINV-Classes”
Run “Get-Help .Compare-WSUSSubscriptions.ps1 -Detailed” to get more help.
Monitoring
Like any other deployment each baseline deployment can be viewed via “Monitoring” and “Deployments”.
For any uncompliant systems the exact values can be viewed via the “More Details” button on the right side of the screen.

Corresponding reports can be found in the report folder called: “Compliance and Settings Management”.
Another option to view compliance is the compliance report on a local system via the ConfigMgr client applet.

Conclusion
Whenever changing anything outside of the ConfigMgr console create a configuration item to document and monitor each setting.
I hope the article was worth reading and I hope the items will help you get a better understanding of the changes which might happen to your ConfigMgr environment before any real issues arise.
Have fun detecting any changes in your ConfigMgr environment and let me know what you think.
Jonas Ohmsen
Microsoft Germany
Disclaimer:
This posting is provided “AS IS” with no warranties, and confers no rights
Resources:
Other blogs:
https://aka.ms/JonasOhmsenBlogs
Github repository with baseline and config items
https://github.com/jonasatgit/scriptrepo/tree/master/Compliance
Get started with compliance settings
https://docs.microsoft.com/en-us/mem/configmgr/compliance/get-started/get-started-with-compliance-settings
SQL query times out or console slow performance
https://docs.microsoft.com/en-us/troubleshoot/mem/configmgr/sql-query-times-out-or-console-slow-performance
WSUS best practices
https://docs.microsoft.com/en-us/troubleshoot/mem/configmgr/windows-server-update-services-best-practices
Best practices for software updates
https://docs.microsoft.com/en-us/mem/configmgr/sum/plan-design/software-updates-best-practices
by Contributed | May 16, 2021 | Technology
This article is contributed. See the original author and article here.
Microsoft has published a learning path for fusion dev teams. In addition to that, they also published an e-book for it. We can see how an organisation can build up a fusion team and deliver services through this fusion development approach.
Gartner claims that 84% of organisations have at least one fusion team. According to the article, Gartner defines the fusion team as a “cross-functional team that uses data and technology to achieve business outcomes”. Because of this nature, the fusion team’s leader often comes from the business side rather than the IT side and makes decisions from the perspective outside of IT. In other words, the fusion team pursues the business achievement from the broader organisational aspects, although they use technologies. What can the fusion team deliver a service or product for their customers, then?
Lamna Healthcare Company is a fictitious company that provides health and fitness services for their members. They are about to build a mobile app using Power Apps. Throughout this post, I’m going to observe how they cope with it within the fusion team.
You can find the sample code used in this post at this GitHub repository.
Scenario
Lamna Healthcare Company runs a fitness centre in Korea. Ji Min is a team leader for personal trainers. The centre has built a system that the trainers put the workout logs for their members through a system. For their customer experiences, they at the same time also write the records to their members’ journal by hand. Ji Min wonders whether it’s efficient for both trainers and members because it seems they write the same log twice. Fortunately, she’s willing to build a Power Apps app for those workout logs. When a trainer or member logs the workout details through the app, the centre stores the data to their data storage (Azure Cosmos DB) through their backend (Azure Functions and Azure Service Bus).
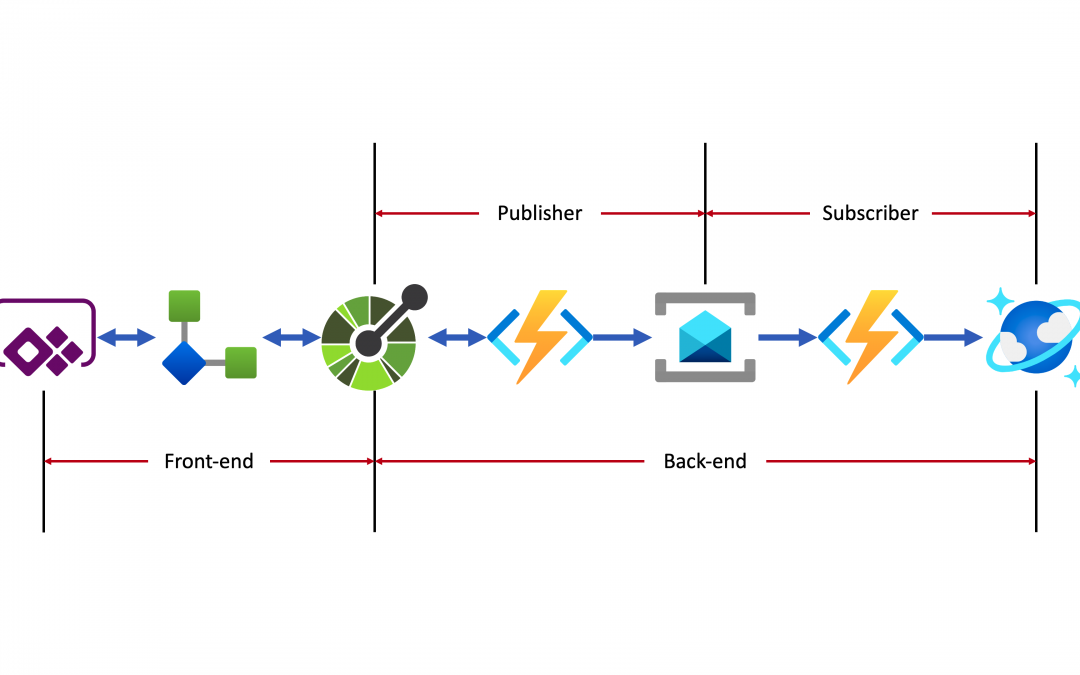
As the backend API has already been up and running, all she needs to do is to use the API within Power Apps via a custom connector. The end-to-end application architecture looks like:
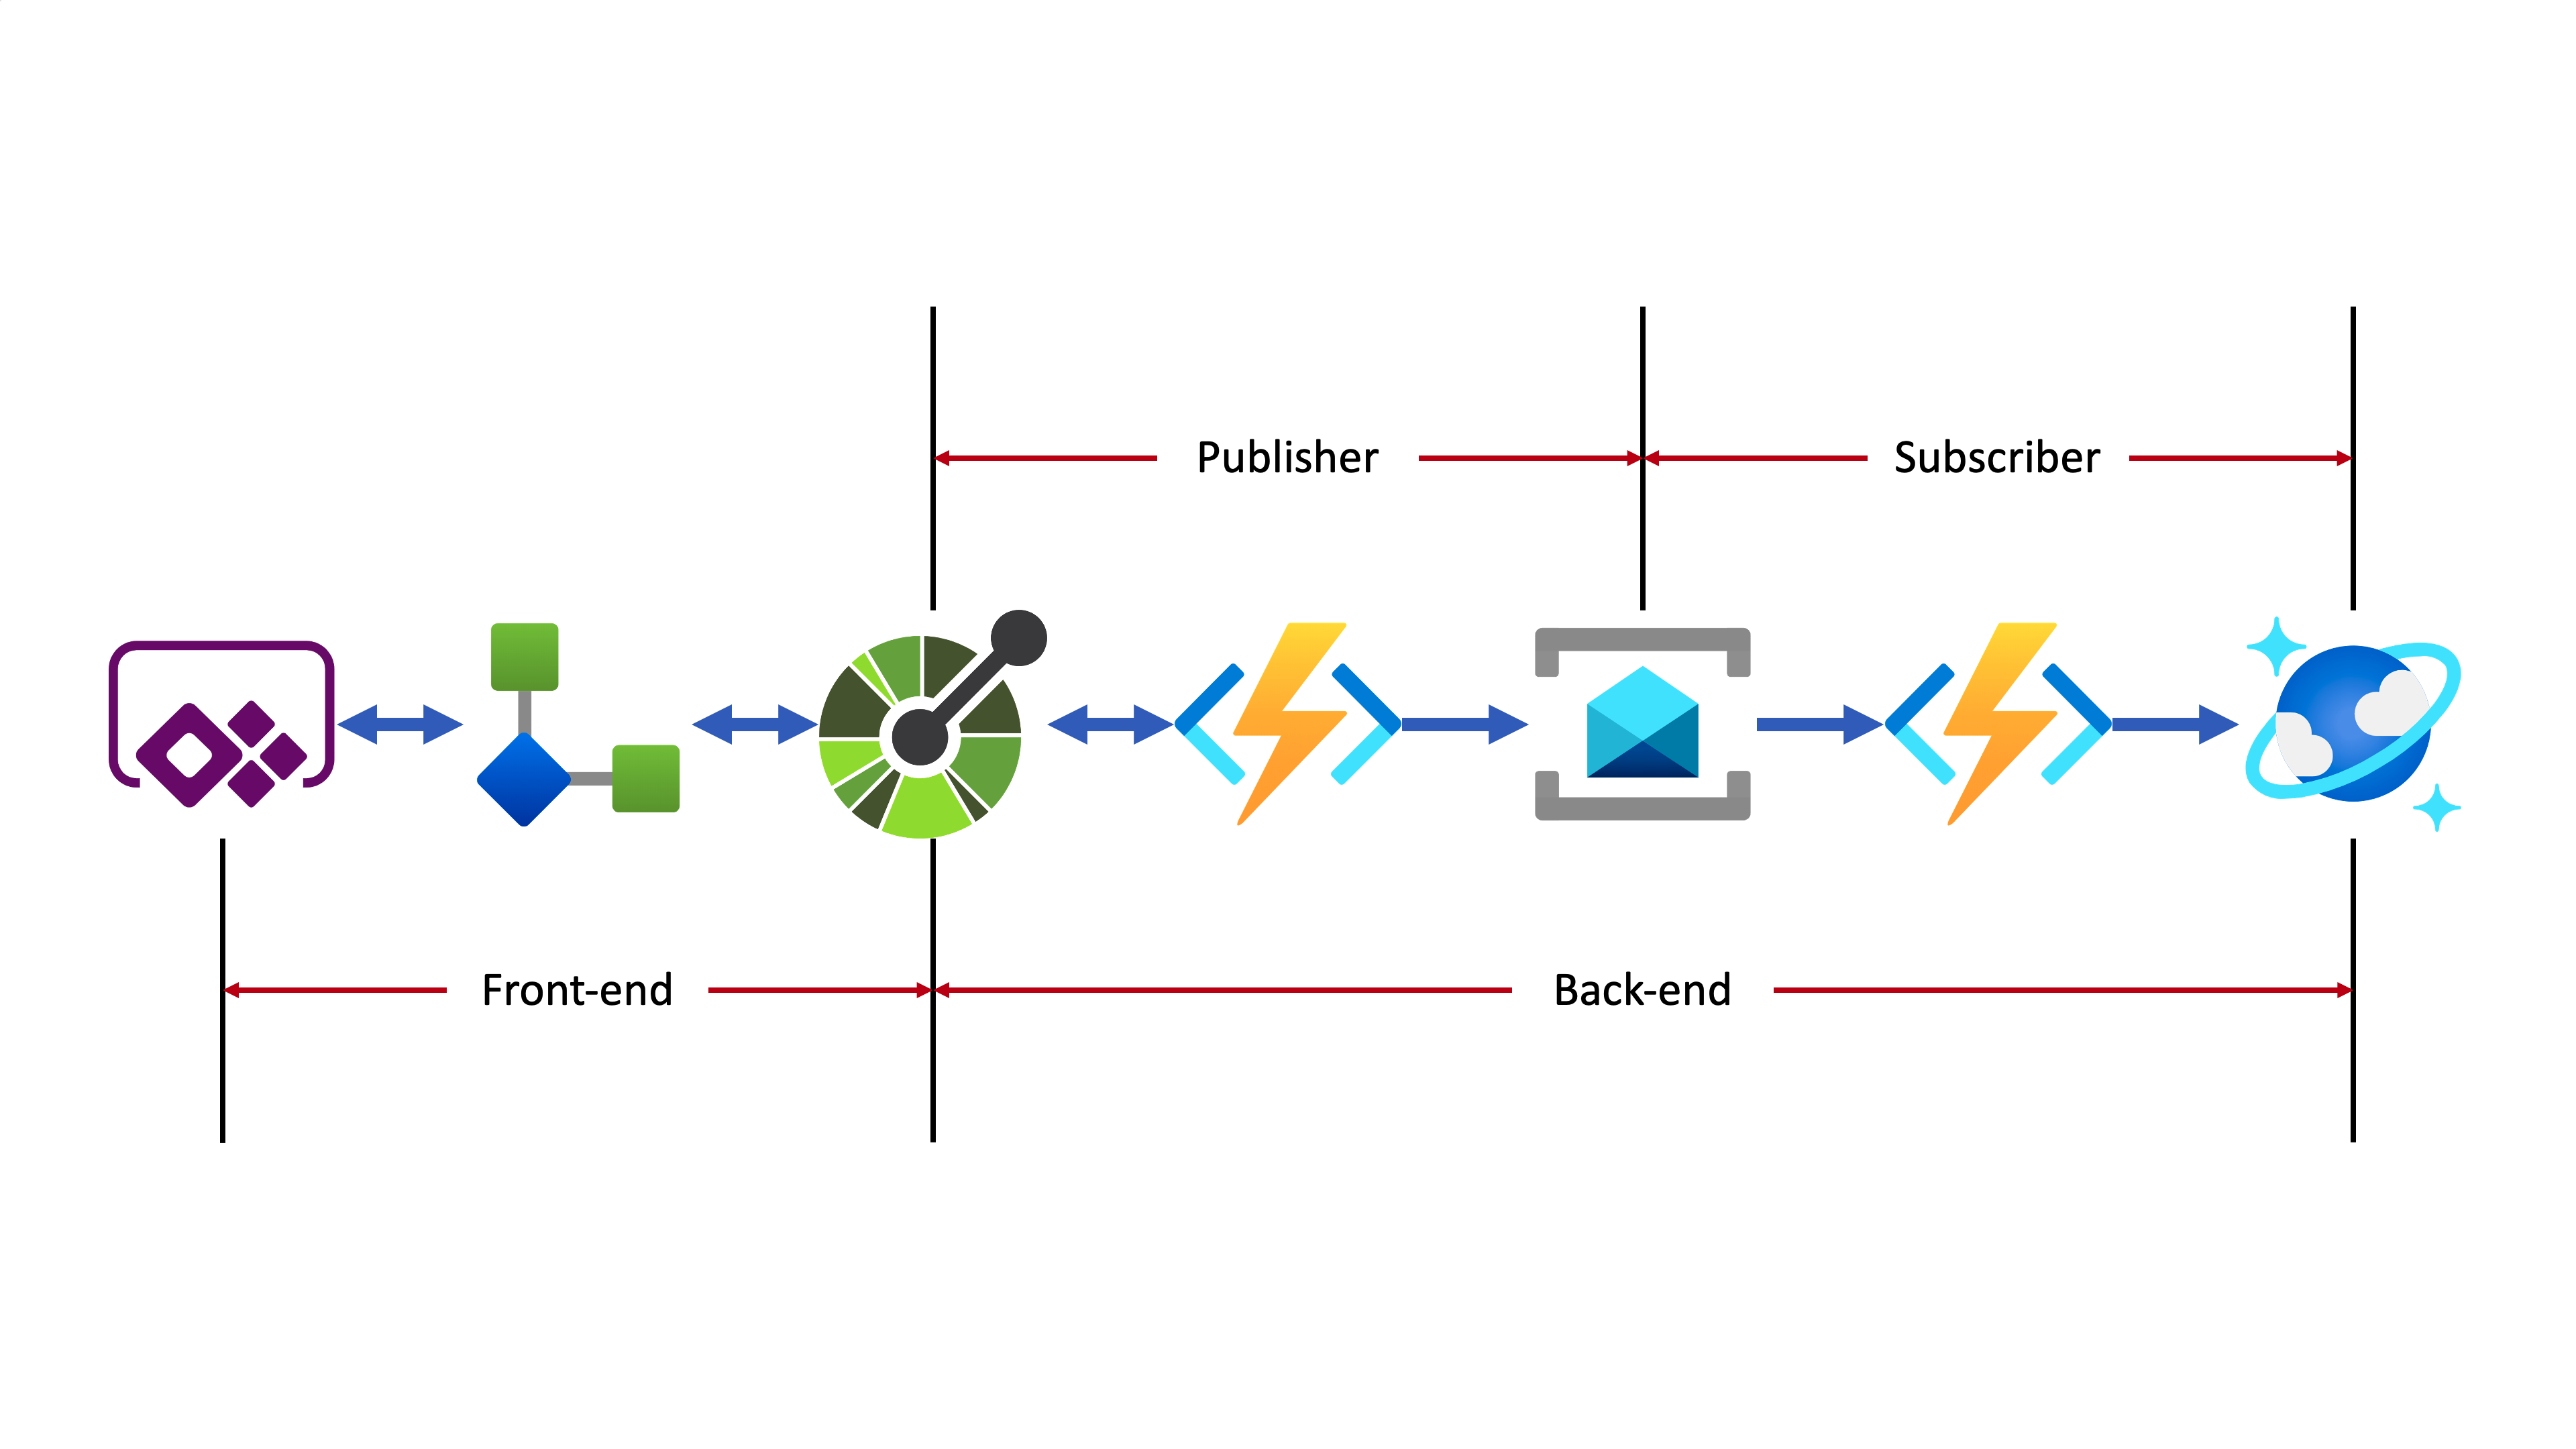
- Azure Functions used as the backend API adds the OpenAPI extension, which increases discoverability.
- A custom connector is generated by the OpenAPI document.
- Through the custom connector, the Power Apps app sends the workout data to the backend system.
- The backend system implements the Pub/Sub pattern that handles data asynchronously.
- At the publisher’s end, data from the Power Apps app keeps accumulated. Then it is aggregated when a workout routine ends and sent to Azure Service Bus.
- At the subscriber’s end, another Azure Functions takes the message from Azure Service Bus and finally stores it to Azure Cosmos DB.
Improving Backend API
As Ji Min is a part of the fusion team representing the personal trainers’ team, she contributes many ideas to the team to achieve more business outcomes. Su Bin is a pro dev in the same fusion team who is responsible for the backend APIs. Ji Min asked Su Bin to make the API discoverable so that Ji Min can do something on her side. Therefore, Su Bin added the OpenAPI extension to the Azure Functions app by installing the NuGet package.
dotnet add package Microsoft.Azure.WebJobs.Extensions.OpenApi –prerelease
By adding minimal efforts, Su Bin added a few OpenAPI-related decorators to the function endpoints. The following code snippets are just an example API for creating a routine when a workout begins. As it’s over-simplified codes for brevity, you can check out the full codes at this link.
    // Decorators for OpenAPI

    [OpenApiOperation(operationId: “CreateRoutine”, tags: new[] { “publisher”, “routine” }, Summary = “Create a new routine”, Description = “This creates a new routine”, Visibility = OpenApiVisibilityType.Important)]

    [OpenApiSecurity(“function_key”, SecuritySchemeType.ApiKey, Name = “x-functions-key”, In = OpenApiSecurityLocationType.Header, Description = “API key to execute this endpoint”)]

    [OpenApiRequestBody(contentType: ContentTypes.ApplicationJson, bodyType: typeof(RoutineRequestMessage), Required = true, Example = typeof(RoutineRequestMessageExample), Description = “The request message payload for a routine”)]

    [OpenApiResponseWithBody(statusCode: HttpStatusCode.OK, contentType: ContentTypes.ApplicationJson, bodyType: typeof(RoutineResponseMessage), Example = typeof(RoutineResponseMessageExample), Summary = “200 response”, Description = “This returns the response of ‘OK'”)]

    [OpenApiResponseWithBody(statusCode: HttpStatusCode.InternalServerError, contentType: ContentTypes.ApplicationJson, bodyType: typeof(ErrorResponseMessage), Example = typeof(ErrorResponseMessageExample), Summary = “500 response”, Description = “This returns the response of ‘Internal Server Error'”)]

    // Decorators for OpenAPI

    [FunctionName(nameof(RoutineHttpTrigger.CreateRoutineAsync))]

    public async Task CreateRoutineAsync(

        [HttpTrigger(AuthorizationLevel.Function, HttpVerbs.Post, Route = “routines”)] HttpRequest req,

        ExecutionContext context,

        ILogger log)

    {

        …

    }
After the decorators being added, deploy the function app, and you will see the Swagger UI screen like:

As the OpenAPI extension supports both V2 (Swagger) and V3, you’ll see either V2 or V3 doc depending on your configurations when you visit https://<function_app_name>.azurewebsites.net/api/swagger.json. The screenshot above renders the V3 doc.
Create Custom Connector
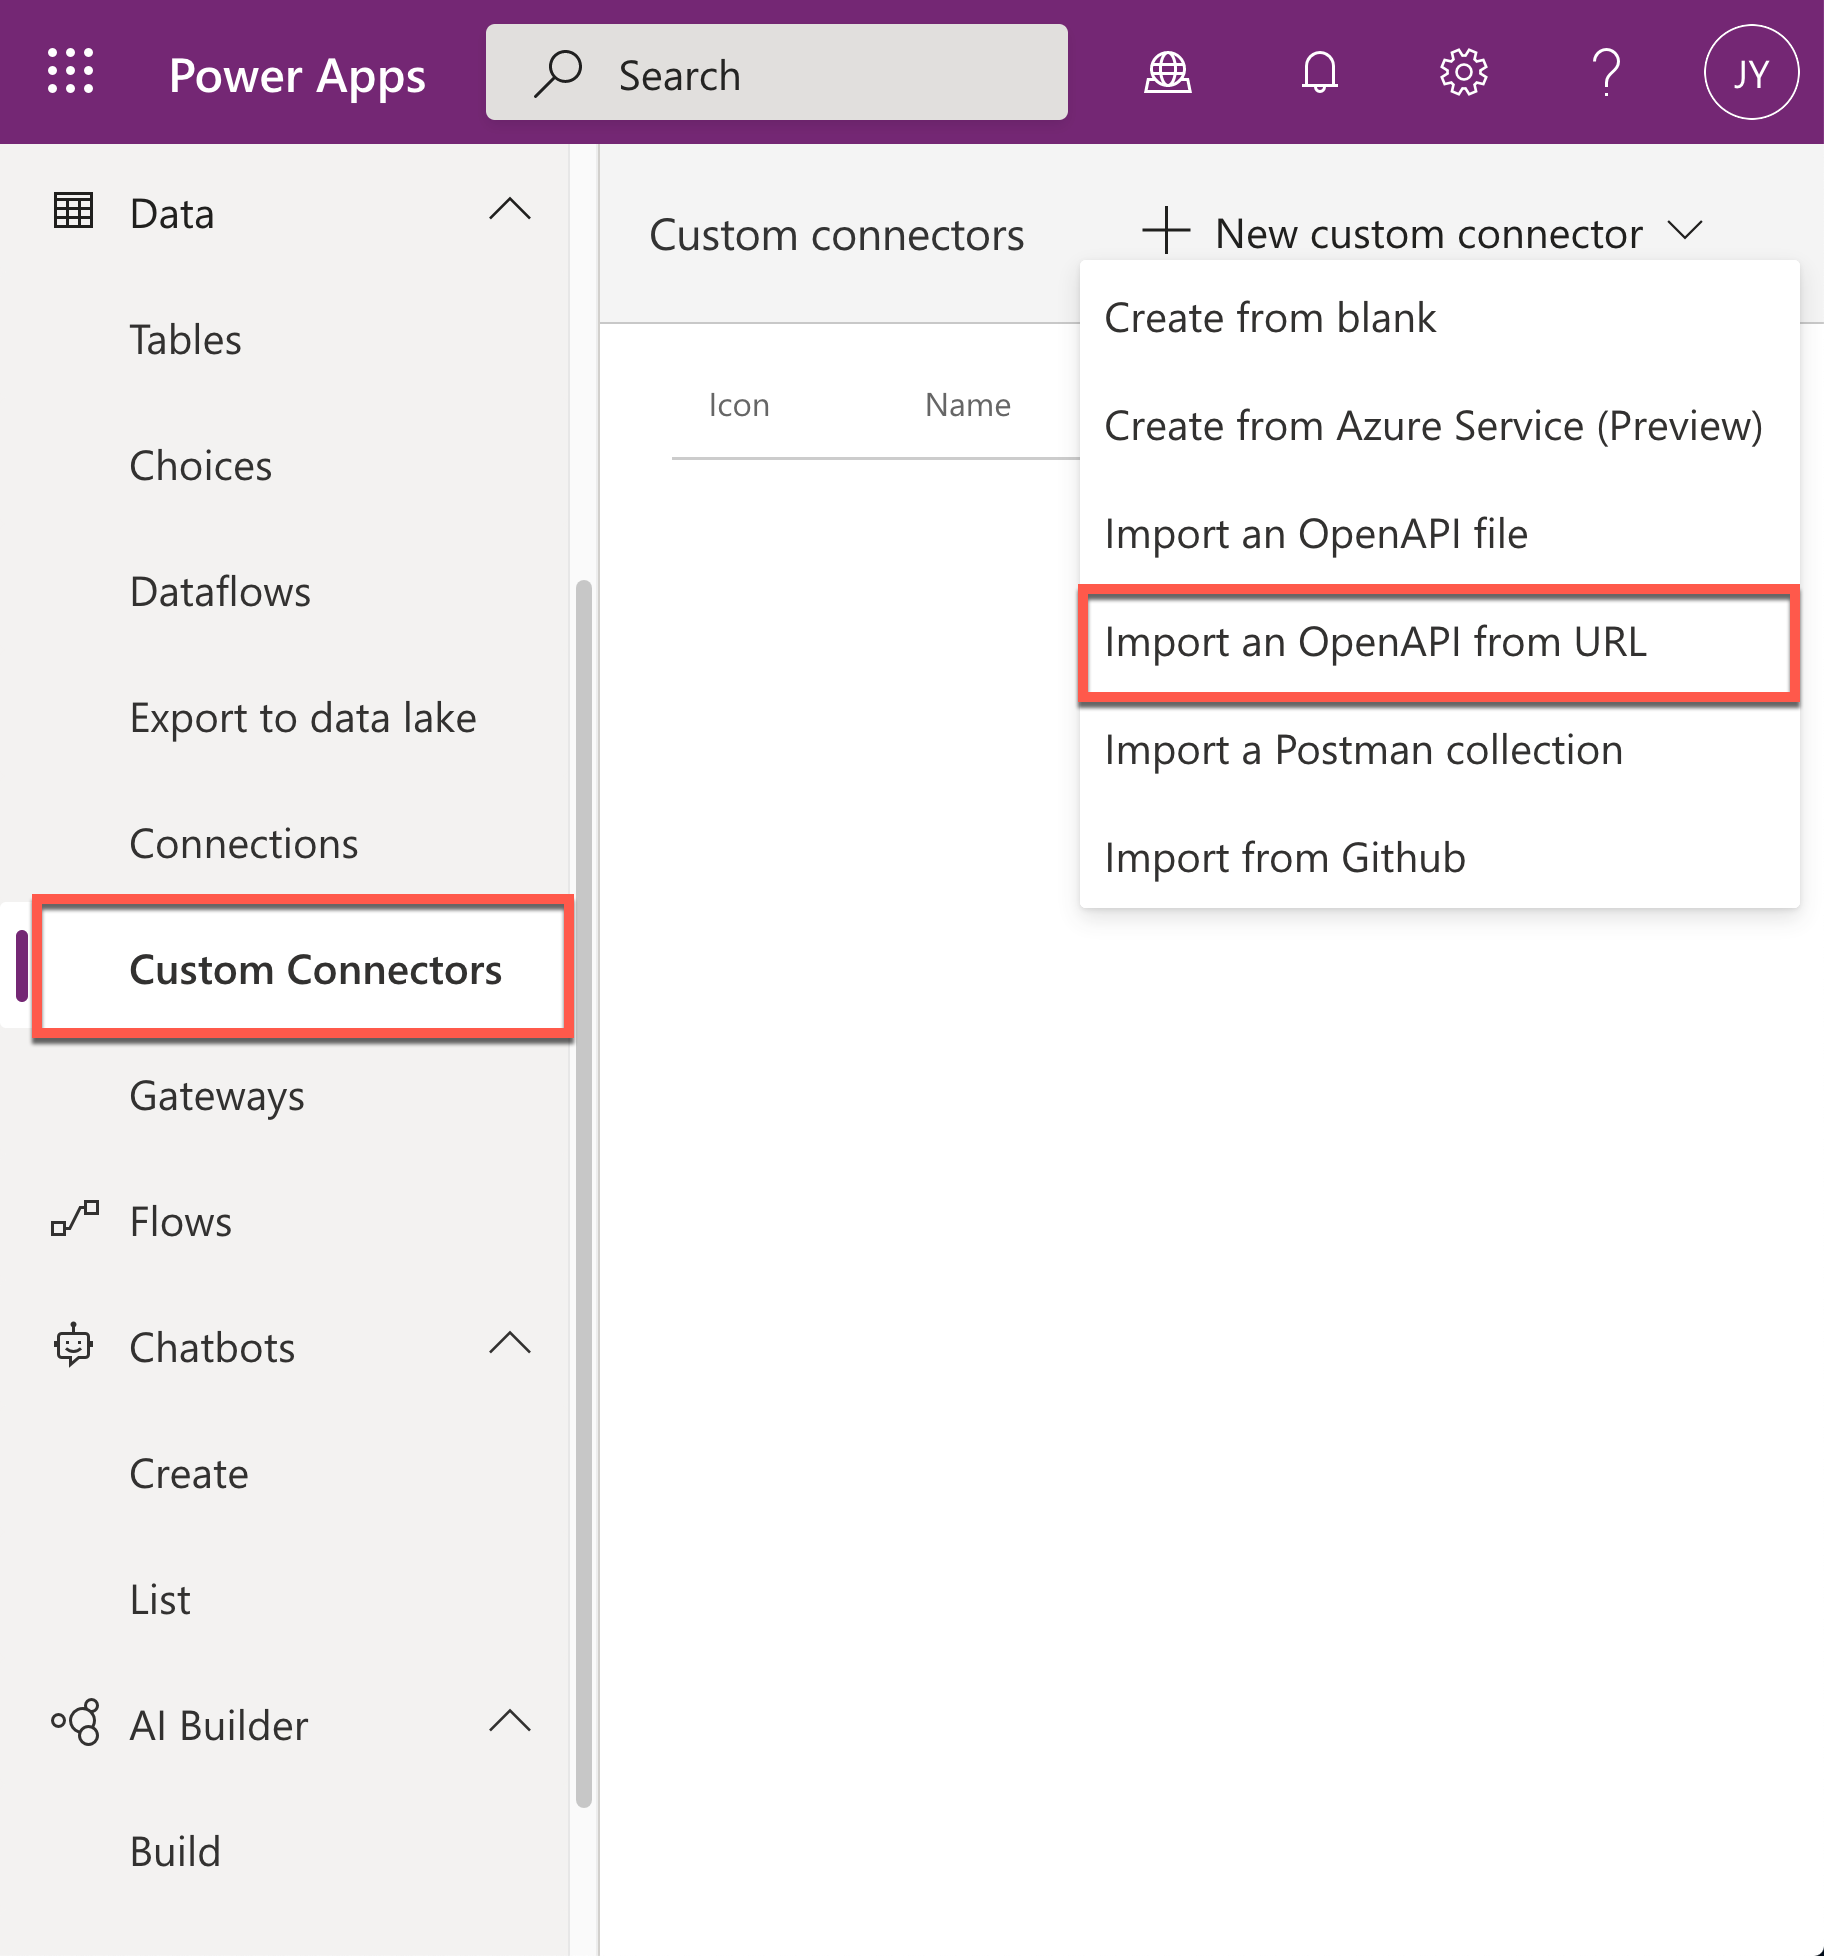
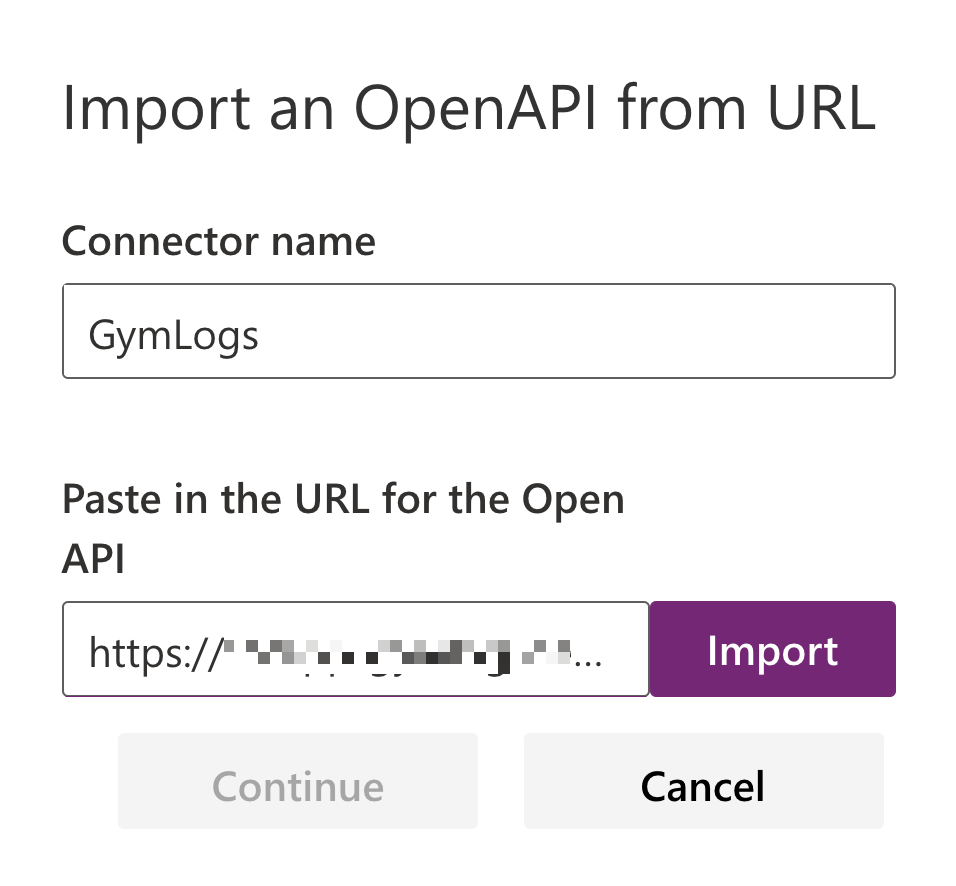
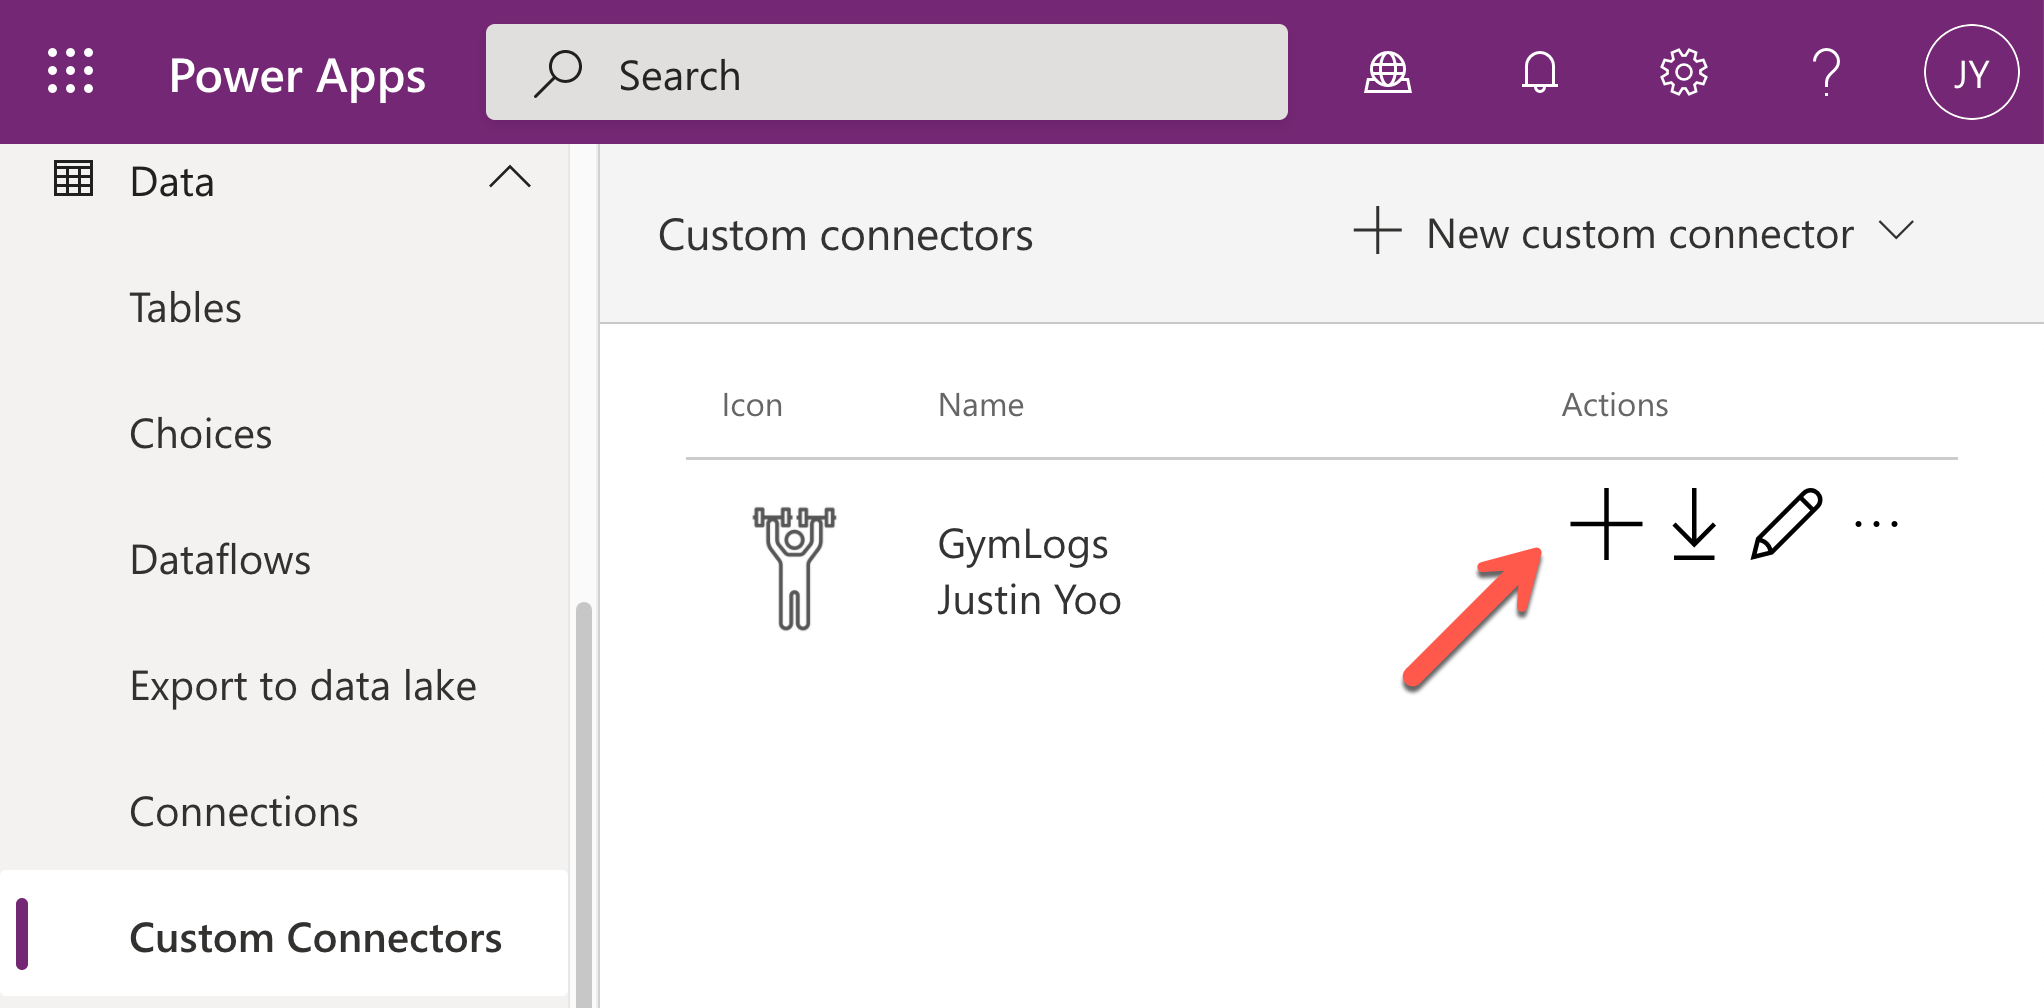
The serverless API has now got better discoverability. Now it’s time to create a custom connector for Power Apps to access the API. As Power Apps is a low-code app maker platform, Ji Min, as a citizen dev, can easily make the custom connector. Click the Custom Connector menu at the left-hand side, click the :heavy_plus_sign: New custom connector button and select the Import an OpenAPI from URL menu.
Put the OpenAPI document URL to the field of Paste in the URL for the OpenAPI. Currently, the custom connector only supports the OpenAPI spec v2. Therefore, use the URL, https://<function_app_name>.azurewebsites.net/api/openapi/v2.json for import.
Sometimes, you’ll have the following error during the import. It’s because the CORS setting is missing between the Power Apps Studio and Azure Functions app instance.
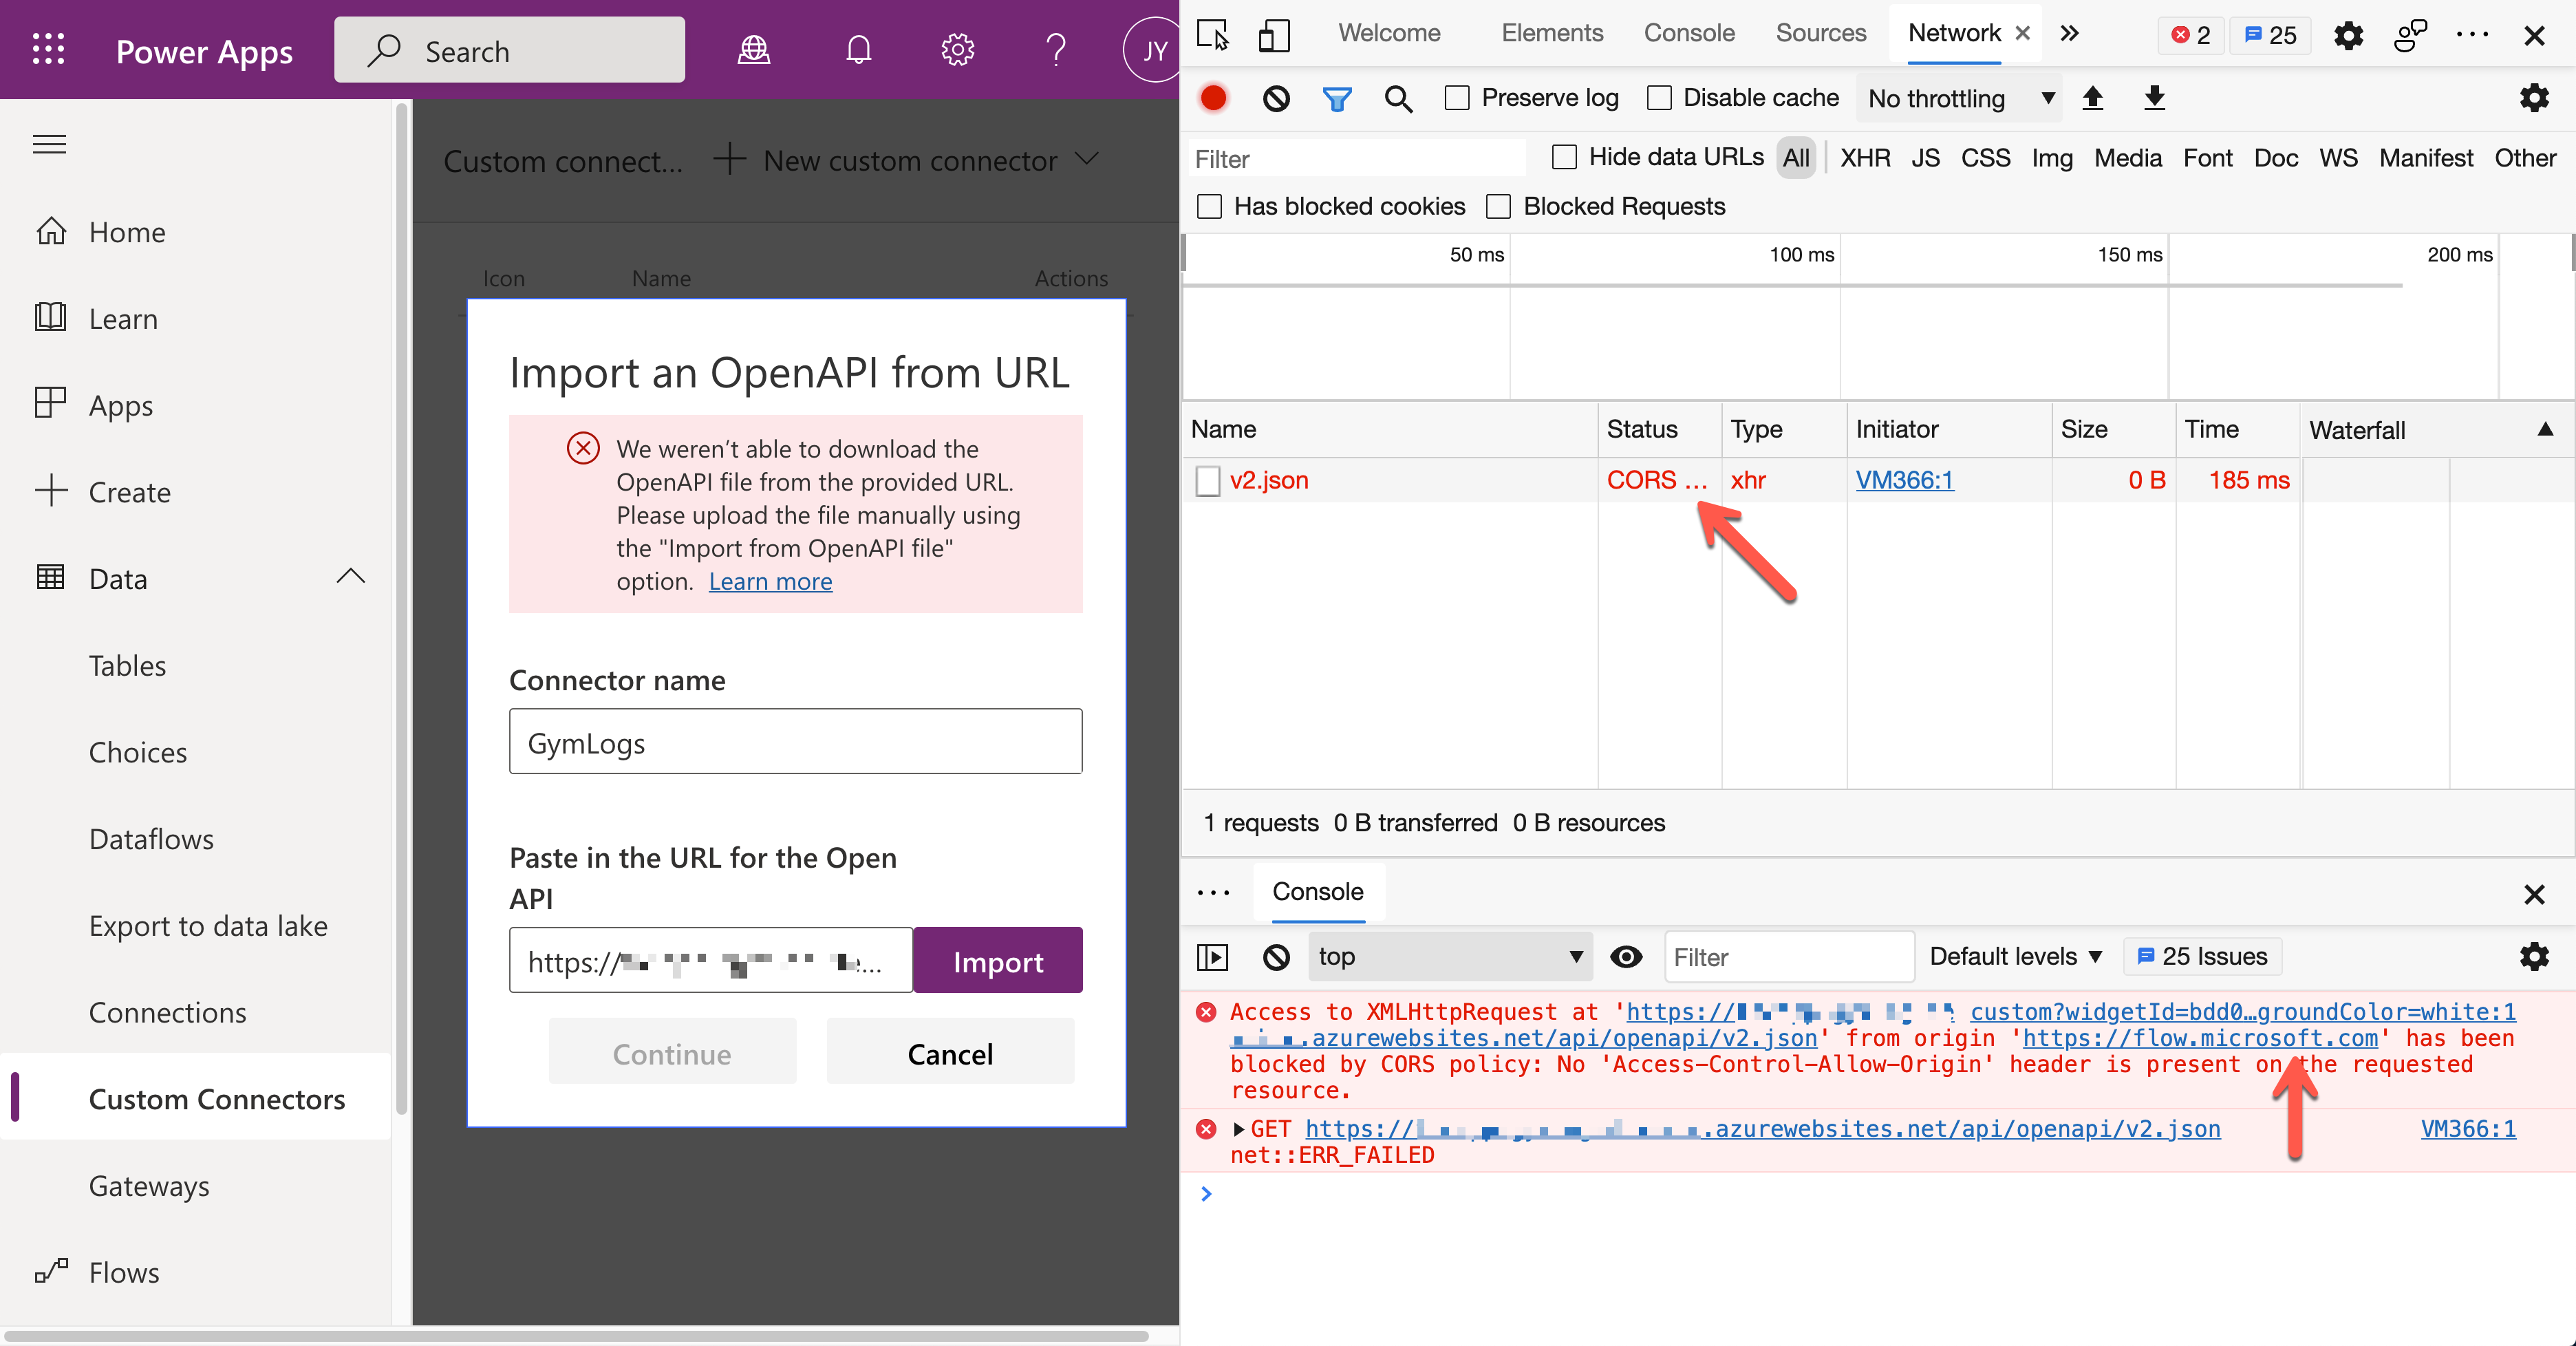
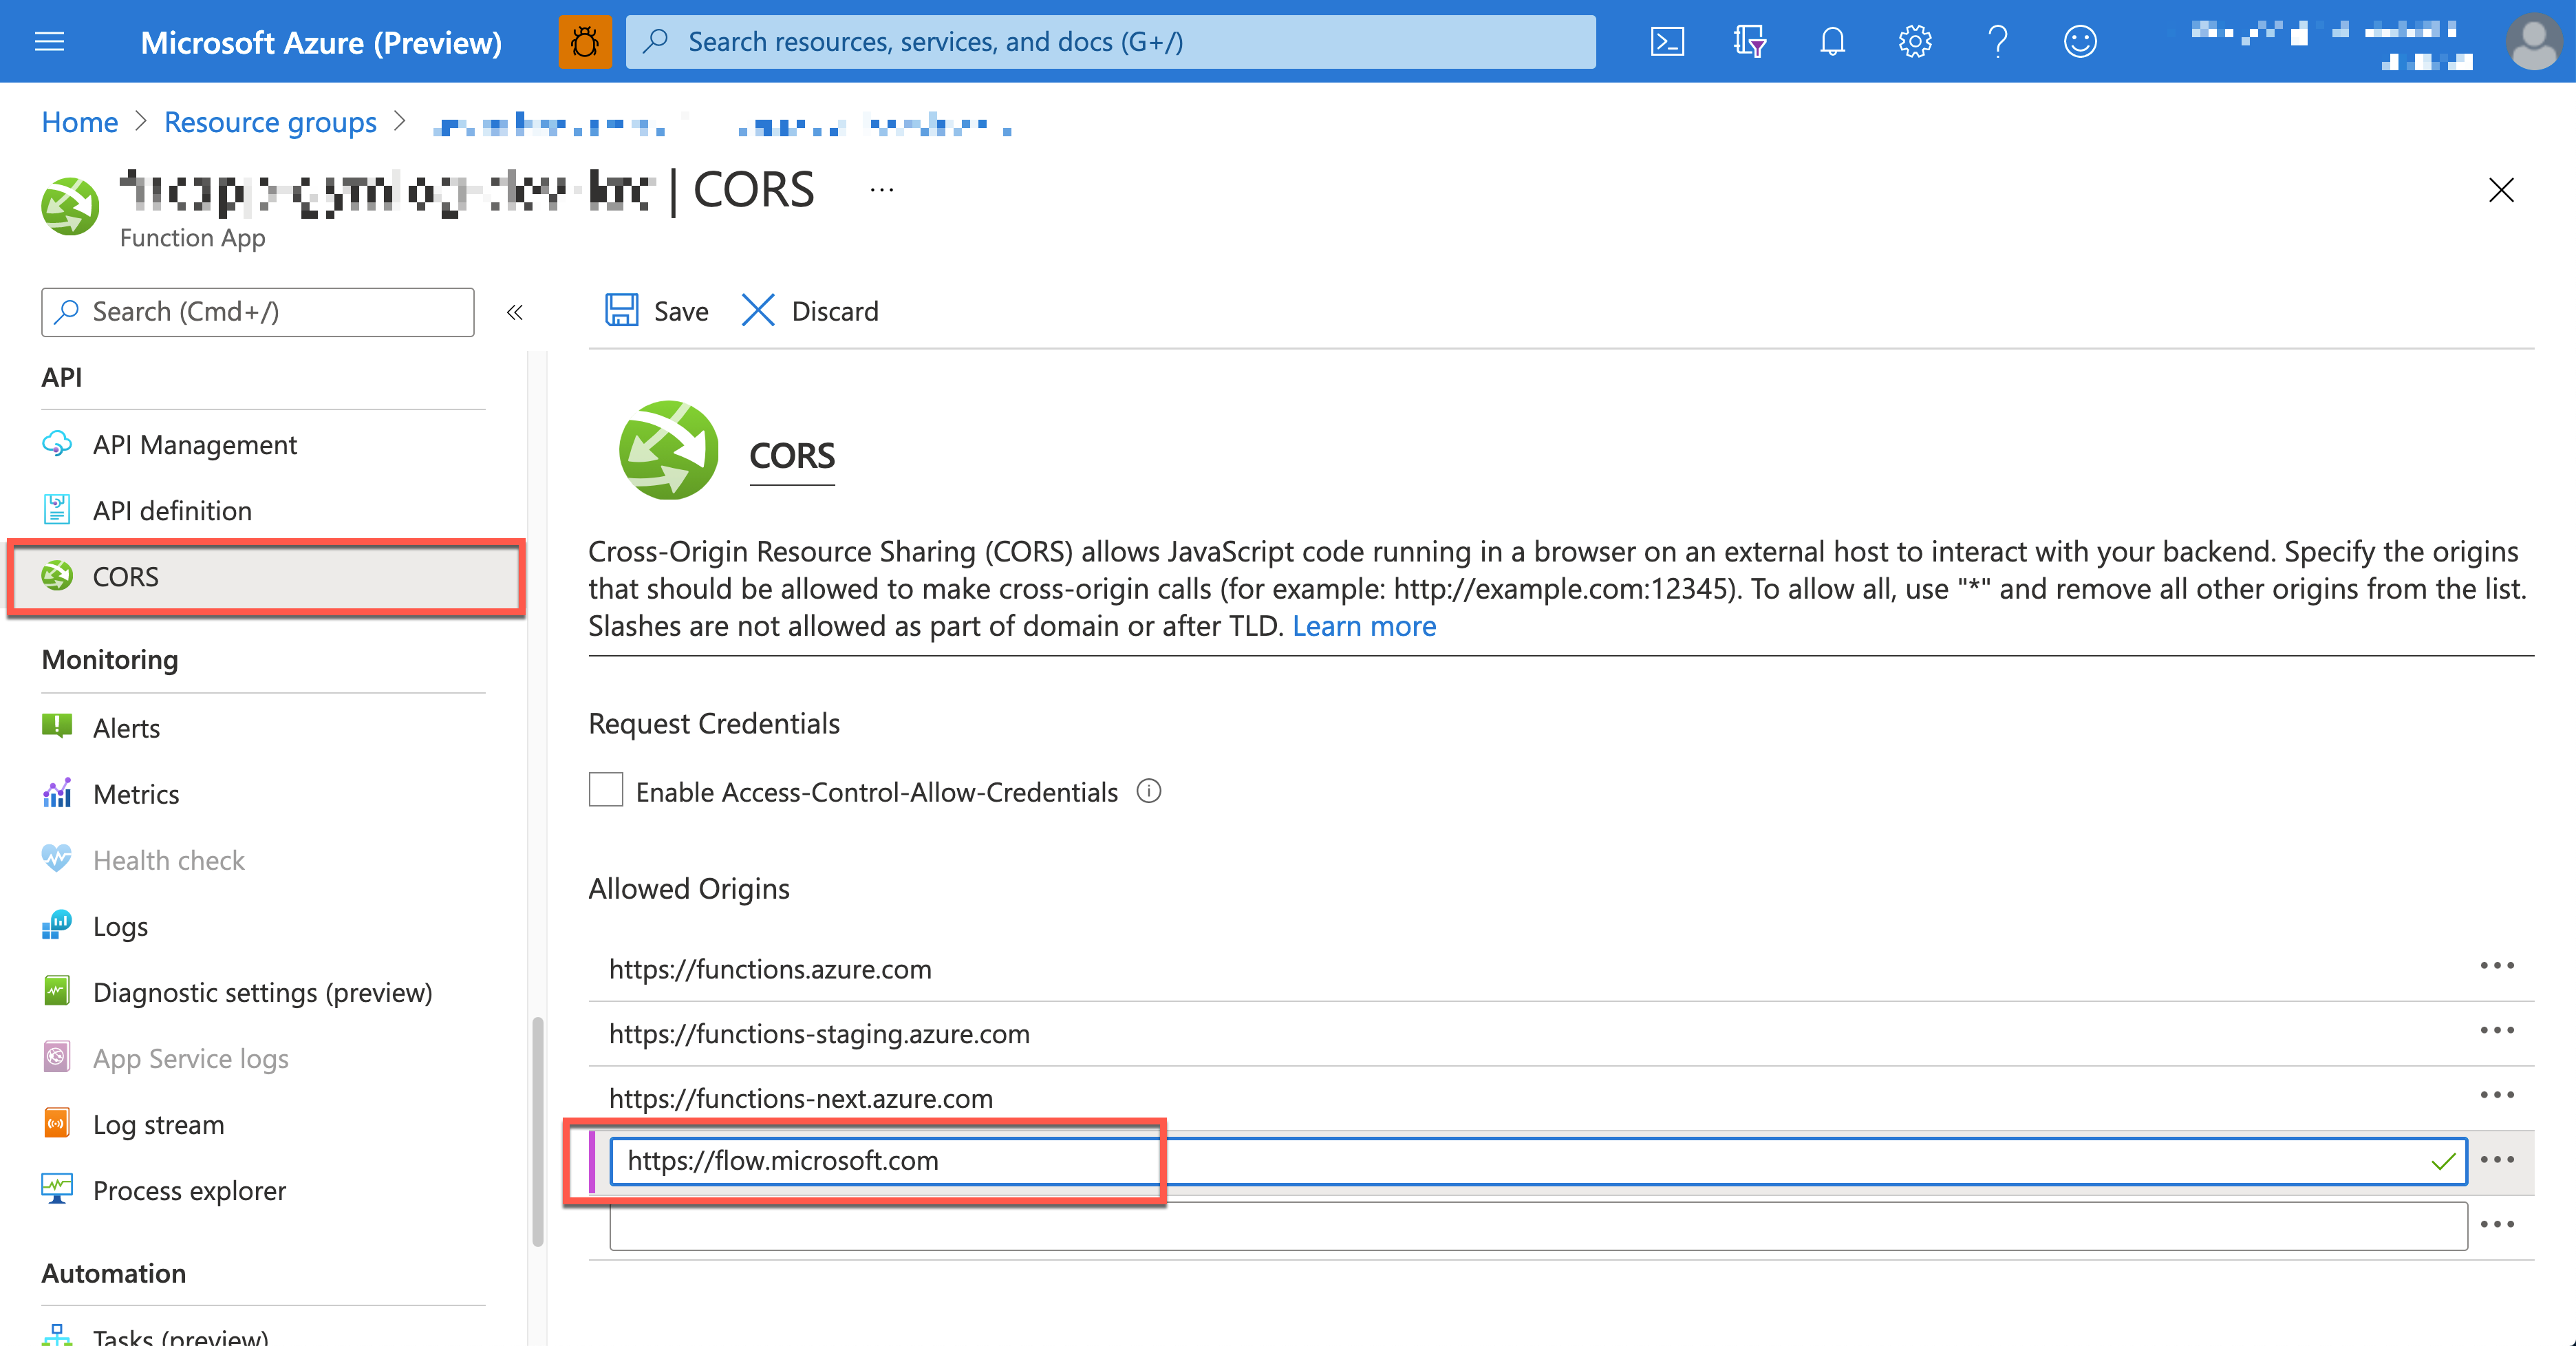
To figure this out, add the URL, https://flow.microsoft.com, to the Azure Function’s CORS settings.
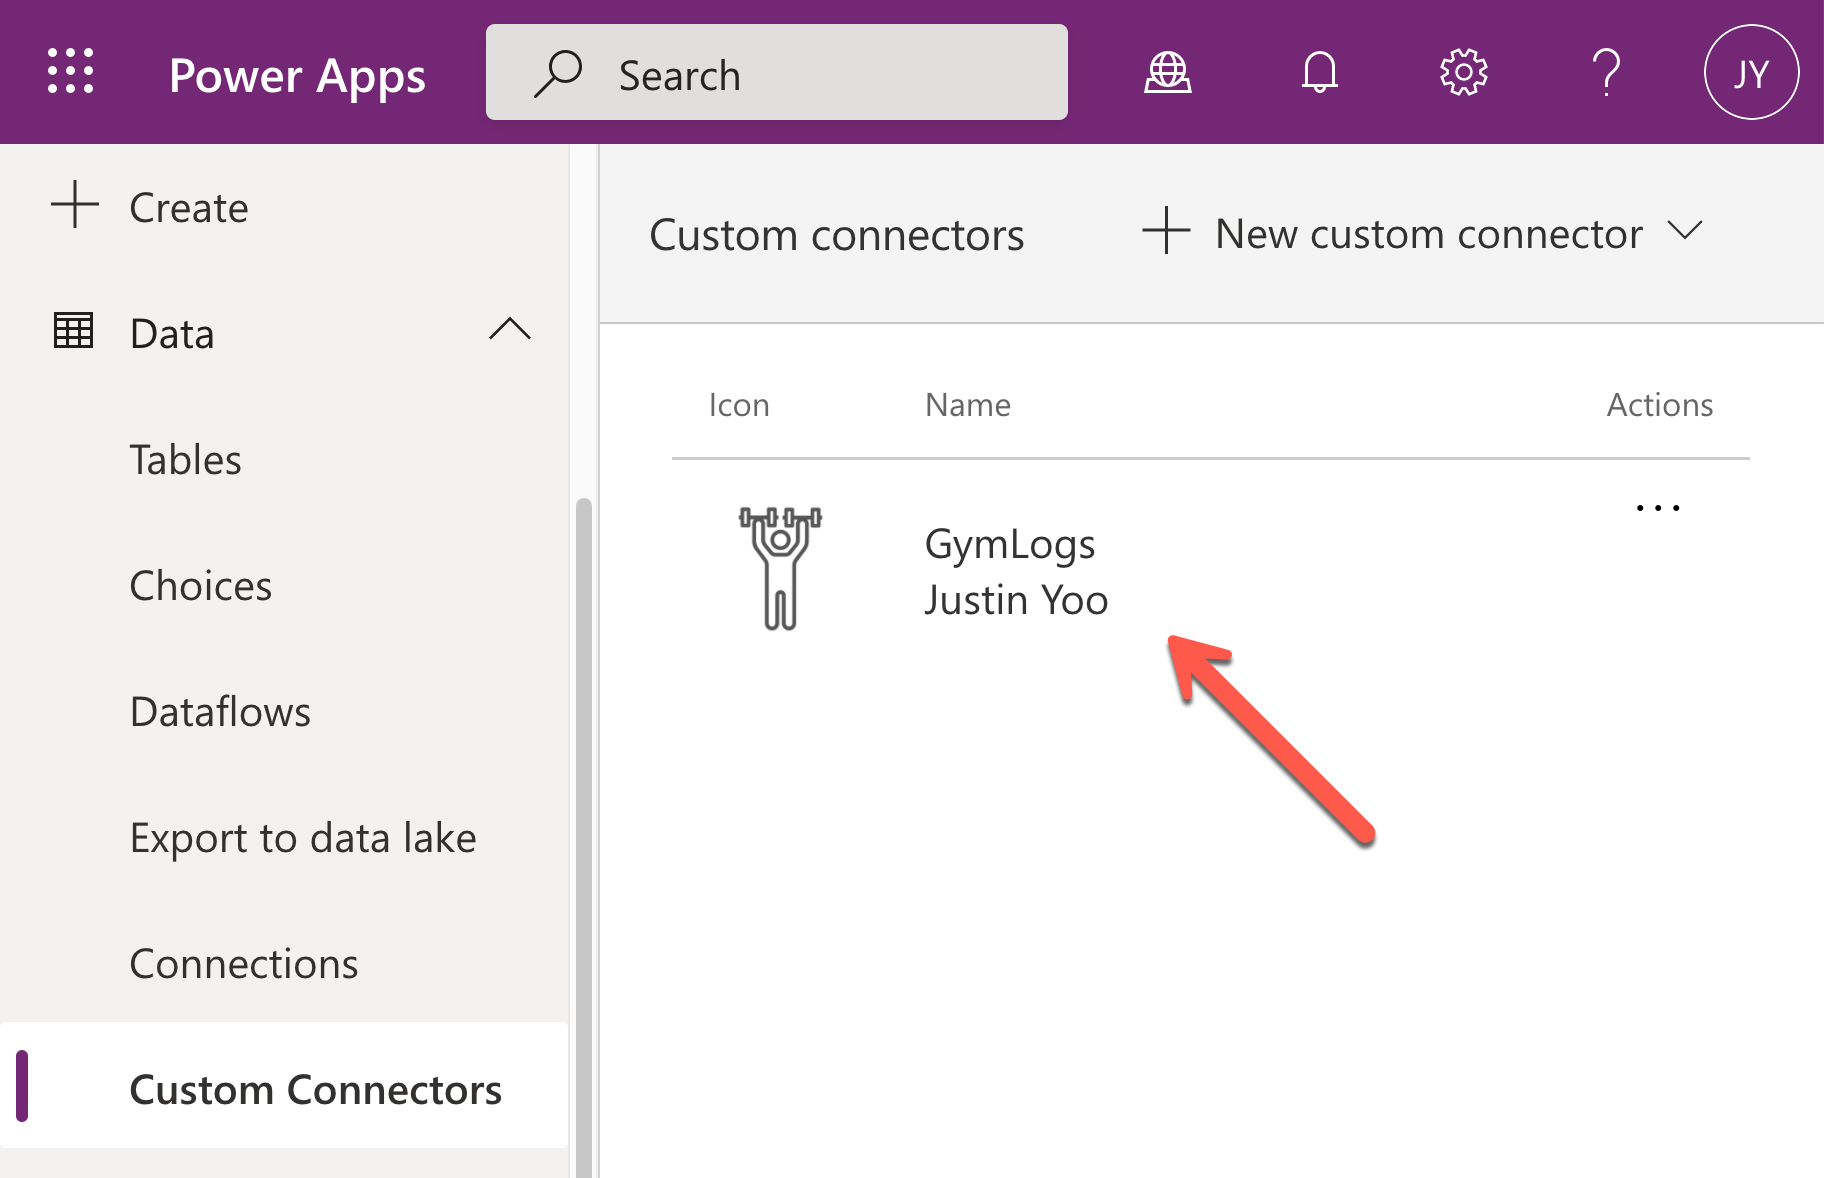
After the CORS configuration, go back to Power Apps Studio and create the custom connector again. It’s now OK without an error. As the rest of creating the custom connector process is the same as this process, I won’t repeat it here. Finally, you’ve got the custom connector for the Gym Logs.
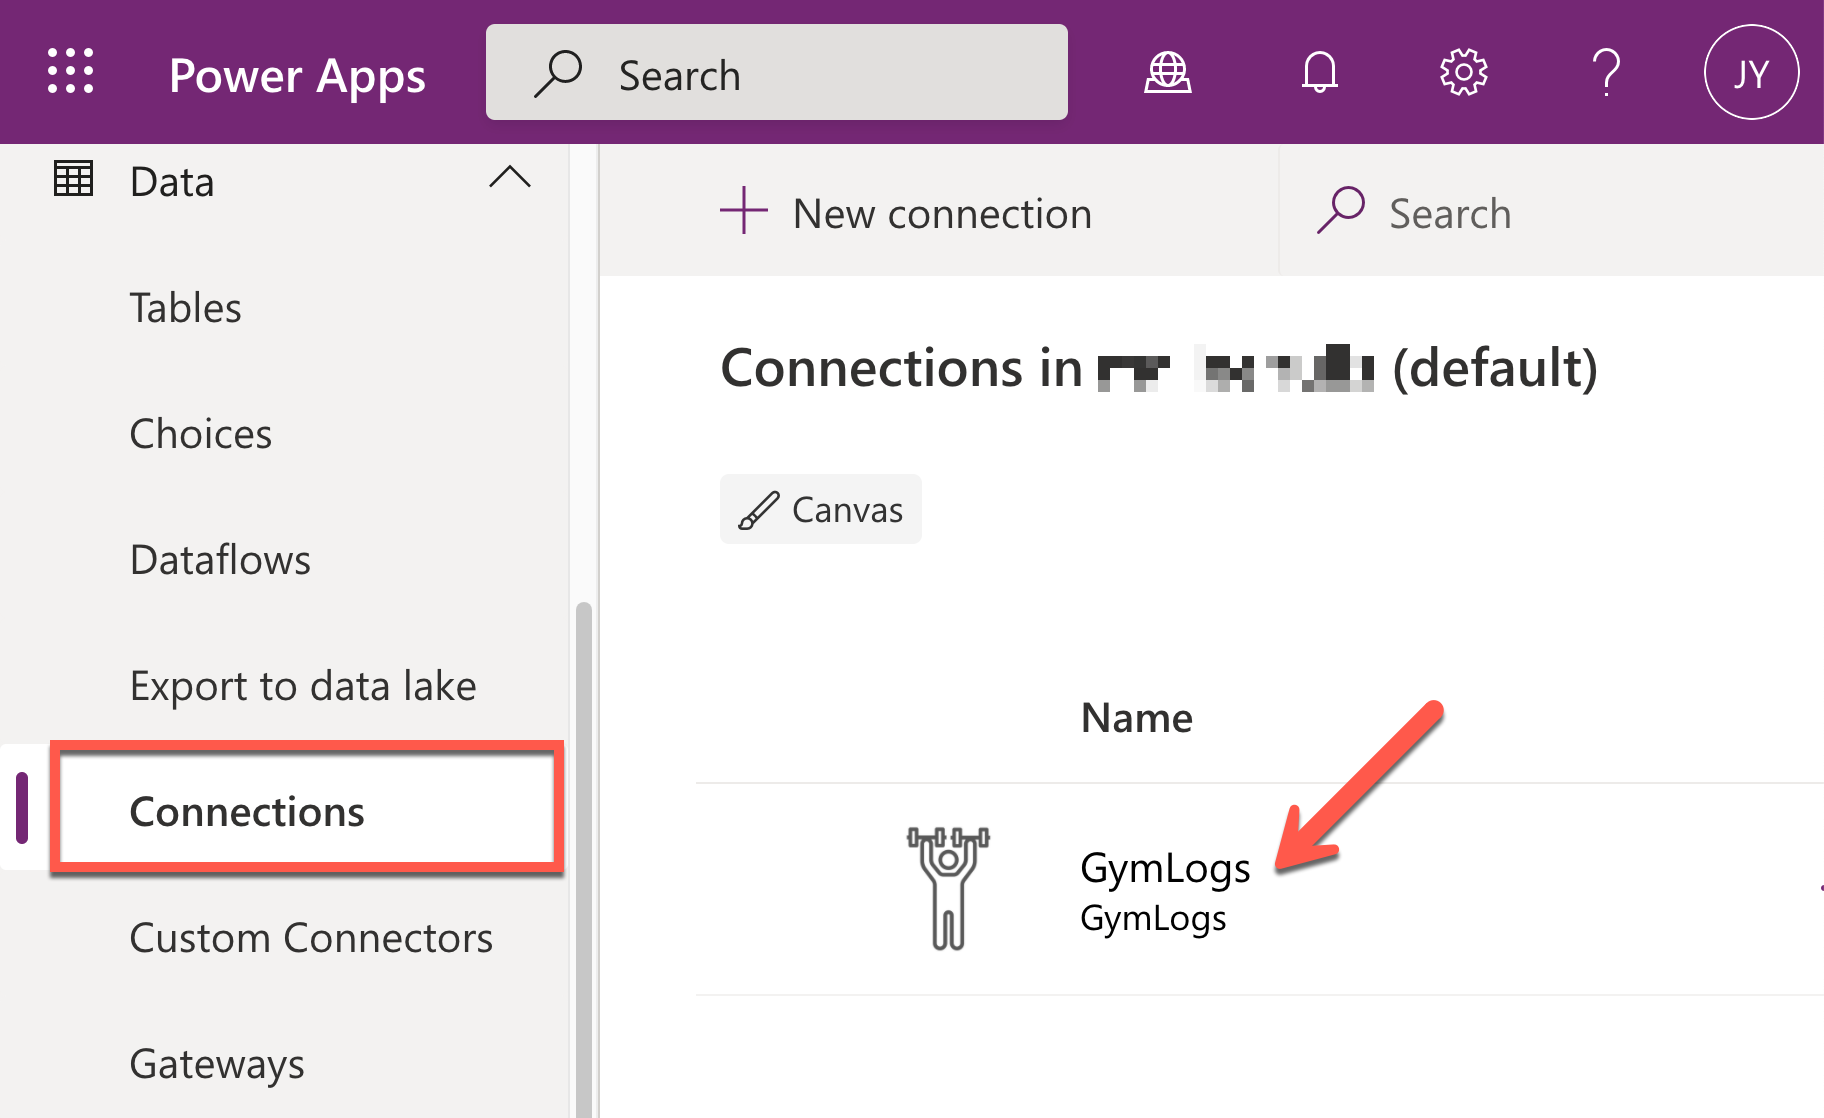
Connecting Custom Connector via Authentication
In order for Ji Min to use the custom connector within her Power Apps app, a new connection must be created beforehand by providing authentication details. As API keys protect Azure Functions API endpoints, give the key for the authentication. Click the :heavy_plus_sign: button.
Enter the API key to the field and click the Create button.
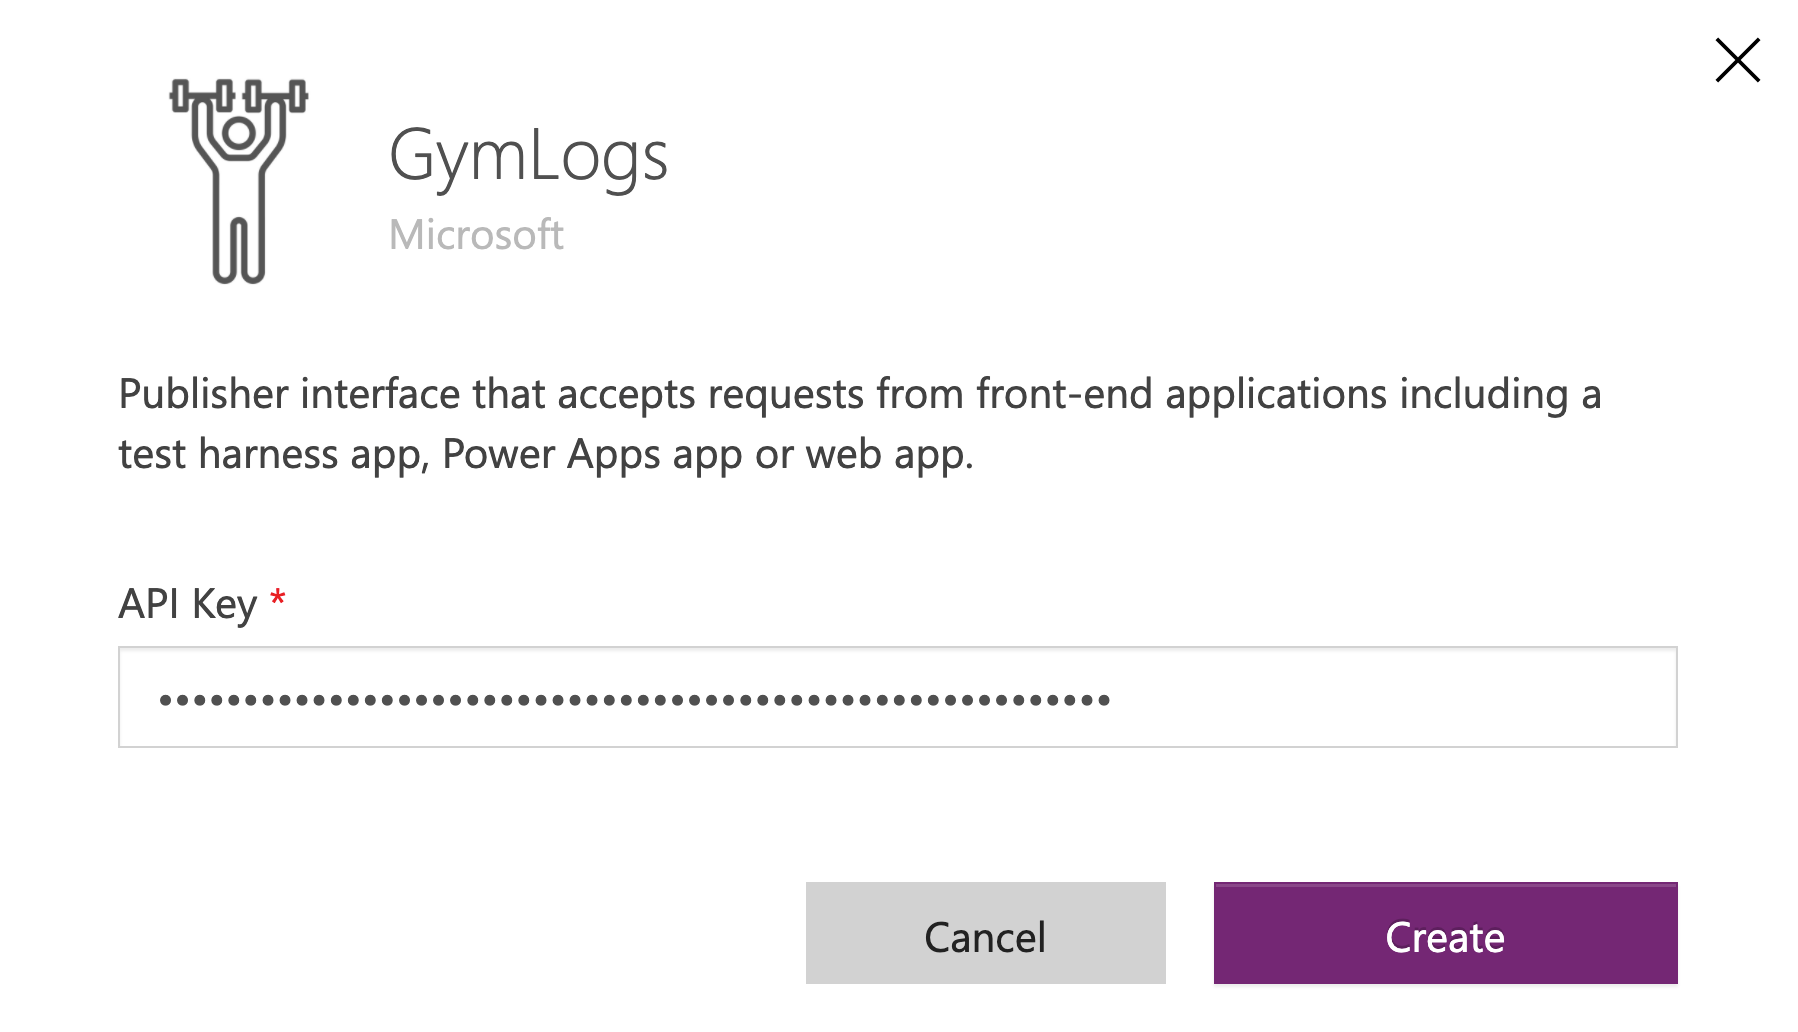
Now, you’ve got the connection and can use the custom connector within the Power Apps app.
Accessing Custom Connector in Power Apps
Ji Min is now able to enter her members’ workout logs through the Power Apps app instead of hand-writing them. Add the custom connector on your Canvas app.
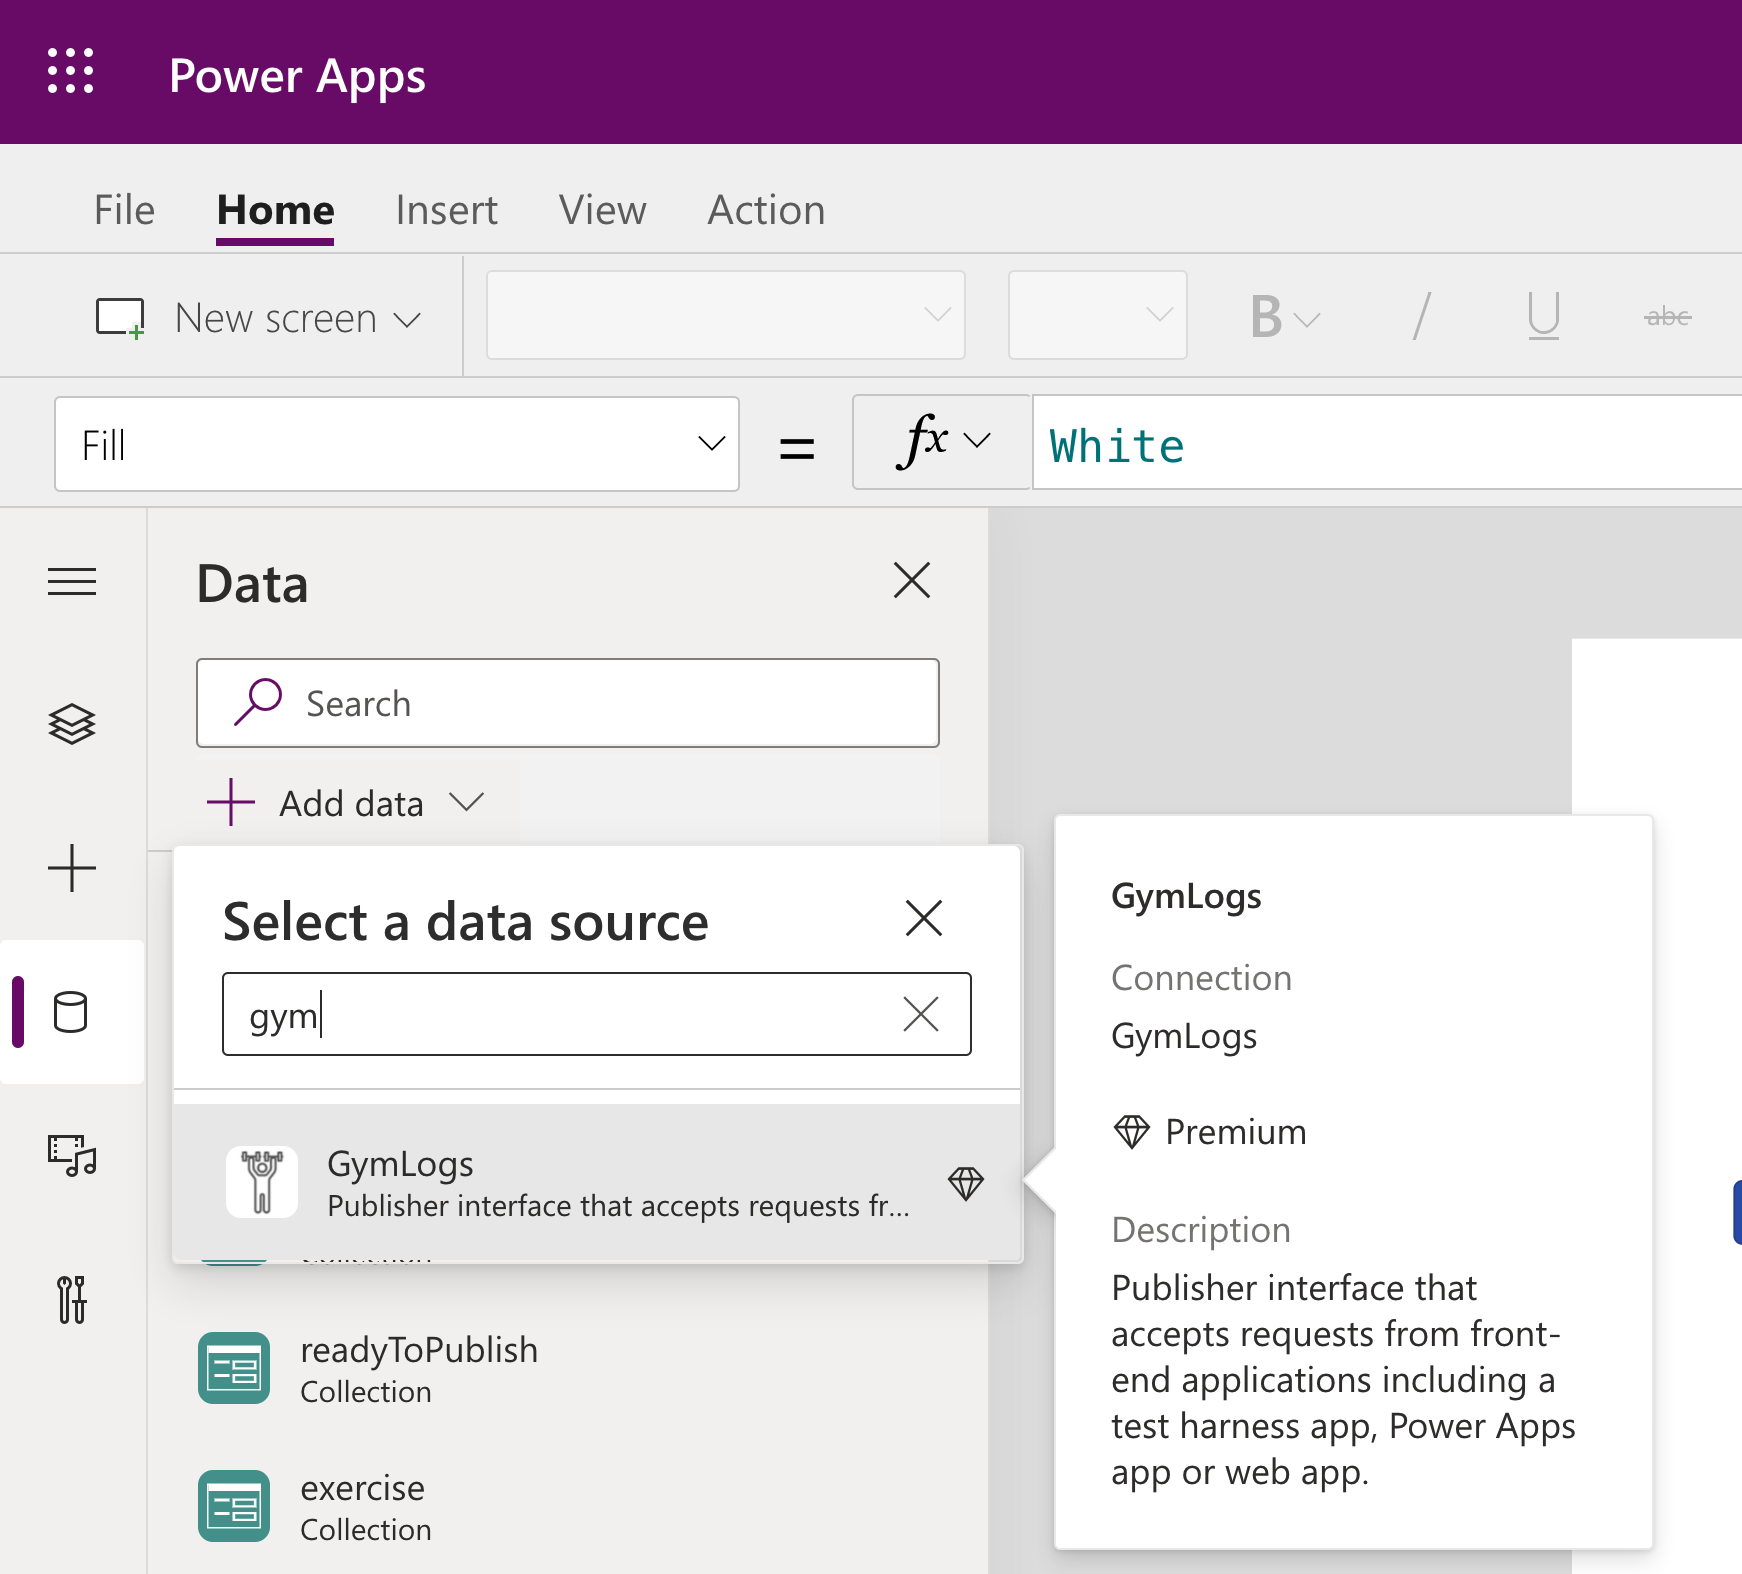
It’s all done! Ji Min finally can manage all the workout logs through the mobile app! Here are a couple of screenshots while using the app.
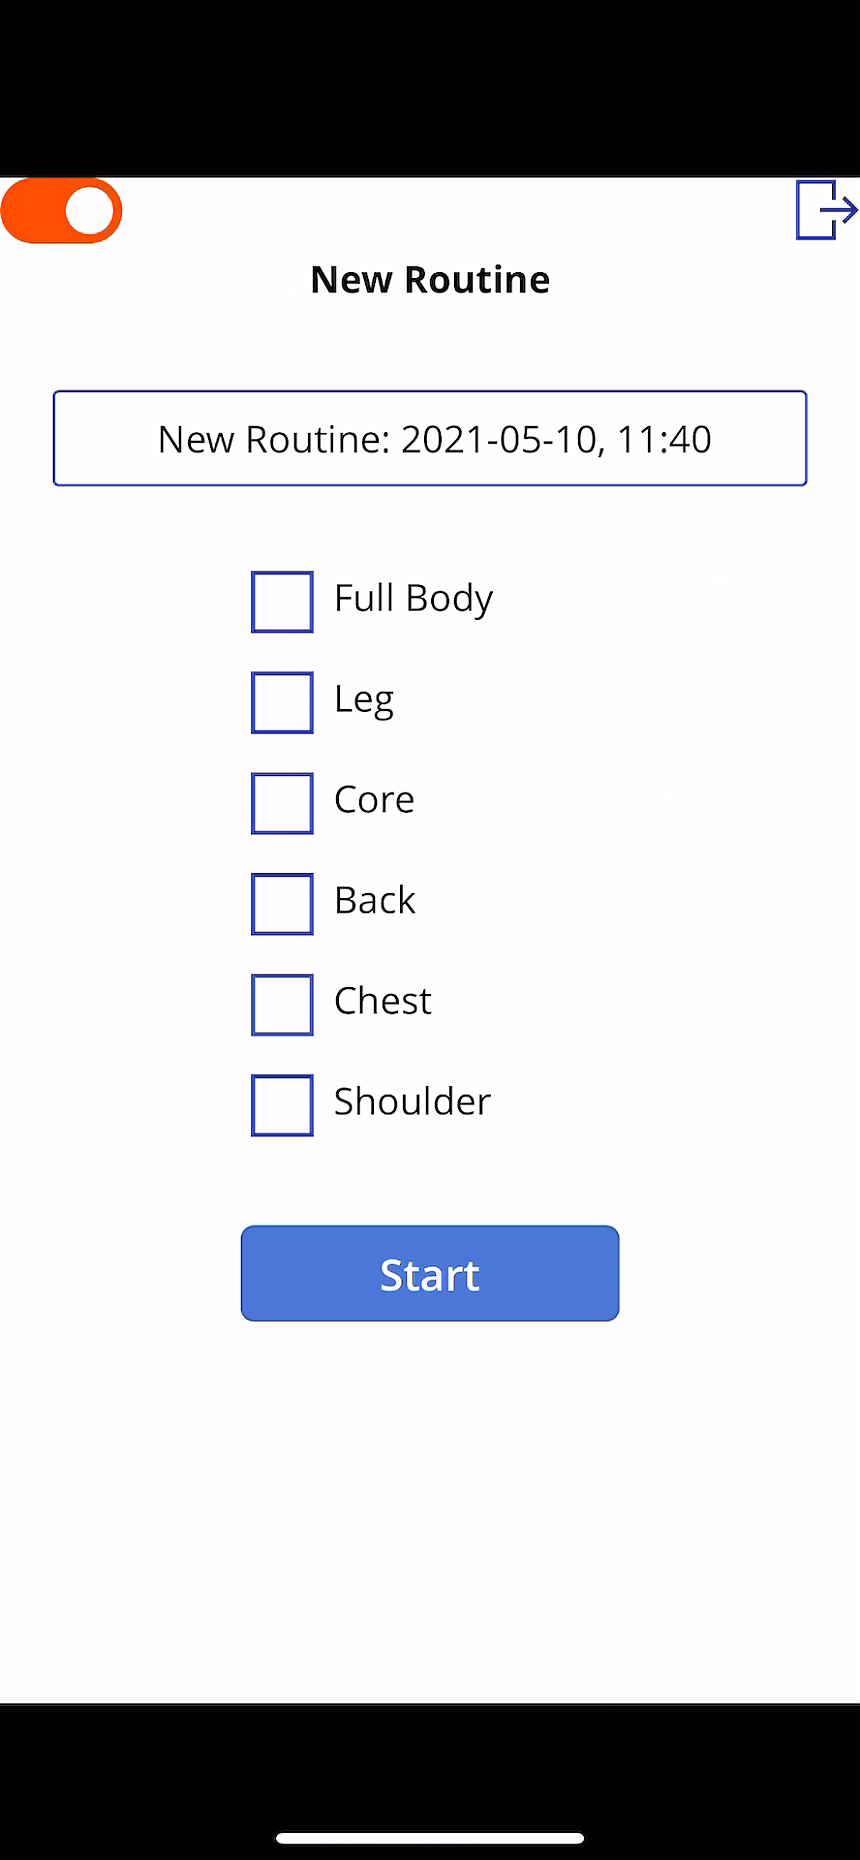
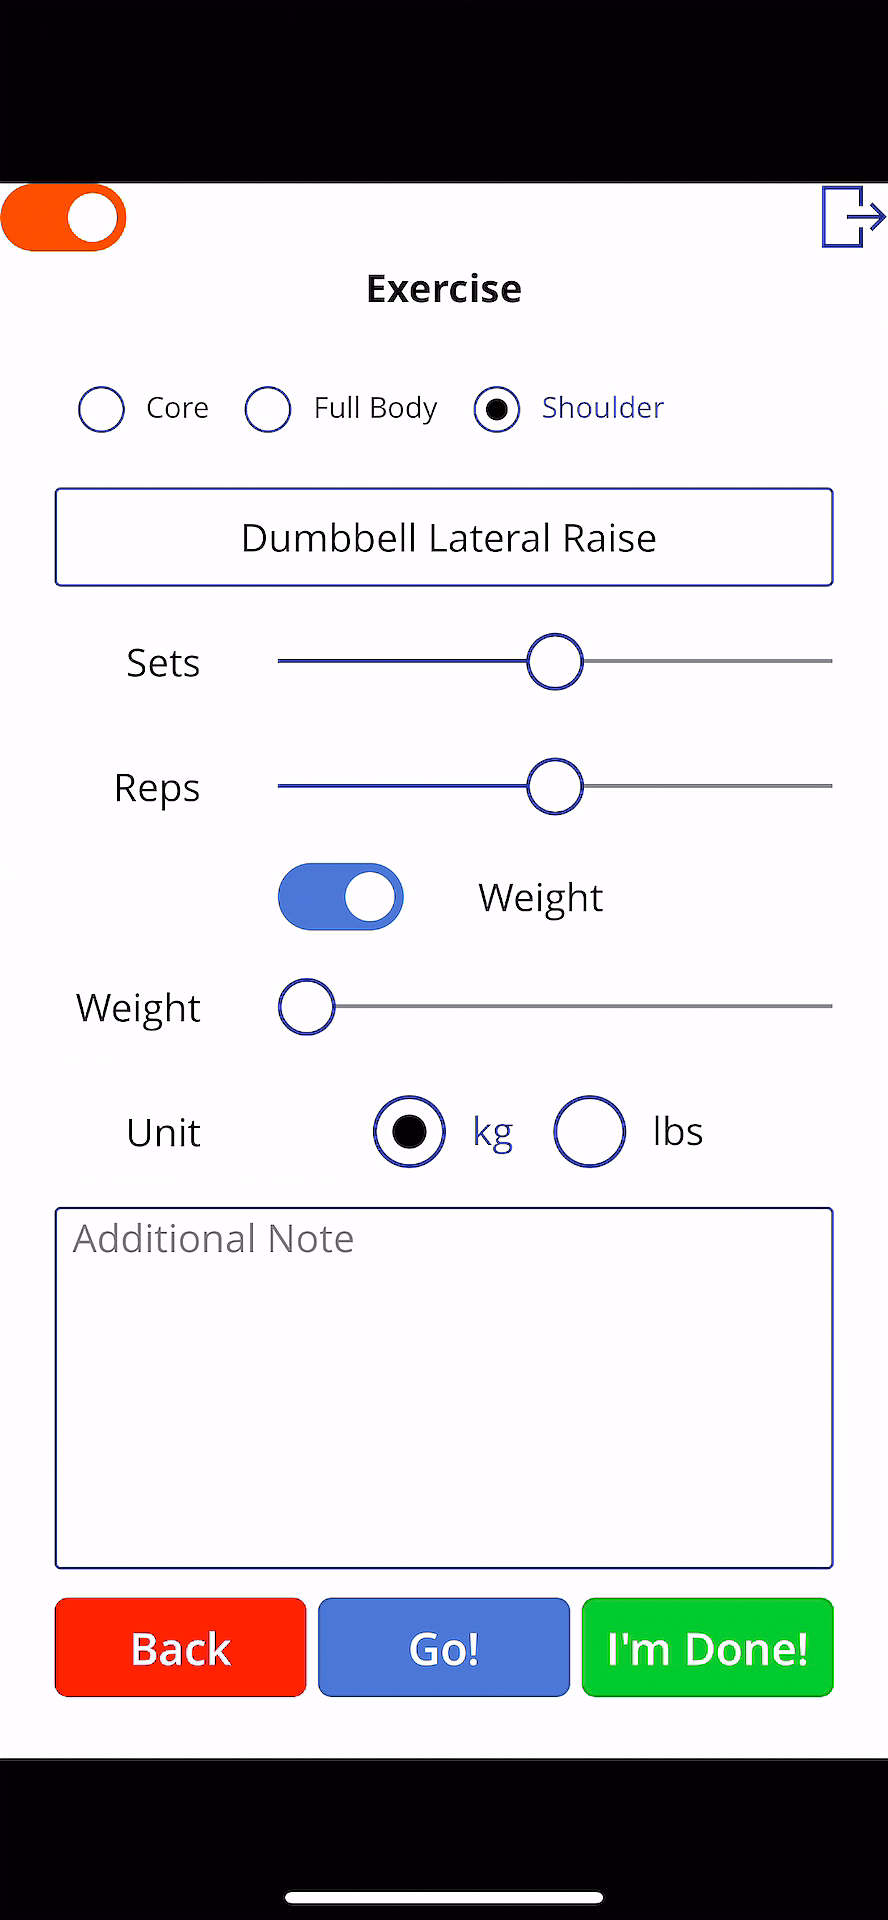
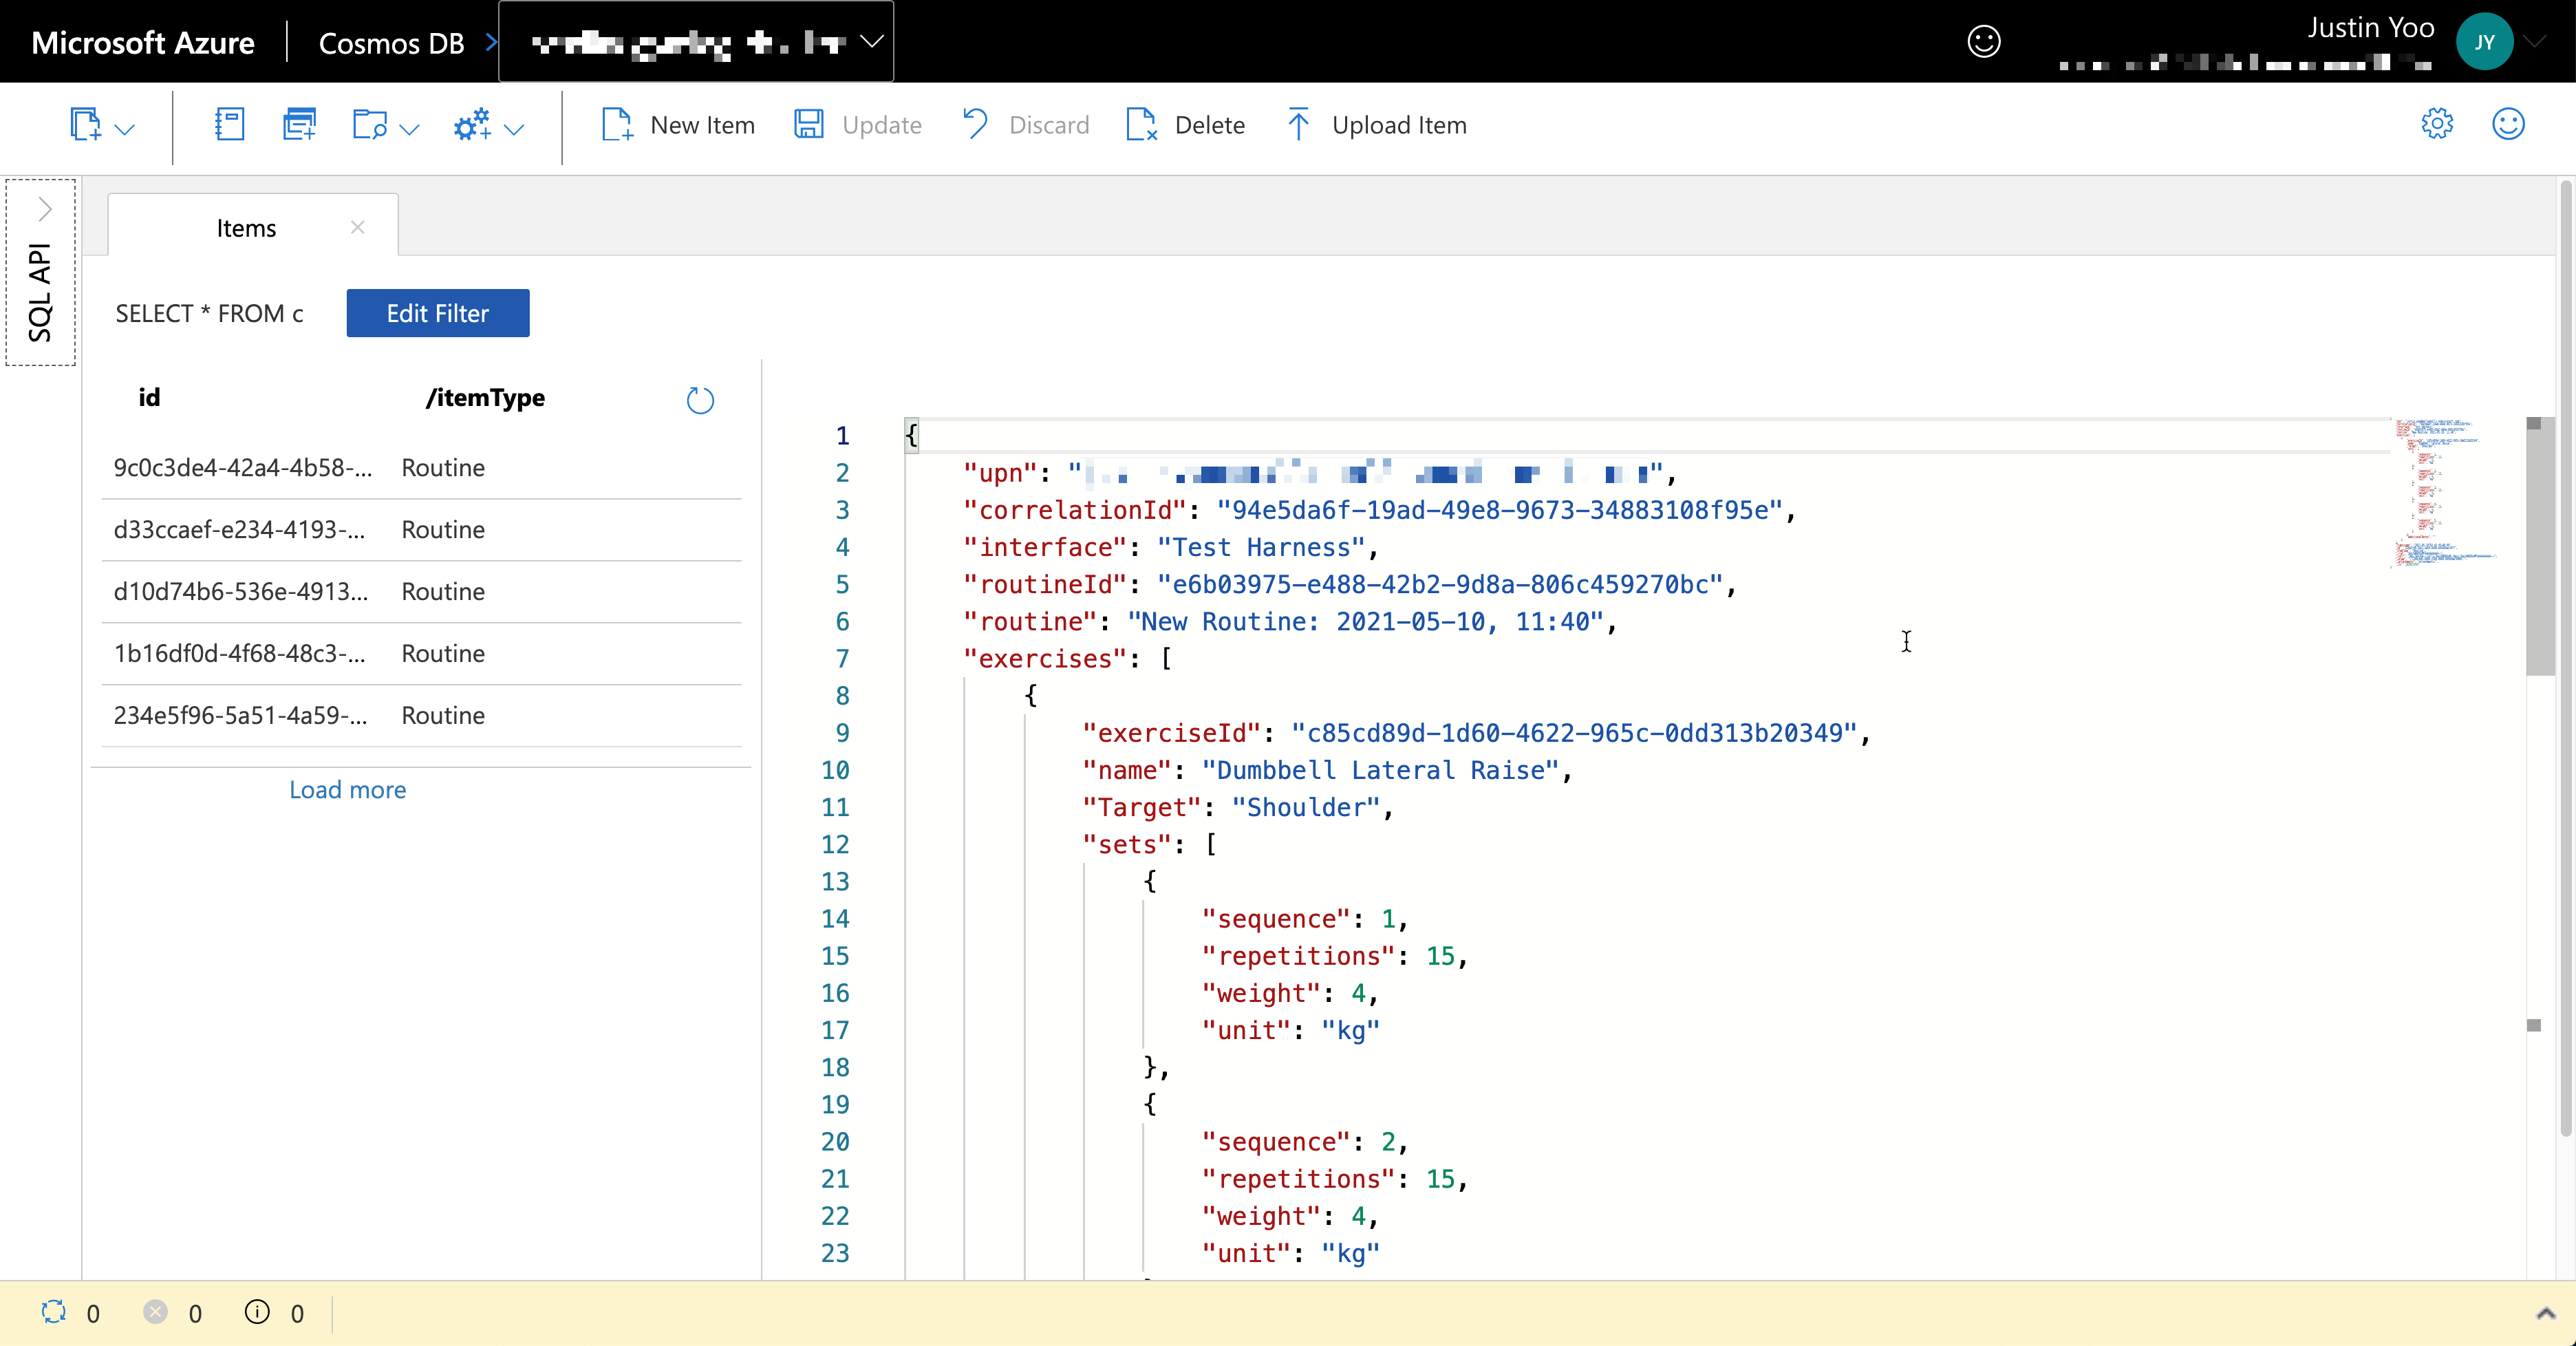
All members’ workout logs are stored into Azure Cosmos DB asynchronously.
Now, Ji Min is happy, her trainer crews are happy, and all members are happy because they can easily record their workout histories.
You can download the GymLogs app directly from the GitHub repository and import it to your Power Apps environment.
So far, we’ve walked through how both citizen developer and pro developer can work together within a fusion team –
- Citizen devs make Power Apps apps, and
- Pro devs provide the citizen devs with discoverable APIs by adding an extension to the existing Azure Functions application.
After this collaboration practice, Lamna Healthcare Company can offer better customer experiences with the workout log apps, resulting in their business growth.
- Members can freely record their exercises, and
- Trainers can analyse the data and offer more personalised workout schedules.
In the next post, let’s trace the end-to-end data flow through Azure Monitoring.
This article was originally published on Dev Kimchi.
by Contributed | May 16, 2021 | Technology
This article is contributed. See the original author and article here.
It can be daunting to start something new. Whether it is joining an online community for the first time, or learning the many ins and outs of GitHub, newcomers always need – and deserve – support in getting up to speed.
Removing barriers for new community members and providing educational resources is exactly the aim of Sharing is Caring. The group assists members of the Microsoft 365 Patterns and Practices (PnP) community with free, hands-on training to remove help them contribute.
Each session provides instructive and collaborative guidance on a multitude of topics, from tips on presenting to the configuration of SPFx Workstation and best practices for Docs and GitHub. Office Apps & Services MVP Emily Mancini says that Sharing is Caring provides an important place for collaboration and contribution in a smaller setting.
“Many community members have no previous experience with GitHub proving to be a hurdle to sharing or using samples,” Emily says. “But by the end of the ‘First-Time Contributors’ session, all attendees will have completed their first pull request and navigated through GitHub. Many people learn best by doing, so creating this separate GitHub repository as a safe practice space allows us to learn together.”
“We have found that working directly with community members in a safe space allowed a better opportunity to become familiar and comfortable with GitHub. We also do not record the sessions as we want everyone to feel comfortable asking any questions.”
PnP is a community-driven, open-source initiative where Microsoft and external community members share their learnings around implementation practices for Microsoft 365, including Microsoft Graph, Microsoft Teams, OneDrive and SharePoint. Emily says the Sharing is Caring group often discusses a sense of belonging in the community and focuses on empowering all members to contribute.
“Whether it is as an article for Microsoft 365 Community Content, or samples for SPFx web parts, SPFx extensions, column and view formatting, or the Power Platform, everyone in the Microsoft 365 community has a place and value to contribute. We can all learn from each other’s diverse perspectives and experiences,” Emily says.
As the group removes entry barriers for members, the result is an increase in contributions. “We see many community members taking off like rockets with their articles and sample contributions,” Emily says. “Many of these contributions then grow to become a demo on the bi-weekly SharePoint Framework community calls.”
Moving forward, the group looks to grow further: “We aim to continue expanding our offerings as the community helps us identify more barriers to adoption,” Emily says. “We’ll be adding more in-depth sessions on how to contribute to various open-source repositories.”
For further information or to contact the team, reach out via the website.
by Contributed | May 16, 2021 | Technology
This article is contributed. See the original author and article here.
It is common that customers contact the Azure Batch Team to provide instructions on how to install Python using the start task feature. I would like to provide the steps to perform this task in case that someone needs to work in a similar case.
Required steps:
- Get the python release that you want to install.
- Add the installer into a storage container.
- Create the windows pool and define the required start task and the resource files to install the features.
Get the python release that you want to install.
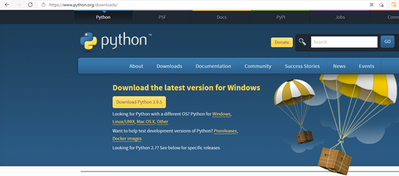
First, download the python installer from the official site (Example below is using the 3.8.0 version for Windows)
Download Python | Python.org
Add the installer into a storage container.
Next step is to upload the installer to a Storage Blob Container, this installer will be downloaded to the Azure Batch Node using the Resource Files Feature in feature steps.
Select your Storage Account and create a new container/ select an existing one, then upload the installer.


Create a Windows Pool, and define the required start task and resource files.
Next step is to create our Windows Batch pool. We will use the required fields to create a pool, which requires to enable the Start task section.

By using the start task run on each compute node as it joins the pool, the task will be executing when the node is added to the pool or when the node is restarted.
Once the start task configuration is enabled, we will need to define the required command line for the installation. We are using the following command line cmd /c “python-3.8.10-amd64.exe /quiet InstallAllUsers=1 PrependPath=1 Include_test=0”
However, you can find all the required command lines to execute the installation in the following link.
3. Using Python on Windows — Python 3.9.5 documentation
It is important to set the User Identity to Pool Autouser, Admin to grant administrative privileges.

Additionally, we need to define the Resource files that Azure Batch downloads to the compute node before running the command line, so once you click on the resource files option you need to click on the “pick storage blob” and it will open an interactive window where you can navigate through your storage explorer and select the installer.

Important: Check the Public access level of the blob container, if you leave it as Private(no anonymous access), like in the above example, you will need to specify the “Include SaS key” when you select the resource file, otherwise you will get authentication problems. However, If the access level is set to Blob or Container it will be public.
If you are using a Private access, then it is required to mark the Include SAS and set an expiration date before adding the Resources files

Finally, once the VM node is ready and the Start task finished, you can access the node using RDP and confirm that python is now installed.


You can execute the following command to confirm that the correct python version is installed.

by Contributed | May 15, 2021 | Technology
This article is contributed. See the original author and article here.
Solving problems is something that “tickles my brain,” says Poornima Nayar.
This inherent love of troubleshooting issues and masterminding solutions is what got the Developer Technologies MVP into tech in the first place, and it is a genuine curiosity that has not subsided more than a decade later.
Now, even with the title of MVP, Poornima continues to upskill and spread the word of its benefits.
“I think there needs to be an awareness that being an MVP is not the end of the learning journey, it is actually the beginning,” she says.
“I think blogs, talks, interviews, short videos introducing technology and above all being approachable to people can help a lot … In short, spread knowledge and show that it is possible.”
Poornima certainly did this shortly after the birth of her daughter.
Upon returning from maternity leave, Poornima felt pressure to dive back into an industry that is known for its breakneck pace of change. To stay in step with the competition, Poornima decided to earn an Azure Certification with MS Learn.
“Having a child totally changed my perspective of learning – learning can be fun! It doesn’t stop the minute you are out of school,” she says.
“I use MS Learn to quickly understand and pick up something new. It gives me that quick starting point to understand a new technology and then build on top of it. I have collected a few badges on MS Learn which is like a little trigger to get me going and make learning fun,” Poornima says.
Today, Poornima is an advocate for upskilling and encourages all tech enthusiasts, regardless of skill level, to never stop learning. One of the best places to get started, Poornima says, is with open-source communities and learning resources.
“Open-source is more about giving than taking. I think it’s the ‘giving’ part that daunts people and this can pose a challenge in having more contributors. The fact that what you contribute or discuss is out there in public is something that can scare people. I have been in that situation myself,” she says.
“It is crucial to educate that open source contribution does not necessarily mean coding alone. There are many more ways to contribute – testing, documentation, issue logging, even giving ideas about a new feature are some of the ways that someone could contribute.”
The most important part, Poornima suggests, is getting involved and learning along the way. For more on Poornima, visit her Twitter @PoornimaNayar

by Contributed | May 15, 2021 | Technology
This article is contributed. See the original author and article here.
Which community project do you maintain?
CLI for Microsoft 365
How does it help people?
It is a cross platform tool which is used by Developers and IT Pros with which you can configure Microsoft 365, manage SharePoint Framework projects and build automation scripts.
What have you been working on lately?
Script for notifying the tenant status for IT Pros
What do you do at work?
I am a consultant for Microsoft 365 services. Apart from that I am also part of a team who primarily develops the Digital workplace Apps related to Microsoft Teams.
Why are you a part of the M365 community?
Because of the Awesome work the Microsoft 365 community is doing selflessly. More than that the inclusiveness which the community provides for all the contributors irrespective of who you are and where you are from. I have seen lot of my peers and colleagues who have got benefited from the work of the community and nothing is better than being part of the community owing to their awesome work across the Microsoft 365 areas.
What was you first community contribution?
First active contribution was back in July 2020 (17 July 2020 to be precise). From then on, there was no looking back for me.
One tip for someone who’d like to start contributing
Do not underestimate your contribution. You may think your contribution is so simple and it will not be beneficial to anyone (Let me confess, I also thought the same initially). With that you are underestimating the power of simplicity. It will be beneficial and may save a lot of time for someone who might be on the other side of the globe and can save his / her / theirs time. Be kind to people who contribute and support and be compassionate. Remember, people who are part of their community is doing this just out of sheer passion and ensure that you show gratitude and empathy.
Remember community is there to help you and to support. I got that during my initial days and I am sure any contributor also will get similar treatment which I have received during my starting days.
by Contributed | May 15, 2021 | Technology
This article is contributed. See the original author and article here.
In this article I’ll go over both of the filters you can find in my React Groups and Teams Filters webpart. The webpart is useful for site managers, admins, and users to find their sites and it’s information. The first filter switches the All Groups in my Organization to My Groups and the second filters the visibility of the groups ( Public/Private/All )
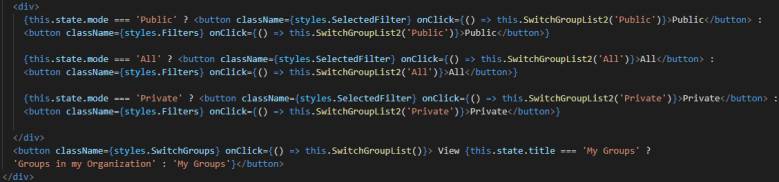
In the screenshot below you can see the code for the buttons.
Visibility Filters
The first three buttons are the visibility filters. They filter the MyGroupResultsFiltered to be the button text you clicked. For example, if you click the ‘Public’ button MyGroupResultsFiltered will be filtered to include only groups with the visibility set as ‘Public’.
Let’s dive deeper into what’s happening. On click of, for instance, Private, the button calls the SwitchGroupList2 function (line 69) and passes through ‘Private’ as a parameter. |
 |
That parameter ‘Private’ is now called ‘Switch’ and next we check if that equals ‘All’.
If it does and you clicked the button titled ‘All’, we want to set the state of AllGroupsresults to the state holding all of the items. We do this because if I were to filter the AllGroupsresults to private and then switch to public and filter that, we’re just filtering a filtered list and you won’t get back any results. AllGroupsresults hold all of the results for Groups in my Organization and AllGroupsresultsFiltered is the filtered version of that list. In other words, when we get back the Groups ( both Groups in my Org and My Groups ) we make a copy of this list that we can filter however we would like and we can call on that list and filter it and assign it to the AllGroupsresultsFiltered value.
If the selected filter is anything other than ‘All’ we go ahead and create a constant that is assigned the filtered list. What this filter does is it maps through AllGroupsresults and checks if every group has the visibility that you selected, keeps the groups that has the visibility, and assigns the value to SwitchedALL. Same thing for MyGroupResults; It maps through MyGroupResults and filters the groups to be the ones that match the visibility you selected. Next, we set the state of AllGroupsresultsFiltered and MyGroupResultsFiltered to be SwitchedALL and SwitchedMY, respectively. In our case, we selected the button with the text ‘Private’ so AllGroupsresultsFiltered and MyGroupResultsFiltered will reflect this change and only show the groups with the visibility ‘Private’.
The last part is, after the if/else statement, we want to set the state ‘mode’ to be the selected filter. We’re doing this so that the button we clicked will have the ‘SelectedFilter’ styling. How we do this is by inputting a ternary operator in the code so that, depending on if the mode equals ‘Private’, we change the styling. If you selected the Private button the SwitchGroupList2 function will set the mode to be ‘Private’ and, consequently, rendering the button with the class ‘Selected Filter’.

Option Filter
On the bottom right of the heading before the groups you will either see a button titled ‘My Groups’ or ‘Groups In My Organization’. |

|
This button allows you to toggle between either displaying groups you are a member of or groups in your organization. On click of this button you call the SwitchGroupList function. ( Not the SwitchGroupList2 function mentioned earlier )
In this function we check if the title in state is ‘Groups In My Organization’. The title is what is displayed, meaning that if the button text is ‘View My Groups’ the title is ‘Groups In My Organization’. |

|
If the title is ‘Groups In My Organization’ we change it to be ‘My Groups’. The opposite also applies- if the title is ‘My Groups’ we go ahead and change it to be ‘Groups In My Organization’.
Why is this part of the code? For two reasons: the first is because we want to toggle the button text and header text between ‘Groups In My Organization’ and ‘My Groups’ and also so that we can display the right information.
 |
In the render there is a ternary operator that checks if the current selected option is ‘My Groups’. |
If this is true it maps through MyGroupResultsFiltered and displays the groups. If not, it renders All of the groups in your organization.
I hope you liked this article and it helped you out with your filters!
You can view the code here: https://github.com/pnp/sp-dev-fx-webparts/tree/main/samples/react-groups-teams
by Contributed | May 14, 2021 | Technology
This article is contributed. See the original author and article here.
With return to work, and hybrid work becoming a reality, familiarity with physical locations is again coming in to play for many organizations. This “back to work” scenario seems to be playing out along three primary scenarios:
- New hires may have never seen an orgs buildings.
- Return workers may be going to new locations as building consolidation efforts have taken place.
- Existing spaces may now be set up for hybrid work with non-dedicated spaces.
Thankfully, organizations can leverage the tremendous power of Microsoft Viva Connections paired with the rich immersive experiences of SharePoint Spaces to:
- Bring impactful, educational, virtual tours to employees that immerse them in the new environments from comfort of home. SharePoint Spaces provides for immersive 360’ tours that can simulate the onsite experience with additional, contextual, information to enrich the experience.
- Light up through Microsoft Viva Connections where the next generation Intranet is brought to employees where they work…. Microsoft Teams.
- Use high quality, low cost, consumer grade devices like the Insta360 One X2, to capture stunning 360’ images and videos that can be leveraged within SharePoint Spaces.
Resources:
Thanks for visiting – Michael Gannotti LinkedIn | Twitter
 Michael Gannotti
by Contributed | May 14, 2021 | Technology
This article is contributed. See the original author and article here.
Hello everyone, we are starting a new video tutorial series focusing on Endpoint Protection integration with Configuration Manager. This series is recorded by @Steve Rachui, a Microsoft principal premier field engineer. The first session is an introduction and previews what is coming in the remainder of the series.
Next in the series Steve focuses on how Configuration Manager can be used to manage antimalware policy settings for the Endpoint Defender client built into Windows.
Posts in the series
- Introduction (this post)
- Antimalware policies
- BitLocker integration and management
- Firewall policies
- Windows Defender Advanced Threat Protection (ATP) policies
- Windows Defender Exploit Guard policies
- Windows Defender Application Guard policies
- Windows Defender Application Control (WDAC) policies
Go straight to the playlist
by Contributed | May 14, 2021 | Technology
This article is contributed. See the original author and article here.
Sharif Nasser grew up with the dream of becoming an inventor.
As a teenager, he became interested in AI and machine learning and became a strong believer in technology as a powerful tool for equity and progress. While currently studying Robotics at Tecnolo’gico de Monterrey, in Monterrey, Mexico, he uses his technical knowledge and expertise to bridge the digital divide across Latin America.
Through large scale online teaching ventures of up to 5000 students, he is making technology more accessible to all. Learn more about his journey and his belief in low code platforms to lower the barrier to entry: aka.ms/power-students.
If you would like to sharpen your own technical skills, check out: aka.ms/trainingandcertification.

Recent Comments