by Contributed | May 20, 2021 | Technology
This article is contributed. See the original author and article here.
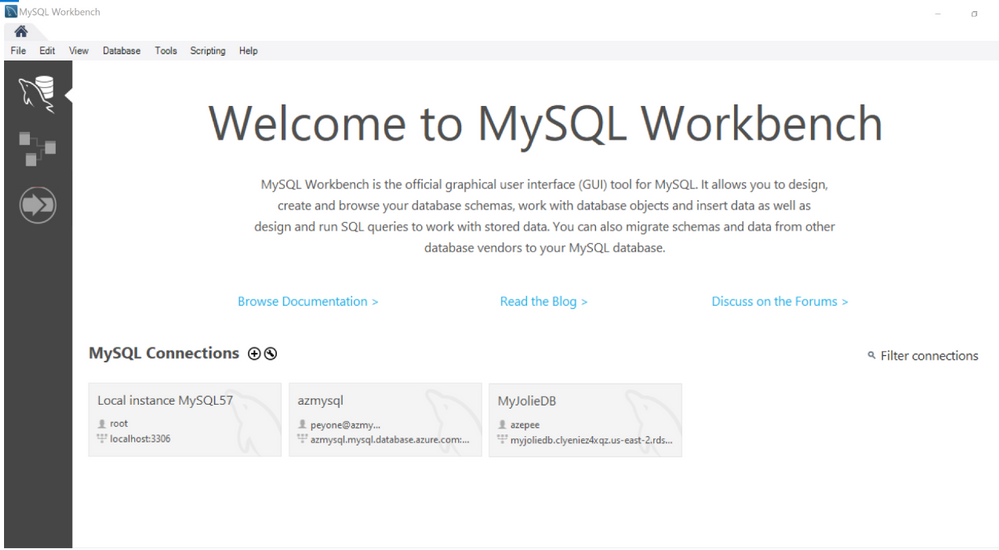
While there are a variety of utilities for migrating Amazon RDS for MySQL to Azure Database for MySQL, one of the easiest and most convenient ways to accomplish this is by using the MySQL Workbench Migration Wizard.
With the Migration Wizard, you can conveniently select which schemas and objects to migrate. In addition, you can view server logs to identify errors and bottlenecks in real time, edit and modify tables or database structures and objects during the migration process as necessary, and then resume migration without having to restart from scratch.
Note: You can also use the Migration Wizard to migrate other sources, such as Microsoft SQL Server, Oracle, PostgreSQL, MariaDB, etc., but those scenarios are outside the current scope.
After signing in to MySQL Workbench, the high-level process for this migration scenario is fairly straightforward:
- Configure connection parameters for the source and database servers,
- Select the schemas and objects to migrate. You can also edit the objects you want to migrate, as necessary.
- Create the schema in the target database and run the MySQL script to create the database objects.
- Transfer data from the source instance to the target environment.
- Verify the consistency of the migrated schema and tables.
For detailed, step-by-step instructions covering this process, see the article Migrate Amazon RDS for MySQL to Azure Database for MySQL using MySQL Workbench.
If you have questions, please feel free to reach out to me or the Ask Azure DB for MySQL alias. Thank you!
by Contributed | May 20, 2021 | Technology
This article is contributed. See the original author and article here.
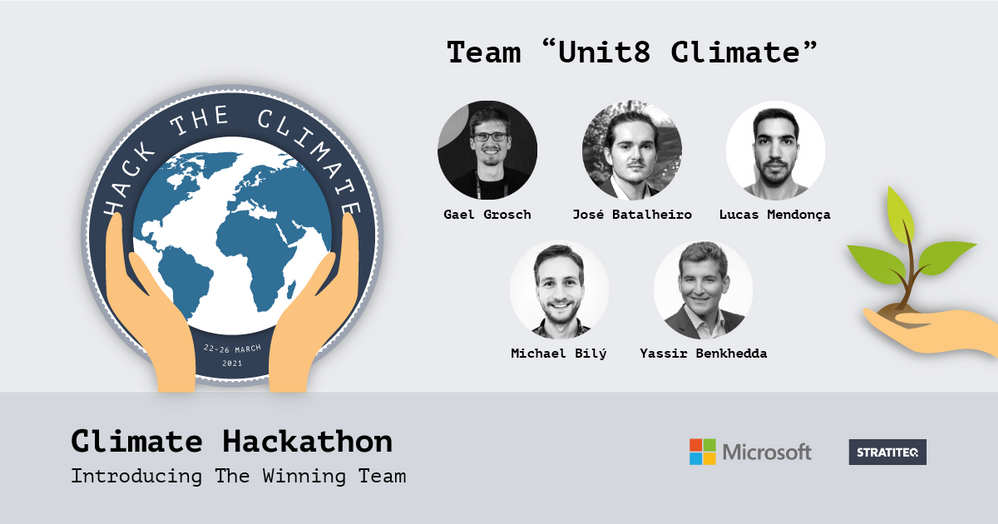
Team Unit8
Climate Hackathon, took place online 22-26 March 2021. The goal was to raise awareness about the Climate issues and at the same time create a platform for our developer audience to develop innovative solutions with our Azure Services.
What made this Hackathon unique, was the collaboration with non-profit and/or non-governmental organizations that have a key role in solving some of the climate challenges but might not have enough resources or technical competencies to do so on their own. These organizations provided real life challenges for the Hackathon participants to solve. The challenges were categorized into four tracks: carbon, ecosystem, waste, and water.
The outcome of the hackathon was 14 quality solutions and 3 winners:
We interviewed the team behind the winner of the Carbon track, Methane Leaks – Unit8 Climate to get to know them, their motives to join the hackathon, as well as their learnings during the hackathon and how they want to apply these learnings in their upcoming projects.
This team worked on challenges provided by Ember & Subak and consisted of the following individuals:
The Methane Leaks – Unit8 Climate team worked on a solution to use AI to monitor methane leaks. The solution uses satellite data from Sentinel 5P and other sources to automatically detect new potential methane leaks by clustering abnormal emissions and linking them to the fossil infrastructure.
What compelled you to take part in Climate Hackathon? What did you hope to achieve by participating?
Climate change is one of the key threats we face today. It is a really important topic for us at Unit8. Reducing our carbon footprint is an important topic. We also work with NGOs to tackle some of their problems through custom technological solutions we build for them.
Taking part in this Hackathon was a logical step for us. It particularly motivated us to explore new topics and see what other people are doing in the industry. In addition, it was a great opportunity to meet new people with similar interests.
We hoped our proposed solution would be useful for the people involved. Last year, we worked with WWF to apply machine learning techniques to wildfire prediction. We are convinced there are lots of promising areas where Data & AI can help us find new and better solutions.
How did this hackathon support your work to address climate change?
The hackathon helped us understand some of the current challenges faced by organizations and get a sense of the community helping the field progress. There really seems to be a lot of involvement, and that is great to see!
In addition, we could get a sense of the technological solutions needed and the impact they can have. That will help us in our current and future projects. We, at Unit8, are always working hand in hand with domain experts to go from an idea to a concrete and working solution in short timeframes. Seeing what we achieved within a week motivates us to keep going!

What new learnings and partnerships arose from your participation in this Hackathon?
We learned a lot from this hackathon!
We learned to use great tools to work with satellite imagery and, also, that it can be difficult working with geospatial data and handling the many data sources needed. We found it quite challenging to build advanced AI models on top of the satellite data because of the resolution of the data and the background noise that brought us to focus on a simpler solution that we could deliver. Of course, with more time we could have investigated more advanced techniques.
The other learning we had was the role of public data in the different projects. We live in an age where accessing large amounts of public data is easy, and it was fascinating to see the use cases people came up with around these data sources. Of course, there is still a fair amount of work that goes into processing the data and building a user interface that is useful for people, which confirms our belief in the impact we can have.
We also learned about some non-profits and sustainable initiatives at Microsoft that we did not know of. We hope to keep in touch with them and who knows, maybe work alongside them again in the future.
 Project overview
How will you continue to use the learnings from the Climate Hackathon to further your organization’s important work?
The hackathon truly revealed the many applications of geo-satellite imagery. We were already working internally on a wildfire forecasting project using similar data but the many challenges relying on that data made us realize its potential. Working with that data is complicated for newcomers and we would like to think of a way to make it easier for us and others.
The learnings and connections will help us stay engaged with the community and NGOs and find new collaborations on projects fighting climate change!
by Contributed | May 20, 2021 | Technology
This article is contributed. See the original author and article here.
Microsoft Azure provides a broad range of services that enable developers to build, deploy and scale their apps even faster. Our end-to-end platform helps developers focus on apps, not infrastructure and our latest innovations enable developers to build applications with best-in-class developer tools, modernize existing apps as well as build cloud native applications.
Discover the latest news in Azure application development at Microsoft Build 2021 and explore how Microsoft’s developer toolkit and platform allows you to build on your terms and run your applications your way.
The online event will be kicking off on the morning of May 25th, at 8.30 AM in the Pacific Time Zone. The event programming will include a keynote, live segments, breakouts, Ask the Experts, Product Roundtables, Learn Lives, Intro to Technical Skills sessions, and more. This all will be available across multiple time zones. Be sure to visit the Microsoft Build home page to view the event agenda and additional details. We recommend you to register (it is free) to have full attendee experience and be able to participate in Q&As.
On Day 1, Amanda Silver, Donovan Brown and Julia Strauss will present Increase Developer Velocity with Microsoft’s end-to-end developer platform technical session, followed by Gabe Monroy, Jeff Hollan and Bec Lyons with Build cloud-native applications that run anywhere technical session. On Day 2, don’t miss Microsoft: Into Focus. Scott Guthrie, Microsoft EVP of Cloud & AI, will recap top key news and messages from Day 1 technical sessions on the breadth and depth of the Microsoft Cloud and Scott Hanselman and Friends will showcase Microsoft’s latest innovative developer resources with one of a kind session and fun demos.
The complete line up of Azure Application Development technical sessions is listed below for you to build a schedule that is unique to you and your interests. Many sessions will be available in two different time zones but most of them will be available on-demand at the links below. Navigate to the session page to see full details.
Technical Sessions + Breakout Sessions:
Microsoft Build is also and foremost an amazing opportunity to connect with Microsoft experts. After each breakout sessions, you can join our Ask The Experts sessions to dive deeper on the subject and engage in live discussions.
Ask the Experts:
Influence the future of Microsoft products and services by registering for Product Roundtables. These small group discussion sessions allow you to talk with the Microsoft product teams where you’ll have the possibility to explain how you use Microsoft products.
Product Roundtables:
Take advantage of connecting with Microsoft experts who will walk you through some great app development Learn modules available today on Microsoft Learn. Tune in for Intro to Python and C# session to learn how to get started programming with these popular languages.
Learn Live and Intro to Technical Skills:
Finally, explore our on-demand recordings to go more in depth on specific topics.
On-Demand recordings:
You can learn more about Azure Application Development at https://azure.com/developer, we can’t wait to see what you create!
And an event wouldn’t be an event without some swag! Download yours
here.
Enjoy Microsoft Build 2021!
by Contributed | May 20, 2021 | Technology
This article is contributed. See the original author and article here.
By Carolina de Sa Luz – Program Manager | Microsoft Endpoint Manager – Intune
Microsoft Endpoint Manager lets you manage a wide set of endpoint platforms by configuring and deploying policies and applications to users and devices from the cloud. This blog post describes best practices to enroll users, set up certificates, assign access and permissions, and multiple applications assignments.
We recommend enabling multi-factor authentication (MFA) for both users and administrators.
Note: Users require an E3 license for Microsoft Intune and administrator accounts require an Azure Active Directory premium license for MFA.
Common enrollment scenarios
Enrollment failures occur if there’s a misconfiguration during set up by the administrator or the end user didn’t follow the enrollment process correctly.
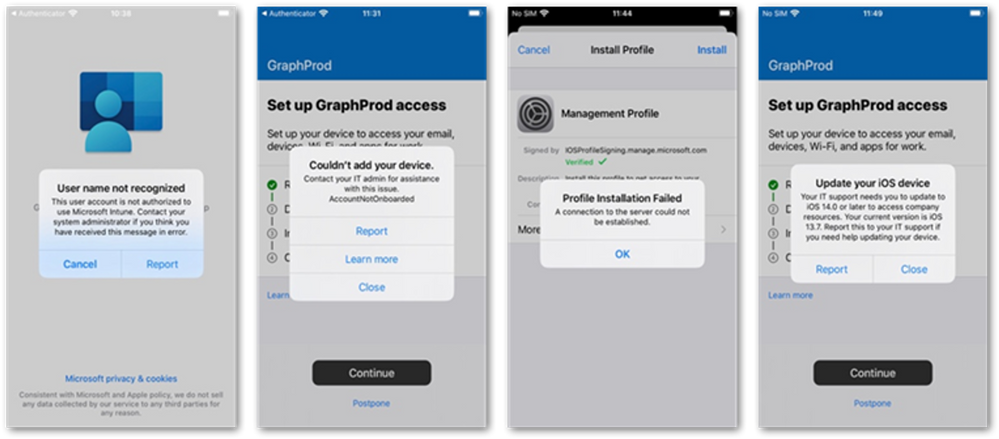
Here are four common messages that users might see when enrolling an iOS device:
Common error messages users might see when enrolling an iOS device
- Username not recognized – This message appears when the end user doesn’t have an Intune license assigned. Once you license the user, they should be able to enroll their device. Read about assigning licenses to users here.
- Couldn’t add your device – If you see this message during enrollment, it means that your administrator hasn’t yet configured Apple Push Notification Service (APNS). This is a key requirement to manage any Apple device. Once the certificate is set up, the user will be able to set up the device. Read about Apple MDM push certificates here.
- Profile Installation Failed – The user sees this message if the administrator has blocked personal device enrollment under device enrollment restrictions. Learn about setting enrollment restrictions here.
- Update your iOS device – Users see this message when an administrator configures an operating system (OS) version requirement under device enrollment restrictions. For example, if the administrator requires iOS version 14 and the device is using iOS version 13.x or below, users must upgrade their device to complete enrollment.
Android users encounter similar messages:
 Common error messages users might see when enrolling an Android device
- Your company support needs to assign license for access – This means that the user doesn’t have an Intune license. They will be able to enroll their device after you license the user. Read this article to learn about options for enrolling Android devices in Intune.
- Check device settings – Users get this message if you haven’t configured Managed Google Play, which is required to manage Android Enterprise. Once you configure Managed Google Play, users will be able to enroll their Android Enterprise devices.
- Couldn’t add your device – This message refers to enrollment restrictions for Android Enterprise Work Profiles and Work Profile Personal. You might be aware that Google has officially deprecated Device Admin-based management. For that reason, we recommend blocking this mode under Devices > Enrollment restrictions and using Android Enterprise instead.
Intune reports
Microsoft Intune enables you to quickly generate and view a wide variety of reports to monitor configuration, compliance, enrollment, status updates and other information. We developed a new reporting section to make it easier to access these new types of reports, enhance the structure of existing reports, and improve functionality so you can better monitor the health of your devices and apps across the organization.
Check out this blog post to learn more about the reporting framework and read about the latest new reports here. You can get to these reports by navigating to the Microsoft Endpoint Manager admin center > Devices > Monitor and select the report you want to generate.
Enrollment failures
Enrollment failures can happen. The Enrollment failures report lets you monitor activity for all users or for a specific user. The report includes a graphical overview where you can see failed enrollments over time. It can also display alerts.
For example, in the report below, an end user has tried to enroll several iOS and Android devices. The report shows that the user failed to enroll their personal Android device and iOS device. This is likely due to an enrollment restriction.
 Example enrollment errors for iOS and Android devices.
Troubleshooting enrollment failures
As an admin, consider which policies are in place that might be preventing the device from enrolling. In this example, the admin has configured a policy to block personal enrollment for Android Enterprise. Additionally, for iOS/iPadOS, the policy has been set with a minimum version requirement of iOS version 14. The iOS devices that failed do not meet this requirement because they are running version 13.7.
 Example of a device restriction policy configured to block personal enrollment for Android Enterprise
If you’re seeing enrollment failures, check your device enrollment restrictions policy. It might be that a conditional access policy has been set up requiring devices to be enrolled in Intune and compliant.
The example also shows that devices can have a range of OS versions, especially iOS devices. For this scenario, the user needs to upgrade their device from version 13.7 to 14.0 to complete the enrollment.
Not all failures are due to policy configurations. An incomplete enrollment can occur for the following reasons:
- A user halts an action during an enrollment.
- They closed the Company Portal during an enrollment.
- They took longer than 30 minutes between each section of the enrollment process.
 Example screenshot of the incomplete user enrollment report
You can learn more in this article about incomplete user enrollment. We also recommend reading this article on troubleshooting device enrollment for additional help if you’re experiencing issues with device enrollment.
Working with connectors
Connectors are connections that you configure to external services such as Apple Volume Purchase Program (VPP) or certificates or credential required to connect to an external service like Google Play App Sync.
Intune works with companies such as Apple and Google, and you can check the status of third-party relationships in the Microsoft Endpoint Manager admin center. Go to Tenant administration, and then select Tenant Status > Connector status to view details, including license availability and use, communications, and connector status. This article provides more information about the Intune Tenant Status page. Find out about connectors for Intune here.
 Example screenshot of Connector status details under the Tenant admin blade
Here are a few best practices for connectors:
Apple Push Notification service (APNs):
- You need to renew the APNs every 365 days with the same Apple ID you used to create the certificate.
Important
You need to renew, not replace, the APNs certificate. If you replace it, you will break every Apple enrollment you have in place.
- Renew the certificate with the Apple ID you used to initially create the certificate.
- Always use an administrative Apple ID. With a personal Apple ID, you run the risk of losing access to an account when someone leaves the organization. If you lose access to an account, we recommend that you reach out to Apple Support Services.
Managed Google Play:
- Use an administrative Gmail account to manage Android Enterprise devices. This account should only be used for this purpose.
- Never disconnect the connection you build with Google. If you do, you will break every enrollment that you have for Android Enterprise in your organization.
Delegating access
Delegating access is used extensively by organizations that operate across multiple geographies. They decentralize IT operations, giving local administrators permissions to manage and report their local devices. Intune gives you the ability to create role-based access control (RBAC) and scope tags to manage delegated access. With RBAC, you’re setting the administrators’ permissions and the type of users they can work with. With Scope Tags you can mark the objects that the administrators can look at and work with. Read more about RBAC with Intune here.
Troubleshooting a delegated access scenario
When you’re working with scope tags, remember that the default scope tag is automatically added to all untagged objects that support scope tags. For example, say you created an OEMConfig policy. An OEMConfig policy allows administrators to configure unique settings specific to the OEM that developed that device. Find out more about OEMConfig policies and how they work with Intune here.
To configure this type of policy, first you need to add the OEM application. After that you’ll be able to create your policy by attaching the specific application to your policy. Each OEM has their own application. Samsung, for example, has a KSP application. Zebra devices have Zebra OEMConfig applications.
However, after you create the policy, you might get an unauthorized access message when you try to edit it:
 Example screenshot on an unauthorized access message when an OEM Config policy automatically inherits the default scope tag
When you add the OEM Config application, the application will automatically inherit the default scope tag. The OEM Config policy automatically inherits administrator’s scope tag. This mismatch causes the unauthorized access screen message.
Resolution options: Your local administrator can reach out to central administration and ask them to attach the scope tag to your relevant application.
The second option is to get permission to read all the mobile applications that have been added to the environment.
To learn about scope tags for distributed IT with Intune, check out this article.
Deployment and Assignment
When you’re deciding whether to deploy to users or devices, the answer often depends on the circumstances. Understanding who needs the devices and what they will be used for will help you determine if you should deploy a policy or application to a user group or device group.
- Device groups are used for applying applications and policies to a set of devices, regardless of the user.
- User groups are set up with the end user in mind. The user might use multiple devices.
Here’s an example. A global company has a team of sellers that uses Microsoft Dynamics to sell to their customers and seal deals. The administrator must deploy the Dynamics application to the sellers. The best way to deploy the Dynamics application is to the user group to target a set of users rather than specific devices.
The company also has a team of field engineers who work in shifts and use shared ruggedized devices throughout the shifts. In this case, the administrator would use a device group to ensure that all these devices, regardless of who is using them, can receive the correct applications and policies.
Learn how to create groups for users and devices by reading this article and see how to assign user and device profiles for additional tips on deciding when to deploy to a user group vs device group.
Note
When working with assignment groups, it’s important to remember that you can’t add multiple application assignments to devices. However, you can assign users to multiple groups with different intents. If you deploy applications and policies to multiple user groups, take into consideration what will happen if the same user is in both groups:
- Required intent always wins the conflict.
- Available intent works alongside Required intent. As an example, Apple Volume Purchase Program (VPP) apps deployed as Required won’t show as Available in the Company Portal app. For this scenario, customers can deploy the app as Required to group A and as Available to Group B. Both groups have the same users. As a result, the application will be deployed as Required and still show as Available in the Company Portal app.
- Available with or without enrollment can be used when devices only have Intune app protection policies. Users can still see which applications have been recommended by their administrators if they assigned apps using this intent.
- Uninstall intent be used to remove specific applications from devices. This is often used by customers with Android devices, such as customers who wish to use Microsoft Edge instead of Chrome.
This table describes how conflicts are resolved.
Some additional items to keep in mind:
- For iOS, you cannot deploy applications as available to groups of devices. This type of assignment only supported for Android Enterprise fully managed and corporate-owned personally enabled (COPE). Find out more about COPE in this post.
- The app is only displayed as Available if the user logged into the Company Portal as the primary user who enrolled the device and if the app is applicable to the device.
- To configure what happens to managed apps when devices are no longer managed, you can select the intended setting under Uninstall on device removal.
- To configure whether a required iOS/iPadOS app is installed as a removable app by end users, you can select the setting under Install as removable.
- AppleID is required to deploy Apple Store Apps. AppleID is required to deploy user license VPP apps. AppleID is not required to deploy device license VPP apps.
Conclusion
There’s a lot to learn when starting out with Intune. We hope this article helps you succeed as you enroll devices and apply policies. Admins can take advantage of Intune to monitor, report, and troubleshoot their environments. Intune has extensive configuration settings and comprehensive security policies that can be applied on each platform to help you customize to meet your organization’s needs.
More info and feedback
For further resources on this subject, please see the links below.
Enroll iOS/iPadOS devices in Intune in Microsoft Intune
Enroll Android Enterprise personally-owned work profile devices in Intune
Microsoft Intune Tenant Status page
Device management capabilities in Microsoft Intune
Use role-based access control (RBAC) and scope tags for distributed IT in Intune
Let us know if you have any additional questions by replying to this post or reaching out to @IntuneSuppTeam on Twitter.
by Contributed | May 20, 2021 | Technology
This article is contributed. See the original author and article here.
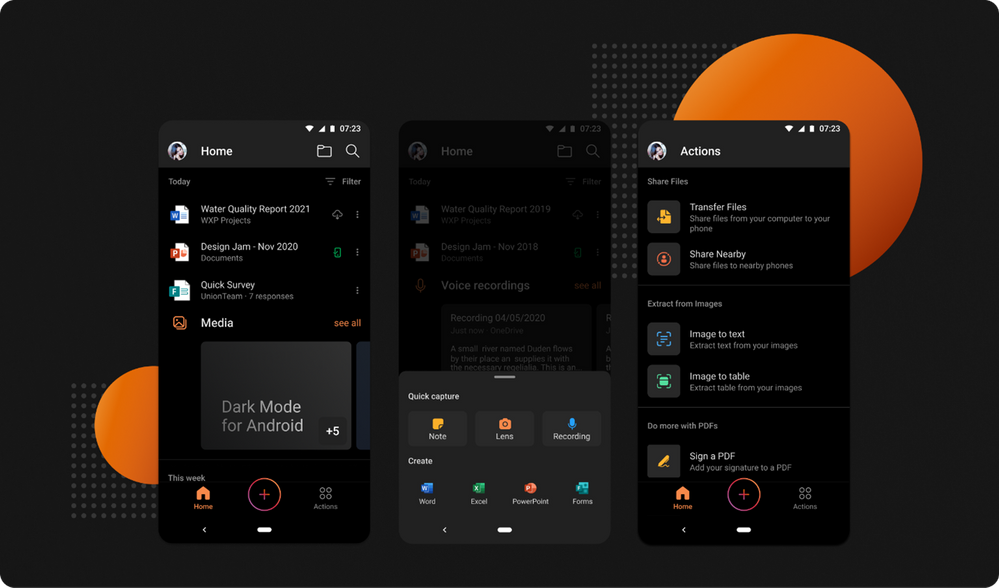
You asked, we listened! Dark Mode is now rolling out in the Office app for Android phones. It’s been a highly requested feature by many of our customers, and we’re proud to begin releasing it today. Many people prefer using Dark Mode as they find it provides a more comfortable visual experience for reading and working on mobile devices.
The Office app helps you get work done on a mobile device by combining Word, Excel, and PowerPoint into a single app and adding many rich capabilities for creating and working with PDFs, images, scanning, capturing notes, and much more. Now you can do all this using a theme of your choice — based on the time of day, your surroundings, or your device settings. Dark Mode ensures that you can adjust the Office app to low-light environments, while providing you with better viewing options and keeping battery consumption low.
How to enable Dark Mode
The newest version of the Office app for Android will automatically adjust to Dark Mode if your device is already set to that preference. You can also turn Dark Mode on or off by tapping your profile icon on the Home tab in the Office app, selecting Settings, and then selecting Light, Dark, or System Default from the Theme options.
Download the Microsoft Office Mobile App today and always keep it up-to-date to ensure you have the latest features and improvements. The feature will be rolling out to users worldwide over the next few weeks, so if you do not see it in your app yet, you can expect to receive an update in the near future that will have it.
Please share your feedback with us about Dark Mode right from the app by tapping your profile icon on the Home tab, and then select, “Send Feedback.” For more information about Dark Mode investments across Microsoft apps, check out this “Designing Dark Mode” article on Medium.
Continue the conversation by joining us in the Microsoft 365 Tech Community! Whether you have product questions or just want to stay informed with the latest updates on new releases, tools, and blogs, Microsoft 365 Tech Community is your go-to resource to stay connected!

by Contributed | May 20, 2021 | Technology
This article is contributed. See the original author and article here.
This month, our team is busy participating in several industry events – the RSA Conference, Gartner IAM and Microsoft Build – and sharing the new partnerships and integrations we’ve developed to help support your Zero Trust strategy.
Reflecting on last year, the RSA Conference in 2020 was my last in-person business trip before the pandemic. I loved connecting with our customers and partners to celebrate their hard work and discuss future opportunities to collaborate. I also enjoyed announcing the recipients of our Microsoft Security Partner Awards last week. While the RSA Conference is virtual this year, was able to continue my tradition of celebrating our partners at our Microsoft Security Partner Awards.
Congratulations to all the winners of Microsoft Security Partner Awards! Something else worth celebrating? Exciting new integrations from our key alliance partners.
New compatible FIDO2 security keys to help you go passwordless
The general availability of Azure AD passwordless is generating buzz. Many customers are deploying passwordless authentication to improve their Zero Trust strategy. The Government of Nunavut, for example turned to phishing-resistant FIDO2-based YubiKeys after experiencing a ransomware attack.
This month, I want to highlight two new FIDO2 security keys with biometric sensors.

|
Nymi Workplace Wearables: This is our first wearable FIDO2 device that uses both fingerprint and heartbeat sensors to continuously authenticate you. You can use this device to access Azure AD-connected applications and physical buildings without regularly touching the device. Learn more about how the Nymi Workplace Wearable works by watching this video.
|

|
Kensington Verimak IT Fingerprint Key: This new FIDO2 device has a simple design and Match-in-Sensor Fingerprint Technology, which combines high biometric performance and 360-degree readability with anti-spoofing technology. It exceeds industry standards for false rejection rate (FRR 2%) and false acceptance rate (FAR 0.001%). Fingerprint data is also isolated and secured in the sensor, so only an encrypted match is transferred.
|
FIDO2 security keys are just one of the ways – along with Windows Hello for Business and the Microsoft Authenticator app – organizations can go passwordless. You can find the list of FIDO2 security key providers that are compatible with our passwordless experience in our documentation here.
Protect your mission-critical apps with F5 BIG-IP APM and Microsoft Azure AD Conditional Access
Last year, F5 and Microsoft launched a simplified user and administrator experience for application access to help customers enable their workforce to access all apps, including apps that use legacy authentication, seamlessly and securely when working from home. Since then, we’ve seen the use of the F5 BIG-IP Access Policy Manager (APM) integration increase nearly three times, with customers like Durham County and Johnson Controls using these capabilities to help deploy their Zero Trust strategy.
To make it easier for customers to protect their apps with F5 BIG-IP APM, F5 has developed an integration that allows customers to apply Conditional Access policies directly in the F5 BIG-IP APM interface. Customers will be able to streamline policy enforcement, such as requiring multi-factor authentication (MFA) for non-compliant devices, for access to their apps behind F5 BIG-IP APM. With this integration, customers can easily extend the power of Conditional Access that they use for their cloud apps to apps that use legacy authentication as well. This integration will be available in the coming months and you can learn more by reading F5’s blog.

Protecting legacy apps with new secure hybrid access partners
Securing access to legacy apps with Azure AD continues to be a critical step to ensure customers can adopt a Zero Trust strategy. Our secure hybrid access partner solutions and Azure AD App Proxy are ways customers can protect their legacy apps with Azure AD. We’ve added three new secure hybrid access partner solutions to give you more choice on how you can secure your legacy apps. These new secure hybrid access partner solutions include Banyan Security, Datawiza Access Broker and CheckPoint Harmony.
As part of their integration, Datawiza also launched an automated way to integrate legacy apps to Azure AD with their One-Click solution last month. By utilizing the application API in Microsoft Graph, Datawiza’s One-Click solution automates several key application integration steps, eliminating manual steps like the need to toggle between Azure AD and Datawiza’s access management system. For each application, administrators can simply enter basic application information (i.e., location of application) into the Datawiza Cloud Management Console and click a single button to complete the integration with Azure AD.

Protect your Azure AD B2C tenant with Cloudflare Web Application firewall
Our customers need support for a strong network access strategy once they implement Azure AD B2C in their environment. Integrating Cloudflare Web Application Firewall with Azure AD B2C can provide customers the ability to write custom security rules (including rate limiting rules), DDoS mitigation, and deploy advanced bot management features. The Cloudflare WAF works by proxying and inspecting traffic towards your application and analyzing the payloads to ensure only non-malicious content reaches your origin servers. By incorporating the Cloudflare integration into Azure AD B2C, customers can ensure that their application is protected against sophisticated attack vectors including zero-day vulnerabilities, malicious automated botnets, and other generic attacks such as those listed in the OWASP Top 10.
New apps available in the Azure AD app gallery
Our team continues to add more applications to the Azure AD app gallery so our customers can easily deploy the apps their organizations need. Recently, we added some highly requested apps such as:
- Cisco Intersight, an intelligent visualization, optimization, and orchestration application that brings together your teams, tools, infrastructure, and apps.
- Broadcom DX, a SaaS based services that provides native and 3rd party data ingestion, monitoring, and analytics for cloud and hybrid environments.
- We’ve also partnered closely with Check Point to add five of their applications in the Azure AD app gallery. These applications include Check Point Cloud Security Posture Management, Check Point Identity Awareness, Check Point Remote Secure Access VPN, Check Point Harmony Connect and Check Point Infinity Portal.
Stay up to date with the latest identity integrations
In case you missed some of our recent partner integrations you can watch the latest edition of our new partner integration video below.
Helping customers adopt a Zero Trust approach requires us to work closely together with industry partners. I’m grateful for all the partners that have collaborated with us and welcome new partners to build solutions with our identity platform. We’ve added a new section to the Zero Trust Resource Center for ISVs who are creating Zero Trust solutions for partners. You can learn about general integration strategies, creating secure hybrid access solutions, and becoming a Microsoft-compatible FIDO2 hardware vendor. Reach out to me on Twitter @Sue_Bohn to share ideas or leave comments below.
Best regards,
Sue Bohn
Partner Director of Program Management
Microsoft Identity Division
Learn more about Microsoft identity:
by Scott Muniz | May 20, 2021 | Security, Technology
This article is contributed. See the original author and article here.
Cisco has released security updates to address vulnerabilities in multiple Cisco products. A remote attacker could exploit some of these vulnerabilities to take control of an affected system. For updates addressing lower severity vulnerabilities, see the Cisco Security Advisories page.
CISA encourages users and administrators to review the following Cisco advisories and apply the necessary updates:
by Contributed | May 20, 2021 | Technology
This article is contributed. See the original author and article here.
Get ready to learn, connect, and code at Microsoft Build 2021 on May 25-27, 2021! Explore what’s next in tech and the future of hybrid work, discover solutions, and add to your toolbox.
Whether you’re new to the industry or are a seasoned developer, the Learning Zone is the place to build your skills and learn something new. Through a variety of learning activities, workshops, sessions, and more, you’ll find something that fits your skill level and personal learning style to expand your knowledge.
- Cloud Skills Challenge – If you like competition, sign up and complete one or more unique challenges tailored to different themes across our cloud services and be entered for a chance to meet one of our product leaders – Amanda Silver, Donovan Brown, Scott Hanselman, or Mark Russinovich, just to name a few!
- Learn Live – If hands-on learning is your preferred style, tap into these self-paced modules while you’re guided by subject matter experts.
- Student Zone – This isn’t just for ‘traditional students.’ If you’re new to the industry or looking to make your next career move in tech, be sure to check out these sessions.
In addition, join us in the Ask the Experts: Microsoft Certification sessions in the Connection Zone to get your Microsoft Certification questions answered by our panel experts.
You’ll also find a Table Topics session on How the community and certifications can help you achieve more in the Connection Zone – an opportunity to connect with the community and our experts to tap into help with your professional development.
To get the latest event details, follow us on LinkedIn and Twitter (#MSBuild, #CloudSkillsChallenge, #ProudToBeCertified). After the event, be sure to continue what you start from one free convenient location – Microsoft Learn. You’ll find deeper technical content, training options, certification details, and developer communities.
Now that you know what we have in store for you, register for Microsoft Build today and join us in the Learning Zone on May 25-27 so you can build your learning journey.
by Contributed | May 20, 2021 | Technology
This article is contributed. See the original author and article here.
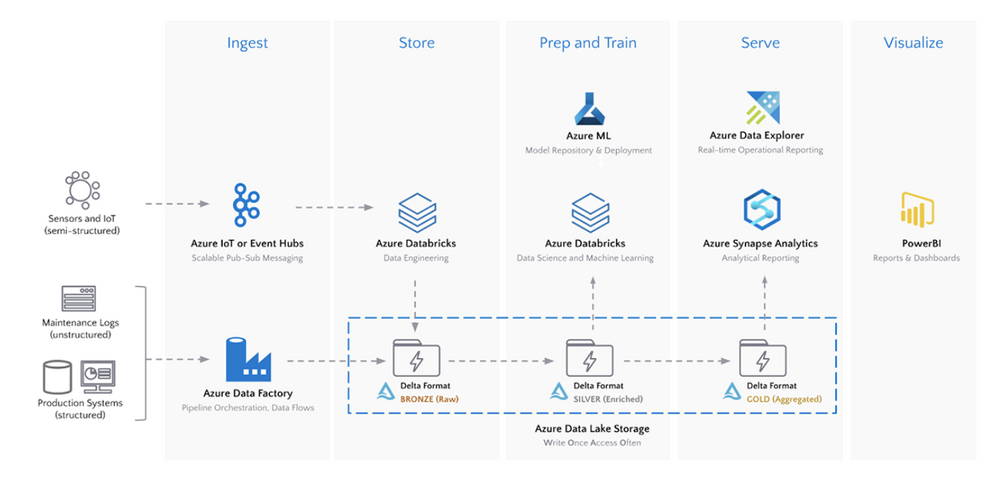
The Internet of Things (IoT) technology stack in Operational Technology (OT) is widely used across various industries, including oil & gas, manufacturing, utilities, and natural resources, for solving operational challenges and delivering mission-critical insights and analytics.
More and more organizations are leveraging Microsoft’s Azure cloud platform to perform large scale analytics and machine learning using data from IoT assets, something that had not been simple to do using traditional systems such as Scada and Historians.
In this article, we preview an end-to-end Azure Data and AI cloud architecture that enables IoT analytics. This article is based on our 3-part blog series on the Databricks Blog site. You can find more information and code samples starting with
Here is the overall architecture discussed in this article and the Databricks blog series:
For making this article applicable on a common IoT use case, consider the scenario of balancing optimal short-term utilization of an asset, such as a wind turbine, against its long-term maintenance costs.

In order to develop insights on short-term optimization as well as longer term maintenance costs, various data sources need to be considered and ingested into the cloud for centralized storage and analysis. Here are a few Azure cloud services to consider, depending on whether the data sources can be stream or batch processed.
- For streaming data into Azure, IoT Hub or Event Hub should be used
- For batch data ingestion and data orchestration, Azure Data Factory should be considered
For the wind turbine scenario, streaming data can be the sensor data collected from the turbines, while structured data can be maintenance and failure data collected in a batch process.
Once the data sources are ingested into Azure, there are a few options, again depending on stream or batch processing, to process and store the data. In this architecture, the Delta format in Azure Databricks backed by Azure Data Lake Gen 2 is the preferred data format for large-scale IoT data sources: Delta Lake and Delta Engine guide – Azure Databricks – Workspace | Microsoft Docs
Once the data is ingested, processed and stored into Delta format, Azure Databricks can be used for big data analytics including data engineering and data science using Spark. As a common pattern, multiple zones within the data lake and aggregations are highlighted below identified through
- Bronze for raw granular IoT data
- Silver for aggregated data, commonly used for machine learning and data science
- Gold for enriched data ready for analytics and reporting purposes
Data engineers can use Azure Databricks and create 3 Delta tables corresponding to these three zones. Users can use programming languages namely Python, Scala, R, and SQL in Azure Databricks for accelerated data engineering and data science development.
Azure Machine Learning can be used for machine learning, most commonly together with Azure Databricks, in this IoT architecture. For example, Azure Databricks can be used with Spark to engineer features and aggregate data. Then Azure Machine Learning can be used to build models through code, drag-and-drop, or even automated machine learning. In addition, Azure Machine Learning can be used to deploy and operationalize machine learning models.
For the wind turbine scenario, the bronze Delta table could be the granular IoT sensor data from the turbines while the silver Delta table is the aggregated (by the hour for example) data. Then Azure Databricks can be used to perform feature engineering and feature selection to build a machine learning and analytics ready dataset. This dataset would then be loaded in Azure Machine Learning to build a predictive maintenance model or a power generation prediction model.
Finally, once the predictions and gold enriched data is created in the gold Delta table with Azure Databricks, it can be loaded into Azure Synapse Analytics for BI analytics and reporting scenarios together with Power BI. Azure Data Explorer provides real-time operational analytics so IoT data can be streamed directly from IoT Hub or Event Hub to Data Explorer.
In summary, this article covered the end-to-end steps for enabling IoT data analytics and machine learning on the Azure cloud platform, including some best practices, recommended services, and application with wind turbine operations use case. This blog series has the full details and provides code samples as well: Articles by Hubert Duan – The Databricks Blog.
by Contributed | May 20, 2021 | Technology
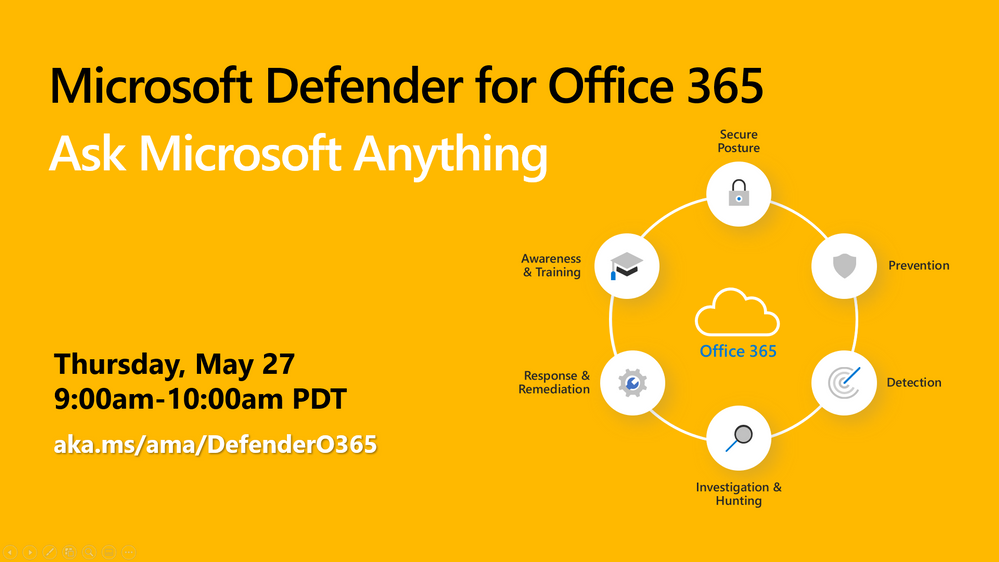
This article is contributed. See the original author and article here.
The Microsoft Defender for Office 365 team wants to hear from you! We’re excited to invite you to join us for a Tech Community Ask Microsoft Anything (AMA). Our team will be on hand to answer any of your questions about Microsoft Defender for Office 365, Exchange Online Protection, and email and collaboration security in general, so come prepared!
The AMA will take place Thursday, May 27, 2021, from 9:00-10:00am Pacific Time. We hope to see you there!
Use the link below to add a reminder to your calendar and to join the discussion.
https://aka.ms/ama/DefenderO365

Recent Comments