
by Contributed | May 25, 2021 | Technology
This article is contributed. See the original author and article here.
The 19th annual Imagine Cup brought together thousands of students from 163 countries across the globe reimagining tech solutions to impact their communities. With projects submitted in four social good categories – Earth, Education, Healthcare, and Lifestyle – the competition advanced through Online Semifinals and World Finals rounds. As winners of each category, the top four teams were selected to pitch their projects at the World Championship during Microsoft Build for the chance to take home the 2021 trophy.
Congratulations to Team REWEBA from Kenya, who won the grand prize for their IoT-based infant monitoring solution, which remotely analyzes infant parameters during post-natal screening and serves as an early warning intervention system. The team won USD75,000, a mentoring session with Microsoft CEO Satya Nadella, and a USD50,000 Microsoft Azure Grant.
The 2021 World Championship was judged by Jocelyn Jackson, Enhao Li, and Toni Townes-Whitley – innovation and industry experts spanning a variety of technology, diversity, start-up, and social impact backgrounds that align to the core of Imagine Cup’s mission. Hosts Tiernan Madorno, Microsoft Business Program Manager, and Donovan Brown, Microsoft Partner Program Manager, kicked off the show, introducing each of the judges tasked with selecting the World Champion. The top four teams then gave an in-depth presentation on their solutions, which were assessed for their technology, diversity, originality, and innovative design. Watch the show to experience the moment when Team REWEBA is crowned champion!
Meet the 2021 World Champion
From left to right, team members Dharmik Karania, Jeet Gohil, Khushi Gupta, and Abdihamid Ali
Team REWEBA, Kenya – Healthcare category
After meeting at the United States International University in Kenya, the team started working together on a graduate project aimed at solving a major problem within their community. Members of the team had interned at a local hospital, learning first-hand the challenges that mothers can face traveling long distances for infant screenings. Lack of healthcare access in marginalized communities, compounded by the effects of COVID-19, contributes to a high infant mortality rate. Team member Khushi Gupta says, “Sub-Saharan Africa remains the region with the highest under-5 mortality rate in the world. We can solve this problem using REWEBA, a remote infant monitoring system that can be used in marginalized areas thus giving everyone equal access to healthcare.” They realized how beneficial it could be to apply IoT to create a remote monitoring solution, and their project was born.
REWEBA (Remote Well Baby) is an early warning system that digitally monitors babies’ growth and health parameters and sends them to doctors for timely intervention. It combines Machine Learning, IoT, Analytics, and more to provide innovative functionalities for infant screening, mimicking the process of post-natal screening in a hospital. Team member Jeet Gohil shared that “There’s a lot of technologies that we came to discover {through building our project}, for example Azure DevOps, IoT, and Functions. We learned a lot about how to build IoT systems.”
Kushi Gupta stated the driving factor for the team’s solution was enabling equal access to healthcare services and saving infants from fatal diseases: “Africa has the highest number of {infant mortalities}, highlighting the gap in healthcare services. REWEBA is the only remote healthcare solution that provides regular growth monitoring for infants from the comfort of the home, while also giving direct access to doctors for immediate intervention.”
Looking to the future, Team REWEBA hope to enhance and scale their project to include additional infant screening factors and a postnatal screening device for mothers. The team would like to launch a start-up in Kenya to enable even better access to healthcare services in marginalized areas. When asked how winning the 2021 Imagine Cup will impact their project, the team responded, “The winning prize and the Azure grants will take our project up a notch, and we envision saving millions of babies’ lives all around Kenya. We plan to extend throughout Africa and India as well, as these are the countries where infant mortality is really high.”
.jpg") Team REWEBA’s winning moment.
Team REWEBA’s winning moment.
————–
Registration for the 2022 competition is now open. Join over two million student competitors worldwide in making an impact in what you’re most passionate about and sign up for Imagine Cup today!
by Contributed | May 25, 2021 | Technology
This article is contributed. See the original author and article here.
While trying to upload files that are bigger than 64 KB, we came across this error: 413 Request Entity Too Large.
The maximum message size quota for incoming messages (65536) has been exceeded. To increase the quota, use the MaxReceivedMessageSize property on the appropriate binding element.
The maximum message size quota for incoming messages (65536) has been exceeded. To increase the quota, use the MaxReceivedMessageSize property on the appropriate binding element.
As the error above mentions, this issue occurs because the request size is bigger than the MaxReceivedMessageSize for WCF.
Solution
Increase MaxReceivedMessageSize value for your web service to solve this issue. However, this may get tricky because there are two different MaxReceivedMessageSize parameters:
- MaxReceivedMessageSize in System.ServiceModel.Configuration.BasicHttpBindingElement
- MaxReceivedMessageSize in System.ServiceModel.Channels.HttpTransportBindingElement
This configuration below will increase the MaxReceivedMessageSize in System.ServiceModel.Configuration.BasicHttpBindingElement
<basicHttpBinding>
   <binding name="basicHttpBinding_Portal" maxReceivedMessageSize="2147483647" maxBufferSize="2147483647" maxBufferPoolSize="2147483647">
       <readerQuotas maxBytesPerRead="2147483647" maxArrayLength="2147483647" maxStringContentLength="2147483647" maxDepth="2147483647" maxNameTableCharCount="2147483647"/>
    </binding>
</basicHttpBinding>
You should increase the MaxReceivedMessageSize in System.ServiceModel.Channels.HttpTransportBindingElement as well:
<customBinding>
   <binding closeTimeout="00:10:00" openTimeout="00:10:00" sendTimeout="00:10:00">
      <httpTransport maxReceivedMessageSize="2147483647" maxBufferSize="2147483647" useDefaultWebProxy="true" transferMode="Buffered" />
   </binding>
</customBinding>
You can also do it in the code as explained in this document.
by Contributed | May 25, 2021 | Technology
This article is contributed. See the original author and article here.
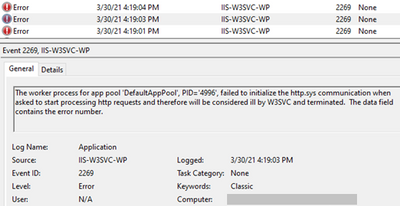
For an issue I worked on, the application pool kept stopping with Event ID 2269, 5139, and 5002. The errors and warnings I saw in Event Viewer are below.
Event 2269
The worker process for app pool 'DefaultAppPool' failed to initialize the http.sys communication when asked to start processing http requests

Event 5139
A listener channel for protocol 'http' in worker process serving application pool 'DefaultAppPool' reported a listener channel failure.

Event 5002
Application pool 'DefaultAppPool' is being automatically disabled due to a series of failures
Solution
Check if the application pool identity has “Bypass traverse checking” permission. This is group-policy permission to determine which users can traverse folders even if they don’t have permission on folders.
To give “Bypass traverse checking” permission:
- Go to “Start > Run”, type “gpedit.msc”
- Follow “Computer Configuration > Windows Settings > Security Settings > Local Policies > User Rights Assignment”
- Right click “Bypass traverse checking” and click “Properties”
- Click “Add User or Group”. Add these users and groups: Everyone, Users, IIS_IUSRS, IIS AppPoolDefaultAppPool
- Restart the server
- Open the same window and make sure the users/groups you added are still there
- Test the application

If this doesn’t work, use “netstat” and see if there are port conflicts. There might be network and file structure related issues as well
Note: With the steps above, we added more users than we should. This is for testing only. You can later harden this configuration.
by Contributed | May 25, 2021 | Technology
This article is contributed. See the original author and article here.
When you run a penetration test on your web application, the report may point out BREACH as a high-risk vulnerability. BREACH attack works by trying to guess the secret keys in a compressed and encrypted response. Attacker makes many requests and try to figure out the encrypted information byte-by-byte using the pattern in responses.
Here is an example vulnerability test report that mentions the BREACH:
'id'           : 'BREACH',
'port'         : '443',
'severity'     : 'HIGH',
'finding'      : 'potentially VULNERABLE, uses gzip HTTP compression - only supplied '/' tested'
Mitigations
Common recommendations:
- Disabling HTTP compression
- Separating secrets from user input
- Randomizing secrets per request
- Masking secrets (effectively randomizing by XORing with a random secret per request)
- Protecting vulnerable pages with CSRF
- Length hiding (by adding a random number of bytes to the responses)
- Rate-limiting the requests
My comments about these mitigations:
- The first option (disabling HTTP compression) will mitigate this vulnerability. However, this may have a performance effect
- Recommendations #2 to #5 are related to the coding of the application. They can help preventing this attack. They are also best practices for development
- Recommendations #6 and #7 are hosting-related. You may need to talk to your hosting company to make these changes
The question is how the scan tool is determining to raise this vulnerability? Is it just checking if the compression is enabled? If that’s the only check it does, then recommended mitigations from #2 to #7 won’t make this vulnerability disappear from the report.
My recommendation would be to keep the compression enabled but implementing the other recommendations (from #2 to #7).
by Contributed | May 25, 2021 | Technology
This article is contributed. See the original author and article here.
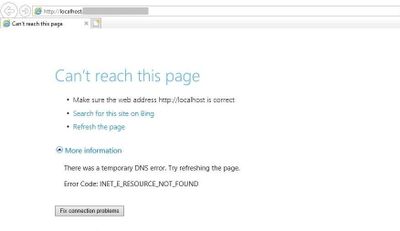
You may come across this error message when you access your website: “Can’t reach this page. There was a temporary DNS error. Error code: INET_E_RESOURCE_NOT_FOUND”
Solution
As the error mentions, there might be a problem with the DNS record of your application. However, for the issue I worked on, the root cause was the corruption in the IE registry setting.
We renamed the Connections container in the registry key below. After a server restart, a new Connections container was created and the application started working.
HKEY_LOCAL_MACHINE > Software > Microsoft > Windows > CurrentVersion > Internet Settings > Connections
My guess is that an Windows update or another system-level change can cause this issue.
by Contributed | May 25, 2021 | Technology
This article is contributed. See the original author and article here.
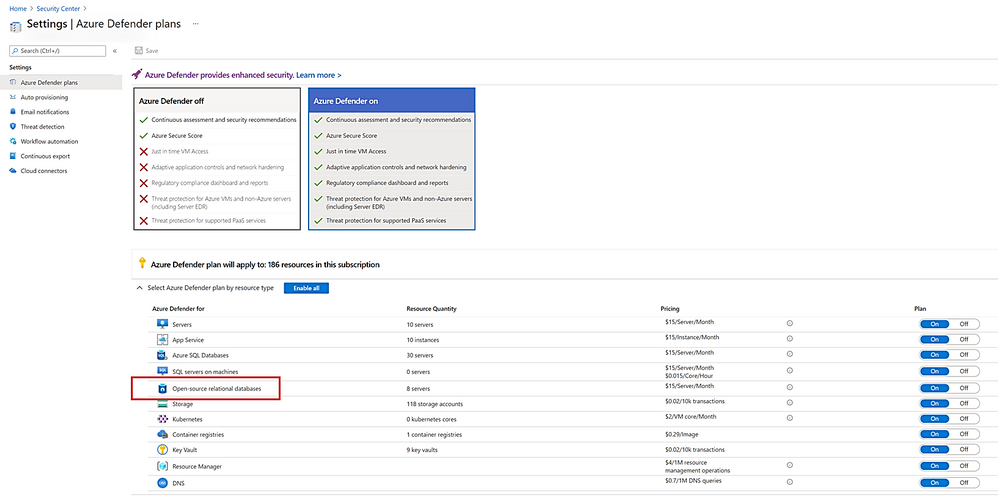
We recently announced the general availability of Azure Defender for SQL to protect SQL Servers in Azure, on premises, and in multi-cloud deployments on Amazon Web Services (AWS) and Google Cloud Platform (GCP). Today we are happy to announce we are expanding Azure Defender’s SQL protection to open-source relational databases. Azure Defender for open-source relational databases is now generally available for use with Azure Databases for MySQL, PostgreSQL, and MariaDB single servers.
Attackers often laterally traverse within organizations to discover and exfiltrate data, wherever it is stored, making open-source databases and SQL Server common targets. With Azure Defender, you can now protect your SQL Servers, as well as your open-source databases, expanding and strengthening your protection across your entire SQL estate. We recommend you protect your production instances of SQL and open-source databases with Azure Defender as part of your overall security strategy.
Protect your SQL estate with Azure Defender today
Azure Defender for open-source relational databases constantly monitors your servers for security threats and detects anomalous database activities indicating potential threats to Azure Database for MySQL, PostgreSQL and MariaDB. Some examples are:
- Granular detection of brute force attacks
- Azure Defender for open-source relational databases provides detailed information on attempted and successful brute force attacks. This lets you investigate and respond with a more complete understanding of the nature and status of the attack on your environment.
- Behavioral alerts detection
- Azure Defender for open-source relational databases alerts you to suspicious and unexpected behaviors on your servers, such as changes in the access pattern to your database.
- Threat intelligence-based detection
- Azure Defender leverages Microsoft’s threat intelligence and vast knowledge base to surface threat alerts so you can act against them.
Azure Defender for Open-Source Databases is just one component of the Azure Defender stack, which also protects SQL Servers, virtual machines, storage, and containers. In addition, you will benefit from centralized management for security, integration with Azure Secure Score, and native integration with Azure Sentinel.
Get started today!
Protect your Azure open-source databases today and expand your organization’s protection. To learn more, visit our documentation page. To learn more about Azure Defender visit our website. Follow us at @MSFTSecurity for the latest news and updates on cybersecurity.
by Contributed | May 25, 2021 | Technology
This article is contributed. See the original author and article here.
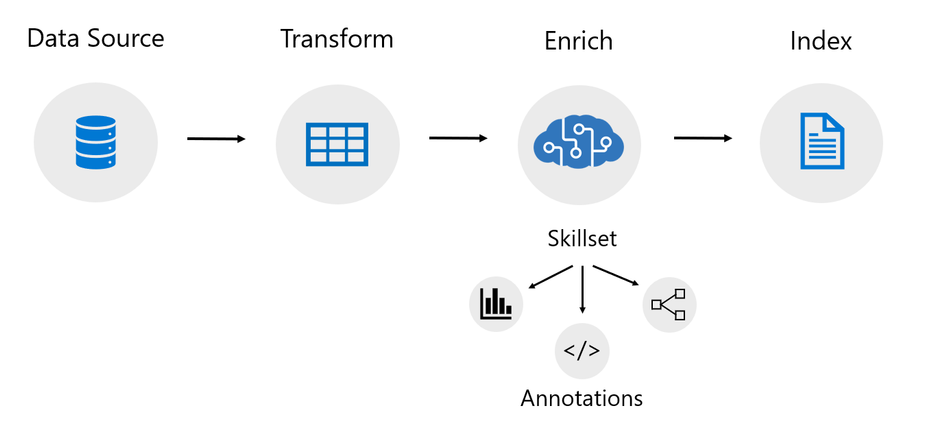
An indexer in Azure Cognitive Search is a crawler that extracts searchable text and metadata from a data source and populates a search index using field-to-field mappings between source data and your index. This approach is sometimes referred to as a ‘pull model’ because the service pulls data in without you having to write any code that adds data to an index. Indexers also drive the AI enrichment capabilities of Cognitive Search, integrating external processing of content en route to an index. Previously, indexers mostly just supported Azure data sources like Azure blobs and Azure SQL.
Today we’re excited to announce the following updates related to data source support!
New preview indexers
- Amazon Redshift (Powered by Power Query)
- Cosmos DB Gremlin API
- Elasticsearch (Powered by Power Query)
- MySQL
- PostgreSQL (Powered by Power Query)
- Salesforce Objects (Powered by Power Query)
- Salesforce Reports (Powered by Power Query)
- SharePoint Online
- Smartsheet (Powered by Power Query)
- Snowflake (Powered by Power Query)
GA indexers
- Azure Data Lake Storage Gen2
Power Query Connectors
Power Query is a data transformation and data preparation engine with the ability to pull data from many different data sources. Power Query connectors are used in products like Power BI and Excel. Azure Cognitive Search has added support for select Power Query data connectors so that you can pull data from more data sources using the familiar indexer pipeline.
You can use the select Power Query connectors just like you would use any other indexer. The Power Query connectors integrated into Azure Cognitive Search support change tracking, skillsets, field mappings, and many of the other features that indexers provide. They also support transformations.
These optional transformations can be used to manipulate your data before pulling it into an Azure Cognitive Search index. They can be as simple as removing a column or filtering rows or as advanced as adding your own M script.
To learn more about how to pull data from your data source using one of the new Power Query indexers, view the following tutorial:
SharePoint Online Indexer
The SharePoint Online indexer allows you to pull content from one or more SharePoint Online document libraries and index that content into an Azure Cognitive Search index. It supports many different file formats including the Office file formats. It also supports change detection that will by default identify which documents in your document library have been updated, added, or deleted. This means that after the initial ingestion of content from your document library, the indexer will only process content that has been updated, added, or deleted from your document library.
To learn more about how to pull data from your SharePoint Online document library, view the following tutorial:
Getting started
To get started with the new preview indexers, sign up using the below form:
https://aka.ms/azure-cognitive-search/indexer-preview
For more information, see our documentation at:
by Contributed | May 25, 2021 | Technology
This article is contributed. See the original author and article here.
We are excited to announce that Azure Spot VMs are now supported in Azure Databricks. Together, Spot VMs and Azure Databricks help innovative customers like aluminium and energy producer Hydro to accelerate data + AI workloads while optimizing costs. This will allow you to access unused Azure compute capacity at deep discounts—up to 90 percent compared to pay-as-you-go prices.* This feature is GA in all regions where Azure Databricks is available today.
How can you use and save cost using this feature? With Azure Spot VMs, you can access unused Azure compute capacity at deep discounts. Discounts vary based on region, VM type, and availability of compute capacity when your workload is deployed. You pay up to the maximum price that you optionally agree to in advance. You can specify the use of Spot VMs for your clusters and pools via the Databricks UI or Rest API.
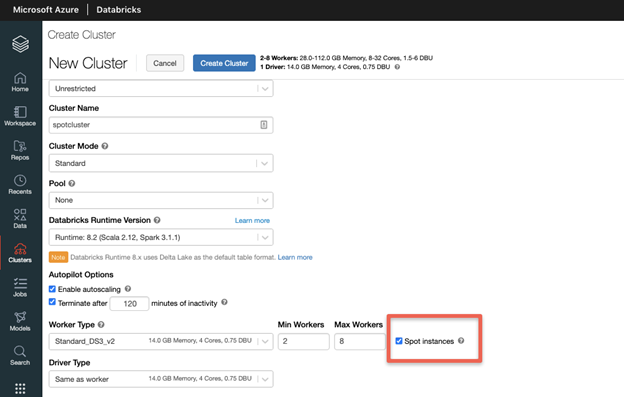
Create an Azure Databricks cluster with Spot VMs using the UI
When you create an Azure Databricks cluster, select your desired instance type, Databricks Runtime version and then select the “Spot Instances” checkbox as highlighted below.
Spot VMs are ideal for workloads that can be interrupted, providing scalability while reducing costs. Azure Databricks automatically handles the termination of Spot VMs by starting new pay-as-you-go worker nodes to guarantee your jobs will eventually complete. This provides predictability, while helping to lower costs.
When a cluster is created with Spot instances, Databricks will allocate Spot VMs for all worker nodes, if available. The driver node is always an On-Demand VM. During your workload runs, Spot VMs can be evicted when Azure no longer has available compute capacity and must reallocate its resources. Spot VMs will also be evicted when the current price exceeds the maximum price that you optionally agreed to pay before the VMs were allocated. In either case, pay-as-you-go instances will automatically replace any evicted Spot VMs.
Create an Azure Databricks cluster with Spot VMs using the REST API
With the Azure Databricks Clusters REST API, you have the ability to choose your maximum Spot price and fallback option if Spot instances are not available or are above your maximum price. Create a bearer token in the Databricks UI. This will be used to authenticate when making your API call.

Create an Azure Databricks warm pool with Spot VMs using the UI
You can use Azure Spot VMs to configure warm pools. Clusters in the pool will launch with spot instances for all nodes, driver and worker nodes. When creating a pool, select the desired instance size and Databricks Runtime version, then choose “All Spot” from the On-demand/Spot option.


At any point in time when Azure needs the capacity back, the Azure infrastructure will evict Azure Spot Virtual Machines with 30 seconds notice. Databricks will attempt to replace the evicted Spot Virtual Machines, if unsuccessful, on-demand VMs are deployed to replace evicted Spot VMs.
Create a warm pool with Spot VMs using the Instance Pools API
The Instance Pools API can be used to create warm Azure Databricks pools with Spot VMs. In addition to the options available in the Azure Databricks UI, the Instance Pools API enables you to specify a maximum Spot VM price and fallback behavior if Spot VM capacity is unavailable.
Spot Pricing, Trends and Eviction Rates
Spot VM pricing can be viewed for all series on the Linux VM pricing page. The last column in the tables under each series type shows the savings based on region.

On the Databricks pricing page, you can view the ‘Pay As You Go Total Price’ (PAYG) and ‘Spot (%Savings) Total Price’. Note that the DBU price does not change with the use of Spot VMs. Savings are from discounts on Spot VMs only. Please note that Spot VMs pricing does not include network, storage or other resources, which are billed separately.
- Pay As You Go Total Price = Pay As You Go Price + DBU Price
- Spot Total Price = Spot VM Price (% Savings of PAYG) + DBU Price

Customers can also look at Spot VM pricing trends for the last 3 months and eviction rate. To see this, navigate to the Create a virtual machine page within the Azure Portal and click the “View pricing history and compare pricing in nearby regions” link. This will show you historical pricing and eviction rate for the regions and instances you select.

Learn more about using Azure Spot VMs with Azure Databricks by viewing the documentation: Azure Spot VMs, Azure Databricks Clusters, Azure Databricks Clusters API, Azure Databricks pools and Instance Pools API . To get started with Azure Databricks, visit the Azure Databricks page and attend up-coming Azure Databricks events.
*Actual discounts may vary based on region, VM type, and Azure compute capacity available when the workload is deployed. Please note that Spot VMs pricing does not include network, storage or other resources, which are billed separately.
by Contributed | May 25, 2021 | Technology
This article is contributed. See the original author and article here.
Process Monitor v3.80
Process Monitor is the latest tool to integrate with the new Sysinternals theme engine, giving it dark mode support.
Sysmon v13.20
This update to Sysmon, an advanced system security monitor, adds “not begin with” and “not end with” filter conditions and fixes a regression for rule include/exclude logic.
TCPView v4.10
This update to TCPView, a TCP/UDP endpoint query tool, adds the ability to filter connections by state.
Process Explorer v16.40
This update to Process Explorer, an advanced process, DLL and handle viewing utility, adds process filtering support to the main display and reports process CET (shadow stack) support.
PsExec v2.34
This PsExec release reverts to sending all PsExec output to stderr so that only target process output emits to stdout.
Sigcheck v2.81
Sigcheck v2.81 fixes a bug in filtering output for unsigned VirusTotal unknown files and now reports the signing time for files with untrusted certificate signatures.
WinObj v3.10
This WinObj update extends search functionality to include symbolic link targets.

by Contributed | May 25, 2021 | Technology
This article is contributed. See the original author and article here.
SharePoint Syntex brings advanced AI-powered content management to SharePoint & Microsoft 365. We’re continuing to work with our customers and partners to make updates and improvements. Here are the latest updates to support powerful AI models that transform content into knowledge.

Sensitivity labels
Coming soon, you can automatically set sensitivity labels in document understanding models. This is in addition to the ability to automatically apply retention labels. Applying sensitivity labels (aka Microsoft Information Protection or “MIP” labels) enables you to classify and protect your organization’s data, while making sure that productivity isn’t hindered.
Automatic sensitivity labels are important because:
- You don’t need to train your users when to use each of your classifications.
- You don’t need to rely on users to classify all content correctly.
- Users no longer need to know about your policies—they can instead focus on their work.
- And also coming soon, Microsoft Viva Topics will be able to use sensitivity labels to restrict visibility of sensitive content, even if that content is widely shared.
These changes will start to rollout to Targeted Release users in May 2021, and can be tracked on the Microsoft 365 Public Roadmap ID 81975.
Regular expressions
This month we also added a new regular expression (RegEx) explanation type, allowing you to provide more complex explanations when training a model. This update includes a set of RegEx explanation templates that can be used or edited like other explanation templates, such as date, currency, and phone number.
Regular expressions provide a powerful, flexible, and efficient method for processing text. The extensive pattern-matching notation of regular expressions enables you to quickly parse large amounts of text to find specific character patterns.
This update will also start rollout to Targeted Release users in May 2021, and can be tracked on the Microsoft 365 Public Roadmap ID 81976.
Developer Community Support: GitHub repository
We’re thrilled to announce the release of or Syntex developer community n GitHub. Visit our GitHub repository for Syntex community work to get community samples that demonstrate different usage patterns of Document Understanding models in Syntex. To start you off, we included four samples focused on benefit changes, contract notices, services agreements, and trade confirmations.
The samples in this repository contain both the Document Understanding model files, as well as the files used to train the model. Once imported in your Syntex Content Center site, you’ll be able to use these models to process files, as well as view and edit the key model elements – the classifier and extractors – to match your needs. If you want to further deploy the model, then checkout the Deploying Models article to learn more.
You can also use this repository to submit a community contribution, view the issue list, and participate in a discussion forum.
Roadmap
We’re continuing to improve and enhance SharePoint Syntex and we’ll share new features with you as they become available. To stay up to date on Knowledge and Content Services, and products updates like those listed here, subscribe to the Microsoft Viva newsletter.

Recent Comments