This article is contributed. See the original author and article here.
The modern rich text editor is now our advanced editor for an end-to-end enhanced authoring experience. As part of this advancement, we are phasing out the current rich text editor and integrating its capabilities into the modern rich text editor.
Key dates
Disclosure date: August 9, 2024 The modern rich text editor for non-customized controls was delivered in April. By October, the modern rich text editor for customized controls will also be delivered.
End of support: October 31, 2024 After this date, no new enhancements will be done to the current rich text editor and the modern rich text editor will be generally available.
End of life: April 30, 2025 After this date, the current rich text editor will be taken out of service.
Next Steps
We strongly encourage customers to leverage the modern rich text editor, which will be enriched with all the editor experiences. The modern rich text editor is designed to align with the familiar and intuitive interfaces of Microsoft applications such as Outlook, Word, and OneNote. This update introduces a modern design, dark mode and new Copilot features to enhance your text editing capabilities. This ensures reliability and alignment with our commitment to cost-efficiency and user-centric innovation. Learn more about the modern rich text editor.
Please contact your Success Manager, FastTrack representative, or Microsoft Support if you have any additional questions.
“Teams meetings have evolved significantly over the past few years, with the end of live Team events, the introduction of Town Halls, and the strengthening of Teams Premium features. It’s not always easy to understand what is and isn’t included in Teams Premium licences, or to explain the benefits of purchasing this new plan. This documentation and its comparison tables make my job a lot easier today.”
“Using Azure Pipelines for CI/CD in a closed network environment requires the use of self-hosted agents, and managing these images was a very labor-intensive task. Even with automation, updates took 5-6 hours and had to be done once or twice a month. It was probably a challenge for everyone.
In this context, the announcement of the Managed DevOps Pools on this blog was very welcome news. It’s not just me; it’s likely the solution everyone was hoping for, and I am very much looking forward to it.”
(In Japanese: Azure Pipelinesを使って閉域環境でのCI/CDはセルフホストエージェントを使わなければならない上に、イメージの管理は非常に大変な作業でした。更新作業には自動化していても5-6時間かかる上に、月に1-2度は行わなくてはなりません。おそらく皆さん大変だったでしょう。
This article is contributed. See the original author and article here.
Azure Monitor managed service for Prometheus provides a production-grade solution for monitoring without the hassle of installation and maintenance. By leveraging these managed services, we can focus on extracting insights from your metrics and logs rather than managing the underlying infrastructure.
The integration of essential GPU metrics—such as Framebuffer Memory Usage, GPU Utilization, Tensor Core Utilization, and SM Clock Frequencies—into Azure Managed Prometheus and Grafana enhances the visualization of actionable insights. This integration facilitates a comprehensive understanding of GPU consumption patterns, enabling more informed decisions regarding optimization and resource allocation.
Azure Managed Prometheus recently announced general availability of Operator and CRD support, which will enable customers to customize metrics collection and add scraping of metrics from workloads and applications using Service and Pod Monitors, similar to the OSS Prometheus Operator.
This blog will demonstrate how we leveraged the CRD/Operator support in Azure Managed Prometheus and used the Nvidia DCGM Exporter and Grafana to enable GPU monitoring.
GPU monitoring
As the use of GPUs has skyrocketed for deploying large language models (LLMs) for both inference and fine-tuning, monitoring these resources becomes critical to ensure optimal performance and utilization. Prometheus, an open-source monitoring and alerting toolkit, coupled with Grafana, a powerful dashboarding and visualization tool, provides an excellent solution for collecting, visualizing, and acting on these metrics.
Essential metrics such as Framebuffer Memory Usage, GPU Utilization, Tensor Core Utilization, and SM Clock Frequencies serve as fundamental indicators of GPU consumption, offering invaluable insights into the performance and efficiency of graphics processing units, and thereby enabling us to reduce our COGs and improve operations.
Using Nvidia’s DGCM Exporter with Azure Managed Prometheus
The DGCM Exporter is a tool developed by Nvidia to collect and export GPU metrics. It runs as a pod on Kubernetes clusters and gathers various metrics from Nvidia GPUs, such as utilization, memory usage, temperature, and power consumption. These metrics are crucial for monitoring and managing the performance of GPUs.
You can integrate this exporter with Azure Managed Prometheus. The section below in blog describes the steps and changes needed to deploy the DCGM Exporter successfully.
Prerequisites
Before we jump straight to the installation, ensure your AKS cluster meets the following requirements:
GPU Node Pool: Add a node pool with the required VM SKU that includes GPU support.
EnableAzure Managed Prometheus and Azure Managed Grafana on your AKS cluster.
Refactoring Nvidia DCGM Exporter for AKS: Code Changes and Deployment Guide
Updating API Versions and Configurations for Seamless Integration
As per the official documentation, the best way to get started with DGCM Exporter is to install it using Helm. When installing over AKS with Managed Prometheus, you might encounter the below error:
Error: Installation Failed: Unable to build Kubernetes objects from release manifest: resource mapping not found for name: "dcgm-exporter-xxxxx" namespace: "default" from "": no matches for kind "ServiceMonitor" in version "monitoring.coreos.com/v1". Ensure CRDs are installed first.
To resolve this, follow these steps to make necessary changes in the DCGM code:
Clone the Project: Go to the GitHub repository of the DCGM Exporter and clone the project or download it to your local machine.
Navigate to the Template Folder: The code used to deploy the DCGM Exporter is located in the template folder within the deployment folder.
Modify the service-monitor.yaml File: Find the file service-monitor.yaml. The apiVersion key in this file needs to be updated from monitoring.coreos.com/v1 to azmonitoring.coreos.com/v1. This change allows the DCGM Exporter to use the Azure managed Prometheus CRD.
apiVersion: azmonitoring.coreos.com/v1
4. Handle Node Selectors and Tolerations: GPU node pools often have tolerations and node selector tags. Modify the values.yaml file in the deployment folder to handle these configurations:
Helm: Packaging, Pushing, and Installation on Azure Container Registry
We followed the MS Learn documentationfor pushing and installing the package through Helm on Azure Container Registry. For a comprehensive understanding, you can refer to the documentation. Here are the quick steps for installation:
After making all the necessary changes in the deployment folder on the source code, be on that directory to package the code. Log in to your registry to proceed further.
1. Package the Helm chart and login to your container registry:
3. Verify that the package has been pushed to the registry on Azure portal.
4. Install the chart and verify the installation:
helm install dcgm-nvidia oci:///helm/dcgm-exporter -n gpu-resources
#Check the installation on your AKS cluster by running:
helm list -n gpu-resources
#Verify the DGCM Exporter:
Kubectl get po -n gpu-resources
Kubectl get ds -n gpu-resources
You can now check that the DGCM Exporter is running on the GPU nodes as a DaemonSet.
Exporting GPU Metrics and Configuring Azure Managed Grafana Dashboard
Once the DGCM Exporter DaemonSet is running across all GPU node pools, you need to export the GPU metrics generated by this workload to Azure Managed Prometheus. This is accomplished by deploying a PodMonitor resource. Follow these steps:
Deploy the PodMonitor: Apply the following YAML configuration to deploy the PodMonitor:
2. Check if the PodMonitor is deployed and running by executing:
kubectl get podmonitor -n
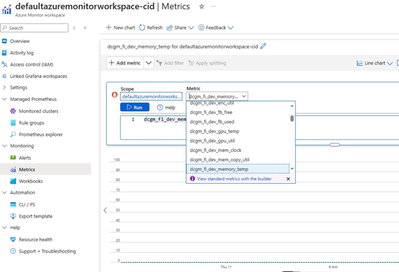
3. Verify Metrics export: Ensure that the metrics are being exported to Azure Managed Prometheus on the portal by navigating to the “Metrics” page on your Azure Monitor Workspace.
Create the DGCM Dashboard on Azure Managed Grafana
This article is contributed. See the original author and article here.
La computación en la nube está revolucionando diversas áreas de la tecnología, incluyendo programación, datos, inteligencia artificial (IA) y seguridad. Para ayudar a los profesionales a especializarse en esta área en constante evolución, Microsoft está lanzando la iniciativa Azure Infra Girls. Este programa ofrece una serie de cuatro clases en vivo, gratuitas y en español, que se llevarán a cabo del 3 al 24 de septiembre, a las 12:30pm (GMT-6, Ciudad de México).
Durante estas sesiones, los participantes tendrán la oportunidad de profundizar sus conocimientos en computación en la nube y prepararse para la certificación AZ-900 (Azure Fundamentals), a través de una ruta de aprendizaje con cursos certificados en Microsoft Learn.
Todas nuestras sesiones comenzaran en base a la zona horaria de Ciudad de México.
Sesión
Descripción
Conceptos de computaciónen la nubeconMicrosoft Azure
Sept 3, 12:30PM Mexico City (GMT-6)
En el primer episodio de Azure Infra Girls, aprenderás sobre los conceptos básicos de la programación en la nube.Comprenderás qué son las nubes públicas, privadas e híbridas, los beneficios y los tipos de servicios, como IaaS, PaaS, SaaS, Serverless, y cómo usar Azure para desarrollar tus aplicaciones.
Arquitectura y servicios de Azure
Sept 11, 12:30PM Mexico City (GMT-6)
En la segunda sesión, profundizaremos en los conceptos de arquitectura y servicios de Azure, con algunos ejercicios prácticos para crear un Escritorio Virtual (Azure Virtual Desktop) y alojar un recurso en Azure.
Administración y gobernanza de Azure
Sept 17, 12:30PM Mexico City (GMT-6)
En la tercerasesión, abordaremos los servicios de administración y gobernanza de Azure, analizando el control de costos, las funcionalidades y herramientas de gobernanza, el cumplimiento y la supervisión.
Simulacion del examen Azure Fundamentals AZ-900
Sept 24, 12:30PM Mexico City (GMT-6)
En esta sesión, realizaremos un simulacro del examen con preguntas relacionadas con los temas. Estarán relacionados, sobre conceptos de nube, arquitectura y servicios de Azure. Asimismo, con administración y gobernanza.
Para aquellos que desean profundizar en la computación en la nube y prepararse para la certificación AZ-900 Azure Fundamentals, tenemos una ruta de aprendizaje completa disponible en Microsoft Learn. Esta ruta aborda las principales áreas de la certificación, permitiéndote estudiar de forma gratuita y a tu propio ritmo. Además, al completar los cursos, podrás obtener certificados que pueden ser añadidos a tu perfil de LinkedIn, destacando tus nuevas habilidades y conocimientos.
Los módulos de Microsoft Learn para la certificación AZ-900 incluyen:
Evaluación de sus conocimientos: estas evaluaciones le proporcionarán una infomacion general del estilo, la redacción y la dificultad de las preguntas que probablemente verá en el examen. A través de estas valoraciones, puede evaluar su preparación, determinar dónde necesita preparación adicional y llenar los vacíos de conocimiento para aumentar la probabilidad de aprobar el examen.
Demostración de experiencia: aquí puede experimentar con el aspecto del examen antes de realizarlo. Podrá interactuar con diferentes tipos de preguntas en la misma interfaz de usuario que usará durante el examen.
Regístrate y Participa
No te pierdas esta increíble oportunidad para seguir aprendiendo y avanzar en tu carrera tecnológica. Únete a Azure Infra Girls y comienza tu viaje hacia la especialización en computación en la nube con Microsoft. Esperamos verte en nuestras sesiones en vivo y ayudarte a alcanzar tus objetivos profesionales en el mundo de la tecnología.
This article is contributed. See the original author and article here.
Microsoft ISV Success for Business Applications offers platforms, resources, and support designed to help partners develop, publish, and market business apps. Learn more about this offer from AppJetty:
MappyField 365: MappyField 365 is a powerful geo-mapping plugin for Microsoft Dynamics 365 that boosts business productivity with advanced features like live tracking, geographic data visualization, proximity search, auto-scheduling, auto check-ins, territory management, and heat maps. Accelerate your business across organizations with location intelligence from AppJetty.
This article is contributed. See the original author and article here.
Despite the convenience of online shopping, many shoppers still value the hands-on experience of visiting retail stores. The instant gratification, social interactions, and serendipity of physical shopping continues to attract buyers. With the evolution of technology, retailers are seeking more automated ways to fulfill their customers’ shopping needs. Self-service checkout solutions have become a crucial component of retail businesses’ strategies aimed at enhancing the overall shopping experience.
Long lines at checkout can result in decreased sales and unhappy customers. Modern shoppers seek control, ease, and security while purchasing, leading to a preference for self-service. Retailers are adopting self-checkout (SCO) systems to offer more personal and confidential buying experiences. The growth in SCO is partly due to labor shortages and rising wage costs. RBR research predicts self-checkout terminals will grow by 90% annually worldwide, indicating a trend toward faster, self-reliant service.
While there are clear advantages, it’s essential to acknowledge and address some of the challenges through technology. These challenges encompass issues related to scanning, the overall usability of checkout devices, losses attributed to theft and inadvertent misuse, as well as the absence of personal interaction.
Discover the benefits of Microsoft Dynamics 365 Commerces Self-checkout Preview. Self-checkout is available as a public preview.
Self-checkout in Dynamics 365 Commerce
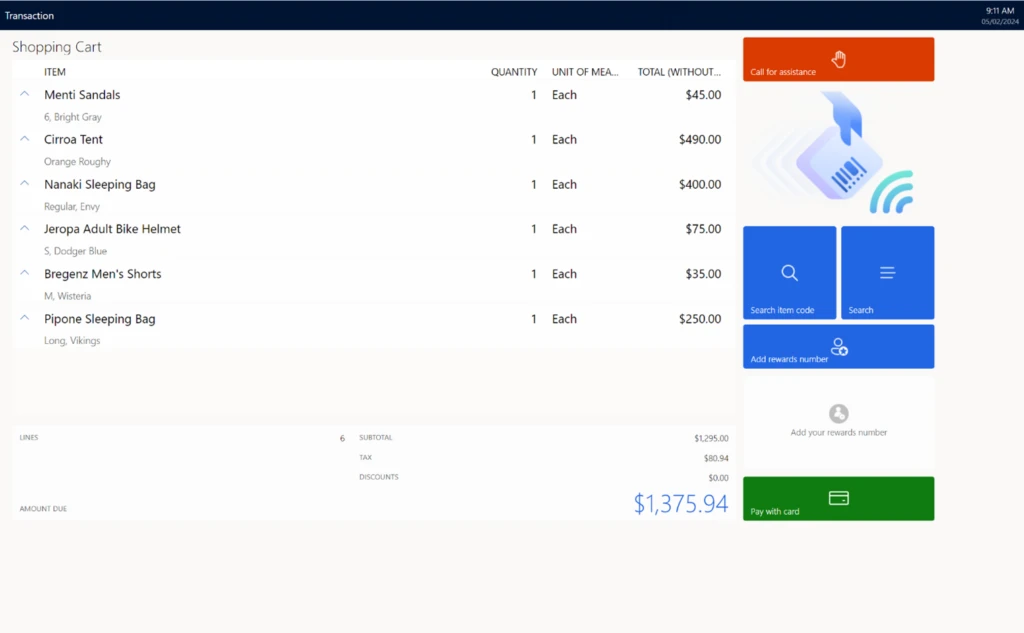
The new self-checkout solution in Dynamics 365 Commerce is the same point-of-sale application (Store Commerce app) in self-checkout mode. Payment integrations, localization support, hardware integrations and any extensions built for the fixed till will also work for the self-checkout app. This allows retailers to quickly turn on self-checkout by leveraging their existing investments on Store commerce app for Windows. The Store Commerce app in self-checkout mode supports the following:
Simplified login that allows cashiers to access the registers while also allowing shoppers to self-checkout.
Out-of-box self-checkout layout for a quick start allowing users to scan items, support loyalty, and pay with credit or debit.
Intuitive interface for shoppers that provides only the supported actions in self-checkout while disabling store associate actions.
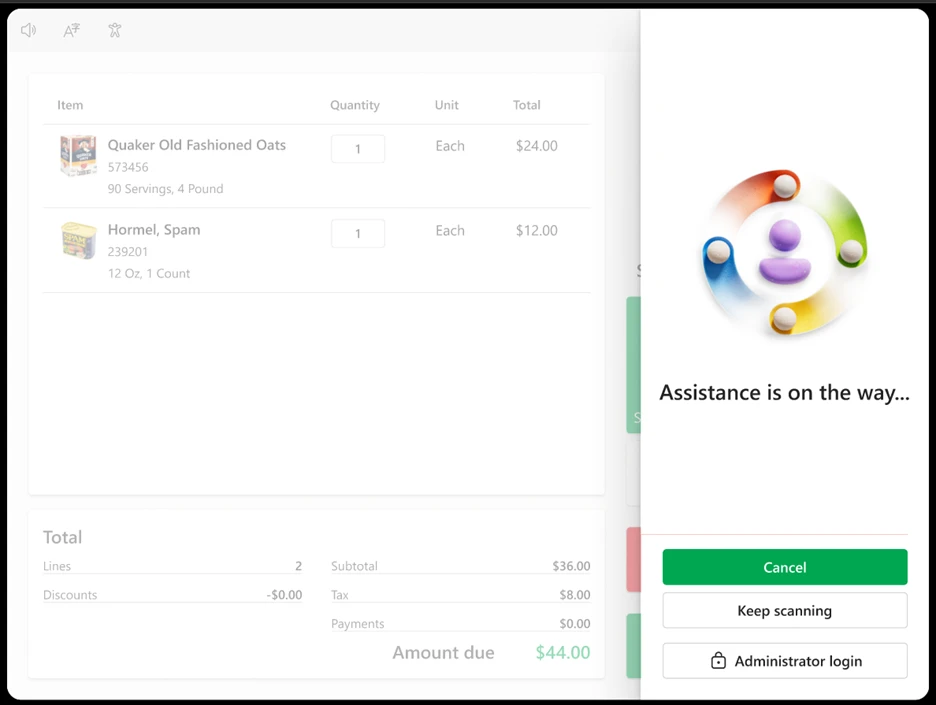
Call for assistance to allow shoppers to request assistance for elevated actions like voids, overrides and discounts.
Browse operation that allows shoppers to browse for products that are not scannable or too big or too small to scan.
The ability to restrict certain products from being purchased via self-checkout using a configuration in Headquarters.
Offline support for business continuity even during network outage.
Support for store commerce peripherals such as Scanners, payment terminals and printers for self-checkout.
Adyen payment integration out-of-box.
Self-checkout to meet every retailer’s need
Retail sectors have diverse needs for point of sale and self-service checkout systems. Fashion retailers might prefer kiosk-based solutions for efficient scan-and-pay transactions. Grocery stores require self-checkouts integrated with weighing and bagging scale capabilities, along with cash handling machines. Store commerce self-checkout solution is built on commerce SDK and therefore is fully extensible for customers. Here are a few ways retailers can tailor the solution for their business needs.
Retailers can easily configure the default self-checkout layout to add operations that fit their business needs. For example, they can include an operation to apply coupons.
The Store Commerce self-checkout system is hardware agnostic and works across a variety of different hardware. Retailers cater to their unique needs regarding certain hardware peripherals through development of custom integrations with either the supported OPOS drivers or tailor-made SDKs.
Moreover, retailers have the advantage of integrating their existing localizations, payment methods, and additional extensions that are established within the cashier-managed workflows directly into the self-service checkout procedures.
In scenarios where cashier intervention might be necessary, such as when items with particular discounts are scanned, retailers can employ out-of-box extensions to promptly request cashier assistance.
Theft and losses in self-checkout
While self-checkout drives efficiency, there is still a high risk of theft and accidental loss as it’s easy for customers to by-pass scanning items or make honest mistakes. Retailers need to balance the efficiency of self-checkout with the need to thwart theft. Some retailers have achieved this by limiting the number of items in the checkout stand, some have eliminated cash as a payment method.
In addition, new theft detection systems are now available in the market using cameras and algorithms for spotting thefts. There are image-recognition algorithms used in combination with multiple cameras to detect shopper’s movements for theft. Microsoft’s Azure vision, allows retailers to train the model with their own catalog and use camera-based image detection during checkout to identify and add items to the cart thereby reducing the risk of theft.
Retailers can use additional mechanisms to trigger cashier intervention for dubious scenarios such as repeated scanning of identical barcodes, unusual scanning of multiple low-priced items, items missing in the bagging area, etc .
Copilot
As we introduce Copilot features in Store Commerce, they could be leveraged easily for self-checkout. For instance, copilot can play a role while a customer is doing a price check or browsing for product availability. Voice-assistance in Copilot will help make the shopper experience smoother. Furthermore, we expect that Copilot scenarios such as product discovery, product suggestions, and personalized offers will be of high value for a shopper using a kiosk.
Future of self-checkout
Traditional self-checkout (SCO) methods often utilize kiosks, but retailers are also exploring scan-and-go options for added convenience. These allow customers to use their own devices or the store’s device to scan items and pay with their chosen method. Additionally, smart carts with integrated computerized screens are emerging, enabling shoppers to avoid traditional checkout lines for increased efficiency. However, while these innovations are gaining popularity, they might not be ideal for all merchandise types, could elevate theft risks, and might be more appropriate for stores with smaller footprints.
As Store commerce self-checkout gains wide adoption by multiple retailers in various industry segments such as apparel and fashion, department and grocery store we will keep a close eye on customers’ need and incorporate their feedback into the product.
For instance, our customers have requested that self-checkout systems include interruption features for assistance calls tailored to the retailer’s specific requirements for theft prevention or validation and provide an option for shoppers to select their preferred language.
It is becoming clear that retailers favor a hybrid model that combines human interaction with automated convenience. With the power and efficiency of Microsoft Dynamics 365 Store commerce point of sale alongside Store commerce self-checkout, we aim to provide customers and shoppers with exceptional shopping experience.
This article is contributed. See the original author and article here.
Effective financial reporting is crucial for finance professionals to ensure accuracy, compliance, and strategic decision-making. Financial reports are the backbone of organizational transparency, offering insights that drive timely business decisions. However, managing financial reporting across multiple environments can be a daunting task, often leading to inconsistencies and inefficiencies.
To address these challenges, the latest update to Dynamics 365 Finance introduces the financial reporting add-in, a powerful tool designed to streamline financial reporting processes, enhance data accuracy, and provide comprehensive business insights. With this change, Financial reporting is no longer deployed by default in all environments.
Comprehensive Yet Configurable and Easy-to-Use Financial Reporting
The financial reporting add-in for Dynamics 365 Finance offers a robust suite of functionalities and capabilities that make it both powerful and user-friendly:
Flexible Report Design: Create custom financial statements tailored to your organization’s needs using a drag-and-drop interface.
Real-Time Data Integration: Access real-time financial data, ensuring that reports reflect the latest financial position.
Collaboration and Sharing: Easily share reports and collaborate with team members, facilitating efficient communication and decision-making.
Secure Access: Ensure sensitive financial information protection by maintaining data security with role-based access controls.
Get Started Quickly with 22 Reporting Templates: Generate standard financial reports efficiently by using a variety of pre-built templates. This saves time and ensures consistency across your financial data.
These features provide finance professionals with the tools they need to generate accurate and insightful financial reports without the complexity often associated with financial reporting systems.
Consistent and Efficient Financial Reporting Across Environments
Financial reporting often involves juggling multiple environments, each with unique configurations and requirements. This can lead to inconsistencies and inefficiencies, especially when moving data between production and sandbox environments. The financial reporting add-in for Dynamics 365 ensures a standardized approach to financial reporting across all environments. This reduces the time and effort required to set up and maintain reporting systems.
Ensuring Availability Across Existing and New Environments
For users currently utilizing financial reporting, there will be no changes to your existing environments. The financial reporting add-in remains accessible through lifecycle services (LCS), ensuring seamless access and continuity. The add-in continues to be available within the Dynamics 365 Finance menu, maintaining user familiarity and ease of use.
Users not currently utilizing financial reporting should have received communication about its removal from your LCS environment. (Reinstall via LCS if needed.) The financial reporting menu item will always be accessible within Dynamics Finance.
Financial reporting is not deployed by default in newly created environments. However, easy installation via LCS is available, if needed. This provides users the flexibility to customize their environment setup based on specific reporting needs. This optional deployment feature empowers users to manage and configure their reporting tools according to their requirements. This in turn streamlines operations and reduces unnecessary pre-installations.
Streamlined Data Management for Multi-Environment Setups
For customers managing multiple production and sandbox environments, please note financial reporting may be used in some environments but not others. When moving data, the financial reporting database will only transfer if both the source and target environments have it installed. To ensure smooth transitions, we recommend pre-installing financial reporting in both source and target environments to include it in data migrations.
This selective deployment capability ensures operational continuity, avoiding disruptions during data migrations and maintaining financial reporting capabilities. The flexibility to tailor environment setups based on specific operational needs, creates a more efficient and effective financial reporting process.
Enhanced Simplicity and Improved Efficiency
By integrating the financial reporting add-in for Dynamics 365 Finance, organizations can achieve significant business outcomes. The streamlined financial reporting processes reduce complexity and administrative overhead, leading to enhanced simplicity in managing financial data. Faster setup and maintenance of reporting systems contribute to improved operational efficiency. IT resources are freed up and finance professionals can focus on strategic tasks rather than manual reporting processes.
Better Financial Insights and Informed Decision-Making
Consistent and accurate reporting across environments provides reliable data for informed decision-making. The financial reporting add-in provides finance professionals access to precise insights, enabling strategic decisions driving business growth and success. With these enhanced reporting capabilities, organizations can better navigate the complexities of financial management and achieve their business objectives.
Expanding Regional Availability
The financial reporting add-in is now generally available. All regions supported by Dynamics 365 Finance will find access to these enhanced capabilities. Organizations worldwide can leverage the benefits of streamlined financial reporting, driving greater efficiency and accuracy in their financial operations.
Get Started Today!
We believe these improvements will significantly enhance your financial reporting processes. We also believe they will deliver tangible business value and support your strategic financial goals. Visit the financial reporting documentation for more information and installation instructions.
This article is contributed. See the original author and article here.
You have navigated the complex and changing realities of the hybrid workplace, found new ways to move aspects of your business to the cloud, and kept employees and critical business operations connected and running in a challenging cyber security environment.
This article is contributed. See the original author and article here.
Introduction
Companies are increasingly facing regulatory and consumer requirements for traceability. Traceability ensures product compliance with regulations, captures sustainability metrics, and even demonstrates commitment to ethical sourcing and manufacturing practices. Traceability has long been critical for companies in industries like food and beverage, aerospace, and life sciences. Now, it’s also coming to the forefront for many emerging or developing industries.
Traceability in Dynamics 365 enables your business to track product genealogy information and custody events. It can also collect data against unique identifiers such as serial numbers and batch numbers. Built on the Microsoft platform, it allows you to connect to any sources of traceability data across your business. This allows you to quickly access the data you need to support your genealogy requirements. The intuitive user interface provides multiple options to view the data and Copilot summaries to drive insights to actions.
With Traceability, businesses can reduce the time and cost of completing product recalls and pass regulatory audits with ease. Traceability helps businesses use insights to improve product quality and increase customer satisfaction. We are pleased to announce the Traceability add-in for Dynamics 365 Supply Chain Management is now available in preview.
Benefits
Improving product traceability in your business can help with the following areas:
Streamlined product lifecycle tracking
Traceability provides you the ability to not only capture the as-built bill of materials, but can also be used to update the as-maintained bill of materials for a product. For companies that do aftermarket product maintenance, this means improved tracking on a single source of truth.
Improved product quality
Because the data is in one place, quality engineers can use insights from Traceability to understand trends and impacts on product quality to make design improvements.
Reduced time and cost of product recall
The rapid reporting available in Traceability makes product recalls easier to manage than ever. Query on multiple levels of bill of material or recipe data to identify any impacted product during a recall and find it in your supply chain so it can be quickly and properly disposed of.
Increased regulatory compliance
Traceability allows you to quickly demonstrate to auditors that business is meeting product compliance requirements, regardless of industry. Flexible configurations let you define what attributes and events your business needs to track. Native reports allow quick access to information.
Capabilities
Traceability offers the following capabilities as part of the preview release:
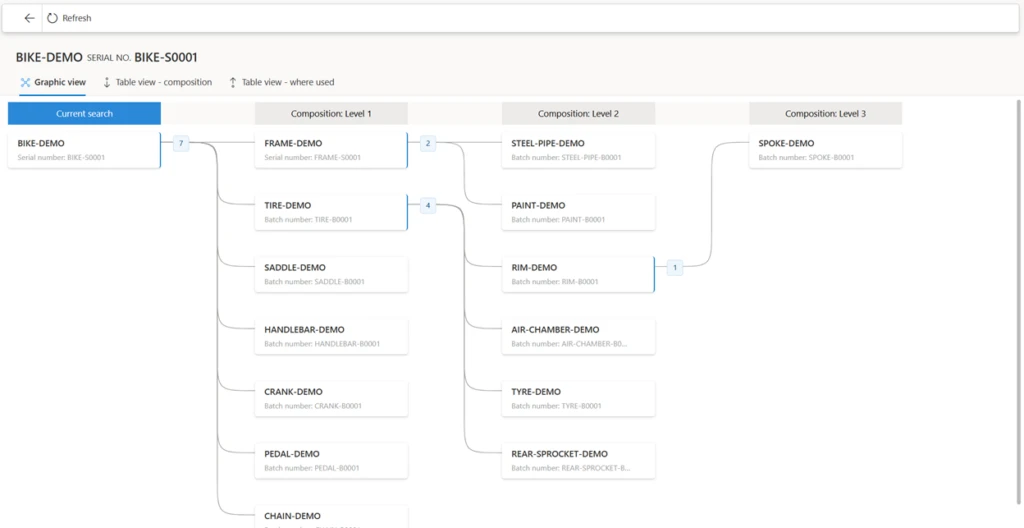
Genealogy trace reporting
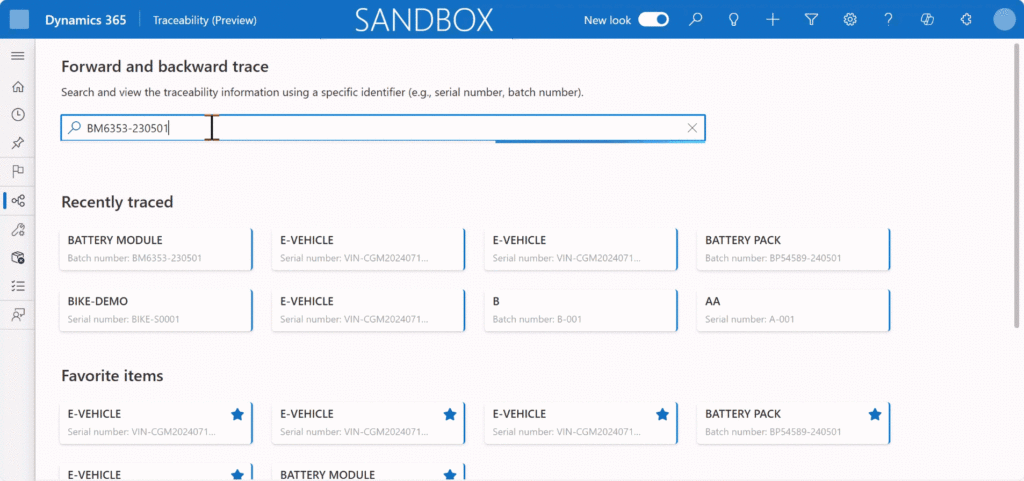
One out-of-the-box reports offered with Traceability is the genealogy trace report. Search for any batch or serial number and view the multi-level bill of materials of the batch or serial item. The graphical interface drills in quickly to any of the specific components or view further details of relevant attributes and events tracked on the traced item.
Where-used reporting with Copilot summary
If companies need to recall products quickly and efficiently, the where-used reporting allows quick views of any items that have consumed a batch or serial component in your manufacturing process. Coming in Wave 2 2024, Copilot will provide summaries of where-used products, so you can assess the impact and scope of a recall much faster. With Copilot-summarized impacted goods and suggested next steps, QA managers will feel informed and competent because they can quickly view a list of impacted finished goods, evaluate the impact, and take the right action for those goods offline.
Microsoft Platform architecture
Traceability is built on the Microsoft platform, so it connectsto any product genealogy or traceability system in your network, like quality management systems, manufacturing execution systems, or third-party ERP systems. The backend uses a managed Azure Data Lake to retain the data, so you can rest easy knowing you’ll have long-term access.
Native integration with Dynamics 365 Supply Chain Management
Traceability is part of Dynamics 365 SCM, so product genealogy data captured in Dynamics 365 is shared natively with Traceability. This now includes linking specific batch and serial components to batch and serial produced items with release of the tracked components feature in April 2024. Coming next is support for additional modules like Procurement, Sales, Asset management, Quality management, and more.
Scenario Example
Contoso-EV, an electric vehicle manufacturer, recently received customer complaints about power attenuation in their latest model. After root cause analysis, the quality engineer identified that this issue was caused by a specific batch of batteries. The solution is to replace the battery pack.
Quality engineers use the “Where-used” report in Traceability to search for vehicle identification numbers (VIN) associated with defective batteries. From sales order activity tracking, Traceability helps the quality engineer find cars sold to customers or dealerships as a subset of all cars sold by Contoso. This saves engineer from having to review every single car sold to identify which are impacted by the battery issue. The engineer uses the “Item trace” report to identify the vendor who sold the defective batteries and opens a non-conformance, ensuring the issue does not happen again.
The quality engineer orchestrates a coordinated response involving the sales team to inform customers and dealerships of the issue, with Contoso-EV committing to complimentary repair services. With Traceability in Dynamics 365 SCM, Contoso rapidly identifies issues in their products and deploys the fix, improving customer satisfaction.
Conclusion
The Traceability add-in for Dynamics 365 Supply Chain Management heralds advanced insights, sophisticated data modeling, and robust track and trace storage capabilities. It seamlessly integrates with Dynamics 365 SCM and extends public API support for third-party integration. This innovation amplifies transparency and control, underpins regulatory compliance with centralized data management, and elevates customer satisfaction and trust in suppliers’ brand reputations.
This article is contributed. See the original author and article here.
This post was co-authored by Michael Mendoza, Director of Service Transformation, Hitachi Solutions.
The era of AI came upon us quickly, and many business leaders are scrambling to determine AI strategies that provide the best way forward for their employees and customers alike. The 2024 Microsoft Work Trend Index shows that 79% of leaders agree that their company needs to adopt AI to stay competitive; however, 60% of leaders worry that their organization lacks a plan and a vision for implementing AI.1
Many leaders in service organizations see AI as a boon for providing capabilities that can help them improve operations and serve customers better. After all, these days, high service quality is absolutely critical to driving greater revenue and customer satisfaction. But having a vision for AI and implementing that vision are two different things. Service leaders want to implement AI solutions in the most impactful way possible to ensure that service agents and field technicians alike feel confident using the solutions to help them be more productive throughout the day. And they also want to ensure that customers reap the benefits of these AI solutions as well through more positive and efficient interactions with agents and technicians and faster resolution times.
Upcoming Hitachi Solutions webinar
Learn how to make your AI vision a reality in field service.
Enabling quick, first-time resolution of customer issues in the field is critical to ensuring the efficiency of service operations and providing the best possible experience for customers, to help build loyalty and grow revenue. Arming field technicians with intuitive, AI-powered solutions that combine capabilities such as workflow automation, scheduling algorithms, and mobility can significantly enhance service outcomes. Research shows that high performing field service organizations have been early to embrace AI and automation to help improve job performance—and 93% of mobile workers in high performing organizations also report job satisfaction as a significant benefit.2
A key area for modernizing field service and improving operational efficiency is automation. Over 60% of frontline workers like service agents and field technicians struggle with having to do repetitive or menial tasks that take time away from more meaningful work. According to a recent McKinsey study, service organizations have the potential to use AI-powered workflows to help automate tasks that currently take up to 70% of field service employees’ time.3 This means that both agents and technicians can get back time that lets them focus on servicing more customers.
And all of this is good news for business: more than 55% of GDP gains by 2030 are expected to be driven by improved labor productivity powered by AI.4 Smart service organizations know that strategic implementation of AI-powered solutions helps agents and technicians find information and experts, personalize service, and automate mundane tasks. So the question is: Where to begin?
Preparing field service for AI
The benefits of AI—improved service, increased efficiencies, and deeper business intelligence—to name a few—are clearly compelling. But successfully implementing AI solutions and making them part of the organization’s work culture requires careful planning and certain key steps.
We’ve identified five critical steps to help field service organizations prepare for implementing AI solutions in a way that benefits employees and customers alike.
Step 1: Focus on a framework for capturing and proving business value
Proving business value is absolutely critical to the success of any AI strategy. Field service leaders must identify their overall goals for adopting AI solutions, ensuring they are relevant and aligning them with the organization’s overall priorities for the business. They must consider the specific goals, whether they include optimizing processes for faster service resolution, improving customer experience by enhancing key customer touchpoints, or increasing overall revenue by servicing more customers. Then, they can identify their key performance indicators (KPIs) aligned with these goals, such as resolution rates, customer satisfaction scores, or revenue goals.
Step 2: Evaluate the use cases for AI applicability
Once the high-level objectives are clear, field service leaders should take a closer look at daily operations to understand where AI solutions can most help them improve. For example: Do service agents waste a lot of time responding to and managing customer email, or searching for customers’ service history? What processes are they using to schedule field technicians? Do they need help automating scheduling and filling gaps for service? In the field, do technicians need better access to service manuals or technical experts that can help them resolve issues quickly?
Identifying these use cases can help field service leaders understand which areas could benefit from AI-powered solutions most quickly to gain quick wins, and which AI use cases might take more time and training to implement.
Step 3: Enable innovation and collaboration early on
The whole idea behind adopting AI-powered solutions for field service is to help break down information and communication siloes and improve processes to increase efficiency and keep customers happy. The right AI tools provide clear visibility into processes, surface experts and other critical contacts, and enable collaboration to resolve customer issues—all within the flow of work.
Step 4: Design for iteration, feedback, and agility
Empowering field service organizations with AI-powered, low-code solutions provides the opportunity for field service teams to develop and test new apps and processes quickly. This keeps the service organization agile and helps it do a better job of both meeting the demands of the business and improving customer experience. For example, the ability to tweak a new automated scheduling process based on real-time feedback from field technicians could show immediate benefit in helping technicians reach more customers and resolve more issues each day.
Step 5: Ensure training and enablement to drive adoption
While resistance to change can sometimes be a barrier, the latest Microsoft Work Trend Index shows that when it comes to AI, employees are ahead of employers when it comes to being ready. However, even the most exciting technologies can end up on the shelf—so to speak—once the novelty has worn off. That’s why field service leaders need a clear plan for driving adoption and training for AI solutions. Selecting an AI solution provider that provides training resources, along with developing internal champions within the field service organization, can help employees feel more confident about when and how to use AI solutions in their daily work.
Making the AI vision a reality
AI has the power to drive new levels of productivity and efficiency in field service, so it’s critical to take the right steps to ensure your organization has the most effective approach to adopting—and gaining the most value from—AI solutions. If you want to learn more about how to turn your AI vision into a reality, register for our upcoming webinar.


Recent Comments