by Contributed | Jun 16, 2021 | Technology
This article is contributed. See the original author and article here.
Microsoft Teams Meetings for Government – Spring Edition: video series available now!
Once again, the Microsoft CSM (Customer Success Manager) team representing State & Local Government customers has produced a new 4-week series on the topic of Meetings in Microsoft Teams.
Migrations with Data Consistency Score (DCS) – more than you ever wanted to know!
Data Consistency Score (DCS) is a (somewhat) new feature for Office 365 migrations that scores the fidelity of migrated data, allowing admins to identify inconsistencies and integrity issues between source and target data when performing a mailbox migration to or from Office 365 (onboarding and offboarding). DCS is meant to replace the existing Bad Item Limit and Large Item Limit (BIL / LIL) model and related shortcomings.
Empowering governments to support skills and talent development
Through our skills initiatives and programs, Microsoft is committed to supporting governments across the globe who rely on technology to digitally transform their operations, deliver services to their employees, and empower the citizens they support.
The transformation imperative: Government
Given the far-reaching demands on their time and resources, it is no surprise that in a global survey of 800 executives across eight industries conducted by The Economist Intelligence Unit and sponsored by Microsoft, respondents from government/public-sector organisations (referred to as “government” in this report) say that improving operational efficiency has driven digital transformation strategy over the last 12 months at a higher rate than respondents from other sectors (48% versus a survey average of 40%).
Equipping everyone with the right devices and accessories for hybrid work
The future of work is hybrid. To empower people to thrive in this new world of work, business leaders will need to provide everyone with a plan for enabling that work, as well as spaces and technology that help them feel included and engaged—whether they’re working from home, at the office, or on the go. But after more than 12 months of remote work, many people find their home set-ups are falling short—in our recent global survey of over 30,000 people, over 40 percent reported a lack of office essentials at home.
Release News
Microsoft Whiteboard availability to GCC Q2CY21, GCC-High Q3CY21, DoD Q3CY22
Skype for Business Online will be retired on July 31, 2021. Customers should start planning their move to Teams today
Organizations using Skype for Business Online will soon be upgraded to Microsoft Teams automatically
Up to 1,000 participants can now join a Teams meeting and participate fully using voice, video, and chat. This is an increase on the previous limit of up to 300 attendees – GCC
Reply-All Storm Protection updates
We have recently rolled out the capability to export Microsoft Lists to CSV files to all environments
Block device feature is being retired from the Devices section of the Teams admin center
New Exchange Admin Center – General Availability
New manage tag experience and other enhancements with tags in Teams
External Sharing Integration with Azure AD B2B – GCC
Updates to the Network planner tool for Microsoft Teams provide better estimates to the bandwidth needs for organizations – GCC
Enghouse Network and Patton Electronics are now certified SBC vendors for Microsoft Teams Direct Routing. Avaya has been certified for media bypass scenarios
Administrators can now customize certain apps in Microsoft Teams allowing them to alter and re-brand the app to align to the organization’s brand
Teams Device Administrator role provides access only to Device Management module in Teams admin center – coming to GCC-High
Site Swap for larger customers ~10K licenses or more
Call merge in Microsoft Teams lets users combine (merge) VoIP and PSTN calls into a single call allowing multiple calling parties to communicate – GCC
References and Information Resources
|
Microsoft 365 Public Roadmap
This link is filtered to show GCC, GCC High and DOD specific items. For more general information uncheck these boxes under “Cloud Instance”.
New to filtering the roadmap for GCC specific changes? Try this:
Stay on top of Office 365 changes
Here are a few ways that you can stay on top of the Office 365 updates in your organization.
Microsoft Tech Community for Public Sector
Your community for discussion surrounding the public sector, local and state governments.
Microsoft 365 for US Government Service Descriptions
- Office ProPlus (GCC, GCCH, DoD)
- PowerApps (GCC, GCCH, DoD)
- Power Automate US Government (GCC, GCCH, DoD)
- Power BI (GCC, GCCH)
- Planner (GCC, GCCH, DoD)
- Outlook Mobile (GCC, GCCH, DoD)
- My Analytics (GCCH, DoD)
- Dynamics 365 US Government
June Webinars & Remote Work Resources
June Edition Sections:
- Highlighted
- Microsoft Teams – IT Admins & Planning
- Microsoft Teams – End Users & Champions
- Security & Compliance
- Device Management
- Blogs & Articles of Interest
Microsoft Teams for Gov YouTube Video Series
The hub for teamwork in Office 365 GCC, GCC High, & DoD
Microsoft Teams for US Government Adoption Guide

Message Center Posts and Updates for Microsoft Teams in GCC
|
Looking for what’s on the map for Microsoft Teams and only Teams in GCC?
Go right to the GCC Teams Feature Communications Guide
Message Center Highlights
|
MC258803 – Communication Compliance supports optical character recognition and 7 languages for pre-trained classifiers
Microsoft 365 Roadmap ID 82006 and 83702
The Communication Compliance solution in the Microsoft 365 compliance center will soon be able to leverage optical character recognition to extract and evaluate images in messages. In addition, it will support additional languages for Threat, Profanity, and Harassment classifiers.
When this will happen?
Rollout will begin in late June and is expected to be complete by late July.
How this will affect your organization?
With this update, we are introducing the ability to extract printed or handwritten text from images using Azure Computer Vision Optical Character Recognition (OCR). Text extracted can then be evaluated against conditions defined in your Communication Compliance policies.
Additionally, Communication Compliance will now be able to detect content that maps to Threat, Profanity, and Harassment classifiers in the following languages :
Chinese
|
English
|
French
|
German
|
Italian
|
Japanese
|
Portuguese
|
Spanish
|
What you need to do to prepare?
To make use of these preview features, admins will need to explicitly configure a Communication Compliance policy and select optical character recognition or additional languages to detect as part of the policy conditions.
By default, global administrators do not have access to Communication Compliance features. To enable permissions for Communication Compliance features, see Make Communication Compliance available in your organization.
You might want to notify appropriate users about this new capability and update your training and documentation as needed.
Learn more about Communication Compliance in Microsoft 365.
MC258802 – SharePoint: Page Details Updates
Microsoft 365 Roadmap ID 81994
These updates will allow users to delete their page, edit the page URL, and copy a link to their page from within the page details panel.
When this will happen?
We expect this rollout to begin in early June and to be completed by early July.
How this will affect your organization?
Users with permission to author SharePoint pages will now see three new fields in the page details panel.

What you need to do to prepare?
You might want to notify your users about this new capability and update your training and documentation as appropriate.
MC258800 – Lower All Raised Hands
Microsoft 365 Roadmap ID 82643 and 83487
Meeting organizers and presenters can lower all raised hands during a Teams Meeting.
Note: Only meeting organizers and presenters can manage raised hands.
When this will happen?
· Standard release will start rolling out in early June and complete by mid-June.
· GCC will start rolling out in mid-June and complete in mid July.
· GCC-High and DOD will start rolling out in mid-July and complete by mid-August.
How this will affect your organization?
When at least one hand is raised, all users in your organization can use this feature. Organizers and presenters can navigate to the participant roster during a meeting, click on the  option at the top right of the roster, and choose to lower all hands.
MC258796 – Introducing 2×2 gallery view for Teams meetings viewed in Edge and Chrome browsers – GCC
Microsoft 365 Roadmap ID 70589
Edge and Chrome browsers will soon be able to display up to four participant videos (2×2) during a Teams meeting.
When this will happen?
We will begin rolling this out in late May and expect to complete by mid-June.
How this will affect your organization?
Gallery view now can show up to four participant videos during a meeting in Edge or Chrome browser.
What you need to do to prepare?
You may consider updating your training and documentation as appropriate.
MC258632 – Two new Direct Routing endpoints in Japan
Direct routing service is adding capacity across regions and that capacity falls into already published Teams IP ranges and domains. Please make sure that all published Teams specific endpoints are permitted for your Direct Routing scenarios.
When this will happen?
Beginning in late June and expect to complete by early July.
How this will affect your organization?
As part of Teams Direct Routing expansion and service improvement we have deployed new instances of Direct Routing infrastructure in Japan. If you have Teams Direct Routing enabled, before this change takes effect, you need to make sure that:
1. Your Session Border Controllers are configured correctly
2. That all IPs from Plan Direct Routing – Microsoft 365, Office 365, and Office 365 GCC environments are added to your IP Access Control Lists (ACLs)
3. You have opened ports for all these IP addresses in your firewall to allow incoming and outgoing traffic to and from the addresses for signaling. For more information please see Plan Direct Routing
Users may no longer be able to make calls via Direct Routing, when this change is implemented if proper configuration is not applied and not all steps are followed.
MC258631 – Microsoft Teams: Profile menu update, relocating profile menu links to a new menu in the title bar – GCC-High and DoD
Access to Settings, Zoom Controls, Keyboard Shortcuts, About, and Check for Updates is moving from the Me Menu to a new menu in the title bar. The Me Menu will be focused on account management, where users can switch to another account or tenant through the first level of the Me Menu. The following links will be moved out of the Me Menu into a new menu in the title bar:
· Zoom Controls
· Keyboard Shortcuts
· About
· Check for updates
When this will happen?
· We will roll this out in early July.
How this will affect your organization?
The Me Menu will be focused on account management, with account and tenant switching moved to level one of the menu.

Settings, Zoom Controls, Keyboard Shortcuts, About, and Check for Updates is moving from the Me Menu to a new menu in the title bar.

MC258629 – Addition of Mac Desktop App for GCC High
Teams support for GCCH is being extended to include the provision of a Mac desktop version of Teams application for GCC High environments.
When this will happen?
The Mac desktop version of Teams for GCC High environments is available now.
How this will affect your organization?
Your Mac users will now have an official GCC High Mac version of Teams to use on their Mac devices.
What you need to do to prepare?
You can point your Mac users to https://gov.teams.microsoft.us/downloads to get the Mac desktop version of Teams.
Additional information
MC258624 – Microsoft Information Protection: Announcing updated data classification confidence levels
We’re renaming the confidence levels (also called match accuracy) of data classification from a numerical scale to three distinct levels: high, medium, and low.
When this will happen?
Rollout began in early May, and should be complete by early June.
How this will affect your organization?
Sensitive information types were previously labeled with numerical values to reflect confidence: 85, 75, and 65. With this change, we are renaming the classification to high, medium, and low, respectively. Each level reflects the degree of supporting evidence detected along with primary element. Your existing polices will be automatically migrated to these renamed confidence levels.
· A high confidence level has the most supporting elements and results in the fewest false positives but the most false negatives.
· A low confidence level has most false positives but the fewest false negatives.
Your existing policies in the following solutions will soon reflect these updated classifications, and you will notice an improvement in the accuracy of your policy match results:
· Auto-labeling policies
· Communication compliance
· Data loss prevention policies
· Retention labels
· Sensitivity labels
What you need to do to prepare?
No action is needed to prepare for this change. You might want to notify your users about this new capability and update your training and documentation as appropriate.
Learn more about data classification in the Microsoft 365 compliance center.
MC258623 – Roaming bandwidth control – GCC
Microsoft 365 Roadmap ID 81350
Roaming bandwidth control is a new capability that allows admins to set dynamic bandwidth policies which are based upon the geographic location of users’ Teams clients. This allows admins to set more limited bandwidth controls for when users travel to remote or bandwidth constrained locations, and then relax limitations when they travel to a location with higher bandwidth capacity. Initially two settings from the Teams Meeting Policy will be included – AllowIPVideo, andMediaBitRateKb
When this will happen?
We expect to begin this rollout in early June and to be complete by late June.
How this will affect your organization?
The policy is not enabled by default and an admin will need to configure the policy via PowerShell to implement it.
What you need to do to prepare?
To use bandwidth control for a network site, use the PowerShell cmdlet to configure the policy:
· New-CsTeamsNetworkRoamingPolicy
MC258428 – Office for the Web – retiring File Share Embed
We will be retiring the File Share Embed dialog from Office for the Web (Word, PowerPoint, Excel, and Visio) beginning July 1st 2021. Instead we recommend the utilization of SharePoint File Viewer Web Part or existing Graph APIs (e.g. PreviewItem,) which is where we will continue to invest our development resources.
Key points:
· Timing: early July to mid-July
· Action: review and assess impact for your organization.
How this will affect your organization?
Once this change is made users will no longer be able to generate new embed codes using File Share Embed dialog inside Word, PowerPoint, Excel, and Visio for the Web, when this change is implemented.

What you need to do to prepare?
Instead of using File Share Embed dialog from inside the Office for the Web application, we recommend using the SharePoint Web Part called “File Viewer” or the PreviewItem Graph API to embed Office files inside other web pages. You may consider updating your training and documentation as appropriate.
MC258423 – Microsoft Information Protection: Exact Data Match to support auto labeling
Microsoft 365 Roadmap ID 81968
This update will enable organizations to configure new or existing auto-labeling policies using Exact Data Match (EDM) sensitive information types, enabling more granular control over labeling sensitive content.
When this will happen?
Rollout will begin in mid-June and is expected to be complete by mid-July 2021
How this will affect your organization?
Tenant admins will be able to use EDM sensitive information types in their auto-labeling policies for SharePoint Online, One Drive for Business, and Exchange Online. In addition, tenant admins can create new or update existing auto-labeling policies to use EDM sensitive information types, either from the Microsoft 365 compliance center or by using a cmdlet.
· Microsoft 365 compliance center for GCC
· Microsoft 365 compliance center for GCC-H
· Microsoft 365 compliance center for DoD
Note: You must be a global admin, compliance administrator, or Exchange Online administrator to perform these tasks.
What you need to do to prepare?
Learn more: Create custom sensitive information types with Exact Data Match based classification.
MC258228 – Reminder: Azure Active Directory – Enable support for TLS 1.2 protocol to avoid service impact
Note: If you have already transitioned to TLS 1.2, you can safely disregard this message.
As previously announced we will soon begin to retire support for following protocols and ciphers, in Azure Active Directory:
· TLS 1.1, TLS 1.0 , 3DES cipher suite (TLS_RSA_WITH_3DES_EDE_CBC_SHA)
These protocols and ciphers are being retired to improve security when users/services interact with our cloud services.
Multiple announcements have been made via public articles “What’s new in Azure Active Directory?” (Oct 2020, Nov 2020), emails to Azure subscription owners and Message center posts. This is a final reminder.
Key points:
· TLS 1.0, 1.1 and 3DES cipher suite in U.S. government instances starting on March 31, 2021 – on going in phases.
· TLS 1.0, 1.1 and 3DES cipher suite in public instances starting June 30, 2021.
How this will affect your organization?
Applications that are communicating with or authenticating against Azure Active Directory, may not work as expected if they are NOT able to use TLS 1.2 to communicate.
What you need to do to prepare?
Use TLS 1.2 and modern cipher suites on client/server applications/OS, communicating with Azure Active Directory, for Azure workloads or Microsoft 365 services.
For more information/guidance related to this retirement, please refer to:
· Enable support for TLS 1.2 in your environment, in preparation for upcoming Azure AD TLS 1.0/1.1 deprecation – Active Directory | Microsoft Docs
If you have any questions or concerns, please contact us.
MC258227 – SharePoint admin center: New columns on Active sites page
Microsoft 365 Roadmap ID 68813
In the SharePoint admin center, the Active sites page will provide new information:
· The “Created from” column will show the apps that were used to create sites.
· The “Teams” column will show which sites are connected to Microsoft Teams.
In addition, you will have a new built-in view, “Sites connected to Teams,” which lists all the sites in your organization that are connected to Microsoft Teams.
The “Created from” and “Teams” information will also be available in the details panel when you select an individual site.
When this will happen?
We will start rolling out this feature in early June and expect to complete the roll out by the end of June.
How this will affect your organization?
These changes affect the Active sites page of the SharePoint admin center, which is available to global admins, SharePoint admin, and Global Readers in your organization.
Note: “Created from” information is available for all sites created after October 2020.

New “Created from” and “Teams” column

New “Sites connected to Teams” view
What you need to do to prepare?
When the new columns are available to your organization, we recommend that you add them to your custom views.
· Go to the SharePoint admin center.
· Open the ‘Active sites’ page by selecting Sites -> Active sites in the left pane.
· Select your custom view from the list of views in the upper-right.
· Select any column header and then select Customize columns OR Scroll to the right and select Customize columns.
· In the list of available columns, scroll down and select the Created from column, and Teams column.
· In the list of views, select Save view as to save the changes to your view.
You may also want to notify your SharePoint admins about the new columns and update your training and documentation as appropriate.
MC258225 – SharePoint admin center: Replace root site is now available to all customers
This message is associated with Microsoft 365 Roadmap ID 72224
Replacing (swapping) the root site is now available to all customers from the SharePoint admin center.
· Previously, customers with more than 10k users had to use PowerShell to replace their root site.
When this will happen?
Targeted release (entire org): We will begin and complete rolling this out in early June.
Standard release: We will begin rolling this out in early June and expect to complete rollout late July.
How this will affect your organization?
Global and SharePoint admins can perform this action from the SharePoint admin center.
Instructions: Start by selecting the current root site in the Active Sites Page of the SharePoint admin center, and then selecting Replace in the command bar.
Note: To quickly find your root site, sort the URL column from A to Z.
· When you replace your root site, you’ll be guided through running page diagnostics to verify the health of the site.
· It is recommended replacing the root site at a time when site usage is low.
What you need to do to prepare?
No actions are required to prepare for this change. When you replace your root site, you’ll be guided through running page diagnostics to verify the health of the site. You might want to update your training and documentation as appropriate.
Learn how to replace the root site Using the new SharePoint admin center.
MC258024 – Move-CsUser will no longer require -MoveToTeams switch to move users directly from on-premises to TeamsOnly
We’re making some changes to how administrators migrate users with accounts in on-premises Skype for Business Server to the cloud. In preparation for the upcoming retirement of Skype for Business Online, when moving users from on-premises to the cloud, users will be automatically be moved to TeamsOnly mode.
Starting June 07, 2021, when administrators of on-premises Skype for Business Server deployments run Move-CsUser to migrate to the cloud, it will no longer be required to specify the -MoveToTeams switch in order to move users directly to TeamsOnly mode. Users will automatically be assigned TeamsOnly mode and their meetings from on-premises will be automatically converted to Teams meetings, just as if the -MoveToTeams switch had been specified, regardless of whether the switch is actually specified. This includes migrations from Lync Server 2013, which never had the MoveToTeams switch.
Organizations that require the ability to move users from on-premises Skype for Business Server to Skype for Business Online without setting the user’s mode to TeamsOnly can still temporarily achieve this (prior to retirement of Skype for Business Online) by updating the user’s mode after the move to the cloud is complete. Note: Eventually it will no longer be possible to specify a mode other than TeamsOnly for an online user since Skype for Business Online is being retired. A future communication will provide details of that change.
When will this happen?
We will begin implementing this change on June 07, 2021
How this will affect your organization?
You are receiving this message because our reporting indicates your organization has one or more users with a Skype for Business Server account homed in on-premises in a hybrid M365 tenant that is using either Teams and or Skype for Business Online.
After this change is implemented, whenever you run Move-CsUser from on-premises Skype for Business Server or Lync Server PowerShell, the specified user will automatically be migrated to the cloud as before, but their mode will automatically set to TeamsOnly and their meetings converted to Teams meetings (even if -MoveToTeams switch is not specified). Similarly, if you use the Skype for Business Server Admin Control panel, the user will be moved to TeamsOnly, even if you chose the UI option to move to Skype for Business Online.
What you need to do to prepare?
There is no required action on your part to prepare for this change, and no on-premises software update is required to benefit from this change. Even older versions of Move-CsUser that do not support the MoveToTeams switch (such as in Lync Server 2013 or Skype for Business Server 2015 CU7 and earlier) will behave as if the switch was specified. Finally, if you do specify the MoveToTeams switch, the behavior remains unchanged.
Please click Additional Information to learn more.
Additional Information
MC258021 – Pinning on Outlook for iOS and Android
Microsoft 365 Roadmap ID 83043
This new Outlook for iOS and Android release will soon roll out the ability to pin messages on both platforms. After tapping the Pinned filter in the message list, all conversations will be easy to get to and keep track of.
When this will happen?
We will begin rolling this out to the Apple Store and Google Play Store in late May and be complete by mid-June.
How this will affect your organization?
Outlook for iOS and Android will begin supporting the ability to pin conversations and view pinned conversations in the upcoming weeks. Users can pin or unpin conversations either through swipe actions in the message list or through mail actions by tapping the  in the top right corner of the reading pane.


Once an item has been pinned, it can be identified in the message list by its background color and the pinned icon. Users can easily access all their pinned items using the filter button at the top right corner of the message list.

These messages will show up at the top of the message list for other Outlook clients that support pin, such as Outlook on the web.
MC257688 – Office 365 Service Communications API availability in Microsoft Graph – GCC
Microsoft 365 Roadmap ID 68720
The Office 365 Service Communications API will soon be available via Microsoft Graph in Beta for Public Preview. This API provides access to Message Center and Service Health posts for your tenant.
When this will happen?
Public Preview availability is expected in late May and we will update this post with documentation once available.
How this will affect your organization?
If you are currently using the Service Communications API as part of the Office 365 Management APIs you can migrate to using the new Graph versions once available for your tenant.
To learn more about Graph see: Overview of Microsoft Graph
MC257668 – Prevent/Fix: Users on Windows version 19H2 may be unable to connect to desktop clients for some Microsoft 365 services
Problem detected: Some users on Windows version 19H2 may be unable to connect to desktop clients for some Microsoft 365 services, including Microsoft Teams, Outlook, and OneDrive for Business.
As described in Service Health Dashboard post MO257074, we’ve detected a problem related to some Windows clients running version 19H2, and specifically the update delivered via KB 5003169. We are sending you this communication because we’ve determined that your organization has some users running Windows version 19H2 and if they have taken the update they may have issues connecting to one or more Microsoft 365 services. The following communication provides instructions on how to correct the problem for any affected users.
How this will affect your organization?
Users affected by this problem are potentially unable to connect to Microsoft 365 services including Microsoft Teams, Outlook and OneDrive for Business.
When encountering this problem, users may see the following errors: “We’re sorry – we’ve run into an issue,” or “80080300” when attempting to connect or sign in.
What action do I need to take?
· To fix this problem for users that are reporting this issue on devices that have already installed Windows Update KB 5003169, we’ve confirmed that an additional device reboot will resolve the problem.
· For users on Virtual Desktop Interface (VDI) clients, we have confirmed that a reboot of the underlying VDI host may also be required.
· For users on devices which have yet to install Windows Update KB 5003169, those devices will require an additional reboot after the final automated Windows Update restart, and any hosts of VDI instances should also be rebooted as part of this process. We recommend incorporating these steps into your update process as you adopt Windows Update KB 5003169.
Click Additional Information to find out more.
Additional Information
MC257471 – Microsoft Teams: Private channels coming to GCC-H and DoD
Microsoft 365 Roadmap ID 67199
As initially announced in June of last year, we will soon be rolling out private channels in Teams for our GCC High and DoD customers. We apologize for the delay.
Key points:
· Timing: We will begin rolling this out in mid-June and expect to complete by the end of July.
· Roll-out: tenant level
· Control type: admin control
· Action: review and assess by mid-June 2021.
How this will affect your organization?
Private channels allow focused private collaboration within a team. The conversations, files, and roster of the private channel are accessible only to its members.
Private channels will be enabled by default for tenants.
What you need to do to prepare?
If you want your end users to have the ability to create private channels, there is no action needed. If not wanted, you will have 30 days to configure private channel policy prior to feature rollout.
You might want to notify your users about this new capability and update your training and documentation as appropriate.
Learn more:
· Enable private channels at your own pace via the Teams Admin Center or via PowerShell (New-CsTeamsChannelsPolicy)
· Overview of private channels in Teams
· Teams can have standard or private channels
· Manage teams policies in Microsoft Teams
MC257469 – Microsoft Forms Auditing events in Gov environments
Microsoft 365 Roadmap ID 80674
This update will bring Auditing support for Microsoft Forms events to your cloud environments. Admins will be able to find out if a user/admin performed specific actions such as viewed a specific Form, deleted a Form from their system, or changed important Forms settings.
Note: Data is not backfilled. Auditing events will only begin to populate after the feature is enabled in the environment.
· Prior events will not be present in the Audit log.
When this will happen?
This will begin rollout in mid-June and be completely rolled out by end of June
How this will affect your organization?
Admins can now use auditing as needed in these environments.
What you need to do to prepare?
You may want to update internal support processes and documentation.
Learn more:
Search the audit log in the compliance center.
Additional Information
MC257468 – Power Apps can now display images from Microsoft Lists
Microsoft 365 Roadmap ID 81986
Power Apps image controls can now display images that are stored in image columns in Microsoft Lists. Images can be displayed in four sizes: small, medium, large, or full.
When this will happen?
· Targeted release will begin rolling out in early June 2021 and will be complete by mid-June 2021.
· Standard release to all other cloud environments will begin in mid-June 2021 and be complete by end of June 2021.
How this will affect your organization?
New apps that use the SharePoint connector to add a list as a data source may display images from the list if they are present in the list. Existing apps can also be updated to show images.
What you need to do to prepare?
You might want to notify your users about this new functionality and update your training and documentation as appropriate.
Learn more:
· Image control in Power Apps
· SharePoint connector documentation
MC257466 – Microsoft Forms File Upload for Government
Microsoft 365 Roadmap ID 81837
We are introducing File Upload for Microsoft Forms in government clouds.
When this will happen?
We will begin rolling this out in mid-June and expect to complete rollout late June.
How this will affect your organization?
This new feature allows form designers to choose a new question type, File Upload, which enables respondents to attach files as part of their response.
· Files can be accessed in either SharePoint or OneDrive for Business, depending on the form type. Group forms are stored in SharePoint, while personal forms are stored in OneDrive for Business.
· Form creators can limit the number and size of files as well as specify file types.
What you need to do to prepare?
You might want to notify your users about this new capability and update your training and documentation as appropriate.
Learn more:
Add questions that allow for file uploads.
MC257465 – Teams device management in GCC-High
Microsoft 365 Roadmap ID 81503
Device management support in the Teams admin center will soon be available in the GCCH cloud environment. If you use Teams in your tenant, this information is for you.
When this will happen?
Device management support will roll out to all GCC-High customers in mid-June.
How this will affect your organization?
Using device management, you can control the entire lifecycle of your Teams devices, such as IP phones, collaboration bars, Teams displays, and Teams Meeting Room devices.
Some of the key capabilities are as follows:
· Enroll devices
· View key device information for each device type
· Use tags to effectively organize devices
· Update management
· Monitor health and performance
· Get activity insights
· Role based access control to better align with your organization structure

Device Inventory: List of Devices and Associated Details

Details for a selected device

Teams Admin Center Dashboard
What you need to do to prepare?
The ‘Devices’ option will be added to the left bar menu in the Teams admin center portal. Opening this option provides multiple options to onboard, manage, and monitor Teams devices.
To manage devices, such as change device configuration, restart devices, manage updates, or view device and peripheral health, you need to be assigned one of the following Microsoft 365 admin roles:
· Microsoft 365 Global admin
· Teams Service admin
· Teams Device admin
Once the Teams devices are setup and enrolled, you will be able to manage it through Teams admin center.
Learn more about Teams device management
MC257241 – Expanding user impersonation to 350 protected users instead of 60 within anti-phishing policy
Microsoft 365 Roadmap ID 81981
The number of protected users limit is being expanded to 350 instead of 60 within Anti-Phishing policy
When this will happen?
We expect the rollout to begin at the end of May 2021 and expect the rollout to be fully complete by the end of first week of June 2021.
How this will affect your organization?
Once available, within Anti-Phishing policy, in the Users to protect section, you will be able to specify up to 350 users (per policy). This means you will be able to specify more users to be protected. As it does today, the user impersonation protection will continue to prevent the specified internal or external email addresses from being impersonated as message senders. More information can be found here.
What you need to do to prepare?
You may consider updating your training and documentation as appropriate.
Additional Information
MC257237 – Forms: Shorten URL when sending Forms to collect responses
Microsoft 365 Roadmap ID 81984
When this will happen?
We expect this rollout to begin in early June and be completed by mid-July.
How this will affect your organization?
This feature enables forms designers to send a shortened version of the forms link to collect responses from participants. The domain of the short URL link will not change, it will remain forms.office.com.
What you need to do to prepare?
You might want to notify your users about this new capability and update your training and documentation as appropriate.
MC257236 – Saved feature is being retired from Microsoft Teams on web, desktop, and mobile
We will be removing access to the Saved feature within Microsoft Teams clients (web, desktop, and mobile) for the GCC, GCC-High, and DoD clouds.
Key points:
· Timing: August 16, 2021
· Action: review and assess impact on your organization
How this affects your organization?
After the Saved feature is removed, users will no longer be able to save messages or posts, or view previously saved messages and posts.
· Web and Desktop: Any user who visits Saved (from the Me menu) will see a message informing them that the Saved app will be removed at least 30 days before the removal happens. After this notification period, all entrypoints to saved messages and posts will be removed, along with any entrypoints to the Saved feature.
· Mobile: Any user who visits Saved will see a message informing them that their saved messages and posts will no longer be available. This message will be shown to Saved visitors at least 30 days before they will no longer be able to access their saved messages and posts. After the notice period, all entrypoints to save messages and posts will be removed. Users will still see the Saved entrypoint, which will show a notice that their saved posts and messages are no longer available.
What you can do to prepare?
We recommend that users save messages and posts using Tasks, a Teams app. Messages saved as tasks can be accessed through the Tasks app through the app bar.
You may consider updating your training and documentation as appropriate.
You can learn more about the Tasks app here: Use the Tasks app in Teams.
MC257152 – Internet Explorer 11 (IE11) desktop application retires on Windows 10 on June 15, 2022 (non-LTSC, non-Server)
We announced that the future of Internet Explorer on Windows 10 is in Microsoft Edge. Internet Explorer mode (IE mode) provides legacy browser support within Microsoft Edge. Because of this, the IE11 desktop application will be retired on June 15, 2022. This means that the IE11 desktop application will no longer be supported and afterwards will redirect to Microsoft Edge if a user tries to access it.
Internet Explorer 11 desktop application
· Timing: The IE11 desktop application retires on June 15, 2022
o Windows 10 LTSC and Server not affected. For a full list of what is in scope for retirement, see the FAQ.
· Action:
o To continue using a supported browser, transition to the new Microsoft Edge.
o To continue using legacy IE-based sites and apps, you will need to configure those sites and apps to open in Microsoft Edge using Internet Explorer mode.
How this will affect your organization?
If your organization has legacy sites and apps with IE dependencies, you will need to set up IE mode so that users can access them through Microsoft Edge. Microsoft Edge, with Internet Explorer mode, is the only browser with built-in compatibility for legacy IE-based sites and apps. It also gives your organization world-class compatibility with a dual-engine advantage:
· Microsoft Edge renders IE-based sites and apps using IE mode.
· Microsoft Edge renders modern sites and apps using Chromium.
IE mode support follows the lifecycle of Windows Client, Server, and IoT releases at least through 2029. Additionally, Microsoft will give one year notice to deprecate the IE mode experience in-market when the time comes.
Reminder: This new announcement builds on our previous one. As communicated in MC220490 (August ’20), Microsoft 365 apps and services will no longer support IE11 after August 17, 2021; after this date, Microsoft 365 apps and services will be unable to connect, or have a degraded feature experience, when accessed on IE11. Other Microsoft products and services are also ending support for IE11. For a full list, please see our Microsoft apps and services to end support page.
What you need to do to prepare?
To prepare, we recommend setting up Microsoft Edge in your organization. If your organization needs legacy browser support, you will want to set up IE mode in Microsoft Edge.
· View the Microsoft browser usage report in the Microsoft 365 Admin center to help size IE usage in your organization. Appropriate permissions required.
· Use the Getting Started guide to learn how to set up Microsoft Edge in your organization, configure Internet Explorer mode (if needed), and move your end users.
o FastTrack can help with deployment and configuration at no additional charge for customers with 150 or more seats of Windows 10.
o For help with web app and site compatibility, especially if you have legacy site concerns after configuring IE mode, learn more about the App Assure program.
Additional Information
· Read our announcement blog for more information.
· Visit the Internet Explorer mode website.
· Read our FAQ to help answer your questions.
· Visit the Microsoft Edge and IE lifecycle page for more details.
We always value feedback and questions from our customers. Please feel free to submit either feedback or questions via Message Center.
MC257029 – Prepare your SharePoint and OneDrive environment for end of support for Internet Explorer 11
As shared in MC220490 last year, Microsoft 365 apps and services will not support Internet Explorer 11 (IE 11) after August 17, 2021.
How this will affect your organization?
Once this change takes effect, Microsoft 365 apps and services, including SharePoint Online and OneDrive, will not be supported on IE 11. This means that after the above dates, customers will have a degraded experience or will be unable to connect to Microsoft 365 apps and services on IE 11. For degraded experiences, new Microsoft 365 features will not be available or certain features may cease to work when accessing the app or service via IE 11. While we know this change will be difficult for some customers, we believe that they will get the most out of Microsoft 365 apps when using the Microsoft Edge browser. Microsoft 365 users will be well served with this change through faster and more responsive web access to greater sets of features in everyday toolsets.
What you need to do to prepare?
As this date comes closer, we are committed to helping make this transition as smooth as possible for our customers and have identified considerations and practices for admins to help transition off classic SharePoint features that rely on Internet Explorer 11. If you use IE11 browsers to access SharePoint or OneDrive content, we strongly recommend you to review the guidelines posted in this article and take the necessary action before August 17, 2021 so there is no service disruption for users: Prepare your SharePoint and OneDrive for Business environment for the retirement of Internet Explorer 11.
Admins can monitor the IE11 browser usage for their tenants in Admin Center. Check this article to review your browser usage: Microsoft 365 Reports in the admin center – Microsoft browser usage – Microsoft 365 admin | Microsoft Docs
If your organization already finished upgrading to Microsoft Edge, no further action would be needed.
Additional Information
MC256939 – Prevent issues with Journaling and Exchange Online mailbox limits
As announced in MC239262 and on this blog post, Exchange Online is starting to enforce our published mailbox receiving rate limit, incrementally lowering the threshold until reaching the documented limit of 3600 messages per rolling hour.
We’ve detected that some tenants have configured their alternate journaling mailbox to point to an address hosted in Exchange Online, which as described in the configuration documentation is an unsupported configuration and due to the new enforcement of limits may cause throttling on alternate Journal mailbox and loss of the Journal Report NDR emails.
Note: If your organization is not using Exchange Online’s journaling functionality you can safely disregard this message.
As a reminder, Microsoft’s best practice to meet your email compliance and regulatory needs is to leverage our Microsoft 365 Compliance suite of solutions rather than journaling messages to another location.
How this will affect your organization?
If your organization is using Exchange Online’s journaling functionality and has configured your alternate journaling mailbox to an address hosted in Exchange Online, due to the updated enforcement of limits, you may lose Journal Report NDR emails sent to your cloud-hosted alternate Journal mailbox if it exceeds the established rate limit.
What you need to do to prepare?
To confirm whether you have this unsupported configuration:
· Go to the “non-delivery reports” email configuration under the Journal Rules section of your classic Exchange Admin Center
· Validate if the selected address is an Exchange Online mailbox
o If you do not have any address selected here or the address selected is not an Exchange Online mailbox, you are not required to take any action.
o If you do have this unsupported configuration, you must update the email address to a mailbox outside of Exchange Online before May 31st to avoid losing NDR emails sent to this mailbox in the event that your primary journaling mailbox becomes unavailable.
If you need more time to update this configuration for your alternate journaling address, please contact Microsoft Support, in certain cases we may be able to grant up to a 30-day grace period for changes to be made.
MC256838 – (Updated) Azure B2B Integration with SharePoint Online is now Generally Available – GCC
Microsoft 365 Roadmap ID 81955
Updated May 20, 2021: We have updated the rollout timeline below. Thank you for your patience.
Azure B2B Integration with SharePoint Online and OneDrive is now generally available.
When this will happen?
We will begin rolling this out in late July (previously late May) and expect to complete rollout in late August (previously mid-June).
How this will affect your organization?
To enable this integration while it was in Preview, customers were required to enable the feature in SharePoint Online Management Shell and to enable One Time Passcode in Azure Active Directory (AAD). Going forward, only the PowerShell flag is required to enable this integration. While disabled, external sharing in OneDrive and SharePoint Online will use the SharePoint Online One Time Passcode experience.
· When the integration flag is enabled: External users will be invited via the Azure B2B platform when sharing from SPO. If Azure B2B One Time Passcode option is enabled, recipients that do not have password backed accounts will get a sign in experience through AAD that uses One Time Passcodes. Otherwise, external users will authenticate via their own AAD account or via an MSA account.
· When the integration flag is not enabled: External users will continue to use their existing accounts previously invited to the tenant. Any sharing to new external users may result in either AAD backed accounts or SPO only email authorized guests that use an SPO One Time Passcode experience for sign in.
Note: This integration is still disabled by default and can be enabled by tenant administrators using the SharePoint Online Management Shell.
What you need to do to prepare?
You might want to notify your users about this new capability and update your training and documentation as appropriate.
Learn how to enable Microsoft SharePoint and Microsoft OneDrive integration with Azure AD B2B
MC256837 – Sharing Links for Microsoft Lists is now available
Microsoft 365 Roadmap ID 81965
This release will allow users to now share Microsoft Lists using the same sharing links that they have been using for files and folders.
When this will happen?
We will begin rolling this out in mid-May and expect to complete rollout late June.
How this will affect your organization?
Users can now share entire lists using sharing links. The experience is identical to the sharing links experiences that are supported for files and folders. The same admin controls that apply to sharing files and folders will also apply to lists and list items.
What you need to do to prepare?
You might want to notify your users about this new capability and update your training and documentation as appropriate.
Additional Information
MC256836 – Whiteboard for GCC
Whiteboard for web and Teams meetings will become available for your tenant.
Note: The new Whiteboard experience requires OneDrive for Business. If your organization does not have OneDrive for Business, please verify that Whiteboard is disabled.
When this will happen?
Starting in mid-June and completing by mid-July.
How this will affect your organization?
Your end users can create and collaborate on whiteboards in the web application and in Teams meetings.
Whiteboard will begin a gradual roll-out in GCC. The data is stored in OneDrive for Business and Whiteboard is on by default but can be disabled using the SharePoint admin PowerShell cmdlets. The supported features allow you to create and collaborate on whiteboards using the web application and within a Teams meeting. It does not yet include native applications on Windows 10, Surface Hub or iOS.
Note: If you have a Surface Hub, the Whiteboard application will continue to operate in a local-only mode and cannot collaborate with the service. We will be adding support for the native applications later in 2021, another announcement will be shared as we have more details.
What you need to do to prepare?
If you do not wish to have this service available, you can disable it using the SharePoint Online PowerShell module following the instructions in the Additional Information.
If you do not have OneDrive for Business, you should verify that Whiteboard is disabled using the SharePoint Online PowerShell module.
MC256833 – Reminder – Secure by default has retired the Move message to Junk Email folder policy option
As originally announced in MC237394, Feb 21, we have officially retired the ‘Move to Junk folder’ option for high confidence phishing emails. You can no longer select that option while creating any new policies or editing existing policies. We are now rolling out changes to tenants who are currently using the Junk option to automatically switch to the default ‘Quarantine’ option.
When this will happen?
We’ll be gradually rolling this out starting mid-May, and the roll out will be completed by the end of July.
How this will affect your organization?
You are receiving this message because our reporting indicates you currently have anti-spam policies created with ‘Move to Junk folder’ as the selected option for high confidence phishing emails.
The option will be automatically switched to the default Quarantine option, when this change is implemented.
What you need to do to prepare?
There is no action through you may consider updating training and documentation as appropriate.
Please see Additional Information to learn more about Secure by Default.
Additional Information
MC256832 – (Updated) Advanced Audit – Search term events in Exchange Online and SharePoint Online
Microsoft 365 Roadmap ID 68718
Updated May 20, 2021: We have updated the rollout timeline below. Thank you for your patience.
We’re introducing new search term events within the Microsoft 365 Advanced Audit solution to aid in your forensic and compliance investigations.
When this will happen?
· GCC & GCC-High: will begin in late June and is expected to be complete by early July
· DoD: will begin early September and complete by late September.
How this will affect your organization?
The following search term events will soon be available within the Advanced Audit solution:
The SearchQueryInitiatedExchange event is triggered when a person uses Outlook to search for items in a mailbox. Events are triggered when searches are performed in the following Outlook environments:
· Outlook (desktop client)
· Outlook on the web (OWA)
· Outlook for iOS
· Outlook for Android
· Mail app for Windows 10
Similar to searching for mailbox items, the SearchQueryInitiatedSharePoint event is triggered when a person searches for items in SharePoint. Events are triggered when searches are performed in the following types of SharePoint sites:
· Home sites
· Communication sites
· Hub sites
· Sites associated with Microsoft Teams
What you need to do to prepare?
Access the Advanced Audit solution by visiting the Microsoft 365 compliance center:
· Microsoft 365 compliance center for GCC
· Microsoft 365 compliance center for GCC-H
Learn more about search term events by reviewing documentation.
Additional Information
MC256505 – New Filters Public Preview is Now Available
We are excited to announce that we have just released a new Filters feature for Microsoft Endpoint Manager. IT administrators can now use filters to target apps and policies to specific devices.
When will this happen?
With the May Intune service update, we officially released a new “Filters” public preview for IT administrators using Microsoft Intune. This new feature provides more flexibility for targeting applications and policies, making deployments faster and easier.
How this will affect your organization?
This feature is optional and new for IT administrators to consider using to help with targeting of policies and applications for users on specific devices. You’ll experience a new “Opt-in” capability for this feature in order to evaluate and experience this new functionality. Find out more by reviewing the content and details below.
What you need to do to prepare?
· Learn more about Filters Public Preview
· Review the introductory video on Filters
· Read the Filters Public Preview Support Tips
· Review documentation at Create filters in Microsoft Intune
· Provide feedback to the team at Filters preview feedback
MC256473 – (Updated) Microsoft Defender for Office 365: Introducing Advanced Delivery for Phishing Simulations and SecOps Mailboxes
Microsoft 365 Roadmap ID 72207
Updated May 21, 2021: We have updated the rollout timeline below. Thank you for your patience.
We are introducing a new capability, Advanced Delivery, for the configuration of third-party phishing simulation campaigns and delivery of messages to security operations (SecOps) mailboxes. Admins will now be able to explicitly configure for the following scenarios and ensure messages configured as part of these scenarios are handled correctly across product experiences:
· Third-Party Phish simulation campaigns: Admins using a third-party phish education vendor to simulate attacks that can help identify vulnerable users before a real attack impacts their organization.
· Security Operations (SecOps) mailboxes: These are special mailboxes Admins setup to support the ability for end users to report malicious emails to SecOps teams. These are also used by security teams to collect and analyze unfiltered messages.
Key points:
· Timing: We will begin rolling this out in mid-June and expect to complete rollout mid-July.
· Roll-out: user level roll-out v tenant level
· Control type: admin control
· Action: review, assess and configure your third-party phishing simulation campaigns/delivery for security operation mailboxes when feature rolls out (mid-July).
How this will affect your organization?
With Advanced Delivery, we will ensure that protection filters will respect these configurations and not block these messages. We will also show off these messages with the appropriate annotations in the reporting, investigation and security experiences in the product, so security teams and admins are not confused about the true nature of these messages.
Since these do not represent a real threat to your organization, we will, for example, not flag the messages as malicious and inadvertently remove them from your inbox, and we’ll skip things like triggering alerts, detonation, and automated investigations. However, admins will have the ability to filter, analyze and understand messages delivered due to these special scenarios.
What you need to do to prepare?
If you are currently using Exchange mail flow rules (also known as transport rules or ETRs) to configure your third-party phishing simulation campaigns or delivery for security operation mailboxes, you should begin to configure these with the new Advanced Delivery policy when the feature is launched in June.
After the last phase of Secure by Default is enabled in July for ETRs, Defender for Office 365;
· Will no longer deliver high confidence phish, regardless of any explicit ETRs.
· Will no longer be a recommended method to configure the above scenarios.
Learn More:
· Microsoft Defender for Office 365 tech community blog announcing this new capability: Mastering Configuration Part Two (microsoft.com)
· MS documentation on the new Advanced Delivery Policy: Configure the delivery of third-party phishing simulations to users and unfiltered messages to SecOps mailboxes – Office 365 | Microsoft Docs
· How we are keeping customers secure: Secure by default in Office 365 – Office 365 | Microsoft Docs
MC256467 – New DLP alerts management dashboard in Microsoft 365 compliance center
Microsoft 365 Roadmap ID 81980
You will soon see a new Data loss prevention (DLP) alerts management experience within the Microsoft 365 compliance center.
When this will happen?
Rollout will begin in early June and is expected to be complete by late June 2021.
How this will affect your organization?
The new DLP alerts dashboard experience makes it possible for admins to review, investigate, and manage DLP policy match events, related content, and associated metadata. Admins can also edit alert configuration options as a part of the DLP policy authoring experience. The dashboard shows alerts for DLP policies that are enforced on these workloads: Exchange, SharePoint, OneDrive, Teams, and Devices.
To access the new DLP alerts dashboard, navigate to Data loss prevention in the Microsoft 365 compliance center, then select the Alerts tab.
· Microsoft 365 compliance center for GCC
· Microsoft 365 compliance center for GCC-H
· Microsoft 365 compliance center for DoD
To access the new DLP alerts dashboard, navigate to Data loss prevention in the Microsoft 365 compliance center, then select the Alerts tab.

After selecting View details for a selected event, you will see a new overview page for the alert (image 1 below).
After subsequently selecting the Events tab, you will see the following new feature (image 2 below).
· Sensitive information types: View instances of sensitive content that violates the DLP policy. You will also be able to view up to 300 characters surrounding the detected sensitive content to provide contextual clarity. This information will be available within the following workloads:
o Exchange (email body and attachments)
o OneDrive
o SharePoint
o Teams
Note: The DLP alerts management dashboard will surface policy alerts for all DLP solutions that your tenant has configured, based on your license eligibility.
What you need to do to prepare?
Before anyone can access Sensitive information types, you must assign users to the Content Explorer Content Viewer role group; it is not accessible by default. This role group pre-assigns the role Data Classification Content Viewer.
· Configure and view alerts for DLP polices
· Review licensing requirements for data loss prevention solutions in Microsoft 365
MC256466 – Information barriers feature and service plan coming to GCC-High and DoD
Microsoft 365 Roadmap ID 70729
With this feature release, you will now be able to configure and apply information barriers policies. You will also see a new service plan, Information Barriers, as part of your licensing details.
Key points:
· Timing: Rollout will begin in mid-June and is expected to be complete by late July 2021.
· Roll-out: tenant level
· Control type: admin control per below roles
· Action: review and assess
How this will affect your organization?
The information barriers compliance feature enables restricting communication and collaboration between two groups to avoid a conflict of interest from occurring in your organization. After this change takes place, you’ll be able to prevent users in your organization from interacting with and viewing other members of your organization. This is particularly helpful for organizations that need to adhere to ethical wall requirements and other related industry standards and regulations.
What you need to do to prepare?
Note: To define or edit information barrier policies, you must be assigned one of the following roles:
· Compliance administrator
· IB Compliance Management
· Microsoft 365 global administrator
· Office 365 global administrator
You may consider updating your training and documentation as appropriate.
Learn More:
· Define information barrier policies
· Learn about information barriers in Microsoft 365
MC256463 – Reminder: Retiring Delve mobile for iOS and Android
As originally announced in MC242486 (March, 21), we will retire Delve mobile for iOS and Android on June 1, 2021. We recommend Outlook Mobile instead, which has similar features available. You’ll find profile information and files on the profile cards, and recommended documents on the Search tab. We’ll continue to invest development resources to improve the functionality in Outlook Mobile.
Key Points:
· Remove Delve mobile apps from App Store and Google Play: March 1, 2021
· Stop serving requests from Delve mobile apps: June 1, 2021
MC256461 – Block is being retired from Devices – Teams admin center
We will be retiring the feature Block from the Devices section in the Teams admin center. Block provided a way to avoid sending commands to devices even if they were included in a group of devices that were being bulk-edited. Devices were still listed in your list of devices with a status of Blocked.
Per usage and feedback we believe that it doesn’t address significantly relevant scenarios for the administrators and we want to focus on more effective management features. Instead we recommend the utilization of Remove for excluding devices from managing and usage.
Note: If you haven’t used Block from the Devices section in the Teams admin center or currently have no devices in a Blocked state, you will not be impacted.
Key points:
· Timing: We’ll begin gradually rolling this out in mid-May and expect to complete by the end of May
· Action: review and utilize Remove instead of Block
MC256027 – Opt-out from Multi-Window Producer – GCC
Microsoft 365 Roadmap ID 81804
We recently rolled out the Multi-Window Producer experience (announced in MC248212, April 2021) to all users. Since the Multi-Window Producer experience for Live Events currently does not have the Call Health Panel, we are providing an opportunity for you to opt your users out of the Multi-Window Producer experience and continue using the single view experience until the Call Health Panel is available for the Multi-Window Producer Experience.
How this will affect your organization?
If you choose to opt-out of the Multi-Window Producer experience, your tenant will be reverted back to the single window experience until the end of June when the Call Health Panel is available to the Multi-Window Producer experience.
What you need to do to prepare?
If you wish to continue with the current Multi-Window Producer experience there is nothing you need to do.
If you would like to opt-out, please send mail to tlerequests@microsoft.com with your tenant ID.
MC256025 – (Updated) Outlook – new position for Send button in iOS
This message is associated with Microsoft 365 Roadmap ID 83145
Updated May 25, 2021: We have updated the rollout timeline below. Thank you for your patience.
We are moving the “send” button to a more convenient and easy-to-reach position when using your thumbs to type in Outlook for iOS. This will also match the experience in quick reply.
When this will happen?
Roll out will begin early June (previously late May) and be completed by early July (previously late June).
How this will affect your organization?
When this update rolls out, the button to send an email message in full screen compose mode will move from the top right of the screen to the bottom right in the toolbar.

What you need to do to prepare?
There is no action you need to take to prepare for this change, but you might consider updating your user documentation and alerting your help desk.
MC255697 – Records Management – announcing the ability to delete unused record labels
This message is associated with Microsoft 365 Roadmap ID 81964
With this update, you will be able to delete unused record labels in the Microsoft 365 records management solution, which is part of Microsoft 365 compliance center.
When this will happen?
Rollout is underway now and is expected to be complete by late May.
How this will affect your organization?
Record managers (those with Records Management role) will be able to delete unused record labels. An unused label has not been applied to either a retention label policy or any content in SharePoint, OneDrive, Exchange, and/or Microsoft 365 groups (as determined by Content Explorer).
Compliance administrators, compliance data administrators, and global administrators can access Microsoft 365 compliance center here:
· Microsoft 365 compliance center for GCC cloud tenants
· Microsoft 365 compliance center for GCC-High cloud tenants
· Microsoft 365 compliance center for DoD cloud tenants
What you need to do to prepare?
You might want to notify affected users about this new capability and update your training and documentation as appropriate.
Learn more:
· Get started with records management
· Apply a retention label to content automatically
· Create retention labels and apply them in apps
MC255695 – Setting to turn off/on comments for a list
Microsoft 365 Roadmap ID 70706
This new feature will enable users to soon be able to turn off/on comments for individual lists. Any user with manage list permission on the list will be able to access this setting in Advanced settings under List settings.
When this will happen?
Targeted release (entire org:) will begin rolling this out in mid-May and expect to complete rollout late May.
Standard release: will begin rolling this out in late May and expect to complete rollout mid-June.
How this will affect your organization?
Admins can already turn off or turn on comments for their entire organization in the admin center. This new setting allows a finer-grained control for organizations that want to disallow commenting on specific lists. If an admin had previously turned off commenting for the entire organization, they can now turn on commenting for the organization and then turn off commenting for specific lists. The experience when comments are turned off for a list is similar to when comments are turned off for the organization in the admin center. The experience when a user turns off comments is as follows:
· All comments already present on list items remain as is.
· Comments pane is collapsed by default when an item is opened.
· Comments textbox is disabled.
· Entry points to comments from the All Items view are hidden.
· Users can delete comments, but not add new comments.
When a user chooses to turn the comments back on, the feature will work the same way as before it was turned off. To turn off comments for a list: Select List settings  > then Advanced settings > under Allow comments on list items, select No. Then scroll to the bottom of the Advanced settings page and select OK to save changes.

The comment entry points will be hidden, and the comments textbox will be disabled.

What you need to do to prepare?
You might want to notify your users about this new capability and update your training and documentation as appropriate.
Learn more:
To aid collaboration within and across teams, see Add and reply to comments in list items
MC255694 – OneDrive: Android – Jump to Page for PDF viewing
Microsoft 365 Roadmap ID 81920
You will soon be able to move from page to page while viewing PDF documents in Microsoft OneDrive Android app by typing the page number in Jump to Page.
When this will happen?
We will begin rolling this out to the Google play store in mid-May and expect to complete rollout late May.
How this will affect your organization?
Jump to page helps users, who use OneDrive on Android, quickly navigate to specific pages in PDFs.
1. When viewing a PDF, tap the page number at the bottom of the screen.
2. When the Jump to page dialog appears, enter any page number to jump to that page.

MC255693 – OneDrive: iOS – Jump to Page for PDF viewing
Microsoft 365 Roadmap ID 81919
You will soon be able to move from page to page while viewing PDF documents in Microsoft OneDrive iOS app by typing the page number in Jump to Page.
When this will happen?
We will begin rolling this out to the App store in mid-May and expect to complete rollout late May.
How this will affect your organization?
Jump to page helps users, who use OneDrive on iOS, quickly navigate to specific pages in PDFs.
1. When viewing a PDF, tap the page number at the bottom of the screen.
2. When the Jump to page dialog appears, enter any page number to jump to that page.

MC255536 – Group chat with external users in Teams GA
Microsoft 365 Roadmap ID 51126
This new external group chat feature enables your users to initiate and participate in group Teams chats with users from outside your organization, AAD identity required. Expanding on the existing ability for Teams users to find, participate in 1:1 chat, call and set up meetings with external users, external group chat in Teams supports up to 250 participants across multiple organizations in a single chat. This is rolling out on Teams desktop, web and mobile.
· External group chat is part of Microsoft Teams Connect. Azure Active Directory (AAD) is required. The organizations are required to use the open federation policy or be on each other’s allow list.
When this will happen?
We will begin rolling this out in mid-May and expect to complete rollout late July.
How this will affect your organization?
Once your organization is federated with another organization, users can initiate a chat in the same way they would with someone inside their organization. Simply tap on the new Chat icon, enter the email address of the recipient, and tap the Search externally option to find the user. You can add up to 250 participants to a single group chat.
This rollout of external group chats will not change any previous organizational settings. All legacy settings will be honored.
What you need to do to prepare?
Open federation is the default setting in Teams. If you wish to limit the organizations your users can contact or can be contacted by, and the groups and users that can participate, you can manage the allowed or blocked domains and users lists from the Teams Admin Center.
Additional Information
MC255535 – Notifications pane in Outlook for Web will now be titled ‘Activity’
Microsoft 365 Roadmap ID 72213
The notifications pane under the bell icon in Outlook for Web will now be titled ‘Activity’ instead of the previous ‘Notifications’
When this will happen?
We will begin rolling this out in early May and expect to complete rollout by mid-May
How this will affect your organization?
There will be no impact to you or your organization. Functionality will remain the same.
What you need to do to prepare?
You might want to notify your users about this new capability and update your training and documentation as appropriate.
MC255451 – Power Platform tenant isolation service cross-cloud connectivity gap
We have identified an issue with Power Platform tenant isolation service when used in certain cross-cloud scenarios.
Power Platform tenant isolation allows organizations to restrict AAD-based connections spanning across tenants in Power Apps and Power Automate. Admins can currently use this capability by opening a support case and having it enabled. Self-serve configuration is also available in private preview within Power Platform admin center for customers who have opted in for the private preview. You can read more about Power Platform tenant isolation here:
Restrict cross-tenant inbound and outbound access – Power Platform | Microsoft Docs.
As Power Platform has unlocked new scenarios that enable cross-cloud connectivity, it is important to note that tenant isolation does not protect organizations from inbound connections for certain cross-cloud scenarios. If a tenant has tenant isolation turned on,
1. Outgoing connections made to other tenants in all clouds are restricted, unless an “Allowed list” of tenants is specified.
2. Incoming connections that are established from other tenants within the same cloud are restricted.
3. Incoming connections that are established from other tenants in other clouds are not restricted.
In other words, tenant isolation is applied in scenarios 1 and 2, but not in scenario 3. For example, if a tenant in Commercial cloud has turned on Power Platform tenant isolation, incoming connections that are established from US Government and other clouds are not restricted and vice versa.
We are currently investigating this issue and we will share an update once we have identified a path forward to address the issue. Thank you for your patience and please feel free to reach out to your Microsoft representative if you have any questions.
MC255070 – Retention polices for Teams messages rolling out to US gov clouds
Microsoft 365 Roadmap ID 81963
Updated May 25, 2021: We have updated the post below for additional clarity. Thank you for your feedback.
Compliance administrators will now be able to apply retention and deletion policies to Teams chats and channel messages.
When this will happen?
Rollout will begin in late May and is expected to be complete by end of June.
How this will affect your organization?
By default, no retention or deletion policies are applied to your Teams content. With this release, Compliance administrators will now have the option to configure retention and deletion policies for Teams chats and channel messages. You can use these policies to delete Teams chats and channel messages or preserve them for eDiscovery, regulatory, or other purposes.
When creating a retention policy within the Microsoft 365 compliance center > Information governance solution, you can toggle on Teams chats and/or Teams channel messages as locations to apply your policy.
Note: Teams retention policies do not currently support private channels; we will add this functionality in a future release.
What you need to do to prepare?
No action is needed to enable this feature. You can configure Teams retention policies in the Microsoft 365 compliance center:
· Microsoft 365 compliance center for GCC
· Microsoft 365 compliance center for GCC-H
· Microsoft 365 compliance center for DoD
Learn more by reviewing the following documentation:
· Learn about retention for Teams
· Create and configure retention policies to automatically retain or delete content
MC255068 – Together Mode generally available – GCC
Updated May 11, 2021: We have updated the timeline below. Thank you for your patience.
General availability of Together Mode and removal of the Preview label.
When this will happen?
Removal of the Preview label:
· Standard and GCC release will begin mid-May (previously end of May) and complete by early June.
How this will affect your organization?
The removal of the preview label indicates that all Together Mode capabilities will be functional and available to your organization.
This includes the ability to view Together Mode experience and the ability for meeting participants to select/change scenes.
What you need to do to prepare?
You may consider updating your training and documentation as appropriate.
To get started with Together Mode: Enabling Together Mode in MS Teams
MC255067 – Reply-URL List is changed in Exchange Online PowerShell
Exchange Online PowerShell (PS) has updated the Reply-URL list to make the list safer for our customers. We are transitioning away from the Reply-URL “ietf:wg:oauth:2.0:oob”.
Note: If you have updated to the Exchange Online PowerShell V2 module and updated the Reply-URL you can safely disregard this message.
When will this happen?
We will be making this change in early June and expect to complete by mid-June.
How this affects your organization?
If you are an admin of an EXO tenant with any of the following configurations, you will be affected by this configurational change:
1. Admins using version of EXO MFA PS module/EXO PS V2 Module earlier than 1.0.1
2. Hybrid customers who use HCW versions earlier than 17.0.5785.0
3. Developers/admins who create automation with ModernAuth using Reply-URL to acquire OAuth token and then invoke a New-PSSession
What you need to do to prepare?
Exchange Online PowerShell has released a new version of the EXO PS V2 module that uses the new Reply-URL list, and it is strongly recommended to move to this new version of the module as soon as possible. The new Reply-URLs that should be used (different URLs for different environments) are:
· WW/PROD: https://login.microsoftonline.com/organizations/oauth2/nativeclient
· GCC High: https://login.microsoftonline.us/organizations/oauth2/nativeclient
· US Gov DoD: https://login.microsoftonline.us/organizations/oauth2/nativeclient
What happens if you do not move to the newer version or if you do not use the new Reply-URL?
· Error Message: You will see a similar error when using EXO PS v2 / EXO PS Using MFA / HCW or ModernAuth using Reply-URL: Sorry, but we’re having trouble signing you in. ADSTS50011: The reply URL specified in the request does not match the reply URLs configured for the application: ‘fb78d390-0c51-40cd-8e17-fdbfab77341b’ or ‘a0c73c16-a7e3-4564-9a95-2bdf47383716’.
Simply update to the latest version of the EXO PS V2 module to resolve this error: Update-Module. If using HCW, download the latest HCW from https://aka.ms/hybridwizard and restart the wizard. The developers/admins who create automation with ModernAuth using Reply-URL will need to configure the newly updated Reply-URL in their code.
Blog
MC254893 – Adding Link settings to the Quick Permissions inside the OneDrive Share Control
Microsoft 365 Roadmap ID 81958
This new OneDrive feature will make Link settings more discoverable by adding it to the quick permissions dropdown inside the OneDrive sharing dialog.
When this will happen?
· Targeted release (entire org): Will begin rolling this out in early May and expect to complete rollout mid-May.
· Standard release: Will begin rolling this out in mid-May and expect to complete rollout late May.
How this will affect your organization?
Users who interact with the OneDrive/SharePoint share control will easily find Link settings and be able to set the options they want on their link .
Note: Some users may see this feature before other users within your organization.
MC254890 – Modifications to Export in Advanced eDiscovery to increase amount of exportable data – GCC
This message is associated with Microsoft 365 Roadmap ID 70721
This feature update improves the Advanced eDiscovery export process allowing you to export larger amounts of data by separating them into multiple ZIP files. Now, we’ve raised the maximum size of an export from an Advanced eDiscovery review set from 3 million documents or 100 GB (whichever is smaller) to 5 million documents or 500 GB (whichever is smaller).
When this will happen?
We will begin rolling this out in late May and expect to complete rollout mid-June.
How this will affect your organization?
If your organization uses Advanced eDiscovery, the export format options will change slightly and the maximum amount of exportable data will increase by five times and come in the form of multiple ZIP files. After you download all ZIP files, you can unzip them to a single location to recreate the entire export. This will provide improved export reliability and the ability to manage the large files created by the export process.
After configuring the export, click Export to start the export process. Depending on the option selected in Output options, export files can be accessed by direct download or in your organization’s Azure Storage account.
What you need to do to prepare?
eDiscovery managers should review the changes in the export structure described above and determine if you need to make any changes to your organization’s export process.
Learn more:
For more information about exporting data in Advanced eDiscovery, see Export documents from a review set in Advanced eDiscovery.
Review Document metadata fields in Advanced eDiscovery to see updated metadata fields in the load file.
The following fields were added to the documentation:
Marked_as_pivot
|
ModernAttachment_ParentId
|
Input_file_ID
|
Native_type
|
Doc_last_saved_by
|
Export_native_path
|
Extracted_text_path
|
Redacted_text_path
|
Original_file_extension
|
Email_date_received
|
Email_internet_headers070707
|
|
Converted_file_path
|
Redacted_file_path
|
|
Version_GroupId
|
Row_number
|
|
The following fields were removed from the documentation. These fields were either not populated or not present in the load file, the review set, or both.
Attachment Names
|
Family relevance score Case issue 1
|
File relevance score Case issue 1*
|
Marked as seed Case issue 1*
|
Normalized relevance score Case issue 1
|
Parent Path
|
Read percent Case issue 1
|
Relevance load group Case issue 1
|
Marked as seed Case issue 1*
|
Relevance status description Case issue 1
|
Relevance Comment
|
Tagged by Case issue 1
|
The following field was updated with the correct name.
Document Revision was renamed to doc_version
|
Container_ID was replaced with Parent_ID
|
MC254632 – Announcing Outlook support for encrypt-only sensitivity labels and PowerShell advanced settings
Microsoft 365 Roadmap IDs 72218 and 72219
You will be able to create labels within Microsoft 365 compliance center that enforce an encrypt-only restriction when applied to Outlook email messages. Additionally, Outlook clients that use built-in labeling will now support the PowerShell label policy advanced settings DisableMandatoryInOutlook and OutlookDefaultLabel.
This message applies to Outlook clients for desktop (16.0.14012.10000), web, iOS (4.2111+), Android (4.2111+), and Mac (16.43.1108+).
When this will happen?
We will begin rolling this out in early May and expect to complete rollout early June.
How this will affect your organization?
With encrypt-only restriction, available within Office 365 Message Encryption, users can send encrypted email to any recipient, whether the recipient is inside or outside of the organization. The protection follows the lifecycle of the email.
Outlook clients that use built-in labeling will now also enforce existing PowerShell label policy advanced settings DisableMandatoryInOutlook and OutlookDefaultLabel, previously supported only by the Azure Information Protection unified labeling client. If you have already configured these settings for your organization, they will now be enforced in Outlook clients.
What you need to do to prepare?
You will be able to create labels in the Microsoft 365 compliance center that enforce the encrypt-only setting on Outlook email messages. You may want to notify your users about this new capability and update your training and documentation as appropriate.
If your organization previously turned off mandatory labeling while awaiting support for advanced settings (DisableMandatoryInOutlook), you can re-enable the mandatory label for Word, Excel, PowerPoint, and Outlook now. Once this advanced setting update is completely rolled out, we will re-enable mandatory labeling capabilities for Outlook iOS and Android clients.
Note: We will let you know when these settings are available within the Microsoft 365 compliance center as an alternative to the PowerShell configuration. You will then be able to configure the settings within the Sensitivity label policy workflow. As this feature rolls out, reference documentation will be updated to reflect how to configure these settings in the compliance center.
Learn more by reviewing the following documentation:
· Compare the labeling solutions for Windows computers
· Encrypt-only option for emails
· Manage sensitivity labels in Office apps
· Restrict access to content by using sensitivity labels to apply encryption
MC254425 – Microsoft 365 compliance capabilities for card content generated through apps in Teams messages – GCC
Microsoft 365 Roadmap ID 82992
We are excited to announce that the following Microsoft 365 compliance capabilities will now be available for card content generated through apps in Teams messages in addition to chat and file content:
· Legal hold: Preserve card content
· eDiscovery: Identify, collect and produce card content in response to an investigation
· Audit: Audit user activity on cards for forensics
· Retention: Manage card content lifecycle in Teams
These capabilities can be managed across Microsoft services including Teams from the Microsoft 365 Security and Compliance center.
Key Points:
· Timing: begin rolling out early June and expect to complete late July
· Action: review and assess
How this will affect your organization?
The above capabilities are built in platform and will be available for all Teams apps including your custom Teams apps. Selecting Teams as a location in the above compliance workflows will now automatically include card content generated through apps from the corresponding Teams conversations including 1:1 chat, 1:many, group chat, or a channel conversation.
Your existing retention policies or legal hold on Teams locations will now automatically include card content generated through apps.
Note: Historic card content generated through apps will not be available in the above compliance workflows. Only card content generated after the time of this release will be available.
MC254424 – Introducing the ability to copy and edit built-in classifiers
As part of your data classification efforts in the Microsoft 365 compliance center, you will now be able to customize built-in classifiers (sensitive information types) to meet your organization’s needs.
When this will happen?
Rollout is expected to be complete by mid-May.
How this will affect your organization?
With this update, you can now copy built-in sensitive information types and edit the copied versions to fine tune them for your organization.
When creating a custom information type, you’ll notice an improved user interface and new capabilities. Changes include the ability to use validators (such as a Luhn check) for regular expressions. There are additional checks to help refine detection, including options for excluding text as well as defining starting and ending characters.
What you need to do to prepare?
You might want to notify your users about this new capability and update your training and documentation as appropriate.
Learn more:
· Learn about sensitive information types
· Get started with custom sensitive information types
MC254423 – Export Lists to CSV
So you are aware: We have recently rolled out the capability to export Microsoft Lists to CSV files to all environments.
When this will happen?
This feature rolled out during the second half of April, 2021 and is now fully available in all environments. We apologize for not announcing this feature in advance.
How this will affect your organization?
On Windows machines, the Export to Excel button has been changed to say Export, with two options underneath:
· Excel Workbooks, which is the previously-existing export feature
· CSV, which is new
On Macs, only the Export to CSV option is available.
This feature is only supported inside Lists, and not inside Document Libraries.
Note: Unfortunately, when the feature was rolled out, the changes were visible in both document libraries and lists and we are working to correct this issue by late May, and only show the new CSV option inside lists.
MC254421 – Exchange Online Protection: Quarantine & reports portals are both getting a new look
We wanted to let you know that both the quarantine portal and the reports portal will each be getting a new look and will be available in the new Security portal at security.microsoft.com and protection.office.com.
For Admins who currently use the reporting and quarantine(including end users) portals, this new look will automatically be switched over when the features are deployed.
When this will happen?
We will start releasing this to all Exchange Online Protection customers starting in early May and we expect to finish the rollout worldwide by early June.
How this will affect your organization?
Admins and end users who use the security portal will see the quarantine portal presented in a new way. Additionally, admins who use the security portal will also see the reports portal presented in a new way.
What you need to do to prepare?
The new quarantine and reports portals will both be deployed as normal. The new pages will show up in your tenant once the deployment reaches the servers in your region. There won’t be any changes in the URL or any redirections pointing to the portal, so there is nothing for admins to do in order to get this change.
MC254418 – Exchange: Update to Exchange Online Reply-All Storm Protection
Microsoft 365 Roadmap ID 68840
Last year we introduced the Reply-all Storm Protection feature to help protect your organization from unwanted reply-all storms.
This update, coming soon, allows admins to customize various settings for it.
When this will happen?
Roll-out for all Microsoft 365 environments will begin in early May and should be completed by early June.
How this will affect your organization?
This update gives Microsoft 365 tenant admins the ability to customize most all of the Reply-all Storm Protection settings to the following parameters:
Setting
|
Value
|
Enabled/disabled
|
Enabled or Disabled
|
Minimum number of recipients
|
1000 to 5000
|
Minimum number of reply-alls
|
5 to 20
|
Detection time (sliding window)
|
60 minutes (not customizable)
|
Block duration
|
1 to 12 hours
|
While most of the default settings remain the same, some have changed:
Setting
|
Previous Default
|
New Default
|
Enabled/disabled
|
Enabled
|
Enabled
|
Minimum number of recipients
|
5000
|
2500
|
Minimum number of reply-alls
|
10
|
10
|
Detection time (sliding window)
|
60 minutes
|
60 minutes (not customizable)
|
Block duration
|
4 hours
|
6 hours
|
What you need to do to prepare?
There is nothing you need to do prepare for this update, but be aware that the change to the default minimum number of recipients from 5000 to 2500 may result in more reply-all storms being detected and acted upon than previously.
You can use the Remote Powershell Set-TransportConfig cmdlet to customize the settings:
· Set-TransportConfig -ReplyAllStormProtectionEnabled [$True:$False]
· Set-TransportConfig -ReplyAllStormDetectionMinimumRecipients [1000 – 5000]
· Set-TransportConfig -ReplyAllStormDetectionMinimumReplies [5 – 20]
· Set-TransportConfig -ReplyAllStormBlockDuration [1 – 12]
MC254085 – Reminder: Skype for Business Online retires July 31, 2021
Note: If your organization has already transitioned from Skype for Business Online to Microsoft Teams, please disregard this message.
Originally announced in MC219641 (July ’20), as Microsoft Teams has become the core communications client for Microsoft 365, this is a reminder the Skype for Business Online service will retire July 31, 2021. At that point, access to the service will end.
How this will affect your organization?
- While your organization will no longer be able to use Skype for Business Online once the service retires, July 31, 2021, you may continue to use Microsoft Teams as part of an existing licensing agreement.
- Support for the integration of third-party party Audio Conferencing Providers (ACP) into Skype for Business Online will end as Skype for Business Online retires.
- Neither the Skype consumer service nor Skype for Business Server products are affected by the retirement of Skype for Business Online.
What you need to do to prepare?
We encourage customers using Skype for Business Online to plan and begin the upgrade to Teams today. To help, Microsoft offers comprehensive transition resources including a proven upgrade framework, guidance for technical and organizational readiness, free upgrade planning workshops, and FastTrack onboarding assistance for eligible subscriptions.
MC254084 – Microsoft Teams: Profile menu update, relocating profile menu links to a new menu in the title bar
The Me Menu updates were originally announced in MC228368 (Dec ’20). To ensure the feature was ready, the rollout was delayed and we are now ready to proceed.
Access to Settings, Zoom Controls, Keyboard Shortcuts, About, and Check for Updates is moving from the Me Menu to a new menu in the title bar. The Me Menu will be focused on account management, where users can switch to another account or tenant through the first level of the Me Menu. The following links will be moved out of the Me Menu into a new menu in the title bar:
· Zoom Controls
· Keyboard Shortcuts
· About
· Check for updates
When this will happen?
· Rollout to Standard release will begin in late May and complete by early June.
· Rollout to GCC will begin in mid-June and complete by early July.
The Me Menu will be focused on account management, with account and tenant switching moved to level one of the menu.
Settings, Zoom Controls, Keyboard Shortcuts, About, and Check for Updates is moving from the Me Menu to a new menu in the title bar.
MC254083 – Microsoft 365 Translation in Outlook Win32 coming soon
Microsoft 365 Roadmap ID 81921
We are introducing Microsoft 365 translation services to Outlook Win32 clients. This release is a new set of translation features that enable users to translate full messages or specific words and phrases. This is rolling out on Outlook desktop.
Key Points:
· Timing: Rolling out in early June and expect to complete by early July.
o Rolling out in semi-annual channel in January 2022.
· Roll-out: user level
· Control type: admin control
· Action: review and assess by June 7, 2021
How this will affect your organization?
When enabled, if a user receives an email in another language, they can translate the message to their preferred language by using the following three options:
1. User will be prompted to translate the message using intelligent suggestions that appears on top of the message.
2. User can click on “…”, then Translate Message for message translation.
3. User can select a piece of text and see translation for it in the context menu. Select the text, then right click, then select Translate.
This feature is rolling out default on.
What you need to do to prepare?
If you want to use the new modern Translator feature in Outlook, when you update to Version 2101, Translator will be available to use by default.
Note: If you wish to disable this feature, you must do so by June 7th 2021.
· For more information see How to configure translation capabilities available in Office
Learn More:
· How to translate text into a different language
· Announcing new translation features in Outlook
MC253595 – (Updated) Teams: Simplified way to manage your notification settings – GCC-High and DoD
Microsoft 365 Roadmap ID 70663
Updated May 20, 2021: We have updated the rollout timeline below. Thank you for your patience.
This new Microsoft Team feature update will enable end users to configure notification settings through a simplified global notification settings page for Teams desktop and web.
When this will happen?
This will rollout at the end of June (previously mid-May) and expect to complete by mid-July.
How this affects your organization?
Your end users will be able to configure notification settings through a simplified global notification settings page. This update will enable them to choose from the two available Teams and channel notification preset options (All activity or Mentions & replies). For greater control over their channel, they can further customize their channel notification settings by clicking Custom.
The new settings can be accessed by selecting the profile picture at the top right corner of Teams, and then selecting Settings > Notifications.

What you need to do to prepare?
You might want to notify your users about this new capability and update your training and documentation as appropriate.
Please review Manage notifications in Teams to learn more.
MC253497 – (Updated) Together Mode – GCC-High and DoD
Microsoft 365 Roadmap ID 68847 and 70625
Updated May 07, 2021: We have updated the rollout timeline below. Thank you for your patience.
This release of Together mode uses AI segmentation technology in meetings to digitally place participants in a shared background, making it feel like users are sitting in the same room. This is rolling out on Teams desktop.
When this will happen?
· GCC-High: We will begin rolling this out in early June (previously early May) and expect to complete rollout late June (previously late May).
· DoD: We will begin rolling this out in mid-July (previously early June) and expect to complete rollout mid-August (previously late June).
How this will affect your organization?
Meeting participants in your tenant can now view participants in Together Mode. Additionally, users will be able to select from various different virtual spaces and change the scenes in Together Mode.
One of various available Together mode scenes.

Now a user can change Together mode scenes during a meeting.

MC252940 – (Updated) Admins can install Apps in Meetings – GCC
Microsoft 365 Roadmap ID 81086
Updated May 20, 2021: We have updated the rollout timeline below. Thank you for your patience.
We are enabling IT admins to select Teams apps that can be installed in meetings for their organization. It will leverage the App setup policies, Installed apps section in which admins can specify the apps to install on behalf of their users.
This is rolling out to Microsoft Teams desktop, web and mobile.
When this will happen?
We will begin rolling this out in mid-June (previously mid-May) and expect to complete rollout early July (previously early June).
How this will affect your organization?
Tenant admins will be able to install apps in meetings on behalf of their users and be able to choose which apps are installed by default when Teams is started.
What you need to do to prepare?
You might want to notify your users about this new capability and update your training and documentation as appropriate.
Additional Information
MC252704 – PowerPoint Live: Present to Teams from PowerPoint for Windows
Microsoft 365 Roadmap ID 80599
Updated May 27, 2021: We have updated the rollout timeline below. Thank you for your patience.
This new feature release will bring the PowerPoint Live in Teams entry point into PowerPoint for Windows. Clicking the Present in Teams button in PowerPoint will be the only step you need to take to present the deck in your Teams meeting.
When this will happen?
We will begin rolling this out in mid-May and expect to complete the roll-out late June (previously late May).
How this will affect your organization?
Users can click the Present in Teams button in PowerPoint for Windows to present their slides into an ongoing Teams meeting in the PowerPoint Live mode.
There are two entry points users can choose from, one in the top right corner and the other under the Slide Show tab.
Requirements:
· Have the latest Teams desktop app installed.
· Have the latest PowerPoint for Windows installed
· Store the presentation on OneDrive for Business or SharePoint.
· Join a Teams meeting before clicking the Present in Teams button in PowerPoint for Windows.
· Be using an Office 365 E3/A3, Office 365 E5/A5, or Microsoft 365 for Government license.
MC252330 – (Updated) Reduce background noise in Microsoft Teams Meetings (now available for MacOS users)
This message is associated with Microsoft 365 Roadmap ID 82826
Updated May 04, 2021: We have updated the rollout timeline below. Thank you for your patience.
The AI-based, real-time noise suppression that was added to Windows desktop client for Microsoft Teams in Nov 2020 will soon also be available on MacOS. This feature will automatically remove background noise from your meetings.
When this will happen?
We will begin rolling this out in late May (previously April) and expect to complete rollout late August.
How this will affect your organization?
Users can set the noise suppression level before a meeting. Once changed, the setting applies to the next call.
The four settings are Auto (default), Low, High, and Off.
They are accessible from the profile image > Settings prior to a meeting and from More options […] > Device settings during a meeting.
When left on the default setting, Auto, the Teams app sets noise suppression based on ambient sound.
· Low is designed for persistent background noise like an air conditioner, computer fan, or music.
· (New) High suppresses all background sound that is not speech; this setting uses more computer resources.
· Off disables the noise suppression feature.
Note: The high setting is unavailable for MacOS users with M1 Arm Processor
MC252196 – (Updated) OneDrive: Android – Outline for PDF viewing
Microsoft 365 Roadmap ID 81917
Updated May 07, 2021: We have updated the rollout timeline below. Thank you for your patience.
This new OneDrive for Android release will allow you to view a table of contents that you can use for easy and concise navigation in a PDF document. Just press a title in the table of contents and you’ll navigate directly to the page.
When this will happen?
We will begin rolling this out to the Google Play Store in mid-May (previously early May) and expect to complete rollout late May (previously mid-May).
How this will affect your organization?
Users will be able to use Outline to quickly navigate through PDF content using a clickable table of contents.
· While viewing a PDF, tap Outline.
· When table of contents appears, tap on any page title to jump to that page.
OneDrive Android Outline for PDF viewing
Note: The feature only works if the PDF includes a table of contents.
What you need to do to prepare?
You might want to notify your users about this new capability and update your training and documentation as appropriate.
MC251564 – (Updated) Organizers can lock meetings – GCC
Microsoft 365 Roadmap ID 80669
Updated May 11, 2021: We have updated the rollout timeline below. Thank you for your patience.
Within the desktop app in-meeting experience, organizers can choose to lock their meetings to prevent subsequent unwanted join attempts.
Users attempting to join a locked meeting by any means (e.g. from web, desktop, mobile, PSTN, and devices) will not be able to do so. There will be a message to say that the meeting is locked.
When this will happen?
We will begin rolling out at the end of May (previously mid-May) and expect to complete by mid-June (previously end of May).
How this will affect your organization?
When the change has rolled out meeting organizers will have the option to Lock the meeting:

MC250957 – (Updated) Request Files is now Available – GCC-High and DoD
Microsoft 365 Roadmap ID 72228
Updated May 20, 2021: We have updated the rollout timeline below. Thank you for your patience.
This new OneDrive Request Files feature will soon be available in your environment. This feature will enable users to give others permissions to upload files to a specific folder in their OneDrive. This is rolling out to OneDrive on the web.
When this will happen?
We will begin rolling this out in late April and expect to complete by mid-June (previously mid-May).
How this will affect your organization?
When Anyone links are enabled in your organization, users in OneDrive will be able to create a Request Files link to a folder in their OneDrive. They will be able to send this link which allows recipients to upload items into the folder without the ability to see any files stored within the folder.
Anyone links give access to anyone who receives this link, whether they receive it directly or forwarded from someone else. This may include people outside of your organization.
Note: Expiration dates can be set based on admin policy.
What you need to do to prepare?
You might want to notify your users about this new capability and update your training and documentation as appropriate.
Additional information
MC250797 – (Updated) Teams: Create teams with Templates – GCC
Microsoft 365 Roadmap ID 71635
Updated May 18, 2021: We will start templates in GCC rollout this week in a phased approach. As an Admin, you will see templates in Teams Admin Center but may not see templates in Teams app just yet. By end of May, your tenant should be able to see templates in the Teams app.
This new feature will allow users to use Microsoft Teams templates when creating a new team. Teams templates let users quickly create rich collaboration spaces with channels for different topics and preinstall apps to pull in content and services.
Custom templates are not yet available for EDU customers but are planned in the future.
When this will happen?
We will begin rolling this out in mid-May and expect the rollout to be complete by the end of June.
How this will affect your organization?
Your users can choose from both Microsoft provided templates as well as custom templates within the tenant to create teams. For Microsoft provided templates, we provide 13 pre-built or base templates for different tasks, such as managing a project or an event or coordinating an incident response. Base templates have a predefined team structure with a set of channels, tabs, and apps; they can be duplicated but not edited.
IT admins can create, modify and remove custom templates for their tenants in the Teams Admin center and via PowerShell. In the Teams Admin center, Admins may also manage which templates are shown or hidden to the end user in the team creation flow.
MC250528 – (Updated) “Tasks by Planner and To Do” app name to be shortened to “Tasks” within Teams
Updated May 07, 2021: We have updated the rollout timeline below. Thank you for your patience.
Reminder: Last year we announced the public preview of Tasks in Teams. At the same time, we also announced the planned three-stage naming sequence for how the app name would appear in Teams.
This update reflects the final stage where we shorten Tasks by Planner and To Do to simply Tasks for simplicity, brevity and to better reflect the app combining the To Do and Planner experiences. You’ll still be able to find the app by searching Planner or To Do and this will not impact the functionality of the app.
When this will happen?
We will begin rolling this out in mid-May (previously early May) and expect to complete by the end of May (previously mid-May).
How this will affect your organization?
Users will see the Tasks by Planner and the To Do app names in Teams shortened to Tasks.
MC249777 – (Updated) Microsoft Teams: introducing organization-wide backgrounds (preview) – GCC
Microsoft 365 Roadmap ID 80193
Updated May 25, 2021: We have updated the rollout timeline below. Thank you for your patience.
Currently, your end users can replace the background in a video meeting or call with an image, if you have enabled this feature for Teams desktop apps and Teams on the web.
We are introducing, via a preview feature, the ability for you to provide backgrounds that end users have access to across the organization.
This feature will require an Advanced Communications license when it becomes generally available in July. If users do not have an Advanced Communications license, any organization backgrounds applied during the preview will no longer be available.
When this will happen?
Rollout is planned from early June (previously mid-May) to early July (previously mid-June).
How this will affect your organization?
Once this feature is in preview, anyone within your organization can view these backgrounds and apply them across calls and meetings via the new background settings panel.
While the feature is in preview, users will be able to view these images in a new background settings panel accessed from the […] options link in the meeting controls, and then apply an image across calls and meetings.
During a meeting or call, users can access Apply background effects from the […] options link in the meeting controls. Before joining a meeting, users can select Background filters below the video image.
What you need to do to prepare?
You can upload images in Teams admin center for use in your tenant.
Images can be either PNG or JPG format; they should be no smaller than 360x360px and no larger than 2048x2048px. You can host
up to 50 images in your tenant.
Learn more:
Change your background for a Teams meeting
MC249776 – Introducing Approvals in Microsoft Teams – GCC
Microsoft 365 Roadmap ID 82332
Updated May 27, 2021: We have updated the rollout timeline below. Thank you for your patience.
Approvals in Microsoft Teams is a way to streamline requests and processes with a team or partners. Users will be able to create new approvals, view pending approvals, and see previous ones in one place.
Users with an F3 license or above are able to take advantage of the Approvals app within Teams (license list below). If you do not have users that meet that requirement, you may safely ignore this message.
Key points:
· Timing: mid-June (previously mid-May)
· Roll-out: tenant level
· Control type: user control and admin control
· Action: review and assess by May 10, 2021
How this will affect your organization?
Approvals is a native Teams application that lets users easily create, manage, and share approvals from a hub for teamwork. These approvals are triggered directly with the Power Automate infrastructure and do not require a flow with an approvals action.
Users see all of their approvals in the hub, including the approvals that have been completed. Approvals show up across all of a user’s systems, including Power Automate, SharePoint, and Microsoft Dynamics 365.

What you need to do to prepare?
The Approvals app is on by default if your tenant has enabled Power Automate.
Manage the Approvals app in the Teams Admin Center within the app page, including customizing which users are able to access the app via permission policies. Currently, all the approvals are created in your organization’s default environment.
MC248427 – (Updated) Customize apps in Microsoft Teams – GCC
Microsoft 365 Roadmap ID 70769
Updated May 04, 2021: We have updated the rollout timeline below. Thank you for your patience.
A new Microsoft Teams app customization feature gives you the ability to re-brand some Teams apps.
When this will happen?
Rollout begins mid-May (previously mid-April) and should be complete by late May (previously late April).
How this will affect your organization?
When a Teams app allows customization, Global and Teams admins will be able to customize that app to match tenant branding.
What you need to do to prepare?
To determine which apps are customizable, go to the Teams admin center. Expand Teams Apps; select Manage apps; then check the Customizable column of the apps list and sort by apps that are customizable.
You might want to notify any admins on your team about this new capability and update your training and documentation as appropriate.
Learn more: Customize apps in Microsoft Teams
MC248395 – (Updated) Teams: Join a meeting with digital meeting ID
Microsoft 365 Roadmap ID 80668
Updated May 13, 2021: We have updated the rollout timeline below. Thank you for your patience.
This release of Microsoft Teams Meeting ID will be rolling out across Microsoft Teams Desktop, Mobile and Web and will provide an additional way for users to join a Microsoft Teams meeting by entering a digital ID.
Key points:
· Timing: We will begin rolling this out in early June (previously early May) and expect to complete rollout by early July (previously late May).
· Roll-out: tenant level
· Control type: user control
· Action: review and assess
How this will affect your organization?
All meetings will have a Meeting ID that is automatically assigned to a Microsoft Teams user and added to the meeting invite under the meeting link. Meeting attendees can join the meeting by entering the Meeting ID. For all meeting attendees, the pre-join, lobby and security will remain the same.
Join a meeting by ID in Outlook.

Join a meeting by ID on Teams desktop.

Join a meeting by ID on mobile.

MC248392 – (Updated) Spoof intelligence management enhancements for policy, insights, and report
Microsoft 365 Roadmap ID 70590
Updated May 04, 2021: We have updated the rollout timeline below. Thank you for your patience.
The Spoof intelligence experience will introduce enhancements so that Security Administrators can gain better management of spoofing activity within their tenant. These feature updates will provide a clearer and easier way for Security Administrators to configure domain spoofing for both Cross-Org (External) and Intra-Org (Internal) email messages using a new “Tenant allow/block list policy” designed for Spoofing activity. Furthermore, users will be able to review insights provided by spoof intelligence system and take actions. Additionally, an enhanced Spoof detections report (also known as Spoof Mail Report) will show details about authentication results such as SPF, DKIM, DMARC, so users can assess configurations within their tenant and adopt industry email standards as applicable. This Spoof Mail Report will provide a historical view of up to last 90 days of spoofing activity using the report.
When this will happen?
Roll out will begin at the end of May (previously April) and is expected to be completed by the end of June.
How this will affect your organization?
Once available, a new additional policy, “Tenant Allow/Block Lists” will appear in the list of Threat policies page, which will provide a page for “Spoofing” from where a Security Administrator can manage spoofed domains/users (i.e. email addresses) and allow or block them for the tenant. You need to have a Security Admin role as well as View-Only Configuration/View-Only Organization Management role.
As a Security Administrator, you can view, add, update, delete spoofed domain pairs using this Policy or optionally using the below PowerShell cmdlets.
· Get-TenantAllowBlockListSpoofItems
· New-TenantAllowBlockListSpoofItems
· Set-TenantAllowBlockListSpoofItems
· Remove-TenantAllowBlockListSpoofItems
MC248212 – (Updated) Teams live event producers will see a separate windows experience for managing events
Microsoft 365 Roadmap ID 81804
Updated May 20, 2021: We have updated the rollout timeline below. Thank you for your patience.
Currently, a Microsoft Teams live event producer manages a live event within the primary Teams window. With this update, producers will manage a live event in a separate Teams window.
Key points:
· Timing: early May; complete end of May (previously mid-May)
· Roll-out: tenant level
· Control type: user control and admin control
MC248208 – (Updated) Attack simulation training in Microsoft Defender for Office 365
Updated May 11, 2021: We have updated the rollout timeline below. Thank you for your patience.
We are pleased to announce the General Availability (GA) of Attack simulation training in Microsoft Defender for Office 365 in GCC. Attack simulation training is an intelligent social engineering risk management tool that automates the creation and management of phishing simulations to help customers detect, prioritize and remediate phishing risks by using real phish and hyper-targeted training to change employee behavior
When this will happen?
This will be made available in June (previously May).
How this will affect your organization?
Attack simulation training in Microsoft Defender for Office 365, available on security.microsoft.com will be available to all GCC customers to simulate and train all employees in phishing risks and measure changed behavior.
What you need to do to prepare?
Try out Attack simulation training in Microsoft Defender for Office 365: https://security.microsoft.com/attacksimulator
MC248001 – (Updated) Microsoft Teams: new experience for Planner users – GCC
Microsoft 365 Roadmap ID 68950
Updated May 20, 2021: We have updated the rollout timeline below. Thank you for your patience.
We are updating the Planner user experience in Microsoft Teams to include both To Do and Planner together in one place as initially announced in MC211421 (April 2020). This will only impact the Teams desktop apps and Teams on the web.
Key points:
· Timing: Begins end of May (previously mid-May), complete by mid-June (previously late May)
· Roll-out: tenant level
· Control type: user control
· Action: Review and assess
MC247826 – (Updated) New PowerPoint Live Presentation option with desktop and window sharing – GCC
Microsoft 365 Roadmap ID 66587
Updated May 07, 2021: We have updated the rollout timeline below. Thank you for your patience.
When making a Live Presentation, presenters will soon be able to add a video feed to the presentation. This feature is available for presenters using the Microsoft Teams desktop app for both Windows and Mac.
When this will happen?
Rollout is mid-May (previously early May) through mid-June (previously late May).
How this will affect your organization?
Currently, when using a Teams desktop or mobile app, presenters first connect to the Teams call, share the presentation in PowerPoint for the web, and then select Present Live.
When using the Teams Desktop app, the presenter will have a new option, Standout mode. When a presenter selects Standout mode, participants will see the presenter’s video feed superimposed onto the foreground of the content being shared. This mode appears to meeting participants who are using the Teams desktop or mobile app as well as Teams on the web.
Meeting presenters can customize the participant view before starting the meeting or after it has begun.
The presenter can easily enable or disable the video feed can during the Live Presentation.
MC246446 – (Updated) Outlook – Suggested replies available for GCC subscriptions
Microsoft 365 Roadmap ID 70719
Updated May 27, 2021: We have updated the rollout timeline below. Thank you for your patience.
Outlook on the web, iOS, and Android are rolling out suggested replies to customers with government licenses in GCC in the following languages: Chinese (Simplified), English, French, German, Italian, Portuguese, and Spanish.
When this will happen?
· Desktop will rollout from mid-June (previously early May) through the end of June (previously mid-May)
· Mobile (Android) has started rollout and will complete by end of June.
· Mobile (iOS) will rollout from mid-June through the end of June.
How this will affect your organization?
When this feature rolls out to your tenant, your users will see three options for suggested replies if people are having an email conversation in Outlook on the web, iOS or Android in any of the supported languages.
· Chinese (Simplified)
· English
· French
· German
· Italian
· Portuguese
· Spanish.
Users can select a suggested reply and still have the option to keep editing until they click or tap on “send”.
MC246221 – (Updated) Multiple Spotlights coming to Teams meetings – GCC
Microsoft 365 Roadmap ID 80425
Updated April 22, 2021: We have updated the message to include the mobile client and additional images for clarity. Thank you for your patience.
This release of Multiple spotlights in Teams meetings will allow organizers and presenters to spotlight up to 7 participants simultaneously for everyone to see during meetings and will roll out across Microsoft Teams Desktop, Mobile and on the Web.
When this will happen?
This feature will rollout from early May (previously mid-April) through mid-May (previously end of April).
How this will affect your organization?
Users, when they are the meeting presenters or organizers, can now spotlight more participants in Team meetings than ever before. The spotlighting of selected participants will be maintained on their videos or avatars for everyone to see until turned off by the presenter or organizer.
Presenters/organizers can now:
· Start spotlight on multiple participants by accessing their context menu from the participant roster or from the stage
· Stop individual spotlights or stop all spotlights in bulk from the roster
· Spotlight a maximum of 7 participants simultaneously in a meeting
MC245824 – (Updated) Customizable Praise for Microsoft Teams – GCC
Microsoft 365 Roadmap ID 80913
Updated May 13, 2021: We have updated the rollout timeline below. Thank you for your patience.
The Praise app in Microsoft Teams is designed to help recognize the effort that goes into the wide range of work that Teams users do.
With this update, we have added Praise settings to the Microsoft Teams admin center.
When this will happen?
Rollout is expected to begin at the end of May (previously mid-May) and complete in early June (previously end of May).
How this will affect your organization?
Nothing in Praise will change until you take action. With this change, you can upload up to 25 custom Praise badges and disable the current default Praise badges.
This update includes a set of Praise badges designed for educators and educator organizations. If you would like to use them in your organization, enable them in the Teams admin center.
What you need to do to prepare?
The default badge set is already enabled and available in the Praise app. You can control which badges are available in your organization from the Teams admin center.
MC245302 – (Updated) PowerPoint Live in Teams: Slide Translation
Microsoft 365 Roadmap ID 80601
Updated May 18, 2021: We have updated the rollout timeline below. Thank you for your patience.
This new slide translation feature in Microsoft Teams (desktop) will enable all meeting attendees to translate presentation content, presented via PowerPoint Live in a Teams meeting, into a language of their choice while in private view.
When this will happen?
We will begin rolling this out in mid-June (previously mid-May) and expect to complete rollout by late June (previously mid-June).
How this will affect your organization?
Meeting attendees will see the slide translation feature when the presenter uses PowerPoint Live in a Teams meeting. Each meeting attendee will be able to convert the slide show content into one of nineteen languages of their preference. This unique experience will only occur for the user requesting slide translation without interrupting the presenter or any other attendees in the meeting.
What you need to do to prepare?
You might want to notify your users about this new capability and update your training and documentation as appropriate.
MC244599 – (Updated) De-identify personally identifiable information in Teams admin usage reports – GCC, GCCH
Microsoft 365 Roadmap ID 70774
Updated May 11, 2021: We have updated this post with additional screenshots for more detail.
Usage reports in Teams admin center currently exposes user identifiable information like AAD Id, User name, email etc. in various reports (like Teams user activity, device usage reports )
Currently, M365 admin center Teams usage report has capability to de-identify personal information which is present in usage reports available in M365 admin center (see more). However, these settings don’t apply to usage reports available in Teams admin center.
We are introducing a capability where Global admin can de-identify PII information in Teams usage reports based on Anonymization setting available in M365 admin center. This will help global administrators to hide Personally identifiable information of users in your organization.
Key points:
· Timing: roll out to begin in early April and expect to complete by mid-April
· Action: review and assess impact for your organization and updating settings as appropriate
How this will affect your organization?
This change will de-identify the personally identifiable information in Teams user activity report & Teams device usage report based on whether the de-identification setting is turned ON/OFF in M365 admin center (refer above screenshot). Currently, Only Global administrator role have access to this setting and is permissible to turn it ON/OFF.
Please note : Current DEFAULT behavior of this setting in the Microsoft 365 admin center is OFF. Which means, Personal information will be displayed in clear text if Global administrator does not make any changes to this setting.
Changes to Teams user activity report in Teams admin center: If the de-identification setting is ON, Following changes are expected –
· Report UI changes – Display name column information will be de-identified.

· Report Export changes – ID, DisplayName and UserName columns information will be de-identified.

Changes to Teams device usage report in Teams admin center: If the de-identification setting is ON, Following changes are expected –
· Report UI changes – Display name column information will be de-identified
· Report Export changes – ID, DisplayName and UserName columns information will be de-identified.

How these changes will benefit you:
· Global administrators will have more control over the Personally identifiable information in Teams admin center usage repots.
· This will be useful where teams users are concerned about monitoring and tracking based on personally identifiable data (By Providing de-identifiable capabilities)
What you need to do to prepare?
Set expectations for the coming updates with the relevant decision makers and colleagues who are using these reports for analysis and review. If you have automated business processes that consume this data, you may need to set de-identification settings accordingly.
Additional Information
MC243207 – (Updated) Important update: Microsoft Dataverse Backfill for Office GCC and GCC High SKUs
Updated May 04, 2021: We have updated the rollout timeline below. Thank you for your patience.
Microsoft Dataverse for Teams will be available to your organization. Microsoft Dataverse for Teams delivers a built-in, low-code data platform for Microsoft Teams. It provides relational data storage, rich data types, enterprise-grade governance, and one-click solution deployment. Dataverse for Teams enables everyone to easily build and deploy apps.
You can familiarize yourself with the FAQ documentation to learn about the benefits and capabilities that will soon become available to you and your users. You can also learn more about Teams environments and how to manage these environments within your organization.
We are reaching out to provide an update to admins about the availability of Microsoft Dataverse.
Key points:
· Timing: mid-May through end of May (previously April)
· Action: review and assess for your organization
How this will affect your organization?
Once available in your organization, licensed users will be able to utilize Microsoft Dataverse.
These capabilities will be enabled by the following new service plans: Common Data Service for Teams and Common Data Service – O365
What you need to do to prepare?
You may want to update your training and documentation as appropriate.
Learn more about Microsoft Power Apps US Government
MC242825 – (Updated) Teams: Transfer calls between devices – GCC
This message is associated with Microsoft 365 Roadmap ID 68776
Updated May 25, 2021: We have updated the rollout timeline below. Thank you for your patience.
This new Teams release will expand support and allow calling participants to transfer an ongoing VoIP, PSTN or Group call between Teams devices. Users will be able to transfer a call from one device to another or even add a second device to the same call.
When this will happen?
This feature will rollout to Standard and GCC tenants from early June (previously early May) to late June (previously late May).
How this will affect your organization?
After joining a Teams call on one device, users will be able to join the same call on a second device. For example; going from desktop to a mobile device or even to another desktop. Additionally, they will be able to transfer a call from one device to a second device, in the same call, if there is a need to share content from the second device.
MC242824 – (Updated) Microsoft Teams: Dynamic View – GCC
Microsoft 365 Roadmap ID 65943
Updated April 22, 2021: We have updated the rollout timeline below. Thank you for your patience.
Microsoft Teams is excited to introduce Dynamic view, a redesigned and optimized meeting stage that will optimize your experience of consuming shared content and engaging with video and audio participants.
When this will happen?
· For non-EDU Enterprise customers we will begin rolling out at the end of May and expect to complete by mid-June.
· For EDU customers we will begin rolling out mid-June and expect to complete early July.
How this will affect your organization?
All users will get a new optimized visual experience in Teams Meetings.
Dynamic view will enable:
· Video and audio participants to be shown separately, with audio participants appearing as smaller circles
· Shared content to appear larger, with more participants being visible
· Users to pin or spotlight particular people in the meeting and make them appear larger than other participants
· You to view Together Mode alongside content
· Users to dock the participant gallery to the top of their screen
MC242587 – (Updated) Increasing interactive meeting participants and chat from 300 to 1000
Microsoft 365 Roadmap ID 65951 and 68844
Updated May 13, 2021: We are pleased to announce that this feature has completed rolling out and is available in your organization as applicable.
Currently, we allow only 300 users to be added to interactive meetings. We are going to increase the meeting participant and chat size from 300 to 1000.
When will this happen?
We will start rollout early May (previously early April) and expect to complete by mid-May (previously end of April).
How this will affect your organization?
Once this change has rolled out interactive meetings and chats will support 1000 participants.
MC240393 – (Updated) OneDrive admin center settings are coming to the SharePoint admin center
Microsoft 365 Roadmap ID 65911
Updated May 04, 2021: We have updated the rollout timeline below. Thank you for your patience.
The OneDrive and SharePoint admin centers are converging into one, providing you with holistic control as we streamline the admin experience.
When this will happen?
· Phase 1 is rolling out from mid-February through early May (previously March), beginning with Targeted release (organization) tenants.
· Phase 2 is rolling out from mid-May through mid-June (previously March), beginning with Targeted release (organization) tenants.
How this will affect your organization?
In Phase 1, we’re adding OneDrive Sync, Storage, and Notifications settings to the Settings page in the SharePoint admin center. You can identify
them by the OneDrive icon and name. In this phase, there are no changes in the OneDrive admin center.
In Phase 2, we will add a link from the OneDrive admin center [https://admin.onedrive.com] to the converged SharePoint admin center. In addition, we will add a banner in the OneDrive admin center announcing the new access point.
You will have access to OneDrive settings in both locations until late spring. We will communicate with you again before this retirement timeline is finalized.
What you need to do to prepare?
When the link becomes available, we recommend using SharePoint admin center instead of the OneDrive admin center for improved:
· Accessibility
· Support for admin roles such as Global Reader
· Reports and insights on the new home page (coming soon)
· Performance and reliability
You might want to notify SharePoint and OneDrive admins about this new capability and update your training and documentation as appropriate.
MC240160 – (Updated) Reminder: Disabling TLS 1.0 and TLS 1.1 in Microsoft 365
Updated May 12, 2021: We have updated this post with additional details and resources.
In the upcoming days, we will be completing the changes to disable TLS1.0/1.1 protocols for OneDrive and SharePoint in M365 as we have previously communicated via multiple Message Center posts. If you experience any of the following error messages, it might be related to this change. Please take immediate action to complete the remediation steps as soon as possible to avoid usage interruption. Here is a list of common error codes likely caused by incomplete remediation to prepare for the TLS enforcement change.
· Windows 7 and Windows 8 Machine or Windows 2018 server OneDrive Sync Client error: 0x8004de40 when log in or try to connect via OneDrive. Error Code: 0x8004deb4 when signing in to OneDrive and Authentication errors when connecting to SharePoint or OneDrive from Windows 8 or 7
· Application error: System.Net.WebException: The underlying connection was closed: Preparing for TLS 1.2 in Office 365 and Office 365 GCC
· An existing connection was forcibly closed by the remote host: Preparing for TLS 1.2 in Office 365 and Office 365 GCC
· Connection disconnected: Unexpected error occurred when sending: Preparing for TLS 1.2 in Office 365 and Office 365 GCC
· Token request failed: Authentication errors occur when client doesn’t have TLS 1.2 support
· Authentication error: Authentication errors occur when client doesn’t have TLS 1.2 support
This message post is a reminder of the ongoing progress of retiring TLS 1.0 and TLS 1.1 protocols in Microsoft 365.
As previously communicated (MC126199 in Dec 2017, MC128929 in Feb 2018, MC186827 in July 2019, and MC218794 in July 2020), we are moving all our online services to Transport Layer Security (TLS) 1.2+ to provide best in class encryption, and to ensure our services is more secure by default. The changes to enforce TLS1.2+ in our service started on October 15, 2020 and will continue to propagate through all Microsoft 365 environments for the next few months. If you have not taken steps to prepare for this change, your connectivity to Microsoft 365 might be impacted.
Note: If your organization has already taken steps to migrate from TLS 1.0 and 1.1, you can safely disregard this message
Key Points:
· Major: Retirement of TLS1.0/1.1 protocols. All requests with TLS1.0/1.1 to Microsoft 365 will no longer work.
· Timing: Started October 15, 2020
· Action: update or replace client devices as appropriate
How this affects your organization?
Once this change takes effect, all connections to Microsoft 365 using the protocols TLS 1.0 and TLS 1.1 will no longer work. In addition, .NET applications executed using the .NET 4.5 runtime are a common set of applications that are impacted as .NET 4.5 defaults to TLS 1.1, however any application that calls into Microsoft 365 API’s using TLS 1.0 or TLS 1.1 will be impacted.
What you should do to prepare?
Update or replace clients and devices that rely on TLS 1.0 and 1.1 to connect to Microsoft 365.
· Please check additional information in TLS 1.0 and 1.1 deprecation for Office 365 – Microsoft 365 Compliance
Update and configure the .NET Framework to support TLS 1.2+.
· Please check additional information in How to enable Transport Layer Security (TLS) 1.2 on clients – Configuration Manager | Microsoft Docs
MC240066 – (Updated) Introducing a SharePoint app bar that features global navigation – GCC
Microsoft 365 Roadmap ID 70576
Updated May 04, 2021: We are ready to proceed with the rollout and have updated the rollout timeline below. Thank you for your patience.
Your SharePoint modern communication and team sites will soon feature the SharePoint app bar which provides quick access to customizable global navigation as well as other intranet resources. The SharePoint app bar makes important content and resources easily accessible for users on these sites, regardless of where they might be in SharePoint.
Key points:
· Timing:
o Targeted release is complete.
o Roll out to Standard tenants will begin in early May and complete by the end of May.
· Roll-out: tenant and user level
· Action: review and assess
How this affects your organization?
Users access the SharePoint app bar from the upper left-hand side of the browser on the SharePoint start page and throughout modern SharePoint sites. The SharePoint app bar improves global wayfinding and dynamically displays personalized content for sites, news, and files.
The app bar features customizable global navigation that leads to important intranet resources. Personalized content, news and files, is driven by Microsoft Graph and cannot be customized.
What you need to do to prepare?
Please review these admin notes in the support document.
If you take no action, the new SharePoint app bar will appear on your SharePoint modern communication and team sites. Until you customize it, the global nav entry point will refer your users to their SharePoint start page.
· You can temporarily disable the SharePoint app bar until October 31, 2021 in your tenant to prepare for this change or to control its rollout to users.
· Customizing the global navigation tab requires that you have an organization home site. Learn how to set up a home site. You can set up a home site just for global navigation.
MC237669 – (Updated) Forms is getting a new start page
Microsoft 365 Roadmap ID 80044
Updated May 11, 2021: Based on learnings from our early rings, we have made the decision to make additional changes before we proceed with the rollout. We will deliver a new Message center post once we re-start the rollout. Thank you for your patience.
We are replacing the existing Forms portal page at forms.office.com with a new Forms start page at Office.com (Office.com > Forms).
Key points:
· Timing: We will communicate via Message center when we are ready to proceed.
· Roll-out: tenant level
· Action: review and assess
How this will affect your organization?
This update replaces the existing Forms Portal page with a new Forms Start page on Office.com (Office.com > Forms).
MC237369 – (Updated) Announcing general availability of Microsoft 365 data classification analytics (GCC-H & DoD)
Microsoft 365 Roadmap ID 70666
Updated May 11, 2021: We have updated the rollout timeline below. Thank you for your patience.
New data classification analytics capabilities will soon be available within your Microsoft 365 compliance center experience in two new service plans, Information Protection and Governance Analytics – Premium and Information Protection and Governance Analytics – Standard.
Key points:
· Timing:
o New service plans: late April (previously mid-March)
o Feature available: from mid April through the end of May (previously early May)
· Roll-out: tenant level
· Control type: admin UI
· Action: review and assess
How this will affect your organization?
Data classification capabilities in Microsoft 365 compliance center help you get a holistic understanding of the sensitive data in your digital estate and related user activities.
· Activity Explorer shows activities related to your sensitive data and labels, such as label downgrades or external sharing that could expose your content to risk.
· Content Explorer provides visibility into amount and types of sensitive data, and allows you to filter by label or sensitivity type to get a detailed view of locations where the sensitive data is stored.
· Overview shows you the locations of your digital content and most common sensitive information types and labels present.
What you need to do to prepare?
Two new service plans, Information Protection and Governance Analytics – Premium and Information Protection and Governance Analytics – Standard, will enable these capabilities. You may wish to make note of this for your records.
Learn more:
· Data classification release notes
· Get started with activity explorer
· Get started with content explorer
MC236756 – (Updated) Microsoft Teams – Virtual Breakout Rooms – GCC-High
Microsoft 365 Roadmap ID 70604
Updated May 04, 2021: Based on learnings from our early rings, we have made the decision to make additional changes before we finalize the rollout. We have updated the timeline below and will provide additional updates as we proceed. Thank you for your patience.
Breakout rooms allow meeting organizers to split main meetings into smaller sessions for focused discussions.
Key Points:
· Timing: begin in late March (previously late February) and expect to complete by late May (previously late April).
· Control: Admin and Organizer
How this affects your organization?
Once available, follow the steps below to setup and use Breakout rooms.
Administrators
1. As an admin, ensure users can schedule private meetings with the following settings:
1. Allow scheduling private meeting = on
2. Allow Meet now in private meeting = on
3. Allow channel meeting scheduling = on
4. Allow meet now in channels = on
Meeting Organizers and Participants
1. To see the breakout rooms option within your meetings, you must turn on the new Teams meeting experience by
1. Clicking on your profile image within Teams
2. Selecting Settings
3. Checking the “Turn on new meeting experience” option within General settings.
4. Restart your Teams client.
5. You can double check that the setting is setup correctly by starting a meeting and verifying that the meeting opens in its own window.
2. Make sure all participants, including the meeting organizer are using the latest version of Teams. If joining on Android or iOS mobile or tablet, make sure participants go to their App Store and download the latest update.
3. As a meeting organizer, join a channel / private scheduled meeting, or channel / private meet now meeting. Once you are in the meeting you should see the breakout room option next to the raise hand control.
o You must be a meeting organizer to see the option. Meeting attendees and presenters will not see the breakout rooms option.

What you need to do to prepare?
As an admin, review and share the settings to ensure they are set correctly for your organization and your users.
Additionally, you may wish to share the information below with your users to help them prepare.
Features available for Organizer:
· Breakout room setup on Teams desktop client
· Create breakout rooms in scheduled private meetings (including recurring) and private meet now meetings
· Meeting organizers can manage rooms and hop between rooms freely
· Setup breakout rooms during an active meeting
· Create up to 50 breakout rooms in a single meeting
· Add, remove, delete breakout rooms
· Rename rooms to the title of your choice
· Reassign room participants from one room to another before as well as while the rooms are open
· Room transition: as an organizer, you can decide if participants get moved to the room automatically when you open the room, or, if they need to click to confirm the move. The “auto-accept” setting is available per meeting.
· Send an announcement that will show up as a meeting chat message in each room.
· Chats, files, and recordings: only the organizer will always have access to all rooms meeting artifacts
Features available for the participants:
· Join breakout rooms from web, desktop, iOS, iPads, Android mobiles and tablets. Note that organizers cannot move participants who joined via Desk phones or Teams devices join to a breakout room, they can stay in main meeting as their breakout room.
· Participants join the room as presenters, so they can present, share Whiteboard, etc. freely.
· Participants cannot add others to meeting chat, copy meeting details, nudge others to the meeting, or use “call me back”
· Hoping between rooms: Meeting participants cannot hop back to main meeting or between rooms on their own. They must wait for the meeting organizer to pull them back to the main meeting.
· Chat during the breakout session. Chat and artifacts shared during meeting are viewable for room participants.
· Chats, files, and recordings: Participants have access to artifacts, but only organizer has access to the links – if link is shared by meeting organizer, then participants will have access
· Multi-device join: breakout room is not supported when the participant joins the same meeting and same account from multiple devices
Where and when can I set up breakout rooms?
· You can set up breakout rooms after you join the meeting as the organizer. You can bulk create rooms at the start, or manually add or remove rooms.
· You can set up breakout rooms from desktop client, but not in mobile and web.
· We plan to enable the ability for you to set up breakout rooms before the meeting very soon.
When can I assign participants to breakout room?
· You can assign participant when you are setting up the rooms. You can do so manually before the rooms open or reassign participants to a different room while the room is open.
· You can also auto-assign the participants to rooms when you first set up the rooms in the meeting.
MC236329 – (Updated) Large gallery view and Together Mode for web meetings in Edge and Chrome browsers – GCC
Microsoft 365 Roadmap ID 70573
Updated May 04, 2021: We have updated the rollout timeline below. Thank you for your patience.
This new Teams feature allows users to change layout to Together mode or Large gallery during a meeting conducted in Edge or Chrome browsers.
When this will happen?
We will begin rolling this out in early May (previously late March) and expect to be complete by early June (previously late-April).
How this will affect your organization?
This release will improve the experience for users who join Teams meetings in Edge and Chrome browsers by positioning up to 50 invitees into a virtual space by removing each individual background people have and replacing them with a common background.
MC231223 – (Updated) New meeting options for managing large Teams meetings in Outlook for Windows – GCC
Microsoft 365 Roadmap ID 78699
Updated May 20, 2021: We have updated the rollout timeline below. Thank you for your patience.
When organizing Teams meetings in Outlook for Windows for 40 or more participants or 10 or more distribution lists, Teams users will soon see a prompt to set meeting options.
Key points:
· Timing: mid-July (previously early June) through the end of August (previously end of June)
· Roll-out: tenant level
· Control type: user control
· Action: review and assess
MC230680 – (Updated) Meeting Reactions in Teams Meetings
Microsoft 365 Roadmap IDs 65946 and 68905
Updated May 27, 2021: We have updated the rollout timeline below. Thank you for your patience.
The Meeting Reactions feature allows users to react to participants during a meeting. Reactions will be available on Teams Desktop and Teams Mobile apps.
When this will happen?
· Production and GCC environments: will start rolling out in early February (previously late January) and will be complete by mid-February (previously early February). Complete
· GCC-High tenants: start rolling out early June (previously end of May) and will be complete by the end of June (previously mid-June)
· DOD tenants: start rolling out in Q3 calendar year 2021 (we will provide an additional update in the future).
How this will affect your organization?
In a Teams meeting, participants can choose from four different reaction types – like, heart, applause, and laugh – and send it to meeting attendees from the new reactions and raise hand flyout in the control bar.
Meeting participants will see the reaction displayed over their position.
When content is shared, the reactions will float over the content. This applies to Desktop, Window, PowerPoint, and Whiteboard sharing.
What you need to do to prepare?
Meeting reactions will be on by default and you should consider how to deploy in your tenant.
You can change whether users have reactions on or off by default by using the AllowMeetingReactions policy. If you turn reactions off by default for users, they can still enable reactions in their meetings if they are the meeting organizer from the meeting option page.
You might want to notify your users about this new capability and update your training and documentation as appropriate.
Support for meetings on web, room systems, or surface hub will follow later in the year.
Learn more: Set-CsTeamsMeetingPolicy
MC229363 – (Updated) Microsoft Teams: meeting recordings saved to OneDrive and SharePoint – GCC
Microsoft 365 Roadmap ID 76074
Updated May 26, 2021: To ensure the best possible experience for our users, we are delaying the mandatory move of Teams meeting recordings on OneDrive and SharePoint from July 7th to August 16th in order to ensure availability of transcript driven captions and the ability to block downloads. Please see the updated timeline below.
We’re changing the storage for new Teams meeting recordings to be stored on, and served from, OneDrive and SharePoint (ODSP) – instead of Microsoft Stream (Classic). Customers are able to opt in, opt out, or take no action with regard to these changes.
This change will apply to customers who either opt in or take no action following this announcement.
Key points:
· Timing:
o January 11 2021 (Complete): Unless you delay this change, all new Teams meeting recordings will be saved to ODSP.
o Rolling out incrementally starting August 16th, 2021 (previously July 7th): All meeting recordings will be saved to ODSP.
· Rollout: Tenant level
· Control: Admin via PowerShell
How this will affect your organization?
This change impacts your organization in several ways:
· New features
o The move to ODSP immediately unlocks long-awaited features such as external and guest sharing, applying retention policy automatically, and support for GoLocal.
· Meeting storage
o Non-channel meetings: stored in the OneDrive of the person who clicked the record button and located in a new folder labeled Recordings.
o Channel meetings: stored in a new folder labeled Recordings.
· Permissions
o Non-channel meetings: all meeting invitees, except for external users, automatically get a shared link to access the meeting recording. The meeting organizer or the person that clicked the record button will need to explicitly add external users to the share.
o Channel meetings: permissions will be inherited from the owner and member list in the channel.
· Feature gaps
Teams meeting recordings that are watched on OneDrive and SharePoint may have some feature gaps compared to Classic Stream (see full list here). We are working to deliver the following features before the mandatory switch:
o Ability to block download of non-channel meeting recording by default
o Ability to block download of channel meeting recordings by default
o Ability to ensure closed captions are available during the video playback by rolling out the following changes to Live Transcription in Teams meetings by August 2021:
§ Live transcription to be available across all Office and Microsoft 365 license types, including: Government G1/G3/G5 (currently just available to Enterprise E3/E5, Business Standard, and Business Premium customers).
§ Live transcription to be available across all meeting types: private, channel, and ad-hoc meetings (currently available to just private meetings).
§ Live transcription to always be generated when a user starts recording a meeting on desktop client (currently Live Transcription needs to be started separately from the recording).
MC229058 – (Updated) Planner tasks storage location update
Updated May 04, 2021: Based on learnings from our early rings, we have made the decision to make additional changes before we proceed with the rollout. We will deliver a new Message center post once we re-start the rollout. Thank you for your patience.
Beginning in January 2021, a copy of some Planner tasks will be stored in a user’s Exchange mailbox. All Planner tasks will continue to be stored in the Planner Service.
Key points:
· Timing:
o We will communicate via Message center when we are ready to proceed.
· Roll-out: tenant level
How this will affect your organization?
A secondary copy of Planner tasks which are assigned to at least one user will be stored in the user’s Exchange mailbox. If a task is assigned to multiple users, each user will have a copy of the task stored inside their individual mailbox. Unassigned tasks will not be copied to a mailbox.
For end users, existing To Do, Planner, and Outlook Task experiences will remain the same.
This update supports our work to add Planner tasks to eDiscovery and to build deeper integrations between To Do and Planner.
MC222745 – (Updated) Introducing live transcription in Microsoft Teams meetings – GCC
Microsoft 365 Roadmap ID 82836
Updated May 07, 2021: We have updated the post for additional clarity and adjusted the rollout timeline below. Thank you for your patience.
This feature update of Live transcription with speaker attribution in Microsoft Teams meetings is a written record of the conversations available during and after the meeting and will provide another way to both follow and review meeting conversations.
This feature update will rollout on Teams desktop.
When this will happen?
We will start rollout in late May (previously early May) and expect to complete rollout by early June (previously end of May).
How this will affect your organization?
This feature improves the accessibility of Microsoft Teams and allows meeting participants to be more productive. It also creates a more inclusive experience for participants who are deaf, hard-of-hearing, or have varying levels of language proficiency.
Participants in noisy places will also benefit from the visual aid.
Note: Live transcriptions with speaker attribution will be available in English (US) under the following licenses:
· Office 365/Microsoft 365 E3
· Office 365/Microsoft 365 E5
· Microsoft 365 Business Standard
· Microsoft 365 Business Premium
The channel and meet-now Meetings will be supported in the near future.
What you need to do to prepare?
To get started, the tenant admin needs to turn on the Allow Transcription policy.
Then the meeting organizer or a presenter can start transcription.
Live transcription with speaker attribution is available in new meeting and calling experiences.
Microsoft 365 IP and URL Endpoint Updates
|
Documentation – Office 365 IP Address and URL web service
28 May 2021 – GCC
28 May 2021 – GCC High
28 May 2021 – DOD
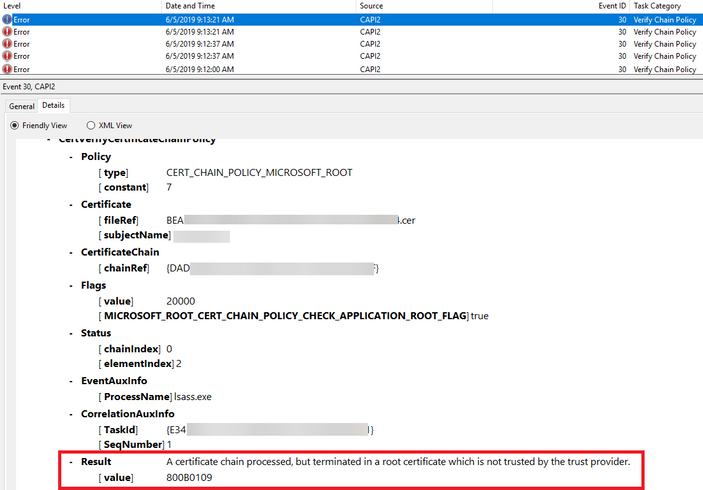
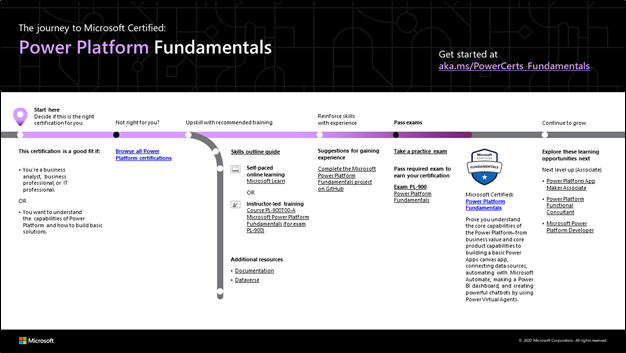


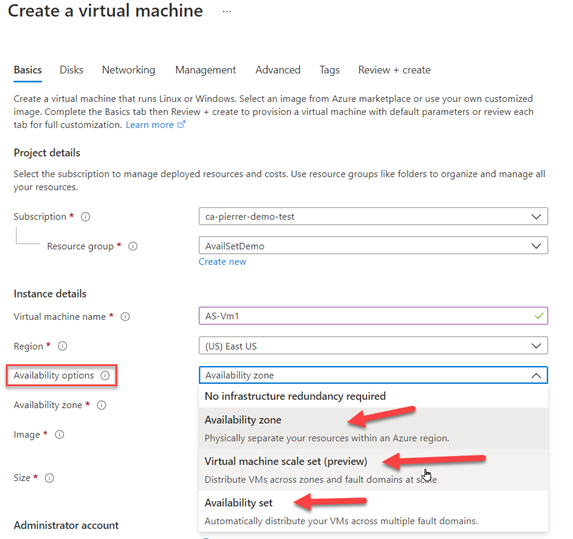


Recent Comments