by Contributed | Jun 17, 2021 | Technology
This article is contributed. See the original author and article here.
Starting later this month, we’re introducing new personal wellbeing experiences including a Headspace integration with Microsoft Viva Insights to empower people to balance the need to stay connected and informed with the need to disconnect and recharge. In the 2021 Work Trend Index – a study of over 31,000 people in 31 countries – over half of the respondents reported feeling overworked and over a third described themselves as outright exhausted. The research uncovered something crucial: employees want flexible remote work options to stay, but the digital overload associated with more remote work is challenging their wellbeing. To help address these challenges, we’re introducing updates to the Viva Insights app in Microsoft Teams including a Headspace integration, a new focus mode, and quiet time settings.
Headspace meditations and mindfulness exercises
Weekly meeting time for Teams users has more than doubled since the onset of the COVID-19 pandemic. Back-to-back meetings increase stress and make it harder to stay engaged and focused. In just a few minutes a day, meditation and mindfulness with Headspace can help you reduce stress and improve focus. Starting later this month, we’re bringing a curated set of guided meditations and mindfulness exercises from Headspace to the Viva Insights app to help you start your day grounded, relax your mind before a big presentation, or disconnect from work in the evening.
Recharge with a quick mental break and tap into Headspace guided meditations in the Viva Insights app in Teams
Focus mode with Headspace music and timers
Back-to-back meetings not only increase our stress, but can also cause a rise in after-hours work to finish individual tasks. To help you protect time to work uninterrupted with Teams notifications silenced, Viva Insights offers the ability to schedule daily focus time. Building upon this, later this year, we are introducing a new focus mode in the Viva Insights app. This will feature Focus music from Headspace and implement timers to help you make progress on important tasks in regular intervals, with breaks planned in between.
 Introducing a new focus mode in the Viva Insights app in Teams featuring Headspace music and timers
Quiet time user and admin settings
Remote work has eliminated physical boundaries between work and life, and an increase in after-hours chats has led to a feeling of being always-on. To help create better boundaries and protect your personal time, later this year Viva Insights will offer the ability to configure quiet time to silence mobile notifications from Outlook and Teams outside your working hours as well as provide personalized insights on how well you are disconnecting. You will also be able to set quiet time directly from Teams and Outlook mobile.
 Introducing quiet time settings to silence after-hours mobile notifications from Teams and Outlook
Additionally, with new controls coming in Microsoft Endpoint Manager, IT administrators can create org-level policies to mute after-hours notifications. This will provide organizations a way to encourage their employees to disconnect and recharge during their personal time, as well as support compliance with regulations that limit use of work applications outside of working hours.
 Introducing quiet time settings in Microsoft Endpoint Manager admin center
Learn more
- For more on Microsoft Viva, head over to aka.ms/Viva
- For more on getting started with the Viva Insights app in Teams, visit aka.ms/InsightsDocumentation
- Join our first Microsoft Viva Ask Microsoft Anything (AMA) event on June 23, 2021, where members of the Viva team will be available to respond to questions.
- Join Kamal Janardhan, Product Management lead for Viva Insights and Jeremy Chapman, the host of Microsoft Mechanics, as they walk through the Viva Insights user experience and showcase steps for IT admins to configure access. Watch the full Microsoft Mechanics video series at aka.ms/VivaMechanics.

by Contributed | Jun 17, 2021 | Business, Microsoft 365, Technology
This article is contributed. See the original author and article here.
The future of work is collaboration without compromise—wherever, whenever.
The post New hybrid work innovations in Microsoft Teams Rooms, Fluid, and Microsoft Viva appeared first on Microsoft 365 Blog.
Brought to you by Dr. Ware, Microsoft Office 365 Silver Partner, Charleston SC.
by Contributed | Jun 17, 2021 | Technology
This article is contributed. See the original author and article here.
We introduced Microsoft Whiteboard with the goal of bringing people together for visual collaboration, working across a range of devices and ecosystems including Microsoft Teams.
Over the past 18 months, while many people were working remotely, we learned that customers needed virtual-first tools to creatively problem solve with others. To help people thrive in a more flexible work environment, we have reimagined the Whiteboard experience to help our customers collaborate, wherever and whenever.
Today we’re excited to announce a completely new Microsoft Whiteboard, the visual collaboration workspace in Microsoft 365, designed for hybrid work.
With the new innovations in Microsoft Whiteboard, we’re providing better hybrid work and collaboration experiences, whether or not you’re physically in the room together. To achieve this, our innovations focus on five key areas: guided collaboration, new content types, new user interface, improved inking experience and expanded Microsoft 365 integration. Let’s look at what’s new in each key area.
Make real-time collaboration easier
Collaboration that just works is core to the new Whiteboard experience, and we’re introducing a number of new features to make this a reality. Collaboration Cursors help you be remote, but feel together, by showing where and what other collaborators are doing on the whiteboard. Get other people’s attention as you share your best ideas with the new Laser Pointer. Reduce distractions while guiding users through ideas with Follow Along. And finally, easily get started with the most common scenarios like problem-solving, planning, and workshops, with our wide array of new Templates. Together, these features improve collaboration, engage all participants, and reduce hybrid work barriers—no matter where you are.
Boost creativity with rich and interactive content
Collaboration powered by rich content is a key part of the new Whiteboard experience. This allows everyone to contribute in the way that best suits their idea, device type, or personal preference. Combine shapes, lines, text and ink to create Collaborative Diagrams. Make connections, annotate, and iterate together across multiple types of content with our new Insert Image and Document capabilities. Organize related thoughts, ideas or solutions in an auto-layout grid with Notes Grid. Provide lightweight, contextual feedback via a range of engaging and fun Reaction Stickers. Collaborate across apps by bringing in Fluid Components like tables or task lists. Yes, you can still use Whiteboard for inking, but all of these new capabilities transform Whiteboard into a rich visual collaboration workspace that lets you and your team be more creative together.
Experience a unified modern look and feel
With the introduction of so many new collaboration features and content types, we’ve created a new user interface to support our ever-growing capabilities. Our new Fluent Toolbar adds a modern visual refresh to our expanded set of visual collaboration tools. The new Creation Gallery provides a highly discoverable, intuitive and responsive layout across devices as large as a Surface Hub and as small as a phone. See who is on the board and collaborating with you at all times in the new Top Bar. The new Whiteboard provides a Single Unified User Experience across all devices, operating systems, and platforms. Ultimately, the new Whiteboard user interface emphasizes what matters most—people and content—so you can do your best work.
.png") Experience a unified modern look & feel in the new Microsoft Whiteboard
Experience a unified modern look & feel in the new Microsoft Whiteboard
Maximize creativity with ink for everyone
Digital ink is an important part of whiteboarding, whether used to express your own ideas or to comment and annotate on others’ ideas. The new Whiteboard is empowering everyone, no matter if you have a pen or not, to leverage the unique visual expression capabilities that ink can offer. Improved Mouse Inking smoothes ink, making it easier than ever for those with a mouse or trackpad to visually communicate ideas that are hard to write in words. Pen Support for Whiteboard in Teams allows you to ink automatically or get the unique benefits of using a pen, such as the tail eraser. Quickly draw shapes and watch them automatically straighten with Shape Recognition. Spark the imagination and creativity of your team with Rainbow & Galaxy Ink.

Integrate seamlessly across Microsoft 365
The new Whiteboard is now integrated into even more areas across Microsoft 365 to more seamlessly fit into your existing workflows. Whiteboard is now available in Teams Channels & Chats. The new Share Content experience in Teams Meetings allows you to easily start a collaborative whiteboard for everyone in the meeting with just one click. Pre-prep or reuse whiteboards across multiple Teams Meetings with the new Open Existing Board functionality. Search and discover whiteboards on Office.com and SharePoint, and leverage the rich content management features of OneDrive for Business.
.png") The new Microsoft Whiteboard is integrated seamlessly across Microsoft 365 such as Teams, Office.com, OneDrive and SharePoint.
The new Microsoft Whiteboard is integrated seamlessly across Microsoft 365 such as Teams, Office.com, OneDrive and SharePoint.
We hear from customers every day that while the future of work may be evolving, one thing remains clear—it’s never been more important for people to be able to collaborate effectively wherever and whenever. We’ve created the completely new, hybrid work focused Whiteboard experience to meet this need, so both remote and in-person attendees can visually collaborate across the same digital canvas. To get started, try the new Whiteboard today. To learn more, visit the Whiteboard product page or read the FAQ.

by Contributed | Jun 17, 2021 | Technology
This article is contributed. See the original author and article here.
The hybrid workplace is here, and Microsoft Teams Rooms has the latest innovations to enhance everyone’s experiences, whether in the room, or remote. To make meetings more engaging for both remote and in room attendees, we are announcing a new category of intelligent speakers for Teams Rooms on Windows.
1. Inclusive meetings powered by Microsoft Teams
Intelligent speakers are intelligent peripherals for Microsoft Teams Rooms on Windows and are designed to bring high quality audio experiences to remote participants can clearly hear all the voices in the room. And they are optimized for Cortana voice assistance to offer touch-less experience to join and end meetings in shared spaces.
2. Intelligent transcription with speaker attribution
Intelligent speakers will bring people identification in live transcription in a shared environment enabling clear voice capture of participants in the meeting room. Allowing everyone in the meeting to spend less time note taking and easily follow along who said what in the room. Intelligent speakers include a 7-microphone array to identify voices of up to ten people in meeting rooms so whether you are working remotely or in the conference room, you can effectively see who said what during and after the meeting.
3. Powered by Microsoft Graph
Knowing who is speaking makes transcription more accurate and meaningful. Once we know who is speaking, we can leverage the power of intelligence through Microsoft Graph that provides access to rich people-centric data and insight in the Microsoft Cloud to contextualize the transcription. For example, because we know who the speaker is, the acronyms, names of colleagues, and different words the speaker uses can be more accurately transcribed.
4. Enterprise grade privacy and security
Voice data will be securely stored in the Office 365 Cloud, and users will retain control of their information, including the ability to delete it at any time. The capture of voice data can be turned on or off for each meeting. Additionally, admins have full control to turn on/off people identification through voice recognition feature across the organization.

The first two partners to launch intelligent speakers are EPOS with Capture 5 and Yealink with MS Speech, they will both require a Microsoft Teams Rooms Standard or Premium license to be enabled. EPOS Capture 5 and Yealink M Speech intelligent speakers can be purchased individually and in bundles to work with Microsoft Teams Rooms on Windows products.
Yealink offers a Microsoft Teams Room on Windows bundle with (MVC 320 or MVC 640) and MS Speech Intelligent Speaker. EPOS and Lenovo have partnered to offer a Microsoft Teams Room on Windows bundle with Lenovo ThinkSmart Hub Gen 2 and EPOS Capture 5.
 Lenovo ThinkSmart Hub Gen 2 bundle(left) and Yealink MVC 320 bundle (right)
Intelligent speakers people identification is available in preview and will be available with a Teams Rooms Standard or Premium license. Future licensing requirements for people identification in transcription are subject to change. The Teams intelligent speaker is available in English in the United States, future regions to come.
by Contributed | Jun 17, 2021 | Technology
This article is contributed. See the original author and article here.
Recording of the Microsoft Teams monthly community call from June 15, 2021.
Call Summary
Latest news from Microsoft engineering on Microsoft Teams updates and community assets.
It’s time for summer break and for upcoming changes to community call cadence. Sign up for June trainings on Sharing-is-caring. See the new Microsoft 365 Extensibility look book gallery co-developed by Microsoft Teams and Sharepoint engineering. Visit the Microsoft Teams samples gallery to get started with Microsoft Teams development. Build your Teams apps fast with yo teams – go to PnP Teams Quickstart. Build 2021 – latest news on the Microsoft Teams platform and integrations including: Shared stage, Together Mode, Fluid components, Adaptive Cards, Microsoft Teams Toolkit and Developer Portal. The host of this call was Vesa Juvonen (Microsoft) | @vesajuvonen. Q&A takes place in chat throughout the call
Actions:
- Register for Sharing is Caring Events:
- First Time Contributor Session – June 29th (EMEA, APAC & US friendly times available)
- Community Docs Session – June 23rd
- PnP – SPFx Developer Workstation Setup – June 17th
- PnP SPFx Samples – Solving SPFx version differences using Node Version Manager – June 24th
- Ask Me Anything – Teams Dev – July 13th
- First Time Presenter – June 30th
- More than Code with VSCode – June 16th
- Maturity Model Practitioners – July
- PnP Office Hours – 1:1 session – Register
- PnP Buddy System – Request a Buddy
- Call attention to your great work by using the #PnPWeekly on Twitter.
Microsoft Teams Development Samples: (https://aka.ms/teams-samples)

Always a highlight to see you here. Looking forward to seeing you in person at an event one day.
Demos delivered in this session
Kudos App sample using Teams Activity Feed API in Microsoft Graph – showcases how to build a solution leveraging the Teams Activity Feed API for sending notifications to selected users. See how activities (notifications) are gated in the manifest. Create a Kudos app (100 lines code) with appropriate Graph services permissions, layout UI using Fluent UI components, add out-of-box controls from Microsoft Graph Toolkit. Activity feed is now a fully supported workload.
Building a digital asset / document repository management app for Microsoft Teams – Document manager – an asset management system sample app that makes use of Teams platform capabilities to simplify searching, retrieving, sharing, contributing, and governing assets. Uses messaging extensions to find documents, task module to upload documents, Graph APIs, and creates awareness of / gains approvals on assets leveraging user specific views in Adaptive Cards. Stores documents awaiting approval in staging folder in library.
Introduction to Microsoft Teams Toolkit v2 – helps developers create and deploy Teams apps with integrated Identity, access to cloud storage, data from Microsoft Graph, and other services in Azure and M365 with a “zero-configuration” approach (single-line statements and no side trips to Azure and ADD) to the developer experience. Efficiently configures front-end, back-end, bot at same time. Simplifies creating proof-of-concepts! Get the toolkit through the Extensions Marketplace in VS Code.
Thank you for your work. Samples are often showcased in Demos.
Topics covered in this call
- News and updates – Vesa Juvonen (Microsoft) | @vesajuvonen – 3:11
- Build 2021 Recap on Microsoft Teams platform announcements – 9:15
Demo: Kudos App sample using Teams Activity Feed API in Microsoft Graph – Sébastien Levert (Microsoft) | @sebastienlevert – 15:39
Demo: Building a digital asset / document repository management app for Microsoft Teams – Sathya Raveendran (Microsoft) & Arun Kumar Anaparthi (Zen3 Infosolutions) – 30:38
Demo: Introduction to Microsoft Teams Toolkit v2 – Zhenya Savchenko (Microsoft) – 45:27
Resources:
Additional resources around the covered topics and links from the slides.
General resources:
Upcoming Calls | Recurrent Invites:
Microsoft Teams monthly community calls are targeted at anyone who’s interested in Microsoft Teams development topics. This includes Microsoft Teams, Bots, App templates, Samples, and more. Details on the Microsoft 365 community from http://aka.ms/m365pnp. We also welcome community demos, if you are interested in doing a live demo in these calls!
You can download recurrent invite from https://aka.ms/microsoftteamscommunitycall. Welcome and join in the discussion. If you have any questions, comments, or feedback, feel free to provide your input as comments to this post as well. More details on the Microsoft 365 community and options to get involved are available from http://aka.ms/m365pnp.
“Sharing is caring”
Microsoft 365 PnP team, Microsoft – 16th of June 2021
by Contributed | Jun 17, 2021 | Technology
This article is contributed. See the original author and article here.
After releasing many features that unblock and accelerate the migration of SQL Server Integration Services (SSIS) packages into Azure Data Factory (ADF), see https://techcommunity.microsoft.com/t5/sql-server-integration-services/blast-to-the-future-accelerating-legacy-ssis-migrations-into/ba-p/1792821, we’d like to show you how to quickly extend ADF capabilities by leveraging these SSIS features, all without designing/deploying your own package.
Instead, we’ll provide a sample package with parameterized properties that you can simply download, drag & drop into an Execute SSIS Package activity in ADF pipeline and run it on your self-hosted/SSIS integration runtimes (SHIR/SSIS IR) with run-time parameter values assigned for your specific scenario.
This article illustrates 3 easy steps to run any SQL statements/script anywhere using SSIS in ADF: (1) Prepare your SHIR/SSIS IR; (2) Prepare an Execute SSIS Package activity in ADF pipeline; and (3) Run the Execute SSIS Package activity on your SHIR/SSIS IR.
1) Prepare your SHIR/SSIS IR
Our sample package will allow you to run any SQL statements/script on premises and in the cloud. To access SQL Server or any other SQL-based relational database management system (RDBMS) on premises, your SSIS IR will need to join a virtual network (VNet) connected to your on-premises network or use an SHIR as a proxy. For this purpose, we’ll use the proxy method that’s relatively easier/quicker to configure than the VNet method.
First, to prepare an SHIR as a proxy for your SSIS IR, see https://docs.microsoft.com/en-us/azure/data-factory/self-hosted-integration-runtime-proxy-ssis.
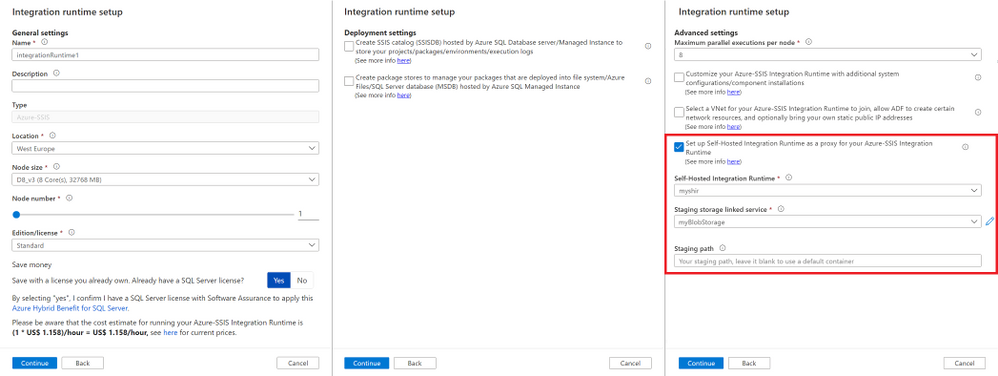
Next, to quickly prepare your SSIS IR for this purpose, you can unselect all checkboxes on the Deployment settings page and only select the checkbox to configure an SHIR as a proxy on the Advanced settings page of Integration runtime setup pane, see https://docs.microsoft.com/azure/data-factory/tutorial-deploy-ssis-packages-azure.
Since your SSIS IR isn’t joining a VNet, it should be running within 5 minutes.
2) Prepare an Execute SSIS Package activity in ADF pipeline
Once your SHIR and SSIS IR are running, you can go to the Integration runtimes page in ADF Manage hub and select the Execute SSIS package button on the right side of your SSIS IR name.

This will auto-create an ADF pipeline with Execute SSIS Package activity already in it.
We’ve created a sample package (ExecuteSQL.dtsx) on SQL Server Data Tools (SSDT) containing 3 components named after their actual type/function: Execute SQL Task to run any SQL statements/script, OLEDB Connection Manager to access SQL Server or any other SQL-based RDBMS, and File Connection Manager to access any SQL script stored in file system. We’ve also parameterized the following package properties for you to assign your run-time values:
— ConnectionString: Enter the usual connectivity info for OLEDB Connection Manager, e.g.
— To use Windows Authentication:
— Data Source=[.|YourSQLServerName];Initial Catalog=YourDBName;Provider=SQLNCLI11.1;Integrated Security=SSPI;Auto Translate=False;
— To use SQL Authentication:
— Data Source=[.|YourSQLServerName|YourAzureSQLServerEndpoint];User ID=YourUserID;Password=YourPassword;Initial Catalog=YourDBName;Provider=SQLNCLI11.1;Persist Security Info=True;Auto Translate=False;
— To use Azure Active Directory (AAD) Authentication with ADF managed identity:
— Data Source=YourAzureSQLServerEndpoint;User ID=;Initial Catalog=YourDBName;Provider=MSOLEDBSQL;Integrated Security=SSPI;Auto Translate=False;
— ConnectUsingManagedIdentity: Enter True or False to enable or disable AAD Authentication with ADF managed identity on your OLEDB Connection Manager, respectively.
— ExecuteOnProxy: Enter True or False to run Execute SQL Task on your SHIR or SSIS IR, respectively.
— FilePath: Enter the local/UNC path of your SQL script stored in file system.
— SQLStatementSource: Enter your SQL statements or File Connection Manager depending on what you assigned to the SQLStatementSourceType parameter.
— SQLStatementSourceType: Enter 1 or 2 to run your SQL statements assigned to the SQLStatementSource parameter or your SQL script file referenced by the FilePath parameter, respectively.

You can download our sample package from https://ssisazurefileshare.blob.core.windows.net/blogs/ExecuteSQL.dtsx and then drag & drop it as an embedded package on the Settings tab of your Execute SSIS Package activity in ADF pipeline.

3) Run the Execute SSIS Package activity on your SHIR/SSIS IR
Once you embed our sample package in your Execute SSIS Package activity in ADF pipeline, you can run it on your SHIR/SSIS IR with run-time parameter values assigned for your specific scenario. Here are some examples:
Example 1) Run any SQL statements on your SQL Server on premises
To run any SQL statements on your SQL Server on premises, complete the following steps:
a) Configure the Windows authentication feature on the Settings tab of your Execute SSIS Package activity to connect to your SQL Server on premises with Azure Key Vault (AKV) to store your sensitive data.

b) Add the following parameters on the SSIS parameters tab to assign their run-time values:
— ConnectionString: Use Windows authentication, e.g.
Data Source=.;Initial Catalog=YourDBName;Provider=SQLNCLI11.1;Integrated Security=SSPI;Auto Translate=False;
— ConnectUsingManagedIdentity: False
— ExecuteOnProxy: True
— SQLStatementSource: Enter any SQL statements, e.g.
CREATE TABLE [Customer] (
[Firstname] nvarchar(50),
[Lastname] nvarchar(50),
[Street] nvarchar(50),
[Postalcode] nvarchar(50),
[City] nvarchar(50),
[Country] nvarchar(50))
— SQLStatementSourceType: 1

Example 2) Run any SQL script file on your SQL Server on premises
To run any SQL script file on your SQL Server on premises, complete the following steps:
a) If you store your SQL script file on the same machine as your SQL Server/SHIR:
1) Configure the Windows authentication feature on the Settings tab of your Execute SSIS Package activity to connect to your SQL Server on premises with AKV to store your sensitive data – See the above example.
2) Add the following parameters on the SSIS parameters tab to assign their run-time values:
— ConnectionString: Use Windows authentication, e.g.
Data Source=.;Initial Catalog=YourDBName;Provider=SQLNCLI11.1;Integrated Security=SSPI;Auto Translate=False;
— ConnectUsingManagedIdentity: False
— ExecuteOnProxy: True
— FilePath: Enter the local path of your SQL script file, e.g.
C:UsersYourUsernameDownloadsSQLScript.sql.
— SQLStatementSource: File Connection Manager
— SQLStatementSourceType: 2

b) If you store your SQL script file in Azure Files:
1) Configure the Windows authentication feature on the Settings tab of your Execute SSIS Package activity to connect to Azure Files with AKV to store your sensitive data.

2) Add the following parameters on the SSIS parameters tab to assign their run-time values:
— ConnectionString: Use SQL authentication, e.g.
Data Source=.;User ID=YourUserID;Password=YourPassword;Initial Catalog=YourDBName;Provider=SQLNCLI11.1;Persist Security Info=True;Auto Translate=False;
You can also configure AKV to store your sensitive data.
— ConnectUsingManagedIdentity: False
— ExecuteOnProxy: True
— FilePath: Enter the UNC path of your SQL script file, e.g.
//YourAzureStorageAccountName.file.core.windows.net/YourFileShareName/SQLScript.sql
— SQLStatementSource: File Connection Manager
— SQLStatementSourceType: 2

Example 3) Run any package stored in SSISDB hosted by your SQL Server on premises
To run any package stored in SSISDB hosted by your SQL Server on premises, complete the following steps:
a) Configure the Windows authentication feature on the Settings tab of your Execute SSIS Package activity to connect to your SQL Server on premises with AKV to store your sensitive data – See the above example.
b) Add the following parameters on the SSIS parameters tab to assign their run-time values:
— ConnectionString: Use Windows authentication, e.g.
Data Source=.;Initial Catalog=SSISDB;Provider=SQLNCLI11.1;Integrated Security=SSPI;Auto Translate=False;
— ConnectUsingManagedIdentity: False
— ExecuteOnProxy: True
— SQLStatementSource:
DECLARE @return_value INT, @exe_id BIGINT, @err_msg NVARCHAR(150)
EXEC @return_value=[SSISDB].[catalog].[create_execution] @folder_name=N’YourFolderName’, @project_name=N’YourProjectName’, @package_name=N’YourPackageName.dtsx’, @use32bitruntime=0, @execution_id=@exe_id OUTPUT
EXEC [SSISDB].[catalog].[set_execution_parameter_value] @exe_id, @object_type=50, @parameter_name=N’SYNCHRONIZED’, @parameter_value=1
EXEC [SSISDB].[catalog].[start_execution] @execution_id=@exe_id, @retry_count=0
IF(SELECT [status] FROM [SSISDB].[catalog].[executions] WHERE execution_id=@exe_id)<>7
BEGIN
SET @err_msg=N’Your package execution did not succeed for execution ID: ‘ + CAST(@exe_id AS NVARCHAR(20))
RAISERROR(@err_msg,15,1)
END
— SQLStatementSourceType: 1

Example 4) Clean up package execution logs outside the configured retention window for SSISDB hosted by your Azure SQL Database server
To clean up package execution logs outside the configured retention window for SSISDB hosted by your Azure SQL Database server, complete the following steps:
a) Add the following parameters on the SSIS parameters tab of your Execute SSIS Package activity to assign their run-time values:
— ConnectionString: Use AAD authentication with ADF managed identity, e.g.
Data Source=YourAzureSQLDatabaseServerName.database.windows.net;User ID=;Initial Catalog=SSISDB;Provider=MSOLEDBSQL;Integrated Security=SSPI;Auto Translate=False;
— ConnectUsingManagedIdentity: True
Make sure that you configure your Azure SQL Database server to allow access using AAD authentication with ADF managed identity, see https://docs.microsoft.com/sql/integration-services/connection-manager/ole-db-connection-manager?view=sql-server-ver15#managed-identities-for-azure-resources-authentication.
— ExecuteOnProxy: False
— SQLStatementSource:
EXEC internal.cleanup_server_retention_window_exclusive
— SQLStatementSourceType: 1

If you have other scenarios that require you to assign run-time values to different properties that aren’t parameterized in our sample package, you can still do so on the Connection managers/Property overrides tabs of your Execute SSIS Package activity by referencing the component names (Execute SQL Task/OLEDB Connection Manager/File Connection Manager).
I hope you’ll find this article useful to run any SQL statements/script anywhere using SSIS in ADF. Please don’t hesitate to contact us if you have any feedbacks, questions, or issues, and we’ll follow up ASAP. Thank you as always for your support.

by Scott Muniz | Jun 17, 2021 | Security, Technology
This article is contributed. See the original author and article here.
Official websites use .gov
A .gov website belongs to an official government organization in the United States.

Secure .gov websites use HTTPS A
lock ( )
) or
https:// means you’ve safely connected to the .gov website. Share sensitive information only on official, secure websites.
by Contributed | Jun 17, 2021 | Technology
This article is contributed. See the original author and article here.
Come to the cloud, it has consumption-based billing! But what does that mean, exactly? Is my virtual machine free if it is shut down? Lets explore the billing components of an Azure Virtual Machine.
Resources in Azure all have particular cost meters and charging methods. Each product page details what those are. For consumption-based billing, you need to broaden your perception of what the word “consumption” means. You might think you’re not consuming the services of a virtual machine if it is shut down, but it is a little more comprehensive than that.
Azure Virtual Machine components
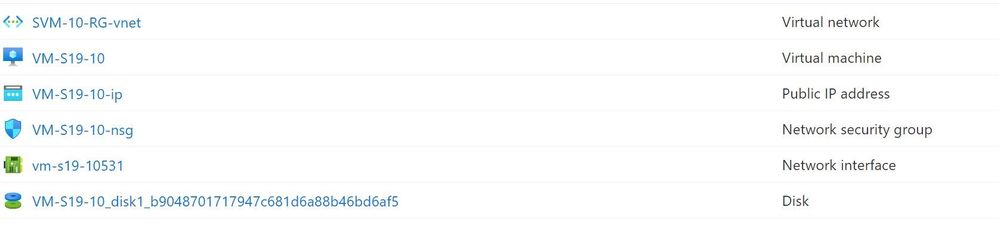
When you create a Windows Virtual Machine in Azure, you don’t get just one resource. An Azure VM relies on 5 resources, created by default:
- Virtual machine
- Disk
- Network interface
- Virtual network (or choose to use an existing virtual network)
- Network security group (optional but highly recommended)
If you want to make this VM publicly available over the internet, you also need a Public IP address.
Azure Virtual Machine resources
Now lets look at which of those components have billing implications when the VM is shut down.
The virtual machine resource – power states and billing
The state of the virtual machine impacts whether the virtual machine resource is being billed or not, in relation to the virtual machine resource and its reliance and use of underlying hardware.
Running – The virtual machine is powered up and working, and currently being billed for.
Stopped – The VM has been shut down from within the guest operating system or using PowerOff APIs. The VM will be showing as Stopped. This does not release the lease that the VM has on the underlying hardware, which means the hardware is unavailable for other customers. In this state, the virtual machine is still billed for.
Deallocated – The VM has released the lease on the underlying hardware and is completely powered off, so the virtual machine resource is not billed. It will appear in the Azure portal as Stopped (Deallocated).
 Azure Virtual Machine status
What if I have the VM scheduled to shut down automatically on a schedule?
The shutdown automation provided natively by Azure puts the machine in the Deallocated state, so it is not being billed while it is shut down. See Start/stop VMs during off-hours overview.
What if I shut the VM down using PowerShell?
The Stop-AzVM PowerShell cmdlet also puts the machine in the Deallocated state, so it is not being billed while it is shut down.
What if I shut the VM down using the Azure CLI or Cloud Shell?
It depends on which command you use. az vm stop will not deallocate the VM from the hardware and will display the warning “About to power off the specified VM… It will continue to be billed. To deallocate a VM, run: az vm deallocate”
For more information, see States and billing of Azure Virtual Machines.
Billing of other Azure Virtual machine components
Even if the virtual machine is deallocated and not consuming “compute” time (holding a lease on hardware), there are components of this virtual machine that you are still using. Most commonly, this is storage and networking.
Storage – disk costs
While the VM is shut down, there is still a storage cost for the disk that is holding the virtual hard drive file, as well as any other data storage disks you may have created, as you are still consuming file storage.
This resource group contains a VM that was shut down for the month of May and incurred a USD$0.31 daily cost for a 127GiB Premium SSD disk with locally redundant storage including a less than USD$0.01 charge for the storage account.
 Deallocated virtual machine costs
See Managed Disks pricing.
Note: There’s another type of storage for Azure VM operating systems called Ephemeral OS Disks. These are free and suitable for stateless workloads, but don’t support features like Azure Backup, Azure Disk Encryption, Disk snapshots or Azure Site Recovery. Learn more at Ephemeral OS disks for Azure VMs.
Networking
The network interface, virtual network and network security group will not incur any charges. Visit Virtual Network pricing.
A static Public IP address will still be billed if the VM is shut down or even deleted, unless you delete the static public IP address. For pricing, visit IP Addresses pricing.
Azure Bastion (optional)
Azure Bastion allows for secure remote access to your virtual machine guest operating system via a browser, without needing to open RDP port 3389. Regardless of the state of your virtual machine, you will be charged for any Azure Bastion hosts. If you use this infrequently, you can delete and recreate an Azure Bastion host when needed. Learn more about Azure Bastion pricing here.
Other related Azure services
Other services related to Azure Virtual Machines may also incur a cost while a VM is shut down, including Azure Defender for Servers and Azure Backup. Both Azure Arc enabled servers and Azure Lighthouse, for server management, are free capabilities.
Learn more at Microsoft Learn
Control Azure spending and manage bills with Azure Cost Management + Billing
Introduction to Azure virtual machines
by Contributed | Jun 16, 2021 | Technology
This article is contributed. See the original author and article here.
I am from Andhra Pradesh and I would like to create a telugu language pack extension to VS code. I need the guidance how to do it.
by Contributed | Jun 16, 2021 | Technology
This article is contributed. See the original author and article here.
SQL Server 2016 mainstream support is scheduled to end 7/13/2021 as defined by the lifecycle policy.
With the crossover to extended support, Microsoft is committed to providing a final service pack for SQL Server 2016 to all customers. The release of SQL Server 2016 Service Pack 3 will be shipped after mainstream supports ends, targeting September 2021. This will be the final service pack for SQL Server 2016.
For any questions, please work with our support channels as documented in our help and feedback page.

Recent Comments