![[Guest Blog] At the Intersection of Mixed Reality and Business Applications: My Career Journey](https://www.drware.com/wp-content/uploads/2021/06/fb_image-1184.png)
by Contributed | Jun 25, 2021 | Technology
This article is contributed. See the original author and article here.
This article is written by Martin Heward, a Microsoft employee and long time professional in Business Applications, who shares his biz apps to mixed reality journey as a part of our Humans of Mixed Reality series. This blog is formatted in a Q&A style – please read Martin’s answers to questions around his career story.
Q: How did you get started in the MR space?
A: As a long time professional in Business Applications (as a customer, partner, now Global Black Belt aka GBB specialist), I am no stranger to emerging technology since during much of my career, I’ve seen many Dynamics 365 products start off as an incubation product just like our Mixed Reality business applications today. Not long after I joined Microsoft 3.5 years ago, I came across the concept of Mixed Reality and immediately was intrigued by its possibility to add unmatched business value for my customers and prospects. As a new employee with time to learn (remember those days?) in the summer of 2018, I jumped on the opportunity to be one of the early adopters and became Master-Certified in both Mixed Reality and the HoloLens.
As part of that process, I received an HoloLens (1st gen) for learning and pre-sales. However, I am glad that I was disciplined enough to not play with it, or even turn it on until I had completed the learning courses. I will NEVER forget that magical moment when I put it on for the first time after having some idea (albeit only 2-dimensional) about what to expect. Even though the HoloLens (1st gen) had some limitations with field of view and gesturing that was not exactly intuitive at the time, I was completely blown away with Mixed Reality in general. I know many people have already said this before, but it truly is one of those rare concepts that you can describe with words and human emotions all day long, but not understand until you experience it on your own.
Here’s a handy diagram to illustrate where mixed reality business applications like Remote Assist and Guides come in the broader Dynamics 365 infrastructure:

Q: What excites you most about mixed reality?
A: Personally, mixed reality is exciting to me because of how relevant and complementary it is to core challenges that our Business Applications customers are tackling each day. Mixed Reality and the value it brings spans every industry we operate in. It is certainly extremely relevant in my focus industries of Process Manufacturing, Energy, and Utilities. From Health and Safety, to Production Optimization, to an aging workforce of frontline workers; these are fundamental issues discussed in board rooms at every single one of the customer organizations I interact with. My job is to create a vision of transformation of business processes with Dynamics 365 – adding in Mixed Reality to my messaging is a way of super-charging this message and making the previously perceived sci-fi-like future seem very possible and current.
Q: Why do you think mixed reality business applications are truly transformative for organizations?
A: We all know transformation may be one of the most overused terms in our industry, and perhaps the most vague. Business Applications is unique in the sense that it is not a commodity that we are delivering, instead it is more like a box of LEGO, if you will, that requires transformation of business processes that the configured Business App is meant to complement. This process of envisioning typically takes lots of time. What is so refreshing about Dynamics 365 mixed reality business applications such as Remote Assist and Guides is that they are much closer to a commodity than those of us in Business Applications are used to. Mixed Reality applications can transform business processes and be adopted quickly, sometimes even right out of the box.
This quick time to value is related to the fundamental nature of mixed reality apps. I’ve spoken with many individuals who experience mixed reality for the first time (be it at marketing shows and conferences) and they often have sentiment much like mine around “the experience” of learning in a completely different manner than we are used to. Everyone’s learning styles are quite different – I see this first hand with my own two kids. Some are traditional, others are kinesthetic and require movement to retain information. There is something profound and different about performing tasks on a HoloLens. Many, including myself seem to retain information in much greater quantity and specificity than traditional methods.
Here’s a nostalgic photo of me with my very first HoloLens (1st gen) device:

Q: What advice would you give to others considering careers in mixed reality, or exploring the use of mixed reality in their organizations?
A: As stated earlier, my advice about mixed reality is to first perform research and due diligence before jumping in and worrying about devices and your organizations specific use cases. The applications of mixed reality are vast, and just like any emerging technology, many decision makers within business see this as a future-state investment. For many, most unfortunately, this could mean months and years of pilots and proof of concepts. This is a medium that is proven to be transformational even in the most hard industrial environments within our customers operations. To avoid this perception of emerging versus ready, I would think outside the box and be very selective about the business problems you are aligning with. First impressions are quite powerful and can be a challenge to overcome if outcomes are not aligned with expectations. A good way of avoiding this is to weave it into messaging as matter of fact versus something profound and singled out.
Q: Do you have any useful resources you can share that have inspired you (links, e-books, podcasts etc)?
I hope you will be bold and experience mixed reality for yourself, and witness firsthand what it can do for industries worldwide!
#MixedReality #CareerJourney
by Contributed | Jun 25, 2021 | Technology
This article is contributed. See the original author and article here.
Hi All,
Last month we launched AKS on Azure Stack HCI. Since then we have been busily working with folk who have been trying it out and getting started on deploying their containerized applications on top of AKS on Azure Stack HCI. At the same time we have been busily working on the first update to AKS on Azure Stack HCI – which is now available! You can evaluate AKS-HCI by registering here: https://aka.ms/AKS-HCI-Evaluate.
With this update – we are bringing in the following changes:
Seamless update of Kubernetes clusters
One of the biggest items that we have been working on is ensuring that this update is completely seamless for our users. You can update our PowerShell, Windows Admin Center extension and the AKS on Azure Stack HCI host with zero impact to your running workloads. You can then decide when to update individual Kubernetes clusters.
As you update your Kubernetes clusters – we ensure that this is as low impact as possible by following a process where, for each worker node in the cluster we:
- Provision a new worker node that is based on the June update
- Join the new worker node to the Kubernetes cluster
- Drain the existing worker node
- Decommission the existing worker node
Note – all of this is handled seamlessly for you. You just say “Update”!
Prometheus now included
Monitoring the health, performance, and resource usage of the control plane and worker nodes of your AKS-HCI workload cluster is crucial in production environment. Prometheus, a Cloud Native Computing Foundation project, is an open-source toolkit that is particularly popular for monitoring Kubernetes. Prometheus works with different types of collectors and agents to collect metrics and store them in a database where you can query the data and view reports. While it has been available for use with AKS on Azure Stack HCI, in this latest version we have made the deployment of Prometheus even simpler. You can now deploy Prometheus when creating new workload cluster by passing -enableMonitoring parameter to New-AksHciCluster cmdlet. Or, you can deploy it on an existing workload cluster by using Install-AksHciMonitoring cmdlet.
Once deployed, Prometheus can be used as a data source for rich queries and visualization in Grafana. Please refer to our technical docs for more details.
Security and Stability improvements
A key part of this update is that we have included pertinent security updates that have been released for Windows, Linux, Kubernetes and all the OSS components that are included in AKS on Azure Stack HCI. At the same time we have been continuing to do security and stability testing on AKS on Azure Stack HCI ourselves – and this update includes fixes to address any issues that we have discovered.
Once you have downloaded and installed the AKS on Azure Stack HCI June 2021 Update – you can report any issues you encounter, and track future feature work on our GitHub Project at https://github.com/Azure/aks-hci. And, if you do not have the hardware handy to evaluate AKS on Azure Stack HCI you can follow our guide for evaluating AKS-HCI inside an Azure VM: https://aka.ms/aks-hci-evalonazure.
I look forward to hearing from you all!
Cheers,
Ben

by Contributed | Jun 25, 2021 | Technology
This article is contributed. See the original author and article here.
Dear IT Pros,
Today we discuss about All things about WDAC – Windows Defender Application Control.
WDAC was introduced with Windows 10 and could be applied to Windows server 2016 and later, its older name is Configurable Code Integrity (CCI). WDAC allows organizations to control which drivers and applications are allowed to run on devices.
- Windows Server 2016/2019 or anything before version 1903 only support legacy policies (aka 1 policy in place)
- Windows Server Core edition does support WDAC but some components that depends on AppLocker won’t work
WDAC policies apply to the managed computer as a whole and affects all users of the device. WDAC rules can be defined based on:
- Attributes of the codesigning certificate(s) used to sign an app and its binaries
- Attributes of the app’s binaries that come from the signed metadata for the files, such as Original Filename and version, or the hash of the file
- The reputation of the app as determined by Microsoft’s Intelligent Security Graph
- The identity of the process that initiated the installation of the app and its binaries (managed installer)
- The Folder or File path from which the app or file is launched (beginning with Windows 10 version 1903)
- The process that launched the app or binary
Multiple Policies and Supplemental Policy.
Beginning with Windows 10 version 1903, Windows server 2022, WDAC supports up to 32 active policies on a device at once. The following scenarios are supported:
- Enforce and Audit Side-by-Side
- Multiple Base Policies, users can enforce two or more base policies simultaneously in order to allow simpler policy targeting for policies with different scope/intent.
- If two base policies exist on a device, an application has to be allowed by both to run
- Supplemental Policies, users can deploy one or more supplemental policies to expand a base policy. For supplemental policies, applications that are allowed by either the base policy or its supplemental policy/policies are allowed to run
PLANNING.
Implementing application control can have unintended consequences, plan your deployment carefully.
- Decide what devices you will manage with WDAC and split them into deployment rings: Test, UAT and Prod ring, so you can control the scale of the deployment and respond if anything goes wrong.
- All WDAC policy changes should be deployed in audit mode before proceeding to enforcement. Carefully monitor events from devices where the policy has been deployed to ensure the block events you observe match your expectation before broadening the deployment to other deployment rings.
- If your organization uses Microsoft Defender for Endpoint, you can use the Advanced Hunting feature to centrally monitor WDAC-related events. Otherwise, we recommend using an event log forwarding solution to collect relevant events from your managed endpoints.
- Leverage medatada in the policies (version, policyID, description, etc) to keep track of which policies applied to what group of devices in production.
Options For WDAC Policy Creation:
The creation of an WDAC Policy depends on the level of restriction you may want to apply to your target devices. You could start with a pre-built template of Windows 10:
Level of Restriction
|
Template to be used (C:WindowsschemasCodeIntegrityExamplePolicies)
|
Allowed All Applications
|
AllowAll.xml
|
Allowed All Enabled HVCI
|
AllowAll_EnableHVCI.xml (Enable Hypervisor-Code-Integrity in Memory)
|
Allowed All Microsoft Applications
|
AllowMicrosoft.xml
|
Allowed All Microsoft and Good Reputation Applications
|
DefaultWindows_Enforced.xml or
DefaultWindows_Audit.xml
|
Deny All Applications but the one you choose
|
DenyAllAudit.xml
|
Other pre-built .xml template for Application or Script Control
|
Allowed Application deployed by Microsoft Endpoint Configuration Manager (MECM).
|
WDAC Policy deployed to Clients at directory location:
%OSDrive%WindowsCCMDeviceGuard
|
Device Guard Signing Service (DGSS) DefaultPolicy.xml
|
Including the rules from DefaultWindows and adds rules to trust apps signed with your organization-specific certificates issued by the DGSS version 2
|
- You could use WDAC Wizard to view and customize the allow or deny rules applied to different applications.
- Every WDAC policy is created with audit mode enabled by default. After you have successfully deployed and tested a WDAC policy in audit mode and are ready to test the policy in enforced mode, use WDAC Wizard to turn off Audit mode this will make the WDAC Policy become Enforced mode. You also could use command in an elevated Windows PowerShell session to make WDAC Policy in Enforced mode:
- Ensure that rule options 9 (“Advanced Boot Options Menu”) and 10 (“Boot Audit on Failure”) are set the way that you intend for this policy. We strongly recommend that you enable these rule options before you run any enforced policy for the first time. Enabling these options provides administrators with a pre-boot command prompt and allows Windows to start even if the WDAC policy blocks a kernel-mode driver from running. When ready for enterprise deployment, you can remove these options.
- To ensure that these options are enabled in a policy, use Set-RuleOption as shown in the following commands. You can run these commands even if you’re not sure whether options 9 and 10 are already enabled—if so, the commands have no effect.
> Set-RuleOption -FilePath InitialCIPolicy -Option 9
> Set-RuleOption -FilePath InitialCIPolicy -Option 10
- Copy the initial file to maintain an original copy:
> copy InitialCIPolicy.xml EnforcedCIPolicy.xml
- Use Set-RuleOption to delete the audit mode rule option:
> Set-RuleOption -FilePath EnforcedCIPolicy.xml -Option 3 -Delete
Note
To enforce a WDAC policy, you delete option 3, the Audit Mode Enabled option. There is no “enforced” option in a WDAC policy.
> ConvertFrom-CIPolicy EnforcedCIPolicy.xml EnforcedCIPolicy.bin
- Now that this policy is in enforced mode, you can deploy it to your test computers. Rename the policy to SIPolicy.p7b and copy it to C:WindowsSystem32CodeIntegrity for testing, or deploy the policy through Group Policy by following the instructions in Deploy and manage Windows Defender Application Control with Group Policy. You can also use other client management software to deploy and manage the policy.
- Windows Defender Application Control policy – policy rule options
WDAC – policy rule options
|
|
Rule option
|
Description
|
WDAC Wizard Icon
|
0 Enabled:UMCI
|
WDAC policies restrict both kernel-mode and user-mode binaries. By default, only kernel-mode binaries are restricted. Enabling this rule option validates user mode executables and scripts.
|

|
1 Enabled:Boot Menu Protection
|
This option is not currently supported.
|
|
2 Required:WHQL
|
By default, legacy drivers that are not Windows Hardware Quality Labs (WHQL) signed are allowed to execute. Enabling this rule requires that every executed driver is WHQL signed and removes legacy driver support. Kernel drivers built for Windows 10 should be WHQL certified.
|

|
3 Enabled:Audit Mode (Default)
|
Instructs WDAC to log information about applications, binaries, and scripts that would have been blocked if the policy was enforced. You can use this option to identify the potential impact of your WDAC policy, and use the audit events to refine the policy before enforcement. To enforce a WDAC policy, delete this option.
|

|
4 Disabled:Flight Signing
|
If enabled, WDAC policies will not trust flightroot-signed binaries. This option would be used by organizations that only want to run released binaries, not pre-release Windows builds.
|

|
5 Enabled:Inherit Default Policy
|
This option is reserved for future use and currently has no effect.
|
|
6 Enabled:Unsigned System Integrity Policy (Default)
|
Allows the policy to remain unsigned. When this option is removed, the policy must be signed and the certificates that are trusted for future policy updates must be identified in the UpdatePolicySigners section.
|

|
7 Allowed:Debug Policy Augmented
|
This option is not currently supported.
|
|
8 Required:EV Signers
|
This rule requires that drivers must be WHQL signed and have been submitted by a partner with an Extended Verification (EV) certificate. All Windows 10 and later drivers will meet this requirement.
|

|
9 Enabled:Advanced Boot Options Menu
|
The F8 preboot menu is disabled by default for all WDAC policies. Setting this rule option allows the F8 menu to appear to physically present users.
|

|
10 Enabled:Boot Audit on Failure
|
Used when the WDAC policy is in enforcement mode. When a driver fails during startup, the WDAC policy will be placed in audit mode so that Windows will be able to load at boot.
|

|
11 Disabled:Script Enforcement
|
This option disables script enforcement options. Unsigned PowerShell scripts and interactive PowerShell are no longer restricted to Constrained Language Mode. NOTE: This option is supported on 1709, 1803, and 1809 builds with the 2019 10C LCU or higher, and on devices with the Windows 10 May 2019 Update (1903) and higher. Using it on versions of Windows 10 without the proper update may have unintended results.
|

|
12 Required:Enforce Store Applications
|
WDAC policies will also apply to Universal Windows applications. (Microsoft Store App)
|

|
13 Enabled:Managed Installer
|
Use this option to automatically allow applications installed by a managed installer. For more information, see Authorize apps deployed with a WDAC managed installer
|

|
14 Enabled:Intelligent Security Graph Authorization
|
Use this option to automatically allow applications with “known good” reputation as defined by Microsoft’s Intelligent Security Graph (ISG).
|

|
15 Enabled:Invalidate EAs on Reboot
|
When the Intelligent Security Graph option (14) is used, WDAC sets an extended file attribute that indicates that the file was authorized to run. This option will cause WDAC to periodically revalidate the reputation for files that were authorized by the ISG upon Windows reboot.
|

|
16 Enabled:Update Policy No Reboot
|
Use this option to allow future WDAC policy updates to apply without requiring a system reboot. NOTE: This option is only supported on Windows 10, version 1709, and above.
|

|
17 Enabled:Allow Supplemental Policies
|
Use this option on a base policy to allow supplemental policies to expand it. NOTE: This option is only supported on Windows 10, version 1903, and above.
|

|
18 Disabled:Runtime FilePath Rule Protection
|
This option disables the default runtime check that only allows FilePath rules for paths that are only writable by an administrator. NOTE: This option is only supported on Windows 10, version 1903, and above.
|

|
19 Enabled:Dynamic Code Security
|
Enables policy enforcement for .NET applications and dynamically loaded libraries. NOTE: This option is only supported on Windows 10, version 1803, and above.
|

|
USING WDAC WIZARD TO CREATE POLICY
Steps to proceed with creating the WDAC Policy by Wizard:
- Download WDAC Wizard and install it.
The WDAC Wizard has 3 options for creating, modifying or merge 2 WDAC policies as shown here:

- Create WDAC policy by Wizard
You could create single base policy or multiple base policy or supplemental policies.

- Launch the WDAC Wizard and choose Single Policy Format
- Choose the Template named “Signed and Reputable Mode” for Microsoft and 3rd party Vendor Applications.
- Typing name for WDAC policy and directory location as shown:

- Choose the option for policy:

- Next, Adding Custom rule,
- Rule type: Choose how to identify the application by publisher name, by path to application executable file or folder, by File attributes, by Packaged App, by File
Hash:

– Custom Rule by Publisher:
Enter the executable file of the related Publisher for the Wizard to collect the Publisher Sign in Code:

– Custom Rule by File Attribute
Checking the box “Use Custom Values” and Use the glider to choose the attribute as shown here

– Custom Rule by Package App (UWP)
Packaged apps, also known as Universal Windows apps, are based on a model that ensures all the files within an app package share the same identity.
- To get a list of packaged apps run on a device, run command:
> Get-AppxPackage | ft

Typing the Package Name to the Wizard under “Package Name” and click Search button as shown:

You could add multiple file hash separated by comma with Custom rule or use the browser button and specify the file:

- Custom Rule by Folder Path or File Path:


- Make sure to let WDAC Wizard to create the binary file if you need it in Settings – “Convert policy to binary after xml creation” as shown in the following:

- Next, Wizard will build the WDAC Policy in xml format. You could close the Wizard once it finishes the task.

- Run Powershell, cd to the location of WDAC Policy
- Convert .xml policy to binary:
> ConvertFrom-CIPolicy .SignedReputable052621.xml SignedReputable052621.bin

- Applying WDAC binary policy to targeted device by GPO or Local Group Policy:

- Result: After reboot the windows 10 device the first time (needed only once) for WDAC Policy to be applied. We could test the access.
To Generate new WDAC Policy from current Audit Policy
While a WDAC policy is running in audit mode, any application that runs but are supposed to be denied according to WDAC Audit Policy, is logged in the
Applications and Services LogsMicrosoftWindowsCodeIntegrityOperational event log. Script and MSI are logged in the
Applications and Services LogsMicrosoftWindowsAppLockerMSI and Script event log. These events can be used to generate a new WDAC policy that can be merged with the original Base policy or deployed as a separate Supplemental policy, if allowed.
You must have already deployed a WDAC audit mode policy to use this process.
- To generate new policy from current one by Powershell:
- In an elevated PowerShell session, run the following commands to initialize variables used by this procedure. This procedure builds upon the Lamna_FullyManagedClients_Audit.xml policy introduced in Create a WDAC policy for fully managed devices and will produce a new policy called EventsPolicy.xml.
PowerShell
$PolicyName= “Lamna_FullyManagedClients_Audit”
$LamnaPolicy=$env:userprofile+”Desktop”+$PolicyName+”.xml”
$EventsPolicy=$env:userprofile+”DesktopEventsPolicy.xml”
$EventsPolicyWarnings=$env:userprofile+”DesktopEventsPolicyWarnings.txt”
- Use New-CIPolicy to generate a new WDAC policy from logged audit events. This example uses a FilePublisher file rule level and a Hash fallback level. Warning messages are redirected to a text file EventsPolicyWarnings.txt.
PowerShell
> New-CIPolicy -FilePath $EventsPolicy -Audit -Level FilePublisher -Fallback Hash –UserPEs -Mul
More detail here.
- To generate new policy from current one by WDAC Wizard:
- Run the WDAC Wizard, Policy Editor
- Enter the Event log and click “Parse…”

- When get the prompt, click OK, Next

- Next, … and close the Wizard after policy is created.
To Create Suplemental Policy from a base policy by WDAC Wizard
- Run WDAC Wizard from Windows Start Menu.
- Choose Policy Creator mode
- Click Multiple Policy Format
- Choose Supplemental Policy
- Browse to Supplemental Policy location
- Browse to Base Policy location

- Next, Create policy and close the Wizard.
DEPLOYING WDAC POLICY
There are 4 ways to deploy WDAC:

To activate the WDAC Policy binary file to WMI repository.
- Another option is using Github AaronLocker Script, You can easily customize rules for your specific requirements with simple text-file edits. AaronLocker includes scripts that document AppLocker and WDAC policies and capture event data into Excel workbooks that facilitate analysis and policy maintenance. AaronLocker is designed to restrict program and script execution by non-administrative users.
- Deploying WDAC Policy by GPO for Domain’s devices.
Group Policy-based deployment of WDAC policies only supports single-policy format WDAC policies. To deploy multiple policy for Windows 10 version 1903 and later, you will need to use other deploying mechanisms.
You can copy the WDAC policies to a file share to which all computer accounts have access, e.g: NYCCL1WDACAllowMSAppEnforcedV3.bin:

- Regardless of the type of policy you deploy (.bin, .p7b, or .p7), they are all converted to SIPolicy.b7p in directory WindowsSystem32CodeIntegrity when WDAC is applied to Client Windows 10

- For multiple policies, they are in {Policy GUID}.cip policy files found in the WindowsSystem32CodeIntegrityCIPoliciesActive folder once WDAC Policy is applied to Client Windows 10.

- Deploying WDAC Policy by MECM (SCCM) for Device Collection.
An Example is shown here:

> Adding File or Folder path as shown here:

> Next and Close.
- Deploy WDAC Policy by MDM (Intune)
Intune includes native support for WDAC which can be a helpful starting point, but customers may find the available circle-of-trust options too limiting. To deploy a custom policy through Intune and define your own circle of trust, you can configure a profile using Custom OMA-URI.
An Example:
- OMA-URI: ./Vendor/MSFT/ApplicationControl/Policies/Policy GUID/Policy
- Data type: Base64
- Certificate file: upload your binary format policy file. You do not need to upload a Base64 file, as Intune will convert the uploaded .bin file to Base64 on your behalf.

After the first reboot to apply the WDAC Policy, then, only Office 365 applications, and Allowed Applications ( Acrobat DC) are able to run. Others (like Chrome) will be blocked as shown here:

Also, you could download and install applications but you could not run it as shown here:

To Monitor WDAC Events
A Windows Defender Application Control (WDAC) policy logs events locally in Windows Event Viewer in either enforced or audit mode. These events are generated under two locations:
- Event IDs beginning with 30 appear in Applications and Services logs – Microsoft – Windows – CodeIntegrity – Operational
- Event IDs beginning with 80 appear in Applications and Services logs – Microsoft – Windows – AppLocker – MSI and Script
Microsoft Windows CodeIntegrity Operational log event IDs
Event ID
|
Explanation
|
3076
|
Audit executable/dll file
|
3077
|
Block executable/dll file
|
3089
|
Signing information event correlated with either a 3076 or 3077 event. One 3089 event is generated for each signature of a file. Contains the total number of signatures on a file and an index as to which signature it is.
Unsigned files will generate a single 3089 event with TotalSignatureCount 0. Correlated in the “System” portion of the event data under “Correlation ActivityID”.
|
3099
|
Indicates that a policy has been loaded
|
Microsoft Windows Applocker MSI and Script log event IDs
Event ID
|
Explanation
|
|
8028
|
Audit script/MSI file generated by Windows LockDown Policy (WLDP) being called by the scripthosts themselves. Note: there is no WDAC enforcement on 3rd party scripthosts.
|
|
8029
|
Block script/MSI file
|
|
8038
|
Signing information event correlated with either a 8028 or 8029 event. One 8038 event is generated for each signature of a script file.
Unsigned script files will generate a single 8038 event with TotalSignatureCount 0.
|
|
Optional Intelligent Security Graph (ISG) or Managed Installer (MI) diagnostic events 3090, 3091, 3092
Event ID
|
Explanation
|
3090
|
Allow executable/dll file
|
3091
|
Audit executable/dll file
|
3092
|
Block executable/dll file
|
- The SmartLocker template which appears in the event should indicate why the binary passed/failed. Only one event is generated per binary pass/fail.
- If both ISG and MI are disabled, 3090, 3091, and 3092 events will not be generated.
Enabling ISG and MI diagnostic events
- In order to enable 3091 audit events and 3092 block events, you must create a TestFlags regkey with a value of 0x100.
- reg add hklmsystemcurrentcontrolsetcontrolci -v TestFlags -t REG_DWORD -d 0x100
- In order to enable 3090 allow events as well as 3091 and 3092 events, you must instead create a TestFlags regkey with a value of 0x300.
o reg add hklmsystemcurrentcontrolsetcontrolci -v TestFlags -t REG_DWORD -d 0x300
WDAC Tips
- Quick WDAC Policy applied to a testing Windows 10 device without GPO or Deployment Mechanism:
To apply the policy immediately,
- copy the {Policy GUID}.cip binary policy created by the WDAC Wizard location to the CodeIntergrity Active Foder in :
WindowsSystem32CodeIntegrityCIPoliciesActive folder

- Reboot device after copying policy to the above folder.
- To Control Application Installation – Managed Installer:
- Specify managed installers by using the Managed Installer rule collection in AppLocker policy.
- Enable service enforcement in AppLocker policy.
- Enable the managed installer option in a WDAC policy.
Detailed steps as in Microsoft document “Configure a WDAC managed installer (Windows 10)”
- To prevent machine unbootable to Windows OS during WDAC testing period.
The denied rule of WDAC Policy related to system driver may cause a loss of OS on testing device.
In WDAC Wizard’ Settings, please make sure to enable “Boot Audit on Failure” feature, it will automatically switch policy mode from enforcement to audit if the system drivers failed to load due to denied rule of Policy. This will save OS from loss because of driver failure in boot procedure.
To prevent loss of OS :
- On testing device, run WDAC Wizard – Policy Editor
- Select your Policy xml file to open it
- Policy Rules, click Advanced Options as shown here:

- Click to turn on “Boot Audit on Failure”
- Next and close the Wizard.
- In WindowsSystem32CodeIntegrityCIPoliciesActive folder, replace the old .cip policy with new cip policy and reboot the device to apply new WDAC policy.
- To Generate an WDAC rule for Universal App WUA based on package name:
- Run WDAC Wizard and Create a Custom Rule based on package App as shown here:
- Type a word related name of package e.g: F5
- Search (button)
- Create Rule
To view the name of your package if you do not know the exact name of WUA
- Go to C:Program FilesWindowsApps
- View your WUA apps ID
I hope the information is useful for your WDAC deployment. Then, until next time.
Reference:
Disclaimer
- The sample scripts are not supported under any Microsoft standard support program or service. The sample scripts are provided AS IS without warranty of any kind. Microsoft further disclaims all implied warranties including, without limitation, any implied warranties of merchantability or of fitness for a particular purpose. The entire risk arising out of the use or performance of the sample scripts and documentation remains with you. In no event shall Microsoft, its authors, or anyone else involved in the creation, production, or delivery of the scripts be liable for any damages whatsoever (including, without limitation, damages for loss of business profits, business interruption, loss of business information, or other pecuniary loss) arising out of the use of or inability to use the sample scripts or documentation, even if Microsoft has been advised of the possibility of such damages.
by Contributed | Jun 25, 2021 | Technology
This article is contributed. See the original author and article here.
Throughout the last several months there have been many new features, updates, and happenings in the world of Information Protection at Microsoft. As we continue to build out more of this story, we wanted to use this opportunity to connect with customers, partners, and more on some of these updates to keep you informed and provide a single pane of glass on everything we have been working on for the last several months. In addition, we hope to give you some insight into the next big things being built within MIP overall.
Microsoft Information Protection:
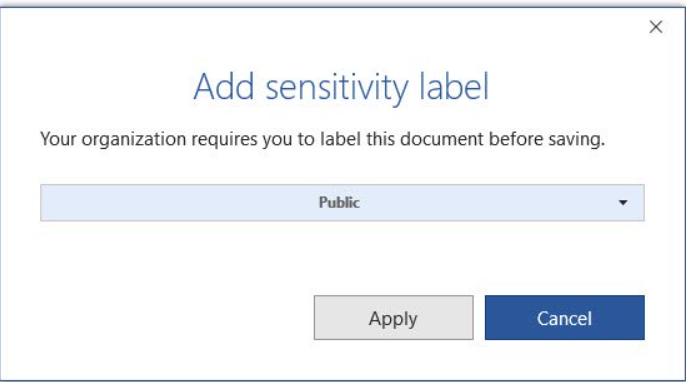
General Availability: Mandatory Labeling
General Availability: Improvements for Exchange Online service side auto-labeling

Public Preview: Co-authoring
- Co-authoring and AutoSave on Microsoft Information Protection-encrypted documents
- Client-based automatic and recommended labeling on Mac
- Mandatory labeling requiring users to apply a label to their email and documents
- Availability of audit label activities in Activity Explorer
- Native support for variables and per-app content marking
- You can leverage co-authoring using:
- Production or test tenant
- Microsoft 365 apps with the following versions:
- Windows – Current Channel 16.0.14026.20270+ (2105)
- Mac: 16.50.21061301+
- If AIP Unified Labeling Client Version is in use, verify that in addition to the updated Microsoft 365 app, you use version 2.10.46.0 of the Unified Labeling client.
- PLEASE NOTE: That Co-authoring for Native/Built-In Labeling will be added in the upcoming Current Channel within 2 weeks
Read more about the feature at Enable co-authoring for documents encrypted by sensitivity labels in Microsoft 365 – Microsoft 365 Compliance | Microsoft Docs

Public Preview: AIP Audit Logs in Activity Explorer

General Availability: Dynamic Markings with Variables within native labeling across all platforms

GA: DLP Alerts
Microsoft announces the General Availability of the Microsoft Data Loss Prevention Alerts Dashboard. This latest addition in the Microsoft’s data loss prevention solution provides customers with the ability to holistically investigate DLP policy violations across:
- Exchange
- SharePoint Online
- OneDrive
- Teams
- Devices
- Cloud apps
- On-premises file shares
Learn more about the feature at: Learn about the data loss prevention Alerts dashboard – Microsoft 365 Compliance | Microsoft Docs

Azure Information Protection:
GA: Track and Revoke
- Document tracking provides information for administrators about when a protected document was accessed.
- If necessary, both admins and users can revoke document access for protected tracked documents.
- This feature is available for AIP UL client version 2.9.111.0 or later

Public Preview: DLP On-Prem
- The DLP on-premises scanner crawls on-premises data-at-rest in file shares and SharePoint document libraries and folders for sensitive items that, if leaked, would pose a risk to your organization or pose a risk of compliance policy violation
- This gives you the visibility and control you need to ensure that sensitive items are used and protected properly, and to help prevent risky behavior that might compromise them
- You need to leverage the Scanner binaries from AIP UL Client Version 2.10.43.0

![[Guest Blog] Hypotheses and High Hopes: How 'empower everyone' can really mean everyone](https://www.drware.com/wp-content/uploads/2021/06/fb_image-194.jpeg)
by Contributed | Jun 25, 2021 | Technology
This article is contributed. See the original author and article here.
This blog was written by MVP, Paul Culmsee. Paul explains how he came to guide many non IT people into Power Platform experts, and what he has learnt along the way. Paul has a proven track record of developing world-class Power Platform talent through mentorship.
My name is Paul Culmsee and I run a consultancy called Seven Sigma in Perth, Western Australia.
I’m starting my story at the time when a startup that I had poured my heart, soul (and cash) into failed. Why it failed doesn’t actually matter, but amongst the pain felt at the time came the learning of some lessons. One in particular that really rearranged my mental molecules was finally understanding what it means to formulate a hypothesis, test it as quick as you can to see if you are right, and adjust if you are not. This principle has served me very well ever since, and as you will see has delivered some awesome outcomes that we never could have predicted.
So as you read my story, see if you can spot all my hypotheses, and how I tested them.
“Can this be used for audits?”
I think it was late 2016 or early 2017 when I built my first simple Power App for capturing lessons learnt on projects and was surprised at how quick and easy it was. I showed it to a team member, a Safety Manager, who took the phone, used the app for a few moments, then asked two questions: 1) “Is PowerApps any good?” and; 2) “Can this be used for audits?”
I found it interesting that he had little interest in the problem my app was trying to solve, but quickly connected the concept to one of his business’ own problems. In the past, when introducing tools like SharePoint or Teams, I was used to having to explain the intent and benefits to users.
Anyway, at that time, I did not know the answers, so I said, “I honestly don’t know if it’s any good, but would you be willing to fund a few days to build a prototype? Worst case is it sucks, and you can give a real prototype to IT to get done by real developers.”
Five days later, the app was delivered and yes, Power Apps seemed good. It was surprisingly easy, and I suggested it could be taught to anyone. They took me up on it which led to conducting what I suspect is the world’s first Hackathon-style training session on Power Apps to a group of non-IT users. I taught them how to build their own audit apps. I will never forget the best comment of the day that is the essence of citizen development…
“We are a bunch of electricians, welders and fitters and here we are, building apps!”
On daughters and hackathons
Word spread of that session and in true FOMO style, I ended up doing six more sessions with different teams at that company. I began to suspect Power Apps was going to be mega huge in the future, and it would initially be driven by citizen developers before IT departments would start to notice. I had proven that hackathon training worked at small scale, but that was all members of the same company and teams. What about folks from different organisations with different use-cases?
To test this hypothesis, I called up my old friend, Debbie Ireland, in New Zealand, who runs a training company and after a couple of conversations, numbers and dates were set for public Power Apps hackathons in New Zealand. The experiment continued…
Around this time, my teenage daughter, Ashlee, was struggling with anxiety and depression, something that had affected her for some time. She has already told this story, but the quick version is she agreed to my offer to teach her Power Apps for the same money she was getting in a dead-end job. She learnt it blazingly fast, and early on, when I asked her if she liked it, she answered, “Well, I don’t hate it!” (I took that as a yes!).
Ashlee did well with Power Apps – very well. Such was the positive change in her, I asked her to come to New Zealand with me to help run the hackathons. Not only were the sessions all sold out, but we also learnt that hackathon-style training works for diverse groups too. More importantly for me was how it transformed Ashlee. At times, we would swap roles, and she would present. For someone who was too terrified to put her hand up at school, she was now taking centre stage. In fact, when she came home, she designed and ran youth hackathons and I was relegated to the assistant role.
 The world-first Power Platform Youth Hackathon in 2018
Early success
While all of this was happening, we were proving the power of citizen development at one of our major clients – an internationally known Australian company. What started out as me helping a citizen maker put the finishing touches off an app that managed logistics at a port, led to the IT department taking note, asking me 1) for help to govern the platform; and 2) to prove that citizen development could be the basis for that governance via a mentored and end-to-end project.
On the latter challenge, I spent 12 half-day sessions over three months mentoring Ada and Tram, two geoscientists by profession, to build and launch that particular app. It was a success, was enhanced from its scope and as I type these words, is being re-engineered as a whole-of-organisation solution. The success of these type of stories meant that this organisation was one of the earliest to sign an enterprise deal with Microsoft to unlock the broader Power Platform stack.
On the governance side, I worked with Nichole – a former Executive Assistant with no formal IT background, who was the inaugural member of the Power Apps team. I mentored her as not only an app maker, but on how to govern, manage and grow the Power Platform. Together, we designed a vision, service model, and guardrails for Power Platform, and she manages it to this day (and is my top coffee buddy).
I still work with Nichole and have many fond memories. At the very start, she came in completely green, so not only was she tasked with governance, but inherited some Power Apps work performed by someone else. Talk about diving in the deep end! In our first session I remember her asking me “What is a variable?” Yet, she embraced the learning curve with such grit that within a short time, she had built and deployed various apps, trained users and developed a deep understanding of the whole platform, and how to manage it.
By the way, much of the early work Nichole and I did can now be found in the dashboards of the Power Platform Centre of Excellence Starter Kit.
 One of the many dashboards we developed now in Power Platform CoE Starter Kit
The three-month challenge…
I would be remiss not to mention another Culmsee here – my wife, Terrie. Even before Ashlee started her journey, Terrie could see value and learnt how to build apps as well. A nurse in her early career, Terrie has a lot of other strings to her bow and is a natural when it comes to User Experience and Design-Thinking. In a wonderful feedback loop, her deep working knowledge of Power Apps means she now mentors everyone in our team (including me) to the point that when we design our apps, we always ask each-other “What would Terrie make us change here!”
Learning from Terrie, Ashlee, Ada, Tram, Nichole, and by now a very large number of hackathons, I felt we could now take someone with no experience, get them building apps in a week, get them good in a month, and get them really good within three months.
To prove this, we took on two trainees at my company – Tahlia and Woong. Both were students who came in with no prior Power Apps experience, and both worked in the Power Platform team at my client with Nichole and myself. They did not just perform app development either. Both had to engage with users directly, envision the solution, learn to estimate well, develop User Experience skills, train users, and learn how to structure projects. Both Tahlia and Woong exceeded our expectations by light-years, remain full-time at my company, and along with Ashlee, are now senior members of our team and highly regarded by clients. I am so proud of them all – they give me the energy to keep going!
Onwards and upwards
I think we have done our bit to prove that citizen development is real, is desirable, and most importantly, does a lot more than teach some app development skills. As you can see by my stories, people have learnt much more than how to open Power Apps studio. They have truly embraced the promise of Digital Transformation.
I semi-jokingly tell people that while Microsoft’s mission is to “Empower everyone”, Seven Sigma’s mission is to “prove that Microsoft is not lying”. So, have we proved all we set out to prove? No! The next step in our plans is to take on more trainees, but have Tahlia, Ashlee and Woong mentor them, to prove that a virtuous cycle of world-class mentoring can be created and sustained.
Ten years ago, websites used to cost many thousands of dollars to build and maintain, yet these days hugely rich sites can be built by anyone, using monthly online services at a fraction of that original cost. I believe apps are now on that same trajectory and the opportunity is huge for organisations. The paradigm is changing before our very eyes.
Whether you agree with my assertion about the future of apps or not, I get disillusioned when I hear people lament about a lack of local skills/talent, but then exacerbate the problem by defaulting to offshore development. It is my sincere hope that more organisations, as they recognise the paradigm of citizen development and low code, give local folks opportunities to shine.
We, at Seven Sigma, have proven it can be done. What about your company?
by Contributed | Jun 25, 2021 | Technology
This article is contributed. See the original author and article here.
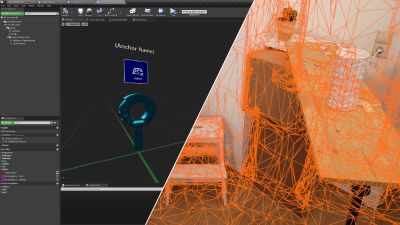
We’re proud to announce HoloLens 2 Mixed Reality Production for Unreal Engine, a free course built in collaboration with our friends at Epic Games. You don’t need to already know how to use Unreal Engine or develop for the HoloLens — this course will take you from zero to expert! It covers every topic you’ll need to know to build complex full-featured AR apps, from gestural controls to mapping the 3D world around you using mesh tracking and Azure Spatial Anchors, all using Unreal’s Blueprints system rather than requiring you to write C++ code. While the course will help you get a HoloLens 2 device set up for development if you have one, you can also use the HoloLens Simulator or the Unreal Play in Editor feature without needing an AR headset.
Today, we’re excited to launch the first four courses of the learning path.
In “Prepare Unreal Engine for Mixed Reality Development”, you’ll learn how to set up your development environment, setting up both Unreal Engine 4 and the HoloLens development kit to successfully build and deploy projects to a physical HoloLens device or the HoloLens simulator.
In “Gaze and Head Interactions”, you’ll learn all about the HoloLens’ gaze and head tracking capabilities, and explore best practices for designing experiences that use head and gaze position.
 A sample app you’ll be building with a 3D world
In “Incorporate Hand Interactions with UX Tools”, you’ll learn how to integrate hand tracking into your apps, including complex manipulation of objects in your scene with tricks like snapping to a world mesh.
Finally, “Implement UI with UX Tools and Unreal Motion Graphics” will show you how to create delightful user interfaces in both 2D and 3D using Unreal Motion Graphics and the UX Tools library.
 Designing interactions that use the real world
There will be 7 more courses coming soon covering more advanced topics like world mapping, spatial audio, voice recognition, performance optimization, and multi-device networking, but these first few courses will give you a solid foundation to start building exciting experiences for the HoloLens with Unreal Engine 4!
The course is completely free and available here.
by Contributed | Jun 25, 2021 | Technology
This article is contributed. See the original author and article here.
This blog is part of the Change Data Capture in Azure SQL Databases Blog Series, which started with the announcement on releasing CDC in Azure SQL Databases in early June 2021. You can view the release announcement here: https://aka.ms/CDCAzureSQLDB
Key Change Data Capture Concepts
Below is a list of the key CDC components that are worth understanding before enabling CDC at the database and table levels:
- Capture process (sp_cdc_scan) – Scans the transaction log for new change data, created when first source table is enabled for CDC.
- Cleanup process (sp_cdc_cleanup_change_tables) – Cleanup for all DB change tables based on a time retention value, created when first source table is enabled for CDC.
- Change tables – Source tables have associated change tables which have records of change data.
- Table-valued functions (fn_cdc_get_all_changes, fn_cdc_get_net_changes) – Enumerate the changes that appear in the change tables over a specified range, returning the information in the form of a filtered result set.
- Log sequence number – Identifies changes that were committed within the same transaction and orders those transactions.
- Monitoring CDC – Use DMVs such as sys.dm_cdc_log_scan_sessions and sys.dm_cdc_errors.
Now in public preview, CDC in Azure SQL Databases offers a similar functionality to SQL Server and Azure SQL Managed Instance CDC. However, on Azure SQL Databases, CDC provides a scheduler which automatically runs the capture and cleanup processes, which are run as SQL Server Agent jobs on SQL Server and on Azure SQL Managed Instance.
Enabling Change Data Capture on Azure SQL Databases
1. Enable CDC at the database level:
EXEC sys.sp_cdc_enable_db
System tables (e.g. cdc.captured_columns, cdc.change_tables) and the cdc schema will be created, stored in the same database.
2. Enable CDC at the table level:
EXEC sys.sp_cdc_enable_table
@source_schema = N’dbo’,
@source_name = N’MyTable’,
@role_name = N’MyRole’,
@filegroup_name = N’MyDB_CT’,
@supports_net_changes = 1
The associated change table (cdc.dbo_MyTable_CT) will be created, along with the capture and cleanup jobs (cdc.cdc_jobs). Be aware that in Azure SQL Databases, capture and cleanup are run by the scheduler, while in SQL Server and Azure SQL Managed Instance they are run by the SQL Server Agent.
3. Run DML changes on source tables and observe changes being recorded in the associated CT tables.
4. Table-valued functions can be used to collect changes from the CT tables.
5. Disable CDC at the table level:
EXEC sys.sp_cdc_disable_table
@source_schema = N’dbo’,
@source_name = N’MyTable’,
@capture_instance = N’dbo_MyTable’
6. Disable CDC at the database level:
EXEC sys.sp_cdc_disable_db
Limitations for CDC in Azure SQL Databases
- In Azure SQL Databases, the following tiers within the DTU model are not supported for Change Data Capture: Basic, Standard (S0, S1, S2). If you want to downgrade a Change Data Capture-enabled database to an unsupported tier, you must first disable Change Data Capture on the database and then downgrade.
- Running point-in-time-restore (PITR) on an Azure SQL Database that has Change Data Capture enabled will not preserve the Change Data Capture artifacts (e.g. system tables). After PITR, those artifacts will not be available.
- If you create an Azure SQL Database as an AAD user and enable Change Data Capture on it, a SQL user (e.g. even sys admin role) will not be able to disable/make changes to Change Data Capture artifacts. However, another AAD user will be able to enable/disable Change Data Capture on the same database.
Performance implications for CDC in Azure SQL Databases
The performance impact from enabling change data capture on Azure SQL Database is similar to the performance impact of enabling CDC for SQL Server or Azure SQL Managed Instance. Factors that may impact performance:
- The number of tracked CDC-enabled tables.
- Frequency of changes in the tracked tables.
- Space available in the source database, since CDC artifacts (e.g. CT tables, cdc_jobs etc.) are stored in the same database.
- Whether the database is single or pooled. For databases in elastic pools, in addition to considering the number of tables that have CDC enabled, pay attention to the number of databases those tables belong to. Databases in a pool share resources among them (such as disk space), so enabling CDC on multiple databases runs the risk of reaching the max size of the elastic pool disk size. Monitor resources such as CPU, memory and log throughput.
Consider increasing the number of vCores or upgrade to a higher database tier to ensure the same performance level as before CDC was enabled on your Azure SQL Database. Monitor space utilization closely and test your workload thoroughly before enabling CDC on databases in production.
Blog Series for Change Data Capture in Azure SQL Databases
We are happy to continue the bi-weekly blog series for customers who’d like to learn more about enabling CDC in their Azure SQL Databases! This series explores different features/services that can be integrated with CDC to enhance change data functionality.
The next blog will focus on using Azure Data Factory to send Change Data Capture Data to external destinations.
by Contributed | Jun 25, 2021 | Technology
This article is contributed. See the original author and article here.
On November 1, 2021, Microsoft will no longer support Office 2010 & 2013 clients for Microsoft 365 Government Community Cloud (GCC) and Microsoft 365 GCC High tenants, and will deny access to Microsoft 365 GCC High. To ensure business continuity, reduce security risk, and maintain CMMC compliance, Summit 7 recommends assessing and planning your organizational upgrade today.
Primary Issue: Office desktop client applications, such as Outlook, OneDrive and Teams clients cannot connect to Microsoft 365 GCC High services. Windows Defender for Endpoint will also experience compatibility issues.
Microsoft Government Cloud Services are always evolving. New releases are iterated, tested, and released into the Microsoft Commercial Cloud and Government Community Cloud at a rapid cadence. After new applications and services have gone through the FedRAMP compliance certification, they are implemented in Office 365 GCC High. At the same time, aging versions of Microsoft Office and Windows desktop operating systems will face reliability and performance issues when connecting to the current release of Microsoft 365 Cloud platforms.
As of this writing, November is less than five months away. For most of our clients, the Microsoft End-of-Support for Office 2010 and Office 2013 falls in the next fiscal budget period to start planning and executing an organization migration for older devices, desktop OS, and Office applications. Additionally, the latest versions of Microsoft Office desktop applications come with the latest release of Windows 10 as an operating system requirement. Organizations can avoid future user experience issues by taking strategic steps now and increase proper cyber hygiene by updating out-of-support applications and OS. Even more, neglecting some of these steps may put your organization in a non-compliant state according to CMMC Level 3 requirements.
The CMMC Domain – System and Information Integrity (SI) – is one of the areas of concern when operating dated OS, firmware, and endpoint software. SI.1.210 for example requires organizations to “Identify, report, and correct information system flaws in a timely manner.” By keeping users on non-supported clients, the proper security updates will not occur, and the organization will be susceptible to advanced threats and jeopardize their ability to meet CMMC Level 3.
On the other hand, there can be a well planned approach to maintain certain workloads or end-of-life technologies. Risk Management (RM) 3.147 requires DIB suppliers to “Manage non-vendor supported products separately and restrict as necessary to reduce risk.” If a smaller user base needs to perform unique duties with Office 2010 or 2013 applications, the organization can consider isolating endpoints with firewalls or air-gapped network architectures.
Understanding Microsoft Fixed Policy Product Lifecycle
Microsoft Products are released in two phases generally covering a ten-year lifecycle —Mainstream Support and Extended Support.
- Mainstream Support is the first phase of a product’s lifecycle and typically lasts five years. During this phase:
- Microsoft receives requests and provides changes to product design and features
- Performs security and non-security updates
- Self-help and paid support options are available
- Extended Support is the final phase of a product’s lifecycle and typically last five years from the end of the Mainstream Support. Microsoft only supports products at the published service level in Extended Support including:
- Security updates
- Paid programs
- Unified Support customers have the ability to request non-security fixes for designated products
If it’s absolutely mission-critical to run legacy applications beyond the End of Support date, you typically can invest in Microsoft’ Extended Security Update (ESU) Program, but this is mostly untenable with Microsoft 365 GCC High.
Can I Delay Migrating Office 2010/2013?
Microsoft products are Secure by Design for the era the products were originally released and supported. Still, the cyber threat landscape is constantly evolving. As a result, older applications simply can’t keep pace with software innovation and effectively address software vulnerabilities. This particular flaw was on full display when organizations failed to patch and update Exchange 2013, resulting in the infamous SolarWinds attack. As we continue to see an escalation in the scale, scope, and sophistication of cyber threats in the United States from nation states and cyber criminals – the continued use of outdated applications, operating systems, and infrastructure is an open invitation for malicious actors to wreak havoc on your organization.
Final Thoughts for Migration Planning
Security and compliance are significant reasons on their own to migrate your organization to the latest clients for Windows and Microsoft 365 for your Government Cloud Services. More than that, there is another dynamic that is equally important—the productivity of your organization—in other words, the people dynamic.
Legacy Office applications are often customized for the organization’s mission and people. These customizations may use macros, scripts, addons, and third-party applications that are also out-of-support, no longer needed, or non-compliant with CMMC. Yet, people rely on these bespoke Office applications to perform their daily activities. Within the CMMC clarification documents, SC.3.180 explains “As legacy components in your architecture age, it may become increasingly difficult for those components to meet security principles and requirements. This should factor into life-cycle decisions…”
As you assess your inventory, be mindful to identify any customizations to your legacy Office applications. Some features may have been deprecated, replaced, or embedded into the latest versions of Microsoft 365. Note the changes so that you can prepare your people for what’s coming, what’s different, and how to enhance their productivity, collaboration, and mission-fulfillment.
Help Is Always Available
Getting a handle on the number of devices and their respective configurations can be a daunting task. Microsoft Endpoint Manager is a solution to assess and manage devices; as well as deploy apps across your organization’s desktops, laptops, tablets, and phones. It’s part of the Microsoft 365 Cloud and can help accelerate your organization’s ability to be compliant with regulations, mitigate cyber threats, and improve your organization’s productivity.
Microsoft keeps a short list of partners that understand the requirements for CMMC, Office 365 GCC High, and all of the nuance of modernizing DIB companies. You don’t have to tackle these challenges alone. Summit 7 can partner to help you assess your migration and start planning today, so that this year you can enjoy the holiday season in November/December.
Original Source Blog:
https://info.summit7systems.com/blog/office-2010-2013-clients-eos-gcc-high
by Contributed | Jun 25, 2021 | Technology
This article is contributed. See the original author and article here.
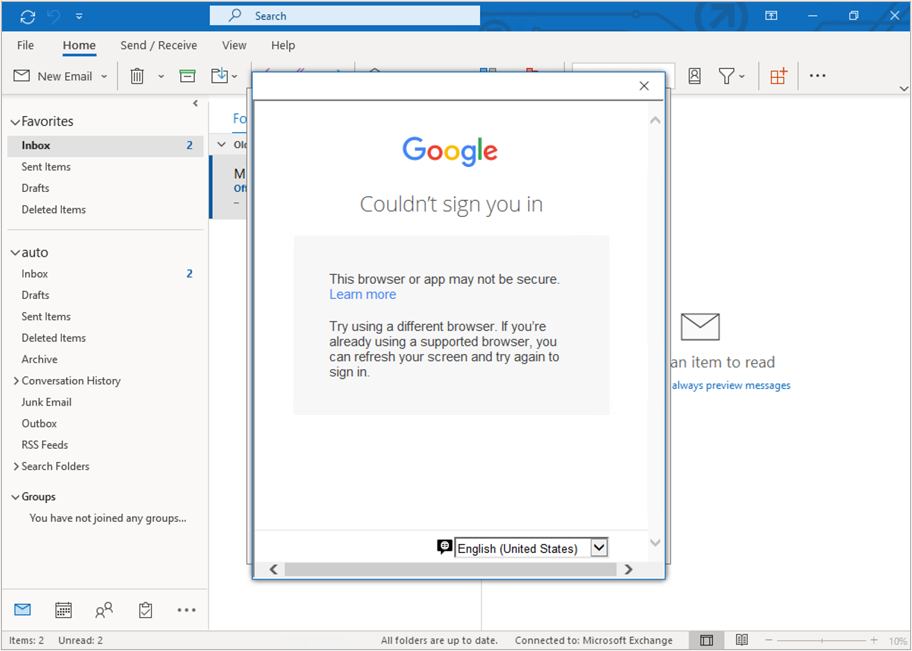
We’ve recently received customer reports that they are unable to add Google accounts to Outlook once the Windows 10 Security Baseline is applied. When attempting to add a Google account, they see the message “Couldn’t sign you in. The browser or app may not be secure,” as shown below.
Google prompt in Outlook displaying a message “Couldn’t sign you in. The browser or app may not be secure”.
This error is caused by a configuration setting within a Windows 10 Security Baseline.
- Sign in to the Microsoft Endpoint Manager admin center.
- Navigate to Endpoint Security > Security baselines > Windows 10 Security Baseline.
- Under Profile Name, select a baseline.
- Select Properties, then click Edit next to Configuration settings.
- Under Internet Explorer, there is a setting “Internet Explorer security zones use only machine settings,” which is set to Enabled by default. To avoid this issue, set the field to Not configured.
 Screenshot of a Windows 10 Security Baseline with the “Internet Explorer security zones use only machine settings” setting shown.
When troubleshooting this issue, note that there are in other areas that should be checked:
- Intune administrative templates:
- In Microsoft Endpoint Manager admin center, go to Devices > Configuration profiles.
- Select the administrative template, select Properties, then click Edit next to Configuration settings.
- Go to Computer Configuration > Microsoft Edge > Security Zones: Use only machine settings.
- Confirm the Enabled button is not selected. This field is left blank by default.
- Intune settings catalog (preview):
- In Microsoft Endpoint Manager admin center, go to Devices > Configuration profiles.
- Select the settings catalog, select Properties, then click Edit next to Configuration settings.
- Go to Internet Explorer > Security Zones: Use only machine settings.
- Confirm the toggle is not set to Enabled. This field is set to Disabled by default.
- Group policy object (GPO) settings.
If you have any questions, reply to this post or reach out to @IntuneSuppTeam on Twitter.

by Contributed | Jun 25, 2021 | Technology
This article is contributed. See the original author and article here.
Guest blog by Electronic and Information Engineering Project team at Imperial College.
Introduction
We are a group of students studying engineering at Imperial College London!
Teams Project Repo and Resources
For a full breakdown of our project see https://r15hil.github.io/ICL-Project15-ELP/
Project context

The Elephant Listening Project (ELP) began in 2000, our client Peter Howard Wrege took over in 2007 as director https://elephantlisteningproject.org/.
ELP focuses on helping protect one of three types of elephants, the forest elephant which has a unique lifestyle and is adapted to living in dense vegetation such as the forest. They depend on fruits found in the forest and are known as the architect of the rainforest since they disperse seeds all around the forest. Since they spend their time in the forest it is extremely hard to track them since the canopy of the rainforest is so thick, you cannot see the forest floor, so ELP use an acoustic recorder to record vocalisations of the elephants to track them. Currently they have put one acoustic recorder per 25 square kilometre. These devices can detect elephant calls in a 1km radius and gunshots 2-2.5km radius around each recording site. Currently the recordings are recorded to an SD card, and then collection from all the sites takes a total of 21 days in the forest. This happens every 4 months. Once all the data is collected it goes through a simple ‘template detector’ which has 7 examples of gunshot sounds, cross correlation analysis is carried out, locations in the audio file with a high correlation get flagged as a gunshot.
The problem with the simple cross correlation method is that it produces an extremely large amount of false positives, such as tree branch falls and even things as simple as raindrops hitting the recording device. This means that there is a 15-20 day analysis effort, however it is predicted that with a better detector, this analysis effort can be cut down to a 2-3 day effort!
Currently the detector has an extremely high recall, but a very bad precision (0.5%!!!). The ideal scenario would be to improve the precision, in order to remove these false positives and make sure that when a gunshot is detected, the gunshot is in fact a gunshot (high precision).
The expectation is to have a much better detector than the one in place, that can detect gunshots to a very high precision with a reasonable accuracy. Distinguishing between automatic weapons (eg AK-47) and shotguns is also important, since automatic weapons are usually used to poach elephants. This is an important first step to real time detection.
Key Challenges
The dataset we had was very varied and sometimes noisy! It consisted of thousands of hours of audio recordings of the rainforest and a spreadsheet of the gunshots located in the files. The gunshots we were given varied, some close to the recorder and some far, sometimes multiple shots and sometimes single shots.
A lot of sounds in the rainforest sound like gunshots, but it is relatively easier distinguishing them using a frequency representation which brought us onto our initial approach.
Approach(es)
Our first approach was to use convolutional neural network known as CNN. We trained this using a method called mel-frequency cepstrum coefficients known as MFCCs.

This MFCC method is a well known way to tackle audio machine learning classification.
MFCC extracts features from frequency, amplitude and the time component. However, MFCCs are very sensitive to noise, and because the rainforest contains various sounds, testing it on 24 hour sound clips did not work. The reason it didn’t work is because our data of the gunshots to train our model also included other sounds (noise), which meant that our machine learning model learnt to recognise random forest background noises instead of gunshots. Due to a lack of time and knowledge on identifying gunshot, checking and relabelling all of our dataset manually so that it only clean gunshots was not viable. Hence, we decided to use a computer vision method as a second approach.
We focused on labelling gunshots on a visual representation of sound called the mel-spectrogram which allows us to ignore the noise other parts of the audio clip which would be noise, and specifically focus on the gunshot.

Labelling our data was extremely easy for our computer vision (object detection) model. We used the Data Labelling service on Azure Machine Learning where we could label our mel-spectrograms for gunshots and build our dataset to train our object detection models. These object detection models (Yolov4 and Faster R-CNN ) use XML files in training, Azure Machine Learning allowed us to export our labelled data in a COCO format in a JSON file. The conversion from COCO to the XML format we needed to train our models was done with ease.
With the new object detectors, we were able to find the exact start and end times of gunshots and save it to a spreadsheet!


This is extremely significant because essentially what our system is doing is not only detecting gunshots, but generating clean and labelled data of gunshots, and with this data more standard methods of machine learning for audio methods can be used, such as MFCC.
To expand on this, we also found that our detector was picking up “gunshot like” sound events such as thunder, monkey alarm calls and raindrops hitting the detector (‘hn’ in the image below). This meant that we could use that data to train our model further, to say ‘that is not a gunshot, it is a…’, training for the other sound events to be detected too.

Our Design History – Overview

Concept
The concept of our system was to train a machine learning model in order to classify sound. A sound classification model would be to detect whether or not there was a gunshot.
Signal Processing
Trying to detect gunshots directly from sound waveform is hard because it does not give you much information to work with, only amplitude. Hence, we needed to do some signal processing to extract some features from the sound.
Initially we began research by reading papers and watching video lectures in signal processing. All sources of research we used can be found in “Code and resources used”.
What we found were two common signal processing techniques in order to analyse sound, the Mel-Frequency Cepstrum Coefficients (MFCCs, on the left below) and the Mel-Spectrogram (on the right below).


Since MFCCs were a smaller representation and most commonly used in audio machine learning for speech and sound classification, we believed it would be a great place to start, and build a dataset on. We also built a dataset with Mel-spectrograms.
Machine Learning – Multi-layer perceptron (MLP)
The multi-layer perceptron is a common machine learning model used for things such as regression or classification, from our knowledge of machine learning we believed this network would not perform well due to its ‘global approach’ limitation, where all values are passed into the network at once. This will also have an extremely high complexity with the data representation of sounds we are using as we would have to flatten all the 3D arrays into a single 1D array and input all of this data at once.
Convolutional Neural Network (CNN)
CNNs are mainly applied to analyse visual 2D data therefore we do not have to flatten our data like we have to do with MLP. Using this you can classify an image to find whether or not a gunshot is present since is “scans through” the data and looks for patterns, in our case a gunshot pattern. We could use both MFCC or Mel-spectrograms to train this.
Recurrent Neural Network (RNN)
A recurrent neural network is a special type of network which can recognise sequencing, and therefore we believed it would work very well in order the detect gunshots. This is because a gunshot typically has an initial impulse and then a trailing echo, an RNN would be able to learn this impulse and trailing echo type scenario and output whether it was a gunshot or something else. This would be trained with MFCCs.
Object Detection
Although usually a larger architecture, object detection would work well in order to detect gunshots from Mel-Spectrograms due to a gunshots unique shape. This means that we can detect whether there is a gunshot present, but also how many gunshots are present as Object Detection won’t classify the entire image like a CNN would, it would classify regions of the image.
Implementation -The Dataset
The data we were given was a key factor and had a direct impact in which models worked for us and did not.
We were given thousands of hours of audio data, each file being 24 hours long. Since we were provided with ‘relative’ gunshot locations in audio clips, our dataset was very noisy, the time locations we were given usually contained a gunshot within 12 seconds of the given time, and sometimes contained multiple gunshots. Due to the lack of time on this project, it was not realistic to listen to all of the sound clips and manually relabel all our data by ear, also, gunshots are sometimes very hard to distinguish from other rainforests sounds by ear, and many of these other sounds were very new to us. This is why we took a 12 second window in our signal processing, to ensure all of our data contains the gunshot(s). Luckily, in our testing of different machine learning techniques, we found an approach to solve the problem of detecting gunshots in noisy data, as well as building a clean dataset for the future!
CNN with Mel-Spectrogram
Building a simple CNN with only a few convolutional layers, which a dense layer classifying whether there is a gunshot or not, worked quite well, with precision and recall above 80% on our validation sets! However, this method on noisy images did not work well, noisy images being a Mel-spectrogram with a lot of different sounds, such as below. Although it has an OK precision and recall, we cannot guarantee all the gunshots will be the only sounds occuring at once. Below you can see an example of a gunshot which can be detected using a CNN, and a gunshot that cannot be detected using a CNN.


CNN and RNN with MFCC
This method suffered a similar problem with noise as the CNN with Mel-Spectrogram did. However with a clean dataset, we think an RNN with MFCC would work extremely well!
Object Detection with Mel-Spectrogram
Object Detection won’t classify the entire image like a CNN would, it would classify regions of the image, and therefore it can ignore other sound events on a Mel-spectrogram. In our testing we found that object detection worked very well in detecting gunshots on a mel-spectrogram, and could even be trained to detect other sound events such as raindrops hitting the acoustic recorder, monkey alarm calls and thunder!
What this allowed us to do was to also get the exact start and end times of gunshots, and hence automatically building a clean dataset that can be used to train networks in the future with much cleaner data that contains the exact location of these sound events! This method also allowed us to count the gunshots by seeing how many were detected in the 12s window, as you can see below.

Build – Use of cloud technology
In this project, the use of cloud technology allowed us to speed up many processes, such as building the dataset. We used Microsoft Azure to store our thousands of hours of sound files, and Azure Machine Learning Services to train some of our models, pre-process our data and build our dataset!
Storage
In order to store all of our sound files, we used blob storages on Azure. This meant that we could import these large 24 hour audio files into Azure Machine Learning Services for building our dataset. Azure Machine Learning Services allowed us to create IPYNB notebooks to run our scripts to find the gunshots in the files, extract them and build our dataset.

Data labelling
Azure ML also provided us with a Data Labelling service where we could label our Mel-spectrograms for gunshots and build our dataset to train our object detection models. These object detection models (Yolov4 and Faster R-CNN ) use XML files in training, Azure ML studio allows us to export our labelled data in a COCO format in a JSON file. The conversion from COCO to the XML format we needed to train our models was done with ease.

Custom Vision
The Custom Vision model is the simplest model of the three to train. We did this by using Azure Custom Vision, it allowed us to upload images, label the images and train models with no code at all!
Custom Vision is a part of the Azure Cognitive Services provided by Microsoft which is used for training different machine learning models in order to perform image classification and object detection. This service provides us with an efficient method of labelling our sound events (“the objects”) for training models that can detect gunshot sound events in a spectrogram.

First, we have to upload a set of images which will represent our dataset and tag them by creating a bounding box around the sound event (“around the object”). Once the labelling is done, the dataset is used for training. The model will be trained in the cloud so no coding is needed in the training process. The only feature that we have to adjust when we train the model is the time spent on training. A longer time budget allowed means better learning. However, when the model cannot be improved anymore, the training will stop even if assigned a longer time.

The service provides us with some charts for the model’s precision and recall. By adjusting the probability threshold and the overlap threshold of our model we can see how the precision and recall changes. This is helpful when trying to find the optimal probability threshold for detecting the gunshots.
The final model can be exported for many uses, in many formats. We use the Tensorflow model. The system contains two python files for object detection, a pb file that contains the model, a json file with metadata properties and some txt files. We adapted the system from the standard package provided. The sound files are preprocessed inside the predict.py file and it extracts the audio files from the sounds folder and it exports labelled pictures with the identified gunshots in cache/images folder. It then does inference on the spectrogram to detect gunshots. Once all the soundfiles have been checked a CSV is generated with the start and end times of the gunshots detected within the audio.
Yolov4 Introduction
The full name of YOLOV4 is YOU ONLY LOOK ONCE. It is an object detector which consists of a bunch of deep learning techniques and completely based on Convolutional Neural Network(CNN). The primary advantages of YOLOv4 compared to the other object detector are the fast speed and relatively high precision.
The objective of Microsoft project 15 is detecting the gunshots in forest. The conventional audio classification method is not effective and efficient on this project, because the labelling of true locations of gunshots in training set is inaccurate. Therefore, we start to consider computer vision method, like YOLOV4, to do the detection. Firstly, the raw audio files are converted into thousands of 12 seconds clips and represented in Mel-spectrum. After that, according to the information of true locations of gunshots, the images that contain the gunshots are picked out and construct training data set. These pre-processing steps are the same with the other techniques used to do the detection for project 15 and you can find the detailed explanations from https://r15hil.github.io/ICL-Project15-ELP/.
In this project, YOLOV4 can be trained and deployed on NVIDIA GeForce GTX 1060 GPU and the training time is approximately one hour.
Implementation
1. Load Training Data
In order to train the model, the first step we need to do is loading the training data in yolov4-keras-masterVOCdevkitVOC2007Annotations. The data has to be in XML form and includes the information about the type of the object and the position of the bounding box.
Then run voc_annotations file to save the information of training data into a .txt file. Remember to modify the classes list in line 14 before operating the file.

2. Train the Model
The train.py file is used to train the model. Before running the file, make sure the following file paths are correct.

3. Test
For more detailed testing tutorial, follow How to run
More Explanations
The idea of using YOLOV4 is after training and testing Faster R-CNN method. Faster R-CNN model achieves 95%-98% precision on gunshot detection which is extraordinarily improved compared to the current detector. The training data for YOLOV4 model is totally same with that used in the Faster R-CNN model. Therefore, in this document, the detection results of YOLOV4 will not be the main points to talk about. Briefly speaking, the YOLOV4 can achieve 85% precision but detect the events with lower probability than Faster R-CNN .


The reason why we still build YOLOV4 model is that it can make our clients to have diversified options and choose the most appropriate proposal in the real application condition. Even though Faster R-CNN model has the best detection performance, the disadvantage is obvious which is its operation time. In the case of similar GPU, the Faster R-CNN needs 100 minutes to process 24 hours audio file while YOLOV4 only takes 44 minutes to do the same work.
Faster R-CNN – Introduction

Figure1. Gunshot and some example sounds that cause errors for the current detectors
The Faster R-CNN code provided above is used to tackle the gunshot detection problem of Microsoft project 15. (see Project 15 and Documentation). The gunshot detection is solved by object detection method instead of any audio classification network method under certain conditions.
- The Limited number of forest gunshot datasets given with random labeled true location, which generally require 12s to involve single or multi gunshot in the extracted sound clip. The random label means that the true location provided is not the exact location of the start of the gunshot. Gunshot may happen after the given true location in the range of one to twelve 12 seconds. The number of gunshots after true location also ranging from single gunshots over to 30 gunshots.
- We do not have enough time for manually relabelling the audio dataset and limited knowledge to identify gunshots from any other similar sounds in the forest. In some case, even gunshot expert find difficulty to identify gunshot from those similar forest sound. e.g., tree branch.
- Forest gunshots shoot at different angles and may shoot from miles. Online gunshot dataset would not implement to this task directly.
- Current detector used in the forest has only 0.5% precision. It will peak up sound like raindrop and thunder shown in Figure1. Detection needs long manual post-processing time. Hence, the given audio dataset would be limited and involve mistakes.
The above conditions challenge audio classification methods like MFCC with CNN. Hence, the objection detection method provides an easier approach under a limited time. Object detection provides faster labeling through Mel-spectrum images, which are shown above. Mel spectrum also provides an easy path to identify gunshots without the specialty of gunshot audio sound. The Faster R-CNN model provides high precision 95%-98% on gunshot detection. The detection bounding box can also be used to re-calculate both the start and end times of the gunshot. This reduces manual post-processing time from 20 days to less than an hour. A more standard dataset also be generated for any audio classification algorithm in future development.
Set up
tensorflow 1.13-gpu (CUDA 10.0)
keras 2.1.5
h5py 2.10.0
pre-trained model ‘retrain.hdf5’ can be download from here.
The more detailed tutorial on setting up can be found here.
Pre-trained model
The latest model is trained under a multi-classes dataset including AK-47 gunshot, shotgun, monkey, thunder, and hn, where hn represent hard negative. Hard negatives are high-frequency mistakes made by the current detector, which are mostly peak without an echo shape spectrum. For example, any sounds have the shape of the raindrop (just peak without echo) but can be appeared in the different frequency domain with a raindrop. The initial model is only trained with gunshot and hn datasets due to the limited given manual dataset. Then the network test under a low threshold value, e.g.0.6, to obtain more false positive datasets or true gunshot among thousand hours forest sound file testing. The model will then use those hard negatives to re-train. This technic also calls hard mining. The following images Figure.2 show three hard negative datasets (monkey, thunder, hn) used to train the lastest model.

Figure2. three type of hard negative enter into training
The model also provides classification between different gunshot which are AK-47 and shotgun shown in Figure3.
Figure3. Mel-spectrum image of AK-47 and shotgun
Result
The following testing result shown in Table1 is based on the experiment on over 400 hours of forest sound clips given by our clients. The more detailed information on other models except Faster R-CNN can be found in https://r15hil.github.io/ICL-Project15-ELP/.
Model name |
current template detector |
custom AI(Microsoft) |
YOLOV4 |
Faster R-CNN |
|---|
Gunshot dectection precision |
0.5% |
60% |
85% |
95% |
Table1. testing result from different models
The model also generates a CSV file shown in Figure4. It includes the file name, label, offset, start time, and end time. The offset is the left end axis of the Mel-spectrum, where each Mel-spectrum is conducted from 12s sound clips. The start time and end time can then calculated using the offset and the detection bounding coordinate. Therefore, this CSV file would provide a more standard dataset, where the true location will more likely sit just before the gunshot happen. Each cutting sound clip is likely to include a single gunshot. Therefore, this dataset would involve less noise and wrong labeling. It will benefit future development on any audio classification method.
Figure4. example of csv file for gunshot labelling
Current model weaknesses and Future development
The number of the hard negative dataset is still limited after 400 hours of sound clip testing. Hard negatives like the bee and strong thunder sound(shown in Figure5) are the main predicted errors for the current model. To improve the model further, it should find more hard negatives using a lower threshold of the network through thousands of hours of sound clip testing. Then, the obtained hard negative dataset can be used to re-train and improve the model. However, the current model can avoid those false positives by setting around a 0.98 threshold value, but it will reduce the recall rate by 5-10%. The missing gunshots are mainly long-distance gunshots. This is also caused by very limited long-distance gunshots provided in the training dataset.

Figure5. Mel-spectrum image of the strong thunder and bee
Reference
https://github.com/yhenon/keras-rcnn
Results
Model name |
current template detector |
custom AI(Microsoft) |
YOLOV4 |
Faster R-CNN |
|---|
Gunshot dectection precision |
0.5% |
60% |
85% |
95% |
Table1. testing result from different models

What we learnt
Throughout this capstone project we learnt a wide range of things, not only to do with technologies but also the importance and safety of forest elephants, and how big of an impact they have on rainforests.
Poaching these elephants means that there is a reduce in the amount of seed dispersion, essentially preventing the diverse nature of rainforests and the spread of fruits and plants across the forest in which many animals depend on.
“Without intervention to stop poaching, as much as 96 percent of Central Africa’s forests will undergo major changes in tree-species composition and structure as local populations of elephants are extirpated, and surviving populations are crowded into ever-smaller forest remnants,” explained John Poulson from Duke University’s Nicholas School of the Environment.
In terms of technologies, we learnt a lot about signal processing through MFCCs and mel-spectrograms; how to train and use different object detection models; feature extraction from data; how to use Azure ML studio and blob storage.
Above all, we learnt that in projects with a set goal, there will always be obstacles but tackling those obstacles is really when your creative and innovative ideas come to life.
For full documentation and code visit https://r15hil.github.io/ICL-Project15-ELP/
Learning Resources
Classify endangered bird species with Custom Vision – Learn | Microsoft Docs
Classify images with the Custom Vision service – Learn | Microsoft Docs
Build a Web App with Refreshable Machine Learning Models – Learn | Microsoft Docs
Explore computer vision in Microsoft Azure – Learn | Microsoft Docs
Introduction to Computer Vision with PyTorch – Learn | Microsoft Docs
Train and evaluate deep learning models – Learn | Microsoft Docs
PyTorch Fundamentals – Learn | Microsoft Docs

Recent Comments