by Scott Muniz | Aug 9, 2021 | Security, Technology
This article is contributed. See the original author and article here.
| acronis — true_image |
Acronis True Image prior to 2021 Update 4 for Windows allowed local privilege escalation due to improper soft link handling (issue 1 of 2). |
2021-08-05 |
not yet calculated |
CVE-2021-32576
MISC |
acronis — true_image
|
Acronis True Image prior to 2021 Update 4 for Windows and Acronis True Image prior to 2021 Update 5 for macOS allowed an unauthenticated attacker (who has a local code execution ability) to tamper with the micro-service API. |
2021-08-05 |
not yet calculated |
CVE-2021-32579
MISC
MISC |
acronis — true_image
|
Acronis True Image prior to 2021 Update 4 for Windows allowed local privilege escalation due to DLL hijacking. |
2021-08-05 |
not yet calculated |
CVE-2021-32580
MISC |
acronis — true_image
|
Acronis True Image prior to 2021 Update 4 for Windows, Acronis True Image prior to 2021 Update 5 for Mac, Acronis Agent prior to build 26653, Acronis Cyber Protect prior to build 27009 did not implement SSL certificate validation. |
2021-08-05 |
not yet calculated |
CVE-2021-32581
MISC
MISC
MISC |
acronis — true_image
|
Acronis True Image prior to 2021 Update 5 for Windows allowed local privilege escalation due to insecure folder permissions. |
2021-08-05 |
not yet calculated |
CVE-2021-32577
MISC |
acronis — true_image
|
Acronis True Image prior to 2021 Update 4 for Windows allowed local privilege escalation due to improper soft link handling (issue 2 of 2). |
2021-08-05 |
not yet calculated |
CVE-2021-32578
MISC |
advantech — r-seenev
|
An OS Command Injection vulnerability exists in the ping.php script functionality of Advantech R-SeeNet v 2.4.12 (20.10.2020). A specially crafted HTTP request can lead to arbitrary OS command execution. An attacker can send a crafted HTTP request to trigger this vulnerability. |
2021-08-05 |
not yet calculated |
CVE-2021-21805
MISC |
| akaunting — akaunting |
Akaunting version 2.1.12 and earlier suffers from a code injection issue in the Money.php component of the application. A POST sent to /{company_id}/sales/invoices/{invoice_id} with an items[0][price] that includes a PHP callable function is executed directly. This issue was fixed in version 2.1.13 of the product. |
2021-08-04 |
not yet calculated |
CVE-2021-36800
MISC |
akaunting — akaunting
|
Akaunting version 2.1.12 and earlier suffers from an authentication bypass issue in the user-controllable field, companies[0]. This issue was fixed in version 2.1.13 of the product. |
2021-08-04 |
not yet calculated |
CVE-2021-36801
MISC |
akaunting — akaunting
|
Akaunting version 2.1.12 and earlier suffers from a persistent (type II) cross-site scripting (XSS) vulnerability in processing user-supplied avatar images. This issue was fixed in version 2.1.13 of the product. |
2021-08-04 |
not yet calculated |
CVE-2021-36803
MISC |
akaunting — akaunting
|
Akaunting version 2.1.12 and earlier suffers from a denial-of-service issue that is triggered by setting a malformed ‘locale’ variable and sending it in an otherwise normal HTTP POST request. This issue was fixed in version 2.1.13 of the product. |
2021-08-04 |
not yet calculated |
CVE-2021-36802
MISC |
akaunting — akaunting
|
Akaunting version 2.1.12 and earlier suffers from a password reset spoofing vulnerability, wherein an attacker can proxy password reset requests through a running Akaunting instance, if that attacker knows the target’s e-mail address. This issue was fixed in version 2.1.13 of the product. Please note that this issue is ultimately caused by the defaults provided by the Laravel framework, specifically how proxy headers are handled with respect to multi-tenant implementations. In other words, while this is not technically a vulnerability in Laravel, this default configuration is very likely to lead to practically identical identical vulnerabilities in Laravel projects that implement multi-tenant applications. |
2021-08-04 |
not yet calculated |
CVE-2021-36804
MISC
MISC
MISC |
akaunting — akaunting
|
Akaunting version 2.1.12 and earlier suffers from a persistent (type II) cross-site scripting (XSS) vulnerability in the sales invoice processing component of the application. This issue was fixed in version 2.1.13 of the product. |
2021-08-04 |
not yet calculated |
CVE-2021-36805
MISC |
argo — experssion_templates
|
In Argo Workflows through 3.1.3, if EXPRESSION_TEMPLATES is enabled and untrusted users are allowed to specify input parameters when running workflows, an attacker may be able to disrupt a workflow because expression template output is evaluated. |
2021-08-03 |
not yet calculated |
CVE-2021-37914
MISC
MISC |
asylo — messagereader
|
An untrusted memory read vulnerability in Asylo versions up to 0.6.1 allows an untrusted attacker to pass a syscall number in MessageReader that is then used by sysno() and can bypass validation. This can allow the attacker to read memory from within the secure enclave. We recommend updating to Asylo 0.6.3 or past https://github.com/google/asylo/commit/90d7619e9dd99bcdb6cd28c7649d741d254d9a1a |
2021-08-02 |
not yet calculated |
CVE-2021-22552
MISC |
atlassian — confluence_server
|
Affected versions of Atlassian Confluence Server allow remote attackers to view restricted resources via a Pre-Authorization Arbitrary File Read vulnerability in the /s/ endpoint. The affected versions are before version 7.4.10, and from version 7.5.0 before 7.12.3. |
2021-08-03 |
not yet calculated |
CVE-2021-26085
N/A |
atlassian — jira
|
The resolution SAML SSO apps for Atlassian products allow a remote attacker to login to a user account when only the username is known (i.e., no other authentication is provided). The fixed versions are for Jira: 3.6.6.1, 4.0.12, 5.0.5; for Confluence 3.6.6, 4.0.12, 5.0.5; for Bitbucket 2.5.9, 3.6.6, 4.0.12, 5.0.5; for Bamboo 2.5.9, 3.6.6, 4.0.12, 5.0.5; and for Fisheye 2.5.9. |
2021-08-02 |
not yet calculated |
CVE-2021-37843
MISC |
atlassian — jira_server
|
The DefaultOSWorkflowConfigurator class in Jira Server and Jira Data Center before version 8.18.1 allows remote attackers who can trick a system administrator to import their malicious workflow to execute arbitrary code via a Remote Code Execution (RCE) vulnerability. The vulnerability allowed for various problematic OSWorkflow classes to be used as part of workflows. The fix for this issue blocks usage of unsafe conditions, validators, functions and registers that are build-in into OSWorkflow library and other Jira dependencies. Atlassian-made functions or functions provided by 3rd party plugins are not affected by this fix. |
2021-08-02 |
not yet calculated |
CVE-2017-18113
MISC |
atomicparseley — atomicparseley
|
A stack-buffer-overflow occurs in Atomicparsley 20210124.204813.840499f through APar_readX() in src/util.cpp while parsing a crafted mp4 file because of the missing boundary check. |
2021-08-04 |
not yet calculated |
CVE-2021-37231
MISC
MISC |
atomicparseley — atomicparseley
|
A stack overflow vulnerability occurs in Atomicparsley 20210124.204813.840499f through APar_read64() in src/util.cpp due to the lack of buffer size of uint32_buffer while reading more bytes in APar_read64. |
2021-08-04 |
not yet calculated |
CVE-2021-37232
MISC
MISC |
bento4 — bento4
|
An issue was discovered in Bento4 through v1.6.0-636. A NULL pointer dereference exists in the function AP4_StszAtom::WriteFields located in Ap4StszAtom.cpp. It allows an attacker to cause a denial of service (DOS). |
2021-08-05 |
not yet calculated |
CVE-2021-35306
MISC |
bento4 — bento4
|
An issue was discovered in Bento4 through v1.6.0-636. A NULL pointer dereference exists in the AP4_DescriptorFinder::Test component located in /Core/Ap4Descriptor.h. It allows an attacker to cause a denial of service (DOS). |
2021-08-05 |
not yet calculated |
CVE-2021-35307
MISC |
bootperformancetable — bootperformancetable
|
BootPerformanceTable pointer is read from an NVRAM variable in PEI. Recommend setting PcdFirmwarePerformanceDataTableS3Support to FALSE. |
2021-08-05 |
not yet calculated |
CVE-2021-28216
MISC |
bosch — ip_cameras
|
A vulnerability in the web-based interface allows an unauthenticated remote attacker to trigger actions on an affected system on behalf of another user (CSRF – Cross Site Request Forgery). This requires the victim to be tricked into clicking a malicious link or opening a malicious website while being logged in into the camera. |
2021-08-05 |
not yet calculated |
CVE-2021-23849
CONFIRM |
btrbk — btrbk
|
Btrbk before 0.31.2 allows command execution because of the mishandling of remote hosts filtering SSH commands using ssh_filter_btrbk.sh in authorized_keys. |
2021-08-07 |
not yet calculated |
CVE-2021-38173
MISC
CONFIRM |
care2x — open_source_hospital_information_management
|
SQL Injection Vulnerability in Care2x Open Source Hospital Information Management 2.7 Alpha via the (1) pday, (2) pmonth, and (3) pyear parameters in GET requests sent to /modules/nursing/nursing-station.php. |
2021-08-06 |
not yet calculated |
CVE-2021-36351
MISC
MISC |
| centreon — centreon |
A SQL injection vulnerability in image generation in Centreon before 20.04.14, 20.10.8, and 21.04.2 allows remote authenticated (but low-privileged) attackers to execute arbitrary SQL commands via the include/views/graphs/generateGraphs/generateImage.php index parameter. |
2021-08-03 |
not yet calculated |
CVE-2021-37557
MISC
MISC |
centreon — centreon
|
A SQL injection vulnerability in reporting export in Centreon before 20.04.14, 20.10.8, and 21.04.2 allows remote authenticated (but low-privileged) attackers to execute arbitrary SQL commands via the include/reporting/dashboard/csvExport/csv_HostGroupLogs.php start and end parameters. |
2021-08-03 |
not yet calculated |
CVE-2021-37556
MISC
MISC |
chikitsa — chikitsa_patient_management_system
|
index.php/appointment/insert_patient_add_appointment in Chikitsa Patient Management System 2.0.0 allows XSS. |
2021-08-06 |
not yet calculated |
CVE-2021-38152
MISC
MISC |
chikitsa — chikitsa_patient_management_system
|
index.php/admin/add_user in Chikitsa Patient Management System 2.0.0 allows XSS. |
2021-08-06 |
not yet calculated |
CVE-2021-38149
MISC
MISC |
chikitsa — chikitsa_patient_management_system
|
index.php/appointment/todos in Chikitsa Patient Management System 2.0.0 allows XSS. |
2021-08-06 |
not yet calculated |
CVE-2021-38151
MISC
MISC |
cisco — connected_mobile_experiences
|
A vulnerability in the change password API of Cisco Connected Mobile Experiences (CMX) could allow an authenticated, remote attacker to alter their own password to a value that does not comply with the strong authentication requirements that are configured on an affected device. This vulnerability exists because a password policy check is incomplete at the time a password is changed at server side using the API. An attacker could exploit this vulnerability by sending a specially crafted API request to the affected device. A successful exploit could allow the attacker to change their own password to a value that does not comply with the configured strong authentication requirements. |
2021-08-04 |
not yet calculated |
CVE-2021-1522
CISCO |
cisco — evolved_programmable_network_manager
|
A vulnerability in the REST API of Cisco Evolved Programmable Network Manager (EPNM) could allow an authenticated, remote attacker to access sensitive data on an affected system. This vulnerability exists because the application does not sufficiently protect sensitive data when responding to an API request. An attacker could exploit the vulnerability by sending a specific API request to the affected application. A successful exploit could allow the attacker to obtain sensitive information about the application. |
2021-08-04 |
not yet calculated |
CVE-2021-34707
CISCO |
cisco — multiple_small_business_routers
|
Multiple vulnerabilities in the web-based management interface of the Cisco Small Business RV340, RV340W, RV345, and RV345P Dual WAN Gigabit VPN Routers could allow an attacker to do the following: Execute arbitrary code Cause a denial of service (DoS) condition Execute arbitrary commands For more information about these vulnerabilities, see the Details section of this advisory. |
2021-08-04 |
not yet calculated |
CVE-2021-1609
CISCO |
cisco — multiple_small_business_routers
|
Multiple vulnerabilities in the web-based management interface of the Cisco Small Business RV340, RV340W, RV345, and RV345P Dual WAN Gigabit VPN Routers could allow an attacker to do the following: Execute arbitrary code Cause a denial of service (DoS) condition Execute arbitrary commands For more information about these vulnerabilities, see the Details section of this advisory. |
2021-08-04 |
not yet calculated |
CVE-2021-1610
CISCO |
cisco — multiple_small_business_routers
|
A vulnerability in the web-based management interface of Cisco Small Business RV160, RV160W, RV260, RV260P, and RV260W VPN Routers could allow an unauthenticated, remote attacker to execute arbitrary commands on the underlying operating system of an affected device. This vulnerability is due to insufficient user input validation. An attacker could exploit this vulnerability by sending a crafted request to the web-based management interface. A successful exploit could allow the attacker to execute arbitrary commands on an affected device using root-level privileges. Due to the nature of the vulnerability, only commands without parameters can be executed. |
2021-08-04 |
not yet calculated |
CVE-2021-1602
CISCO |
cisco — packet_tracer
|
A vulnerability in Cisco Packet Tracer for Windows could allow an authenticated, local attacker to perform a DLL injection attack on an affected device. To exploit this vulnerability, the attacker must have valid credentials on the Windows system. This vulnerability is due to incorrect handling of directory paths at run time. An attacker could exploit this vulnerability by inserting a configuration file in a specific path on the system, which can cause a malicious DLL file to be loaded when the application starts. A successful exploit could allow an attacker with normal user privileges to execute arbitrary code on the affected system with the privileges of another user’s account. |
2021-08-04 |
not yet calculated |
CVE-2021-1593
CISCO |
citrix — adc_and_gateway
|
A session fixation vulnerability exists in Citrix ADC and Citrix Gateway 13.0-82.45 when configured SAML service provider that could allow an attacker to hijack a session. |
2021-08-05 |
not yet calculated |
CVE-2021-22927
MISC |
citrix — multiple_products
|
A vulnerability has been discovered in Citrix ADC (formerly known as NetScaler ADC) and Citrix Gateway (formerly known as NetScaler Gateway), and Citrix SD-WAN WANOP Edition models 4000-WO, 4100-WO, 5000-WO, and 5100-WO. These vulnerabilities, if exploited, could lead to the limited available disk space on the appliances being fully consumed. |
2021-08-05 |
not yet calculated |
CVE-2021-22919
MISC |
citrix — multiple_products
|
A vulnerability has been discovered in Citrix ADC (formerly known as NetScaler ADC) and Citrix Gateway (formerly known as NetScaler Gateway), and Citrix SD-WAN WANOP Edition models 4000-WO, 4100-WO, 5000-WO, and 5100-WO. These vulnerabilities, if exploited, could lead to a phishing attack through a SAML authentication hijack to steal a valid user session. |
2021-08-05 |
not yet calculated |
CVE-2021-22920
MISC |
citrix — virtual_apps_and_desktops
|
A vulnerability has been identified in Citrix Virtual Apps and Desktops that could, if exploited, allow a user of a Windows VDA that has either Citrix Profile Management or Citrix Profile Management WMI Plugin installed to escalate their privilege level on that Windows VDA to SYSTEM. |
2021-08-05 |
not yet calculated |
CVE-2021-22928
MISC |
cms_simple_made — cms_simple_made
|
CMS Made Simple (CMSMS) 2.2.14 allows stored XSS via the Extensions > Fie Picker.. |
2021-08-05 |
not yet calculated |
CVE-2020-22732
MISC |
cmsuno — cmsuno
|
CMSuno 1.7 is vulnerable to an authenticated stored cross site scripting in modifying the filename parameter (tgo) while updating the theme. |
2021-08-03 |
not yet calculated |
CVE-2021-36654
MISC |
codesys — control_runtime
|
CODESYS Control Runtime system before 3.5.17.10 has a Heap-based Buffer Overflow. |
2021-08-03 |
not yet calculated |
CVE-2021-33485
CONFIRM |
| codesys — development_system |
A unsafe deserialization vulnerability exists in the ObjectManager.plugin ProfileInformation.ProfileData functionality of CODESYS GmbH CODESYS Development System 3.5.16 and 3.5.17. A specially crafted file can lead to arbitrary command execution. An attacker can provide a malicious file to trigger this vulnerability. |
2021-08-02 |
not yet calculated |
CVE-2021-21866
MISC
CONFIRM |
codesys — development_system
|
A unsafe deserialization vulnerability exists in the ComponentModel Profile.FromFile() functionality of CODESYS GmbH CODESYS Development System 3.5.16 and 3.5.17. A specially crafted file can lead to arbitrary command execution. An attacker can provide a malicious file to trigger this vulnerability. |
2021-08-05 |
not yet calculated |
CVE-2021-21863
MISC |
codesys — development_system
|
A unsafe deserialization vulnerability exists in the ComponentModel ComponentManager.StartupCultureSettings functionality of CODESYS GmbH CODESYS Development System 3.5.16 and 3.5.17. A specially crafted file can lead to arbitrary command execution. An attacker can provide a malicious file to trigger this vulnerability. |
2021-08-02 |
not yet calculated |
CVE-2021-21864
MISC
CONFIRM |
codesys — development_system
|
A unsafe deserialization vulnerability exists in the PackageManagement.plugin ExtensionMethods.Clone() functionality of CODESYS GmbH CODESYS Development System 3.5.16. A specially crafted file can lead to arbitrary command execution. An attacker can provide a malicious file to trigger this vulnerability. |
2021-08-02 |
not yet calculated |
CVE-2021-21865
MISC
CONFIRM |
codesys — ethernetip
|
In CODESYS EtherNetIP before 4.1.0.0, specific EtherNet/IP requests may cause a null pointer dereference in the downloaded vulnerable EtherNet/IP stack that is executed by the CODESYS Control runtime system. |
2021-08-04 |
not yet calculated |
CVE-2021-36765
CONFIRM |
codesys — gateway
|
In CODESYS Gateway V3 before 3.5.17.10, there is a NULL Pointer Dereference. Crafted communication requests may cause a Null pointer dereference in the affected CODESYS products and may result in a denial-of-service condition. |
2021-08-04 |
not yet calculated |
CVE-2021-36764
CONFIRM |
codesys — gateway
|
In CODESYS V3 web server before 3.5.17.10, files or directories are accessible to External Parties. |
2021-08-03 |
not yet calculated |
CVE-2021-36763
CONFIRM |
codesys — runtime_toolkit
|
All versions of the CODESYS V3 Runtime Toolkit for VxWorks from version V3.5.8.0 and before version V3.5.17.10 have Improper Handling of Exceptional Conditions. |
2021-08-03 |
not yet calculated |
CVE-2021-33486
MISC |
comelit — app-leios_de_casa
|
An issue was discovered in Comelit “App lejos de casa (web)” 2.8.0. It allows privilege escalation via modified domus and logged fields, related to js/bridge.min.js and login.json. For example, an attacker can achieve high privileges (installer or administrator) for the graphical interface via a 1C000000000S value for domus, in conjunction with a zero value for logged. |
2021-08-03 |
not yet calculated |
CVE-2019-14453
MISC |
confd — confd
|
A vulnerability in ConfD could allow an authenticated, local attacker to execute arbitrary commands at the level of the account under which ConfD is running, which is commonly root. To exploit this vulnerability, an attacker must have a valid account on an affected device. The vulnerability exists because the affected software incorrectly runs the SFTP user service at the privilege level of the account that was running when the ConfD built-in Secure Shell (SSH) server for CLI was enabled. If the ConfD built-in SSH server was not enabled, the device is not affected by this vulnerability. An attacker with low-level privileges could exploit this vulnerability by authenticating to an affected device and issuing a series of commands at the SFTP interface. A successful exploit could allow the attacker to elevate privileges to the level of the account under which ConfD is running, which is commonly root. Note: Any user who can authenticate to the built-in SSH server may exploit this vulnerability. By default, all ConfD users have this access if the server is enabled. Software updates that address this vulnerability have been released. |
2021-08-04 |
not yet calculated |
CVE-2021-1572
CISCO |
corero — securewatch_managed_services
|
Corero SecureWatch Managed Services 9.7.2.0020 is affected by a Path Traversal vulnerability via the snap_file parameter in the /it-IT/splunkd/__raw/services/get_snapshot HTTP API endpoint. A ‘low privileged’ attacker can read any file on the target host. |
2021-08-06 |
not yet calculated |
CVE-2021-38136
MISC
MISC |
corero — securewatch_managed_services
|
Corero SecureWatch Managed Services 9.7.2.0020 does not correctly check swa-monitor and cns-monitor user’s privileges, allowing a user to perform actions not belonging to his role. |
2021-08-06 |
not yet calculated |
CVE-2021-38137
MISC
MISC |
crossbeam-deque — crossbeam-deque
|
crossbeam-deque is a package of work-stealing deques for building task schedulers when programming in Rust. In versions prior to 0.7.4 and 0.8.0, the result of the race condition is that one or more tasks in the worker queue can be popped twice instead of other tasks that are forgotten and never popped. If tasks are allocated on the heap, this can cause double free and a memory leak. If not, this still can cause a logical bug. Crates using `Stealer::steal`, `Stealer::steal_batch`, or `Stealer::steal_batch_and_pop` are affected by this issue. This has been fixed in crossbeam-deque 0.8.1 and 0.7.4. |
2021-08-02 |
not yet calculated |
CVE-2021-32810
CONFIRM |
d-link — dir-615
|
A buffer overflow in D-Link DIR-615 C2 3.03WW. The ping_ipaddr parameter in ping_response.cgi POST request allows an attacker to crash the webserver and might even gain remote code execution. |
2021-08-06 |
not yet calculated |
CVE-2021-37388
MISC
MISC |
def_con — 27
|
The DEF CON 27 badge allows remote attackers to exploit a buffer overflow by sending an oversized packet via the NFMI (Near Field Magnetic Induction) protocol. |
2021-08-04 |
not yet calculated |
CVE-2021-38111
MISC |
dell — emc_idrac9
|
Dell EMC iDRAC9 versions prior to 4.40.40.00 contain a DOM-based cross-site scripting vulnerability. A remote attacker could potentially exploit this vulnerability to run malicious HTML or JavaScript in a victim’s browser by tricking a victim in to following a specially crafted link. |
2021-08-03 |
not yet calculated |
CVE-2021-21576
MISC |
dell — emc_idrac9
|
Dell EMC iDRAC9 versions prior to 5.00.00.00 contain a cross-site scripting vulnerability. A remote attacker could potentially exploit this vulnerability to run malicious HTML or JavaScript in a victim’s browser by tricking a victim in to following a specially crafted link. |
2021-08-03 |
not yet calculated |
CVE-2021-21581
MISC |
dell — emc_idrac9
|
Dell EMC iDRAC8 versions prior to 2.80.80.80 & Dell EMC iDRAC9 versions prior to 5.00.00.00 contain a Content spoofing / Text injection, where a malicious URL can inject text to present a customized message on the application that can phish users into believing that the message is legitimate. |
2021-08-03 |
not yet calculated |
CVE-2021-21580
MISC |
dell — emc_idrac9
|
Dell EMC iDRAC9 versions prior to 4.40.40.00 contain an open redirect vulnerability. A remote unauthenticated attacker may exploit this vulnerability to redirect users to arbitrary web URLs by tricking the victim users to click on maliciously crafted links. |
2021-08-03 |
not yet calculated |
CVE-2021-21579
MISC |
dell — emc_idrac9
|
Dell EMC iDRAC9 versions prior to 4.40.40.00 contain an open redirect vulnerability. A remote unauthenticated attacker may exploit this vulnerability to redirect users to arbitrary web URLs by tricking the victim users to click on maliciously crafted links. |
2021-08-03 |
not yet calculated |
CVE-2021-21578
MISC |
dell — emc_idrac9
|
Dell EMC iDRAC9 versions prior to 4.40.40.00 contain a DOM-based cross-site scripting vulnerability. A remote attacker could potentially exploit this vulnerability to run malicious HTML or JavaScript in a victim’s browser by tricking a victim in to following a specially crafted link. |
2021-08-03 |
not yet calculated |
CVE-2021-21577
MISC |
dell — emc_powerscale_onefs
|
Dell EMC PowerScale OneFS versions 8.1.2-9.1.0.x contain an Improper Check for Unusual or Exceptional Conditions in its auditing component.This can lead to an authenticated user with low-privileges to trigger a denial of service event. |
2021-08-03 |
not yet calculated |
CVE-2021-21563
MISC |
dell — emc_powerscale_onefs
|
Dell PowerScale OneFS versions 9.1.0.3 and earlier contain a denial of service vulnerability. SmartConnect had an error condition that may be triggered to loop, using CPU and potentially preventing other SmartConnect DNS responses. |
2021-08-03 |
not yet calculated |
CVE-2021-21565
MISC |
dell — emc_powerscale_onefs
|
Dell EMC PowerScale OneFS contains an untrusted search path vulnerability. This vulnerability allows a user with (ISI_PRIV_LOGIN_SSH or ISI_PRIV_LOGIN_CONSOLE) and (ISI_PRIV_SYS_UPGRADE or ISI_PRIV_AUDIT) to provide an untrusted path which can lead to run resources that are not under the application’s direct control. |
2021-08-03 |
not yet calculated |
CVE-2021-21562
MISC |
dell — powerscale_onefs
|
Dell PowerScale OneFS versions 8.1.0-9.1.0 contain an Incorrect User Management vulnerability.under some specific conditions, this can allow the CompAdmin user to elevate privileges and break out of Compliance mode. This is a critical vulnerability and Dell recommends upgrading at the earliest. |
2021-08-03 |
not yet calculated |
CVE-2021-21553
MISC |
demuxer — demuxer
|
Prior to ffmpeg version 4.3, the tty demuxer did not have a ‘read_probe’ function assigned to it. By crafting a legitimate “ffconcat” file that references an image, followed by a file the triggers the tty demuxer, the contents of the second file will be copied into the output file verbatim (as long as the `-vcodec copy` option is passed to ffmpeg). |
2021-08-05 |
not yet calculated |
CVE-2021-3566
MISC |
devexpress — xtrareports
|
DevExpress.XtraReports.UI through v21.1 allows attackers to execute arbitrary code via insecure deserialization. |
2021-08-04 |
not yet calculated |
CVE-2021-36483
MISC |
drogon — drogon
|
A path traversal vulnerability in the static router for Drogon from 1.0.0-beta14 to 1.6.0 could allow an unauthenticated, remote attacker to arbitrarily read files. The vulnerability is due to lack of proper input validation for requested path. An attacker could exploit this vulnerability by sending crafted HTTP request with specific path to read. Successful exploitation could allow the attacker to read files that should be restricted. |
2021-08-04 |
not yet calculated |
CVE-2021-35397
MISC
MISC
MISC
MISC |
ecobee3 — lite_4.5.81.200_device
|
Hardcoded default root credentials exist on the ecobee3 lite 4.5.81.200 device. This allows a threat actor to gain access to the password-protected bootloader environment through the serial console. |
2021-08-03 |
not yet calculated |
CVE-2021-27952
MISC |
entando — admin_console
|
A Server Side Template Injection in the Entando Admin Console 6.3.9 and before allows a user with privileges to execute FreeMarker template with command execution via freemarker.template.utility.Execute |
2021-08-02 |
not yet calculated |
CVE-2021-35450
MISC
MISC |
espocrm — espocrm
|
EspoCRM 6.1.6 and prior suffers from a persistent (type II) cross-site scripting (XSS) vulnerability in processing user-supplied avatar images. This issue was fixed in version 6.1.7 of the product. |
2021-08-04 |
not yet calculated |
CVE-2021-3539
MISC |
ethereum — erc20
|
A security flaw in the ‘owned’ function of a smart contract implementation for RobotCoin (RBTC), a tradeable Ethereum ERC20 token, allows attackers to hijack victim accounts and arbitrarily increase the digital supply of assets. |
2021-08-03 |
not yet calculated |
CVE-2021-34272
MISC |
ethereum — erc20
|
An integer overflow in the transfer function of a smart contract implementation for Lancer Token, an Ethereum ERC20 token, allows the owner to cause unexpected financial losses between two large accounts during a transaction. |
2021-08-03 |
not yet calculated |
CVE-2021-33403
MISC
MISC |
ethereum — erc20
|
An integer overflow in the mintToken function of a smart contract implementation for Doftcoin Token, an Ethereum ERC20 token, allows the owner to cause unexpected financial losses. |
2021-08-03 |
not yet calculated |
CVE-2021-34270
MISC |
ethereum — erc20
|
A security flaw in the ‘owned’ function of a smart contract implementation for BTC2X (B2X), a tradeable Ethereum ERC20 token, allows attackers to hijack victim accounts and arbitrarily increase the digital supply of assets. |
2021-08-03 |
not yet calculated |
CVE-2021-34273
MISC |
ezpdfreader — ezpdfreader
|
An improper input validation vulnerability in the service of ezPDFReader allows attacker to execute arbitrary command. This issue occurred when the ezPDF launcher received and executed crafted input values through JSON-RPC communication. |
2021-08-05 |
not yet calculated |
CVE-2021-26605
MISC |
| fedoraproject — fedora33 |
curl supports the `-t` command line option, known as `CURLOPT_TELNETOPTIONS`in libcurl. This rarely used option is used to send variable=content pairs toTELNET servers.Due to flaw in the option parser for sending `NEW_ENV` variables, libcurlcould be made to pass on uninitialized data from a stack based buffer to theserver. Therefore potentially revealing sensitive internal information to theserver using a clear-text network protocol.This could happen because curl did not call and use sscanf() correctly whenparsing the string provided by the application. |
2021-08-05 |
not yet calculated |
CVE-2021-22925
MISC |
fedoraproject — fedora33
|
When curl is instructed to download content using the metalink feature, thecontents is verified against a hash provided in the metalink XML file.The metalink XML file points out to the client how to get the same contentfrom a set of different URLs, potentially hosted by different servers and theclient can then download the file from one or several of them. In a serial orparallel manner.If one of the servers hosting the contents has been breached and the contentsof the specific file on that server is replaced with a modified payload, curlshould detect this when the hash of the file mismatches after a completeddownload. It should remove the contents and instead try getting the contentsfrom another URL. This is not done, and instead such a hash mismatch is onlymentioned in text and the potentially malicious content is kept in the file ondisk. |
2021-08-05 |
not yet calculated |
CVE-2021-22922
MISC |
fedoraproject — fedora33
|
When curl is instructed to get content using the metalink feature, and a user name and password are used to download the metalink XML file, those same credentials are then subsequently passed on to each of the servers from which curl will download or try to download the contents from. Often contrary to the user’s expectations and intentions and without telling the user it happened. |
2021-08-05 |
not yet calculated |
CVE-2021-22923
MISC |
ffmpeg — ffmpeg
|
libavcodec/dnxhddec.c in FFmpeg 4.4 does not check the return value of the init_vlc function, a similar issue to CVE-2013-0868. |
2021-08-04 |
not yet calculated |
CVE-2021-38114
MISC
MISC |
fortinet — fortieportal
|
A Improper Limitation of a Pathname to a Restricted Directory (‘Path Traversal’) in Fortinet FortiPortal 6.x before 6.0.5, FortiPortal 5.3.x before 5.3.6 and any FortiPortal before 6.2.5 allows authenticated attacker to disclosure information via crafted GET request with malicious parameter values. |
2021-08-04 |
not yet calculated |
CVE-2021-36168
CONFIRM |
fortinet — fortimanager_and_fortianalyser
|
Multiple improper neutralization of input during web page generation (CWE-79) in FortiManager and FortiAnalyzer versions 7.0.0, 6.4.5 and below, 6.2.7 and below user interface, may allow a remote authenticated attacker to perform a Stored Cross Site Scripting attack (XSS) by injecting malicious payload in GET parameters. |
2021-08-06 |
not yet calculated |
CVE-2021-32597
CONFIRM |
fortinet — fortimanager_and_fortianalyzer
|
An improper access control vulnerability in FortiManager and FortiAnalyzer GUI interface 7.0.0, 6.4.5 and below, 6.2.8 and below, 6.0.11and below, 5.6.11and below may allow a remote and authenticated attacker with restricted user profile to retrieve the list of administrative users of other ADOMs and their related configuration. |
2021-08-06 |
not yet calculated |
CVE-2021-32587
CONFIRM |
fortinet — fortimanager_fortianalyser
|
A server-side request forgery (SSRF) (CWE-918) vulnerability in FortiManager and FortiAnalyser GUI 7.0.0, 6.4.5 and below, 6.2.7 and below, 6.0.11 and below, 5.6.11 and below may allow a remote and authenticated attacker to access unauthorized files and services on the system via specifically crafted web requests. |
2021-08-05 |
not yet calculated |
CVE-2021-32603
CONFIRM |
fortinet — fortimanager_fortianalyser
|
An improper neutralization of CRLF sequences in HTTP headers (‘HTTP Response Splitting’) vulnerability In FortiManager and FortiAnalyzer GUI 7.0.0, 6.4.6 and below, 6.2.8 and below, 6.0.11 and below, 5.6.11 and below may allow an authenticated and remote attacker to perform an HTTP request splitting attack which gives attackers control of the remaining headers and body of the response. |
2021-08-05 |
not yet calculated |
CVE-2021-32598
CONFIRM |
| fortinet — fortios |
A buffer underwrite vulnerability in the firmware verification routine of FortiOS before 7.0.1 may allow an attacker located in the adjacent network to potentially execute arbitrary code via a specifically crafted firmware image. |
2021-08-04 |
not yet calculated |
CVE-2021-24018
CONFIRM |
| fortinet — fortiportal |
Multiple improper neutralization of special elements used in an SQL command vulnerabilities in FortiPortal 6.0.0 through 6.0.4, 5.3.0 through 5.3.5, 5.2.0 through 5.2.5, and 4.2.2 and earlier may allow an attacker with regular user’s privileges to execute arbitrary commands on the underlying SQL database via specifically crafted HTTP requests. |
2021-08-04 |
not yet calculated |
CVE-2021-32590
CONFIRM |
fortinet — fortiportal
|
An unrestricted file upload vulnerability in the web interface of FortiPortal 6.0.0 through 6.0.4, 5.3.0 through 5.3.5, 5.2.0 through 5.2.5, and 4.2.2 and earlier may allow a low-privileged user to potentially tamper with the underlying system’s files via the upload of specifically crafted files. |
2021-08-04 |
not yet calculated |
CVE-2021-32594
CONFIRM |
fortinet — fortiportal
|
A use of one-way hash with a predictable salt vulnerability in the password storing mechanism of FortiPortal 6.0.0 through 6.04 may allow an attacker already in possession of the password store to decrypt the passwords by means of precomputed tables. |
2021-08-04 |
not yet calculated |
CVE-2021-32596
CONFIRM |
fortinet — fortisandbox
|
Improper limitation of a pathname to a restricted directory vulnerabilities in FortiSandbox 3.2.0 through 3.2.2, and 3.1.0 through 3.1.4 may allow an authenticated user to obtain unauthorized access to files and data via specifially crafted web requests. |
2021-08-04 |
not yet calculated |
CVE-2021-24010
CONFIRM |
fortinet — fortisandbox
|
Multiple instances of improper neutralization of input during web page generation vulnerabilities in FortiSandbox before 4.0.0 may allow an unauthenticated attacker to perform an XSS attack via specifically crafted request parameters. |
2021-08-04 |
not yet calculated |
CVE-2021-24014
CONFIRM |
fortinet — fortisandbox
|
An instance of small space of random values in the RPC API of FortiSandbox before 4.0.0 may allow an attacker in possession of a few information pieces about the state of the device to possibly predict valid session IDs. |
2021-08-04 |
not yet calculated |
CVE-2021-26098
CONFIRM |
fortinet — fortisandbox
|
An improper neutralization of special elements used in an OS Command vulnerability in FortiSandbox 3.2.0 through 3.2.2, 3.1.0 through 3.1.4, and 3.0.0 through 3.0.6 may allow an authenticated attacker with access to the web GUI to execute unauthorized code or commands via specifically crafted HTTP requests. |
2021-08-04 |
not yet calculated |
CVE-2021-26097
CONFIRM |
fortinet — fortisandbox
|
Multiple instances of heap-based buffer overflow in the command shell of FortiSandbox before 4.0.0 may allow an authenticated attacker to manipulate memory and alter its content by means of specifically crafted command line arguments. |
2021-08-04 |
not yet calculated |
CVE-2021-26096
CONFIRM |
fortinet — fortisandbox
|
Instances of SQL Injection vulnerabilities in the checksum search and MTA-quarantine modules of FortiSandbox 3.2.0 through 3.2.2, and 3.1.0 through 3.1.4 may allow an authenticated attacker to execute unauthorized code on the underlying SQL interpreter via specifically crafted HTTP requests. |
2021-08-04 |
not yet calculated |
CVE-2020-29011
CONFIRM |
fortinet — fortisandbox
|
An uncontrolled resource consumption (denial of service) vulnerability in the login modules of FortiSandbox 3.2.0 through 3.2.2, 3.1.0 through 3.1.4, and 3.0.0 through 3.0.6; and FortiAuthenticator before 6.0.6 may allow an unauthenticated attacker to bring the device into an unresponsive state via specifically-crafted long request parameters. |
2021-08-04 |
not yet calculated |
CVE-2021-22124
CONFIRM |
foxit — software_pdf_reader
|
A use-after-free vulnerability exists in the JavaScript engine of Foxit Software’s PDF Reader, version 11.0.0.49893. A specially crafted PDF document can trigger the reuse of previously freed memory, which can lead to arbitrary code execution. An attacker needs to trick the user to open the malicious file to trigger this vulnerability. Exploitation is also possible if a user visits a specially crafted, malicious site if the browser plugin extension is enabled. |
2021-08-05 |
not yet calculated |
CVE-2021-21893
MISC |
foxit — software_pdf_reader
|
A use-after-free vulnerability exists in the JavaScript engine of Foxit Software’s PDF Reader, version 10.1.4.37651. A specially crafted PDF document can trigger the reuse of previously free memory, which can lead to arbitrary code execution. An attacker needs to trick the user into opening a malicious file or site to trigger this vulnerability if the browser plugin extension is enabled. |
2021-08-05 |
not yet calculated |
CVE-2021-21870
MISC |
foxit — software_pdf_reader
|
A use-after-free vulnerability exists in the JavaScript engine of Foxit Software’s PDF Reader, version 10.1.3.37598. A specially crafted PDF document can trigger the reuse of previously freed memory, which can lead to arbitrary code execution. An attacker needs to trick the user to open the malicious file to trigger this vulnerability. Exploitation is also possible if a user visits a specially crafted, malicious site if the browser plugin extension is enabled. |
2021-08-05 |
not yet calculated |
CVE-2021-21831
MISC |
gd — graphics_library
|
read_header_tga in gd_tga.c in the GD Graphics Library (aka LibGD) through 2.3.2 allows remote attackers to cause a denial of service (out-of-bounds read) via a crafted TGA file. |
2021-08-04 |
not yet calculated |
CVE-2021-38115
MISC
MISC |
gestionale — amica_prodigy
|
A vulnerability was found in CIR 2000 / Gestionale Amica Prodigy v1.7. The Amica Prodigy’s executable “RemoteBackup.Service.exe” has incorrect permissions, allowing a local unprivileged user to replace it with a malicious file that will be executed with “LocalSystem” privileges. |
2021-08-06 |
not yet calculated |
CVE-2021-35312
MISC |
getsimple_cms — getsimple_cms
|
A stored cross site scripting (XSS) vulnerability in /admin/snippets.php of GetSimple CMS 3.4.0a allows attackers to execute arbitrary web scripts or HTML via crafted payload in the Edit Snippets module. |
2021-08-06 |
not yet calculated |
CVE-2020-21353
MISC |
gitlab — ce/ee
|
An issue has been discovered in GitLab CE/EE affecting all versions starting from 14.0. It was possible to exploit a stored cross-site-scripting via a specifically crafted default branch name. |
2021-08-05 |
not yet calculated |
CVE-2021-22241
MISC
MISC
CONFIRM |
gitlab — ce/ee
|
Improper access control in GitLab EE versions 13.11.6, 13.12.6, and 14.0.2 allows users to be created via single sign on despite user cap being enabled |
2021-08-05 |
not yet calculated |
CVE-2021-22240
MISC
MISC
CONFIRM |
gitlab — ce/ee
|
An issue has been discovered in GitLab CE/EE affecting all versions starting with 13.11, 13.12 and 14.0. A specially crafted design image allowed attackers to read arbitrary files on the server. |
2021-08-05 |
not yet calculated |
CVE-2021-22234
CONFIRM
MISC
MISC |
| go — go |
In archive/zip in Go before 1.15.13 and 1.16.x before 1.16.5, a crafted file count (in an archive’s header) can cause a NewReader or OpenReader panic. |
2021-08-02 |
not yet calculated |
CVE-2021-33196
MISC
MISC |
| go — go |
In Go before 1.15.13 and 1.16.x before 1.16.5, some configurations of ReverseProxy (from net/http/httputil) result in a situation where an attacker is able to drop arbitrary headers. |
2021-08-02 |
not yet calculated |
CVE-2021-33197
MISC
MISC |
go — go
|
In Go before 1.15.13 and 1.16.x before 1.16.5, there can be a panic for a large exponent to the math/big.Rat SetString or UnmarshalText method. |
2021-08-02 |
not yet calculated |
CVE-2021-33198
MISC
MISC |
go — go
|
Go before 1.15.13 and 1.16.x before 1.16.5 has functions for DNS lookups that do not validate replies from DNS servers, and thus a return value may contain an unsafe injection (e.g., XSS) that does not conform to the RFC1035 format. |
2021-08-02 |
not yet calculated |
CVE-2021-33195
MISC
MISC |
| google — chrome |
Stack buffer overflow in Printing in Google Chrome prior to 92.0.4515.107 allowed a remote attacker who had compromised the renderer process to potentially exploit stack corruption via a crafted HTML page. |
2021-08-03 |
not yet calculated |
CVE-2021-30566
MISC
MISC |
| google — chrome |
Use after free in GPU in Google Chrome prior to 92.0.4515.107 allowed a remote attacker to potentially exploit heap corruption via a crafted HTML page. |
2021-08-03 |
not yet calculated |
CVE-2021-30573
MISC
MISC |
| google — chrome |
Out of bounds write in Autofill in Google Chrome prior to 92.0.4515.107 allowed a remote attacker who had compromised the renderer process to potentially exploit heap corruption via a crafted HTML page. |
2021-08-03 |
not yet calculated |
CVE-2021-30575
MISC
MISC |
| google — chrome |
Use after free in Blink XSLT in Google Chrome prior to 91.0.4472.164 allowed a remote attacker to potentially exploit heap corruption via a crafted HTML page. |
2021-08-03 |
not yet calculated |
CVE-2021-30560
MISC
MISC |
| google — chrome |
Uninitialized use in Media in Google Chrome prior to 92.0.4515.107 allowed a remote attacker to perform out of bounds memory access via a crafted HTML page. |
2021-08-03 |
not yet calculated |
CVE-2021-30578
MISC
MISC |
google — chrome
|
Use after free in sensor handling in Google Chrome on Windows prior to 92.0.4515.107 allowed a remote attacker to potentially exploit heap corruption via a crafted HTML page. |
2021-08-03 |
not yet calculated |
CVE-2021-30585
MISC
MISC |
google — chrome
|
Insufficient validation of untrusted input in Sharing in Google Chrome prior to 92.0.4515.107 allowed a remote attacker to bypass navigation restrictions via a crafted click-to-call link. |
2021-08-03 |
not yet calculated |
CVE-2021-30589
MISC
MISC |
google — chrome
|
Out of bounds write in Tab Groups in Google Chrome on Linux and ChromeOS prior to 92.0.4515.107 allowed an attacker who convinced a user to install a malicious extension to perform an out of bounds memory write via a crafted HTML page. |
2021-08-03 |
not yet calculated |
CVE-2021-30565
MISC
MISC |
google — chrome
|
Use after free in UI framework in Google Chrome prior to 92.0.4515.107 allowed a remote attacker to potentially exploit heap corruption via a crafted HTML page. |
2021-08-03 |
not yet calculated |
CVE-2021-30579
MISC
MISC |
google — chrome
|
Insufficient policy enforcement in Installer in Google Chrome prior to 92.0.4515.107 allowed a remote attacker to perform local privilege escalation via a crafted file. |
2021-08-03 |
not yet calculated |
CVE-2021-30577
MISC
MISC |
google — chrome
|
Use after free in DevTools in Google Chrome prior to 92.0.4515.107 allowed an attacker who convinced a user to install a malicious extension to potentially exploit heap corruption via a crafted HTML page. |
2021-08-03 |
not yet calculated |
CVE-2021-30576
MISC
MISC |
google — chrome
|
Use after free in protocol handling in Google Chrome prior to 92.0.4515.107 allowed a remote attacker to potentially exploit heap corruption via a crafted HTML page. |
2021-08-03 |
not yet calculated |
CVE-2021-30574
MISC
MISC |
google — chrome
|
Use after free in Autofill in Google Chrome prior to 92.0.4515.107 allowed a remote attacker to potentially exploit heap corruption via a crafted HTML page. |
2021-08-03 |
not yet calculated |
CVE-2021-30572
MISC
MISC |
google — chrome
|
Insufficient policy enforcement in DevTools in Google Chrome prior to 92.0.4515.107 allowed an attacker who convinced a user to install a malicious extension to potentially perform a sandbox escape via a crafted HTML page. |
2021-08-03 |
not yet calculated |
CVE-2021-30571
MISC
MISC |
google — chrome
|
Use after free in sqlite in Google Chrome prior to 92.0.4515.107 allowed a remote attacker to potentially exploit heap corruption via a crafted HTML page. |
2021-08-03 |
not yet calculated |
CVE-2021-30569
MISC
MISC |
google — chrome
|
Heap buffer overflow in WebGL in Google Chrome prior to 92.0.4515.107 allowed a remote attacker to potentially exploit heap corruption via a crafted HTML page. |
2021-08-03 |
not yet calculated |
CVE-2021-30568
MISC
MISC |
google — chrome
|
Use after free in DevTools in Google Chrome prior to 92.0.4515.107 allowed an attacker who convinced a user to open DevTools to potentially exploit heap corruption via specific user gesture. |
2021-08-03 |
not yet calculated |
CVE-2021-30567
MISC
MISC |
google — chrome
|
Heap buffer overflow in WebXR in Google Chrome prior to 91.0.4472.164 allowed a remote attacker to potentially exploit heap corruption via a crafted HTML page. |
2021-08-03 |
not yet calculated |
CVE-2021-30564
MISC
MISC |
google — chrome
|
Type confusion in V8 in Google Chrome prior to 92.0.4515.107 allowed a remote attacker to potentially exploit heap corruption via a crafted HTML page. |
2021-08-03 |
not yet calculated |
CVE-2021-30588
MISC
MISC |
google — chrome
|
Type Confusion in V8 in Google Chrome prior to 91.0.4472.164 allowed a remote attacker to potentially exploit heap corruption via a crafted HTML page. |
2021-08-03 |
not yet calculated |
CVE-2021-30563
MISC
MISC |
google — chrome
|
Use after free in WebSerial in Google Chrome prior to 91.0.4472.164 allowed a remote attacker to potentially exploit heap corruption via a crafted HTML page. |
2021-08-03 |
not yet calculated |
CVE-2021-30562
MISC
MISC |
google — chrome
|
Type Confusion in V8 in Google Chrome prior to 91.0.4472.164 allowed a remote attacker to potentially exploit heap corruption via a crafted HTML page. |
2021-08-03 |
not yet calculated |
CVE-2021-30561
MISC
MISC |
google — chrome
|
Use after free in V8 in Google Chrome prior to 91.0.4472.164 allowed a remote attacker to potentially exploit heap corruption via a crafted HTML page. |
2021-08-03 |
not yet calculated |
CVE-2021-30541
MISC
MISC |
google — chrome
|
Inappropriate implementation in Animation in Google Chrome prior to 92.0.4515.107 allowed a remote attacker to leak cross-origin data via a crafted HTML page. |
2021-08-03 |
not yet calculated |
CVE-2021-30582
MISC
MISC |
google — chrome
|
Insufficient policy enforcement in image handling in iOS in Google Chrome on iOS prior to 92.0.4515.107 allowed a remote attacker to leak cross-origin data via a crafted HTML page. |
2021-08-03 |
not yet calculated |
CVE-2021-30583
MISC
MISC |
google — chrome
|
Incorrect security UI in Downloads in Google Chrome on Android prior to 92.0.4515.107 allowed a remote attacker to perform domain spoofing via a crafted HTML page. |
2021-08-03 |
not yet calculated |
CVE-2021-30584
MISC
MISC |
google — chrome
|
Use after free in dialog box handling in Windows in Google Chrome prior to 92.0.4515.107 allowed an attacker who convinced a user to install a malicious extension to potentially exploit heap corruption via a crafted HTML page. |
2021-08-03 |
not yet calculated |
CVE-2021-30586
MISC
MISC |
google — chrome
|
Inappropriate implementation in Compositing in Google Chrome prior to 92.0.4515.107 allowed a remote attacker to potentially spoof the contents of the Omnibox (URL bar) via a crafted HTML page. |
2021-08-03 |
not yet calculated |
CVE-2021-30587
MISC
MISC |
google — chrome
|
Out of bounds write in ANGLE in Google Chrome prior to 91.0.4472.164 allowed a remote attacker to potentially exploit heap corruption via a crafted HTML page. |
2021-08-03 |
not yet calculated |
CVE-2021-30559
MISC
MISC |
google — chrome
|
Insufficient policy enforcement in Android intents in Google Chrome prior to 92.0.4515.107 allowed an attacker who convinced a user to install a malicious application to obtain potentially sensitive information via a crafted HTML page. |
2021-08-03 |
not yet calculated |
CVE-2021-30580
MISC
MISC |
google — chrome
|
Use after free in DevTools in Google Chrome prior to 92.0.4515.107 allowed an attacker who convinced a user to install a malicious extension to potentially exploit heap corruption via a crafted HTML page. |
2021-08-03 |
not yet calculated |
CVE-2021-30581
MISC
MISC |
gpac — gpac
|
The gf_dash_segmenter_probe_input function in GPAC v0.8 allows attackers to cause a denial of service (NULL pointer dereference) via a crafted file in the MP4Box command. |
2021-08-04 |
not yet calculated |
CVE-2020-22352
MISC |
gpac — gpac
|
An issue was discovered in GPAC 1.0.1. There is a heap-based buffer overflow in the function gp_rtp_builder_do_tx3g function in ietf/rtp_pck_3gpp.c, as demonstrated by MP4Box. This can cause a denial of service (DOS). |
2021-08-05 |
not yet calculated |
CVE-2021-36584
MISC |
grafana — cortex
|
An issue was discovered in Grafana Cortex through 1.9.0. The header value X-Scope-OrgID is used to construct file paths for rules files, and if crafted to conduct directory traversal such as ae ../../sensitive/path/in/deployment pathname, then Cortex will attempt to parse a rules file at that location and include some of the contents in the error message. (Other Cortex API requests can also be sent a malicious OrgID header, e.g., tricking the ingester into writing metrics to a different location, but the effect is nuisance rather than information disclosure.) |
2021-08-03 |
not yet calculated |
CVE-2021-36157
MISC
MISC |
grafana — loki
|
An issue was discovered in Grafana Loki through 2.2.1. The header value X-Scope-OrgID is used to construct file paths for rules files, and if crafted to conduct directory traversal such as ae ../../sensitive/path/in/deployment pathname, then Loki will attempt to parse a rules file at that location and include some of the contents in the error message. |
2021-08-03 |
not yet calculated |
CVE-2021-36156
MISC
MISC |
graylog — graylog
|
A Session ID leak in the DEBUG log file in Graylog before 4.1.2 allows attackers to escalate privileges (to the access level of the leaked session ID). |
2021-07-31 |
not yet calculated |
CVE-2021-37759
MISC |
graylog — graylog
|
A Session ID leak in the audit log in Graylog before 4.1.2 allows attackers to escalate privileges (to the access level of the leaked session ID). |
2021-07-31 |
not yet calculated |
CVE-2021-37760
MISC |
| harmonyos — harmonyos |
A component of the HarmonyOS has a Out-of-bounds Write Vulnerability. Local attackers may exploit this vulnerability to cause integer overflow. |
2021-08-03 |
not yet calculated |
CVE-2021-22423
MISC |
| harmonyos — harmonyos |
A component of the HarmonyOS has a Integer Overflow or Wraparound vulnerability. Local attackers may exploit this vulnerability to cause memory overwriting. |
2021-08-03 |
not yet calculated |
CVE-2021-22422
MISC |
| harmonyos — harmonyos |
A component of the HarmonyOS has a Data Processing Errors vulnerability. Local attackers may exploit this vulnerability to cause Kernel Memory Leakage. |
2021-08-03 |
not yet calculated |
CVE-2021-22417
MISC |
| harmonyos — harmonyos |
A component of the HarmonyOS has a Insufficient Verification of Data Authenticity vulnerability. Local attackers may exploit this vulnerability to cause persistent dos. |
2021-08-03 |
not yet calculated |
CVE-2021-22419
MISC |
harmonyos — harmonyos
|
A component of the HarmonyOS has a Double Free vulnerability. Local attackers may exploit this vulnerability to cause Root Elevating Privileges. |
2021-08-03 |
not yet calculated |
CVE-2021-22425
MISC |
harmonyos — harmonyos
|
A component of the HarmonyOS has a Kernel Memory Leakage Vulnerability. Local attackers may exploit this vulnerability to cause Kernel Denial of Service. |
2021-08-03 |
not yet calculated |
CVE-2021-22424
MISC |
harmonyos — harmonyos
|
A component of the HarmonyOS has a permission bypass vulnerability. Local attackers may exploit this vulnerability to cause the device to hang due to the page error OsVmPageFaultHandler. |
2021-08-06 |
not yet calculated |
CVE-2021-22295
MISC |
harmonyos — harmonyos
|
A component of the HarmonyOS has a Improper Privilege Management vulnerability. Local attackers may exploit this vulnerability to cause further Elevation of Privileges. |
2021-08-03 |
not yet calculated |
CVE-2021-22421
MISC |
harmonyos — harmonyos
|
A component of the HarmonyOS has a External Control of System or Configuration Setting vulnerability. Local attackers may exploit this vulnerability to cause the underlying trust of the application trustlist mechanism is missing.. |
2021-08-03 |
not yet calculated |
CVE-2021-22420
MISC |
harmonyos — harmonyos
|
A component of the HarmonyOS has a Integer Overflow or Wraparound vulnerability. Local attackers may exploit this vulnerability to cause memory overwriting. |
2021-08-03 |
not yet calculated |
CVE-2021-22418
MISC |
harmonyos — harmonyos
|
A component of the HarmonyOS has a Data Processing Errors vulnerability. Local attackers may exploit this vulnerability to cause Kernel Code Execution. |
2021-08-03 |
not yet calculated |
CVE-2021-22416
MISC |
hdcms — hdcms
|
An arbitrary file upload vulnerability in /fileupload.php of hdcms 5.7 allows attackers to execute arbitrary code via a crafted file. |
2021-08-03 |
not yet calculated |
CVE-2020-19303
MISC |
hewlett_packard_enterprises — edgeline_infrastructure_management_software
|
A potential security vulnerability has been identified in the HPE Edgeline Infrastructure Manager, also known as HPE Edgeline Infrastructure Management Software. The vulnerability could be remotely exploited to disclose sensitive information. HPE has made software updates available to resolve the vulnerability in the HPE Edgeline Infrastructure Manager (EIM). |
2021-08-05 |
not yet calculated |
CVE-2021-26586
MISC |
homekit — wireless_access_control
|
A NULL pointer dereference vulnerability exists on the ecobee3 lite 4.5.81.200 device in the HomeKit Wireless Access Control setup process. A threat actor can exploit this vulnerability to cause a denial of service, forcing the device to reboot via a crafted HTTP request. |
2021-08-03 |
not yet calculated |
CVE-2021-27953
MISC |
homekit — wireless_access_control
|
A heap-based buffer overflow vulnerability exists on the ecobee3 lite 4.5.81.200 device in the HKProcessConfig function of the HomeKit Wireless Access Control setup process. A threat actor can exploit this vulnerability to force the device to connect to a SSID or cause a denial of service. |
2021-08-03 |
not yet calculated |
CVE-2021-27954
MISC |
hotel_druid — hotel_druid
|
A reflected cross-site scripting (XSS) vulnerability exists in multiple pages in version 3.0.2 of the Hotel Druid application that allows for arbitrary execution of JavaScript commands. |
2021-08-03 |
not yet calculated |
CVE-2021-37833
MISC
MISC |
hotel_druid — hotel_druid
|
A SQL injection vulnerability exists in version 3.0.2 of Hotel Druid when SQLite is being used as the application database. A malicious attacker can issue SQL commands to the SQLite database through the vulnerable idappartamenti parameter. |
2021-08-03 |
not yet calculated |
CVE-2021-37832
MISC
MISC |
htmly — htmly
|
The “blog title” field in the “Settings” menu “config” page of “dashboard” in htmly 2.8.1 has a storage cross site scripting (XSS) vulnerability. It allows remote attackers to send an authenticated post HTTP request to admin/config and inject arbitrary web script or HTML through a special website name. |
2021-08-03 |
not yet calculated |
CVE-2021-36703
MISC |
htmly — htmly
|
The “content” field in the “regular post” page of the “add content” menu under “dashboard” in htmly 2.8.1 has a storage cross site scripting (XSS) vulnerability. It allows remote attackers to send authenticated post-http requests to add / content and inject arbitrary web scripts or HTML through special content. |
2021-08-03 |
not yet calculated |
CVE-2021-36702
MISC |
htmly — htmly
|
In htmly version 2.8.1, is vulnerable to an Arbitrary File Deletion on the local host when delete backup files. The vulnerability may allow a remote attacker to delete arbitrary know files on the host. |
2021-08-03 |
not yet calculated |
CVE-2021-36701
MISC |
huawei — digital_balance
|
There is a logic error vulnerability in several smartphones. The software does not properly restrict certain operation when the Digital Balance function is on. Successful exploit could allow the attacker to bypass the Digital Balance limit after a series of operations. Affected product versions include: Hulk-AL00C 9.1.1.201(C00E201R8P1);Jennifer-AN00C 10.1.1.171(C00E170R6P3);Jenny-AL10B 10.1.0.228(C00E220R5P1) and OxfordPL-AN10B 10.1.0.116(C00E110R2P1). |
2021-08-02 |
not yet calculated |
CVE-2021-22398
MISC |
huawei — manageone
|
There is a privilege escalation vulnerability in Huawei ManageOne 8.0.0. External parameters of some files are lack of verification when they are be called. Attackers can exploit this vulnerability by performing these files to cause privilege escalation attack. This can compromise normal service. |
2021-08-02 |
not yet calculated |
CVE-2021-22397
MISC |
huawei — multiple_products
|
There is a privilege escalation vulnerability in some Huawei products. Due to improper privilege management, a local attacker with common privilege may access some specific files in the affected products. Successful exploit will cause privilege escalation.Affected product versions include:eCNS280_TD V100R005C00,V100R005C10;eSE620X vESS V100R001C10SPC200,V100R001C20SPC200. |
2021-08-02 |
not yet calculated |
CVE-2021-22396
MISC |
| huawei — smartphones |
There is an Integer Overflow Vulnerability in Huawei Smartphone.Successful exploitation of this vulnerability may cause random kernel address access. |
2021-08-02 |
not yet calculated |
CVE-2021-22412
MISC |
huawei — smartphones
|
Some Huawei Smartphones has an insufficient input validation vulnerability due to the lack of parameter validation. An attacker may trick a user into installing a malicious APP. The app can modify specific parameters, causing the system to crash. Affected product include:OxfordS-AN00A 10.0.1.10(C00E10R1P1),10.0.1.105(C00E103R3P3),10.0.1.115(C00E110R3P3),10.0.1.123(C00E121R3P3),10.0.1.135(C00E130R3P3),10.0.1.135(C00E130R4P1),10.0.1.152(C00E140R4P1),10.0.1.160(C00E160R4P1),10.0.1.167(C00E166R4P1),10.0.1.173(C00E172R5P1),10.0.1.178(C00E175R5P1) and 10.1.0.202(C00E79R5P1). |
2021-08-03 |
not yet calculated |
CVE-2021-22400
MISC |
huawei — smartphones
|
There is an Integer Overflow Vulnerability in Huawei Smartphone.Successful exploitation of this vulnerability may cause the system to reset. |
2021-08-02 |
not yet calculated |
CVE-2021-22413
MISC |
huawei — smartphones
|
There is a Memory Buffer Errors Vulnerability in Huawei Smartphone.Successful exploitation of this vulnerability may cause the system to reset. |
2021-08-02 |
not yet calculated |
CVE-2021-22414
MISC |
huawei — smartphones
|
There is an Incorrect Calculation of Buffer Size Vulnerability in Huawei Smartphone.Successful exploitation of this vulnerability may cause kernel exceptions with the code. |
2021-08-02 |
not yet calculated |
CVE-2021-22415
MISC |
huawei — smartphones
|
There is an Incomplete Cleanup Vulnerability in Huawei Smartphone.Successful exploitation of this vulnerability may lead to authentication bypass. |
2021-08-02 |
not yet calculated |
CVE-2021-22428
MISC |
huawei — smartphones
|
There is an Input Verification Vulnerability in Huawei Smartphone.Successful exploitation of this vulnerability may cause the system to reset. |
2021-08-02 |
not yet calculated |
CVE-2021-22445
MISC |
huawei — smartphones
|
There is a Heap-based Buffer Overflow Vulnerability in Huawei Smartphone.Successful exploitation of this vulnerability may lead to authentication bypass. |
2021-08-02 |
not yet calculated |
CVE-2021-22427
MISC |
huawei — smartphones
|
There is an Information Disclosure Vulnerability in Huawei Smartphone.Successful exploitation of this vulnerability may cause the system to reset. |
2021-08-02 |
not yet calculated |
CVE-2021-22446
MISC |
huawei — smartphones
|
There is an Improper Check for Unusual or Exceptional Conditions Vulnerability in Huawei Smartphone.Successful exploitation of this vulnerability may cause the system to reset. |
2021-08-02 |
not yet calculated |
CVE-2021-22447
MISC |
hubs_cloud — hubs_cloud
|
Hubs Cloud allows users to download shared content, specifically HTML and JS, which could allow javascript execution in the Hub Cloud instance’s primary hosting domain.*. This vulnerability affects Hubs Cloud < mozillareality/reticulum/1.0.1/20210618012634. |
2021-08-02 |
not yet calculated |
CVE-2021-29979
MISC
MISC |
ibm — api_connect
|
IBM API Connect 5.0.0.0 through 5.0.8.11 is vulnerable to cross-site scripting. This vulnerability allows users to embed arbitrary JavaScript code in the Web UI thus altering the intended functionality potentially leading to credentials disclosure within a trusted session. IBM X-Force ID: 187370. |
2021-08-04 |
not yet calculated |
CVE-2020-4707
CONFIRM
XF |
ibm — cloud_pak_for_security
|
IBM Cloud Pak for Security (CP4S) 1.5.0.0, 1.5.1.0, 1.6.0.0, 1.6.1.0, 1.7.0.0, and 1.7.1.0 could allow a remote authenticated attacker to execute arbitrary commands on the system by sending a specially crafted request. |
2021-08-02 |
not yet calculated |
CVE-2021-29696
CONFIRM
XF |
ibm — cloud_pak_for_security
|
IBM Cloud Pak for Security (CP4S) 1.5.0.0, 1.5.1.0, 1.6.0.0, 1.6.1.0, 1.7.0.0, and 1.7.1.0 could allow a remote authenticated attacker to obtain sensitive information through HTTP requests that could be used in further attacks against the system. |
2021-08-02 |
not yet calculated |
CVE-2021-29697
CONFIRM
XF |
ibm — powervm_hypervisor_fw940_and_fw950
|
IBM PowerVM Hypervisor FW940 and FW950 could allow an attacker to obtain sensitive information if they gain service access to the FSP. IBM X-Force ID: 202476. |
2021-08-04 |
not yet calculated |
CVE-2021-29765
CONFIRM
XF |
ignitedcms — ignitedcms
|
Cross Site Request Forgery (CSRF) in IgnitedCMS v1.0 allows remote attackers to obtain sensitive information and gain privilege via the component “/admin/profile/save_profile”. |
2021-08-06 |
not yet calculated |
CVE-2020-18694
MISC |
| iobit — advanced_systemcare_ultimate |
An information disclosure vulnerability exists in the the way IOBit Advanced SystemCare Ultimate 14.2.0.220 driver handles Privileged I/O read requests. A specially crafted I/O request packet (IRP) can lead to privileged reads in the context of a driver which can result in sensitive information disclosure from the kernel. The IN instruction can read two bytes from the given I/O device, potentially leaking sensitive device data to unprivileged users. |
2021-08-05 |
not yet calculated |
CVE-2021-21791
MISC |
iobit — advanced_systemcare_ultimate
|
An information disclosure vulnerability exists in the IOCTL 0x9c40a148 handling of IOBit Advanced SystemCare Ultimate 14.2.0.220. A specially crafted I/O request packet (IRP) can lead to a disclosure of sensitive information. An attacker can send a malicious IRP to trigger this vulnerability. |
2021-08-05 |
not yet calculated |
CVE-2021-21785
MISC |
iobit — advanced_systemcare_ultimate
|
An information disclosure vulnerability exists in the the way IOBit Advanced SystemCare Ultimate 14.2.0.220 driver handles Privileged I/O read requests. A specially crafted I/O request packet (IRP) can lead to privileged reads in the context of a driver which can result in sensitive information disclosure from the kernel. The IN instruction can read two bytes from the given I/O device, potentially leaking sensitive device data to unprivileged users. |
2021-08-05 |
not yet calculated |
CVE-2021-21790
MISC |
iobit — advanced_systemcare_ultimate
|
An information disclosure vulnerability exists in the the way IOBit Advanced SystemCare Ultimate 14.2.0.220 driver handles Privileged I/O read requests. A specially crafted I/O request packet (IRP) can lead to privileged reads in the context of a driver which can result in sensitive information disclosure from the kernel. The IN instruction can read four bytes from the given I/O device, potentially leaking sensitive device data to unprivileged users. |
2021-08-05 |
not yet calculated |
CVE-2021-21792
MISC |
jeecg-boot_cms — jeecg-boot_cms
|
A SQL injection vulnerability in /jeecg boot/sys/dict/loadtreedata of jeecg-boot CMS 2.3 allows attackers to access sensitive database information. |
2021-08-06 |
not yet calculated |
CVE-2020-28087
MISC |
jeecg-boot_cms — jeecg-boot_cms
|
An arbitrary file upload vulnerability in /jeecg-boot/sys/common/upload of jeecg-boot CMS 2.3 allows attackers to execute arbitrary code. |
2021-08-06 |
not yet calculated |
CVE-2020-28088
MISC |
jetbrains — hub
|
In JetBrains Hub before 2021.1.13402, HTML injection in the password reset email was possible. |
2021-08-06 |
not yet calculated |
CVE-2021-37541
MISC |
jetbrains — hub
|
In JetBrains Hub before 2021.1.13389, account takeover was possible during password reset. |
2021-08-06 |
not yet calculated |
CVE-2021-36209
MISC |
jetbrains — hub
|
In JetBrains Hub before 2021.1.13262, a potentially insufficient CSP for the Widget deployment feature was used. |
2021-08-06 |
not yet calculated |
CVE-2021-37540
MISC |
jetbrains — rubymine
|
In JetBrains RubyMine before 2021.1.1, code execution without user confirmation was possible for untrusted projects. |
2021-08-06 |
not yet calculated |
CVE-2021-37543
MISC |
jetbrains — teamcity
|
In JetBrains TeamCity before 2021.1, an insecure key generation mechanism for encrypted properties was used. |
2021-08-06 |
not yet calculated |
CVE-2021-37546
MISC |
jetbrains — teamcity
|
In JetBrains TeamCity before 2020.2.4, insufficient checks during file uploading were made. |
2021-08-06 |
not yet calculated |
CVE-2021-37547
MISC |
jetbrains — teamcity
|
In JetBrains TeamCity before 2021.1.1, insufficient authentication checks for agent requests were made. |
2021-08-06 |
not yet calculated |
CVE-2021-37545
MISC |
jetbrains — teamcity
|
In JetBrains TeamCity before 2020.2.4, there was an insecure deserialization. |
2021-08-06 |
not yet calculated |
CVE-2021-37544
MISC |
jetbrains — teamcity
|
In JetBrains TeamCity before 2020.2.3, XSS was possible. |
2021-08-06 |
not yet calculated |
CVE-2021-37542
MISC |
| jetbrains — youtrack |
In JetBrains YouTrack before 2021.2.17925, stored XSS was possible. |
2021-08-06 |
not yet calculated |
CVE-2021-37552
MISC |
jetbrains — youtrack
|
In JetBrains YouTrack before 2021.3.21051, a user could see boards without having corresponding permissions. |
2021-08-06 |
not yet calculated |
CVE-2021-37554
MISC |
jetbrains — youtrack
|
In JetBrains YouTrack before 2021.2.16363, an insecure PRNG was used. |
2021-08-06 |
not yet calculated |
CVE-2021-37553
MISC |
jetbrains — youtrack
|
In JetBrains YouTrack before 2021.2.16363, system user passwords were hashed with SHA-256. |
2021-08-06 |
not yet calculated |
CVE-2021-37551
MISC |
jetbrains — youtrack
|
In JetBrains YouTrack before 2021.2.16363, time-unsafe comparisons were used. |
2021-08-06 |
not yet calculated |
CVE-2021-37550
MISC |
jetbrains — youtrack
|
In JetBrains YouTrack before 2021.1.11111, sandboxing in workflows was insufficient. |
2021-08-06 |
not yet calculated |
CVE-2021-37549
MISC |
jetbrains — youtrack
|
In JetBrains TeamCity before 2021.1, passwords in cleartext sometimes could be stored in VCS. |
2021-08-06 |
not yet calculated |
CVE-2021-37548
MISC |
jump — soap
|
An issue was discovered in JUMP AMS 3.6.0.04.009-2487. A JUMP SOAP endpoint permitted the listing of the content of the remote file system. This can be used to identify the complete server filesystem structure, i.e., identifying all the directories and files. |
2021-08-03 |
not yet calculated |
CVE-2021-32017
MISC |
jump — soap
|
An issue was discovered in JUMP AMS 3.6.0.04.009-2487. The JUMP SOAP API was vulnerable to arbitrary file reading due to an improper limitation of file loading on the server filesystem, aka directory traversal. |
2021-08-03 |
not yet calculated |
CVE-2021-32018
MISC |
jump — soap
|
An issue was discovered in JUMP AMS 3.6.0.04.009-2487. A JUMP SOAP endpoint permitted the writing of arbitrary files to a user-controlled location on the remote filesystem (with user-controlled content) via directory traversal, potentially leading to remote code and command execution. |
2021-08-03 |
not yet calculated |
CVE-2021-32016
MISC |
leostream — connection_broker
|
** UNSUPPORTED WHEN ASSIGNED ** LeoStream Connection Broker 9.x before 9.0.34.3 allows Unauthenticated Reflected XSS via the /index.pl user parameter. NOTE: This vulnerability only affects products that are no longer supported by the maintainer. |
2021-08-06 |
not yet calculated |
CVE-2021-38157
MISC
MISC
MISC
MISC |
libcurl — libcurl
|
libcurl-using applications can ask for a specific client certificate to be used in a transfer. This is done with the `CURLOPT_SSLCERT` option (`–cert` with the command line tool).When libcurl is built to use the macOS native TLS library Secure Transport, an application can ask for the client certificate by name or with a file name – using the same option. If the name exists as a file, it will be used instead of by name.If the appliction runs with a current working directory that is writable by other users (like `/tmp`), a malicious user can create a file name with the same name as the app wants to use by name, and thereby trick the application to use the file based cert instead of the one referred to by name making libcurl send the wrong client certificate in the TLS connection handshake. |
2021-08-05 |
not yet calculated |
CVE-2021-22926
MISC |
libcurl — libcurl
|
libcurl keeps previously used connections in a connection pool for subsequenttransfers to reuse, if one of them matches the setup.Due to errors in the logic, the config matching function did not take ‘issuercert’ into account and it compared the involved paths *case insensitively*,which could lead to libcurl reusing wrong connections.File paths are, or can be, case sensitive on many systems but not all, and caneven vary depending on used file systems.The comparison also didn’t include the ‘issuer cert’ which a transfer can setto qualify how to verify the server certificate. |
2021-08-05 |
not yet calculated |
CVE-2021-22924
MISC |
libelfin — libelfin
|
A vulnerability in the elf::section::as_strtab function of Libelfin v0.3 allows attackers to cause a denial of service (DOS) through a segmentation fault via a crafted ELF file. |
2021-08-04 |
not yet calculated |
CVE-2020-24826
MISC
MISC |
libelfin — libelfin
|
A vulnerability in the line_table::line_table function of Libelfin v0.3 allows attackers to cause a denial of service (DOS) through a segmentation fault via a crafted ELF file. |
2021-08-04 |
not yet calculated |
CVE-2020-24825
MISC
MISC |
libelfin — libelfin
|
A global buffer overflow issue in the dwarf::line_table::line_table function of Libelfin v0.3 allows attackers to cause a denial of service (DOS). |
2021-08-04 |
not yet calculated |
CVE-2020-24824
MISC
MISC |
libelfin — libelfin
|
A vulnerability in the dwarf::cursor::skip_form function of Libelfin v0.3 allows attackers to cause a denial of service (DOS) through a segmentation fault via a crafted ELF file. |
2021-08-04 |
not yet calculated |
CVE-2020-24821
MISC
MISC |
libelfin — libelfin
|
A vulnerability in the dwarf::cursor::uleb function of Libelfin v0.3 allows attackers to cause a denial of service (DOS) through a segmentation fault via a crafted ELF file. |
2021-08-04 |
not yet calculated |
CVE-2020-24822
MISC
MISC |
libelfin — libelfin
|
A vulnerability in the dwarf::to_string function of Libelfin v0.3 allows attackers to cause a denial of service (DOS) through a segmentation fault via a crafted ELF file. |
2021-08-04 |
not yet calculated |
CVE-2020-24823
MISC
MISC |
libelfin — libelfin
|
A vulnerability in the dwarf::cursor::skip_form function of Libelfin v0.3 allows attackers to cause a denial of service (DOS) through a segmentation fault via a crafted ELF file. |
2021-08-04 |
not yet calculated |
CVE-2020-24827
MISC
MISC |
libfetch — libfetch
|
libfetch before 2021-07-26, as used in apk-tools, xbps, and other products, mishandles numeric strings for the FTP and HTTP protocols. The FTP passive mode implementation allows an out-of-bounds read because strtol is used to parse the relevant numbers into address bytes. It does not check if the line ends prematurely. If it does, the for-loop condition checks for the ” terminator one byte too late. |
2021-08-03 |
not yet calculated |
CVE-2021-36159
MISC
MISC |
| liferay — portal |
Privilege escalation vulnerability in Liferay Portal 7.0.3 through 7.3.4, and Liferay DXP 7.1 before fix pack 20, and 7.2 before fix pack 9 allows remote authenticated users with permission to update/edit users to take over a company administrator user account by editing the company administrator user. |
2021-08-03 |
not yet calculated |
CVE-2021-33335
CONFIRM
CONFIRM |
| liferay — portal |
The Flags module in Liferay Portal 7.3.1 and earlier, and Liferay DXP 7.0 before fix pack 96, 7.1 before fix pack 20, and 7.2 before fix pack 5, does not limit the rate at which content can be flagged as inappropriate, which allows remote authenticated users to spam the site administrator with emails |
2021-08-03 |
not yet calculated |
CVE-2021-33320
CONFIRM
CONFIRM |
| liferay — portal |
The Portal Workflow module in Liferay Portal 7.3.2 and earlier, and Liferay DXP 7.0 before fix pack 93, 7.1 before fix pack 19 and 7.2 before fix pack 6, does not properly check user permission, which allows remote authenticated users to view and delete workflow submissions via crafted URLs. |
2021-08-03 |
not yet calculated |
CVE-2021-33333
CONFIRM
CONFIRM |
| liferay — portal |
The Dynamic Data Mapping module in Liferay Portal 7.1.0 through 7.3.2, and Liferay DXP 7.1 before fix pack 19, and 7.2 before fix pack 7, autosaves form values for unauthenticated users, which allows remote attackers to view the autosaved values by viewing the form as an unauthenticated user. |
2021-08-03 |
not yet calculated |
CVE-2021-33323
CONFIRM
CONFIRM |
liferay — portal
|
Cross-site scripting (XSS) vulnerability in the Frontend JS module in Liferay Portal 7.3.4 and earlier, and Liferay DXP 7.0 before fix pack 96, 7.1 before fix pack 20 and 7.2 before fix pack 9, allows remote attackers to inject arbitrary web script or HTML via the title of a modal window. |
2021-08-03 |
not yet calculated |
CVE-2021-33326
CONFIRM
CONFIRM |
liferay — portal
|
The Layout module in Liferay Portal 7.1.0 through 7.3.1, and Liferay DXP 7.1 before fix pack 20, and 7.2 before fix pack 5, does not properly check permission of pages, which allows remote authenticated users without view permission of a page to view the page via a site’s page administration. |
2021-08-03 |
not yet calculated |
CVE-2021-33324
CONFIRM
CONFIRM |
liferay — portal
|
Insecure default configuration in Liferay Portal 6.2.3 through 7.3.2, and Liferay DXP before 7.3, allows remote attackers to enumerate user email address via the forgot password functionality. The portal.property login.secure.forgot.password should be defaulted to true. |
2021-08-03 |
not yet calculated |
CVE-2021-33321
CONFIRM
MISC |
liferay — portal
|
In Liferay Portal 7.3.0 and earlier, and Liferay DXP 7.0 before fix pack 96, 7.1 before fix pack 18, and 7.2 before fix pack 5, password reset tokens are not invalidated after a user changes their password, which allows remote attackers to change the user’s password via the old password reset token. |
2021-08-03 |
not yet calculated |
CVE-2021-33322
CONFIRM
CONFIRM |
liferay — portal
|
The Portal Workflow module in Liferay Portal 7.3.2 and earlier, and Liferay DXP 7.0 before fix pack 93, 7.1 before fix pack 19, and 7.2 before fix pack 7, user’s clear text passwords are stored in the database if workflow is enabled for user creation, which allows attackers with access to the database to obtain a user’s password. |
2021-08-03 |
not yet calculated |
CVE-2021-33325
CONFIRM
CONFIRM |
liferay — portal
|
Cross-site scripting (XSS) vulnerability in the Fragment module in Liferay Portal 7.2.1 through 7.3.4, and Liferay DXP 7.2 before fix pack 9 allows remote attackers to inject arbitrary web script or HTML via the _com_liferay_site_admin_web_portlet_SiteAdminPortlet_name parameter. |
2021-08-04 |
not yet calculated |
CVE-2021-33339
CONFIRM
CONFIRM |
liferay — portal
|
The Portlet Configuration module in Liferay Portal 7.2.0 through 7.3.3, and Liferay DXP 7.0 fix pack pack 93 and 94, 7.1 fix pack 18, and 7.2 before fix pack 8, does not properly check user permission, which allows remote authenticated users to view the Guest and User role even if “Role Visibility” is enabled. |
2021-08-03 |
not yet calculated |
CVE-2021-33327
CONFIRM
CONFIRM |
liferay — portal
|
Cross-site scripting (XSS) vulnerability in the Asset module’s edit vocabulary page in Liferay Portal 7.0.0 through 7.3.4, and Liferay DXP 7.0 before fix pack 96, 7.1 before fix pack 20, and 7.2 before fix pack 9, allows remote attackers to inject arbitrary web script or HTML via the (1) _com_liferay_journal_web_portlet_JournalPortlet_name or (2) _com_liferay_document_library_web_portlet_DLAdminPortlet_name parameter. |
2021-08-03 |
not yet calculated |
CVE-2021-33328
CONFIRM
CONFIRM |
liferay — portal
|
Liferay Portal 7.2.0 through 7.3.2, and Liferay DXP 7.2 before fix pack 9, allows access to Cross-origin resource sharing (CORS) protected resources if the user is only authenticated using the portal session authentication, which allows remote attackers to obtain sensitive information including the targeted user’s email address and current CSRF token. |
2021-08-03 |
not yet calculated |
CVE-2021-33330
CONFIRM
CONFIRM |
liferay — portal
|
Open redirect vulnerability in the Notifications module in Liferay Portal 7.0.0 through 7.3.1, and Liferay DXP 7.0 before fix pack 94, 7.1 before fix pack 19 and 7.2 before fix pack 8, allows remote attackers to redirect users to arbitrary external URLs via the ‘redirect’ parameter. |
2021-08-03 |
not yet calculated |
CVE-2021-33331
CONFIRM
CONFIRM |
liferay — portal
|
Cross-site scripting (XSS) vulnerability in the Portlet Configuration module in Liferay Portal 7.1.0 through 7.3.2, and Liferay DXP 7.1 before fix pack 19, and 7.2 before fix pack 7, allows remote attackers to inject arbitrary web script or HTML via the _com_liferay_portlet_configuration_css_web_portlet_PortletConfigurationCSSPortlet_portletResource parameter. |
2021-08-03 |
not yet calculated |
CVE-2021-33332
CONFIRM
CONFIRM |
liferay — portal
|
Cross-site scripting (XSS) vulnerability in the Frontend Taglib module in Liferay Portal 7.4.0 allows remote attackers to inject arbitrary web script or HTML into the management toolbar search via the `keywords` parameter. |
2021-08-04 |
not yet calculated |
CVE-2021-35463
CONFIRM |
liferay — portal
|
The Dynamic Data Mapping module in Liferay Portal 7.0.0 through 7.3.2, and Liferay DXP 7.0 before fix pack 94, 7.1 before fix pack 19, and 7.2 before fix pack 6, does not properly check user permissions, which allows remote attackers with the forms “Access in Site Administration” permission to view all forms and form entries in a site via the forms section in site administration. |
2021-08-03 |
not yet calculated |
CVE-2021-33334
CONFIRM
CONFIRM |
liferay — portal
|
Cross-site scripting (XSS) vulnerability in the Journal module’s add article menu in Liferay Portal 7.3.0 through 7.3.3, and Liferay DXP 7.1 fix pack 18, and 7.2 fix pack 5 through 7, allows remote attackers to inject arbitrary web script or HTML via the _com_liferay_journal_web_portlet_JournalPortlet_name parameter. |
2021-08-04 |
not yet calculated |
CVE-2021-33336
CONFIRM
CONFIRM |
liferay — portal
|
Cross-site scripting (XSS) vulnerability in the Document Library module’s add document menu in Liferay Portal 7.3.0 through 7.3.4, and Liferay DXP 7.1 before fix pack 20, and 7.2 before fix pack 9, allows remote attackers to inject arbitrary web script or HTML via the _com_liferay_document_library_web_portlet_DLAdminPortlet_name parameter. |
2021-08-04 |
not yet calculated |
CVE-2021-33337
CONFIRM
CONFIRM |
liferay — portal
|
The Layout module in Liferay Portal 7.1.0 through 7.3.2, and Liferay DXP 7.1 before fix pack 19, and 7.2 before fix pack 6, exposes the CSRF token in URLs, which allows man-in-the-middle attackers to obtain the token and conduct Cross-Site Request Forgery (CSRF) attacks via the p_auth parameter. |
2021-08-04 |
not yet calculated |
CVE-2021-33338
CONFIRM
CONFIRM |
| linux — linux_kernel |
In drivers/char/virtio_console.c in the Linux kernel before 5.13.4, data corruption or loss can be triggered by an untrusted device that supplies a buf->len value exceeding the buffer size. |
2021-08-07 |
not yet calculated |
CVE-2021-38160
MISC
MISC |
linux — linux_kernel
|
A vulnerability was found in the Linux kernel in versions before v5.14-rc1. Missing size validations on inbound SCTP packets may allow the kernel to read uninitialized memory. |
2021-08-05 |
not yet calculated |
CVE-2021-3655
MISC |
linux — linux_kernel
|
A lack of CPU resource in the Linux kernel tracing module functionality in versions prior to 5.14-rc3 was found in the way user uses trace ring buffer in a specific way. Only privileged local users (with CAP_SYS_ADMIN capability) could use this flaw to starve the resources causing denial of service. |
2021-08-05 |
not yet calculated |
CVE-2021-3679
MISC
MISC |
linux — linux_kernel
|
A permission issue in the Cohesity Linux agent may allow privilege escalation in version 6.5.1b to 6.5.1d-hotfix10, 6.6.0a to 6.6.0b-hotfix1. An underprivileged linux user, if certain environment criteria are met, can gain additional privileges. |
2021-08-06 |
not yet calculated |
CVE-2021-36795
MISC |
linux — linux_kernel
|
In the Linux kernel through 5.13.7, an unprivileged BPF program can obtain sensitive information from kernel memory via a Speculative Store Bypass side-channel attack because a certain preempting store operation does not necessarily occur before a store operation that has an attacker-controlled value. |
2021-08-02 |
not yet calculated |
CVE-2021-35477
MISC
MISC
MISC |
linux — linux_kernel
|
In the Linux kernel through 5.13.7, an unprivileged BPF program can obtain sensitive information from kernel memory via a Speculative Store Bypass side-channel attack because the protection mechanism neglects the possibility of uninitialized memory locations on the BPF stack. |
2021-08-02 |
not yet calculated |
CVE-2021-34556
MISC
MISC
MISC |
linux — linux_kernel
|
In kernel/bpf/hashtab.c in the Linux kernel through 5.13.8, there is an integer overflow and out-of-bounds write when many elements are placed in a single bucket. NOTE: exploitation might be impractical without the CAP_SYS_ADMIN capability. |
2021-08-07 |
not yet calculated |
CVE-2021-38166
MISC
MISC |
lynx — lynx
|
Lynx through 2.8.9 mishandles the userinfo subcomponent of a URI, which allows remote attackers to discover cleartext credentials because they may appear in SNI data. |
2021-08-07 |
not yet calculated |
CVE-2021-38165
MISC
MISC
MISC
MISC
MISC
MLIST |
mattermost — mattermost
|
Fixed a bypass for a reflected cross-site scripting vulnerability affecting OAuth-enabled instances of Mattermost. |
2021-08-05 |
not yet calculated |
CVE-2021-37859
MISC |
mb_connect — mbdialup
|
In MB connect line mbDIALUP versions <= 3.9R0.0 a low privileged local attacker can send a command to the service running with NT AUTHORITYSYSTEM that won’t be validated correctly and allows for an arbitrary code execution with the privileges of the service. |
2021-08-02 |
not yet calculated |
CVE-2021-33527
CONFIRM |
mb_connect — mbdialup
|
In MB connect line mbDIALUP versions <= 3.9R0.0 a low privileged local attacker can send a command to the service running with NT AUTHORITYSYSTEM instructing it to execute a malicous OpenVPN configuration resulting in arbitrary code execution with the privileges of the service. |
2021-08-02 |
not yet calculated |
CVE-2021-33526
CONFIRM |
mb_connect — mymbconnect24
|
In MB connect line mymbCONNECT24, mbCONNECT24 in versions <= 2.8.0 an authenticated attacker can change the password of his account into a new password that violates the password policy by intercepting and modifying the request that is send to the server. |
2021-08-02 |
not yet calculated |
CVE-2021-34574
CONFIRM |
mb_connect — mymbconnect24
|
In MB connect line mymbCONNECT24, mbCONNECT24 in versions <= 2.8.0 an unauthenticated user can enumerate valid users by checking what kind of response the server sends. |
2021-08-02 |
not yet calculated |
CVE-2021-34575
CONFIRM |
mediawiki — mediawiki
|
A SQL injection vulnerability in a MediaWiki script in Centreon before 20.04.14, 20.10.8, and 21.04.2 allows remote unauthenticated attackers to execute arbitrary SQL commands via the host_name and service_description parameters. The vulnerability can be exploited only when a valid Knowledge Base URL is configured on the Knowledge Base configuration page and points to a MediaWiki instance. This relates to the proxy feature in class/centreon-knowledge/ProceduresProxy.class.php and include/configuration/configKnowledge/proxy/proxy.php. |
2021-08-03 |
not yet calculated |
CVE-2021-37558
MISC
MISC |
metinfo — metinfo
|
An issue in /admin/index.php?n=system&c=filept&a=doGetFileList of Metinfo v7.0.0 allows attackers to perform a directory traversal and access sensitive information. |
2021-08-03 |
not yet calculated |
CVE-2020-19304
MISC |
metinfo — metinfo
|
An issue in /app/system/column/admin/index.class.php of Metinfo v7.0.0 causes the indeximg parameter to be deleted when the column is deleted, allowing attackers to escalate privileges. |
2021-08-03 |
not yet calculated |
CVE-2020-19305
MISC |
micro_focus — data_protector
|
A potential unauthorized privilege escalation vulnerability has been identified in Micro Focus Data Protector. The vulnerability affects versions 10.10, 10.20, 10.30, 10.40, 10.50, 10.60, 10.70, 10.80, 10.0 and 10.91. A privileged user may potentially misuse this feature and thus allow unintended and unauthorized access of data. |
2021-08-05 |
not yet calculated |
CVE-2021-22517
MISC |
microchip — miwi
|
In the Microchip MiWi v6.5 software stack, there is a possibility of frame counters being validated/updated prior to message authentication. |
2021-08-05 |
not yet calculated |
CVE-2021-37604
MISC
MISC
MISC
MISC |
microchip — miwi
|
In the Microchip MiWi v6.5 software stack, there is a possibility of frame counters being being validated / updated prior to message authentication. |
2021-08-05 |
not yet calculated |
CVE-2021-37605
MISC
MISC
MISC
MISC |
microsoft — moveit_transfer
|
In certain Progress MOVEit Transfer versions before 2021.0.4 (aka 13.0.4), SQL injection in the MOVEit Transfer web application could allow an unauthenticated remote attacker to gain access to the database. Depending on the database engine being used (MySQL, Microsoft SQL Server, or Azure SQL), an attacker may be able to infer information about the structure and contents of the database, or execute SQL statements that alter or delete database elements, via crafted strings sent to unique MOVEit Transfer transaction types. The fixed versions are 2019.0.8 (11.0.8), 2019.1.7 (11.1.7), 2019.2.4 (11.2.4), 2020.0.7 (12.0.7), 2020.1.6 (12.1.6), and 2021.0.4 (13.0.4). |
2021-08-07 |
not yet calculated |
CVE-2021-38159
CONFIRM
MISC |
minewebcms — minewebcms
|
Cross Site Scripting (XSS) in MineWebCMS v1.7.0 allows remote attackers to execute arbitrary code by injecting malicious code into the ‘Title’ field of the component ‘/admin/news’. |
2021-08-06 |
not yet calculated |
CVE-2020-18693
MISC |
mitsubishi_electric — melsec_iq-r_series_modules
|
Insufficiently Protected Credentials vulnerability in Mitsubishi Electric MELSEC iQ-R series CPU modules (R08/16/32/120SFCPU all versions, R08/16/32/120PSFCPU all versions) allows a remote unauthenticated attacker to login to the target unauthorizedly by sniffing network traffic and obtaining credentials when registering user information in the target or changing a password. |
2021-08-06 |
not yet calculated |
CVE-2021-20597
MISC
MISC |
mitsubishi_electric — melsec_iq-r_series_modules
|
Exposure of Sensitive Information to an Unauthorized Actor vulnerability in Mitsubishi Electric MELSEC iQ-R series CPU modules (R08/16/32/120SFCPU all versions, R08/16/32/120PSFCPU all versions) allows a remote unauthenticated attacker to acquire legitimate user names registered in the module via brute-force attack on user names. |
2021-08-06 |
not yet calculated |
CVE-2021-20594
MISC
MISC |
mitsubishi_electric — melsec_iq-r_series_modules
|
Overly Restrictive Account Lockout Mechanism vulnerability in Mitsubishi Electric MELSEC iQ-R series CPU modules (R08/16/32/120SFCPU all versions, R08/16/32/120PSFCPU all versions) allows a remote unauthenticated attacker to lockout a legitimate user by continuously trying login with incorrect password. |
2021-08-06 |
not yet calculated |
CVE-2021-20598
MISC
MISC |
mitsubishi_electric — modbus/tcp
|
Missing synchronization vulnerability in GOT2000 series GT27 model communication driver versions 01.19.000 through 01.39.010, GT25 model communication driver versions 01.19.000 through 01.39.010 and GT23 model communication driver versions 01.19.000 through 01.39.010 and GT SoftGOT2000 versions 1.170C through 1.256S allows a remote unauthenticated attacker to cause DoS condition on the MODBUS/TCP slave communication function of the products by rapidly and repeatedly connecting and disconnecting to and from the MODBUS/TCP communication port on a target. Restart or reset is required to recover. |
2021-08-05 |
not yet calculated |
CVE-2021-20592
MISC
MISC |
mongodb — rust_driver
|
Specific MongoDB Rust Driver versions can include credentials used by the connection pool to authenticate connections in the monitoring event that is emitted when the pool is created. The user’s logging infrastructure could then potentially ingest these events and unexpectedly leak the credentials. Note that such monitoring is not enabled by default. |
2021-08-02 |
not yet calculated |
CVE-2021-20332
MISC |
monkshu — monkshu
|
Monkshu is an enterprise application server for mobile apps (iOS and Android), responsive HTML 5 apps, and JSON API services. In version 2.90 and earlier, there is a reflected cross-site scripting vulnerability in frontend HTTP server. The attacker can send in a carefully crafted URL along with a known bug in the server which will cause a 500 error, and the response will then embed the URL provided by the hacker. The impact is moderate as the hacker must also be able to craft an HTTP request which should cause a 500 server error. None such requests are known as this point. The issue is patched in version 2.95. As a workaround, one may use a disk caching plugin. |
2021-08-02 |
not yet calculated |
CVE-2021-32812
CONFIRM
MISC
MISC |
moveit — transfer
|
In certain Progress MOVEit Transfer versions before 2021.0.3 (aka 13.0.3), SQL injection in the MOVEit Transfer web application could allow an authenticated remote attacker to gain access to the database. Depending on the database engine being used (MySQL, Microsoft SQL Server, or Azure SQL), an attacker may be able to infer information about the structure and contents of the database, or execute SQL statements that alter or delete database elements, via crafted strings sent to unique MOVEit Transfer transaction types. The fixed versions are 2019.0.7 (11.0.7), 2019.1.6 (11.1.6), 2019.2.3 (11.2.3), 2020.0.6 (12.0.6), 2020.1.5 (12.1.5), and 2021.0.3 (13.0.3). |
2021-08-05 |
not yet calculated |
CVE-2021-37614
CONFIRM
MISC
MISC
MISC |
| mozilla — firefox |
aaPanel through 6.8.12 allows Cross-Site WebSocket Hijacking (CSWH) involving OS commands within WebSocket messages at a ws:// URL for /webssh (the victim must have configured Terminal with at least one host). Successful exploitation depends on the browser used by a potential victim (e.g., exploitation can occur with Firefox but not Chrome). |
2021-08-02 |
not yet calculated |
CVE-2021-37840
MISC
MISC |
| mozilla — firefox |
A malicious webpage could have triggered a use-after-free, memory corruption, and a potentially exploitable crash. *This bug could only be triggered when accessibility was enabled.*. This vulnerability affects Thunderbird < 78.12, Firefox ESR < 78.12, and Firefox < 90. |
2021-08-05 |
not yet calculated |
CVE-2021-29970
MISC
MISC
MISC
MISC |
| mozilla — firefox |
If a user had granted a permission to a webpage and saved that grant, any webpage running on the same host – irrespective of scheme or port – would be granted that permission. *This bug only affects Firefox for Android. Other operating systems are unaffected.*. This vulnerability affects Firefox < 90. |
2021-08-05 |
not yet calculated |
CVE-2021-29971
MISC
MISC |
mozilla — firefox
|
Password autofill was enabled without user interaction on insecure websites on Firefox for Android. This was corrected to require user interaction with the page before a user’s password would be entered by the browser’s autofill functionality *This bug only affects Firefox for Android. Other operating systems are unaffected.*. This vulnerability affects Firefox < 90. |
2021-08-05 |
not yet calculated |
CVE-2021-29973
MISC
MISC |
mozilla — firefox
|
Mozilla developers reported memory safety bugs present in code shared between Firefox and Thunderbird. Some of these bugs showed evidence of memory corruption and we presume that with enough effort some of these could have been exploited to run arbitrary code. This vulnerability affects Thunderbird < 78.12, Firefox ESR < 78.12, and Firefox < 90. |
2021-08-05 |
not yet calculated |
CVE-2021-29976
MISC
MISC
MISC
MISC |
mozilla — firefox
|
Through a series of DOM manipulations, a message, over which the attacker had control of the text but not HTML or formatting, could be overlaid on top of another domain (with the new domain correctly shown in the address bar) resulting in possible user confusion. This vulnerability affects Firefox < 90. |
2021-08-05 |
not yet calculated |
CVE-2021-29975
MISC
MISC |
mozilla — firefox
|
Mozilla developers reported memory safety bugs present in Firefox 89. Some of these bugs showed evidence of memory corruption and we presume that with enough effort some of these could have been exploited to run arbitrary code. This vulnerability affects Firefox < 90. |
2021-08-05 |
not yet calculated |
CVE-2021-29977
MISC
MISC |
mozilla — firefox
|
When network partitioning was enabled, e.g. as a result of Enhanced Tracking Protection settings, a TLS error page would allow the user to override an error on a domain which had specified HTTP Strict Transport Security (which implies that the error should not be override-able.) This issue did not affect the network connections, and they were correctly upgraded to HTTPS automatically. This vulnerability affects Firefox < 90. |
2021-08-05 |
not yet calculated |
CVE-2021-29974
MISC
MISC |
mozilla — firefox
|
Multiple low security issues were discovered and fixed in a security audit of Mozilla VPN 2.x branch as part of a 3rd party security audit. This vulnerability affects Mozilla VPN < 2.3. |
2021-08-05 |
not yet calculated |
CVE-2021-29978
MISC
MISC
MISC
MISC
MISC
MISC
MISC
MISC
MISC
MISC
MISC
MISC
MISC
MISC
MISC |
mozilla — firefox
|
A use-after-free vulnerability was found via testing, and traced to an out-of-date Cairo library. Updating the library resolved the issue, and may have remediated other, unknown security vulnerabilities as well. This vulnerability affects Firefox < 90. |
2021-08-05 |
not yet calculated |
CVE-2021-29972
MISC
MISC |
mozilla — thunderbird
|
If Thunderbird was configured to use STARTTLS for an IMAP connection, and an attacker injected IMAP server responses prior to the completion of the STARTTLS handshake, then Thunderbird didn’t ignore the injected data. This could have resulted in Thunderbird showing incorrect information, for example the attacker could have tricked Thunderbird to show folders that didn’t exist on the IMAP server. This vulnerability affects Thunderbird < 78.12. |
2021-08-05 |
not yet calculated |
CVE-2021-29969
MISC
MISC |
mp4box — mp4box
|
An issue was discovered in GPAC v0.8.0, as demonstrated by MP4Box. It contains a heap-based buffer overflow in gf_m2ts_section_complete in media_tools/mpegts.c that can cause a denial of service (DOS) via a crafted MP4 file. |
2021-08-04 |
not yet calculated |
CVE-2020-24829
MISC |
naviwebs — navigate
|
Cross Site Scripting (XSS) vulnerability in Naviwebs Navigate Cms 2.9 via the navigate-quickse parameter to 1) backupsbackups.php, 2) blocksblocks.php, 3) brandsbrands.php, 4) commentscomments.php, 5) couponscoupons.php, 6) feedsfeeds.php, 7) functionsfunctions.php, 8) itemsitems.php, 9) menusmenus.php, 10) ordersorders.php, 11) payment_methodspayment_methods.php, 12) productsproducts.php, 13) profilesprofiles.php, 14) shipping_methodsshipping_methods.php, 15) templatestemplates.php, 16) usersusers.php, 17) webdictionarywebdictionary.php, 18) websiteswebsites.php, and 19) webuserswebusers.php because the initial_url function is built in these files. |
2021-08-06 |
not yet calculated |
CVE-2021-36454
MISC |
naviwebs — navigate
|
SQL Injection vulnerability in Naviwebs Navigate CMS 2.9 via the quicksearch parameter in libpackagescommentscomments.php. |
2021-08-06 |
not yet calculated |
CVE-2021-36455
MISC
MISC |
neo4j — neo4j
|
Neo4j through 3.4.18 (with the shell server enabled) exposes an RMI service that arbitrarily deserializes Java objects, e.g., through setSessionVariable. An attacker can abuse this for remote code execution because there are dependencies with exploitable gadget chains. |
2021-08-05 |
not yet calculated |
CVE-2021-34371
MISC |
net.parseip — net.parseip
|
Go before 1.17 does not properly consider extraneous zero characters at the beginning of an IP address octet, which (in some situations) allows attackers to bypass access control that is based on IP addresses, because of unexpected octal interpretation. This affects net.ParseIP and net.ParseCIDR. |
2021-08-07 |
not yet calculated |
CVE-2021-29923
MISC
MISC
MISC
MISC
MISC
MISC |
netapp — cloud_manager
|
NetApp Cloud Manager versions prior to 3.9.9 log sensitive information when an Active Directory connection fails. The logged information is available only to authenticated users. Customers with auto-upgrade enabled should already be on a fixed version while customers using on-prem connectors with auto-upgrade disabled are advised to upgrade to a fixed version. |
2021-08-06 |
not yet calculated |
CVE-2021-26999
MISC |
netapp — cloud_manager
|
NetApp Cloud Manager versions prior to 3.9.9 log sensitive information that is available only to authenticated users. Customers with auto-upgrade enabled should already be on a fixed version while customers using on-prem connectors with auto-upgrade disabled are advised to upgrade to a fixed version. |
2021-08-06 |
not yet calculated |
CVE-2021-26998
MISC |
| objectplanet — opinio |
admin/file.do in ObjectPlanet Opinio before 7.15 allows Unrestricted File Upload of executable JSP files, resulting in remote code execution, because filePath can have directory traversal and fileContent can be valid JSP code. |
2021-07-31 |
not yet calculated |
CVE-2020-26806
MISC
CONFIRM |
objectplanet — opinio
|
ObjectPlanet Opinio before 7.15 allows XXE attacks via three steps: modify a .css file to have <!ENTITY content, create a .xml file for a generic survey template (containing a link to this .css file), and import this .xml file at the survey/admin/folderSurvey.do?action=viewImportSurvey[‘importFile’] URI. The XXE can then be triggered at a admin/preview.do?action=previewSurvey&surveyId= URI. |
2021-07-31 |
not yet calculated |
CVE-2020-26564
MISC
CONFIRM |
objectplanet — opinio
|
ObjectPlanet Opinio before 7.14 allows Expression Language Injection via the admin/permissionList.do from parameter. This can be used to retrieve possibly sensitive serverInfo data. |
2021-07-31 |
not yet calculated |
CVE-2020-26565
MISC
CONFIRM |
obsidian — obsidian
|
Obsidian before 0.12.12 does not require user confirmation for non-http/https URLs. |
2021-08-07 |
not yet calculated |
CVE-2021-38148
MISC |
onenav — onenav
|
OneNav beta 0.9.12 allows XSS via the Add Link feature. NOTE: the vendor’s position is that there intentionally is not any XSS protection at present, because the attack risk is largely limited to a compromised account; however, XSS protection is planned for a future release. |
2021-08-05 |
not yet calculated |
CVE-2021-38138
MISC
MISC |
open — plc_webserver
|
Command Injection in Open PLC Webserver v3 allows remote attackers to execute arbitrary code via the “Hardware Layer Code Box” component on the “/hardware” page of the application. |
2021-08-03 |
not yet calculated |
CVE-2021-31630
MISC
MISC |
openplc — openplc
|
OpenPLC runtime V3 through 2016-03-14 allows stored XSS via the Device Name to the web server’s Add New Device page. |
2021-08-02 |
not yet calculated |
CVE-2021-3351
MISC |
openstack — keystone
|
OpenStack Keystone 10.x through 16.x before 16.0.2, 17.x before 17.0.1, 18.x before 18.0.1, and 19.x before 19.0.1 allows information disclosure during account locking (related to PCI DSS features). By guessing the name of an account and failing to authenticate multiple times, any unauthenticated actor could both confirm the account exists and obtain that account’s corresponding UUID, which might be leveraged for other unrelated attacks. All deployments enabling security_compliance.lockout_failure_attempts are affected. |
2021-08-06 |
not yet calculated |
CVE-2021-38155
MISC |
opentext — brava!_desktop_build
|
This vulnerability allows remote attackers to execute arbitrary code on affected installations of OpenText Brava! Desktop Build 16.6.3.84 (package 16.6.3.134). User interaction is required to exploit this vulnerability in that the target must visit a malicious page or open a malicious file. The specific flaw exists within the parsing of IGS files. The issue results from the lack of proper initialization of a pointer prior to accessing it. An attacker can leverage this vulnerability to execute code in the context of the current process. Was ZDI-CAN-12690. |
2021-08-03 |
not yet calculated |
CVE-2021-31503
N/A |
opentext — brava!_desktop_build
|
This vulnerability allows remote attackers to execute arbitrary code on affected installations of OpenText Brava! Desktop Build 16.6.3.84 (package 16.6.3.134). User interaction is required to exploit this vulnerability in that the target must visit a malicious page or open a malicious file. The specific flaw exists within the parsing of PDF files. The issue results from the lack of proper validation of a user-supplied value prior to dereferencing it as a pointer. An attacker can leverage this vulnerability to execute code in the context of the current process. Was ZDI-CAN-12691. |
2021-08-03 |
not yet calculated |
CVE-2021-31504
N/A |
openwebif — openwebif
|
In addBouquet in js/bqe.js in OpenWebif (aka e2openplugin-OpenWebif) through 1.4.7, inserting JavaScript into the Add Bouquet feature of the Bouquet Editor (i.e., bouqueteditor/api/addbouquet?name=) leads to Stored XSS. |
2021-08-04 |
not yet calculated |
CVE-2021-38113
MISC |
openwrt — openwrt
|
There is missing input validation of host names displayed in OpenWrt before 19.07.8. The Connection Status page of the luci web-interface allows XSS, which can be used to gain full control over the affected system via ICMP. |
2021-08-02 |
not yet calculated |
CVE-2021-32019
MISC |
pengutronix — barebox
|
crypto/digest.c in Pengutronix barebox through 2021.07.0 leaks timing information because memcmp is used during digest verification. |
2021-08-02 |
not yet calculated |
CVE-2021-37847
MISC |
pengutronix — barebox
|
common/password.c in Pengutronix barebox through 2021.07.0 leaks timing information because strncmp is used during hash comparison. |
2021-08-02 |
not yet calculated |
CVE-2021-37848
MISC |
pi-hole — pi-hole
|
Pi-hole’s Web interface provides a central location to manage a Pi-hole instance and review performance statistics. Prior to Pi-hole Web interface version 5.5.1, the `validDomainWildcard` preg_match filter allows a malicious character through that can be used to execute code, list directories, and overwrite sensitive files. The issue lies in the fact that one of the periods is not escaped, allowing any character to be used in its place. A patch for this vulnerability was released in version 5.5.1. |
2021-08-04 |
not yet calculated |
CVE-2021-32706
MISC
CONFIRM |
pi-hole — pi-hole
|
Pi-hole’s Web interface provides a central location to manage a Pi-hole instance and review performance statistics. Prior to Pi-hole Web interface version 5.5.1, the function to add domains to blocklists or allowlists is vulnerable to a stored cross-site-scripting vulnerability. User input added as a wildcard domain to a blocklist or allowlist is unfiltered in the web interface. Since the payload is stored permanently as a wildcard domain, this is a persistent XSS vulnerability. A remote attacker can therefore attack administrative user accounts through client-side attacks. Pi-hole Web Interface version 5.5.1 contains a patch for this vulnerability. |
2021-08-04 |
not yet calculated |
CVE-2021-32793
CONFIRM
MISC |
pimcore — adminbundle
|
Pimcore AdminBundle version 6.8.0 and earlier suffers from a SQL injection issue in the specificID variable used by the application. This issue was fixed in version 6.9.4 of the product. |
2021-08-04 |
not yet calculated |
CVE-2021-31869
MISC |
pimcore — customer_data_framework
|
Pimcore Customer Data Framework version 3.0.0 and earlier suffers from a Boolean-based blind SQL injection issue in the $id parameter of the SegmentAssignmentController.php component of the application. This issue was fixed in version 3.0.2 of the product. |
2021-08-04 |
not yet calculated |
CVE-2021-31867
MISC |
pki — dream_security
|
A vulnerability in PKI Security Solution of Dream Security could allow arbitrary command execution. This vulnerability is due to insufficient validation of the authorization certificate. An attacker could exploit this vulnerability by sending a crafted HTTP request an affected program. A successful exploit could allow the attacker to remotely execute arbitrary code on a target system. |
2021-08-06 |
not yet calculated |
CVE-2021-26606
MISC |
planview — spigit
|
The REST API in Planview Spigit 4.5.3 allows remote unauthenticated attackers to query sensitive user accounts data, as demonstrated by an api/v1/users/1 request. |
2021-08-05 |
not yet calculated |
CVE-2021-38095
MISC
MISC |
poddycast — poddycast
|
Poddycast is a podcast app made with Electron. Prior to version 0.8.1, an attacker can create a podcast or episode with malicious characters and execute commands on the client machine. The application does not clean the HTML characters of the podcast information obtained from the Feed, which allows the injection of HTML and JS code (cross-site scripting). Being an application made in electron, cross-site scripting can be scaled to remote code execution, making it possible to execute commands on the machine where the application is running. The vulnerability is patched in Poddycast version 0.8.1. |
2021-08-03 |
not yet calculated |
CVE-2021-32772
CONFIRM
MISC
MISC
MISC |
pop3 — courier_mail_server
|
An issue was discovered in the POP3 component of Courier Mail Server before 1.1.5. Meddler-in-the-middle attackers can pipeline commands after the POP3 STLS command, injecting plaintext commands into an encrypted user session. |
2021-08-03 |
not yet calculated |
CVE-2021-38084
MISC
MISC |
| popojicms — popojicms |
A stored cross site scripting (XSS) vulnerability in /admin.php?mod=user&act=addnew of PopojiCMS 1.2 allows attackers to execute arbitrary web scripts or HTML via a crafted payload in the E-Mail field. |
2021-08-06 |
not yet calculated |
CVE-2020-21357
MISC |
popojicms — popojicms
|
An information disclosure vulnerability in upload.php of PopojiCMS 1.2 leads to physical path disclosure of the host when ‘name = “file” is deleted during file uploads. |
2021-08-06 |
not yet calculated |
CVE-2020-21356
MISC |
| prolink — prc2402m |
In ProLink PRC2402M V1.0.18 and older, the set_sys_cmd function in the adm.cgi binary, accessible with a page parameter value of sysCMD contains a trivial command injection where the value of the command parameter is passed directly to system. |
2021-08-06 |
not yet calculated |
CVE-2021-36706
MISC |
prolink — prc2402m
|
In ProLink PRC2402M V1.0.18 and older, the set_TR069 function in the adm.cgi binary, accessible with a page parameter value of TR069 contains a trivial command injection where the value of the TR069_local_port parameter is passed directly to system. |
2021-08-06 |
not yet calculated |
CVE-2021-36705
MISC |
prolink — prc2402m
|
In ProLink PRC2402M V1.0.18 and older, the set_sys_init function in the login.cgi binary allows an attacker to reset the password to the administrative interface of the router. |
2021-08-06 |
not yet calculated |
CVE-2021-36708
MISC |
prolink — prc2402m
|
In ProLink PRC2402M V1.0.18 and older, the set_ledonoff function in the adm.cgi binary, accessible with a page parameter value of ledonoff contains a trivial command injection where the value of the led_cmd parameter is passed directly to do_system. |
2021-08-06 |
not yet calculated |
CVE-2021-36707
MISC |
qemu — qemu
|
A flaw was found in the USB redirector device emulation of QEMU in versions prior to 6.1.0-rc2. It occurs when dropping packets during a bulk transfer from a SPICE client due to the packet queue being full. A malicious SPICE client could use this flaw to make QEMU call free() with faked heap chunk metadata, resulting in a crash of QEMU or potential code execution with the privileges of the QEMU process on the host. |
2021-08-05 |
not yet calculated |
CVE-2021-3682
MISC |
qsan — storage_manager
|
QSAN Storage Manager header page parameters does not filter special characters. Remote attackers can inject JavaScript without logging in and launch reflected XSS attacks to access and modify specific data. |
2021-08-02 |
not yet calculated |
CVE-2021-37216
MISC |
radare2 — radare2
|
A vulnerability was found in Radare2 in version 5.3.1. Improper input validation when reading a crafted LE binary can lead to resource exhaustion and DoS. |
2021-08-02 |
not yet calculated |
CVE-2021-3673
MISC |
raonwiz — raonwiz
|
A vulnerability in File Transfer Solution of Raonwiz could allow arbitrary command execution as the result of viewing a specially-crafted web page. This vulnerability is due to insufficient validation of the parameter of the specific method. An attacker could exploit this vulnerability by setting the parameter to the command they want to execute. A successful exploit could allow the attacker to execute arbitrary commands on a target system as the user. However, the victim must run the Internet Explorer browser with administrator privileges because of the cross-domain policy. |
2021-08-05 |
not yet calculated |
CVE-2020-7863
MISC
MISC |
red_hat — red_hat
|
A flaw was found in the way nettle’s RSA decryption functions handled specially crafted ciphertext. An attacker could use this flaw to provide a manipulated ciphertext leading to application crash and denial of service. |
2021-08-05 |
not yet calculated |
CVE-2021-3580
MISC |
redmine — redmine
|
Redmine 4.2.0 and 4.2.1 allow existing user sessions to continue upon enabling two-factor authentication for the user’s account, but the intended behavior is for those sessions to be terminated. |
2021-08-05 |
not yet calculated |
CVE-2021-37156
MISC
MISC |
roxy-wi — roxy-wi
|
Roxy-WI through 5.2.2.0 allows command injection via /app/funct.py and /api/api_funct.py. |
2021-08-07 |
not yet calculated |
CVE-2021-38169
MISC |
roxy-wi — roxy-wi
|
Roxy-WI through 5.2.2.0 allows authenticated SQL injection via select_servers. |
2021-08-07 |
not yet calculated |
CVE-2021-38168
MISC |
roxy-wi — roxy-wi
|
Roxy-WI through 5.2.2.0 allows SQL Injection via check_login. An unauthenticated attacker can extract a valid uuid to bypass authentication. |
2021-08-07 |
not yet calculated |
CVE-2021-38167
MISC |
ruby — ruby
|
An issue was discovered in Ruby through 2.6.7, 2.7.x through 2.7.3, and 3.x through 3.0.1. Net::IMAP does not raise an exception when StartTLS fails with an an unknown response, which might allow man-in-the-middle attackers to bypass the TLS protections by leveraging a network position between the client and the registry to block the StartTLS command, aka a “StartTLS stripping attack.” |
2021-08-01 |
not yet calculated |
CVE-2021-32066
CONFIRM
CONFIRM
MISC |
rust — rust
|
library/std/src/net/parser.rs in Rust before 1.53.0 does not properly consider extraneous zero characters at the beginning of an IP address string, which (in some situations) allows attackers to bypass access control that is based on IP addresses, because of unexpected octal interpretation. |
2021-08-07 |
not yet calculated |
CVE-2021-29922
MISC
MISC
MISC
MISC
MISC |
salesforce — multiple_products
|
XML external entity (XXE) vulnerability affecting certain versions of a Mule runtime component that may affect CloudHub, GovCloud, Runtime Fabric, Pivotal Cloud Foundry, Private Cloud Edition, and on-premise customers. |
2021-08-05 |
not yet calculated |
CVE-2021-1630
MISC |
samsung — internet
|
Unprotected component vulnerability in Samsung Internet prior to version 14.2 allows untrusted application to access internal files in Samsung Internet. |
2021-08-05 |
not yet calculated |
CVE-2021-25445
MISC |
samsung — mobile
|
A use after free vulnerability in conn_gadget driver prior to SMR AUG-2021 Release 1 allows malicious action by an attacker. |
2021-08-05 |
not yet calculated |
CVE-2021-25443
MISC |
samsung — mobile
|
An IV reuse vulnerability in keymaster prior to SMR AUG-2021 Release 1 allows decryption of custom keyblob with privileged process. |
2021-08-05 |
not yet calculated |
CVE-2021-25444
MISC |
savapi — savapi
|
A Denial-of-Service (DoS) vulnerability was discovered in F-Secure Atlant whereby the SAVAPI component used in certain F-Secure products can crash while scanning fuzzed files. The exploit can be triggered remotely by an attacker. A successful attack will result in Denial-of-Service (DoS) of the Anti-Virus engine. |
2021-08-05 |
not yet calculated |
CVE-2021-33597
MISC
MISC |
secomea — sitemanager
|
Improper Access Control vulnerability in web service of Secomea SiteManager allows local attacker without credentials to gather network information and configuration of the SiteManager. This issue affects: Secomea SiteManager All versions prior to 9.5 on Hardware. |
2021-08-05 |
not yet calculated |
CVE-2021-32002
MISC |
secomea — sitemanager
|
Unprotected Transport of Credentials vulnerability in SiteManager provisioning service allows local attacker to capture credentials if the service is used after provisioning. This issue affects: Secomea SiteManager All versions prior to 9.5 on Hardware. |
2021-08-05 |
not yet calculated |
CVE-2021-32003
MISC |
seeddms — seeddms
|
Cross-Site Request Forgery (CSRF) vulnerability in the /op/op.Ajax.php in SeedDMS v5.1.x<5.1.23 and v6.0.x<6.0.16 allows a remote attacker to edit document name without victim’s knowledge, by enticing an authenticated user to visit an attacker’s web page. |
2021-08-03 |
not yet calculated |
CVE-2021-35343
MISC |
seeddms — seeddms
|
Cross-Site Request Forgery (CSRF) vulnerability in the /op/op.LockDocument.php in SeedDMS v5.1.x<5.1.23 and v6.0.x <6.0.16 allows a remote attacker to lock any document without victim’s knowledge, by enticing an authenticated user to visit an attacker’s web page. |
2021-08-03 |
not yet calculated |
CVE-2021-36542
MISC |
seeddms — seeddms
|
Cross-Site Request Forgery (CSRF) vulnerability in the /op/op.UnlockDocument.php in SeedDMS v5.1.x <5.1.23 and v6.0.x <6.0.16 allows a remote attacker to unlock any document without victim’s knowledge, by enticing an authenticated user to visit an attacker’s web page. |
2021-08-03 |
not yet calculated |
CVE-2021-36543
MISC |
showdoc — showdoc
|
showdoc is vulnerable to Use of Cryptographically Weak Pseudo-Random Number Generator (PRNG) |
2021-08-04 |
not yet calculated |
CVE-2021-3678
MISC
CONFIRM |
showdoc — showdoc
|
showdoc is vulnerable to Missing Cryptographic Step |
2021-08-04 |
not yet calculated |
CVE-2021-3680
CONFIRM
MISC |
skytable — skytable
|
Skytable is a NoSQL database with automated snapshots and TLS. Versions prior to 0.5.1 are vulnerable to a a directory traversal attack enabling remotely connected clients to destroy and/or manipulate critical files on the host’s file system. This security bug has been patched in version 0.5.1. There are no known workarounds aside from upgrading. |
2021-08-03 |
not yet calculated |
CVE-2021-32814
CONFIRM
MISC
MISC
MISC |
skytable — skytable
|
Skytable is an open source NoSQL database. In versions prior to 0.6.4 an incorrect check of return value of the accept function in the run-loop for a TCP socket/TLS socket/TCP+TLS multi-socket causes an early exit from the run loop that should continue infinitely unless terminated by a local user, effectively causing the whole database server to shut down. This has severe impact and can be used to easily cause DoS attacks without the need to use much bandwidth. The attack vectors include using an incomplete TLS connection for example by not providing the certificate for the connection and using a specially crafted TCP packet that triggers the application layer backoff algorithm. |
2021-08-05 |
not yet calculated |
CVE-2021-37625
MISC
CONFIRM
MISC |
smart — touch_call
|
Improper access control vulnerability in Smart Touch Call prior to version 1.0.0.5 allows arbitrary webpage loading in webview. |
2021-08-05 |
not yet calculated |
CVE-2021-25448
MISC |
| smartthings — smartthings |
Improper access control vulnerability in SmartThings prior to version 1.7.67.25 allows untrusted applications to cause arbitrary webpage loading in webview. |
2021-08-05 |
not yet calculated |
CVE-2021-25446
MISC |
smartthings — smartthings
|
Improper access control vulnerability in SmartThings prior to version 1.7.67.25 allows untrusted applications to cause local file inclusion in webview. |
2021-08-05 |
not yet calculated |
CVE-2021-25447
MISC |
sonicwall — sra_products
|
** UNSUPPORTED WHEN ASSIGNED ** Improper neutralization of a SQL Command leading to SQL Injection vulnerability impacting end-of-life Secure Remote Access (SRA) products, specifically the SRA appliances running all 8.x firmware and 9.0.0.9-26sv or earlier. |
2021-08-04 |
not yet calculated |
CVE-2021-20028
CONFIRM |
sourcecodester — phone_shop_sales_management_system
|
Arbitrary File Upload in Sourcecodester Phone Shop Sales Management System 1.0 enables RCE. |
2021-08-03 |
not yet calculated |
CVE-2021-36623
MISC |
sourcecodester — online_covid_vaccination_scheduler
|
Sourcecodester Online Covid Vaccination Scheduler System 1.0 is affected vulnerable to Arbitrary File Upload. The admin panel has an upload function of profile photo accessible at http://localhost/scheduler/admin/?page=user. An attacker could upload a malicious file such as shell.php with the Content-Type: image/png. Then, the attacker have to visit the uploaded profile photo to access the shell. |
2021-08-03 |
not yet calculated |
CVE-2021-36622
EXPLOIT-DB |
sourcegraph — sourcegraph
|
Sourcegraph is a code search and navigation engine. Sourcegraph before version 3.30.0 has two potential information leaks. The site-admin area can be accessed by regular users and all information and features are properly protected except for daily usage statistics and code intelligence uploads and indexes. It is not possible to alter the information, nor interact with any other features in the site-admin area. The issue is patched in version 3.30.0, where the information cannot be accessed by unprivileged users. There are no workarounds aside from upgrading. |
2021-08-02 |
not yet calculated |
CVE-2021-32787
CONFIRM
MISC |
southsoft — gmis
|
Southsoft GMIS 5.0 is vulnerable to CSRF attacks. Attackers can access other users’ private information such as photos through CSRF. For example: any student’s photo information can be accessed through /gmis/(S([1]))/student/grgl/PotoImageShow/?bh=[2]. Among them, the code in [1] is a random string generated according to the user’s login related information. It can protect the user’s identity, but it can not effectively prevent unauthorized access. The code in [2] is the student number of any student. The attacker can carry out CSRF attack on the system by modifying [2] without modifying [1]. |
2021-08-06 |
not yet calculated |
CVE-2021-37381
MISC
MISC |
subrion — subrion
|
Cross-Site Scripting (XSS) vulnerability in Subrion 4.2.1 via the title when adding a page. |
2021-08-06 |
not yet calculated |
CVE-2020-22330
MISC |
subrion_cms — subrion_cms
|
Cross Site Scripting (XSS) vulnerability exists in Subrion CMS 4.2.2 when adding a blog and then editing an image file. |
2021-08-05 |
not yet calculated |
CVE-2020-22392
MISC |
supermartinjn642 — supermartinjn642
|
SuperMartijn642’s Config Lib is a library used by a number of mods for the game Minecraft. The versions of SuperMartijn642’s Config Lib between 1.0.4 and 1.0.8 are affected by a vulnerability and can be exploited on both servers and clients. Using SuperMartijn642’s Config Lib, servers will send a packet to clients with the server’s config values. In order to read `enum` values from the packet data, `ObjectInputStream#readObject` is used. `ObjectInputStream#readObject` will instantiate a class based on the input data. Since, the packet data is not validated before `ObjectInputStream#readObject` is called, an attacker can instantiate any class by sending a malicious packet. If a suitable class is found, the vulnerability can lead to a number of exploits, including remote code execution. Although the vulnerable packet is typically only send from server to client, it can theoretically also be send from client to server. This means both clients and servers running SuperMartijn642’s Config Lib between 1.0.4 and 1.0.8 are vulnerable. The vulnerability has been patched in SuperMartijn642’s Config lib 1.0.9. Both, players and server owners, should update to 1.0.9 or higher. |
2021-08-05 |
not yet calculated |
CVE-2021-37632
CONFIRM |
| swisslog — healthcare_nexus_panel |
A firmware validation issue was discovered in HMI3 Control Panel in Swisslog Healthcare Nexus Panel operated by released versions of software before Nexus Software 7.2.5.7. There is no firmware validation (e.g., cryptographic signature validation) during a File Upload for a firmware update. |
2021-08-02 |
not yet calculated |
CVE-2021-37160
MISC
MISC
MISC
MISC |
| swisslog — healthcare_nexus_panel |
An insecure permissions issue was discovered in HMI3 Control Panel in Swisslog Healthcare Nexus operated by released versions of software before Nexus Software 7.2.5.7. The device has two user accounts with passwords that are hardcoded. |
2021-08-02 |
not yet calculated |
CVE-2021-37163
MISC
MISC
MISC
MISC |
swisslog — healthcare_nexus_panel
|
A buffer overflow issue was discovered in HMI3 Control Panel in Swisslog Healthcare Nexus Panel operated by released versions of software before Nexus Software 7.2.5.7. When a message is sent to the HMI TCP socket, it is forwarded to the hmiProcessMsg function through the pendingQ, and may lead to remote code execution. |
2021-08-02 |
not yet calculated |
CVE-2021-37165
MISC
MISC
MISC
MISC |
swisslog — healthcare_nexus_panel
|
An insecure permissions issue was discovered in HMI3 Control Panel in Swisslog Healthcare Nexus Panel operated by released versions of software before Nexus Software 7.2.5.7. A user logged in using the default credentials can gain root access to the device, which provides permissions for all of the functionality of the device. |
2021-08-02 |
not yet calculated |
CVE-2021-37167
MISC
MISC
MISC
MISC |
swisslog — healthcare_nexus_panel
|
A buffer overflow issue leading to denial of service was discovered in HMI3 Control Panel in Swisslog Healthcare Nexus Panel operated by released versions of software before Nexus Software 7.2.5.7. When HMI3 starts up, it binds a local service to a TCP port on all interfaces of the device, and takes extensive time for the GUI to connect to the TCP socket, allowing the connection to be hijacked by an external attacker. |
2021-08-02 |
not yet calculated |
CVE-2021-37166
MISC
MISC
MISC
MISC |
swisslog — healthcare_nexus_panel
|
A buffer overflow issue was discovered in HMI3 Control Panel in Swisslog Healthcare Nexus Panel operated by released versions of software before Nexus Software 7.2.5.7. In the tcpTxThread function, the received data is copied to a stack buffer. An off-by-3 condition can occur, resulting in a stack-based buffer overflow. |
2021-08-02 |
not yet calculated |
CVE-2021-37164
MISC
MISC
MISC
MISC |
swisslog — healthcare_nexus_panel
|
A buffer overflow issue was discovered in HMI3 Control Panel in Swisslog Healthcare Nexus Panel operated by released versions of software before Nexus Software 7.2.5.7. If an attacker sends a malformed UDP message, a buffer underflow occurs, leading to an out-of-bounds copy and possible remote code execution. |
2021-08-02 |
not yet calculated |
CVE-2021-37162
MISC
MISC
MISC
MISC |
swisslog — healthcare_nexus_panel
|
A buffer overflow issue was discovered in the HMI3 Control Panel contained within the Swisslog Healthcare Nexus Panel, operated by released versions of software before Nexus Software 7.2.5.7. A buffer overflow allows an attacker to overwrite an internal queue data structure and can lead to remote code execution. |
2021-08-02 |
not yet calculated |
CVE-2021-37161
MISC
MISC
MISC
MISC |
| tar — tar |
The npm package “tar” (aka node-tar) before versions 6.1.2, 5.0.7, 4.4.15, and 3.2.3 has an arbitrary File Creation/Overwrite vulnerability via insufficient symlink protection. `node-tar` aims to guarantee that any file whose location would be modified by a symbolic link is not extracted. This is, in part, achieved by ensuring that extracted directories are not symlinks. Additionally, in order to prevent unnecessary `stat` calls to determine whether a given path is a directory, paths are cached when directories are created. This logic was insufficient when extracting tar files that contained both a directory and a symlink with the same name as the directory. This order of operations resulted in the directory being created and added to the `node-tar` directory cache. When a directory is present in the directory cache, subsequent calls to mkdir for that directory are skipped. However, this is also where `node-tar` checks for symlinks occur. By first creating a directory, and then replacing that directory with a symlink, it was thus possible to bypass `node-tar` symlink checks on directories, essentially allowing an untrusted tar file to symlink into an arbitrary location and subsequently extracting arbitrary files into that location, thus allowing arbitrary file creation and overwrite. This issue was addressed in releases 3.2.3, 4.4.15, 5.0.7 and 6.1.2. |
2021-08-03 |
not yet calculated |
CVE-2021-32803
MISC
CONFIRM
MISC
MISC |
tar — tar
|
The npm package “tar” (aka node-tar) before versions 6.1.1, 5.0.6, 4.4.14, and 3.3.2 has a arbitrary File Creation/Overwrite vulnerability due to insufficient absolute path sanitization. node-tar aims to prevent extraction of absolute file paths by turning absolute paths into relative paths when the `preservePaths` flag is not set to `true`. This is achieved by stripping the absolute path root from any absolute file paths contained in a tar file. For example `/home/user/.bashrc` would turn into `home/user/.bashrc`. This logic was insufficient when file paths contained repeated path roots such as `////home/user/.bashrc`. `node-tar` would only strip a single path root from such paths. When given an absolute file path with repeating path roots, the resulting path (e.g. `///home/user/.bashrc`) would still resolve to an absolute path, thus allowing arbitrary file creation and overwrite. This issue was addressed in releases 3.2.2, 4.4.14, 5.0.6 and 6.1.1. Users may work around this vulnerability without upgrading by creating a custom `onentry` method which sanitizes the `entry.path` or a `filter` method which removes entries with absolute paths. See referenced GitHub Advisory for details. Be aware of CVE-2021-32803 which fixes a similar bug in later versions of tar. |
2021-08-03 |
not yet calculated |
CVE-2021-32804
MISC
MISC
CONFIRM
MISC |
tcexam — tcexam
|
A reflected cross-site scripting vulnerability exists in TCExam <= 14.8.3. The paths provided in the f, d, and dir parameters in tce_filemanager.php were not properly validated and could cause reflected XSS via the unsanitized output of the path supplied. An attacker could craft a malicious link which, if triggered by an administrator, could result in the attacker hijacking the victim’s session or performing actions on their behalf. |
2021-08-05 |
not yet calculated |
CVE-2021-20115
MISC |
tcexam — tcexam
|
A reflected cross-site scripting vulnerability exists in TCExam <= 14.8.4. The paths provided in the f, d, and dir parameters in tce_select_mediafile.php were not properly validated and could cause reflected XSS via the unsanitized output of the path supplied. An attacker could craft a malicious link which, if triggered by an administrator, could result in the attacker hijacking the victim’s session or performing actions on their behalf. |
2021-08-05 |
not yet calculated |
CVE-2021-20116
MISC |
totolink — a720r_router
|
A vulnerability in TOTOLINK A720R router with firmware v4.1.5cu.470_B20200911 allows attackers to download the configuration file via sending a crafted HTTP request. |
2021-08-05 |
not yet calculated |
CVE-2021-35326
MISC |
totolink — a720r_router
|
A stack overflow in the checkLoginUser function of TOTOLINK A720R A720R_Firmware v4.1.5cu.470_B20200911 allows attackers to cause a denial of service (DOS). |
2021-08-05 |
not yet calculated |
CVE-2021-35325
MISC |
totolink — a720r_router
|
A vulnerability in the Form_Login function of TOTOLINK A720R A720R_Firmware V4.1.5cu.470_B20200911 allows attackers to bypass authentication. |
2021-08-05 |
not yet calculated |
CVE-2021-35324
MISC |
totolink — a720r_router
|
A vulnerability in TOTOLINK A720R A720R_Firmware v4.1.5cu.470_B20200911 allows attackers to start the Telnet service, then login with the default credentials via a crafted POST request. |
2021-08-05 |
not yet calculated |
CVE-2021-35327
MISC |
traefik — traefik
|
Traefik is an HTTP reverse proxy and load balancer. Prior to version 2.4.13, there exists a potential header vulnerability in Traefik’s handling of the Connection header. Active exploitation of this issue is unlikely, as it requires that a removed header would lead to a privilege escalation, however, the Traefik team has addressed this issue to prevent any potential abuse. If one has a chain of Traefik middlewares, and one of them sets a request header, then sending a request with a certain Connection header will cause it to be removed before the request is sent. In this case, the backend does not see the request header. A patch is available in version 2.4.13. There are no known workarounds aside from upgrading. |
2021-08-03 |
not yet calculated |
CVE-2021-32813
MISC
CONFIRM
MISC |
trend_micro — multiple_products
|
An incorrect permission preservation vulnerability in Trend Micro Apex One, Apex One as a Service and OfficeScan XG SP1 could allow a remote user to perform an attack and bypass authentication on affected installations. Please note: an attacker must first obtain the ability to execute low-privileged code on the target system in order to exploit this vulnerability. |
2021-08-04 |
not yet calculated |
CVE-2021-32465
MISC
MISC
MISC |
trend_micro — multiple_products
|
An incorrect permission assignment privilege escalation vulnerability in Trend Micro Apex One, Apex One as a Service and Worry-Free Business Security Services could allow an attacker to modify a specific script before it is executed. Please note: an attacker must first obtain the ability to execute low-privileged code on the target system in order to exploit this vulnerability. |
2021-08-04 |
not yet calculated |
CVE-2021-32464
MISC
MISC
MISC
MISC |
ubuntu — ubuntu
|
Showing the legitimate URL in the address bar while loading the content from other domain. This makes the user believe that the content is served by a legit domain. Exploiting the vulnerability requires the user to click on a specially crafted, seemingly legitimate URL containing an embedded malicious redirect while using F-Secure Safe Browser for iOS. |
2021-08-05 |
not yet calculated |
CVE-2021-33596
MISC
MISC |
urlinportal — urlinportal
|
Products.isurlinportal is a replacement for isURLInPortal method in Plone. Versions of Products.isurlinportal prior to 1.2.0 have an Open Redirect vulnerability. Various parts of Plone use the ‘is url in portal’ check for security, mostly to see if it is safe to redirect to a url. A url like `https://example.org` is not in the portal. The url `https:example.org` without slashes is considered to be in the portal. When redirecting, some browsers go to `https://example.org`, others give an error. Attackers may use this to redirect victims to their site, especially as part of a phishing attack. The problem has been patched in Products.isurlinportal 1.2.0. |
2021-08-02 |
not yet calculated |
CVE-2021-32806
MISC
CONFIRM |
vaethink — vaethink
|
An arbitrary file upload vulnerability in the avatar upload function of vaeThink v1.0.1 allows attackers to open a webshell via changing uploaded file suffixes to “.php”. |
2021-08-03 |
not yet calculated |
CVE-2020-19302
MISC |
vaethink — vaethink
|
A vulnerability in the vae_admin_rule database table of vaeThink v1.0.1 allows attackers to execute arbitrary code via a crafted payload in the condition parameter. |
2021-08-03 |
not yet calculated |
CVE-2020-19301
MISC |
vizio — p65-f1
|
Vizio P65-F1 6.0.31.4-2 and E50x-E1 10.0.31.4-2 Smart TVs allow a threat actor to execute arbitrary code from a USB drive via the Smart Cast functionality, because files on the USB drive are effectively under the web root and can be executed. |
2021-08-03 |
not yet calculated |
CVE-2021-27942
MISC |
vizio — p65-f1
|
The pairing procedure used by the Vizio P65-F1 6.0.31.4-2 and E50x-E1 10.0.31.4-2 Smart TVs and mobile application is vulnerable to a brute-force attack (against only 10000 possibilities), allowing a threat actor to forcefully pair the device, leading to remote control of the TV settings and configurations. |
2021-08-02 |
not yet calculated |
CVE-2021-27943
MISC
MISC
MISC |
wagecms — wagecms
|
A cross site request forgery (CSRF) in Wage-CMS 1.5.x-dev allows attackers to arbitrarily add users. |
2021-08-06 |
not yet calculated |
CVE-2020-21358
MISC |
wildfly — elytron
|
A flaw was found in Wildfly Elytron where ScramServer may be susceptible to Timing Attack if enabled. The highest threat of this vulnerability is confidentiality. This flaw affectes Wildfly Elytron versions prior to 1.10.14.Final, prior to 1.15.5.Final and prior to 1.16.1.Final. |
2021-08-05 |
not yet calculated |
CVE-2021-3642
MISC |
| wordpress — wordpress |
The Calendar Event Multi View WordPress plugin before 1.4.01 does not sanitise or escape the ‘start’ and ‘end’ GET parameters before outputting them in the page (via php/edit.php), leading to a reflected Cross-Site Scripting issue. |
2021-08-02 |
not yet calculated |
CVE-2021-24498
MISC |
| wordpress — wordpress |
The DrawBlog WordPress plugin through 0.90 does not sanitise or validate some of its settings before outputting them back in the page, leading to an authenticated stored Cross-Site Scripting issue |
2021-08-02 |
not yet calculated |
CVE-2021-24479
MISC |
| wordpress — wordpress |
The Import feature of the RSVPMaker WordPress plugin before 8.7.3 (/wp-admin/tools.php?page=rsvpmaker_export_screen) takes an URL input and calls curl on it, without first validating it to ensure it’s a remote one. As a result, a high privilege user could use that feature to scan the internal network via a SSRF attack. |
2021-08-02 |
not yet calculated |
CVE-2021-24371
MISC
MISC |
| wordpress — wordpress |
The Floating Notification Bar, Sticky Menu on Scroll, and Sticky Header for Any Theme – myStickymenu WordPress plugin before 2.5.2 does not sanitise or escape its Bar Text settings, allowing hight privilege users to use malicious JavaScript in it, leading to a Stored Cross-Site Scripting issue, which will be triggered in the plugin’s setting, as well as all front-page of the blog (when the Welcome bar is active) |
2021-08-02 |
not yet calculated |
CVE-2021-24425
MISC
MISC |
| wordpress — wordpress |
The get_portfolios() and get_portfolio_attributes() functions in the class-portfolio-responsive-gallery-list-table.php and class-portfolio-responsive-gallery-attributes-list-table.php files of the Portfolio Responsive Gallery WordPress plugin before 1.1.8 did not use whitelist or validate the orderby parameter before using it in SQL statements passed to the get_results() DB calls, leading to SQL injection issues in the admin dashboard |
2021-08-02 |
not yet calculated |
CVE-2021-24457
MISC |
| wordpress — wordpress |
The Leaflet Map WordPress plugin before 3.0.0 does not escape some shortcode attributes before they are used in JavaScript code or HTML, which could allow users with a role as low as Contributors to exploit stored XSS issues |
2021-08-02 |
not yet calculated |
CVE-2021-24468
MISC |
| wordpress — wordpress |
The OnAir2 WordPress theme before 3.9.9.2 and QT KenthaRadio WordPress plugin before 2.0.2 have exposed proxy functionality to unauthenticated users, sending requests to this proxy functionality will have the web server fetch and display the content from any URI, this would allow for SSRF (Server Side Request Forgery) and RFI (Remote File Inclusion) vulnerabilities on the website. |
2021-08-02 |
not yet calculated |
CVE-2021-24472
MISC |
| wordpress — wordpress |
The NewsPlugin WordPress plugin is vulnerable to Cross-Site Request Forgery via the handle_save_style function found in the ~/news-plugin.php file which allows attackers to inject arbitrary web scripts, in versions up to and including 1.0.18. |
2021-08-05 |
not yet calculated |
CVE-2021-34631
MISC |
| wordpress — wordpress |
The get_poll_categories(), get_polls() and get_reports() functions in the Poll Maker WordPress plugin before 3.2.1 did not use whitelist or validate the orderby parameter before using it in SQL statements passed to the get_results() DB calls, leading to SQL injection issues in the admin dashboard |
2021-08-02 |
not yet calculated |
CVE-2021-24483
MISC |
| wordpress — wordpress |
The get_faqs() function in the FAQ Builder AYS WordPress plugin before 1.3.6 did not use whitelist or validate the orderby parameter before using it in SQL statements passed to the get_results() DB calls, leading to SQL injection issues in the admin dashboard |
2021-08-02 |
not yet calculated |
CVE-2021-24461
MISC |
wordpress — wordpress
|
The Community Events WordPress plugin before 1.4.8 does not sanitise, validate or escape its importrowscount and successimportcount GET parameters before outputting them back in an admin page, leading to a reflected Cross-Site Scripting issue which will be executed in the context of a logged in administrator |
2021-08-02 |
not yet calculated |
CVE-2021-24496
MISC |
wordpress — wordpress
|
Authenticated File Upload in WordPress Download Manager <= 3.1.24 allows authenticated (Author+) users to upload files with a double extension, e.g. “payload.php.png” which is executable in some configurations. This issue affects: WordPress Download Manager version 3.1.24 and prior versions. |
2021-08-05 |
not yet calculated |
CVE-2021-34639
MISC |
wordpress — wordpress
|
Authenticated Directory Traversal in WordPress Download Manager <= 3.1.24 allows authenticated (Contributor+) users to obtain sensitive configuration file information, as well as allowing Author+ users to perform XSS attacks, by setting Download template to a file containing configuration information or an uploaded JavaScript with an image extension This issue affects: WordPress Download Manager version 3.1.24 and prior versions. |
2021-08-05 |
not yet calculated |
CVE-2021-34638
MISC |
wordpress — wordpress
|
The Post Index WordPress plugin is vulnerable to Cross-Site Request Forgery via the OptionsPage function found in the ~/php/settings.php file which allows attackers to inject arbitrary web scripts, in versions up to and including 0.7.5. |
2021-08-02 |
not yet calculated |
CVE-2021-34637
MISC
MISC |
wordpress — wordpress
|
The Poll Maker WordPress plugin is vulnerable to Reflected Cross-Site Scripting via the mcount parameter found in the ~/admin/partials/settings/poll-maker-settings.php file which allows attackers to inject arbitrary web scripts, in versions up to and including 3.2.8. |
2021-08-02 |
not yet calculated |
CVE-2021-34635
MISC
MISC |
wordpress — wordpress
|
The Admin Custom Login WordPress plugin is vulnerable to Cross-Site Request Forgery due to the loginbgSave action found in the ~/includes/Login-form-setting/Login-form-background.php file which allows attackers to inject arbitrary web scripts, in versions up to and including 3.2.7. |
2021-08-02 |
not yet calculated |
CVE-2021-34628
MISC
MISC |
wordpress — wordpress
|
The SEO Backlinks WordPress plugin is vulnerable to Cross-Site Request Forgery via the loc_config function found in the ~/seo-backlinks.php file which allows attackers to inject arbitrary web scripts, in versions up to and including 4.0.1. |
2021-08-02 |
not yet calculated |
CVE-2021-34632
MISC
MISC |
wordpress — wordpress
|
The Nifty Newsletters WordPress plugin is vulnerable to Cross-Site Request Forgery via the sola_nl_wp_head function found in the ~/sola-newsletters.php file which allows attackers to inject arbitrary web scripts, in versions up to and including 4.0.23. |
2021-08-05 |
not yet calculated |
CVE-2021-34634
MISC
MISC |
wordpress — wordpress
|
The Youtube Feeder WordPress plugin is vulnerable to Cross-Site Request Forgery via the printAdminPage function found in the ~/youtube-feeder.php file which allows attackers to inject arbitrary web scripts, in versions up to and including 2.0.1. |
2021-08-05 |
not yet calculated |
CVE-2021-34633
MISC
MISC |
wordpress — wordpress
|
The Quiz Maker WordPress plugin before 6.2.0.9 did not properly sanitise and escape the order and orderby parameters before using them in SQL statements, leading to SQL injection issues in the admin dashboard |
2021-08-02 |
not yet calculated |
CVE-2021-24456
MISC |
wordpress — wordpress
|
The WP LMS – Best WordPress LMS Plugin WordPress plugin through 1.1.2 does not properly sanitise or validate its User Field Titles, allowing XSS payload to be used in them. Furthermore, no CSRF and capability checks were in place, allowing such attack to be performed either via CSRF or as any user (including unauthenticated) |
2021-08-02 |
not yet calculated |
CVE-2021-24504
MISC |
wordpress — wordpress
|
The get_results() and get_items() functions in the Survey Maker WordPress plugin before 1.5.6 did not use whitelist or validate the orderby parameter before using it in SQL statements passed to the get_results() DB calls, leading to SQL injection issues in the admin dashboard |
2021-08-02 |
not yet calculated |
CVE-2021-24459
MISC |
wordpress — wordpress
|
The Bookshelf WordPress plugin through 2.0.4 does not sanitise or escape its “Paypal email address” setting before outputting it in the page, leading to an authenticated Stored Cross-Site Scripting issue |
2021-08-02 |
not yet calculated |
CVE-2021-24478
MISC |
wordpress — wordpress
|
The Migrate Users WordPress plugin through 1.0.1 does not sanitise or escape its Delimiter option before outputting in a page, leading to a Stored Cross-Site Scripting issue. Furthermore, the plugin does not have CSRF check in place when saving its options, allowing the issue to be exploited via a CSRF attack. |
2021-08-02 |
not yet calculated |
CVE-2021-24477
MISC |
wordpress — wordpress
|
The Steam Group Viewer WordPress plugin through 2.1 does not sanitise or escape its “Steam Group Address” settings before outputting it in the page, leading to an authenticated Stored Cross-Site Scripting issue |
2021-08-02 |
not yet calculated |
CVE-2021-24476
MISC |
wordpress — wordpress
|
The Awesome Weather Widget WordPress plugin through 3.0.2 does not sanitize the id parameter of its awesome_weather_refresh AJAX action, leading to an unauthenticated Reflected Cross-Site Scripting (XSS) Vulnerability. |
2021-08-02 |
not yet calculated |
CVE-2021-24474
MISC |
wordpress — wordpress
|
The User Profile Picture WordPress plugin before 2.6.0 was affected by an IDOR issue, allowing users with the upload_image capability (by default author and above) to change and delete the profile pictures of other users (including those with higher roles). |
2021-08-02 |
not yet calculated |
CVE-2021-24473
MISC |
wordpress — wordpress
|
The Yada Wiki WordPress plugin before 3.4.1 did not sanitise, validate or escape the anchor attribute of its shortcode, leading to a Stored Cross-Site Scripting issue |
2021-08-02 |
not yet calculated |
CVE-2021-24470
MISC |
wordpress — wordpress
|
The YouTube Embed, Playlist and Popup by WpDevArt WordPress plugin before 2.3.9 did not escape, validate or sanitise some of its shortcode options, available to users with a role as low as Contributor, leading to an authenticated Stored Cross-Site Scripting issue. |
2021-08-02 |
not yet calculated |
CVE-2021-24464
MISC |
wordpress — wordpress
|
The Any Hostname WordPress plugin through 1.0.6 does not sanitise or escape its “Allowed hosts” setting, leading to an authenticated stored XSS issue as high privilege users are able to set XSS payloads in it |
2021-08-02 |
not yet calculated |
CVE-2021-24481
MISC |
wordpress — wordpress
|
The get_reports() function in the Secure Copy Content Protection and Content Locking WordPress plugin before 2.6.7 did not use whitelist or validate the orderby parameter before using it in SQL statements passed to the get_results() DB calls, leading to SQL injection issues in the admin dashboard |
2021-08-02 |
not yet calculated |
CVE-2021-24484
MISC |
wordpress — wordpress
|
The get_sliders() function in the Image Slider by Ays- Responsive Slider and Carousel WordPress plugin before 2.5.0 did not use whitelist or validate the orderby parameter before using it in SQL statements passed to the get_results() DB calls, leading to SQL injection issues in the admin dashboard |
2021-08-02 |
not yet calculated |
CVE-2021-24463
MISC |
wordpress — wordpress
|
The get_gallery_categories() and get_galleries() functions in the Photo Gallery by Ays – Responsive Image Gallery WordPress plugin before 4.4.4 did not use whitelist or validate the orderby parameter before using it in SQL statements passed to the get_results() DB calls, leading to SQL injection issues in the admin dashboard |
2021-08-02 |
not yet calculated |
CVE-2021-24462
MISC |
wordpress — wordpress
|
The slider import search feature and tab parameter of the Post Grid WordPress plugin before 2.1.8 settings are not properly sanitised before being output back in the pages, leading to Reflected Cross-Site Scripting issues |
2021-08-02 |
not yet calculated |
CVE-2021-24488
MISC |
wordpress — wordpress
|
The get_fb_likeboxes() function in the Popup Like box – Page Plugin WordPress plugin before 3.5.3 did not use whitelist or validate the orderby parameter before using it in SQL statements passed to the get_results() DB calls, leading to SQL injection issues in the admin dashboard |
2021-08-02 |
not yet calculated |
CVE-2021-24460
MISC |
wordpress — wordpress
|
The Popular Brand Icons – Simple Icons WordPress plugin before 2.7.8 does not sanitise or validate some of its shortcode parameters, such as “color”, “size” or “class”, allowing users with a role as low as Contributor to set Cross-Site payload in them. A post made by a contributor would still have to be approved by an admin to have the XSS triggered in the frontend, however, higher privilege users, such as editor could exploit this without the need of approval, and even when the blog disallows the unfiltered_html capability. |
2021-08-02 |
not yet calculated |
CVE-2021-24503
MISC |
wordpress — wordpress
|
The User Registration & User Profile – Profile Builder WordPress plugin before 3.4.8 does not sanitise or escape its ‘Modify default Redirect Delay timer’ setting, allowing high privilege users to use JavaScript code in it, even when the unfiltered_html capability is disallowed, leading to an authenticated Stored Cross-Site Scripting issue |
2021-08-02 |
not yet calculated |
CVE-2021-24448
MISC |
wordpress — wordpress
|
The hndtst_action_instance_callback AJAX call of the Handsome Testimonials & Reviews WordPress plugin before 2.1.1, available to any authenticated users, does not sanitise, validate or escape the hndtst_previewShortcodeInstanceId POST parameter before using it in a SQL statement, leading to an SQL Injection issue. |
2021-08-02 |
not yet calculated |
CVE-2021-24492
MISC
MISC |
wordpress — wordpress
|
The RSS for Yandex Turbo WordPress plugin through 1.30 does not sanitise or escape some of its settings before saving and outputing them in the admin dashboard, leading to an Authenticated Stored Cross-Site Scripting issue even when the unfiltered_html capability is disallowed. |
2021-08-02 |
not yet calculated |
CVE-2021-24428
MISC
MISC |
wordpress — wordpress
|
The Speed Booster Pack âš¡ PageSpeed Optimization Suite WordPress plugin before 4.2.0 did not validate its caching_exclude_urls and caching_include_query_strings settings before outputting them in a PHP file, which could lead to RCE |
2021-08-02 |
not yet calculated |
CVE-2021-24430
MISC
MISC |
wordpress — wordpress
|
The About Me widget of the Youzify – BuddyPress Community, User Profile, Social Network & Membership WordPress plugin before 1.0.7 does not properly sanitise its Biography field, allowing any authenticated user to set Cross-Site Scripting payloads in it, which will be executed when viewing the affected user profile. This could allow a low privilege user to gain unauthorised access to the admin side of the blog by targeting an admin, inducing them to view their profile with a malicious payload adding a rogue account for example. |
2021-08-02 |
not yet calculated |
CVE-2021-24443
MISC |
wordpress — wordpress
|
The TaxoPress – Create and Manage Taxonomies, Tags, Categories WordPress plugin before 3.7.0.2 does not sanitise its Taxonomy description field, allowing high privilege users to set JavaScript payload in them even when the unfiltered_html capability is disallowed, leading to an authenticated Stored Cross-Site Scripting issue. |
2021-08-02 |
not yet calculated |
CVE-2021-24444
MISC |
wordpress — wordpress
|
The User Registration, User Profiles, Login & Membership – ProfilePress (Formerly WP User Avatar) WordPress plugin before 3.1.8 did not sanitise or escape some of its settings before saving them and outputting them back in the page, allowing high privilege users such as admin to set JavaScript payloads in them even when the unfiltered_html capability is disallowed, leading to an authenticated Stored Cross-Site Scripting issue |
2021-08-02 |
not yet calculated |
CVE-2021-24450
MISC |
wordpress — wordpress
|
The Tutor LMS – eLearning and online course solution WordPress plugin before 1.9.2 did not escape the Summary field of Announcements (when outputting it in an attribute), which can be created by users as low as Tutor Instructor. This lead to a Stored Cross-Site Scripting issue, which is triggered when viewing the Announcements list, and could result in privilege escalation when viewed by an admin. |
2021-08-02 |
not yet calculated |
CVE-2021-24455
MISC |
wordpress — wordpress
|
The Event Geek WordPress plugin through 2.5.2 does not sanitise or escape its “Use your own ” setting before outputting it in the page, leading to an authenticated (admin+) stored Cross-Site Scripting issue |
2021-08-02 |
not yet calculated |
CVE-2021-24480
MISC |
wordpress — wordpress
|
The get_ays_popupboxes() and get_popup_categories() functions of the Popup box WordPress plugin before 2.3.4 did not use whitelist or validate the orderby parameter before using it in SQL statements passed to the get_results() DB calls, leading to SQL injection issues in the admin dashboard |
2021-08-02 |
not yet calculated |
CVE-2021-24458
MISC |
ypsomed — mylife_products
|
Ypsomed mylife Cloud, mylife Mobile Application, Ypsomed mylife Cloud: All versions prior to 1.7.2, Ypsomed mylife App: All versions prior to 1.7.5,The application layer encryption of the communication protocol between the Ypsomed mylife App and mylife Cloud uses non-random IVs, which allows man-in-the-middle attackers to tamper with messages. |
2021-08-02 |
not yet calculated |
CVE-2021-27499
MISC |
ypsomed — mylife_products
|
Ypsomed mylife Cloud, mylife Mobile Application, Ypsomed mylife Cloud: All versions prior to 1.7.2, Ypsomed mylife App: All versions prior to 1.7.5,The application encrypts on the application layer of the communication protocol between the Ypsomed mylife App and mylife Cloud credentials based on hard-coded secrets, which allows man-in-the-middle attackers to tamper with messages. |
2021-08-02 |
not yet calculated |
CVE-2021-27503
MISC |
zoho — manageengine_passwork_manager_pro
|
Zoho ManageEngine Password Manager Pro before 11.2 11200 allows login/AjaxResponse.jsp?RequestType=GetUserDomainName&userName= username enumeration, because the response (to a failed login request) is null only when the username is invalid. |
2021-07-31 |
not yet calculated |
CVE-2021-33617
MISC
MISC
MISC |
zope — zope
|
Zope is an open-source web application server. Zope versions prior to versions 4.6.3 and 5.3 have a remote code execution security issue. In order to be affected, one must use Python 3 for one’s Zope deployment, run Zope 4 below version 4.6.3 or Zope 5 below version 5.3, and have the optional `Products.PythonScripts` add-on package installed. By default, one must have the admin-level Zope “Manager” role to add or edit Script (Python) objects through the web. Only sites that allow untrusted users to add/edit these scripts through the web are at risk. Zope releases 4.6.3 and 5.3 are not vulnerable. As a workaround, a site administrator can restrict adding/editing Script (Python) objects through the web using the standard Zope user/role permission mechanisms. Untrusted users should not be assigned the Zope Manager role and adding/editing these scripts through the web should be restricted to trusted users only. This is the default configuration in Zope. |
2021-08-02 |
not yet calculated |
CVE-2021-32811
MISC
CONFIRM
MISC |
| zte — zte |
A ZTE’s product of the transport network access layer has a security vulnerability. Because the system does not sufficiently verify the data reliability, attackers could replace an authenticated optical module on the equipment with an unauthenticated one, bypassing system authentication and detection, thus affecting signal transmission. This affects: <ZXCTN 6120H><V5.10.00B24> |
2021-08-05 |
not yet calculated |
CVE-2021-21739
MISC |
zte — zte
|
ZTE’s big video business platform has two reflective cross-site scripting (XSS) vulnerabilities. Due to insufficient input verification, the attacker could implement XSS attacks by tampering with the parameters, to affect the operations of valid users. This affects: <ZXIPTV><ZXIPTV-EAS_PV5.06.04.09> |
2021-08-05 |
not yet calculated |
CVE-2021-21738
MISC |
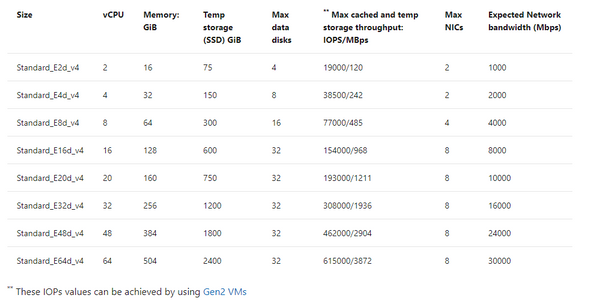
by Contributed | Aug 6, 2021 | Technology
This article is contributed. See the original author and article here.
If you’re migrating your data estate to Azure, as is normal considering Azure is an enterprise cloud that can be the home for all data, including Oracle, you may wonder what storage solutions there are to support these types of IO heavy workloads. Maybe you didn’t realize how important storage was to Oracle in the cloud. Most customers we word with are focused on what vCPU and memory are available in Azure, but for 95% of Oracle workloads, it’s IO that makes the decision on the infrastructure we choose and of that IO, its throughput, (MBPs) that is most often the deciding factor in the final VM sizes and storage type.
This post isn’t going to be about promoting one storage vendor or any solution over another, but hopefully help you understand that each customer engagement is different and that there is a solution for everyone, and you can build out what you need and meet every IO workload with Oracle, (or any other heavy IO workload) in Azure.
There are limits on storage, but more importantly, there are limits per each VM on storage and Network that must be considered. When choosing a VM, don’t just match the amount of vCPU and memory, but can the VM handle the throughput demands your workload will place on it. One of our favorite VMs types is the E-series ds v4. This sku series offers us the ability to have premium SSD for the OS disk, constrained vCPU versions if we need to have a larger “chassis” and memory with lesser vCPU for licensing constraints and higher throughput than we see with many others with similar configurations.
If you inspect the specifications by SKU size, you will see displayed the max cached IOPS/MBPs and Network bandwidth for the E ds v4 series:
Table 1, E-series, ds v4 VMs in Azure specifications
The above table will result in both premium disk and ultra disk being held to both storage and network limits displayed, or for solutions such as ANF, Silk, Excelero or Flashgrid, we’re held to only the network limits shown. As I stated earlier that throughput, MBPs is the biggest headache, not IOPs, (i.e., the number of requests) you can understand why the latter solutions come in handy with IO heavy workloads such as Oracle in Azure.
If you have sized out the Oracle workload for Azure properly, then you will know what you require in Azure IaaS to run it and can then choose the best VM, and storage needed. If you’re then puzzled by storage solutions, let’s take a deeper look and especially for Exadata, demonstrate what options there are.
Don’t Guess
I can’t stress enough, if you haven’t sized out the Oracle workload from an AWR that shows considerable database workload activity from the customer’s environment, you’re just guessing. Do NOT try to lift and shift the infrastructure, especially from an Exadata- you are AGAIN, wasting your time. An Exadata is an engineered system and there are infrastructure components that can’t be shifted over and more often is quite over-provisioned.
I also run into pushback on going through the sizing exercise. Many will want to simply take the existing hardware and lift and shift it to the cloud. This is one of the quickest ways to pay two or more times for Oracle licensing. I’m not going to argue with sales people who pushback with me on this, but chalk the deal or migration up as lost and go spend my time on a migration that’s going to be successful from the beginning.
Fight Me
So I know what the documentation says for storage IaaS VMs–

Table 2, Storage Options for IaaS VMs in Microsoft Docs.
Reality of what is best for Oracle on Azure may not agree with what is in this table and I’m going to tell you now, I don’t agree with the above table. Ultra disk may look appealing for Oracle, but we simply haven’t found the limitations vs. the cost for Oracle worthy, where for other uses, such as redo logs, it’s a fantastic win, (along with non-Oracle opportunities.) Ultra is still limited by the storage and network limit per VM, and this means that we can’t gain the throughput that we require for most heavy Oracle workloads with 2000+ MBPs.
Using example workloads, I can begin to direct and “evolve” our storage solution and the levels we use with real customer use cases:
Storage Name
|
Storage Type
|
Use
|
Standard HDD
|
Native
|
Not for use with Relational Databases
|
Standard SSD
|
Native
|
Less than acceptable for Oracle workloads or Oracle VM OS Disks
|
Premium SSD
|
Native
|
Standard Oracle Workloads and OS Disk, With Datafiles, always turn on ReadOnly host caching.
|
Ultra Disk
|
Native
|
Redo Logs, rarely for datafiles due to limitations.
|
Azure NetApp Files
|
Native with 1st Party Partnership
|
High IO Oracle Workloads, some Exadata
|
Silk
|
Third Party Partnership
|
High IO Oracle + Workloads, especially Exadata
|
Excelero NVMesh
|
Third Party Partnership
|
High IO Oracle + Workloads
|
Flashgrid Storage Fabric SW
|
Third Party Partnership
|
High IO Oracle + Workloads
|
NetApp Cloud Volume OnTap (CVO)
|
Third Party Partnership
|
High IO Oracle + Workloads, especially Exadata
|
Table 3, Storage options most common for Oracle in Azure
As you look at the table above, you realize that there are a few options at the lower IO workload levels and many at the higher ones. This is where knowledge of your workload and demands, along with unique features of each will come in handy when deciding.
Premium Disk
It is going to be very, very rare day that we place an Oracle workload on standard SSD. A P10 disk will be recommended practice for the OS Disk for each VM Oracle will be running on and then we need to start allocating storage for the datafiles, redo logs, etc.
We rarely, if ever come across Oracle databases that don’t need the IO horsepower for anything but Premium. With that, we get significant performance gain from ReadOnly host caching so the P40/P50, (minus that last 1Gb to leave it inside the limit for ReadOnly host caching of 4095 TiB) disks are our favorite and meet the needs of many Oracle workloads. For the smallest Oracle database workloads, we may use smaller premium SSD or stripe premium disk, as we can use multiple disks with a single ASM diskgroup. Always pay attention when choosing your VM size, there is a max number of data disks that can be attached, so this will also determine what storage you choose, (refer to table 1.)
ReadOnly host caching is only available on certain VM series/skus, as well as mid to high range premium SSD and limited to 4095 TiB. If you allocate a disk larger than that, the host caching will automatically be disabled. We hear a lot from Infra folks about “disk bursting”, either credit or On-demand versions with IO in Azure premium SSD storage. I haven’t had a customer workload that really could make use of it, but for smaller workloads, upwards of 30 minutes of bursting could be beneficial. For P40-P80, there is an unlimited bursting that can be an option at 1000 MBPs. Many customers batch loads in Oracle are just too intensive and too long to take advantage of credit-based bursting and On-demand or changing performance tier is too expensive or too inconsistent in performance for many. For relational database workloads, consistency in performance really is key. Most customers choose to stripe disks to get the max throughput from storage for most Oracle databases or choose higher tier storage, skipping bursting options all together.
Using the table below, you can see the size and the IO max for each premium storage, which tells you what you will be limited to for a single disk unless you stripe-
|
|
|
|
Premium Disk Size
|
Storage Amount
|
IOPs Max/Bursting
|
MBPs Max/Bursting
|
P10
|
128
|
500/3500
|
100/170
|
P20
|
256
|
1100/3500
|
125/170
|
P30
|
512
|
2300/3500
|
150/170
|
P40
|
1024
|
5000/30000
|
250/1000
|
P50
|
2048
|
7500/30000
|
250/1000
|
P60
|
8192
|
16000/30000
|
500/1000
|
P70
|
16384
|
18000/30000
|
750/1000
|
P80
|
32767
|
20000/30000
|
900/1000
|
When striping, again, you must be cognizant of the max number of disks you’re allowed per VM, remembering that the OS disk is counted as one.
Ultra Disk
We like Ultra disk, but it has numerous limitations when we start pricing out what it will take to run a database on it, realizing that it will be limited at the storage, not just the network limit per VM, that we have no volume snapshot mechanism or availability zone solution using it and the complicated pricing model, it ends up being a solution with limited use with Oracle. That use is redo logs when a database resides on premium disk and experiencing redo log latency.
More often a better option is to stripe premium disks to achieve upwards of 2000 MBPs, use Azure Backup volume snapshots to eliminate excess IO created by large RMAN backups and no need to spend more money on Ultra Disk.
Azure NetApp Files (ANF)
Many folks think this is a third-party solution, but it’s really a native solution in Azure in partnership with NetApp, and might need a rename to something like, “Azure Enterprise Files”. It’s a first tier storage for high IO workloads and is only limited by the network per VM. An ANF capacity pool is storage built at the region level, has HA built into the solution and can be allocated to multiple VMs, offering the ability to meet numerous workloads that other native solutions can’t. Along with robust cloning capabilities, shared volume snapshots across capacity pools even across regions, which can be used to bring up a second Oracle environment in a short order and avoid additional licensing that would be required if Oracle Data Guard was present.
ANF is also an excellent choice for datacenter migrations where a native storage solution is required or strict, Azure certified storage with high IO capabilities are needed.
Silk
As I work almost primarily on Exadata migrations, I spend a lot of time with Silk data pods. This is a third-party solution that uses a number of patented features to build out a Kubernetes data pod inside Azure, out of compute nodes, (D-series VMs) and management nodes, (L-series VMs) using the NVMe storage to accomplish fast IO. They have compression and dedupe that simplifies some of the additional “decoupling” I’d have to do with the loss of Hybrid Columnar Compression, (HCC) in Exadata. As the IO would grow considerably without HCC, I commonly use additional partitioning and Oracle Advanced Compression to try to make up for that loss.
Another feature that I love about Silk is it’s thin cloning. The ability to create a read/write clone and not have a storage cost is beneficial for E-Business Suite (EBS) and other Oracle applications that require consistent copies across multiple stage environments and the ability to save on storage while doing this, plus doing it quickly is fantastic. Anyone who’s used sparse clone on Exadata would love to have the thin clone in Silk, too.
The Rest
Excelero NVMesh I’ve only been working with for a short while and same with Flashgrid Storage Fabric. While both, like Silk, use VMs and the local storage to creation high IO solutions with the only per VM limitation at the Network layer, they don’t have some of the additional features such as compression/dedupe, thin cloning and volume snapshots. I’ve also been introduced to NetApp Cloud Volume OnTap,(CVO) which marries the best of onprem OnTap storage with Azure in a third-party solution that is closer in features to Silk and can benefit Exadata workloads that rely on HCC, thin cloning and snapshot backups.
The How
When deciding what solution to go through, it’s important to identify the following:
- The vCPU and memory requirements
- The IO, both IOPs and MBPs, especially the latter limit for the VM
- Using the size of the database, along with IOPS/MBPs, then choose the type of storage, (premium or high IO)
- The business’ SLA around Recovery Point Objective (RPO) and Recovery Time Objectcive (RTO) will tell you then which solution will be best that meets the IO needs.
- A secondary service can be added to create additional functionality, (as an example, we add Commvault to ANF to add additional cloning features at a low cost).
So let’s take a few example and look at what kind of combinations you might choose:
Example Oracle Workload #1
- 16 vCPU
- 128G of RAM
- IOPS 22K
- MBPs 212M
- DB Size: 5TB
- Backup Size: 23TB
- RPO/RTO of 15 min/8 hrs
I know this may seem limited on all that you might need to size it out, but we are assuming a sizing assessment has been done from an AWR and from this we can come up with the following recommendations:
Recommended VM: E16ds v4
Storage Option A
- 1 Premium P10- OS Disk
- 6 Premium P40 Disks- Datafiles and Redo Logs
- 24 TiB of Azure Blob Storage- Backups
- Backup strategy: RMAN
Storage Option B
- 1 Premium P10- OS Disk
- 5 Premium P40 Disks- Datafiles
- 40G Ultra Disk- Redo Logs
- 24 TiB of Azure Premium Blob Storage- Backups
- Backup Strategy: Azure Backup for Oracle
Example Oracle Workload #2
- 32 vCPU
- 480G RAM
- IOPs 100K
- MBPS 2800M
- DB Size 8TB
- Backup Size 28TB
- RPO/RTO of 15 min/2 hrs
Due to the limited RTO, I would use Oracle Data Guard to support the 2 hr RTO, as an RMAN recovery from storage wouldn’t meet the requirements for the DR on it’s own.
Recommended VM: E64-32ds v4 constrained vCPU VM
- 1 Premium P10- OS Disk
- Storage Option A: ANF with capacity pool and snapshot taken every 10 minutes to secondary capacity pool in separate region.
- Storage Option B: Excelero with Oracle Data Guard secondary in second Availability Zone, using Fast-start Failover and Observer/DG Broker and RMAN backups to Premium file storage.
Example Oracle Workload #3
- 16 vCPU
- 85G of Ram
- IOPs 300K
- MBPs 4500M
- DB Size 12T
- Backup Size: Using ZDLRS from Oracle
- RPO/RTO of 5 min/1 hr
- Using Exadata features HCC, smart scans, storage indexes, flash cache and flash logging
Recommended VM: E16ds v4, (extra memory will come in handy with the SGA and PGA grows post migration)
- 1 Premium P10- OS Disk
- Storage Option A: Silk with Data Guard, thin cloning, and volume snapshot and their compression/dedupe. Lessen post migration optimization that will need to be done.
- Storage Option B: ANF with Data Guard, volume snapshot for backups to eliminate some of the overhead of IO from RMAN, add Oracle advanced compression and partitioning, along with build out a partitioning strategy to assist with increased IO with loss of HCC.
With the examples above, I stuck to the E-series, ds v4 type VMs, as again, these are some of our favorite skus to work with Oracle on Azure in IaaS. Realize that we do have options for each type of workload, but that depending on the IO, there are different solutions that will meet the customer’s requirements and it’s important to have the right data.

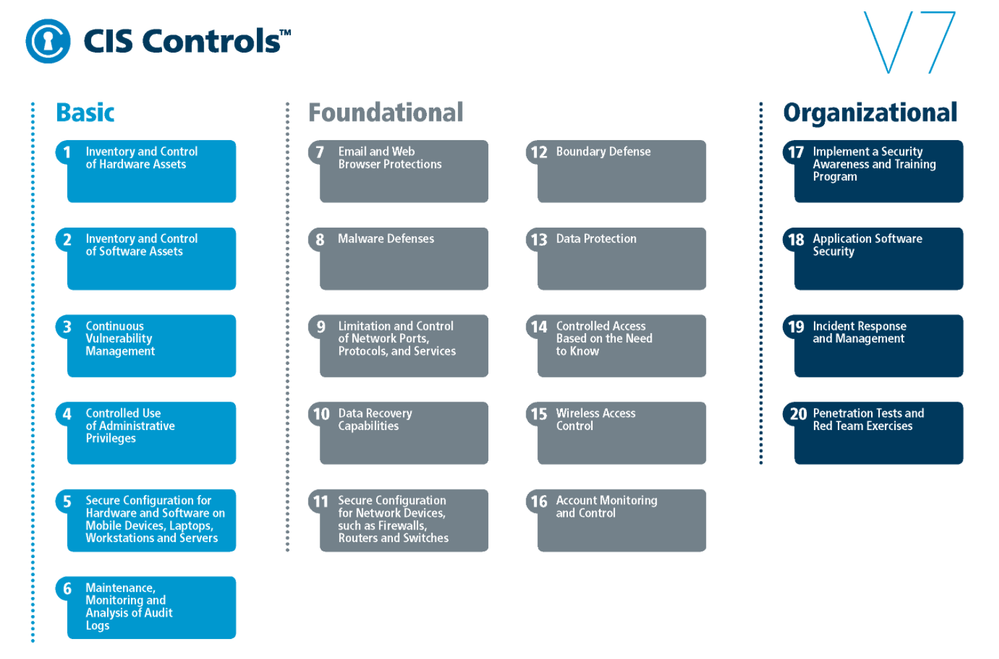


Recent Comments