It’s National Preparedness Month. Are you ready?
This article was originally posted by the FTC. See the original article here.
Brought to you by Dr. Ware, Microsoft Office 365 Silver Partner, Charleston SC.
This article was originally posted by the FTC. See the original article here.
Brought to you by Dr. Ware, Microsoft Office 365 Silver Partner, Charleston SC.
This article is contributed. See the original author and article here.
To remain competitive and thrive, organizations must differentiate their brand through outstanding customer service experiences. As customer expectations and business needs continuously shift, enterprises need the agility to rapidly create, maintain, and optimize those experiences with the latest technologies, including sophisticated AI, without relying on external vendors.
What enterprises need are options that keep them in controla choice of no-code, low-code, and pro-code AI development tools that offer the freedom to quickly build the conversational AI applications they need. After the recent launch of the Microsoft Digital Contact Center Platform, organizations now have those options.
Some organizations want the flexibility and agility to build their own conversational solution in-house on an end-to-end software-as-a-service (SaaS) solution that is quick to deploy, monitor and tune; one that can easily be self-managed by their subject experts. For such organizations, Microsoft Power Virtual Agents and the underlying low-code Power Platform is the right choice. Power Virtual Agents solutions are used widely in many industriesfrom airlines to technology firmsand for a variety of use cases, from internal-facing help desk solutions to external-facing chatbots across multiple channels and languages.
Some examples of Power Virtual Agents users include:
![]()
For large enterprises that need a custom-built natural language model or those with sophisticated interactive voice response (IVR) omnichannel needs, Nuance Mix is the right choice. Such organizations can also call on Nuance Professional Services teams at any stage of their project, drawing on deep expertise in developing, deploying, tuning, and optimizing custom-built conversational AI applications. Omnichannel IVRs and chatbots built using Mix by Nuance Professional Services are widely used by large enterprises, including Fortune 100 companies, from large telcos to major retailers across the world in multiple languages.
Some examples of Nuance Mix users include:
Regardless of which solution organizations begin with, the Digital Contact Center Platform will provide interoperability between them. As we continue to bring Nuance Mix and Power Virtual Agents closer together on the Digital Contact Center Platform, their strengths will make powerful conversational AI solutions even easier and faster to build. And as ever, our commitment to protecting your current investments is thanks to backward compatibility and a clear, disruption-free migration path to any future solutions.
In the final article in this series, we will turn our attention to biometrics and fraud prevention in the digital contact center. In the meantime, learn more about how to create engaging, personalized digital experiences, and achieve superior self-service voice support with the Microsoft Digital Contact Center Platform.
The post The AI-powered contact center, part 3: Build powerful conversational AI solutions appeared first on Microsoft Dynamics 365 Blog.
Brought to you by Dr. Ware, Microsoft Office 365 Silver Partner, Charleston SC.

This article is contributed. See the original author and article here.
The importance of fast database restore operations in any environment cannot be overstated – it is essentially time business cannot carry on; everything is offline.
There is a known DBA saying that “one should not have a backup strategy, but a recovery strategy”, which means that just taking backups isn’t enough, and that the restore process should also be regularly tested, so that you measure and know how much time it takes to restore a production database if and when the need arises.
Azure SQL Managed Instance allows customers not only to recover their databases from when FULL or DIFFERENTIAL backups were taken, but it also allows customers to recover their database to any given point in time by offering PITR – Point-In-Time Restore functionality. Besides being able to restore data from recent backups, Azure SQL Managed Instance also supports recovering databases from discrete, individual backups from long term retention (LTR) storage – which can be configured up to 10 years.
Once the restore process has been initiated, there is nothing that a customer can do to help it – as the process executes asynchronously and cannot be cancelled. While customers can scale up Azure SQL Managed Instance before a restore operation to increase backup restore speed, it’s only possible to do so before a planned restore, and not when there is a sudden and unexpected need. Otherwise, no matter how fast the scaling operation executes, it would still further delay the overall speed of the database restoration process.
There are multiple phases of the SQL MI database restore process, which, aside from the usual SQL Server restore operations, includes registering databases as an Azure asset for visibility & management within the Azure Portal. Additionally, the restore process forces a number of specific internal options, and some property changes such as forcing the switch to the FULL recovery model and forcing the database option PAGE_VERIFY to CHECKSUM, as well as eventually performing a full backup to start the log chain and provide full point-in-time- restore options through the combination of full and log database backups.
The restore operation on SQL MI also includes log truncation, and the execution time for the truncation has been vastly improved, which means that customers can expect their entire database restore process to become faster on both service tiers.
It is important to understand that faster means different speeds on different service tiers. This has to do with an additional necessary operation for the Business Critical service tier. As we have described the internal architecture in High Availability in Azure SQL MI: Business Critical service tier, the Business Critical Service tier runs on a synchronous Availability Group with 4 replicas, meaning the initial backup must be replicated to all the replicas in order to complete the setup. The current implementation of the restore process on the Business Critical service tier uses direct seeding of the Availability Group to distribute the newly restored database between replicas. As such, the restore operation will not complete until the backup has been restored to every replica, and a full backup can’t be taken until direct seeding to the secondary replicas finishes.
The following diagram shows a conceptual explanation of some of the most time-consuming execution phases of the database restore process on Azure SQL Managed Instance.
Although the boxes are similar sizes, they don’t represent the real amount of time spent on each of those specific functions. The real amount of time vastly differs based on the number of transaction log backups, the ratio of data compression, and, of course, the sheer speed of write and log operations that are available to the Azure SQL Managed Instance. Another important factor to consider are the operations executed against the Azure SQL Managed Instance during the database restore process – either directly by the user, or automatically by the engine – such as Tuple Mover in Columnstore Indexes, or even automated operations configured by the customer, such as index maintenance jobs.
For the performance testing, we created two identical Azure SQL Managed Instances – one with the log truncation improvement included and activated, while the second one does not use the improvement. The two instances use the following hardware specifications:
We have tested three databases, each one with a different size and a different fullness percentage, representing ranges from 60 GB up to 800 GB.
Here are the results, in seconds, for multiple restore tests for each of the databases presented both for the default Azure SQL Managed Instance and for the Azure SQL Managed Instance that has the feature enabled.
| 60 GB | 600 GB | 800 GB |
Without Feature | 266 s | 1718 s | 5048 s |
With Feature enabled | 155 s | 704 s | 2054 s |
We went a step further, experimenting with the 800 GB database and tested different situations that included not just a fresh FULL backup but also such configurations as FULL backup with a number of Transaction Log backups, FULL and DIFFERENTIAL and Transaction Log backups. The observed results can be seen in the table below:
| Full only | Full + logs | Full + Diff + Logs |
Without Feature | 84 min | 106 min | 120 min |
With Feature enabled | 34 min | 46 min | 90 min |
Here are those results visualized for better understanding of the impact:
Exact benefits are very specific to the configuration and workload of each Azure SQL Managed Instance. On the General Purpose service tier, the exact size of database data and log files directly impacts the benefit, as it does with any kind of workload. If you are interested in more details, please consult our respective documentation article How-to improve data loading performance on SQL Managed Instance with General Purpose service tier. Additionally, customers should be mindful of the exact geographical region of their backup file locations, and the number of files, as a high number of transaction log files significantly impact restore times, as well as the number of differential backups, and their size.
For the databases smaller than 1 TB in the General Purpose service tier, we expect database restoration speed to increase from 20% to 70%. For databases that are greater than 1 TB, expect restoration speed improvements between 30% to 70%.
However, overall, customers on both service tiers should see a performance improvement to their database backup restoration process – but the improvement will vary for each case.
So, what is the catch, you might ask…?
How can you get an Azure SQL Managed Instance with this feature?
How can you enable faster restores?
The best news is that this feature is coming right now to all of our customers, and they won’t have to enable it, their restore operations will simply start working faster.
This article is contributed. See the original author and article here.
CISA has released CISA Insights: Preparing Critical Infrastructure for Post-Quantum Cryptography, which outlines the actions that critical infrastructure stakeholders should take now to prepare for their future migration to the post-quantum cryptographic standard that the National Institute of Standards and Technology (NIST) will publish in 2024.
CISA strongly urges critical infrastructure stakeholders follow the recommendations in the Insights now to ensure a smooth migration to the post-quantum cryptography standard.
This article was originally posted by the FTC. See the original article here.
Brought to you by Dr. Ware, Microsoft Office 365 Silver Partner, Charleston SC.
This article is contributed. See the original author and article here.
VMware has released a security update to address a vulnerability in Tools. A remote attacker could likely exploit the vulnerability to take control of an affected system.
CISA encourages users and administrators to review VMware Security Advisory VMSA-2022-0024 and apply the necessary update.

This article is contributed. See the original author and article here.
Before we start, please note that if you want to see a table of contents for all the sections of this blog and their various Purview topics, you can locate them in the following link:
Microsoft Purview- Paint By Numbers Series (Part 0) – Overview – Microsoft Tech Community
This document is not meant to replace any official documentation, including those found at docs.microsoft.com. Those documents are continually updated and maintained by Microsoft Corporation. If there is a discrepancy between this document and what you find in the Compliance User Interface (UI) or inside of a reference in docs.microsoft.com, you should always defer to that official documentation and contact your Microsoft Account team as needed. Links to the docs.microsoft.com data will be referenced both in the document steps as well as in the appendix.
All of the following steps should be done with test data, and where possible, testing should be performed in a test environment. Testing should never be performed against production data.
The Information Protection section of this blog series is aimed at Security and Compliance officers who need to properly label data, encrypt it where needed.
This document is meant to guide an administrator who is “net new” to Microsoft E5 Compliance through using Compliance Manager to run an assessment.
This document does not cover any other aspect of Microsoft E5 Purview, including:
It is presumed that you have a pre-existing understanding of what Microsoft E5 Compliance does and how to navigate the User Interface (UI).
For details on licensing (i.e. which components and functions of Purview are in E3 vs E5) you will need to contact your Microsoft Security Specialist, Account Manager, or certified partner.
This document will give a brief explanation of Compliance Manager and walk you through the basic tabs and aspects of the tool
An administrator wants to run their first Compliance Manager assessment.
Types of Assessments in Compliance Manager:
This is taken from the official Microsoft documentation (see the link in the Appendix and Links section):
“Compliance Manger can be used to assess different types of products. All templates, except the Microsoft Data Protection Baseline default template, come in two versions:
Assessments from universal templates are more generalized but offer expanded versatility, since they can help you easily track your organization’s compliance across multiple products.
Note that US Government Community (GCC) Moderate, GCC High, and Department of Defense (DoD) customers cannot currently use universal templates.”
Note – for this blog entry, we will not be running any further discussions or comparisons on Microsoft and/or Universal assessments.
It is recommended you read the official Microsoft documentation on Compliance Manager and the Paint By Numbers – Compliance Manager – Overview (Part 9a) blog.
Now that you have a basic understanding of Compliance Manager (See Part 9a – Compliance Manager – Overview blog entry), we will add an assessment.
“When you create an assessment, you’ll need to assign it to a group. Groups are containers that allow you to organize assessments in a way that is logical to you, such as by year or regulation, or based on your organization’s divisions or geographies.”
We will start with the Overview section of the assessment on the left-hand side.
This tab covers the controls and Control Families that are needed to meet your regulation/certification. Controls are the various requirements in your tenant that must be met to meet a part of an assessment. A Control Family is a grouping of Controls. This will be visible in the top section.
Top section:
In this example, there are 4 Controls Families. You can see by the color if something is done (colored) or not done (grey).
Bottom section:
In the bottom section, you will be able see the Control Family and under each, a Control.
This tab will show you ALL the improvements you can make to help meet your regulation/certification needs. Here is a sample screenshot.
If you click on any of these actions, it will take you to the Improvement Action.
Listed here are all the items Microsoft will make sure are secured in your tenant.
Here is the link Microsoft Purview- Paint By Numbers Series (Part 9c) – Compliance Manager – Improvement Actions – Microsoft Tech Community
Microsoft Purview Compliance Manager – Microsoft Purview (compliance) | Microsoft Docs
Note: This solution is a sample and may be used with Microsoft Compliance tools for dissemination of reference information only. This solution is not intended or made available for use as a replacement for professional and individualized technical advice from Microsoft or a Microsoft certified partner when it comes to the implementation of a compliance and/or advanced eDiscovery solution and no license or right is granted by Microsoft to use this solution for such purposes. This solution is not designed or intended to be a substitute for professional technical advice from Microsoft or a Microsoft certified partner when it comes to the design or implementation of a compliance and/or advanced eDiscovery solution and should not be used as such. Customer bears the sole risk and responsibility for any use. Microsoft does not warrant that the solution or any materials provided in connection therewith will be sufficient for any business purposes or meet the business requirements of any person or organization.
This article is contributed. See the original author and article here.
Mozilla has released security updates to address vulnerabilities in Firefox, Firefox ESR, and Thunderbird. An attacker could exploit some of these vulnerabilities to take control of an affected system.
CISA encourages users and administrators to review the Mozilla security advisories for Firefox 104, Firefox ESR 91.13, Firefox ESR 102.2 and Thunderbird 91.13, Thunderbird 102.2 and apply the necessary updates.
This article was originally posted by the FTC. See the original article here.
Brought to you by Dr. Ware, Microsoft Office 365 Silver Partner, Charleston SC.
This article is contributed. See the original author and article here.
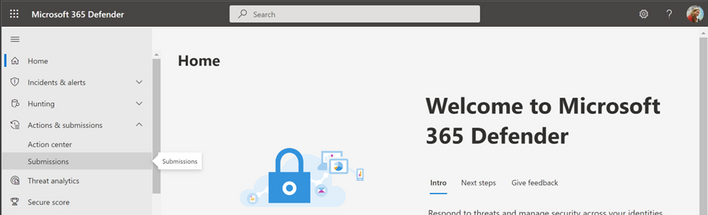
We are excited to announce that you can now block suspicious entities when submitting emails, URLs, or attachments for Microsoft to review. In the Microsoft 365 Defender portal (https://security.microsoft.com), security operations team can now block the sender or domain, URL or attachment while submitting suspicious emails, URLs or attachments from the admin submission flyout panel. You’ll no longer need to switch to the Tenant allow/block list page to block a suspicious entity.
Let’s look at how it works!
From the Emails tab under the submissions portal in Actions & submissions in the Microsoft 365 Defender portal, select Submit to Microsoft for analysis to report phishing, malware or spam email. You can choose to block the sender or domain and provide block expiry date and optional notes. Make sure that you have the required permissions before submitting to Microsoft.
To learn more about blocking email addresses or domains in Tenant allow/block list, See Allow or block emails using the Tenant Allow/Block List.
From the URLs tab under the submissions portal in Actions & submissions in the Microsoft 365 Defender portal, select Submit to Microsoft for analysis to report phishing or malware URL. You can choose to block the URL and provide block expiry date and optional notes. Make sure that you have the required permissions before submitting to Microsoft.
To learn more about blocking urls in Tenant allow/block list, see Allow or block URLs using the Tenant Allow/Block List.
From the Email attachments tab, under the submissions portal in Actions & submissions in the Microsoft 365 Defender portal, select Submit to Microsoft for analysis to report phishing or malware email attachment. You can choose to block the email attachment and provide block expiry date and optional notes. Make sure that you have the required permissions before submitting to Microsoft.
To learn more about blocking email attachment in Tenant allow/block list, see Allow or block files using the Tenant Allow/Block List.
All of the blocked entities created from the admin submission panel for URL, email attachment and emails will show up in Tenant allow/block list under the URL, file and Domains & addresses tab, respectively.
To learn more about Tenant allow/block list, see View entries in the Tenant Allow/Block List.
All other aspects of the submission experience, such as submitting a sample for analysis and viewing the results, remain as it is.
The experience will start rolling out by the end of August. You can expect to see these changes over the next few weeks. The new submissions experience will be available to customers with Exchange Online Protection, Defender for Office 365 Plan 1, Defender for Office 365 Plan 2, including those with Office 365 E5, Microsoft 365 E5, or Microsoft 365 E5 Security licenses.
We’re excited for you to try out these new capabilities. Let us know what you think using the Defender for Office 365 forum.


Recent Comments