
Revolutionize customer service with next-generation AI
This article is contributed. See the original author and article here.
We’re entering the era of next-generation AI that is driving new levels of productivity and efficiency, unleashing new innovations in the customer service space. AI is profoundly changing how customers engage with businesses and how agents provide exceptional service to them.
From a service perspective, customers expect fast, accurate answers to their questions, and personalized help when they contact a business. Meanwhile, businesses are under pressure to provide exceptional customer service with fewer resources. Legacy ways of integrating multiple-point solutions for customer service do not work. The time to embark on a digital transformation journey is now. Choosing the right AI-powered customer service solution for that journey, empowering customer service agents with AI, and reducing costs has never been more important.
We’re excited to launch Copilot in Dynamics 365 Customer Service, which provides agents with real-time AI-powered assistance, developed in alignment with our responsible AI principles and standards. Copilot helps agents resolve issues faster, handle cases more efficiently, and automate time-consuming tasks so they can focus on delivering high-quality service to their customers. In a nutshell, Copilot can help every agent to become your best agent.
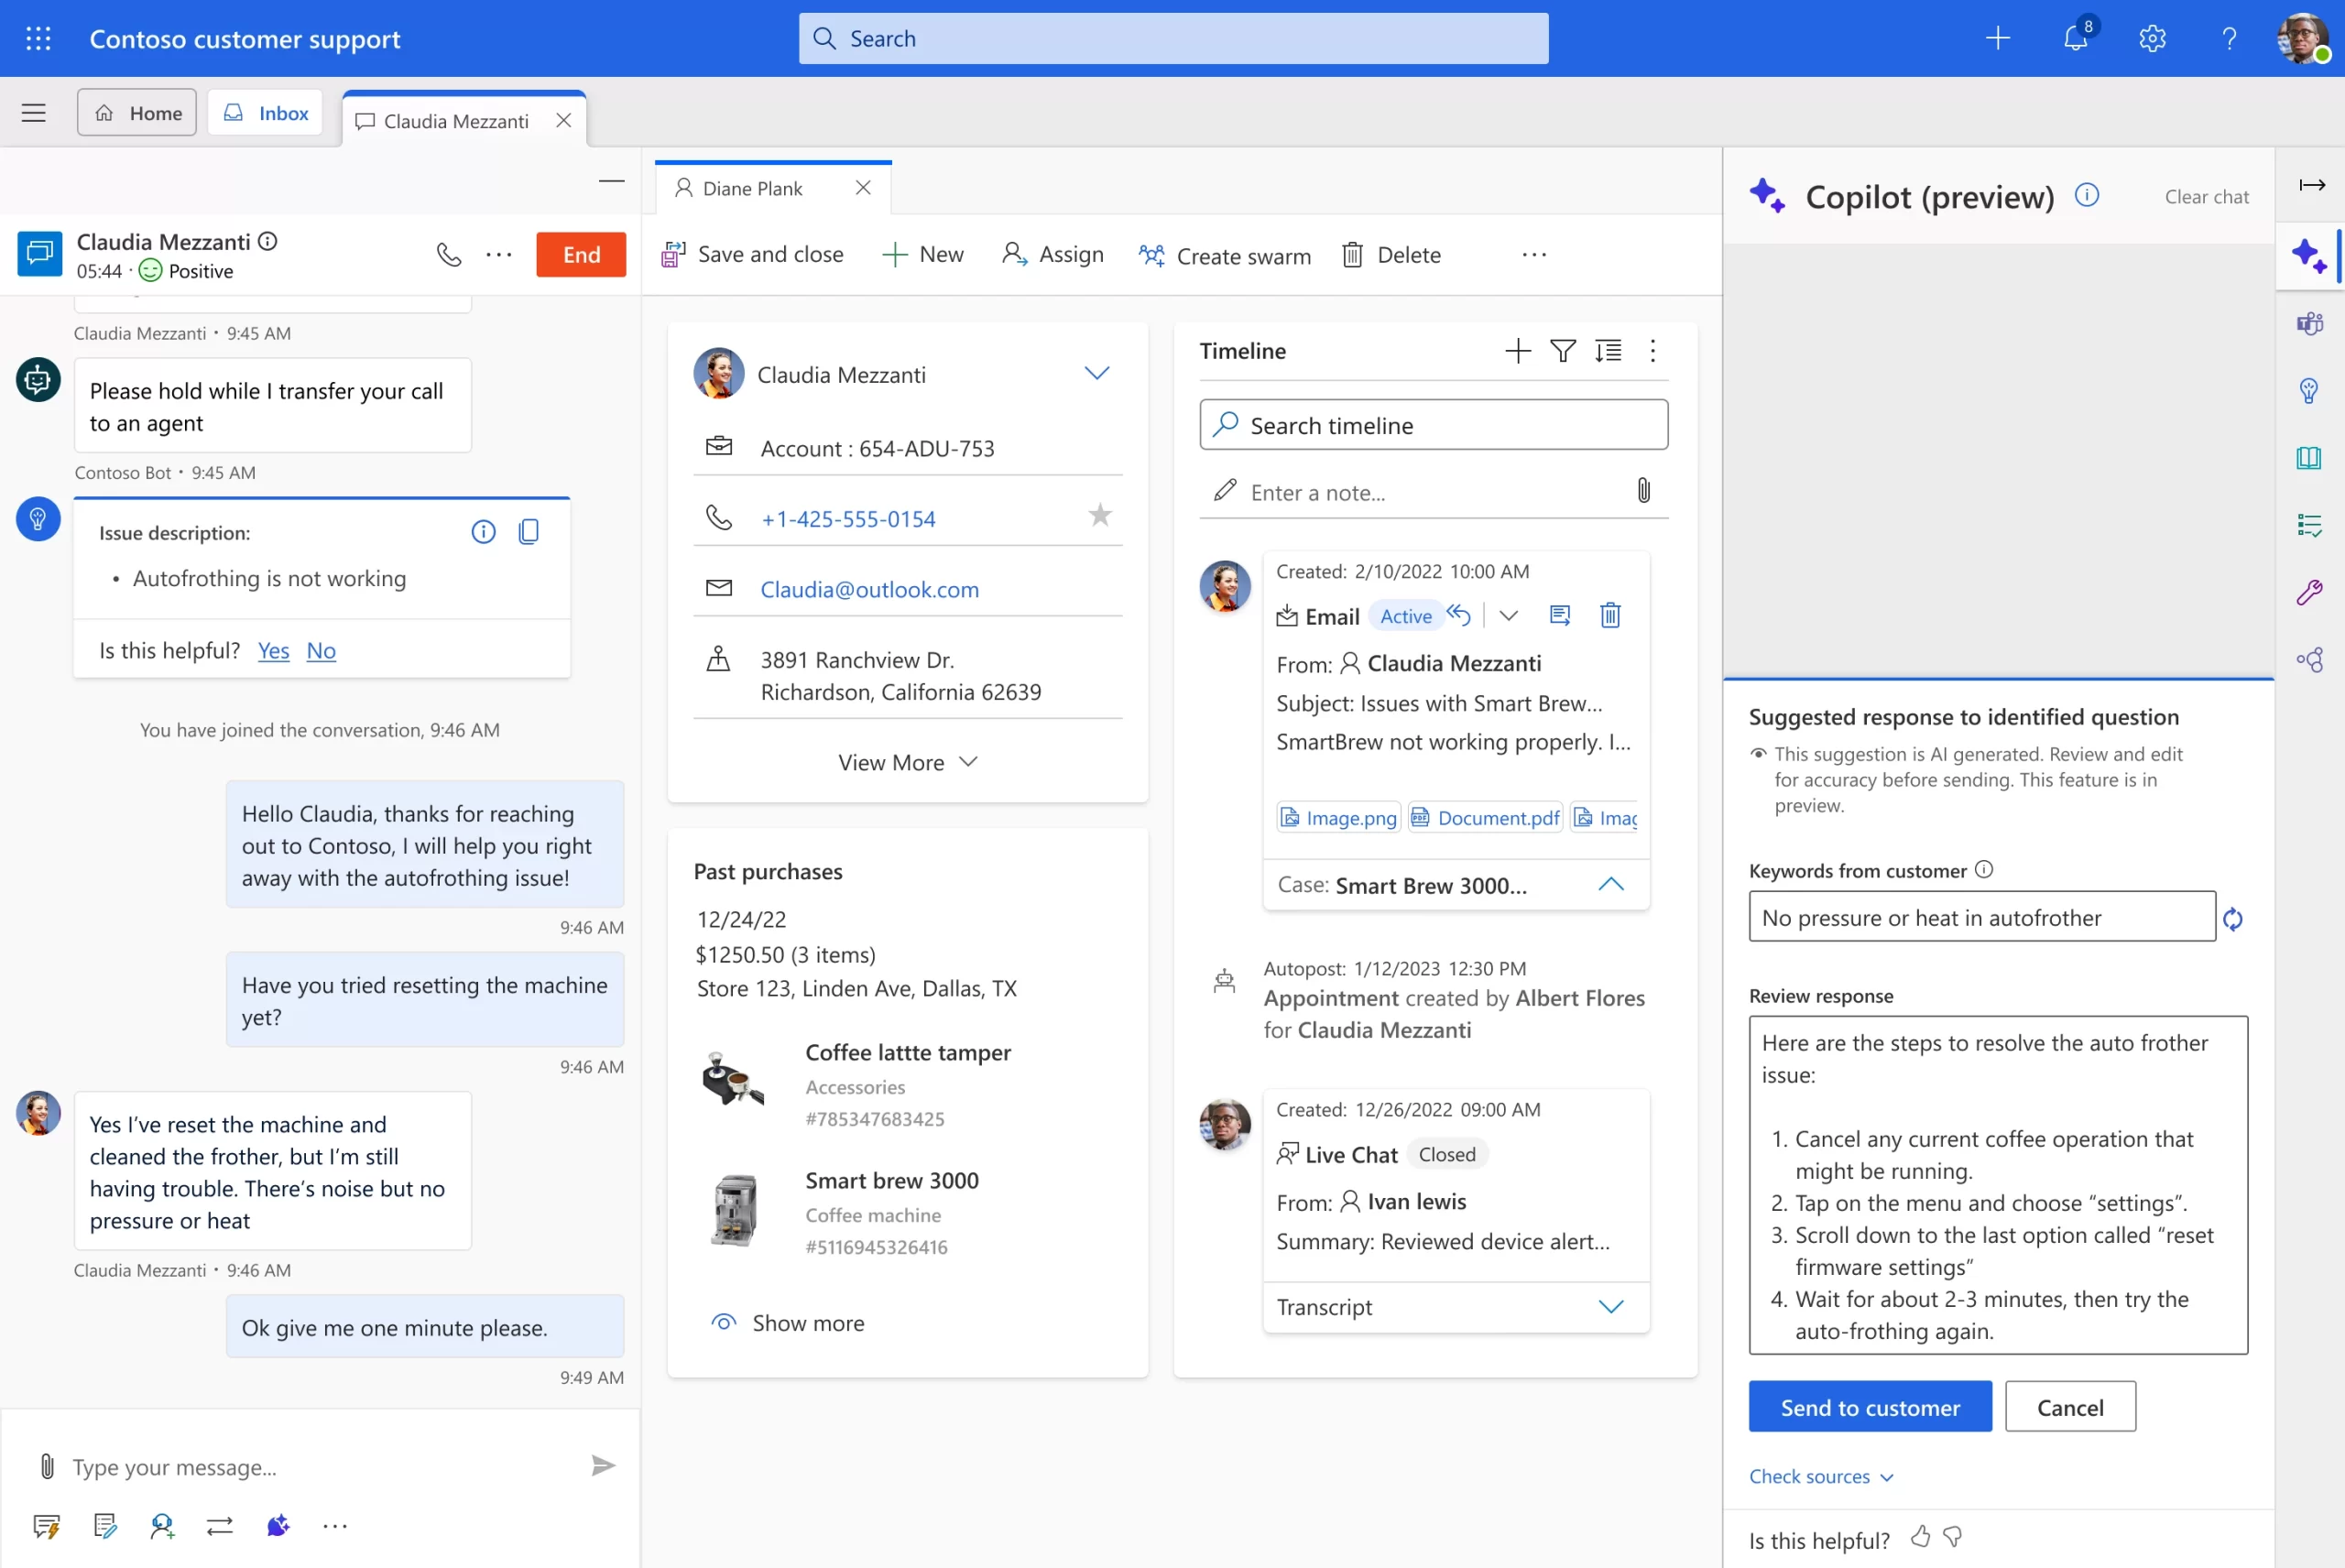
With just a click of a button, Copilot empowers any agent to obtain the most relevant answer to any complex question that a customer may have and deliver a tailored response to the customer in real time using chat messages and emails. Copilot is available to agents as part of their natural flow of solving problems using Customer Service workspace. It’s like having an expert at your fingertips, always ready to assist.
Let’s take a closer look at the ways Copilot revolutionizes customer service and enables agents to deliver fast and relevant resolutions to customer problems.
Make every customer service agent a superagent
Today, when agents get a question from a customer that they can’t answer immediately, they typically search multiple internal knowledge sources or try to find an internal expert to consult with. The amount of time it takes to read through search results, find the right solution, compose a response back to the customer, and resolve the case is often lengthy.
Now, agents can chat with the next-generation AI-powered Copilot in Dynamics 365 Customer Service right within Customer Service workspace. Copilot can diagnose customer problems, use the organization’s internal knowledge and vast amounts of data from trusted websites, and supply the agent with an appropriate solution to give to the customer.
Copilot analyzes customer data to identify patterns, anticipate customer needs, and make suggestions to the agent on how to best handle each interaction. With this powerful tool at their disposal, agents can handle more queries in less time, increasing efficiency and improving the overall customer experience. Since agents are always in the loop every step of the way, they are in full control of using AI to drive their productivity. Agents can verify the responses, check the resources, and personalize the message to match the customer’s specific needs to ensure their satisfaction and optimal experience.

Answer customer questions fast across channels
In today’s fragmented contact center solution space, agents are often inundated with multiple messages on different channels of engagement. They are overwhelmed by multitasking and context switching, often wondering how they can keep up with overflowing incoming requests.
With omnichannel capabilities in Dynamics 365 Customer Service, customer service agents get a streamlined view of incoming chats from a variety of channels (such as Apple Messages for Business, Google Business Messaging, text messages, and WhatsApp) integrated with case management. Agents can now use Copilot in Dynamics 365 Customer Service, which intelligently parses information from the conversation and contextualizes it with organizational and customer data. Furthermore, Copilot keeps track of historical interactions, and uses all of that information to recommend a tailored, helpful answer that agents can review before they respond. Customers get the best service, regardless of their choice of channel.
Send expertly crafted customer service emails
For agents who receive questions via email, Copilot in Dynamics 365 Customer Service can help create relevant and personalized email responses in seconds. Copilot provides agents with predefined prompts based on what the agent is trying to do, such as “suggest a call”, “request more information”, “empathize with feedback”, or “resolve the customer’s problem.” Agents can also provide their own custom prompt for more complex issues.
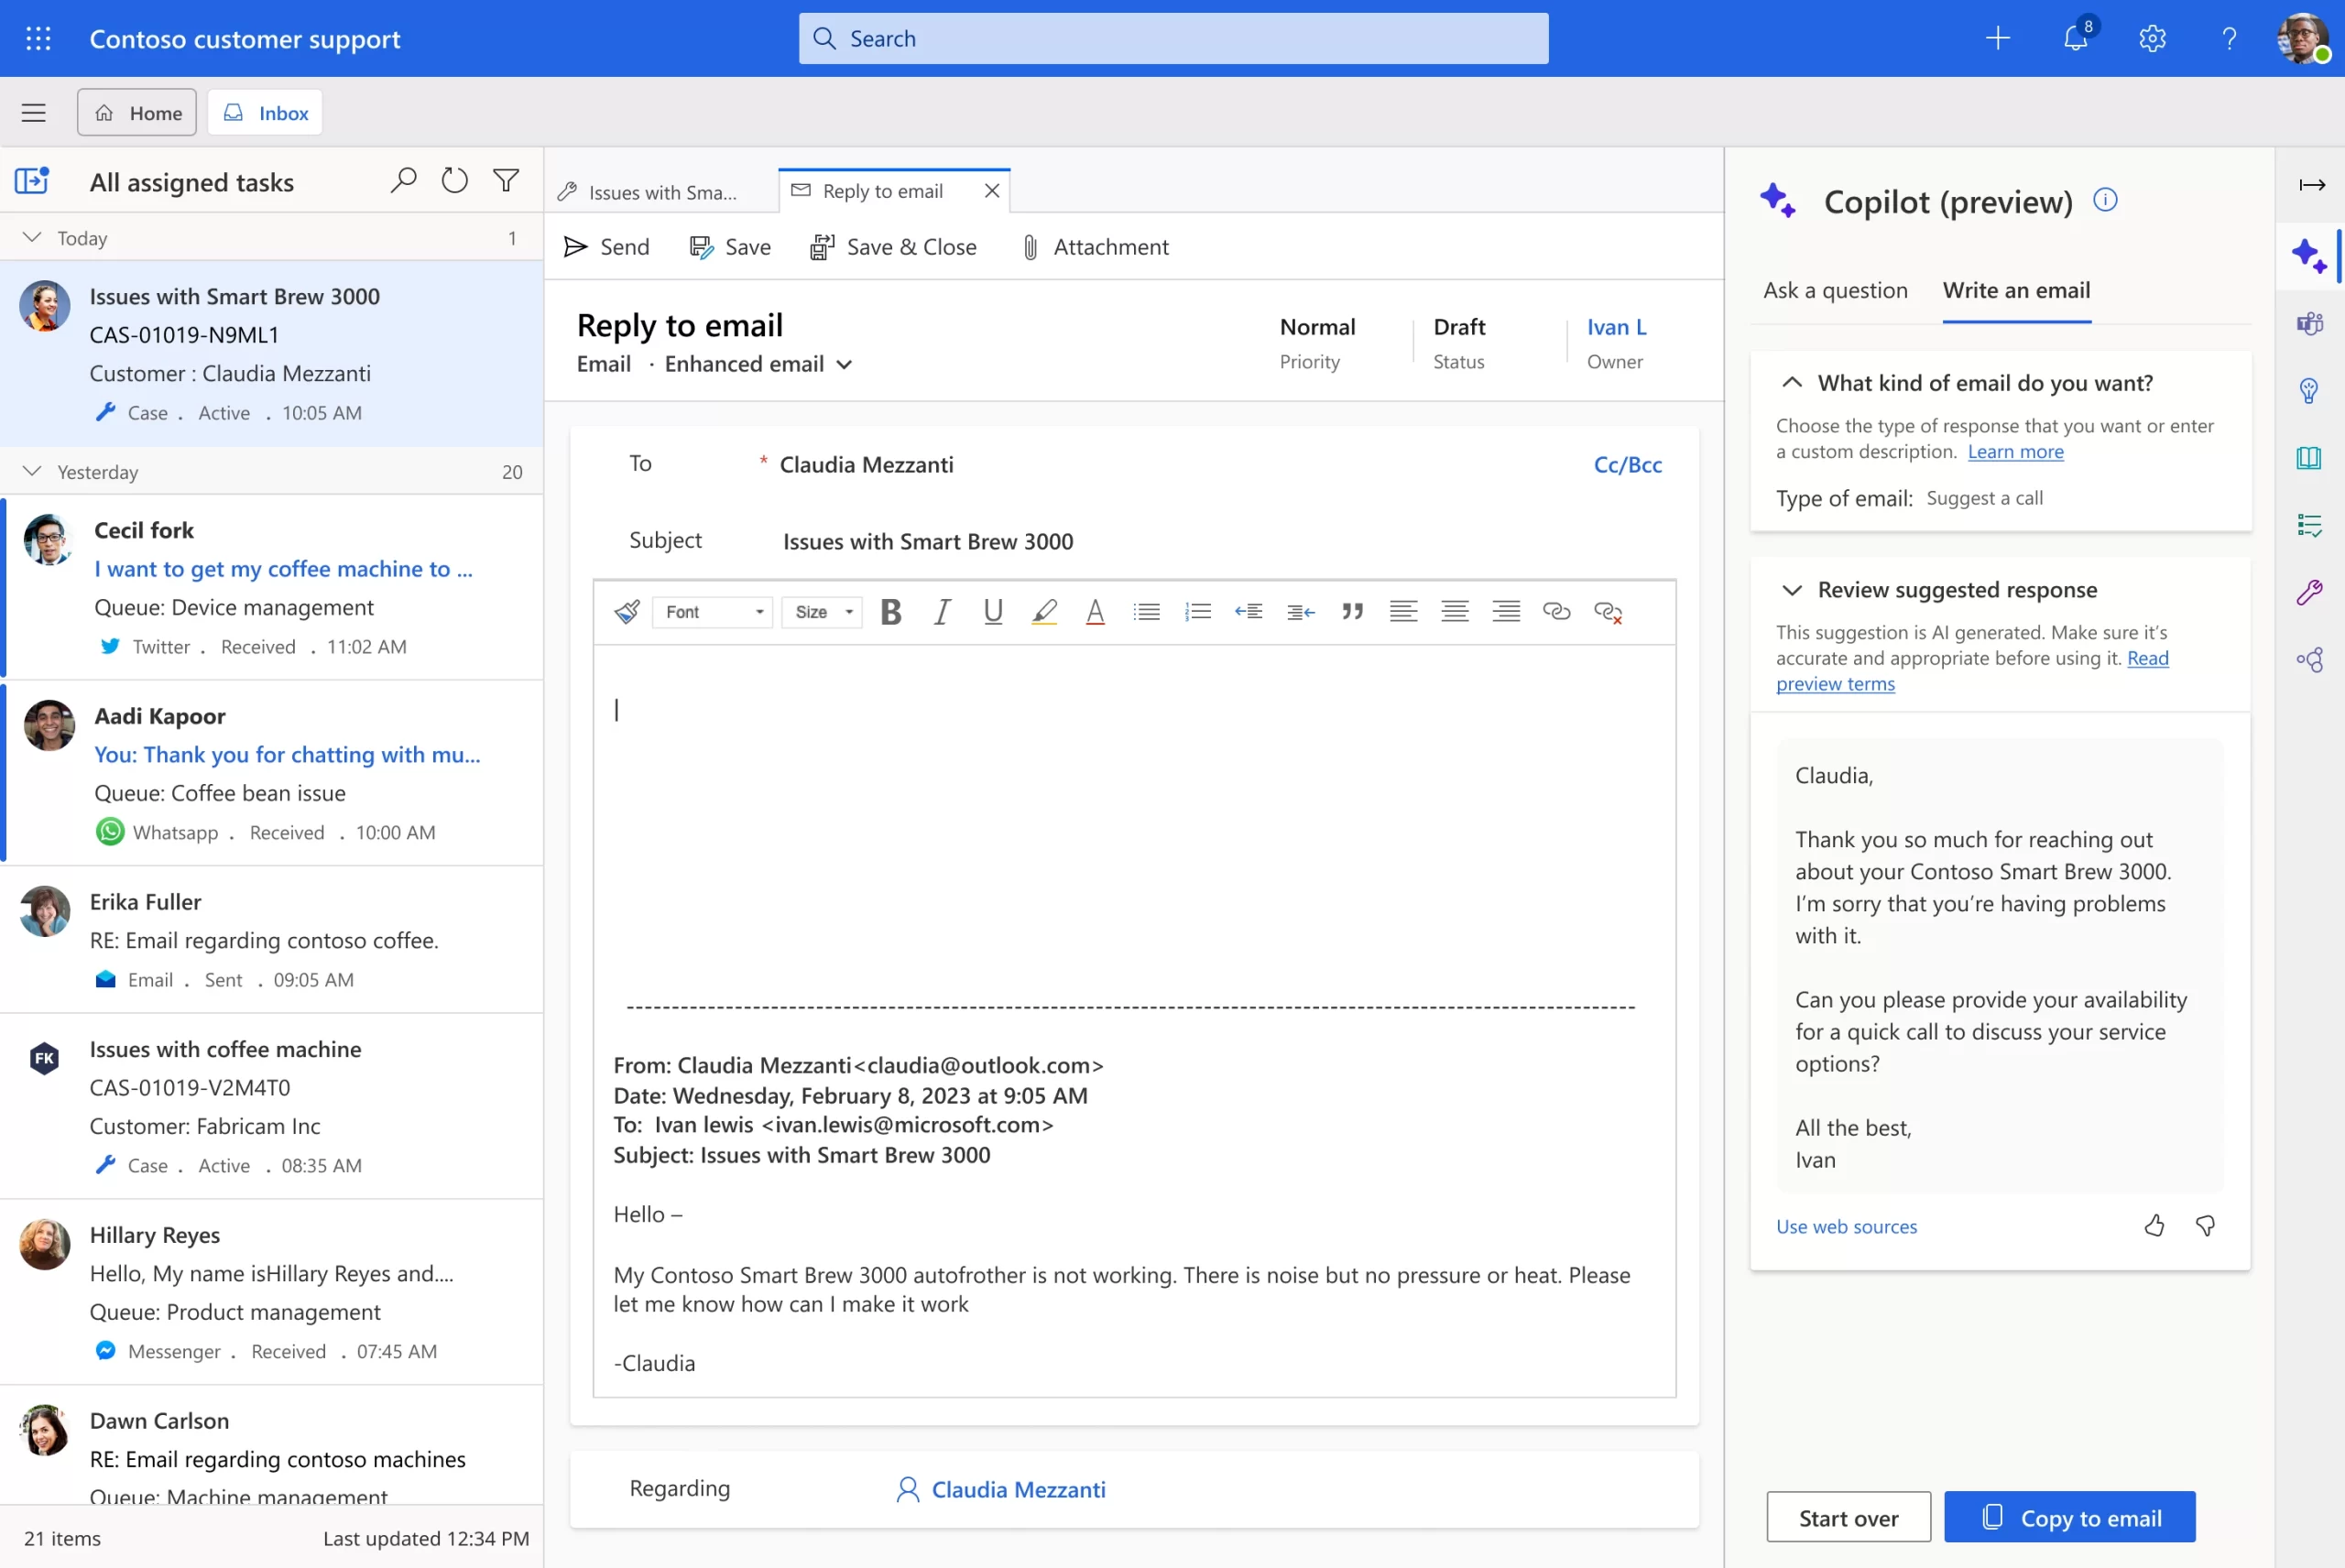
Normally, agents may spend many minutes or hours researching and composing a detailed email with all the necessary information. With Copilot, agents get a composed email response in an instant that they can review and send.This model drives unparalleled productivity for the agent and delivers personalized service for the customer.
This embed requires accepting cookies from the embed’s site to view the embed. Activate the link to accept cookies and view the embedded content.
Enrich self-service with AI-powered conversational assistance
Dynamics 365 Customer Service now offers a powerful conversational experience with Power Virtual Agents, boosted by next-generation AI capabilities. Customers can get relevant answers to their questions immediately from intelligent conversational bots that use trusted websites and internal data. Enterprises also have the choice of using Nuance as an on-ramp for their digital transformation journey. Nuance announced new AI capabilities in Nuance Mix. Dynamics 365 Customer Service, together with Microsoft Teams, Microsoft Power Platform, Nuance, and Microsoft Azure, deliver truly transformative experiences for both agents and customers through the contact center.
Next-generation AI that is ready for enterprises
Azure OpenAI Service offers a range of privacy features, including data encryption and secure storage. It also allows users to control access to their data and provides detailed auditing and monitoring capabilities. Dynamics 365 is built on Azure OpenAI, so enterprises can rest assured that it offers the same level of data privacy and protection.
AI solutions built responsibly
We are committed to creating responsible AI by design. Our work is guided by a core set of principles: fairness, reliability and safety, privacy and security, inclusiveness, transparency, and accountability. We are putting those principles into practice across the company to develop and deploy AI that will have a positive impact on society.
Try Copilot in Dynamics 365 Customer Service
Sign up for the limited preview of Copilot in Dynamics 365 Customer Service. This preview is available for instances in North America using the English US language.

Microsoft Business Applications Launch Event
On April 4, discover innovations across Microsoft Dynamics 365 and Microsoft Power Platform at a digital event.
The post Revolutionize customer service with next-generation AI appeared first on Microsoft Dynamics 365 Blog.
Brought to you by Dr. Ware, Microsoft Office 365 Silver Partner, Charleston SC.


Recent Comments