This article is contributed. See the original author and article here.
The advent of next-generation Artificial Intelligence(AI) is ushering in a new era of heightened productivity and efficiency. This is spurring novel breakthroughs in the supply chain domain. With AI’s transformative influence, the conventional ways of operations managers collaborating with suppliers, vendors, and third-party service providers are being revamped to streamline the entire process.
By collaborating with suppliers and utilizing state-of-the-art AI, Supply Chain managers can enhance supply chain performance and avert logistics disruptions triggered by diverse external factors.
We’re excited to launch Copilot in Microsoft Supply Chain Center, which harnesses generative AI to assist Supply Chain managers in real-time communication with suppliers regarding specific news.
Copilot in Microsoft Supply Chain Center
Over the last few years, numerous companies have realized that their existing supply chain technologies are inadequate to cope with the current environment marked by frequent disruptions, limitations, and scarcities. By leveraging AI-powered supply chain management, businesses can gain unparalleled visibility and invaluable insights, enabling them to proactively address potential disruptions before they materialize.
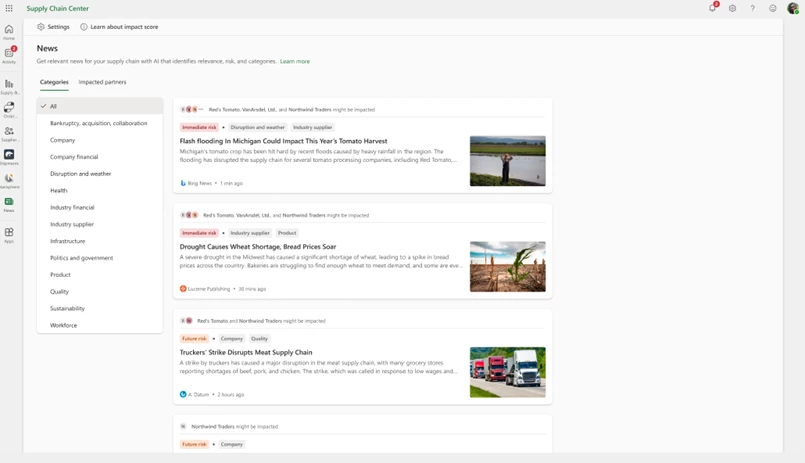
Copilot in Microsoft Supply Chain Centerallows for proactive identification of external issues related to weather, finance, and geopolitics that could impact critical supply chain processes.
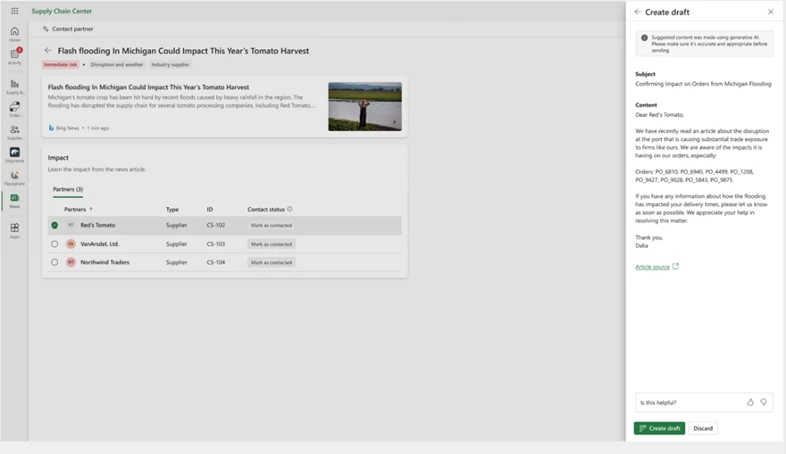
Predictive insights surface impacted orders, and Copilot helps take action on this insight with contextualized email drafts. This enables supply chain users to collaborate with impacted suppliers in real-time to quickly identify new estimated times of arrival and reroute purchase orders based on weather disruptions or geopolitical tensions.
Organizations can collaborate with their suppliers through customized and contextualized responses to fulfill high-priority customer orders via alternate distribution centers, which ultimately streamline operations and save time. By harnessing the power of generative AI and collaboration, Copilot in Microsoft Supply Chain Center helps Supply Chain managers maintain optimal supply chain performance while also mitigating potential disruptions.
Understanding the functionality of Copilot in Microsoft Supply Chain Center
At present, we are leveraging Copilot to streamline communication regarding supplier news. However, our plan is to expand its application to other areas of our product in the future.
Experience the capabilities of Copilot in Microsoft’s Supply Chain Center by viewing the demonstration video below
This embed requires accepting cookies from the embed’s site to view the embed. Activate the link to accept cookies and view the embedded content.
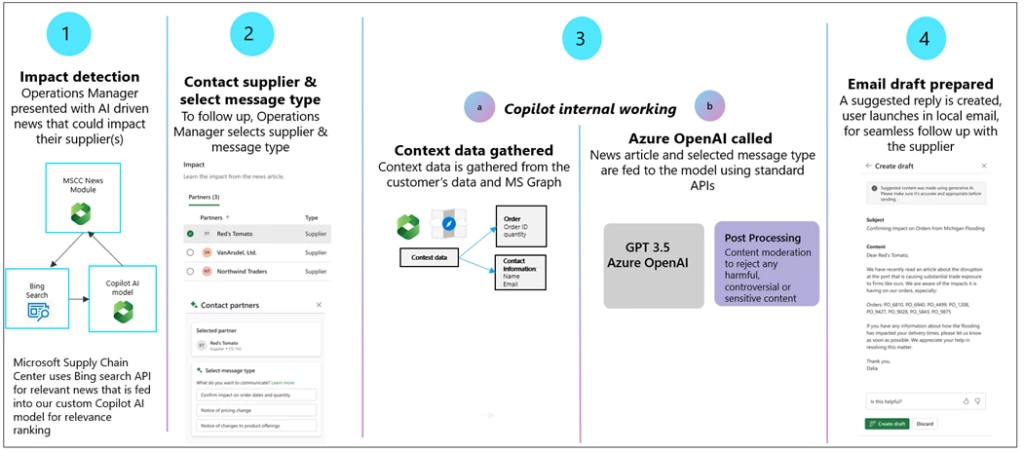
The following four-step process outlines how supplier news communication is facilitated, as shown in the accompanying diagram:
Relevant AI-driven news articles that may impact suppliers are presented to operations managers through Bing Search and our custom Copilot AI model.
Customers initiate collaboration by selecting a supplier and the message type (ex, confirm impact on orders etc.) that they wish to send via email.
Copilot gathers relevant contextual data and calls Azure Open AI (GPT 3.5) for internal processing. As part of Microsoft’s commitment to Responsible AI, any generated response passes through a series of checks before being returned to a user. These checks include a series of relevance scores to ensure messages are on-topic and Content Moderation to detect any harmful, controversial, or sensitive content. Though they cannot fully replace human review, such guard rails help ensure the quality of communication via Copilot.
An email draft is prepared.
Next-generation AI that is ready for enterprises.
Azure OpenAI Service offers a range of privacy features, including data encryption and secure storage. It also allows users to control access to their data and provides detailed auditing and monitoring capabilities. Dynamics 365 is built on Azure OpenAI, so enterprises can rest assured that it offers the same level of data privacy and protection.
AI solutions built responsibly.
We are committed to creating responsible AI by design. Our work is guided by a core set of principles: fairness, reliability and safety, privacy and security, inclusiveness, transparency, and accountability. We are putting those principles into practice across the company to develop and deploy AI that will have a positive impact on society.
Try Copilot in Microsoft Supply Chain Center
Sign up for the limited preview of Copilot in Microsoft Supply Chain Center. This preview is available for instances in North America using the English US language.
Conclusion:
In conclusion, the use of generative AI in the form of Copilot in Microsoft Supply Chain Center can significantly optimize supply chain productivity and prevent disruptions caused by external factors. The tool’s ability to proactively identify issues and provide predictive insights allows for swift action and collaboration with suppliers, leading to more efficient and cost-effective supply chain management. Furthermore, the implementation of responsible AI practices ensures the quality of communication via Copilot. Through proactive supplier collaboration, organizations can achieve greater supply chain resilience, agility, and competitive advantage. Interested parties can learn more about Copilot by viewing the demonstration video or signing up for the waitlist.
This article is contributed. See the original author and article here.
Today, we announced Microsoft 365 Copilot—your copilot for work. Copilot combines the power of large language models with your data in the Microsoft 365 apps and Microsoft Graph to turn your words into the most powerful productivity tool on the planet. And it does so within our existing commitments to data security and privacy in the enterprise.
This article is contributed. See the original author and article here.
Since first announcing new AI-powered experiences for Microsoft Viva Sales last month, we’ve given these capabilities a nameCopilot in Viva Salesand introduced new sales scenarios and updates.
All of this is happening in conjunction with the introduction of Dynamics 365 Copilotthe world’s-first AI copilot in both customer relationship management (CRM) platforms and finance applications enterprise resource planning (ERP). To date, tens of thousands of customers have used next-generation AI capabilities in Dynamics 365 Copilot and within Microsoft Power Platform.
Today’s debut of Microsoft 365 Copilot powers even more ways to unleash creativity, unlock productivity, and uplevel skills. For sellers, the seamless integration of Copilot across Microsoft 365 and Viva Sales (as well as AI-powered capabilities in Microsoft Dynamics 365 Sales) is a powerful combination. It’s a new way to engage prospects and customers, all while freeing up time previously tied up in “busy work”like composing every email from scratch.
As we move into a new era for customer experience, we want to ensure that salespeople feel empowered to focus on what matters, which is deeper engagements with customers. Let’s take a closer look at some of the Copilot capabilities in Viva Sales that make this possible.
Try Viva Sales Today
Use Viva Sales to help sellers be more efficient, productive, and effective.
Copilot in Viva Sales automated email replies is now generally available
With Copilot in Viva Sales, AI-generated email replies have now moved from preview into general availability, with more features and enhancements built into the generated response. Here are some of the new additions we’ve made:
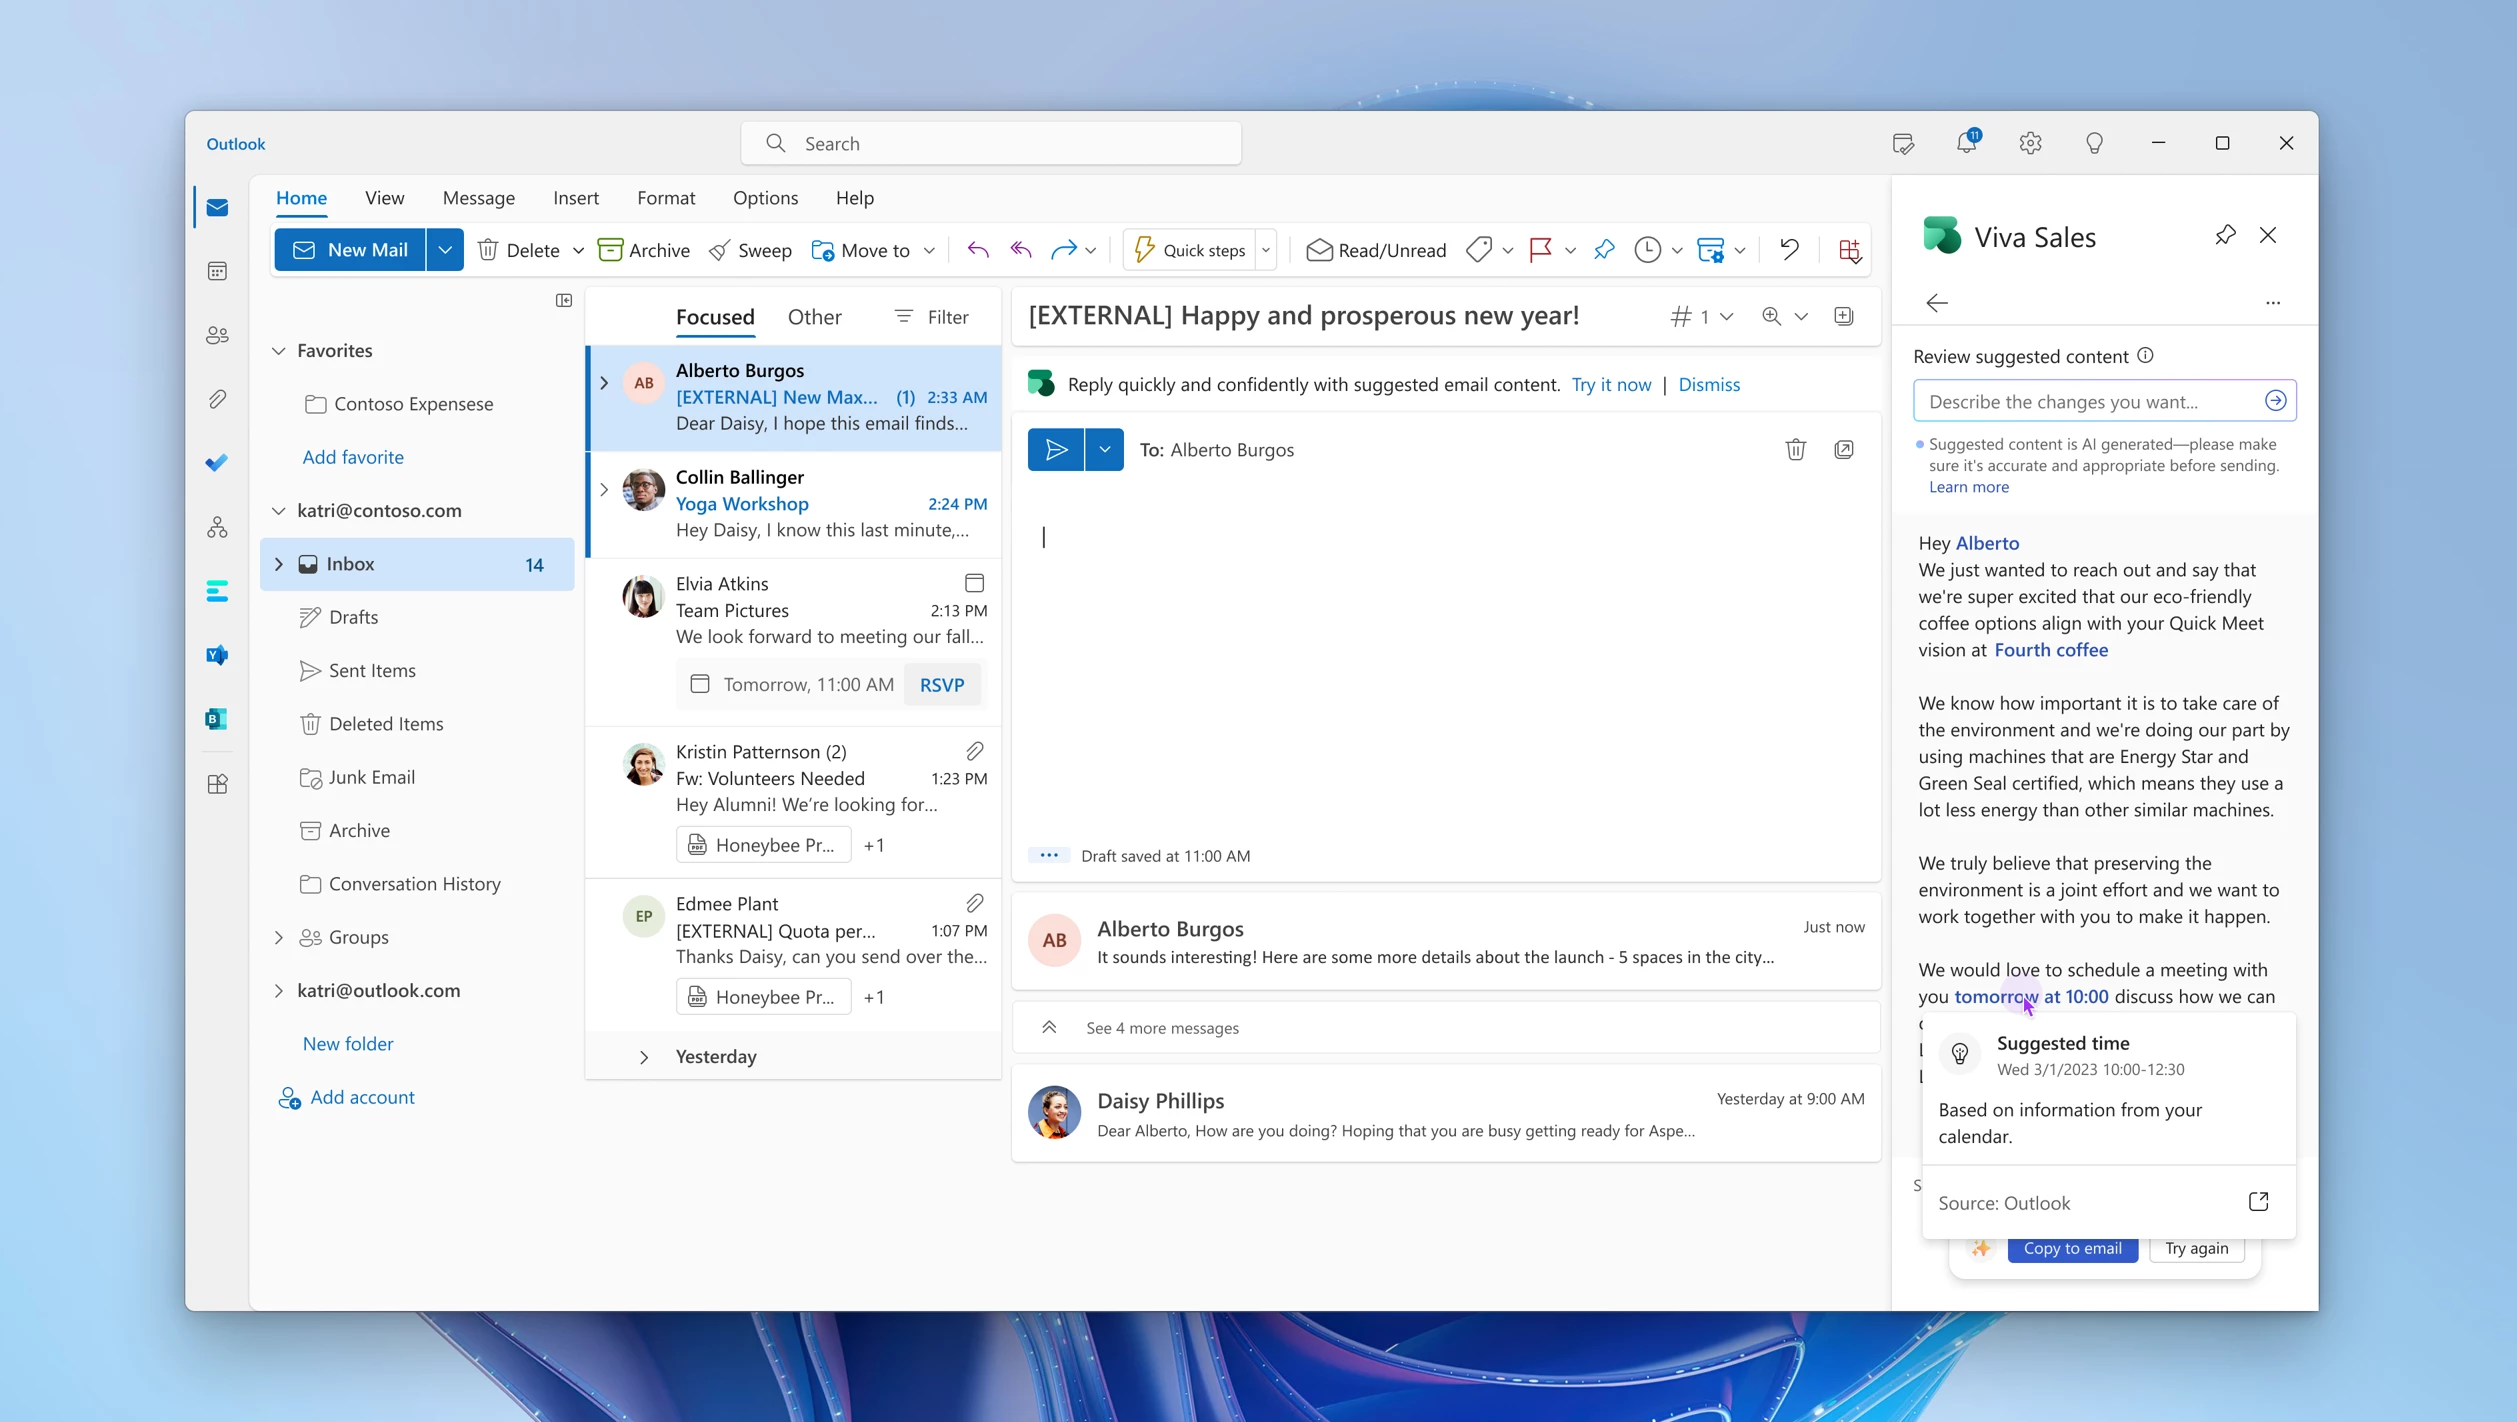
Generate replies with proposed meeting times: Sellers can now generate email replies with proposed meeting times based on their calendar availability in Outlook, making it easier to schedule customer meetings and simplifying the process for finding a time that works for everyone.
Build upon generated replies by providing additional prompts: To make modifications to the generated reply, sellers can refine the results further by providing a new prompt that builds upon the previous suggestion. This allows sellers to more easily fine-tune their email replies according to their unique needs and preferences.
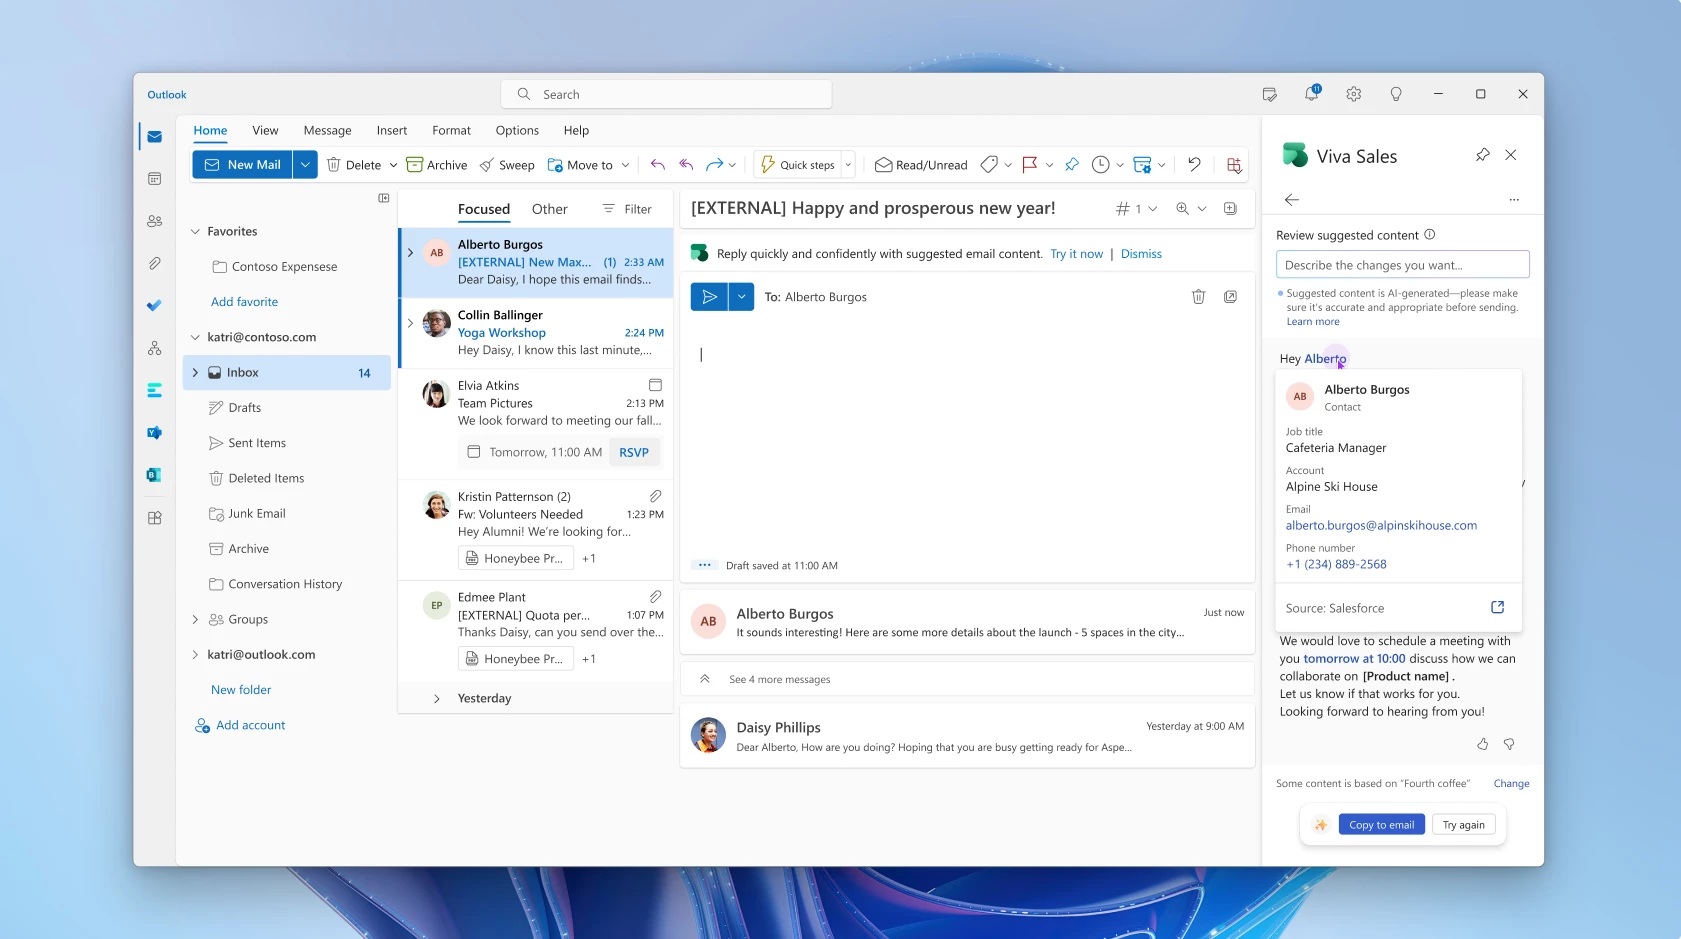
Understand the data sources behind generated replies: Sellers can now hover over any highlighted areas of text to view the data sources behind generated replies. This provides sellers with valuable context and transparency regarding where the embedded information comes from, such as any previous meetings or sales data from the CRM.
Improve future replies by providing feedback: Finally, a new feedback mechanism allows sellers to rate the AI-generated content with a thumbs-up or thumbs-down. This helps refine and improve future replies to ensure that Viva Sales continues to adapt to the unique needs of each seller.
Meeting summarization: Quickly and easily send follow-up emails after meetings
One of the best practices for sellers is to follow up on meetings and customer interactions with a clear summary, including the relevant action items or next steps. This takes time to compile, and in the busy world of a seller, manual tasks like this can take days to get to, or are sometimes forgotten. We want to increase the buyer-seller connection by providing quick seller responsiveness, demonstrating the priority of the relationship without needing to hunt out the information to create a personalized response.
With the help of Copilot in Viva Sales, alongside the insight from the call and CRM, we can automate to help jump-start the seller into action.
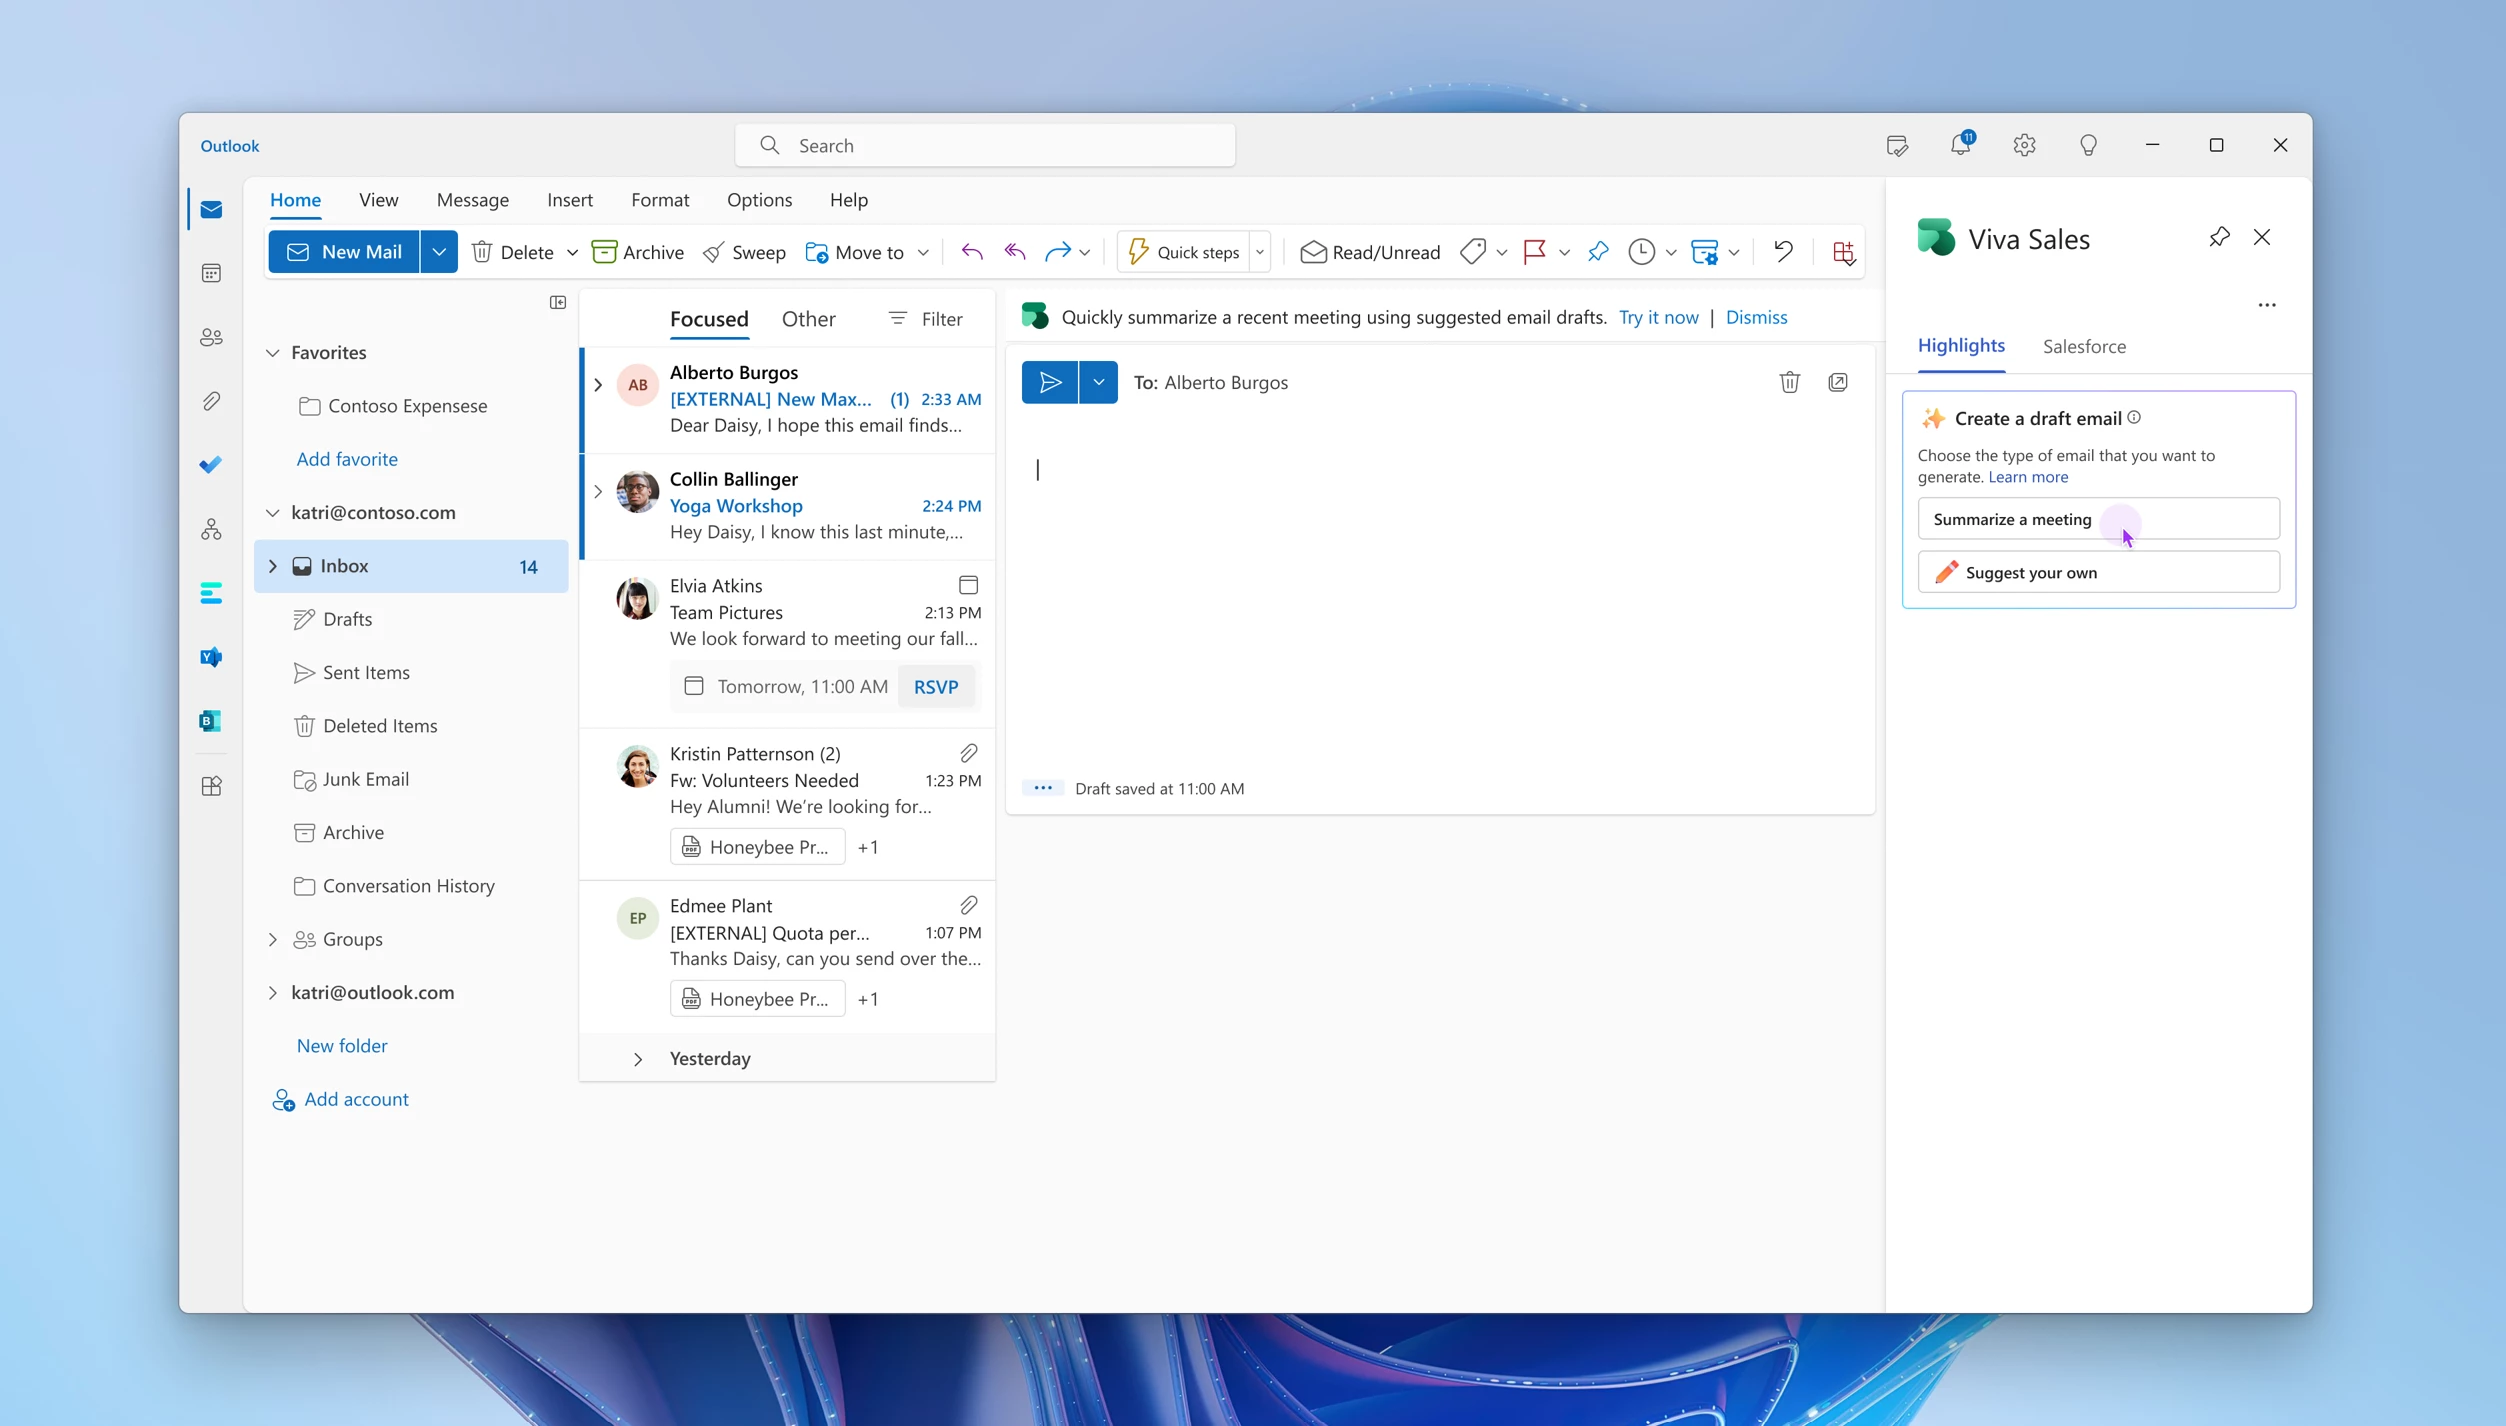
We use the existing conversation intelligence technology in Viva Sales to provide sellers with meeting insights, together with CRM data and the GPT copilot technology. This creates a super-simple way for sellers to generate meaningful meeting summaries:
Start composing an email and launch Viva Sales.
Confirm the relevant meeting to get follow-up content.
Receive the summary email recommendation that refers to topics you discussed and action items you both committed to, and puts all of this in a well-formed email for your review. It even includes relevant data from your CRM to enrich the reference points.
Simply add the recommendation to your email, edit to your liking, and send.
The major difference between this experience from our intelligent meeting recaps in Microsoft Teams is how the magic happens in the seller’s inbox, connected to CRM data, in the context and tone of a customer conversation. There is no need to switch screens, and minimal email composition is required. The seller can make minor edits, all from within Outlook.
Watch the Copilot in Viva Sales demo below:
This embed requires accepting cookies from the embed’s site to view the embed. Activate the link to accept cookies and view the embedded content.
With a monthly release cycle, Viva Sales brings innovation to delight sellers. In addition to the above-mentioned features, we have some exciting updates due over the coming months.
Learn more about Viva Sales
Copilot in Viva Sales is a powerful AI-boosted application that can help sellers to be more efficient, productive, and effective. By providing personalized insights, automating routine tasks, and helping sellers to prioritize their efforts, the available solutions can help sellers to close more deals and grow their businesses. If you are a seller looking to take your sales game to the next level, consider giving Viva Sales a try.
If you are not yet a Viva Sales customer, check out our Viva Sales webpage where you can get a free 30-day trial.
Pricing and licensing can be found here, and note that all Microsoft Dynamics 365 Sales Enterprise and Premium licensed customers will have Viva Sales available at no additional cost.A great reason to get started today!
This article is contributed. See the original author and article here.
Hello everyone, I’m Basel Kablawi, PM on the Azure Edge and Platform – Core Networking team, here to announce the latest updates to the physical network switch requirements!
Our ecosystem of physical switches is designed to help ensure the compatibility and reliability of network switches with Azure Stack HCI, Microsoft’s hyperconverged infrastructure solution. By participating in this program, vendors can validate that their physical switches meet the network requirements for rock-solid interoperability with Azure Stack HCI solutions.
In this blog, we’ll discuss how we’re reclassifying the physical network switches that meet the requirements of Azure Stack HCIto answer the following questions, such as:
“Do I need a datacenter switch for every deployment architecture?”
“Does my management and compute switch need storage capabilities?”
“Are all 22H2 requirements needed for switchless configurations?”
And other related questions…
One of the core benefits of this program is helping you have a seamless deployment and operational experience. This eliminates the risk of switch compatibility issues that increase deployment and troubleshooting times. You know that when you select a physical switch, Azure Stack HCI has everything it needs for the highest quality experience.
Our previous approach required all devices to support each network requirement, regardless of the type of traffic the switch was used for. We heard your feedback, and this led us to update how we think about physical switches connected to Azure Stack HCI nodes.
What are we changing?
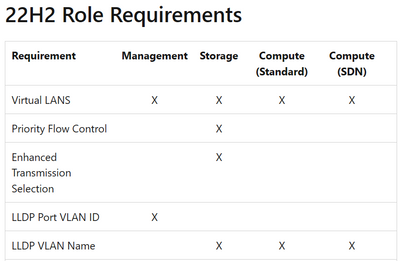
As with the recent change we made to network adapters, physical switches will now be aligned based on the traffic type that they carry. This means more, low-cost and high-quality devices will be available for selection over time. The traffic types are as follows:
Management traffic
Compute traffic – This can be broken down into two categories:
Standard virtual machine traffic
SDN enabled virtual machine traffic
Storage traffic
Here’s an example of the new structure which shows how the specific requirements map to a device carrying a certain type of network traffic:
For an updated mapping of the requirements, please see the documentation on our requirements page.
What does this mean for me?
This change is intended to expand our switch ecosystem by adding more validated switches.With this new approach, there is no more “one size fits all”. You simply pick a switch that has the required capabilities for your specific role types.
What if my switchisn’t listed in the catalog?
If you are utilizing a switch that currently is not on the list, please contact your physical switch vendor.
Is my device still validated for Azure Stack HCI?
All devices listed (21H2/22H2) at the time of this blog are still validated for Azure Stack HCI. Previously certified devices met all the requirements for each role type and as a result remain validated with these changes. All future devices will be validatedaccording to our updated requirements and testing tool results.
Summary
With the changes to our switch program, you can use the new validation structure to identify the best switches for your intended workloads, configuration, and more.
As always, if you have feedback, please leave a comment in the chat below.
This article is contributed. See the original author and article here.
With the rapid advance of Generative AI, as demonstrated by Microsoft, understandably folks are excited! Generative AI has tremendous promise in workload reduction in content creation. For folks working on company Intranets, organizational knowledge management, and more, the need for help is great. Oftentimes these are teams that have part-time roles and are often understaffed.
In this HLS Show Me How video I show how organizations can begin to leverage Microsoft Bing Generative AI with Microsoft Viva… today! Specifically, I show enhancing a Microsoft Viva Topics page with Generative AI content that can then be reviewed and edited. Although I show this action within Topics the same method is applicable in any aspect of Microsoft Viva, such as news in Connections, where content authoring is done.
*During the making of this video I show using the Developer Edition of Microsoft Edge. Literally as soon as I finished and went to post this using my production instance of the Microsoft Edge browser that edition was updated and now includes the Bing component with Generative AI!
This article is contributed. See the original author and article here.
It’s the dawn of a new era in customer experience where AI is transforming the way businesses connect with their audiences. Microsoft is proud to be at the forefront of this shift, using Azure OpenAI Service to empower marketers with new levels of efficiency and effectiveness. With Copilot in Microsoft Dynamics 365 Marketing and Dynamics 365 Customer Insights, marketers can now take advantage of the latest next-generation AI-powered tools to learn more about their customers, create targeted customer segments, and generate personalized content. These cutting-edge features increase productivity that could have taken hours or weeks to produce, empowering anyone on your team to uncover new data insights and create high-quality email content.
At Microsoft, we believe every business should have the ability to harness the power of next-generation AI. That’s why we’re excited about Copilot in Dynamics 365 and Azure OpenAI Service enabling our customers to do more with less by using these new technologies to be more productive. This is just the beginning, and we can’t wait to see where this technology will take us in the future. Here are just a few of the Copilot capabilities we will release in public preview in the coming weeks within Dynamics 365 Marketing and Customer Insights.
Discover more about your customers, faster
Today, customers expect hyper-personalization from the brands they interact with, which requires marketers to have a deep understanding of their customers. However, this knowledge is often locked away in data platforms and managed by data and analytics teams. Accessing this data and analyzing it using SQL queries can take weeks, delaying marketers from delivering the personalized experiences that customers demand.
The exciting new Copilot feature in Dynamics 365 Customer Insights allows data analysts and marketers to engage directly with customer data using natural language. This saves time for data analysts, allowing them to type the query in their own words instead of identifying the query in SQL. This feature democratizes access to insights, allowing marketers to ask questions using everyday language and receive instant answers, without needing to have the knowledge of SQL programming. With simple prompts, marketers can explore, understand, and predict customer preferences and needs in near real time, reducing the reliance on the data and analytics team to provide them with the customer insights they need.
Copilot enables marketers to create targeted customer experiences and interactions that are informed by data-driven decision making. With access to the natural language data discovery feature in Customer Insights, they can build confidence by validating and discovering customer insights for their marketing strategies. For example, a marketer can ask Copilot how many of their customers fit the profile of currently residing in Washington, DC, who are over the age of 25, who have also attended a promotional event in the last six months. With just a few clicks, Copilot will present the results of their query, including the number of customers that match the attributes or behaviors, as well as other useful information such as the customer lifetime value, product preferences, or average purchase price. Copilot in Dynamics 365 Customer Insights removes the barrier of needing to craft queries in SQL to get a deeper understanding of customers, enabling marketers to speed and scale the delivery of hyper-personalized experiences that customers expect.
This embed requires accepting cookies from the embed’s site to view the embed. Activate the link to accept cookies and view the embedded content.
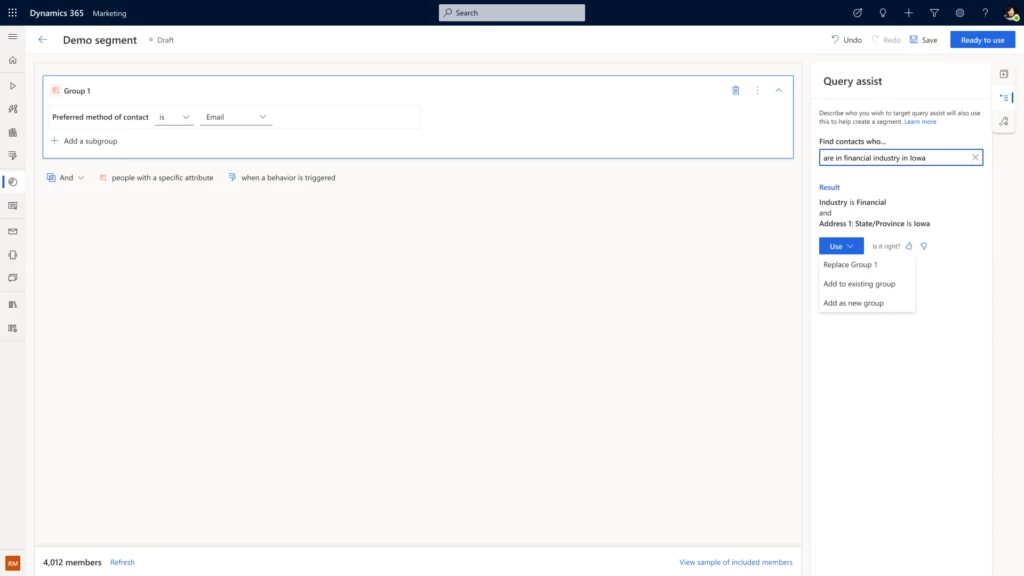
But that’s not allthe work to target the right audience just got easier for marketers, as they can now bypass the time-consuming process of manually building customer segments. With query assist, a new Copilot feature in Dynamics 365 Marketing, marketers can take the guesswork out of targeting the right audience by simply describing the segment in their own words. From there, query assist builds the segment that meets the marketers’ request and enables them to quickly review and modify the list before their next email campaign.
Previously, marketers had to rely on that one person in the company who understands data models and queries to create the target segment. With generative AI targeting, marketers can now quickly go from planning to execution.
Craft captivating content with ease
Finally, we are excited to share the release of our other Copilot in Dynamics 365 Marketing capability, content ideas, which harnesses next-generation AI to offer unparalleled assistance to marketers in their content creation efforts. Content ideas uses AI to generate content, allowing marketers to save time while still providing engaging and relevant emails for their target audience.
To create this powerful capability, we spent more than 10 months working with hundreds of preview customers, gathering and analyzing marketing emails from the public domain to tune our AI model. The result is a highly accurate and reliable content idea engine that uses Azure OpenAI Service to generate content ideas that marketers can easily edit, personalize, and send to their customers. With the Copilot content ideas feature, marketers can spend less time on copywriting and more time on strategic marketing efforts.
This embed requires accepting cookies from the embed’s site to view the embed. Activate the link to accept cookies and view the embedded content.
The benefits of using Copilot in Dynamics 365 Marketing and Customer Insights are clearreduced time spent on marketing tasks, improved efficiency, and higher quality content that connect marketing teams with their customers. And let’s not forget the excitement of working with cutting-edge technology that’s paving the way for a new era of marketing.
Join the waiting list for the Copilot in Dynamics 365 Customer Insights preview today. And visit Dynamics 365 Customer Insights to learn more about our customer data platform and sign up for a free trial.
Finally, to learn more about the depth and breadth of all the new Copilot features that are bringing next-generation AI to every line of business across Dynamics 365, please check out our announcement blog.
This article is contributed. See the original author and article here.
Today we are excited to announce the public preview of near real-time custom detections in Microsoft 365 Defender. This new frequency will allow you to respond to threats faster with automated responses and gain valuable time in stopping attacks and protecting your organization.
Automation is key to keeping up with attackers
While Microsoft’s eXtended Detection and Response (XDR) solution helps prioritize response activities and provides a unified experience that allows for more effective investigation at the incident level, the increasing volume and speed of sophisticated attacks remains challenging.
That’s why automation is becoming an increasingly important tool in optimizing the SOC process. Automating response actions for common alerts can help you stay on top of threats, protect your organization more effectively, and reduce response times. If you want to get started in Microsoft 365 Defender, check out this post.
For effective protection, most organizations have custom detection mechanisms in place that are unique to the requirements of their environment, but in order for these automations to be as effective as possible, the speed of detection is critical.
Detect in near real-time, respond in near real-time
To address the need for faster detections and response, we are thrilled to announce that you can now create custom detection rules that run in near real-time, in addition to existing frequencies ranging from every 24 hours to every hour. These detections can be integrated with the broad set of Microsoft 365 Defender across email, endpoint, and identity, leading to faster response times and faster mitigation of threats.
This means your custom logic will run and evaluate all available signals and alerts faster than ever before and will trigger your predefined response action immediately, once a match is detected.
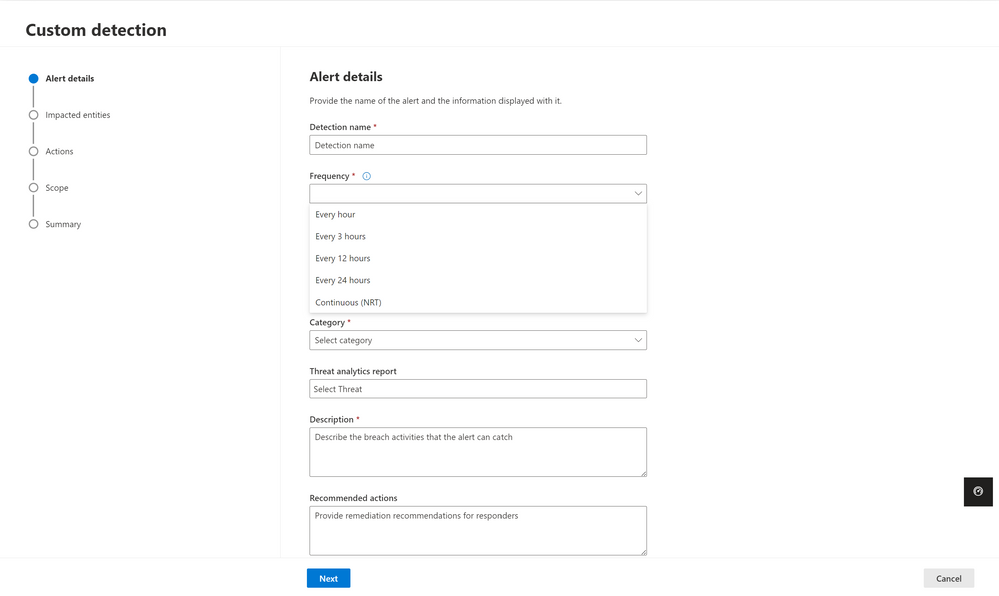
This new frequency will be available in Microsoft 365 Defender as Continuous (NRT). Image 1 shows the configuration wizard for custom detection rules in Microsoft 365 Defender and the various frequency options you can choose from, including near real-time (NRT).
Image 1: Custom detection wizard with the frequency dropdown opened, new frequency of Continuous (NRT) is available.
When you configure a rule using the Continuous (NRT) frequency, the query is compared to every single event that gets into the service, and if there is a match, an alert is triggered. You can use the continuous frequency for queries referencing one table and using operators from the list of supported KQL operators.
Top use cases for custom detections and automated response actions
Monitoring for recent vulnerabilities
A common use case for a near real-time custom detection rule that we see with customers is monitoring for events that might indicate threat activity related to a recently disclosed vulnerability. For instance, you can use the DeviceProcessEvents table to look for the malicious string needed to exploit the Log4j vulnerability and configure remediation actions to run automatically on targeted devices, like initiating investigation on the device:
DeviceProcessEvents
| where ProcessCommandLine matches regex @'(?i)${jndi:(ldap|http|https|ldaps|dns|rmi|iiop)://(${([a-z]){1,20}:([a-z]){1,20}})?(([a-zA-Z0-9]|-){2,100})?(.([a-zA-Z0-9]|-){2,100})?.([a-zA-Z0-9]|-){2,100}.([a-z0-9]){2,20}(/).*}'
or InitiatingProcessCommandLine matches regex @'(?i)${jndi:(ldap|http|https|ldaps|dns|rmi|iiop)://(${([a-z]){1,20}:([a-z]){1,20}})?(([a-zA-Z0-9]|-){2,100})?(.([a-zA-Z0-9]|-){2,100})?.([a-zA-Z0-9]|-){2,100}.([a-z0-9]){2,20}(/).*}'
Detect and remove unwanted emails
Another use case is to look for unwanted emails, that may not necessarily be malicious but have been defined by the organization as unwanted and need to be automatically removed as soon as they are delivered. This empowers security admins to more easily manage mail flows from a security lens and can be done by configuring a Soft Delete remediation action:
EmailEvents
| where Subject contains "This account has been suspended!"
| where SenderFromAddress == "malicious@sender.com"
| where UrlCount > 0
An example of another scenario is to look for messages that spoof the recipient from a particular IP subnet and blocking this activity.
EmailEvents
| where SenderIPv4 startswith "xx.xx.xx." and SenderFromAddress == RecipientEmailAddress
Automation is critical to creating efficiencies in your SOC, but the speed of detection is fundamental to an effective response and keeping your organization safe.
The ability to define custom rules for near real-time detections is in public preview starting today and will enable your defenders to create effective response mechanisms with the breadth of Microsoft 365 Defender’s XDR signal across endpoints, email and more.
Learn more
Check out our documentation and explore how near real-time custom detections can enhance your SOC’s detection and response processes
Wondering which tables are supported by near real-time detections? Find them here.
Near real-time detections are available in public preview starting today. We would love to know what you think. Share your feedback with us in the Microsoft 365 Defender portal or by emailing AHfeedback@microsoft.com.
When:Wednesday, March 22, 2023, 9:30 AM – 2:00 PM (GMT+02:00)
Where:Johannesburg, Gauteng, South Africa
Microsoft Student Summit is an event designed for students and rising developers who are passionate about technology and eager to learn new skills and meet like-minded individuals. Attending the Microsoft Student Summit can provide students with a number of benefits, including:
Exposure to the Latest Technologies: The Microsoft Student Summit provides students with an opportunity to learn about and experience the latest Microsoft technologies, such as cloud computing and artificial intelligence.
Microsoft Learn: Microsoft Student Summit Cloud Skills Challenge are hands-on, allowing students to apply their knowledge and skills to real-world learning and challenges. This can be a valuable experience for students and rising developers who are looking to build their portfolios and demonstrate their abilities to future employers.
Career development: The Microsoft Student Summit can be a valuable resource for students who are interested in pursuing careers in technology. By attending the event, students can gain insights into the latest trends and innovations in the industry and connect with potential employers and recruiters.
Overall, the Microsoft Student Summit provides students and rising developers with a unique opportunity to learn and grow as individuals and technology professionals. Whether you are a beginner or an experienced technologist, the Microsoft Student Summit is a valuable investment in your future.
What is Student Summit?
Are you exploring a career in technology? Or looking to accelerate your technical career? Want to know what a “day in the life of” is really like before you dive in? Or get a jumpstart understanding the skills needed for success? Whether you are just starting your undergraduate degree or a seasoned professional curious about the tactical steps needed to accelerate your career, Microsoft Student Summit will help you discover how to gain expertise in today’s cutting-edge technology needed for your career.
What Will I Learn?
Tech Discover the cutting edge of Application Development and Developer Tools, Low Code/ No-Code / Fusion Development, and AI, Data and Machine Learning and how to build your expertise start your learning journey with our Student Summit Cloud Skills Challenge.
Community Tailored learning paths, upcoming networking events in your region, and invitations to join technical communities to help you deepen your technical expertise learn more at Microsoft Learn Student Hub.
Career Career advice about how to start and accelerate your technical career from industry experts.
This article is contributed. See the original author and article here.
Hello hello, everyone! Happy Friday!
Here’s a recap of what’s been going on in the MTC this week.
MTC Moments of the Week
To start things off, we want to first give a huge shoutout to this week’s MTC Member of the Week – @Kidd_Ip! Kidd is a MCT (Microsoft Certified Trainer) and full time IT pro who has made great contributions to a variety of Tech Community forums across Azure and M365. Way to go, Kidd!
Then on Thursday, we had our second AMA all about Windows Server – from upgrading older versions and the importance of regular updates, to the security features in the latest versions of Windows Server (2022). We received a lot of questions, which were answered by our panel of speakers from the Windows Servicing and Delivery team as well as Windows Server engineers and security product managers. Shout out to @Artem Pronichkin , @Rick Claus, @Scottmca, @Ned Pyle, @Rob Hindman, and the rest team for a great session!
And over on the Blogs, in honor of Women’s History Month, the Marketplace Community kicked off a series of interviews with women leaders in the ISV community. The first edition of this series features an interview between @justinroyal and Harmke Alkemade, AI Cloud Solution Architect at Microsoft and Co-Founder at Friendly Flows. We love to see it!
Did you know that the concept of what we know today as “Spring Break” (in the US, at least) began in 1938, when a college swimming coach, Sam Ingram, brought his team down from New York to Fort Lauderdale, Florida in 1936 to train? When the word got around to other swim coaches, they followed suit, and it began an annual pilgrimage for swimmers from across the US to enjoy the sun – and have some fun. The more you know!
Have a great weekend, everyone, and don’t forget to spring forward on Sunday!
This article is contributed. See the original author and article here.
Welcome to the conclusion of our series on OpenAI and Microsoft Sentinel! Back in Part 1, we introduced the Azure Logic Apps connector for OpenAI and explored the parameters that influence text completion from the GPT3 family of OpenAI Large Language Models (LLMs) with a simple use case: describing the MITRE ATT&CK tactics associated with a Microsoft Sentinel incident. Part 2 covered another useful scenario, summarizing a KQL analytics rule extracted from Sentinel using its REST API. In Part 3, we revisited the first use case and compared the Text Completion (DaVinci) and Chat Completion (Turbo) models. What’s left to cover? Well, quite a lot – let’s get started!
There is some incredible work happening every day by Microsoft employees, MVPs, partners, and independent researchers to harness the power of generative AI everywhere. Within the security field, though, one of the most important topics for AI researchers is data privacy. We could easily extract all entities from a Microsoft Sentinel incident and send them through OpenAI’s API for ChatGPT to summarize and draw conclusions – in fact, I’ve seen half a dozen new projects on GitHub just this week doing exactly that. It’s certainly a fun project for development and testing, but no enterprise SOC wants to export potentially sensitive file hashes, IP addresses, domains, workstation hostnames, and security principals to a third party without strictly defined data sharing agreements (or at all, if they can help it). How can we keep sensitive information private to the organization while still getting benefit from innovative AI solutions such as ChatGPT?
Enter Azure OpenAI Service!
Azure OpenAI Service provides REST API access to the same GPT-3.5, Codex, DALL-E 2, and other LLMs that we worked with earlier in this series, but with the security and enterprise benefits of Microsoft Azure. This service is deployed within your Azure subscription with encryption of data at rest and data privacy governed by Microsoft’s Responsible AI principles. Text completion models including DaVinci have been generally available on Azure OpenAI Service since December 14, 2022. While this article was being written, ChatGPT powered by the gpt-3.5-turbo model was just added to Preview. Access is limited right now, so be sure to apply for access to Azure OpenAI!
ChatGPT on Azure solves a major challenge in operationalizing generative AI LLMs for use in an enterprise SOC. We’ve already seen automation for summarizing incident details, related entities, and analytic rules – and if you’ve followed this series, we’ve actually built several examples! What’s next? I’ve compiled a few examples that I think highlight where AI will bring the most value to a security team in the coming weeks and months.
As an AI copilot for SOC analysts and incident responders, ChatGPT could power a natural language assistant interfacing with security operators through Microsoft Teams to provide a common operating picture of an incident in progress. Check out Chris Stelzer’s innovative work with #SOCGPT for an example of this capability.
ChatGPT could give analysts a head start on hunting for advanced threats in Microsoft 365 Defender Advanced Hunting by transforming Sentinel analytic rules into product-specific hunting queries. A Microsoft colleague has done some pioneering work with ChatGPT for purple-teaming scenarios, both generating and detecting exploit code – the possibilities here are endless.
ChatGPT’s ability to summarize large amounts of information could make it invaluable for incident documentation. Imagine an internal SharePoint with summaries on every closed incident from the past two years!
There are still a few areas where ChatGPT, as innovative as it is, won’t replace human expertise and purpose-built systems. Entity research is one such example; it’s absolutely crucial to have fully defined, normalized telemetry for security analytics and entity mapping. ChatGPT’s models are trained on a very large but still finite set of data and cannot be relied on for real-time threat intelligence. Similarly, ChatGPT’s generated code must always be reviewed before being implemented in production.
I can’t wait to see what happens with OpenAI and security research this year! What security use cases have you found for generative AI? Leave a comment below!


Recent Comments