This article is contributed. See the original author and article here.
Azure portal June 2020 update
This month, Azure portal updates include support for custom data in virtual machine and VM scale sets, improvements to VM size selection, and new blob features for storage including indexing and versioning, and object replication.
Sign in to the Azure portal now and see for yourself everything that’s new. Download the Azure mobile app to stay connected to your Azure resources anytime, anywhere.
Here’s the list of updates to the Azure portal this month:
Compute > Virtual machines
- Portal support for custom data in Virtual Machines and VM scale sets
- VM size selection dropdown recalls your recently used sizes
- VM size picker updates
Storage>Storage accounts
- Blob indexing now in public preview
- Blob versioning now in public preview
- Object replication (OR) now in public preview
Intune
Let’s look at each of these updates in greater detail.
COMPUTE>VIRTUAL MACHINES
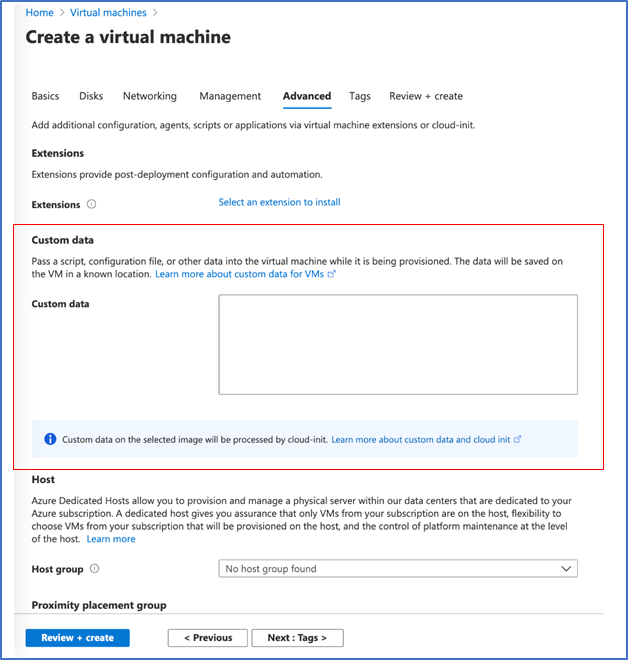
Portal support for custom data in Virtual Machines and VM scale sets
Custom data is now available for Virtual Machines and VM scale sets in Azure Portal and can be used for injecting a script, configuration file, or other metadata into a Microsoft Azure virtual machine. Custom data is only made available to the VM during first boot/initial setup–we call this ‘provisioning’. Provisioning is the process where VM Create parameters, e.g., hostname, username, password, certificates, custom data, and keys, are made available to the VM and a provisioning agent such as the Linux Agent or cloud-init processes them.
Learn more here.

COMPUTE>VIRTUAL MACHINES
VM size selection dropdown recalls your recently used sizes
We have introduced the size dropdown in the VM and VMSS create flows to provide quick access to the sizes you have recently used along with sizes recommended by the image publisher. No longer do you have to visit the full list of sizes if you only have a few that you use for deployments.
As you deploy different VM sizes, the list will grow up to 5 of your most recently used sizes. These sizes persist across your subscriptions so that you can always have quick access to the size you want. During the create VM and VMSS experiences, your most recently used size will be selected initially by default.
In addition to your recently used sizes, you may also see up to 3 sizes recommended by the image publisher.
To view your most recently used sizes:
- Select the Virtual machines or Virtual machine scale sets service from the portal
- Click the Add button to create a new VM or VMSS
- Fill in the subscription, VM name, and any other fields you wish to enter before the Size

4. Press the size dropdown to see your recently used sizes. If you have not recently deployed any virtual machines, you will not see the section for recently used. After you deploy a VM or VMSS, you will find that size in the list.

COMPUTE>VIRTUAL MACHINES
VM size picker updates
Based on your feedback and on data we have analyzed, we have made significant updates to the VM size picking experience. One of the largest pieces of feedback we heard is that the filters were not working for your needs and caused confusion. We have removed default filtering and will now show a list of the most popular sizes across all Azure users to help you in the selection process.
Updates you will see and experience:
- Updated filter design to use dialog boxes instead of inline editing
- View costs per hour or per month
- Insights into the most used sizes by Azure users (these are denoted in the list with an icon)
- Updated search functionality – search is faster and will search across all sizes when you first enter the experience (no more clearing filters first)
- The selected image appears in the size picker for additional context
- Updated grid spacing for improved readability
To see the most popular sizes:
- Select the Virtual machines or Virtual machine scale sets service from the portal
- Click the Add button to create a new VM or VMSS
- Fill in the subscription, VM name, and any other fields you wish to enter before selecting a size
- Click the Select size link below the size dropdown

5. Select a size

STORAGE>STORAGE ACCOUNTS
Blob indexing now in public preview
Blob indexing allows customers to categorize data in their storage account using key-value tag attributes. These tags are automatically indexed and exposed as a multi-dimensional index that can be queried to easily find data. Through blob indexing, customers get native object management and filtering capabilities, which allow them to categorize and find data based on attribute tags set on the data.
Steps:
- Create a storage account in one of the public preview regions (France Central or France South).
- Create a container.
- Select the “Upload” button and upload a file as a block blob.
- Expand the “Advanced” section and go to the “Blob Index Tags” section.

5. Input the key/value pair(s) as your blob index(es).
6. Finish the upload.
7. Navigate to the Containers option under Blob Service, select your container.

8. Select the Blob Index tags filter button to filter within the selected container.
9. Enter a Blob Index tag key and tag value.
10. Select the Blob Index tags filter button to add additional tag filters (up to 10).

STORAGE>STORAGE ACCOUNTS
Blob versioning now in public preview
Azure Blob Versioning automatically maintains previous versions of an object (blobs) and identifies them with version IDs. With this feature, customers can protect their data against erroneous modifications or accidental deletions. Customers can list both the current blob and previous versions using version ID timestamps. They can also access and restore previous versions as the most recent version of their data.
To enable blob versioning in the Azure portal:
- Navigate to your storage account in the portal
- Under “Blob service”, choose “Data protection”
- In the Versioning section, select “Enabled”
- Upload a blob

5. Make some modifications to that blob.
6. Click on that blob.
7. Navigate to the “Versions” tab, where you will see the previous versions for that blob. A previous version can be selected and made into the current version, which restores the blob to how it was at the given timestamp (version ID).

STORAGE>STORAGE ACCOUNTS
Object replication (OR) now in public preview
Object replication asynchronously copies block blobs between a source storage account and a destination account. Some scenarios supported by object replication include:
- Minimizing latency–Latency for read requests can be reduced by enabling clients to consume data from a region that is in closer physical proximity.
- Increasing efficiency for compute workloads–Compute workloads can process the same sets of block blobs in different regions.
- Optimizing data distribution–Customers can process or analyze data in a single location and then replicate just the results to additional regions.
- Optimizing costs–After a customer’s data has been replicated, data is moved to the archive tier using life cycle management policies, thus reducing costs.
To configure object replication in the Azure portal, first create the source and destination containers in their respective storage accounts if they do not already exist. Also, enable blob versioning and change feed on the source account, and enable blob versioning on the destination account.
Then create a replication policy in the Azure portal by following these steps:
- Navigate to the source storage account in the Azure portal.
- Under “Settings”, select “Object replication”.

3. Select “Set up replication”.
4. Select the destination subscription and storage account.

5. In the “Container pairs” section, select a source container from the source account, and a destination container from the destination account. You can create up to 10 container pairs per replication policy.

6. If desired, specify one or more filters to copy only blobs that match a prefix pattern. For example, if you specify a prefix ‘b’, only blobs whose name begin with that letter are replicated. You can specify a virtual directory as part of the prefix.
7. By default, the “copy scope” is set to copy only new objects. To copy all objects in the container or to copy objects starting from a custom date and time, select the “change” link and configure the copy scope for the container pair.
8. Select “Save and apply” to create the replication policy and start replicating data.

INTUNE
The Microsoft Intune team has been hard at work on updates as well. You can find the full list of updates to Intune on the What’s new in Microsoft Intune page, including changes that affect your experience using Intune.
Azure portal “how to” video series
Have you checked out our Azure portal “how to” video series yet? The videos highlight specific aspects of the portal so you can be more efficient and productive while deploying your cloud workloads from the portal.
Next steps
The Azure portal has a large team of engineers that wants to hear from you, so please keep providing us your feedback in the comments section below or on Twitter @AzurePortal.
Don’t forget to sign in to the Azure portal and download the Azure mobile app today to see everything that’s new. See you next month!
Brought to you by Dr. Ware, Microsoft Office 365 Silver Partner, Charleston SC.

Recent Comments