This article is contributed. See the original author and article here.
We can use Azure DevOps to perform all the policy operations – Create and Assign Policy and Initiatives, Remediate non-compliant resources,
and check compliance status.
Steps to setup the environment for policy operations
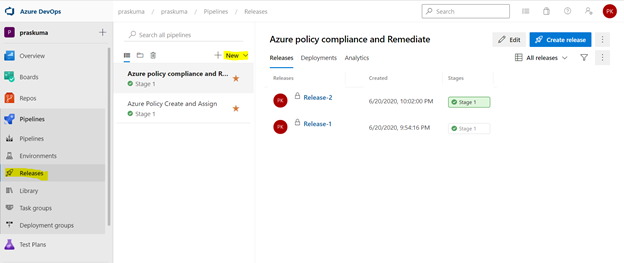
- Login to your Azure DevOps Organization and select Releases as shown below and click on New. Select New Release Pipeline.
- This will open a pop-up window and will ask to select a template.

- Select Azure Policy Deployment and Click on Apply

- Post template selection, We will get a small pop-up window to show us the stage details of this pipeline release. Close this window and proceed with next step.

- Before configuring the different Tasks of the stage, please make sure you have setup a Service connection to integrate your Azure DevOps organization with your Azure Subscription. We need to connect to our Microsoft Azure subscription, to a different build server or file server, to an online continuous integration environment, or to services you install on remote computers.
Please refer the below Microsoft article for step-by-step process to setup the service connection.
Once we setup the service connection, we can get to see/update them as below-

- We need to click on Stage1- Tasks option as highlighted below. Here, we do not need to add/update artifacts as we are not using any GitHub repository for policy operations in this article. Leave it as it is.
We can update the name of pipeline, stage, Agent and Tasks as per our convenience.

- Once We click, we will get to see the Stage Details and the Tasks in the hierarchy. Like here in the below snippet-
Stage Name – Stage 1
Tasks – Create Azure Policy and Assign Azure Policy

- Select any Task. Here we have selected the first task – Create Azure Policy. Please note that since here we are using Azure PowerShell as the backend script, please select the appropriate Task Versions. Here Task version represents the PowerShell version, and the versions may vary depending upon the cmdlets we will be using. It is always recommended to use the latest version.
Choose Azure Resource Manager as Azure Connection Type. If you have access to multiple Azure subscriptions linked through Service connection, you may choose any one of them and that will be used as scope for this policy assignment and creation.
Choose Script Type as Inline Script as we are providing the PowerShell script as inline content. We can use Script File Path as well in case we are using any repository like GitHub as the source for files.

- Copy below PowerShell code into the Inline Script block. We need to update the highlighted/bold values as per our requirement and add our policy in Json format like below
$definition = New-AzPolicyDefinition -Name 'denyCoolTiering2' -DisplayName 'denyCoolTiering2' -Description
'Deny cool access tiering for storage' -Policy '{

    "if": {
 "allOf": [{
"field": "type",
"equals": "Microsoft.Storage/storageAccounts"
},
{
 "field": "kind",
"equals": "BlobStorage"

            },

            {
"field": "Microsoft.Storage/storageAccounts/accessTier",
"equals": "cool"
}
 ]
},

    "then": {
"effect": "deny"
}

}'

- Similarly update the Inline Script of second Task- Assign Azure Policy. Please use the below code as reference and update the bold/highlighted values with your own policy details that is there defined in the target subscriptions.
$definition = Get-AzPolicyDefinition | Where-Object { $_.Properties.DisplayName -eq 'denyCoolTiering2'}

New-AzPolicyAssignment -Name "denyCoolTiering2" -DisplayName "denyCoolTiering2" -PolicyDefinition $definition

- Post updating both the Tasks, Click on Save and a new pop-up window will come up. Select the folder (if you have any hierarchy) with your comments (optional) and click OK.

- Now click on “Create a New Release” and another window will pop-up, click on “Create” and proceed.


Once you click on create, you will get to see a message like in the below snippet that “Release has been created”.

- Click on the message link – “Release has been created” and it will show the progress of all the Tasks in the stage
It will start from Queued and will go into in Progress and then Succeeded. If there is some syntax or runtime error, the task will fail with Failed message. We can click on the status and see the error/failure reason.


If we click on Succeeded link in the Stage, you will get to see the status of each step that was performed by the agent and further we can click on the succeeded status of each step to see the operation logs(Refer below snippet).


- Likewise, we can create either other Stages in the same release or Tasks in the same stage or a new Release for other policy operations like Compliance Check and Remediate. Please refer the below snippets. The steps will remain the same and only Inline Script needs to be updated.


Notes:
- In case of assigning a DINE policy, please make sure that managed identity must complete replication through Azure Active Directory before it can be granted the needed roles as per the documentation here: Remediate non-compliant resources – Azure Policy | Microsoft Docs. Else, the remediation tasks will fail due to missing permissions.
- You may encounter below errors while executing the script in the pipeline.
- The Service Principal (SPN) used by Azure DevOps to connect to your Azure subscription requires the Owner role and you may get this error while SPN has the less than the owner role.

By default, the SPN created by Azure DevOps to connect to your Azure subscription is assigned the Contributor role. For updating the assignment of security roles on a resource group requires the Owner role. You need to ensure that the SPN used by Azure DevOps has the Owner role assigned at the subscription level. This is accomplished through the Access control (IAM) blade for the subscription –

- The same SPN also requires Read directory data permissions to your Azure AD.

Steps to Grant Azure AD permissions:
By default, the SPN created by Azure DevOps is only granted sign in and read user profile permissions against Azure AD. We now need to grant the SPN the additional read directory data permission.
- Go to Azure AD -> App Registrations.
- Select the SPN that Azure DevOps uses

- Select API permission and then click on ‘Add a permission’

- Select Azure Active Directory Graph from the list

- Select Application permissions.

- Select Directory.Read.All permission from the list and click on Add permissions.

- Click on ‘Grant admin consent for Directory’.

Once permission is granted and the status shows as Green, Try running the deploying the Policy through Azure DevOps, it should work.
- Creating and Assigning Policy Initiatives:
In case of creating and assigning policy Initiatives, the above steps from 1-13 will remain the same except the sample code in steps 9 and 10. Please update the script as below:
Creating Policy Initiative : (Replace the code at Step 9)
$jsonPolicysetdefinition = @"

[ {
"policyDefinitionId": "/providers/Microsoft.Authorization/policyDefinitions/ea3f2387-9b95-492a-a190-fcdc54f7b070",

        "parameters": {
"tagName": {
"value": "[parameters('tags')]"
}
}
},
{
"policyDefinitionId": "/providers/Microsoft.Authorization/policyDefinitions/a08ec900-254a-4555-9bf5-e42af04b5c5c",

        "parameters": {
"listOfResourceTypesAllowed": {
"value": "[parameters('resourceTypes')]"
}
}
}
]"@

$jsonPolicydefinitionparameter = @"

{
"tags": {
"type": "String"
},
"resourceTypes": {
"type": "Array"
}
}"@

$Initiative= New-AzPolicySetDefinition -Name 'PolicyInitiativeTest' -PolicyDefinition $jsonPolicysetdefinition -Parameter $jsonPolicydefinitionparameter -SubscriptionId ‘abcd-e44e-4a99-a89c-45be63c6a8ad'

Write-Host $Initiative.PolicySetDefinitionId
Write-Host "##vso[task.setvariable variable=Initiative;isSecret=false;isOutput=true;]$Initiative.PolicySetDefinitionId"
Assign Policy Initiative: (Replace the code at Step 10)
$jsonPolicyassignmentparameter = @"

{

    "tags": {

        "value": "AnotherTag"

    },

    "resourceTypes": {

        "value": [

            "microsoft.devtestlab/labs/costs",

            "microsoft.media/mediaservices/streamingpolicies",

            "microsoft.security/iotsecuritysolutions/iotalerts",

            "microsoft.security/iotsecuritysolutions/analyticsmodels/aggregatedrecommendations",

            "microsoft.sql/managedinstances/metricdefinitions",

            "microsoft.sql/managedinstances/databases/vulnerabilityassessments/rules/baselines",

            "microsoft.sql/managedinstances/databases/backupshorttermretentionpolicies"

        ]

    }

}"@

$Policy = Get-AzPolicySetDefinition -Name 'PolicyInitiativeTest'

$remediationID = New-AzPolicyAssignment -Name 'PolicyInitiativeAssignment' -Scope '/subscriptions/abcd-e44e-4a99-a89c-45be63c6a8ad' -PolicySetDefinition $Policy -PolicyParameter $jsonPolicyassignmentparameter -Location 'eastus' -AssignIdentity

$roleDefId = Get-AzRoleDefinition 'Contributor'

New-AzRoleAssignment -Scope '/subscriptions/abcd-e44e-4a99-a89c-45be63c6a8ad' -ObjectId $remediationID.Identity.PrincipalId -RoleDefinitionId $roleDefId.Id

for($i=0; $i -lt $initative.Properties.policyDefinitions.Length; $i++){

    Start-AzPolicyRemediation -Name '$i Initiative' -PolicyAssignmentId $remediationID.PolicyAssignmentId -PolicyDefinitionReferenceId $initative.Properties.policyDefinitions[$i].policyDefinitionReferenceId }
Brought to you by Dr. Ware, Microsoft Office 365 Silver Partner, Charleston SC.

Recent Comments