This article is contributed. See the original author and article here.
Introduction
Background
In the recent pandemic, health institutions all across the world have been pushed to their limits on about every facet. Through this, many such institutions have begun to reprioritize their modernization efforts around their cloud infrastructure to support increasing demands and hedge against uncertainty. As institutions are migrating their existing workloads into the cloud, a common challenge they are faced with is that many of their on-prem security processes and standards tend to not map one-to-one with the services they are being migrated to. With the sensitive nature of the healthcare industry, it is especially important to solution feasible routes to always ensure security and validation is in place end-to-end.
In this blog post, we will look at how Azure DevOps Pipeline Decorators can be leveraged to bridge the gap in our cloud environment with the customer’s existing security processes on their on-premises IIS server.
What are Pipeline Decorators?
If you have ever run across jobs executing on your azure pipelines that you have not previously defined, there is a good chance you may have already run into decorators before!
Pipeline decorators allow you to program jobs to execute before or after any pipeline runs across your entire Azure DevOps organization. For scenarios such as running a virus scan before every pipeline job, or any sort of automated steps to assist with governance of your CICD processes, pipeline decorators grants you the ability to impose your will at any scale within Azure DevOps.
Read further on decorators on Microsoft Learn: Pipeline decorators – Azure DevOps | Microsoft Learn
In this blog post, I will be walking through a sample process based on the customer scenario’s requirements, and how the pipeline decorators can fit in to assist with their governance objectives.
Scenario
Customer’s Azure DevOps organization has grown to a considerable size composed of numerous projects with various applications with no clearly defined process or standards they adhere to. All of these applications have been hosted on an on-premises IIS server, where the application teams are trusted to provide manual inputs to deployment variables.
Due to the lack of out-of-the-box controls for validating IIS file path permissions with Azure Active Directory identities within Azure DevOps, this was an area of concern with the customer as the deployed production applications effectively did not have any preventative measures to address malicious actors or human error overwriting existing applications.
When looking at the deployment tasks to IIS servers from Azure DevOps, the two primary variables the customer was looking to control were:
virtualAppName– Name of an existing an already existing virtual application on the target machineswebsiteName– Name of an existing website on the machine group
Considering the RBAC strategy the customer has in mind with AAD, there will be a third variable to represent the ownership of the application via an AAD group.
groupId– AAD ID of the application owner’s group
In the next section, I will outline a high-level process proposal based on these three variables, that goes into onboarding applications.
Solutioning
High-Level Process Proposal for Onboarding New Applications
For this demo’s purposes, we will make the following assumptions to build out a process that illustrates how application teams can successfully onboard and assist the operations team in successfully managing the application environment within their on-prem IIS server.
Assumptions
- Ops team only require the following three parameters to help govern application deployments:
virtualAppNamegroupIdwebsiteName
- Application teams only need flexibility while building applications within the CICD pipelines, and currently do not have much concerns or the expertise to manage deployments.
- Ops team wishes to also build security around these parameters such that only the authorized actors will be able to modify these values.
Onboarding New Applications
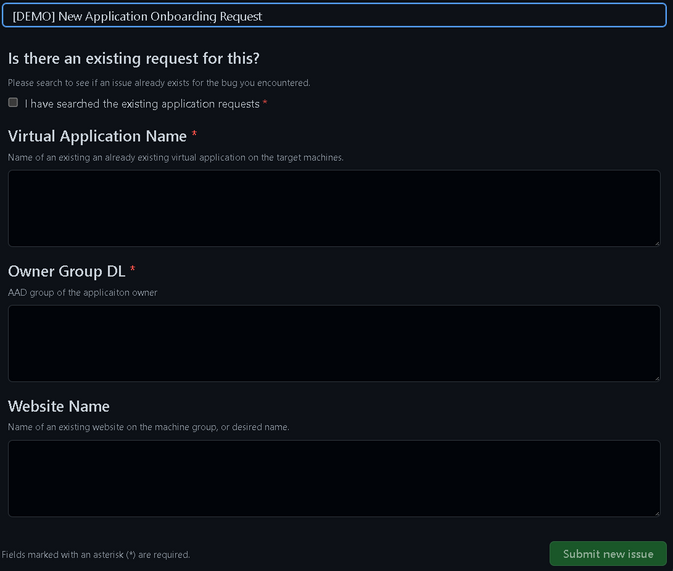
Ops team provides a template (such as GitHub issues templates) for new application requests to the application teams, and captures the following IIS deployment-specific information:
virtualAppNamegroupIdwebsiteName
For this demo, I have created a simple GitHub issues YAML form which the operations team can leverage to capture basic information from the application teams, which can also be tied to automation to further reduce operational overhead:
- Ops team is then notified of the request, and upon successful validation continues to provision an Application Environment with the captured information
- application environment in this context involves the following components:
- Key Vault (per application)
- Service Connection to application Key Vault with read permissions over secrets
- Place the application team provided, ops team validated
virtualAppName,groupId,websiteNamevalues as secrets - Place Service Connection details in the project variable group to allow for the decorator to dynamically retrieve secrets for each project
- Application registered onto the IIS server that adheres to existing IIS server file management strategies
- application environment in this context involves the following components:
- Once the environment is ready for use, notify the application teams by updating the issue template and now the application teams only need to focus on building and publishing their artifact within their CICD pipelines
Updating Existing Applications
- Ops team provides a template for change requests to the application teams, and captures the following information:
virtualAppNamegroupIdwebsiteName- Change Justification/Description
- Core Ops team reviews and approves the change request
- Update the application environment accordingly
- Notify the application team

Now with the high-level process defined, we will now look at how we could bring in the relevant parameters into the decorators to impose validation logic.
Building the Demo
Setting up our Demo Application Environment
In this example, I created a key vault named kv-demolocaldev, and placed the virtualAppName, groupId, and websiteName so we may retrieve the values later as shown below:

Now, we must create the project and subsequently create the service connection to the key vault scoped to the project.
To do this, I created an Azure Resource Manager Service Connection while using my demo identity, that is scoped to the resource group containing the key vault:

Once the service connection is done provisioning, you can navigate to the AAD object by following the Manage Service Principal link, which will allow you to retrieve the Application ID to be used when adding the access policy.

Selecting the Manage Service Principal link will take us to the AAD object, where we can find the Azure Application ID to add to our Key Vault access policy.


The service connection will only need GET secret permissions on its access policy.

Afterwards, we now capture the information about the service connection and key vault by creating a variable group on the application’s Azure DevOps project named demo-connection-details:

There will need to be additional steps taken to provision the IIS server as well with the parameters, but for this demo’s purpose we will assume that the provisioning steps have already been taken care of. Now with this, we can move onto building out our decorators.
Building the Decorators
For the pipeline side, the customer is looking to control both the pre-build with validating the input variables, and post-build in placing guardrails around deployment configurations with the validated parameters.
Both pre and post decorators will leverage the same key vault secrets, so we will start with integrating the key vault secrets into the YAML definition.
Pipeline decorators leverage the same YAML schema as the YAML build pipelines used within Azure DevOps. Meaning we can take advantage of conditional logic with repo branches, dynamic variables, and pull in key vault secrets with service connections.
The high-level logic we are attempting to demonstrate for the pre and post decorators are the following:
Pre:
- Check for variables/conditions to bypass decorators
- Using pre-established variables, connect to application’s Azure Key vault and retrieve secret values
- For each of the deployment variables, process custom validation logic
Post:
- Deploy the application/artifact to the IIS server
You can find the demo files within the following repo: https://github.com/JLee794-Sandbox/ADO-Decorators-PoC
Pre-build decorator
To ensure users can opt-out of the process during development, we can leverage the same YAML schema as build pipelines to construct our conditionals.
- Check for variables/condition to bypass decorators
In the pre-build decorator YAML definition (located in Build/Pre/input-parameter-decorator.yml), for pipeline builds that run off the main branch, that also checks for a simple variable flag named testDecorator to be true for the decorator to execute.
steps:

– ${{ if and(eq(variables[‘Build.SourceBranchName’], ‘main’), contains(variables[‘testDecorator’],’true’) ) }}:
Following right after, I retrieve websiteName, groupId, and virtualAppName with the connection details we have placed within the demo-connection-details, which will be passed in by the build pipeline.
– task: AzureKeyVault@2

  displayName: ‘[PRE BUILD DECORATOR] Accessing Decorator Params from the key vault – $(decorator_keyvault_name), using $(decorator_keyvault_connection_name) connection.’

  inputs:

    azureSubscription: $(decorator_keyvault_connection_name)         # Service Connection Name (scoped to RG)

    KeyVaultName: $(decorator_keyvault_name)   # Key Vault Name

    SecretsFilter: ‘websiteName,groupId,virtualAppName’   # Secret names to retrieve from Key Vault

    RunAsPreJob: true
Now that the secrets have been pulled in, we can now run our custom validation logic for each. For the purpose of this demo, we will just check that each variable exists and throw an error through a simple PowerShell script.
– task: PowerShell@2

    name: ValidateDeploymentVariables

    displayName: ‘[PRE BUILD DECORATOR] Validate Deployment Variables (Injected via Decorator)’

    inputs:

      targetType: ‘inline’

      script: |

        $errorArr = @()
        try {

          Write-Host “VirtualAppName: $(virtualAppName)”

          # your input test cases go here

          # e.g querying the remote-machine to match the virtualAppName

        }

        catch {

          errorArr += ‘virtualAppName’

          Write-Host “##vso[task.logissue type=error]Input parameter ‘virtualAppName’ failed validation tests.”

        }
        try {

          Write-Host “GroupID: $(groupId)”

          # your input test cases go here

          # e.g querying the remote-machine to match the groupId against the local file permissions

        }

        catch {

          Write-Host “##vso[task.logissue type=error]Input parameter ‘groupId’ failed validation tests.”

          errorArr += ‘GroupID’

        }
        try {

          Write-Host “WebSiteName: $(webSiteName)”

          # your input test cases go here

          # e.g querying the web-site URL to see if site already exists, etc.

        }

        catch {

          Write-Host “##vso[task.logissue type=error]Input parameter ‘webSiteName’ failed validation tests.”

          errorArr += ‘GroupID’

        }
        if ($errorArr.count -gt 0) {

          # Link to your teams documentation for further explanation

          Write-Warning -Message “Please provide valid parameters for the following variables: $($errorArr.join(‘, ‘))”

          Write-Warning -Message “See <https://docs.microsoft.com/en-us/azure/devops/pipelines/process/variables?view=azure-devops&tabs=yaml%2Cbatch> for additional details”

          throw “Please provide valid values for $($errorArr.join(‘, ‘)).”

        }
And we are done with the pre-build decorator! Of course, while developing it is important to iteratively test your code. If you would like to publish your code now, skip to the (Publish your extension) section below.
Post-build decorator
For our post-build decorator, all we want to do is determine when the decorator should run, and simply invoke a deployment task such as the IISWebAppDeploymentOnMachineGroup task.
Of course, there are many more validation steps and tools you can place here to further control your deployment process, but for the sake of this demo we will just be outputting some placeholder messages:
steps:

– task: PowerShell@2

  name: DeployToIIS

  displayName: Deploy to IIS (Injected via Decorator)

  condition: |

    and

    (

      eq(variables[‘Build.SourceBranch’], ‘refs/heads/main’),

      eq(variables.testDecorator, ‘true’)

    )

  inputs:

    targetType: ‘inline’

    script: |

      # Validation steps to check if IIS

      # Validation steps to check if iOS or Android

      # > execute deployment accordingly
      Write-Host @”

        Your IIS Web Deploy Task can look like this:
        – task: IISWebAppDeploymentOnMachineGroup@

          inputs:

            webSiteName: $(webSiteName)

            virtualApplication: $(virtualAppName)

            package: ‘$(System.DefaultWorkingDirectory)***.zip’ # Optionally, you can parameterize this as well.

            setParametersFile: # Optional

            removeAdditionalFilesFlag: false # Optional

            excludeFilesFromAppDataFlag: false # Optional

            takeAppOfflineFlag: false # Optional

            additionalArguments: # Optional

            xmlTransformation: # Optional

            xmlVariableSubstitution: # Optional

            jSONFiles: # Optional

      “@
Publishing the Extension to Share with our ADO Organization
First, we need to construct a manifest for the pipeline decorators to publish them to the private Visual Studio marketplace so that we may start using and testing the code.
In the demo directory, under Build we have both Pre and Post directories, where we see a file named vss-extension.json on each. We won’t go into too much of the details around the manifest file here today, but the manifest file allows us to configure how the pipeline decorator executes, and for what sort of target.
Read more on manifest files: Pipeline decorators – Azure DevOps | Microsoft Learn
With the manifest file configured, we can now publish to the marketplace and share it with our ADO organization:
Create publisher on the Marketplace management portal
Install
tfxcommand line tool
npm install -g tfx-cli
Navigate to the directory containing the
vss-extension.json
Generate the
.vsixfile throughtfx extension create
> tfx extension create –rev-versionTFS Cross Platform Command Line Interface v0.11.0
Copyright Microsoft Corporation=== Completed operation: create extension ===
– VSIX: /mnt/c/Users/jinle/Documents/Tools/ADO-Decorator-Demo/Build/Pre/Jinle-SandboxExtensions.jinlesampledecoratorspre-1.0.0.vsix
– Extension ID: jinlesampledecoratorspre
– Extension Version: 1.0.0
– Publisher: Jinle-SandboxExtensions
Upload the extension via the Marketplace management portal or through
tfx extension publish
Share your extension with your ADO Organization on the management portal
Install the extension on your ADO Organization
- Organization Settings > Manage Extensions > Shared > Install
- Organization Settings > Manage Extensions > Shared > Install


Testing the Decorator
Now that your pipeline decorators are installed in your organization, any time you push an update to the Visual Studio marketplace to update your extensions, your organization will automatically get the latest changes.
To test your decorators, you can leverage the built in GUI for Azure DevOps to validate your YAML syntax, as well as executing any build pipeline with the appropriate trigger conditions we have configured previously.
In our demo application environment, I updated the out-of-the-box starter pipeline to include our connection variable group, as well as specify the testDecorators flag to true:
variables:

– name: testDecorator

  value: true

– group: demo-connection-details
Running the pipeline, I can now see the tasks I have defined execute as expected:

Once we verify that the pre and post tasks have run as expected with the conditional controls evaluating in a similar manner, we can then conclude this demo.
Conclusion
Now with the decorator’s scaffolding in place, the customer can continue to take advantage of the flexibility provided by Azure DevOps pipeline’s YAML schema to implement their existing security policies at the organization level.
I hope this post helped bring understanding to how pipeline decorators can be leveraged to automate custom processes and bring governance layers into your ADO environment.
If you have any questions or concerns around this demo, or would like to continue the conversation around potential customer scenarios, please feel free to reach out any time.
Brought to you by Dr. Ware, Microsoft Office 365 Silver Partner, Charleston SC.

Recent Comments