by Scott Muniz | Jul 2, 2020 | Uncategorized
This article is contributed. See the original author and article here.
With Windows 10, version 2004, OEMs and system administrators can now package Windows images with Local Experience Packs, or LXPs.
With Windows 10, version 1803, we started to deliver language translations via Local
Experience Packs, also referred to as LXPs. LXPs are smaller than their lp.cab counterparts because they only contain a subset of language translations that cover most of Windows. Once the device is connected to the internet the rest of the translations are downloaded to the device. As an OEM or system administrator; however, you previously had to add lp.cab for full languages (SKU languages) to the OS image using Deployment Image Servicing and Management (DISM).
Now that OEMs and system administrators can package images with LXPs, there can be significant storage space savings. Specifically, devices with LXP-backed images can support more than twice as many languages out of the box with less than half the storage space[1] needed by traditional lp.cab-backed images.
The table below gives an overview of common language configurations and the potential space savings[2] that LXPs can provide.
Note: When creating images with LXPs, at least one lp.cab will still be required.
|
Image configuration
|
Total lp.cab size (on disk)
|
Total LXP size (on disk)
|
Space reduction
|
|
Global
(~40 languages)
|
7.1 GB
|
2.47 GB
|
~65%
|
|
European
(~25 languages)
|
5.2 GB
|
1.8 GB
|
~65%
|
While Language Interface Packs (LIPs) are only supplied as LXPs, full languages are supplied both as LXPs and lp.cabs.
To add an LXP to your Windows image, you will need to use the AddProvisionedAppXPackage cmdlet. Once you have added an LXP to your image, you should see the following behavior.
- The languages backed by LXP will show up on the language selection screen during the out-of-box experience (OOBE).
- Once the user selects their language, all subsequent screens of the OOBE will be in the corresponding language. Since the LXP has only a subset of operating system strings available, some of the content in OOBE may fall back to the base language. This is on parity with current behavior.
- The first login experience post-OOBE will be in the selected language.
Things to be aware of
When creating an LXP-powered image, please be aware of the following pre-conditions:
- The System Default UI Language can only be set to a language that is backed by lp.cab. To have the system display a language backed by LXP, you will need to set the User UI Language setting to that language. For more information, see User Interface Language Management.
- After OOBE, the PC must be connected to the internet to download resources and complete the localization experience as LXPs only contain a subset of all translations. If a device is not able to connect to WSUS after installation, then it is recommended that lp.cabs be used instead.
- LXPs only carry language resources for Features on Demand (FODs) with satellite language resources preinstalled by Microsoft. If other FODs with satellite resources are added to the image, language resources will be downloaded later in the background, when LXPs are used. For more information on how to enable FODs with satellite language resources out of the box. see Features On Demand.
[1] Storage savings are estimates, actual space savings will vary.
[2] The savings displayed on the table primarily correspond to the image size. After the Windows Installation is complete, unused languages will be removed from the system.
by Scott Muniz | Jul 2, 2020 | Uncategorized
This article is contributed. See the original author and article here.
Have you ever had to transcribe some data from a printed page into Excel by hand? Wouldn’t it be a lot easier to just take a picture and have Excel do the tedious work for you? Of course, it would, and we couldn’t agree more.
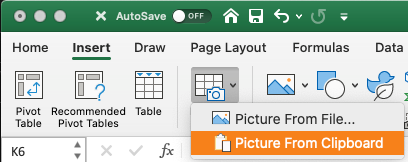
With the new Data from Picture feature in Excel for Mac, you can insert data from a screen clipping on your clipboard, an image file from your computer, or from your iPhone camera. There’s no need to type all the data. Excel can do it for you!
How it works
1. Use one (or more) of the options below to capture the content you want to digitize:
- Select Insert > Data From Picture > Picture From File.

- Copy an image of a table to your clipboard. For example, take a screenshot of a table by pressing SHIFT+CMD+CTRL+4, and then select Insert > Data From Picture > Picture From Clipboard.
- Right-click a cell, and select Scan Documents (requires an iPhone configured to use Continuity Camera). Make sure you have good lighting and focus on the data, and then tap the button to take the picture. If you’re satisfied, tap the Save button to send it to Excel.

2. After you have captured the picture of the content you want to bring into Excel, the Data from Picture dialog box opens and shows the progress as the image is being analyzed.
3. Review the results and make any corrections necessary. Then select Insert Data.

Scenarios to try
- Scan some data from a book or magazine. If you see some interesting data in a book and want to use it in Excel, this is a great way to skip the typing. If you have an iPhone, right-click in Excel on your Mac and select Scan Documents. Your iPhone will light up. Then you can take a picture of the data, and follow the on-screen instructions to bring the data in Excel in no time.
- Screen capture a table from a website. If you’ve ever tried to copy and paste some data from a web site, you’ve likely noticed that the formatting looks different after you’ve pasted it than it did on the website. Instead, try to capture a screen clipping of the table (by pressing SHIFT+CTRL+CMD+4 on your Mac), then select Insert > Data from Picture > Picture From Clipboard. Then, follow the instructions on screen and you should get just what you were looking for.
- Take a picture of some printed data. Maybe you’d like to get data from your previous tax returns into Excel and you only have printed copies. Just take a picture of each one, transfer the pictures to your Mac (OneDrive is great for this). Then, select Insert tab > Data From Picture > Picture From File. Then, follow the on-screen instructions to convert picture to data.
Availability
This feature is available to Office 365 subscribers on version 16.38 or greater.
Feedback
We hope you love this powerful new way to get data into Excel with ease, and we’d love to hear what you think about it. Please click the Feedback button near the top-right corner in Excel and let us know. We’re excited to hear from you!
by Scott Muniz | Jul 2, 2020 | Uncategorized
This article is contributed. See the original author and article here.
Hello everyone, here is part 6 of a series focusing on Application Deployment in Configuration Manager. This series is recorded by @Steve Rachui, a Microsoft principal premier field engineer. These tutorials are from our library and uses Configuration Manager 2012 in the demos, however the concepts are still relevant for Configuration Manager current branch.
This session moves back to the server side to detail package creation and back end processing with the ultimate goal of preparing policy for consumption by the client.
Next in the series Steve demonstrates some of the database changes that happen as a result of creating a sample application.
Posts in the series
Go straight to the playlist
by Scott Muniz | Jul 2, 2020 | Azure, Microsoft, Technology, Uncategorized
This article is contributed. See the original author and article here.
Azure Stack Hub is an extension of Azure that provides a way to run apps in an on-premises environment and deliver Azure services in your datacenter. In this episode of One Ops Question @thomasmaurer talks about the different use cases is can be applied to.
I often get asked by customers about what are the use cases for Azure Stack Hub. It really comes down to bringing Azure services to your own datacenter or your location.
For example you have compliance reason where you can’t use Azure in another country this is where address that Azure Stack Hub can come in and bring those Azure services to you. This allows you to
confidently make technology decisions based on your business requirements, rather than business decisions based on technology limitations.
Here are some of the use cases:
-
Edge and disconnected solutions. this will address latency and connectivity requirements by processing data locally in Azure Stack Hub and then aggregating it in Azure for further analytics, with common app logic across both. You can even deploy Azure Stack Hub disconnected from the internet without connectivity to Azure. Think of factory floors, cruise ships, and air-gaped networks as examples.
-
Cloud apps that meet varied regulations. Develop and deploy apps in Azure with full flexibility to deploy on-premises with Azure Stack Hub to meet regulatory or policy requirements. No code changes are needed. App examples include global audit, financial reporting, foreign exchange trading, online gaming, and expense reporting.
-
Cloud app model on-premises. Use Azure services, containers, serverless, and microservice architectures to update and extend existing apps or build new ones. Use consistent DevOps processes across Azure in the cloud and Azure Stack Hub on-premises to speed up app modernization for core mission-critical apps.
There are even Azure Stack Hub datacenter integration walkthrough that describes the end-to-end process for Azure Stack Hub datacenter integration, from purchasing to post-deployment support..
You can always refer to our documentation to learn more about Azure Stack Hub here: https://cda.ms/1nH and if you’re interested, try Azure for yourself: https://aka.ms/TryAzure13
Cheers!
by Scott Muniz | Jul 2, 2020 | Azure, Microsoft, Technology, Uncategorized
This article is contributed. See the original author and article here.
We are making available the private preview of Azure Arc enabled SQL Server. To read more, see the original article in the SQL Server Tech Community.
-Marko

Recent Comments