Dan Kershaw
Normal
Dan Kershaw
3
6436
2024-05-15T17:40:00Z
2024-05-15T17:43:00Z
1
786
4484
37
10
5260
16.00
Clean
Clean
false
false
false
false
EN-GB
X-NONE
X-NONE
We’re thrilled to announce that Bicep templates for Microsoft Graph resources will be in public preview starting May 21st. Bicep templates bring declarative infrastructure-as-code (IaC) capabilities to Microsoft Graph resources. This new capability will initially be available for core Microsoft Entra ID resources.
Bicep templates for Microsoft Graph resources allow you to define the tenant infrastructure you want to deploy, such as groups or applications, in a file, then use the file throughout the development lifecycle to repeatedly deploy your infrastructure. The file uses the Bicep language, a domain-specific language (DSL), that uses declarative syntax to deploy resources typically used in DevOps and infrastructure-as-code solutions.
What problems does this solve?
Azure Resource Manager or Bicep templates allow you to declare Microsoft Azure resources in files and deploy those resources into your infrastructure. Configuring and managing your Azure services and infrastructure often includes managing Microsoft Entra ID resources, like applications and groups. Until now, you had to orchestrate your deployments between two mechanisms using ARM or Bicep template files for Azure resources and Microsoft Graph PowerShell for Microsoft Entra ID resources.
Now, with the Microsoft Graph Bicep release, you can declare the Microsoft Entra ID resources in the same Bicep files as your Azure resources, making configurations easier to define, and deployments more reliable and repeatable.
Let’s look at how this works and then we’ll run through an example.
The Microsoft Graph Bicep extension
To provide support for Bicep templates for Microsoft Graph resources, we have released the new Microsoft Graph Bicep extension that allows you to author, deploy, and manage supported Microsoft Graph resources (initially Microsoft Entra ID resources) in Bicep template files either on their own, or alongside Azure resources.
Authoring experience
You get the same first-class authoring experience of the Bicep Extension for VS Code when you use it to create your Microsoft Graph resource types in Bicep files. The editor provides rich type-safety, IntelliSense, and syntax validation.
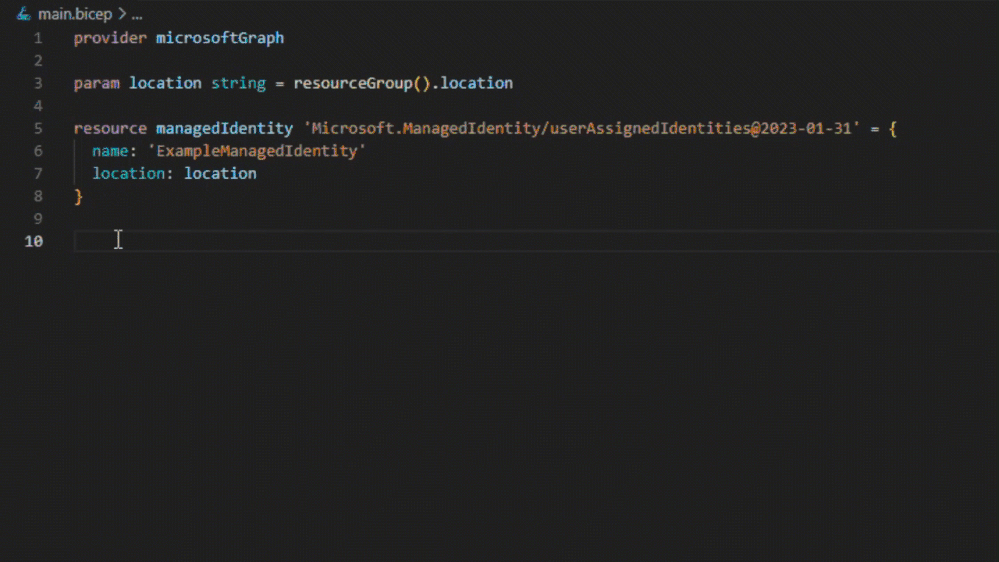
Editing a Bicep file containing Microsoft Graph resources
Once you have authored your Bicep file, you can deploy it using familiar tools such as Azure PowerShell and Azure CLI. When the deployment request is made to the Azure Resource Manager the deployments engine orchestrates the deployment of interdependent resources so they’re created in the correct order, including the Microsoft Graph resources.
The following image shows a Bicep template file where the Microsoft Graph group creation is dependent on the managed identity resource, as it is being added as a group member. The deployments engine first sends the managed identity request to the Resource Manager, which routes it to the Microsoft.ManagedIdentity resource provider. Next, the deployments engine sees that Microsoft.Graph/groups is an extensible resource, so it knows to route this resource request to the Microsoft Graph Bicep extension. The Microsoft Graph Bicep extension then translates the groups resource request into a request to Microsoft Graph.
Deploying a Bicep file containing Microsoft Graph resources
Scenario: Using managed identities with security groups and app roles
Using a Microsoft Entra ID group to assigned roles to managed identities
However, this configuration isn’t possible using a Bicep or Resource Manager template. With Microsoft Graph Bicep extension, this limitation is removed. Rather than assigning and managing multiple Microsoft Azure role assignments, role assignments can be managed via a security group through a single Bicep file.
Bicep file declaring an Microsoft Entra ID group with a managed identity member In the example above, a security group can be created and referenced, whose members can be managed identities. With Bicep templates for Microsoft Graph resources, declaring Microsoft Graph and Microsoft Azure resources together in the same Bicep files, enables new and simplifies existing deployment scenarios, bringing reliable and repeatable deployments.
This article is contributed. See the original author and article here.
Introduction
As ransomware attacks grow in number and sophistication every year, threat actors can quickly impact business operations if organizations are not well prepared. In this blog, we detail an investigation into a ransomware event. During this intrusion the threat actor progressed through the full attack chain, from initial access through to impact, in less than five days, causing significant business disruption for the victim organization.
During the investigation, the Microsoft Incident Response team (formerly known as DART) identified the threat actor employing a range of tools & techniques to achieve their objectives, including:
Exploitation of unpatched internet exposed Microsoft Exchange Servers
Web Shell deployment facilitating remote access
Use of living of the land tools for persistence and reconnaissance
Cobalt Strike beacons for command and control
Process Hollowing and the use of vulnerable drivers for defense evasion
Deployment of custom developed backdoors to facilitate persistence
Deployment of a custom developed data collection and exfiltration tool
Forensic analysis
Initial Access
In order to obtain initial access into the victim’s environment, the Threat Actor was observed exploiting known vulnerabilities (ProxyShell) on unpatched Microsoft Exchange Servers:
CVE-2021-34473
CVE-2021-34523
CVE-2021-31207
The exploitation of these vulnerabilities allowed the Threat Actor to:
Attain SYSTEM level privileges on the compromised Exchange host
Enumerate LegacyDN of users by sending an Autodiscover requests, including SIDs of users
Construct a valid authentication token and use it against the Exchange Powershell backend
Impersonate domain admin users and creates a web shell by using the New-MailboxExportRequest cmdlet
Create web shells in order to obtain remote control on the affected servers
The Threat Actor was observed operating from the following IP to exploit ProxyShell and access the web shell:
185.225.73[.]244
Persistence
Backdoor
Microsoft IR identified the creation of Registry Run Keys, a common persistence mechanism employed by threat actors to maintain access to a compromised device, where a payload is executed each time a specific user logs in.
api-msvc.dll, detected by Microsoft Defender Antivirus as Trojan:Win32/Kovter!MSR, was determined to be a backdoor capable of collecting system information such as installed antivirus products, device name and IP address. This information is then sent via HTTP POST request to a command and control (C2) channel:
Unfortunately, the organization was not using Microsoft Defender as the primary AV/EDR solution, preventing to take action against the malicious code.
An additional file name,api-system.png, was identified with similarities to api-msvc.dll. This file behaved like a DLL, had the same default export function, and also leveraged Run Keys for persistence.
Cobalt Strike Beacon
The threat actor leveraged Cobalt Strike, a common commercial penetration testing tool, to achieve persistence. The file sys.exe, detected by Microsoft Defender Antivirus as Trojan:Win64/CobaltStrike!MSR, was determined to be a Cobalt Strike beacon and was downloaded directly from the file sharing service temp.sh:
hxxps://temp[.]sh/szAyn/sys.exe
This beacon was configured to communicate with the following command and control (C2) channel:
Microsoft IR frequently observes threat actors leveraging legitimate remote access during an intrusion, in an effort to blend in on a victim network. In this case, the threat actor utilized AnyDesk, a common remote administration tool to maintain persistence and move laterally within the network. AnyDesk was installed as a Service and was executed from the following paths:
C:systemtestanydeskAnyDesk.exe
C:Program Files (x86)AnyDeskAnyDesk.exe
C:ScriptsAnyDesk.exe
Successful connections were observed in AnyDesk Logs (ad_svc.trace) involving anonymizer service IP addresses linked to TOR and MULLVAD VPN. This is a common technique that actors employ to obscure their source IP ranges.
Reconnaissance and Privilege Escalation
Microsoft IR found the presence and execution of the network discovery tool NetScan being used by the threat actor to perform network enumeration, under the following executable names:
Evidence of likely Mimikatz usage, a credential theft tool commonly used by threat actors, was also uncovered, through the presence of a related log file mimikatz.log.
Microsoft IR assesses that Mimikatz was likely used to attain credentials for privileged accounts.
Lateral Movement
Using compromised domain admin credentials, the threat actor used Remote Desktop Protocol and Powershell Remoting to obtain access to other servers in the environment, including Domain Controllers.
Data Staging and Data Exfiltration
A suspicious file named “explorer.exe” was identified. The file was recognized by Microsoft Defender Antivirus as “Trojan:Win64/WinGoObfusc.LK!MT” and quarantined, but after disabling Windows Defender Antivirus service, the threat actor was able to execute the file using the following command:
Explorer.exe was reverse engineered by Microsoft IR and determined to be ExByte, a GoLang based tool developed and commonly used in BlackByte ransomware attacks for collection and exfiltration of files from victim networks.
The binary is capable of enumerating files of interest across the network, and upon execution creates a log file containing a list of files and associated metadata.
Multiple log files were uncovered during the investigation in the path:
C:ExchangeMSExchLog.log
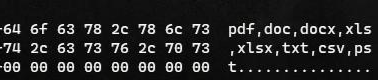
Analysis of the binary revealed a list of file extensions which are targeted for enumeration.
Binary analysis showing file extensions enumerated by explorer.exe
Forensic analysis identified a file named data.txt that was created and later deleted after ExByte execution. This file contained obfuscated credentials which ExByte leveraged to authenticate to the popular file sharing platform Mega NZ, via it’s API at:
hxxps://g.api.mega.co[.]nz
Binary analysis showing explorer.exe functionality for connecting to file sharing service MEGA NZ
Microsoft IR also determined that this tool was crafted specifically for the victim, as it contained a hardcoded device name belonging to the victim and an internal IP address.
Execution Flow
Upon execution ExByte decodes several strings and checks if the process is running with privileged access by reading .PHYSICALDRIVE0:
If this check fails, ShellExecuteW is invoked with IpOperation parameter RunAs which runs explorer.exe with elevated privilege.
After this access check, explorer.exe attempts to read data.txt file in the current location:
If the text file doesn’t exist, it invokes a command for self-deletion and exits from memory:
If data.txt exists, explorer.exe reads the file, passes the buffer to Base64 decode function and then decrypts the data using the key provided in the command-line. The decrypted data is then parsed as JSON below and fed for login function:
{
“a”:”us0”,
“user”:””
}
Finally, it then forms an URL for login to the API of file sharing service MEGA NZ:
hxxps://g.api.mega.co[.]nz/cs?id=1674017543
Data Encryption and Destruction
MICROSOFT IR found several devices where files had been encrypted and identified suspicious executables, detected by Microsoft Defender Antivirus as Trojan:Win64/BlackByte!MSR, with the following names:
wEFT.exe
schillerized.exe
The files were analyzed and determined to be BlackByte 2.0 binaries responsible for encryption across the environment. This binary requires an 8-digit key number to encrypt files.
Two modes of execution were identified:
When the -s parameter is provided, the ransomware self-deletes and encrypts the machine it was executed on
When the -a parameter is provided, the ransomware conducts enumeration and uses an UPX packed version of PsExec to deploy across the network.
Several domain admin credentials were hardcoded in the binary, facilitating the deployment of the binary across the network.
Depending on the switch (-s or -a), execution may create below files:
C:SystemDataM8yl89s7.exe (Random Name – UPX Packed PsExec)
Some capabilities identified for the BlackByte 2.0 ransomware were:
AV/EDR Bypass:
The file rENEgOtiAtES created matches RTCore64.sys, a vulnerable driver (CVE-2049-16098) that allows any authenticated user to read/write to arbitrary memory.
The BlackByte binary then creates and starts a service named RABAsSaa calling rENEgOtiAtES, and exploits this service to evade detection by installed AV/EDR software.
Process Hollowing
Invokes svchost.exe, injects to it to complete device encryption, and self-deletes by executing the following command:
The table below shows IOCs observed during our investigation. We encourage our customers to investigate these indicators in their environments and implement detections and protections to identify past related activity and prevent future attacks against their systems.
Originating IP address for ProxyShell exploitation and web shell interaction
NOTE: These indicators should not be considered exhaustive for this observed activity.
Detections
Microsoft 365 Defender
Microsoft Defender Antivirus
Trojan:Win32/Kovter!MSR
Trojan:Win64/WinGoObfusc.LK!MT
Trojan:Win64/BlackByte!MSR
HackTool:Win32/AdFind!MSR
Trojan:Win64/CobaltStrike!MSR
Microsoft Defender for Endpoint
Microsoft Defender for Endpoint customers should watch for these alerts that can detect behavior observed in this campaign. Note however that these alerts are not indicative of threats unique to the campaign or actor groups described in this report.
‘CVE-2021-31207’ exploit malware was detected
An active ‘NetShDisableFireWall’ malware in a command line was prevented from executing.
Suspicious registry modification.
‘Rtcore64’ hacktool was detected
Possible ongoing hands-on-keyboard activity (Cobalt Strike)
A file or network connection related to a ransomware-linked emerging threat activity group detected
Suspicious sequence of exploration activities
A process was injected with potentially malicious code
| where ProcessCommandLine has_any (“ExcludeDumpster”,”New-ExchangeCertificate”) and ProcessCommandLine has_any ((“-RequestFile”,”-FilePath”)
Suspicious Vssadmin Events
DeviceProcessEvents
| where ProcessCommandLine has_any (“vssadmin”,”vssadmin.exe”) and ProcessCommandLine has “Resize ShadowStorage” and ProcessCommandLine has_any (“MaxSize=401MB”,” MaxSize=UNBOUNDED”)
Conclusions
BlackByte Ransomware attacks are still targeting organizations having infrastructure with old unpatched vulnerabilities, allowing them to accomplish their objectives with a minimum effort. According to Shodan, at the time this blog was written, there are nearly 3300 public facing servers still affected to ProxyShell vulnerabilities, making this an easy target for threat actors looking to impact organizations around the world.
As Microsoft shows in theMicrosoft Digital Defense Report, key practices like “Keep up to date” in conjunction to other good practices mentioned from a basic security hygiene strategy, could protect against 98 percent of attacks.
As new tools are being developed by threat actors, a modern threat protection solution M365 Defender is necessary to prevent and detect the multiple techniques used in the attack chain, especially where the threat actor attempts to evade or disable specific defense mechanisms.
Hunting for malicious behavior should be performed regularly in order to detect potential attacks that could evade detections, as a complementary activity for continuous monitoring from security tools alerts and incidents.
To understand how Microsoft can help you secure your network and respond to network compromise, visit https://aka.ms/MicrosoftIR.
Appendix
Encryption
Different file extensions are targeted by BlackByte binary for Encryption:
.4dd
.4dl
.accdb
.accdc
.accde
.accdr
.accdt
.accft
.adb
.ade
.adf
.adp
.arc
.ora
.alf
.ask
.btr
.bdf
.cat
.cdb
.ckp
.cma
.cpd
.dacpac
.dad
.dadiagrams
.daschema
.db
.db-shm
.db-wal
.db3
.dbc
.dbf
.dbs
.dbt
.dbv
.dbx
.dcb
.dct
.dcx
.ddl
.dlis
.dp1
.dqy
.dsk
.dsn
.dtsx
.dxl
.eco
.ecx
.edb
.epim
.exb
.fcd
.fdb
.fic
.fmp
.fmp12
.fmpsl
.fol
.fp3
.fp4
.fp5
.fp7
.fpt
.frm
.gdb
.grdb
.gwi
.hdb
.his
.ib
.idb
.ihx
.itdb
.itw
.jet
.jtx
.kdb
.kexi
.kexic
.kexis
.lgc
.lwx
.maf
.maq
.mar
.masmav
.mdb
.mpd
.mrg
.mud
.mwb
.myd
.ndf
.nnt
.nrmlib
.ns2
.ns3
.ns4
.nsf
.nv
.nv2
.nwdb
.nyf
.odb
.ogy
.orx
.owc
.p96
.p97
.pan
.pdb
.pdm
.pnz
.qry
.qvd
.rbf
.rctd
.rod
.rodx
.rpd
.rsd
.sas7bdat
.sbf
.scx
.sdb
.sdc
.sdf
.sis
.spg
.sql
.sqlite
.sqlite3
.sqlitedb
.te
.temx
.tmd
.tps
.trc
.trm
.udb
.udl
.usr
.v12
.vis
.vpd
.vvv
.wdb
.wmdb
.wrk
.xdb
.xld
.xmlff
.abcddb
.abs
.abx
.accdw
.and
.db2
.fm5
.hjt
.icg
.icr
.kdb
.lut
.maw
.mdn
.mdt
File extensions targeted by BlackByte binary for encryption
Also, the following Shared Folders are targeted to encrypt:
This article is contributed. See the original author and article here.
¡GitHub y Microsoft lanzaron una nueva iniciativa para ayudarte a impulsar tu carrera en tecnología con la serie de charlas en vivo – Certifícate con GitHub – comienza el 6 de junio y finaliza hasta el 27 de junio. Estas sesiones están diseñadas para ayudarte a obtener la certificación de Fundamentos de GitHub y para ayudarte a explorar herramientas esenciales como GitHub Copilot y GitHub Codespaces. Además, tendrás la oportunidad de obtener un voucher gratuito para el examen de la certificación Fundamentos de GitHub*
* Al final de la sesión, es posible que incluso recibas un cupón (voucher) gratuito para el examen de la certificación de GitHub Foundations, todo basado en el orden de llegada (first-come, first-served basis).
Oferta válida solo hasta agotar existencias. Límite de un cupón de GitHub por persona. Esta oferta no es transferible y no se puede combinar con ninguna otra oferta. Esta oferta finaliza el 27 de junio de 2024 o hasta agotar existencias, y no se puede canjear por dinero en efectivo. Los impuestos, si los hubiera, son responsabilidad exclusiva del destinatario. Microsoft se reserva el derecho de cancelar, cambiar o suspender esta oferta en cualquier momento sin previo aviso.
Obtener la certificación de GitHub es una excelente manera de mostrar tus habilidades y comprensión de las herramientas y tecnología utilizada por más de 100 millones de desarrolladores en todo el mundo.
Durante estas charlas, estarás interactuando con expertos de Microsoft y GitHub que te guiarán durante todas estas sesiones sobre diferentes temas relacionados con la certificación de GitHub Foundations.
Además, al registrarte y asistir a las sesiones en vivo, podrías recibir un voucher gratuito para la certificación GitHub Foundations – todo basado en orden de llegada (first-come, first-served).
Obtener una certificación de GitHub te brinda una ventaja competitiva en el mercado laboral para permitirte demostrar tus habilidades de GitHub en un área en específico.
Estas sesiones estarán llenas de consejos, trucos y ejercicios prácticos que te ayudarán a construir una base sólida para esta certificación. Ya sea que estés comenzando o estés buscando mejorar tus habilidades, este es un evento único para cualquier persona interesada en hacer crecer su carrera en tecnología.
Todas nuestras sesiones comenzaran en base a la zona horaria de Ciudad de México.
Sesión
Descripción
Programando más rápido con GitHub Copilot
6 de junio 2024– 6 pm (GMT-6)
¡Aprovecha GitHub Copilot para automatizar tareas repetitivas y aumentar tu productividad! En esta sesión daremos una introducción a esta herramienta, sus funciones más nuevas, prompts interactivos y ¡mucho más!
Seguridad con tus proyectos en GitHub
12 de Junio 2024– 6 pm (GMT-6)
Descubre cómo aplicar seguridad de GitHub Advanced Security a tus propios proyectos y protegerlos de amenazas y vulnerabilidades de seguridad.
¡Administra tus proyectos con GitHub!
20 de Junio 2024 – 6 pm (GMT-6)
Utiliza GitHub para administrar el desarrollo de tus proyectos de software. En esta sesión, hablaremos sobre la gestión de proyectos con issues, pull requests y seguimiento de cambios.
Trucos para automatizar tus proyectos con GitHub
27 de junio 2024 – 6 pm (GMT-6)
¡Descubre cómo puedes potenciar tus proyectos de programación! Aprende a automatizar cualquier actividad de tus proyectos de software utilizando GitHub. En esta sesión usaremos GitHub Actions, GitHub Copilot y GitHub Codespaces.
Al obtener la certificación de Fundamentos de GitHub, puedes demostrar tu comprensión de los temas y conceptos fundamentales de colaborar, contribuir y trabajar en GitHub. Este examen cubre:
¡El GitHub Challenge es una aventura de aprendizaje de 30 días en Microsoft Learn! Es completamente gratis, súper divertido y con ejercicios dinámicos. ¡Regístrate y vuélvete experto en GitHub Copilot! Además, crearás aventuras interesantes con Python y JavaScript mientras usas GitHub Codespaces y crearás proyectos del mundo real con GitHub Copilot, ¡justo a tiempo para Microsoft Build!Este desafío comienza el 21 de Mayo y finaliza el 21 de Junio de 2024.
Queremos apoyarte en el desarrollo y mejora de tus habilidades. ¡Prepárate para iniciar este emocionante desafío! ¡Este viaje de aprendizaje ha sido diseñado para aumentar tu comprensión de la IA y convertirte en un experto en GitHub Copilot! Este reto en línea te ayudará a prepararte para el examen de certificación de Fundamentos de GitHub, cubriendo algunos temas que pueden aparecer en el examen.
El GitHub Challenge está disponible todos los días y a cualquier hora en Microsoft Learn. Podrás aprender cuando mejor te convenga y a tu propio ritmo.
Al completar este desafío antes del 21 de junio de 2024, recibirás una insignia (badge)digital especial en tu perfil de Microsoft Learn por finalizar esta experiencia de aprendizaje
Esta insignia solo está disponible durante Microsoft Build, nuestro evento para desarrolladores más grande del año.
¡Aprovecha esta increíble y única oportunidad para seguir aprendiendo y haciendo crecer tu carrera en tecnología! ¡Regístrate al reto aquí!
Conoce nuestra guía gratuita con ejercicios dinámicos para ayudarte a prepararte para esta certificación. Puedes leer toda la información que necesitas aquí: aka.ms/InfoGuideGitHub
El código del voucher (cupón) se ingresará manualmente durante el proceso de pago. A continuación, se detallan los pasos de registro y para agendar tu examen:
Inicia sesión en el sitio de registro del examen y elige la certificación deseada. Esto te redireccionará a la página de registro.
Haz clic en “Programar/realizar examen” para continuar.
Completa el formulario de registro y selecciona “Programar examen” en la parte inferior.
Esta acción transmitirá tus detalles de elegibilidad a nuestro proveedor de pruebas, PSI.
Al enviar el formulario de registro, serás dirigido al sitio de pruebas de PSI para finalizar la programación de su examen.
Durante el proceso de pago en el sitio de pruebas de PSI, encontrarás un campo designado donde puedes ingresar el código del voucher (cupón) para poner a cero el saldo.
This article is contributed. See the original author and article here.
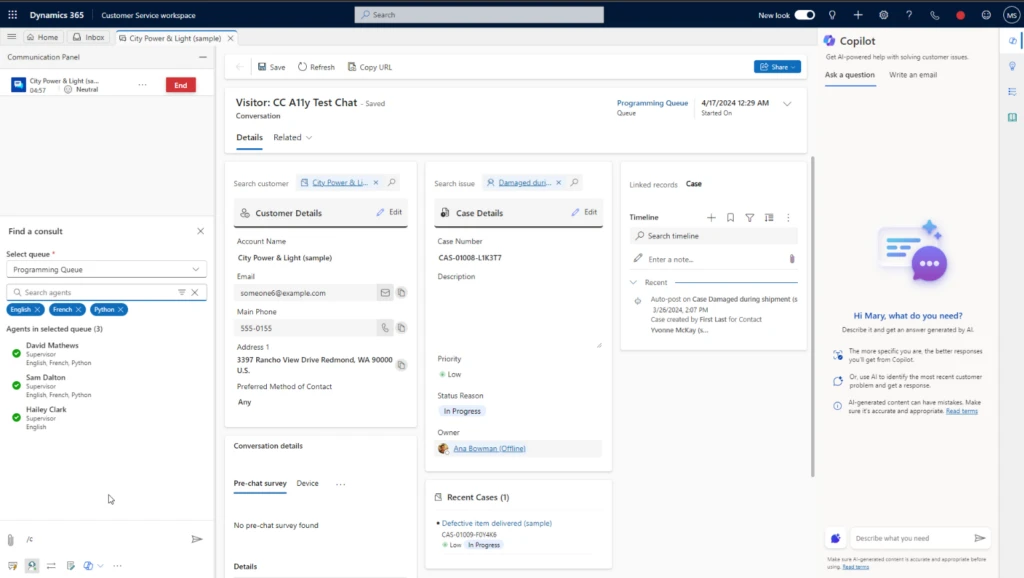
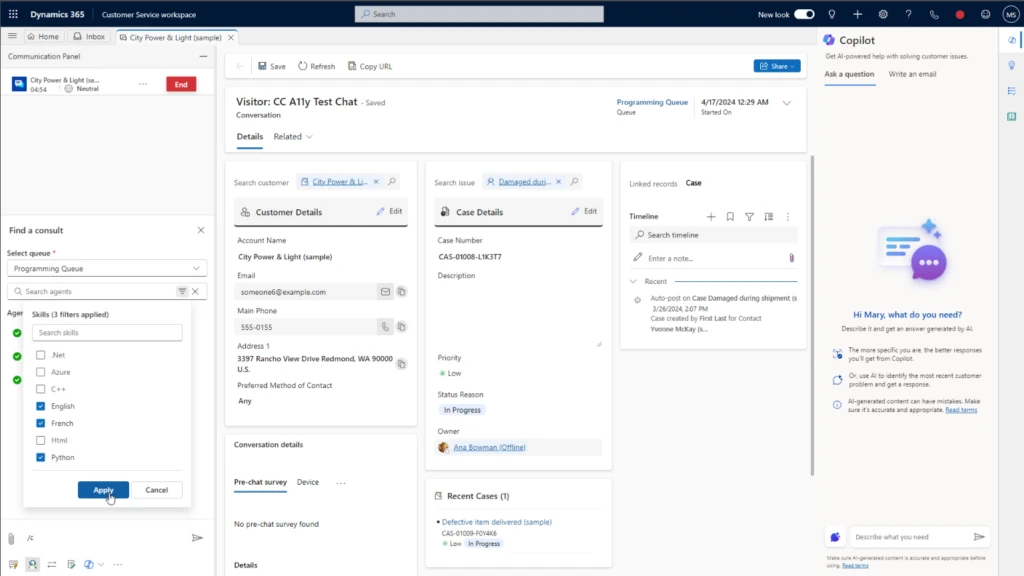
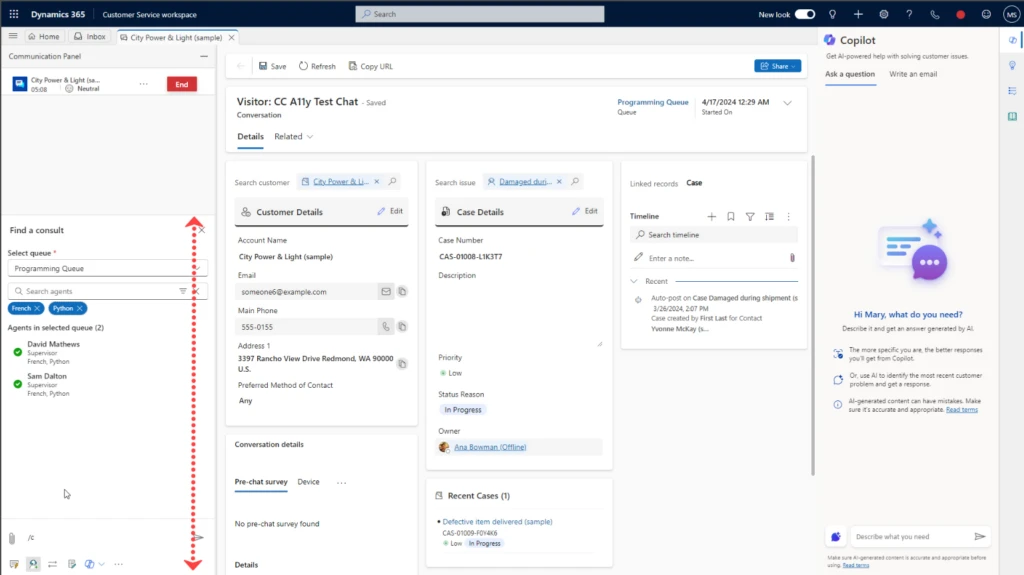
We’re excited to announce skill-based agent search, designed to enhance agent collaboration and improve agent efficiency within Dynamics 365 Customer Service. With this latest release, agents can now search for other agents based on specific skills, facilitating seamless consultations and transfers during customer interactions.
Empowering agents with skill-based search
In today’s fast-paced customer service environment, it’s crucial for agents to have access to the right expertise at the right time. With our new skill-based search functionality, agents can now easily identify and connect with other agents who possess the necessary skills to address customer inquiries effectively.
Efficient consultations and transfers
During a conversation with a customer, agents can initiate a consultation with another agent by specifying desired skills such as language proficiency or product knowledge. The system will then display a list of agents who match the specified criteria. The list includes their names, presence status, and relevant skills.
Seamless user experience
We’ve also redesigned the entire user interface for consult and transfer, providing agents with more modern and intuitive controls. We also made it easier to find the right agent without needing to scroll.
Optimal service delivery
By enabling agents to search for and collaborate with other agents based on skills, organizations can provide optimal customer service. This optimization helps significantly reduce misroutes. Agents can quickly consult with experts in specific areas, ensuring that customer inquiries are addressed by the best-suited agent, ultimately enhancing customer satisfaction and loyalty.
Enable skill-based search for your agents
The latest release will have this default on for all customers. Administrators do not need to perform additional configuration steps to turn this on.
We’re committed to continuously improving our platform to meet the evolving needs of our customers. Stay tuned for more updates and enhancements to come!
This article is contributed. See the original author and article here.
Helping you build better apps has been one of our key focus areas in Azure. Our latest tooling focuses on providing guidance for architecting, optimizing, and deploying apps. Whether you’re creating a new proof of concept or improving an existing app, these capabilities can boost productivity and performance. These capabilities are all in Preview, so please give them a try and let us know what you think!
Starting Right: Architecting Your Azure App
Let’s say you’re starting a proof of concept for a new application. Normally, you might spend a lot of time picking services, architecting apps, and deploying them based on industry best practices. Better Together can streamline this process with the below capabilities.
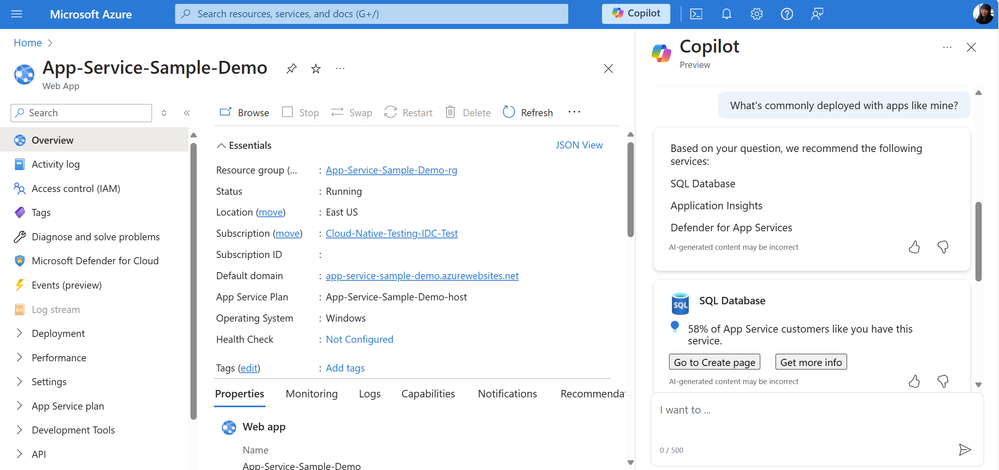
Better Together in Microsoft Copilot for Azure
The Better Together capability which can be accessed from Copilot can be helpful to understanding if you’re on the right track when building your app. In the past it might’ve been time-consuming to learn about the kinds of services that similar apps are using through docs and videos. This capability can streamline some of this process by recommending services based on patterns that other similar apps have used.
Azure Better Together in Copilot
To give this a try, navigate to the Azure Portal and select the Copilot button in the toolbar to open the chat window. Here you can ask questions to recommended services for your app, or architecture, including, “What are popular services that are deployed with App Service apps like mine?” and “Which database should I use with my ACA app?”, and “What services would you recommend to implement distributed caching?”
Azure Better Together in Copilot
Sometimes it’s important to validate if you’re on the right track. When you ask architectural or infrastructure-level questions to Azure Copilot, it helps you discover the most commonly used services for your specific use case. In the example below, after identifying performance bottlenecks in your app and considering implementing distributed caching to enhance performance, the recommendation points to Azure Cache for Redis. This service is widely deployed by many App Service apps similar to yours.
Boosting Performance: Optimizing Your Azure App
If your App Service app is running a little slower than expected, or if you’re suspecting any performance bottlenecks, these are some capabilities that can diagnose and optimize these problems.
Diagnostics Insights (Preview)
Diagnostic logs can return pages of information that are difficult to interpret. This capability can make it easier to identify anomalies and quickly identify bottlenecks . In the Azure Portal, you can efficiently evaluate your application’s CPU usage and track any anomalies by navigating to Diagnose & Solve Problems > Web App Slow. Within this section, you’ll find a chart that provides insights into performance and latency.
Availability and Performance for Azure Apps
Notably, over the last 24 hours, approximately 90% of users accessing this web app experienced low latency.
Another way to access suggestions is to type in “my web app is slow” into Copilot for Azure, which will offer suggestions around any bottlenecks.
Diagnostic Tooling for Azure Apps
Diagnostic charts can sometimes be time-consuming to analyze. However, Copilot offers a helpful Summarization capability. When you input variations of “summarize this page,” Copilot will generate concise summaries of the insights, allowing you to quickly grasp the main points without having to read through every chart and detail.
Diagnostic Tooling for Azure Apps
Application Insights Code Optimizations (Preview)
Performance can be improved by making code-level changes. Code Optimizations helps identify where to make these improvements. By leveraging AI, Code Optimizations detects CPU and memory bottlenecks of your application during runtime. It is available for .NET applications that have Application Insights Profiler enabled. To access Code Optimizations in the Azure Portal, navigate to the Performance blade in Application Insights. For App Service, it’s also available in Diagnose & Solve Problems > Web App Slow.
In this example, some of the performance issues identified may be caused by inefficient code, which can be investigated.
Code Optimizations for Azure Apps
Selecting any of these suggestions will open more details about the performance issue, show where and when in the code it’s occurring, and show the recommended solution.
Code Optimizations for Azure Apps
For many recommendations, a code fix can be generated using the Code Optimizations extension (currently in limited preview) for Visual Studio and Visual Studio Code – Insiders. You can sign up here.
Code Optimizations for Azure Apps in Visual Studio
If you have deployed an App Service app and you’re unsure which services to use to improve scalability and reliability for it, these capabilities can help optimize without reinventing the wheel.
Better Together (Preview) in Azure Portal
It can be time-consuming to pick, create, deploy, and connect a service to your App Service app. Better Together can help you deploy and connect popular services for your App Service app. This capability primarily focuses on connecting newly-created resources to your App Service app more easily. Navigate to Better Together for your App Service app through the Azure Portal using the menu item Better Together.
Better Together for App Service Apps
Enabling Azure Cache for Redis will automatically create a new Redis instance and establish the connection with your existing App Service app. If you choose to “Create” any of the other services, you’ll be directed to their onboarding flow, where you’ll receive guidance on creating and connecting the service. Stay tuned for the next release for a more customized experience!
Take a look at these capabilities in action with the video below.
Conclusion: Better Together
Azure strives to empower you to create robust, high-performing apps. Whether you’re starting a new app or improving an existing one, we are creating tools and services that can help. Please give these capabilities a try and let us know what you think by leaving a comment or emailing us at bettertogetherteam@microsoft.com.


.png")
.png")
.png")
.png")

.png")
.png")


Recent Comments