This article is contributed. See the original author and article here.
APIs are everywhere and there are many ways to host them in Azure! Let us see what are the different possibilities with the pros & cons of each. I am not going to discuss the bits and bytes about each possibility. The purpose of this post is to give you a rough idea of what is possible for a simple scenario (single region, high-availability and disaster recovery are out of scope). I will provide small diagrams for more advanced scenarios.
1) Function App – Consumption tier
Function Apps ship with HTTP-triggered functions. These can be suitable to expose tiny APIs.
Pros: Cost-friendly (economies of scale), Easy to deploy, Fully elastic with built-in auto-scaling from 0 to n instances.
Cons: Limited security controls. Network ACLs are the only way to limit public exposure. Data accessed by such functions must be public from a connectivity perspective. Cold start due to serverless tier. Limited execution time as well as per-execution resource consumption. No WAF (Web Application Firewall) features.
Use cases: Lab, PoC, Prototyping, Limited budgets, Basic API needs (ie: no catalog, no versioning, etc.), asynchronous APIs, Synchronous APIs that can live with the cold start, No strong compliance requirements.
2) Multi-Tenant App Service – Standard tier
Like functions, Web Apps are pretty neat and easy to get started with. Microsoft is managing everything for you under the hoods.
Pros: Cost-friendly (economies of scale) but fixed cost incurred (unlike functions on consumption tier), Easy to deploy, Auto-scaling plans. Resource is limited to the capacity you are willing to pay. No cold start!
Cons: Limited security controls. Network ACLs are the only way to limit public exposure. Data accessed by such apps must be public from a network perspective. No WAF.
Use cases: Lab, PoC, Prototyping, Limited budgets, Basic API needs (ie: no catalog, no versioning, etc.), No strong compliance requirements.
3) Azure Container Instances (ACI)
While Azure Container Instances can be used to host long-running services, I would advise against this idea and keep the ACIs for asynchronous job operations, short-lived executions and as the serverless (virtual kubelets) part of Azure Kubernetes Service.
Pros: Cost-friendly (pay per second of execution), providing the API is not constantly up and running.
Cons: Limited security controls with Windows Containers, better with Linux as Linux-based ACIs can integrate with virtual networks.
Use cases: Lab, PoC, Prototyping, Limited budgets, Basic API needs (ie: no catalog, no versioning, etc.), No strong compliance requirements. Lift & shift of plain old legacy Windows-based backend services.
4) Functions Apps Consumption tier or App Service standard+ Azure API Management (APIM) Consumption tier
In this setup, you intend to publish APIs through Azure API Management. The pros & cons of the underlying hosting option (app service or function apps) remain as explained earlier and are not repeated below.
Pros: Cost-friendly because the serverless flavor of APIM has no fixed cost. It will auto-scale with the actual demand. You can add features to your APIs such as enforcing policies (JWT validation, headers checks etc.) as well as version them.
Cons: More security controls but there is still a few major caveats: network ACLs remain the only way to limit public exposure of the backend and traffic cannot be forced through APIM because the consumption tier has no static IP so this can’t be used as a network ACL on the backend side. Data accessed by such apps must still be public from a network perspective. Still no WAF because APIM is a a PEP (Policy Enforcement Point) but not a WAF.
Use cases: Lab, PoC, Prototyping, Limited budgets, More advanced API needs (catalog, versioning, consistent way of exposing APIs etc.), No strong compliance requirements.
5) Functions Apps Consumption tier or App Service standard+ Azure API Management (APIM) Basic or Standard tier
In this setup, you intend to publish APIs (and enforce routing) through Azure API Management.
Pros: You benefit from APIM capabilities AND you can restrict traffic to the backend to your APIM instance because as of the basic tier, APIM comes with a static IP.
Cons: A bit more expensive (fixed cost for APIM). Manual scaling for the Basic tier (plans possible as of Standard). Data stores accessed by the backends must still be public from a network perspective. Still no WAF because APIM is a a PEP (Policy Enforcement Point) but not a WAF.
Use cases: Limited budgets, More advanced API needs (catalog, versioning, consistent way of exposing APIs etc.), No strong compliance requirements.
6) App Service (or Functions) on Premium tier+Private Endpoint+VNET Integration+WAF
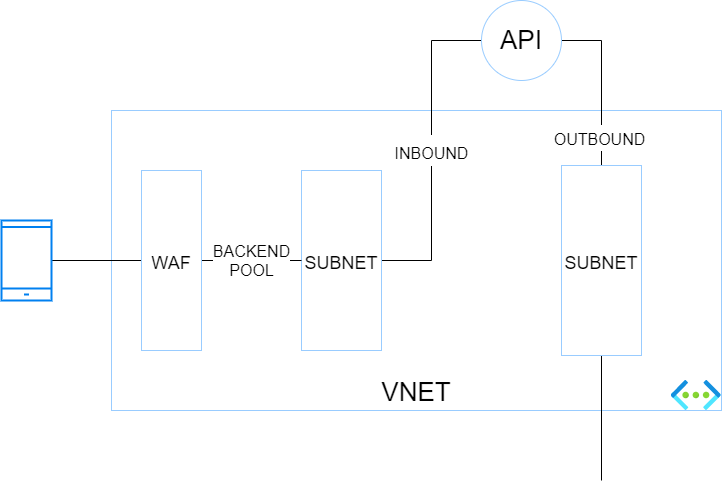
In this setup, you want isolate your backend services totally from internet and make them only accessible through a web application firewall (WAF). Because it is a little more complex, here is a small diagram showing the different blocs and their interactions.
The traffic flies from a caller (here a mobile device) to a WAF which has a public IP. The WAF has a backend pool targeting the endpoints defined in the corresponding private endpoint subnet. The app service is integrated with Azure Private Link (and private DNS zone) for the INBOUND traffic. VNET integration for the App Service (or function app) is enabled to handle the OUTBOUND traffic through another VNET’s subnet.
Pros: This hosting option is more secure than the preceding ones because the data stores can be firewalled thanks to the control over the outbound traffic of the API. The backend services are isolated from internet and proxied by a WAF.
Cons: This architecture is a bit convoluted and is not the best one to run at scale.
Use cases: Stronger focus on security. Basic API needs (no more APIM in the picture).
7) App Service (or Functions) on Premium tier+Private Endpoint+VNET Integration+WAF+APIM Premium
The purpose of this setup is the same as the previous one but you want to combine both WAF & APIM (how it should be) before hitting backend services.
Pros: Inbound traffic is more secure because it traverses a WAF and a PEP. Network ACLs can be set at backend level to only let the API gateway (which has a static IP) call the backend. Outbound traffic of the API gateway can be controlled by a NVA or Azure Firewall.
Cons: This architecture is a bit convoluted and is not the best one to run at scale. APIM premium is expensive but is required because at the time of writing (11/2021), only the Premium tier integrates with Virtual Networks.
Use cases: Stronger focus on security, advanced API needs and possible geo-distributed APIs setup.
WAF+APIM Premium+App Service Environment (ASE)
Before ASE v3, ILB ASEs had a rather bad reputation because of their cost (flat fees), and their complexity. It was indeed quite easy to break them with improperly configured firewall rules. ASE v3 are a breeze to setup and are less expensive (no more flat fee). Therefore ILB ASE comes back as a very interesting option because it offers the best-in-class security at an affordable price, at least from a backend hosting perspective.
Pros: Inbound and outbound traffic can be fully controlled by an NVA or Azure Firewall. Intra VNET traffic can be controlled with Network Security Groups. Backends are totally isolated from internet. This setup is scalable because the ASE can most tons of backends and functions. The underlying compute is based on a single-tenant architecture (Isolated tier).
Cons: Costs (incurred by the isolated tiers and APIM premium) and complexity. Although ASE v3 is a breeze compared to its predecessors, this setup is often part of a larger Hub & Spoke architecture, which involves a lot of networking and firewalling work. You do not get started with it over night!
Use cases: Stronger compliance requirements, advanced API needs and possible geo-distributed APIs setup. This setup is perfectly suitable as a Web Landing Zone that hosts tons of web apps and APIs.
WAF+APIM Premium+AKS
Kubernetes has become a first-class citizen everywhere and AKS is the Microsoft-managed K8s offering on Azure (By the way, Azure Arc also has a ton of handy features to manage K8s clusters at scale wherever they are hosted). So, with this in mind, I could not skip it. Here is a very simplified diagram showing the different building blocks:
Pros: Very similar to the previous architecture with regards to inbound and outbound, Hub & Spoke integration, etc.. although AKS adds a serious bits of extra complexity network-wise. AKS allows you to host nearly anything and has a very rich ecosystem. When I think AKS, I think all the benefits of VMs with all the benefits of cloud native architectures (Infrastructure as Code, increased resilience, zero downtime, releases during business hours, polyglot apps, etc.).
Cons: Costs incurred by APIM premium and the AKS node pools, which should involve at least 3 nodes but ideally 5 for a minimal production-grade setup. Another potential deal-breaker for some organizations is the complexity of K8s (AKS). App Services and Function Apps are way easierto work with and it is a Kubernetes lover who tells you this!
Use cases: Stronger compliance requirements, advanced API needs and possible geo-distributed APIs setup. This setup is perfectly suitable as a Web Landing Zone that hosts tons of web apps and APIs. Microservices architectures (K8s and its ecosystem, including service meshes, are very supportive of microservices architectures).
10) Container Apps
This new service (public preview in 11/2021) is very promising because it comes with some of the AKS promises without the complexity because Microsoft manages nearly everything for you. Container apps remind me to some extend Service Fabric Mesh, let’s hope they have a better future. However, at the time of writing, it is no way in line with typical enterprise needs (Hub & Spoke) but Microsoft is working on a BYO VNET feature. It is still a little early to come with pros & cons but here are a few of them.
Pros: Cost friendly since it scales from 0 to n, like Azure Functions. Easy to deploy and manage.
Cons: N/A (too early)
Use cases: right now, PoCs and protoyping only. In the future, microservices architectures, which is why this service has been built from the ground up.
This article is contributed. See the original author and article here.
Before implementing data extraction from SAP systems please always verify your licensing agreement.
OData services have become one the most powerful interfaces in SAP systems. In the last episode, we’ve built a simple pipeline that extracts business information from an OData service to a data lake and makes them available for further processing and analytics. We’ve created all required resources, including linked services and datasets, and we’ve used them to define the Copy Data activity. The extraction process run without any issues, and we were able to display data from the lake.
But imagine you’d like to change the data source. Instead of Sales Orders, you’d like to get information about Business Partners. To make such a change, you’d have to go through all resources and modify them. You’d have to alter the URL of the OData service, target location and entity. Quite a few changes! Alternatively, you could create a new set of objects, including the Copy Data activity. Both solutions are not ideal. As your project grows, maintaining a large set of resources can become a tremendous job. Not to mention the likelihood of making a mistake!
Fortunately, there is a solution! The Synapse Pipelines are highly customizable, and we can use dynamic parameters. Instead of hardcoding the URL of the OData service, we can use a parameter and provide the value before the pipeline starts. You can use the same approach also to customize the target directory or entity name. Pretty much everything can be parametrized, and it’s only up to you how flexible the pipeline will be.
Today I’ll show you how to use parameters to customize some of the resources. It is the first step towards making the pipeline metadata-driven. In the next episode, we’ll expand the solution even further and describe how to read parameters from an external service. This way you’ll be able to add or modify the OData service without making any changes to the pipeline.
DEFINING PARAMETERS
There is a GitHub repository with source code for each episode. Learn more:
Parameters are external values that you use to replace hardcoded text. You can define them for every resource – a pipeline, a dataset or a linked service – they all accept external values. To assign parameters at the runtime, you can use expressions that I find very similar to Excel formulas. We will use this feature quite often in this blog series.
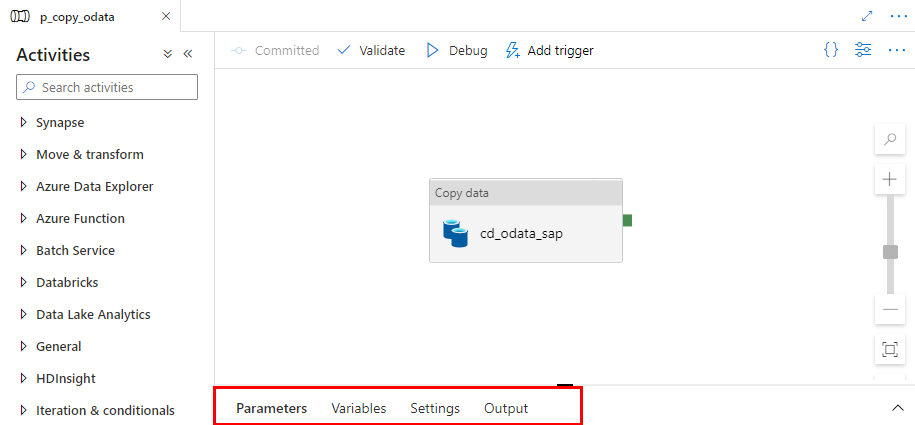
Let’s start by defining the initial set of parameters at the pipeline level. We will use them to set the URL, name and entity of the OData service. Open the pipeline we’ve built last time. At the bottom of the screen, you’ll notice four tabs. Click on the one named Parameters.
When you click the Parameters tab, the window enlarges, revealing the “New” button to define parameters. Add three entries:
Name
Type
URL
String
ODataService
String
Entity
String
You can use values that are passed to the pipeline as parameters in datasets and linked services. I want all files with extracted data to be saved in the directory named after the OData service. The directory structure should look as follows:
/odata/<OData_Service>/<Entity>
For example:
/data/API_SALES_ORDER_SRV/A_SalesOrder
That’s quite easy. You define the target file location in the data lake dataset – therefore the first step is to modify it to accept external parameters. Open the resource definition and go to the Parameters tab. Create a new entry:
Name
Type
Path
String
Now we need to define the target location using the parameter. Open the Connection tab. Replace the current value in the directory field with the following expression to reference the Path parameter. The value that we pass to this parameter will be used as the directory name.
@dataset().Path
Dataset knows what to do with the value passed to the Path parameter. Now we have to maintain it. Open the Copy Data activity and go to the Sink tab. You’ll notice an additional field under Dataset properties that wasn’t there before. The parameter defined at the dataset level is now waiting for a value.
As my directory hierarchy should be <ODataService>/<Entity> I use the Concat expression to combine parameters defined at the pipeline level:
The target dataset now accepts values passed from the pipeline. We can switch to the source dataset that points to the SAP system. Similarly as before, open the OData dataset and define two parameters. They will tell which OData service and Entity should be extracted.
Name
Type
ODataURL
String
Entity
String
The dataset can use the Entity parameter, which can replace the value in the Path field. But the OData URL parameter has to be passed to the underlying Linked Service. Provide the following expression to the Path field on the Connection tab:
@dataset().Entity
Adding parameters to the Linked Service is slightly more difficult, and it requires modifying the JSON definition of the resource. So far, we’ve only used the user interface. Choose Manage from the left menu and choose Linked Services. To edit the source code of the Linked Service, click the {} icon next to its name:
There are two changes to make. The first one is to define the parameter. Enter the following piece of code just under “annotations”:
The second change tells the Linked Service to substitute the URL of the OData service with the value of the ODataURL parameter. Change the value of “url” property with the following expression:
"@{linkedService().ODataURL}"
For reference here is the full definition of the Linked Service:
Click Apply to save the settings. When you open the OData dataset you’ll notice the ODataURL parameter waiting for a value. Reference the dataset parameter of the same name:
@dataset().ODataURL
The only thing left to do is to pass a value to both of the dataset parameters. Open the Copy Data activity and go to the Source tab. There are two new fields that we use to pass a value to a dataset. To pass the address of the OData service I concatenate URL and ODataService parameters defined at the pipeline level. The Entity doesn’t require any transformation.
Publish your changes. We’re ready for the test run! We’ve replaced three hardcoded values, and now we don’t have to modify the pipeline, or any of the resources, whenever we want to extract data from another OData service. It is a great improvement as it makes the process more generic and easy to scale.
EXECUTION AND MONITORING
To verify changes, run the pipeline twice, extracting data from two OData services. Previously, it would require us to make changes inside the pipeline. Now, whenever we start the extraction process, Synapse Studio asks us to provide the URL, OData service name and Entity. We’re not making any changes for the first run, and as before, we extract sales orders. For the second execution, use the API_BUSINESS_PARTNER OData service to get the full list of my customers.
A moment of uncertainty. Have we made all the required changes? No surprise this time, everything works as expected. We were able to extract data from both OData services. The target directory structure looks correct, and as planned, it consists of the OData and Entity name.
The final test is to display extracted data.
Today you’ve learnt how to use parameters to avoid hardcoding values in the pipeline. We’ve used three parameters that allow us to customize the URL, OData name and the Entity. We will build on top of this next week to make the pipeline even more agile by creating a metadata database that stores all information about OData services to fetch.
This article is contributed. See the original author and article here.
Azure App Services currently provides two workflows for scaling: scale up and scale out.
Scale up: Get more CPU, memory, disk space, and extra features. You scale up by changing the pricing tier of the App Service plan that your app belongs to.
Scale out: Increase the number of VM instances that run your app. You can scale out to as many as 30 instances, depending on your pricing tier. App Service Environments in Isolated tier further increases your scale-out count to 100 instances. You can scale manually or automatically based on predefined rules and schedules.
These existing scaling workflows work well, but you may want to instead have the App Service platform automatically scale your web app without the hassle of defining auto-scaling rules & schedules.
We are introducing a new platform-managed automatic scaling feature in Azure App Services. Below is a list of key features provided by App Service’s built-in automatic scaling feature:
The App Service platform will automatically scale out the number of running instances of your application to keep up with the flow of incoming HTTP requests, and automatically scale in your application by reducing the number of running instances when incoming request traffic slows down.
Developers can define per web app scaling and control the minimum number of running instances per web app.
Developers can control the maximum number of instances that an underlying app service plan can scale out to. This ensures that connected resources like databases do not become a bottleneck once automatic scaling is triggered.
Enable or disable automatic scaling for existing app service plans, as well as apps within these plans.
Address cold start issues for your web apps with pre-warmed instances. These instances act as a buffer when scaling out your web apps.
Automatic scaling works with the existing Premium Pv2 and Pv3 SKUs.
Automatic scaling is billed on per second basis and uses the existing Pv2 and Pv3 billing meters.
Pre-warmed instances are also charged on per second basis using the existing Pv2 and Pv3 billing meters once it’s allocated for use by your web app [For additional details about pre-warmed instances refer to AZ Cli section below ]
Use Azure CLI or ARM templates to enable automatic scaling.
Suggested scenarios for automatic scaling:
You want your web app to scale automatically without setting up an auto-scale schedule or set of auto-scale rules based on various resource metrics.
You want your web apps within the same app service plan to scale differently and independently of each other.
A web app is connected to backend data sources like databases or legacy systems which may not be able to scale as fast as the web app. Automatic scaling allows you to set the maximum number of instances your app service plan can scale to. This helps avoid scenarios where a backend is a bottleneck to scaling and is overwhelmed by the web app.
Enable Automatic scaling using Azure CLI:
Step 1:
This step enables automatic scaling for your existing app service plan and web apps within this plan
az resource update -g <<resource group name>> -n <<app service plan name>> –set properties.ElasticScaleEnabled=1 –resource-type Microsoft.Web/serverfarms
az resource update -g sampleResourceGroup -n sampleAppServicePlan –set properties.ElasticScaleEnabled=1 –resource-type Microsoft.Web/serverfarms [This enables automatic scaling for the app service plan named “sampleAppServicePlan”]
*** In some scenarios while setting the value of ElasticScaleEnabled=1 for an existing app service plan for App service Linux you may receive an error message (“Operation returned an invalid status ‘Bad Request’”). In such scenarios follow below mentioned steps:
Execute above step using the — debug flag to return details about the error
az resource update -g <<resource group name>> -n <<app service plan name>> –set properties.ElasticScaleEnabled=1 –resource-type Microsoft.Web/serverfarms — debug (You can now view detailed error message which should be similar to “Message”:”Requested feature is not available in resource group <<Your Resource Group Name>>. Please try using a different resource group or create a new one.”)
You should now create a new resource group and an app service plan (It is recommended to use PV3 SKU for the new app service plan) and then set ElasticScaleEnabled=1
Step 2:
This step defines maximum number of instances that your app service plan can scale to
az resource update -g <<resource group name>> -n <<app service plan name>> — properties.maximumElasticWorkerCount=** –resource-type Microsoft.Web/serverfarms
az resource update -g sampleResourceGroup -n sampleAppServicePlan — properties.maximumElasticWorkerCount=10 –resource-type Microsoft.Web/serverfarms [This sets the max scale out limit of app service plan named “sampleAppServicePlan” to 10 instances]
*** Value of maximumElasticWorkerCount should be less than or equal to 30 (Maximum instances that a premium SKU app service plan can scale out)
*** Value of maximumElasticWorkerCount should be greater than or equal to current instance count (NumberOfWorkers) for your app service plan
Step 3:
This step enables minimum number of instances that your web app will always be available on (per app scaling)
az resource update -g <<resource group name>> -n <<web app name>>/config/web –set properties.minimumElasticInstanceCount=** –resource-type Microsoft.Web/sites
az resource update -g sampleResourceGroup -n sampleWebApp/config/web –set properties.minimumElasticInstanceCount=5 –resource-type Microsoft.Web/sites[This sets the minimum number of instances for the web app named “sampleWebApp” to 5. In this example Web app named “sampleWebApp” is deployed to app service plan named “sampleAppServicePlan “]
Step 4:
This step enables the number of pre-warmed instances readily available for your web app to scale (buffer instances).
*** Default value of “preWarmedInstanceCount” is set as 1 and for most scenarios this value should remain as 1
az resource update -g <<resource group name>> -n <<web app name>>/config/web –set properties.preWarmedInstanceCount=** –resource-type Microsoft.Web/sites
az resource update -g sampleResourceGroup -n sampleWebApp/config/web –set properties.preWarmedInstanceCount=2 –resource-type Microsoft.Web/sites[This sets the number of buffer instances available for automatic scaling for the web app named “sampleWebApp” to 2]
*** Assuming that your web app has five always ready instances (minimumElasticInstanceCount=5) and the default of one pre-warmed instance. When your web app is idle and no HTTP requests are received, the app is provisioned and running with five instances. At this time, you aren’t billed for a pre-warmed instance as the always-ready instances aren’t used, and no pre-warmed instance is allocated. Once your web app starts receiving HTTP Requests and the five always-ready instances become active, and a pre-warmed instance is allocated and the billing for it starts. If the rate of HTTP Requests received by your web app continues to increase, the five active instances are eventually used and when App services decides to scale beyond five instances, it scales into the pre-warmed instance. When that happens, there are now six active instances, and a seventh instance is instantly provisioned and fill the pre-warmed buffer. This sequence of scaling and pre-warming continues until the maximum instance count for the app is reached. No instances are pre-warmed or activated beyond the maximum.
Step 5:
This step disables automatic scaling for your existing app service plan and web apps within this plan
az resource update -g <<resource group name>> -n <<app service plan name>> –set properties.ElasticScaleEnabled=0 –resource-type Microsoft.Web/serverfarms
az resource update -g sampleResourceGroup -n sampleAppServicePlan –set properties.ElasticScaleEnabled=0 –resource-type Microsoft.Web/serverfarms [This disables automatic scaling for the app service plan named “sampleAppServicePlan”]
FAQ:
The App Service automatic scaling feature is currently in early preview.
Automatic scaling is currently supported for Azure App Service for Windows and Linux.(App service for Windows containers and App Service Environments do not support automatic scaling)
Automatic scaling can be configured via Azure CLI and ARM templates only. Azure Portal (UX) support for this feature will be enabled in a future release.
Automatic scaling is available only for Azure App Services Premium Pv2 and Pv3 SKUs
App Service’s automatic scaling feature is different than Azure Autoscale. Automatic scaling is a new built-in feature of the App Service platform that automatically handles web app scaling decisions for you. Azure Autoscale is a pre-existing Azure feature for defining schedule-based and resource-based scaling rules for your app service plans. for your app service plans.
Once automatic scaling is configured, existing Azure Autoscale rules and schedules (if any) will not be honored. Applications can use either automatic scaling, or Azure Autoscale, but not both. If you disable automatic scaling for your app service plan by setting ElasticScaleEnabled=0; existing Autoscale rules if any, will be applicable once again
Health check should not be enabled on web apps with this automatic scaling feature turned on. Due to the rapid scaling provided by this feature, the health check requests can cause unnecessary fluctuations in HTTP traffic. Automatic scaling has its own internal health probes that are used to make informed scaling decisions.
You can only have Azure App Service web apps in the app service plan where you wish to enable automatic scaling. If you have existing Azure Functions apps in the same app service plan, or if you create new Azure Functions apps, then automatic scaling will be disabled. For Functions it is advised to use the Azure Functions Premium plan instead.
This article is contributed. See the original author and article here.
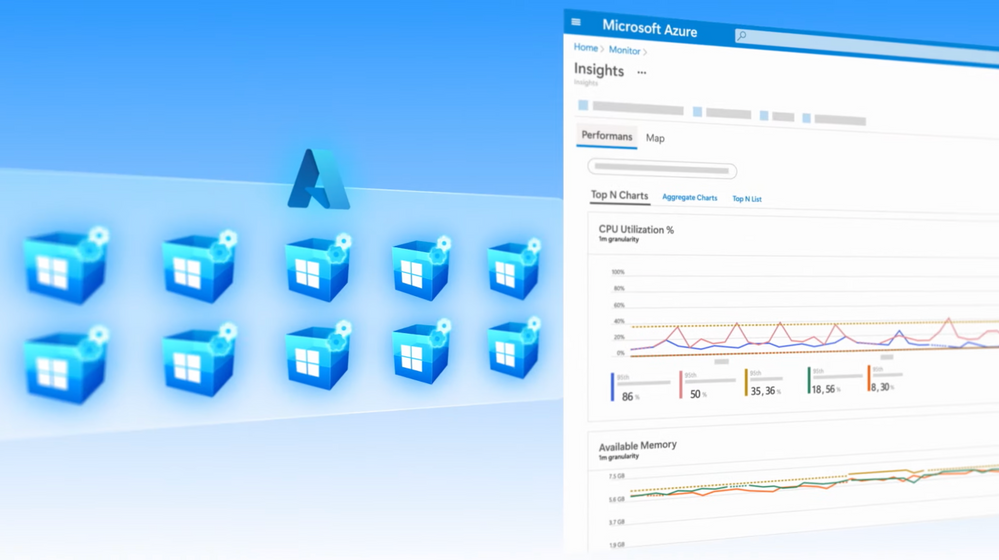
Azure Virtual Machine Scale Sets lets you create and manage a group of virtual machines to run your app or workload and provides sophisticated load-balancing, management, and automation. This is a critical service for creating and dynamically managing thousands of VMs in your environment. If you are new to the service this show will get you up to speed or if you haven’t looked at VM Scale Sets in a while we’ll show you how the service has significantly evolved to help you efficiently architect your apps for centralized configuration, high availability, auto-scaling and performance, cost optimization, security, and more.
We are Microsoft’s official video series for IT. You can watch and share valuable content and demos of current and upcoming tech from the people who build it at Microsoft.
-Welcome to Azure Essentials. I’m Matt McSpirit, and in the next few minutes, I’ll give you an overview of Azure virtual machine scale sets, a critical service for creating and dynamically managing thousands of VMs in your environment. Now if you are new to the service this will get you up to speed, or if you haven’t looked at VM scale sets in a while we’ll show you how it has significantly evolved to help you efficiently architect your apps for centralized configuration, high availability, auto-scaling and performance, cost optimization, security, and more.
-So, let’s start by addressing what is a Virtual Machine Scale Set in Azure? Well as the name implies, this Azure service lets you create and manage a group of virtual machines to run your app or workload and provides sophisticated load-balancing, management, and automation. VM Scale Sets lays the foundation for centralized and consistent configuration of VMs in your environment. One of the primary functions is to specify a VM template with the characteristics that you need for your apps and workloads to run reliably. This includes: the VM image, with support for Windows and Linux platform images as well as your own custom images, the VM size, your networking parameters, the number of VM instances in the group, and with virtual machine extensions you can also add post-deployment configuration like monitoring, anti-malware and automation.
-As you set them up, there are two management modes to deploy your scale sets: Uniform Orchestration, which is optimized for large stateless workloads where your VM instances are identical. Or the newer Flexible orchestration mode, which adds more options: from running workloads with different VM types; or changing your VM sizes without redeploying your scale set; to architecting your scale sets for high availability. And the good news is, they are all easy to set up. You can define your Virtual Machine Scale Set in the Azure Portal as you just saw or with an Azure Resource Manager Template. Of course, if you prefer you can use scripting tools like Azure CLI, PowerShell, and even infrastructure as code tools like Terraform.
-Once set up, any new VM added to the scale set will inherit the configurations that you have defined. And it’s easy to make changes across your scale set. For example, with image-based upgrades, when a new version of a custom or marketplace image is made available, Virtual Machine Scale Sets will detect that and start upgrading the VM instances in batches, and you can use protection policies to exclude VMs that you don’t want to upgrade. Or another example of what you can do is to upgrade your existing VMs in one-go to take advantage of the latest and greatest VMs in Azure.
-That said, beyond consistent configurations, scale sets are used to distribute your business-critical application across multiple instances to provide high availability. And this is achieved in a number of ways. For example, you can automatically distribute up to 1,000 VM instances between availability zones in minutes. This gives you utmost availability, up to 99.99%, and helps you to mitigate any possible datacenter wide issues. Availability zones are offered in most geographies and represent physically separate locations in an Azure region composed of one or more datacenters with independent power, cooling, and networking. VMs can be automatically spread across fault domains in a region, or you can specify a fault domain as part of your VM deployment, which makes it easier to replace VMs. Now this is especially relevant for open-source databases like Cassandra or other quorum-based applications.
-Of course, you also have the option to replicate your VM instances to another Azure region for failover compute. And for storage redundancy, you can also back up data disks using Azure Backup. Beyond hardware failure resilience measures, to get ahead of issues before they impact your operations, you can install the application health extension on each VM instance, so that your app or workload can report application-specific health metrics to Azure. And once you enable automatic instance repair, Azure will automatically remove and replace instances in an unhealthy state, to maintain high availability.
-As you architect for availability with Azure VM Scale Sets you can of course also scale your applications on demand while increasing performance. Scale sets integrate with Azure load balancer for basic layer-four traffic distribution and Azure Application Gateway for more advanced layer-seven traffic distribution. This helps you to easily spread your incoming network traffic across the VMs in your scale sets. Which in turn helps you build scalable solutions while maintaining high levels of performance.
-You can also configure your VM scale set to auto-scale. For example, if you’re running an e-commerce site you may need to scale your front end in response to some event, like a holiday sales spike. Azure will automatically add and subtract VM instances in response to demand so that there is no decline in your app or workload experience. Under scaling, you can use metric-based auto-scaling rules and define thresholds that trigger an increase in VM instances to scale out. And likewise, you can set similar thresholds for when to scale in, taking into account a specified cool down period which allows for a buffer of time before the scale in action is triggered.
-And of course, you can manually scale out and in as you need to. The ability to dynamically scale your VM pool also brings numerous efficiencies as you run your workloads on Azure, because instead of pre-provisioning VMs you’re only paying for the compute resources your application needs. And for even more savings, for your interruptible workloads, you also have the flexibility of using Azure Spot VMs that take advantage of spare compute capacity in Azure as and when it’s available.
– You can also mix and match Azure Spot VMs with regular on-demand VMs. And if you’re worried about Spot VM evictions, the try to restore feature in Azure Virtual Machine Scale Sets, will automatically try to restore an evicted Spot VM and maintain the target VM instance count in your scale set. In fact, we covered Spot VMs as part of your cost optimization strategy, in our last Essentials overview which you can watch at aka.ms/EssentialsSpotVMs.
-Next, Virtual Machine Scale Sets help you improve the security posture of your applications by keeping them up-to-date. Upgrades can be performed automatically, in random order, manually, or using rolling upgrades in defined batches. In addition to image upgrades, you can also do automatic VM guest patching for critical and security updates, and this helps to ease management by safely and automatically patching virtual machines to maintain security compliance. Patch orchestration is managed by Azure and updates are rolled out sequentially across VMs in the scale set to avoid application downtime. You can also force updates on-demand. And with Automatic Extension Upgrades, critical updates are applied as they become available from publishers.
-So that was a quick overview of Azure Virtual Machine Scale Sets and how they can help you to create and deploy thousands of VMs in minutes. The metrics and template-based approach helps you to consistently architect your apps and workloads for auto-scaling, availability, and performance, giving you the control that you need. This lets you focus on your app instead of the complexities of managing your infrastructure. And to learn more visit aka.ms/VMSSOverview and keep watching Microsoft Mechanics for more in the series, bye for now!
This article is contributed. See the original author and article here.
Today’s organizations have seen tremendous value in using mixed reality, as it rapidly changes how employees learn, work, and understand the world around them. With the unique value of mixed reality solutions, such as Microsoft HoloLens 2, Microsoft Dynamics 365 Guides, and Microsoft Dynamics 365 Remote Assist, organizations can drive workforce transformation with on-the-job guidance, hands-on training, and collaboration that is seamless, intuitive, and embedded into everyday workflows.
Intel technicians using HoloLens 2, Dynamics 365 Guides, and Remote Assist to resolve complex issues
Today, we’ll look at how Intel manufacturing facilities are using mixed reality solutions such as HoloLens 2, Dynamics 365 Guides, and Dynamics 365 Remote Assist globally. In some of the world’s most advanced manufacturing facilities, technicians are responsible for building, maintaining, and troubleshooting some of the most complex manufacturing products made by humans. Working at some of the smallest known geometries, every piece of maintenance must be performed precisely by continuously improving processes to ensure the production of smarter, faster, and more energy-efficient computer chips. With six wafer fabrication sites and four assembly test manufacturing locations worldwide, Intel must maintain a global, virtual network.
In Intel’s Israel manufacturing facility, HoloLens 2 and Dynamics 365 Guides have become integral to its manufacturing processes, playing a key role in the following scenarios:
Maintenance and repair tasks: Intel employees “learn by doing” with step-by-step instructions for conducting inspections and audits, deploying new equipment, fixing machine breaks, addressing issues faster, and increasing efficiency. Additionally, Dynamics 365 Guides allows Intel to proactively manage their assets to avoid costly downtime due to unpredicted failure. This includes conducting preventative maintenance, defining new intelligent workflows, and thoroughly completing maintenance tasks using checklists in Dynamics 365 Guides.
Troubleshooting: Dynamics 365 Guides brings critical information into view to help Intel technicians troubleshoot, audit, or support difficult and delicate procedures, improving first-time fix rate for urgent repairs with guidance.
Remote communication: Dynamics 365 Remote Assist seamlessly connects Intel experts and technicians through the calling feature to collaborate and solve problems without disrupting the flow of work. Dynamics 365 Remote Assist has also helped maintain the new normal to everyday routinewith advanced collaboration features, Intel has made it easy for their expert engineers to work from home to perform remote inspections that share video, screenshots, and annotations across devices. By avoiding unnecessary travel, Intel has helped increase safety and wellbeing during COVID-19 on a global scale.
Preparing interactive training materials: Intel employees can train from home, at their desk, or on the shop floor. Dynamics 365 Guides enables authors to build digital, interactive trainings that can be viewed from anywhere and easily scale any updates to keep up with real-time changes. These trainings can be produced by anyone on a PC or HoloLens device with simple 2D and 3D creation in the real-world environment.
Facility tour: With the power of HoloLens 2, employees can provide hands-free, digital facility tours to virtually show the inner workings of Intel’s cutting-edge facilities.
We are thrilled to see what the future holds and how mixed reality will continue to innovate manufacturing processes at Intel. To learn more, watch the video below to discover how Intel Israel is using Dynamics 365 Guides, Dynamics 365 Remote Assist, and HoloLens 2 today.
This embed requires accepting cookies from the embed’s site to view the embed. Activate the link to accept cookies and view the embedded content.


Recent Comments