
by Contributed | Jul 13, 2022 | Dynamics 365, Microsoft 365, Technology
This article is contributed. See the original author and article here.
As the world continues to rebuild and forge a path to a new normal post-COVID-19, more and more business travelers will once again hit the road. Looking further ahead, the Global Business Travel Association expects business travel to fully recover by 2024.1 While this is certainly a welcomed sign of recovery, the uptick in business travel will also mean more expense reports to file and approve for employees and managers.
Most employees have little affection for expense reports and would be happy if the process could be automated. That is exactly why we are excited about the new expense report experience for Microsoft Dynamics 365 Project Operations. The new experience utilizes automation to eliminate many pain points typically associated with expense management: countless hours scanning receipts and credit card statements; itemizing, categorizing, and matching expenditures; and working through frustrating errors that block approval workflows.
Reimagining expense reports at Microsoft
The new expense management experience in Dynamics 365 Project Operations began as an effort to improve how we file expenses here at Microsoft. Like many businesses, filing and approving expenses was a time-consuming chore for employees and managers. With operations in 112 countries and more than 130,000 business travelers worldwide, Microsoft employees spent more than 500,000 hours annually itemizing and filing expense reports. This was both an enormous drain on productivity and a source of employee dread due to the poor user experience.
“We were seeing employees spending 15-20 minutes for a simple expense. Can we automate it or give them a better tool?”Amruta Anawalikar, Senior Program Manager, Microsoft Commerce Financial Services.
To complicate matters further, Microsoft had built up an expansive collection of corporate expense tools over the years, onboarding various internal and third-party expense management platforms through acquisitions and to meet different business needs. Each of these disconnected systems also had varying configurations specific to local environments, and none of them spoke the same language. For example, what one system might call “expense purpose,” another would call “report description.” Standardization and unification were badly needed, but customization wasn’t an option because a primary third-party application didn’t support API integrations.
To learn more, check out the recent blog Automating expense reporting at Microsoft boosts employee experience
End-to-end automation, intelligence, and flexibility
From the start, our primary goal in building an expense management experience in Project Operations was to improve the user experience and productivity. To do this, we aimed to automate the end-to-end expense management process, thus eliminating employees’ need to file expense reports. Microsoft engineers succeeded by combining Microsoft Azure as a cloud base to support an internet-first approach and Microsoft Dynamics 365 as a flexible architecture to overcome the rigid structures of any third-party application and to unify expense reporting tools.
“This is where Dynamics 365 really has an edge. It gives us that flexibility of customization, which will make it extendable for any future needs as well.”Mohit Jain, Senior Software Engineer, Microsoft CFS Finance Engineering.
With a flexible, cloud-based architecture unifying and connecting all expense tools, we were then able to apply automation capabilities. This involved leveraging optical character recognition (OCR) to “read” receipt images and extract essential information such as merchant name, date, and amounts. Employees could populate expense reports in a practically touchless manner. This reduced time spent filing expenses, as well as decreased errors related to manual entry and, in turn, the number of audited expense reports. The final step was applying AI and machine learning to categorize expenses and match unattached receipts with charges from imported credit card statements.
The new expense reporting solution ultimately reduced 70 percent of the time spent by Microsoft employees filing expense reports.
To learn more, check out the recent blog Transforming Microsoft’s corporate expense tools with Microsoft Azure and Microsoft Dynamics 365
Explore Dynamics 365 Project Operations
The expense management module in Dynamics 365 Project Operations provides companies with the following capabilities:
- Track and manage employee expenses.
- Store payment information.
- Automatically import credit card transactions on a recurring basis.
- Set up expense policies and automated approvals.
- Manage expenses in the Mobile expenses app.
Additionally, organizations can now utilize the same tools we use internally as part of the new expense reports reimagined workspace. And it’s available free of charge to current users.
What’s next?
Microsoft Dynamics 365 Project Operations connects sales, resource management, project management, and accounting teams in one application for the enhanced visibility, collaboration, and agility needed to drive successfrom prospects to payments to profits. If your organization sees increased spending on corporate travel in the near future and you are ready to see what a modern and automated expense management module can do for your business, you can learn more through a guided tour or by requesting a free demo.
Sources
1GBTA, 2021. From Setback To Surge: Business Travel Expected To Fully Recover by 2024.
The post Modernize employee expense management with automation and AI appeared first on Microsoft Dynamics 365 Blog.
Brought to you by Dr. Ware, Microsoft Office 365 Silver Partner, Charleston SC.
by Contributed | Jul 11, 2022 | Technology
This article is contributed. See the original author and article here.
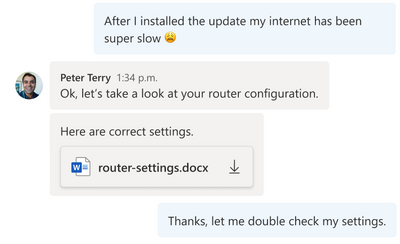
Azure Communication Services allows you to add communications to your applications to help you connect with your customers and across your teams. Available capabilities include voice, video, chat, SMS and more. Frequently you need to share media, such as a Word document, an image, or a video as part of your communication experience. During a meeting, users want to share, open, or download the media directly. This content can be referenced throughout the conversation for visibility and feedback – whether it is a doctor sending a patient a note in a PDF, a retailer sending detailed images of their product, or a customer sharing a scanned financial document with their advisor.
As part of the Azure Family, Azure Communication Services works together with Azure Blob Storage to share media between communication participants. Azure Blob Storage provides you with globally redundant, scalable, encrypted storage for your content and Azure Communication Services allow you to deliver that content.
Using Azure Communication Services chat SDK and the UI Library, developers can easily enable experiences that incorporate chat communications and media sharing into your existing applications. Check out the recently published tutorial and reference implementation. You can find the completed sample on GitHub.
This tutorial covers how to upload media to Azure Blob Storage and link it to your Azure Communication Services chat messages. Going one step further, the guide shows you how to use the Azure Communication Services UI Library to create a beautiful chat user experience which includes these file sharing capabilities. You can even stylize the UI components using the UI library’s simple interfaces to match your existing app.
.png")
The tutorial yields a sample of how file sharing capability can be enabled. You should ensure that the file system used and the process of uploading and downloading files to be compliant with your requirements related to privacy and security.
We hope you check out the tutorial to learn how you can bring interactive communication and media sharing experiences to your application using Azure Communication Services.
by Contributed | Jul 10, 2022 | Technology
This article is contributed. See the original author and article here.
Introduction
Hi folks! My name is Felipe Binotto, Cloud Solution Architect, based in Australia.
The purpose of this article is to provide a comparison on how you can do something with Bicep vs how you can do the same thing with Terraform. My intension here is not to provide an extensive comparison or dive deep into what each language can do but to provide a comparison of the basics.
I have worked with Terraform for a long time before I started working with Bicep and I can say to Terraform Engineers that it should be an easy learning curve with Bicep if you already have good experience with Terraform.
Before we get to the differences when writing the code, let me provide you with a quick overview of why someone would choose one over the other.
The main differentiator of Terraform is being multi-cloud and the nice UI it provides if you leverage Terraform Cloud to store the state. I like the way you can visualize plans and deployments.
Bicep, on the other hand, is for Azure only, but it provides deep integration which unlocks what some call ‘day zero support’ for all resource types and API versions. This means that as soon as some new feature or resource is released, even preview features, they are immediately available to be used with Bicep. If you have been using Terraform for a while, you know that it can take a long time until a new Azure release is also available in Terraform.
Terraform stores a state of your deployment which is a map with the relationship of your deployed resources and the configuration in your code. Based on my field experience, this Terraform state causes more problems than provides benefits. Bicep doesn’t rely on the state but on incremental deployments.
Code
Both Terraform and Bicep are declarative languages. Terraform files have TF extension and Bicep files have BICEP extension.
The main difference is that for Terraform you can have as many TF files as you want in the same folder, and they will be interpreted as a single TF file which is not true for Bicep.
Throughout this article, you will also notice that Bicep uses single quotes while Terraform uses double quotes.
Variables, Parameters & Outputs
Variables
In Bicep, variables can be used to simplify complex expressions which are equivalent to Terraform “local variables”.
The example below depicts how you can concatenate parameter values in a variable to make up a resource name.
param env string
param location string
param name string

var resourceName = '${location}-${env}-${name}'
The same can be achieved in Terraform as follows.
variable "env" {}
variable "name" {}
variable "location" {}

locals {
  resourceName = "${var.location}-${var.env}-${var.name}"
}
Parameters
In Bicep, parameters can be used to pass inputs to your code and make it reusable which is the equivalent to “input variables” in Terraform.
Parameters in Bicep are made of the key work “param”, followed by the parameter name followed by the parameter type, in the example below, a string.
param env string
A default value can also be provided.
param env string = 'prd'
Parameters in Bicep can also use decorators which is a way to provide constraints or metadata. For example, we can constrain the parameters “env” to be three letters only.
@minLength(3)
@maxLength(3)
param env string = 'prd'
Parameter values can be provided from the command line or passed in a JSON file.
In Terraform, input variables can be declared as simple as the following.
variable "env" {}
A default value can also be provided.
variable "env" {
  default = "prd"
}
In Terraform, a validation block is the equivalent to the Bicep parameter decorators.
variable "env" {
  default = "prd"
  validation {
  	condition     = length(var.env) == 3
  	error_message = "The length must be 3."
  }
}
Parameter values can be provided from the command line or passed in a TFVARS file.
Outputs
Outputs are used when a value needs to be returned from the deployed resources.
In Bicep, an output is represented by the keyword “output” followed by the output type and the value to be returned.
In the example below, the hostname is returned which is the FQDN property of a public IP address object.
output hostname string = publicIP.properties.dnsSettings.fqdn
In Terraform, the same can be done as follows.
output "hostname" {
   value = azurerm_public_ip.vm.fqdn
}
Resources
Resources are the most important element in both Bicep and Terraform. They represent the resources which will be deployed to the target infrastructure.
In Bicep, resources are represented by the keyword “resource” followed by a symbolic name, followed by the resource type and API version.
The following represents a compressed version of an Azure VM.
resource vm 'Microsoft.Compute/virtualMachines@2020-06-01' = {
  name: vmName
  location: location
  …
}
The following is how you can reference an existing Azure VM.
resource vm 'Microsoft.Compute/virtualMachines@2020-06-01' existing = {
  name: vmName
}
The same resource can be represented in Terraform as follows.
resource "azurerm_windows_virtual_machine" "vm" {
  name                  = var.vmName
  location              = azurerm_resource_group.resourceGroup.location
  …
}
However, to reference an existing resource in Terraform, you must use a data block.
data "azurerm_virtual_machine" "vm" {
  name                = vmName
  resource_group_name = rgName
}
The main differences in the examples above are the following:
- Resource Type
- For Bicep, the resource type version is provided in the resource definition.
- For Terraform, the version will depend on the plugin versions downloaded during “terraform init” which depends on what has been defined in the “required_providers” block. We will talk about providers in a later section.
- Scope
- For Bicep, the default scope is the Resource Group unless other scope is specified, and the resources don’t have a Resource Group property which requires to be specified.
- For Terraform, the Resource Group has to be specified as part of the resource definition
- Referencing existing resources
- For Bicep, you can use the same construct using the “existing” keyword.
- For Terraform, you must use a data block.
Modules
Modules have the same purpose for both Bicep and Terraform. Modules can be packaged and reused on other deployments. It also improves the readability of your files.
Modules in Bicep are made of the key word “module”, followed by the module path which can be a local file path or a remote registry.
The code below provides a read-world example of a very simple Bicep module reference.
module vmModule '../virtualMachine.bicep' = {
  name: 'vmDeploy'
  params: {
    name: 'myVM'
  }
}
One important distinction of Bicep modules is the ability to provide a scope. As an example, you could have your main deployment file using subscription as the default scope and a resource group as the module scope as depicted below.
module vmModule '../virtualMachine.bicep' = {
  name: 'vmDeploy'
  scope: resourceGroup(otherRG)
  params: {
    name: 'myVM'
  }
}
The same can be achieved with Terraform as follows.
module "vmModule" {
  source   = "../virtualMachine"
  name     = "myVM"
}
Providers & Scopes
Terraform uses providers to interact with cloud providers. You must declare at least one azurerm provider block in your Terraform configuration to be able to interact with Azure as displayed below.
provider "azurerm" {
  features {}
}
To reference multiple subscriptions, you can use an alias for the providers. In the example below we reference two distinct subscriptions.
provider "azurerm" {
  alias             = "dev"
  subscription_id   = "DEV_SUB_ID"
  tenant_id         = "TENANTD_ID"
  client_id         = "CLIENT_ID"
  client_secret     = "CLIENT_SECRET"
  features {}
}

provider "azurerm" {
  alias             = "prd"
  subscription_id   = "PRD_SUB_ID"
  tenant_id         = "TENANTD_ID"
  client_id         = "CLIENT_ID"
  client_secret     = "CLIENT_SECRET"
  features {}
}
Bicep uses scopes to target different resource groups, subscriptions, management groups or tenants.
For example, to deploy a resource to a different resource group, you can add to the resource, the scope property, and use the “resourceGroup” function.
module vmModule '../virtualMachine.bicep' = {
  name: 'vmDeploy'
  scope: resourceGroup(otherRG)
  params: {
    name: 'myVM'
  }
}
To deploy the resource to a resource group in a different subscription, you can also include the subscription id as per the example below.
module vmModule '../virtualMachine.bicep' = {
  name: 'vmDeploy'
  scope: resourceGroup(otherSubscriptionID, otherRG)
  params: {
    name: 'myVM'
  }
}
Deployment
There are many Bicep and Terraform commands and variations which can be used for deployment or to get to a point where a deployment can be performed, but in this section, I will just compare “terraform plan” and “terraform apply” with Bicep’s equivalent commands.
“terraform plan” is the command used to preview the changes before they actually happen. Running it from the command line will output the resources which would be added, modified, or deleted in plain text. Running the plan from Terraform Cloud, you can see the same information but in a nice visual way. Parameters can be passed as variables or variables files as per below.
terraform plan -var 'vmName=myVM'

terraform plan -var-file prd.tfvars
“terraform apply” deploys the resources according to what was previewed in the plan.
In Bicep, the “terraform plan” command is equivalent to the CLI “az deployment group what-if” command or “New-AzResourceGroupDeployment -Whatif” PowerShell command.
Running it from the command line will also output the resources which would be added, modified, or deleted in plain text. However, Bicep still doesn’t provide a user interface for the what-if visualization.
The “terraform apply” command is equivalent to the Bicep CLI command “az deployment group create” or “New-AzResourceGroupDeployment -Confirm” PowerShell command.
Note that these Bicep commands are for resource group deployments. There are similar commands for subscription, management group and tenant deployments.
Conclusion
Terraform still has its place in companies which are multi-cloud or using it for on-premises deployments. I’m Terraform certified and always loved Terraform. However, I must say when considering Azure by itself, Bicep has the upper hand. Even for multi-cloud companies, if you wish to enjoy deep integration and be able to use all new features as soon as they are released, Bicep is the way to go.
I hope this was informative to you and thanks for reading! Add your experiences or questions in the comments section.
Disclaimer
The sample scripts are not supported under any Microsoft standard support program or service. The sample scripts are provided AS IS without warranty of any kind. Microsoft further disclaims all implied warranties including, without limitation, any implied warranties of merchantability or of fitness for a particular purpose. The entire risk arising out of the use or performance of the sample scripts and documentation remains with you. In no event shall Microsoft, its authors, or anyone else involved in the creation, production, or delivery of the scripts be liable for any damages whatsoever (including, without limitation, damages for loss of business profits, business interruption, loss of business information, or other pecuniary loss) arising out of the use of or inability to use the sample scripts or documentation, even if Microsoft has been advised of the possibility of such damages.

Recent Comments