Single to Flexible server PostgreSQL migration tool is now in Preview!

Single to Flexible server PostgreSQL migration tool is now in Preview!

This article is contributed. See the original author and article here.

Many enterprises deploy applications using Azure Database for PostgreSQL Single Server, a fully managed Postgres database service, that is best suited for minimal customizations of your database. In November 2021, we announced that the next generation of the Azure Database for PostgreSQL, Flexible Server, was generally available. Since then, customers have been using methods like dump/restore, Azure Database Migration Service (DMS), and custom scripts to migrate their databases from Single to Flexible Server.


If you are a user of Azure Database for PostgreSQL Single Server, and looking to migrate to Postgres Flexible Server, At Microsoft, our mission is to empower every person and organization on the planet to achieve more. It’s this mission that drives our firm commitment to collaborate and contribute to the Postgres community and invest in bringing the best migration experience to all our Postgres users.


Blog-graphic-two-blue-elephants-on-cyan-blue-background-depicting-single-server-to-flexible-server-migration-1920x1080.png


Why migrate to Azure Database for PostgreSQL Flexible Server?


If you are not familiar with Flexible server, it provides you with the simplicity of a managed database service together with maximum flexibility over your database, and built-in cost-optimization controls. Azure Database for PostgreSQL Flexible Server is the next generation Postgres service in Azure and offers a robust value proposition and benefits including:


  1. Infrastructure: Linux-based VMs, premium managed disks, zone-redundant backups

  2. Cost optimization/Dev friendly: Burstable SKUs, start/stop features, default deployment choices

  3. Additional Improvements over Single Server: Zone-redundant High Availability (HA), support for newer PG versions, custom maintenance windows, connection pooling with PgBouncer, etc.


Learn more about why Flexible Server is the top destination for Azure Database for PostgreSQL


Why do you need the Single to Flexible Server PostgreSQL migration tool?


Now, let’s go over some of the nuances of migrating data from Single to Flexible Server.


Single Server and Flexible Server run on different OS platforms (Windows vs Linux) with different physical layouts (Basic/ 4TB/16TB storage Vs Managed disk), and different collation. Flexible Server supports PostgreSQL DB versions 11 and above. If you are using PG 10 and below on Single Server (those are retired, by the way), you must make sure your application is compatible with higher versions. These challenges prohibit us from making a simple physical copy of the data. Only a logical data copy, such as dump/restore (offline mode), or logical decoding (online mode) can be performed.


While the offline mode of migration is simple, many customers prefer an online migration experience that keeps your source PostgreSQL server up and operational until the cutover, however, there is a lengthy checklist of things to be aware of during this process. These steps include


  1. Setting the source’s WAL_LEVEL to LOGICAL

  2. Schema copy

  3. Creation of databases at the target,

  4. Disabling foreign keys and triggers at the target.

  5. Enabling them post migration, and so on.


Here is where the Single to Flexible migration tool comes into help to make the migration experience simpler for you.


What is Single to Flexible Server PostgreSQL migration tool?


This migration tool is tailormade to alleviate the pain of migrating the PostgreSQL schema and data from Single to Flexible Server. This tool offers a seamless migration experience, while abstracting the migration complexities under the hood. This tool is targeted for less than 1 TiB database size. This migration tool automates the majority of the migration steps, allowing you to focus on minor administration and pre-requisite tasks.


You can either use the Azure portal or Azure CLI to perform online or offline migrations.


  • Offline mode: This offers a simple database dump and restore of the data and schema and is best for smaller sized databases where downtime can be afforded.

  • Online mode: This mode of migration performs data dump and restore, and initiates change data capture using Postgres logical decoding and is best in scenarios where downtime cannot be afforded.


For a detailed comparison, see this documentation.


single to flexible migration process.png


Figure 1: Block diagram to show the migration feature steps and processes


  1. Create a Flexible PostgreSQL server (public or VNET)

  2. Invoke migration from Azure Portal or Azure CLI and choose databases to migrate.

  3. A Migration infrastructure is provisioned (DMS) on your behalf

  4. Initiates migration 

    • (4a) Initial dump/restore (online & offline)

    • (4b) streams the changes using logical decoding – CDC (online only)


  5. You can then cutover if you are doing online migration. If you are using offline mode, then post restore, the cutover is automatically performed.


What are the steps involved for a successful migration?


1. Planning for Single to Flexible PostgreSQL server migration


This is a very critical step. Some of the steps in the planning phase include:


  1. Getting the list of source Single servers, SKUs, storage, public/private access (Discovery)

  2. Single server provides Basic, General purpose, and Memory optimized SKUs. Flexible Server offers Burstable SKUs, General purpose, and Memory optimized SKUs. While General purpose and Memory optimized SKUs can be migrated to the equivalent SKUs, for your Basic SKU, you can consider either Burstable SKU or General purpose SKU depending in your workload. See Flexible server compute & storage documentation for details.

  3. Get the list of each database in the server, the size, and extensions usage. If your database sizes are larger than 1TiB, then we recommend you reach out to your account team or contact us at AskAzureDBforPostgreSQL@service.microsoft.com to help with your migration requirement..

  4. Decide on the mode of migration. This may require batching of databases for each server.

  5. You can also choose to do a different Database:Server layout compared to Single Server. For example, you can choose to consolidate databases on Flexible (or) you want to spread out databases across multiple Flexible servers.

  6. Plan for the day/time for migrating your data to make sure your activity is reduced at the source server.


2. Migration pre-requisites


Once you have the plan in place, take care of few pre-requisites. For example


  1. Provision Flexible Server in public/VNET with the desired compute tier.

  2. Set the source Single Server WAL level to LOGICAL.

  3. Create an Azure AD application and register with the source server, target server, and the Azure resource group.


3. Migrating your databases from Single to Flexible Server PostgreSQL


Now that you have taken care of pre-requisites, you can invoke migration using the Azure Portal or Azure CLI. Create one or more migration tasks using Azure portal or Azure CLI. High-level steps include


  1. Select the source server

  2. Choose up to 8 databases per migration task

  3. Choose online or offline mode of migration

  4. Select network to deploy the migration infrastructure (if using private network).

  5. Create the migration


Following the invocation of the migration, the source and the target server and details are validated before initiating the migration infrastructure using Azure DMS, copying of schema, perform dump/restore steps, and if doing online then continue with CDC.


  1. Verify data at the target

  2. If doing online migration, when ready, perform cutover.


4. Post migration tasks


Once the data is available in the target Flexible PostgreSQL server, perform post-migration tasks including copying of roles, recreating large objects and copying of settings such as server parameters, firewall rules, monitoring alerts, and tags to the target Flexible server.


What are the limitations?


You can find a list of limitations in this documentation.


What do our early adopter customers say about their experience?


We’re thankful to our many customers who have evaluated the managed migration tooling and trusted us with migrating their business-critical applications to Azure Database for PostgreSQL Flexible Server. Customers appreciate the migration tool’s ease of use, features, and functionality to migrate from different Single Server configurations. Below are comments from a few of our customers who have migrated to the Flexible Server using the migration tool.


Allego, a leading European public EV charging network, continued to offer smart charging solutions for electric cars, motors, buses and trucks without interruption. Electric mobility increases the air quality of our cities and reduces noise pollution. To fast forward the transition towards sustainable mobility Allego believes that anyone with an electric vehicle should be able to charge whenever and wherever they need. That’s why we have partnered with Allego and are working towards providing simple, reliable and affordable charging solutions. Read more about the Allego story here.


sridrang_0-1653947731059.png


“The Single to Flexible migration tool was critical for us to have a minimal downtime. While migrating 30 databases with 1.4TB of data across Postgres versions, we had both versions living side-by-side until cutover and with no impact to our business.”


Mr. Oliver Fourel, Head of EV Platform, Allego


Digitate is a leading software provider bringing agility, assurance, and resiliency to IT and business operations.


sridrang_1-1653947789718.png


“We had a humongous task of upgrading 50+ PostgreSQL 9.6 of database size 100GB+ to a higher version in Flexible Postgres server. Single to Flexible Server Migration tool provided a very seamless approach for migration. This tool is easy to use with minimum downtime.”


  • Vittal Shirodkar, Azure specialist, Digitate


Why don’t you try migrating your Single server to Flexible PostgreSQL server?


  • If you haven’t explored Flexible server yet, you may want to start with Flexible Server docs, which provide a great place to roll up your sleeves. Also visit our website to learn more about our Azure Database for PostgreSQL managed service

  • Check out the Single Server to Flexible server migration tool demo in the Azure Database for PostgreSQL migration on-demand webinar.

  • We look forward to helping you have a pleasant migration experience to Flexible Server using the migration feature. If you would like to reach out us about the migration experience or migrations to PostgreSQL in general, you can always reach out to our product team via email at Ask Azure DB for PostgreSQL.

 

3 New Data Transformation Functions in ADF

This article is contributed. See the original author and article here.

Azure Data Factory and Azure Synapse Analytics Mapping Data Flows provides powerful, easy-to-use, data transformation at cloud scale. We’ve recently introduced 3 new data transformation functions to our rich data flow expression language: collectUnique(), substringIndex(), and topN().


  • collectUnique()

    • Create a new collection of values into an array. ADF will automatically dedupe elements in the array for you.


  • substringIndex()

    • Extracts the substring before n ccurrences of the delimiter.


  • topN()

    • ADF will sort your data based on the column or expression that you provide and then return the top n results.


Find the documentation for all ADF data flow transformation functions at this link here.

Strike a strategic inventory balance in your supply chain with demand driven material requirements planning (DDMRP)

Strike a strategic inventory balance in your supply chain with demand driven material requirements planning (DDMRP)

This article is contributed. See the original author and article here.

Today we are excited to announce the preview of our demand driven material requirements planning (DDMRP) feature for Microsoft Dynamics 365 Supply Chain Management.

The evolution of MRP

DDMRP is the next evolution of material requirements planning (MRP), which has a long and storied history in manufacturing. From its origins in the early 1960s as the first manufacturing information system, MRP’s first evolution was to MRP II during the 1980s. Then, in the 1990s, MRP II evolved further into sales and operations planning (S&OP). Most recently, MRP was extended to include major enterprise functions, forming the basis of modern enterprise resource planning (ERP) systems. As such, it is fair to say that MRP’s staying power rests in the fact that it works.

Still, almost anyone involved in manufacturing planning can tell you that while MRP works, it is far from perfect. Organizations of every industry, size, and sophistication still have items that they chronically either have too much of or, conversely, never have enough. These items drive unplanned schedule changes, create inefficiencies, and increase costs in various ways. With the arrival of DDMRP, MRP continues to add to its storied history by incorporating new innovative thinking, such as strategically decoupling inventory from the sales forecast and introducing a new calculation for lead time, that delivers significant benefits to early adopters’ organizations.

What is DDMRP?

As MRP continued to be useful, it eventually became a standard function of modern-day ERP. During this time, other significant manufacturing philosophies and methods were born. The least effective of these were fads that have faded from use, but a handful went on to transform manufacturing in their own right. These include distribution requirements planning (DRP), lean manufacturing, theory of constraints (TOC), and Six Sigma. Each of these methodologies added a tool to our belt of such significance that they remain with us and in broad use today. This brings us back to DDMRP, the newest iteration of MRP, and our latest feature available for preview. While DDMRP is a relatively new methodology, it borrows and combines elements from the tried-and-true manufacturing philosophies discussed earlier in this paragraph.

According to the Demand Driven Institute, demand driven material requirements planning (DDMRP) is “a multi-echelon planning and execution method to protect and promote the flow of relevant information through the establishment and management of strategically placed decoupling point stock buffers.”1 It is important to note that the Demand Driven Institute is essentially a standards body for all DDMRP matters. They offer certification for software vendors to ensure that the principles of DDMRP are adequately embedded and utilized in a given application, and we are proud to share that Dynamics 365 Supply Chain Management is Demand Driven Institute compliant.

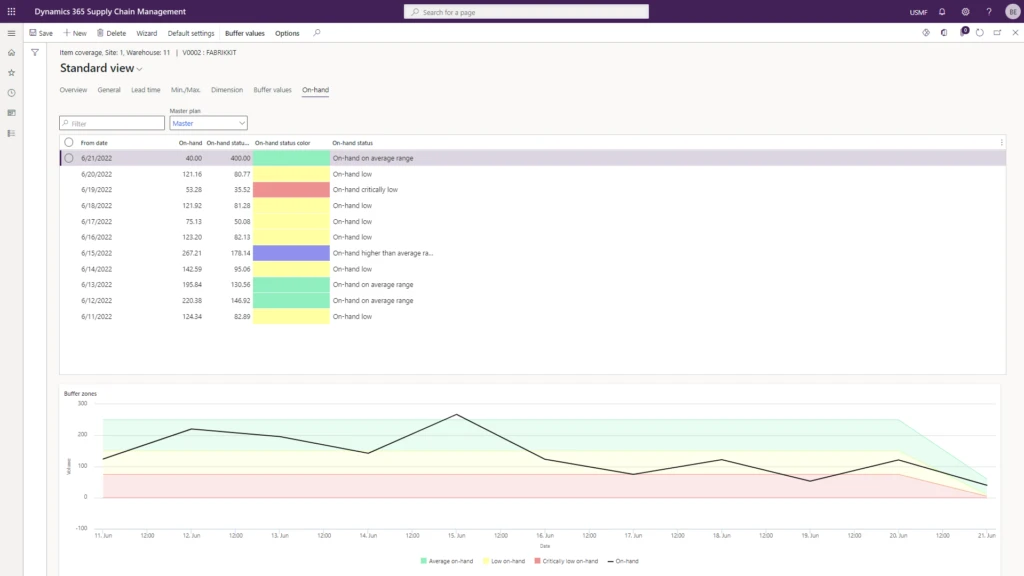
Screenshot of the Dynamics 365 Supply Chain Management interface, standard view.
Figure 1: Dynamics 365 Supply Chain Management item coverage with buffer zones.

Learn more about our DDMRP feature and how to enable it within supply chain management (SCM).

Benefits of using DDMRP

Several of the benefits of using DDMRP include the following:

  • Improve customer service to consistently reach 97 to 100 percent on-time order fulfillment rates.
  • Compress lead times for typical reductions above 80 percent across several industry segments.
  • Optimize inventory to unlock inventory reductions of 30 to 45 percent without impacting service levels.
  • Lower total operating costs by eliminating the false signals and schedule break-ins that drive expensive expedite activities, such as fast freight, partial ships, and cross-ships.
  • Improve planner productivity by providing visibility of priorities instead of constantly fighting the conflicting messages of MRP.

Create a predictive and resilient supply chain

According to a 2022 McKinsey & Company survey of dozens of supply chain executives, 90 percent expect to overhaul planning IT within the next five years.2 The renewed focus on supply chain planning was born from a broad recognition formed during COVID-19: our modern, lean, just-in-time supply chains were amazingly efficient and cost-effective but far from resilient in the face of unprecedented and sustained global disruptions.

As businesses grappled with how to respond to the crisis, many identified opportunities to invest in their supply chain to become more predictive and resilient. It was no longer acceptable, as an example, for manufacturing production scheduling runs to last several hours or only run once per day. The new normal required systems to give planners near-real-time visibility and control and were capable of executing planning runs multiple times per day in the span of minutes. With our Planning Optimization Add-in, we were able to move master planning calculations outside of Dynamics 365 Supply Chain Management, which reduced planning runtimes from hours to minutes. The Planning Optimization Add-in also introduced priority-based planning, which allows businesses to distinguish demand based on urgency, and introduced one of the five steps required as part of DDMRP.

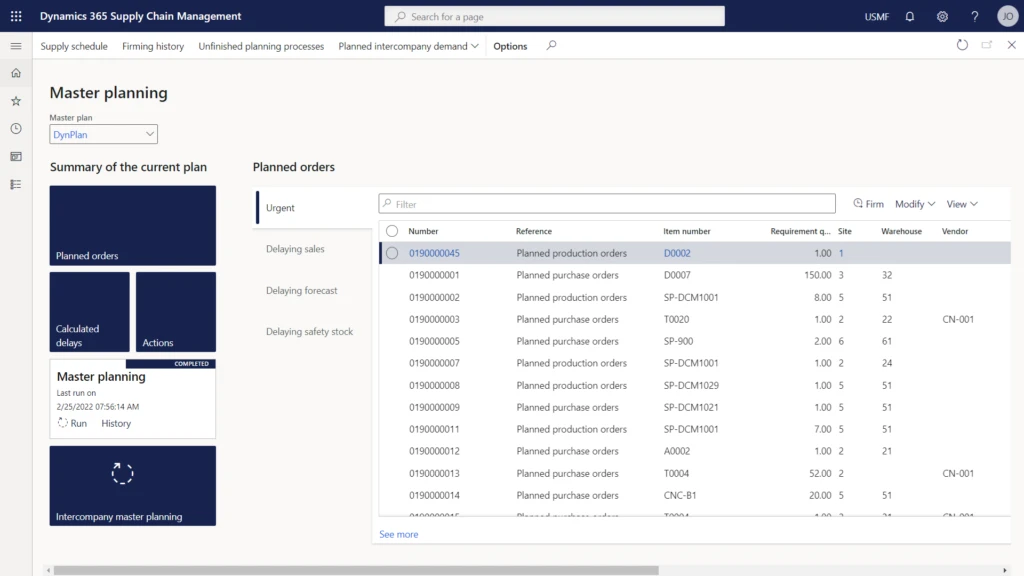
Screenshot of the Dynamics 365 Supply Chain Management interface, displaying Planned orders on the Master planning screen.
Figure 2: Dynamics 365 Supply Chain Management master planning workspace with Planning Optimization.

Microservices, like the Planning Optimization Add-in, are one way to quickly realize value from an ERP migration to the cloud. They deliver benefits such as better performance by offloading workloads to the cloud and improving adaptability by allowing you to react to changing demand in real-time. Ultimately, these investments in planning-related improvement features are designed to reduce stockouts and lower the cost of on-hand inventory, all while ensuring that more customer orders are fulfilled on time and in full.

Learn more in our recent blog: Optimize your supply chain with priority-based planning.

Maximize operational efficiency with agile business applications

In this blog, we announced the preview of DDMRP, reviewed the evolution of MRP, and provided a basic understanding of what DDMRP is and its benefits. Then we touched on related microservice add-ins for Dynamics 365, such as Planning Optimization and priority-based planning, which are helping organizations create predictive and resilient supply chains.

Dynamics 365 Supply Chain Management is an agile and modern, composable business application. It enables manufacturers, retailers, and distributors to create a connected and resilient supply chain by enhancing visibility, advancing planning agility, and maximizing asset uptime to operate profitably during disruptions. And for companies planning to migrate their ERP to the cloud, the composable approach of Dynamics 365 makes it easy to start with a single workload and add additional solutions as the business evolves and needs mature. It also streamlines planning, production, inventory, warehouse, and transportation to maximize operational efficiency while also giving you access to groundbreaking innovations such as demand driven material requirements planning (DDMRP).

What’s next?

Want to learn more about how your organization can use Dynamics 365 Supply Chain Management to increase production volume while reducing infrastructure costs? Check out The Total Economic Impact Of Microsoft Dynamics 365 Supply Chain Management from Forrester Consulting.


Sources

1Demand Driven Institute. What is DDMRP?

2McKinsey & Company, 2022. To improve your supply chain, modernize your supply-chain IT.

The post Strike a strategic inventory balance in your supply chain with demand driven material requirements planning (DDMRP) appeared first on Microsoft Dynamics 365 Blog.

Brought to you by Dr. Ware, Microsoft Office 365 Silver Partner, Charleston SC.

Honor customer data use consent with unified profiles in Dynamics 365 Customer Insights

Honor customer data use consent with unified profiles in Dynamics 365 Customer Insights

This article is contributed. See the original author and article here.

Data protection and privacy regulations, such as the General Data Protection Regulation (GDPR) in the European Union and the California Consumer Privacy Act (CCPA) in the United States, give individuals the right to govern how an organization uses their personal data. These regulations allow people to opt in or out of having their personal data collected, processed, or shared, and require organizations to implement reasonable procedures and practices to obtain and respect their customers’ data use consent.

What is consent?

What do we mean when we talk about “consent” in the context of data protection and privacy? Simply put, it’s an individual’s decision about whether and how data about them is collected and used. Easy to define, but extraordinarily complex in practice.

Organizations have multiple types of information about their customers, including transactional data (such as membership renewals), behavioral data (such as URLs visited), and observational data (such as time spent on specific webpages). Additionally, customers can have multiple types of contact points (such as email addresses, phone numbers, and social media handles). Adding to an already complex challenge, the purposes for using customer data can vary across an organization’s lines of business and can number in the dozens.

Consider the example of an online sports franchise that has two different lines of business: football merchandise and memberships. The organization will need to capture the following information to use a customer’s data with their consent:

  • Organization: Contoso Football Franchise
  • Line of business: Football merchandise
  • Contact point: someone@example.com 
  • Purpose for using data: Email communications with promotional offers for football merchandise
  • Consent preference: Opt-in/opt-out

A customer’s consent to collect and use their data must be obtained for each data source, contact point, and use or purpose.

The challenge: Obtain consent for multiple types of personal data and contact points

Every industry around the globe is affected by privacy legislation and related requirements, from the Health Insurance Portability and Accountability Act (HIPAA) in the healthcare industry, to the Children’s Online Privacy Protection Act (COPPA) in online services, to legal frameworks such as the GDPR, to state-specific acts such as the CCPA. Requesting and respecting your customer’s consent for each contact point, type of data, and the purposes to which the data is putwhich must comply with all applicable data protection and privacy regulationsquickly becomes a monumental task.

The solution: Include consent in your customer data platform

One way to be sure you’ve captured granular levels of consent preferences is to ingest customer data from various sourcestransactional, behavioral, and observationalinto a customer data platform (CDP). A CDP like Microsoft Dynamics 365 Customer Insights helps you build a complete picture of individual customers that includes their consent for specific uses of their data.

Unified customer profiles in Customer Insights provide 360-degree views of your customers, including the consent they’ve granted for using their data. Customer Insights enables companies to add their captured consent data as a primary attribute, ensuring that you can honor your customers’ preferences for the collection, processing, and use of their data. Capturing consent preferences can help you power personalized experiences for customers while at the same time respecting their right to privacy.

Respecting customers’ preferences for specific data use purposes is key to building trust relationships. Dynamics 365 Marketing automatically applies consent preferences through subscription centers to support compliance with the GDPR, CCPA, HIPAA, and other data protection and privacy regulations.

Why include consent in a unified customer profile?

Here are three common scenarios that illustrate the significant advantages to having consent data as part of a single, unified customer profile.

Consent data is specific to lines of business and, hence, is often fragmented.
Consider our earlier example of the online sports franchise with two different lines of business, football merchandise and memberships. This organization is likely to have separate consent data captured by each line of business for the same customer. It makes a lot of sense to unify these consent data sources into a single profile to enforce organization-wide privacy policies.

The customer can revoke consent at any time and expects the business to honor the change with immediate effect. For instance, when a customer who is browsing a website revokes consent for tracking, it must stop immediately. Otherwise, the business risks losing the customer’s trust and could be in violation of regulatory requirements.

When customer consent data isn’t stored with the unified profile, there can be significant delays in syncing data between the marketing application and the consent data source. As part of a unified profile, however, consent data can be updated automatically and the updated profiles can be used to refresh segments, ensuring that customers who have revoked consent are excluded from the segments in a timely manner.

Personal data is anonymized or pseudonymized. Anonymized or pseudonymized customer data is often used for machine learning and AI processing, for instance. If customers’ consent to use their data for this purpose is recorded in separate anonymized or pseudonymized user profiles, it becomes much harder to map a given customer profile across different data sources. When the consent data is stored in a unified profile, however, the organization can continue to get the benefit of data from combined customer interactions when the user identity is anonymized or pseudonymized.

Learn more

Check out the following resources to learn more about customer consent, unified profiles in Dynamics 365 Customer Insights, the GDPR, and the CCPA.

The post Honor customer data use consent with unified profiles in Dynamics 365 Customer Insights appeared first on Microsoft Dynamics 365 Blog.

Brought to you by Dr. Ware, Microsoft Office 365 Silver Partner, Charleston SC.

Stream Microsoft Defender for IoT alerts to a 3rd party SIEM

Stream Microsoft Defender for IoT alerts to a 3rd party SIEM

This article is contributed. See the original author and article here.

Overview


As more businesses convert OT systems to digital IT infrastructures, security operations center (SOC) teams and chief information security officers (CISOs) are increasingly responsible for handling threats from OT networks.


Defender for IoT’s built-in integration with Sentinel helps bridge the gap between IT & OT securitychallenge. Sentinel enables SOC teams to reduce the time taken to manage and resolve OT incidents efficiently by providing out-of-the-box capabilities to analyze OT security alerts, investigate multistage IT/OT attacks, utilize Azure Log Analytics for threat hunting, utilize threat intelligence, and automate incident response using SOAR playbooks.


Customer engagements have taught us that sometimes customers prefer to maintain their existing SIEM, alongside Microsoft Sentinel, or as a standalone SIEM.


In this blog, we’ll introduce a solution that sends Microsoft Defender for IoT alerts to an Event Hub that can be consumed by a 3rd party SIEMs. You can use this solution with Splunk, QRadar, or any other SIEM that supports Event Hub ingestion.


Preparation and use


In this blog, we’ll use Splunk as our example.


Screen Shot 2022-07-25 at 9.02.11.png


The following describe the necessary preparation steps:


  1. Connect your alerts from Defender for IoT to Microsoft Sentinel

  2. Register an application in Azure AD

  3. Create an Azure Event Hub Namespace

  4. Prepare Azure Sentinel to forward Incidents to Event Hub

  5. Configure Splunk to consume Azure Sentinel Incidents from Azure Event Hub


1. Connect your alerts from Defender for IoT to Microsoft Sentinel


The first step is to enable the Defender for IoT data connector so that all Defender for IoT alerts are streamed into Microsoft Sentinel (a free process).


In Microsoft Sentinel, under Configuration, select Data Connectors and then locate Microsoft Defender for IoT data connector. Open the connector page, select the subscription whose alerts you want to stream into Microsoft Sentinel, and then select Connect.


For more information, see Connect your data from Defender for IoT to Microsoft Sentinel


2. Register an application in Azure AD


You’ll need Azure AD to be defined as a service principal for Splunk Add-on for Microsoft Cloud Services.


  1. To register an app in Azure AD, open the Azure Portal and navigate to Azure Active Directory > App Registrations > New Registration. Fill the Name and click Register.

    Screen Shot 2022-07-25 at 9.16.35.png


  2. Click Certificates & secrets to create a secret for the Service Principle. Click New client secret and note its value.
    Screen Shot 2022-07-25 at 9.27.04.png


  3. To grant the required permissions to read data from the app, click API permissions > Add a permission and select Microsoft Graph > Application permissions > SecurityEvents.ReadWrite.All.
    Screen Shot 2022-07-25 at 9.28.43.png

    Ensure that the granted permission is approved by admin.


  4.  For the next step of setting up Splunk Add-on for Microsoft Cloud Services, note the following settings:


    • The Azure AD Display Name

    • The Azure AD Application ID

    • The Azure AD Application Secret

    • The Tenant ID


3. Create an Azure Event Hub Namespace


  1. In the Azure Portal, navigate to Event Hubs > New to create a new Azure Event Hub Namespace. Define a Name, select the Pricing Tier and Throughput Units and click Review + Create.
    Screen Shot 2022-07-25 at 9.29.48.png


  2. Once the Azure Event Hub Namespace is created click Go to resource and click + Event Hubs to create an Azure Event Hub within the Azure Event Hub Namespace.


  3. Define a Name for the Azure Event Hub, configure the Partition CountMessage Retention and click Review + Create.
    Screen Shot 2022-07-25 at 9.33.29.png


  4. Navigate to Access control (IAM) and Click + Add > Add role assignment to add the Azure AD Service Principle created before and delegate as Azure Event Hubs Data Receiver and click Save.
    Screen Shot 2022-07-25 at 9.30.15.png


  5. For the configuration of Splunk Add-on for Microsoft Cloud Services app, make a note of following settings:

    • The Azure Event Hub Namespace Host Name

    • The Azure Event Hub Name


4. Prepare Azure Sentinel to forward Incidents to Event Hub


To forward Microsoft Sentinel incidents or alerts to Azure Event Hub, you’ll need to define your Microsoft Sentinel workspace with a data export rule.


  1. In the Azure Portal, navigate to Log Analytics > select the workspace name related to Microsoft Sentinel > Data Export > New export rule.
    Screen Shot 2022-07-25 at 9.30.24.png


  2. Name the rule, configure the Source as SecurityIncident and the Destination as Event Type utilizing the Event Hub Namespace and Event Hub Name configured previously. Click on Create.
    Screen Shot 2022-07-25 at 9.30.43.png


5. Configure Splunk to consume Microsoft Sentinel Incidents from Azure Event Hub


For Microsoft Defender for IoT alerts to be ingested into Azure Event Hub, install the Splunk Add-on for Microsoft Cloud Services app.


  1. For the installation, open the Splunk portal and navigate to Apps > Find More Apps. For the dashboard find the Splunk Add-on for Microsoft Cloud Services app and Install.
    Screen Shot 2022-07-25 at 9.30.53.png


  2. To add the Azure AD Service Principal, open the Splunk app and navigate to Azure App Account > Add. Use the details you’d noted earlier:

    Define a Name for the Azure App Account


    Add the Client ID, Client Secret, Tenant ID


    Choose Azure Public Cloud as Account Class Type


    Click Update to save and close the configuration.
    Screen Shot 2022-07-25 at 9.31.10.png


  3. Now navigate to Inputs within the Splunk Add-on for Microsoft Cloud Services app and select Azure Event Hub in Create New Input selection. 

    Define a Name for the Azure Event Hub as Input, select the Azure App Account created before, define the Event Hub Namespace (FQDN), Event Hub Name, let the other settings as default and click Update to save and close the configuration.
    Screen Shot 2022-07-25 at 9.31.24.png


Once the ingestion is processed, you can query the data by using sourcetype=”mscs:azure:eventhub” in search field.
Screen Shot 2022-07-25 at 9.31.35.png

Disclaimer: The use of EventHub and Log Analytics export rule may incur an additional charge. For more information, see Event Hubs pricing and Log Data Export pricing