by Contributed | Dec 23, 2022 | Technology
This article is contributed. See the original author and article here.
Since the last update of v1.4.0, this Azure Functions OpenAPI extension has a lot of improvements. Here in this post, let’s discuss what improvements have been made.
Update – v1.5.0
.NET 7 support for the isolated worker extension
According to the Azure Functions roadmap, Azure Functions isolated worker model has started supporting .NET 7. Therefore, this OpenAPI extension also starts supporting .NET 7 with the isolated worker model. The migration step is as easy as changing the target framework. Update your .csproj file and find the netcoreapp3.1 (.NET Core 3.1), net5.0 (.NET 5) or net6.0 (.NET 6), to net7.0 (.NET 7).
    net7.0
    v4
    Exe
    ...

  ...

    ...


  ...
OpenAPI settings instance support out-of-the-box
There are many environment variables related to the OpenAPI extension. All of them are prefixed with OpenApi__ as the environment variables. These environment variables can now be read through the OpenApiSettings instance, injected directly from the extension package. So, all you need to do is to inject the instance.
Here’s the sample code for the in-proc worker model:
// in-proc worker function
public class Function1
{
    private readonly OpenApiSettings _openapi;
    private readonly ILogger _logger;

    // Inject OpenApiSettings instance through the constructor.
    public Function1(OpenApiSettings openapi, ILogger logger)
    {
        _openapi = openapi;
        _logger = logger;
    }
    ...
}
And here’s the sample code for the isolated worker model:
// out-of-proc worker function
public class Function1
{
    private readonly OpenApiSettings _openapi;
    private readonly ILogger _logger;

    // Inject OpenApiSettings instance through the constructor.
    public Function1(OpenApiSettings openapi, ILoggerFactory loggerFactory)
    {
        _openapi = openapi;
        _logger = loggerFactory.CreateLogger();
    }
    ...
}
GitHub Actions workflow support
You can now generate the OpenAPI document on-the-fly within the GitHub Actions workflow. You can find more details on this document. Here’s the sample usage:
steps:
- name: Checkout the repository
  uses: actions/checkout@v2

- name: Setup .NET SDK 7 LTS
  uses: actions/setup-dotnet@v1
  with:
    dotnet-version: '7.x'

- name: Restore NuGet packages
  shell: pwsh
  run: |
    dotnet restore .

- name: Build solution
  shell: pwsh
  run: |
    dotnet build . -c Debug -v minimal

- name: Generate OpenAPI document
  id: oai
  uses: Azure/azure-functions-openapi-extension/actions/build-openapi@v1
  with:
    functionAppPath: 'bin/Debug/net7.0'
    requestUri: 'http://localhost:7071/api/openapi/v3.json'
    documentPath: 'generated'
    documentName: 'openapi.json'
    delay: '30'
    isRemote: 'false'

- name: Check generated OpenAPI document
    shell: pwsh
    run: |
      echo "Generated Document: ${{ steps.oai.outputs.generated }}"

      $json = Get-Content -Path ${{ steps.oai.outputs.generated }} | ConvertFrom-Json
      $result = $json.openapi -eq "3.0.1"
      echo "Check result: $result"
Generic CI/CD pipeline support
In addition to supporting GitHub Actions workflow, both PowerShell script and bash shell script are provided to support generic CI/CD pipelines, including Azure DevOps.
Here’s the PowerShell script:
& $([Scriptblock]::Create($(Invoke-RestMethod https://aka.ms/azfunc-openapi/generate-openapi.ps1))) `
    -FunctionAppPath     `
    -BaseUri             `
    -Endpoint            `
    -OutputPath          `
    -OutputFilename      `
    -Delay               `
    -UseWindows
And here’s the bash shell script:
curl -fsSL https://aka.ms/azfunc-openapi/generate-openapi.sh
    | bash -s --
        -p|--functionapp-path
        -u|--base-uri
        -e|--endpoint
        -o|--output-path
        -f|--output-filename
        -d|--delay
Update – v2.0.0-preview1
Breaking changes
- The
OpenApiHttpTriggerAuthorization class has now become a property of the OpenApiConfigurationOptions class.
- The property,
IncludeRequestingHost of OpenApiConfigurationOptions has now become ExcludeRequestingHost, and its default value is false.
Azure Functions Easy Auth support
If your Azure Function app implements the Easy Auth feature for better AuthN scenarios, the authN’d claims can be directly used for Swagger UI and OpenAPI document generation through the OpenApiHttpTriggerAuthorization class.
Here’s the sample code for the in-proc worker model:
// in-proc worker function
public class Startup : FunctionsStartup
{
    public override void Configure(IFunctionsHostBuilder builder)
    {
        builder.Services.AddSingleton(_ =>
                        {
                            var options = new OpenApiConfigurationOptions()
                            {
                                ...
                                Security = new OpenApiHttpTriggerAuthorization(async req =>
                                {
                                    var result = default(OpenApiAuthorizationResult);

                                    // Add your custom authorisation logic like below
                                    var identities = req.Identities;

                                    return await Task.FromResult(result).ConfigureAwait(false);
                                }),
                            };

                            return options;
                        });
    }
}
And here’s the sample code for the isolated worker model:
public class Program
{
    public static void Main()
    {
        var host = new HostBuilder()
            .ConfigureServices(services =>
            {
                services.AddSingleton(_ =>
                        {
                            var options = new OpenApiConfigurationOptions()
                            {
                                ...
                                Security = new OpenApiHttpTriggerAuthorization(async req =>
                                {
                                    var result = default(OpenApiAuthorizationResult);

                                    // Add your custom authorisation logic like below
                                    var identities = req.Identities;

                                    return await Task.FromResult(result).ConfigureAwait(false);
                                }),
                            };

                            return options;
                        });
            })
            .Build();

        host.Run();
    }
}
Tell us what you think
There are a bunch of improvements released in this new version. Also, We’ve started gradually upgrading the extension version to v2.0.0. So if you have any questions, issues, suggestions or something else, please let us know!
by Contributed | Dec 22, 2022 | Technology
This article is contributed. See the original author and article here.
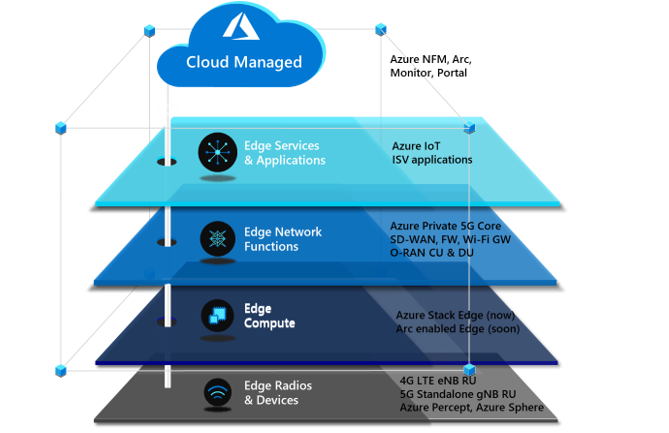
There are four critical components to a private 5G network: the local radio and networking functions, the edge compute platform, the application ecosystem, and the cloud. Private 5G network solutions are often built as a collection of loosely integrated components. This loose-integration approach might make sense in terms of physical and organizational demarcation points, but it has drawbacks. The following problems are inherent in this approach:
- Difficult to deploy
- Difficult to manage
- Expensive to scale
- Not secure
Microsoft offers a different approach to help operators take advantage of the opportunity to provide private 5G to enterprises. This cloud-managed private 5G network solution features cloud-native mobile core technology, advanced edge computing, and a flexible choice of radio and application partners. The solution is designed to be delivered and managed by operators. It’s appropriate for various industry verticals. The Microsoft approach for private 5G networks provides advantages to both operators and enterprises, and a choice of platforms and applications.
Azure private multiaccess edge compute is a solution for integrating edge compute, networking, and applications on a range of edge platforms. It’s designed to help operators and partners deliver high-performance MEC solutions to enterprises.
Private multiaccess edge compute can be deployed across multiple platforms powered by Azure Stack solutions. Azure Stack solutions extend Azure services and capabilities to various environments, from the datacenter to edge locations and remote offices. Enterprises can use Azure Stack to build, deploy, and run hybrid and edge computing apps consistently across IT ecosystems.

Azure Stack Edge is an Azure-managed edge appliance that brings the compute, storage, and intelligence of Azure into the enterprise environment. As part of the private multiaccess edge compute solution, Azure Stack Edge provides a single point for processing mobile network data at the edge. It enables local, intelligent breakout of data processing for faster processing and lower bandwidth consumption.
Azure Stack HCI is a hyperconverged infrastructure (HCI) operating system delivered as an Azure service. It provides the latest security, performance, and hybrid capabilities, which include Azure Arc enablement and management via the Azure portal.
Azure Private 5G Core
The final component of the Microsoft architecture for private 5G networks is the 4G/5G mobile core, which is deployed as a standalone 5G core with an optional 4G interworking function to enable support for 4G LTE RAN. Private 5G Core is a fully virtualized, cloud-native solution that includes standard 5G core network functions.

Azure automates the deployment and configuration of Private 5G Core on Azure Stack Edge. To deploy and update network configuration, the network operator can use any or all of these tools:
- The Azure portal web GUI
- The Azure Resource Manager REST API
- Deployment templates (ARM templates and/or Terraform)
Operators can use declarative syntax, in standard JSON or Bicep data format, to configure the core. This enables integration with CI/CD pipelines like Azure DevOps or GitHub Actions for repeatable deployments and updates across multiple network sites.
Operators don’t have to deploy 5G to benefit from a cloud-enabled private 5G network. Enterprise customers and operators can deploy a private 5G network in a 4G-only, 5G-only, or hybrid-4G/5G environment. Private 5G Core supports the transition from 4G to a 5G standalone network, so enterprises can start with a 4G implementation and later migrate to 5G or deploy a hybrid 4G/5G private solution.
Azure orchestration for edge workloads
Azure provides several tools for onboarding edge applications and network functions. The Microsoft private 5G solution uses Azure Arc and Azure Network Function Manager.
Azure Arc can simplify complex infrastructures that are distributed across on-premises, edge, and multicloud environments and extend Azure management to these environments.
For network function workloads, Network Function Manager is a cloud-native orchestration service that customers can use to deploy and provision network functions on Azure Stack platforms. Supported platforms include Azure Stack Edge Pro, which has a built-in GPU, and Azure Stack HCI. When used with Azure Stack Edge, Network Function Manager provides deployment, provisioning, and cloud-based management of network functions or apps running at the private edge, directly from the Azure portal. It’s a managed service, so an Azure-managed service provider handles updates, lifecycle management, and support for network functions and applications on the edge device. The platform supports virtual machines and containerized workloads, and one or two GPUs for acceleration.
Azure solution characteristics
This solution significantly reduces the total cost of ownership of operating a private cellular network. The following attributes contribute to reducing costs:
Telco private 5G network-as-a-service
Azure enables operators to deploy a complete CBRS/4G/5G mobile core as a service. The private 5G network-as-a-service approach changes how private 5G networks are deployed and managed. It gives operators more flexibility and enables them to provide the mobile core functionality as a hosted and managed service.
The solution can be integrated with a variety of radio access network (RAN) and subscriber identity management (SIM) systems via the Microsoft partner ecosystem. In addition to integration with other applications on Azure, like Azure Machine Learning and Azure IoT Hub, the solution has built-in features that enterprises need for service integrations. These features typically incur separate cost and compute, and require complex operations, but these functions are included as part of this solution. No additional hardware is required. The solution also provides integrated local policy to enable differentiated traffic treatment based on SIM policies configured in the Azure cloud and synced to Azure Private 5G Core.
Cloud-native solution
Because it uses both the Azure cloud and Azure Stack Edge, this solution architecture brings the benefits of cloud economics and a pay-as-you-go consumption model. Customers can size and deploy the solution for their current workloads and avoid the risk of underestimating or overestimating resource requirements. The Azure cloud also provides built-in enhanced security and privacy compliance. Customers can confidently deploy the solution in verticals that require stringent data privacy, like healthcare, government, public safety, and defense. Deploying an edge-based solution that uses Azure Stack Edge provides connectivity services and the ability to deploy edge applications. This combination helps customers deploy edge applications that require low-latency and edge-compute processing.
Cloud management, automation, and observability
The solution is managed remotely via Azure cloud. It’s a multi-tenant solution that gives role-based access control to network admins, enabling them to view, manage, and control private 5G networks and SIMs. Cloud management provides cost savings for several reasons:
- The solution can be serviced without the need to send technicians or agents to a site.
- Cloud management eliminates the need for an additional on-premises operations support system (OSS).
- Exposed northbound APIs can be easily integrated with existing SIM and OSS/BSS (business support system) solutions.
Automation provides a better user experience and simplifies deployment. Automation can reduce solution deployment from weeks to hours, whether the deployment is managed by the operator, a managed services provider (MSP), or a partner. Without automation, the scale needed to deploy a solution to thousands of enterprises and consumers is unattainable. Azure Automation provides cloud-based automation, operating system updates, and a configuration service that supports consistent management across Azure and non-Azure environments. It includes process automation, configuration management, update management, shared capabilities, and heterogeneous features.

The single-pane-of-glass approach doesn’t just enable operators to deploy the service. It also quickly instantiates the private 5G network service at scale for its enterprises. The portal can then be used for full-service assurance and automation, including configuration, fault, and performance management.
Azure Private 5G Core and Azure Stack Edge report metrics and alarms to Azure Monitor to provide network insights. Operators can use these insights for closed-loop automation and to provide service assurance to customers. Beyond network insights, this data can provide useful business intelligence and network monetization to enterprise customers.
Integration with Azure services
This solution enables an ecosystem of applications for operators and enterprise customers. These applications include business intelligence and analytics applications and AI and machine learning applications from Microsoft and others. Azure private multiaccess edge compute combines Private 5G Core and the Azure-managed edge compute environment in a single architecture. This colocation enables enterprises to move data in and out of their mobile networks for processing and choose which data should be processed on-site and which should be sent to the cloud.

MEC for networking and applications
An operator needs to provide both the local radio infrastructure and the managed compute for a private 5G network service. A cloud edge computing component is also required for processing cloud services and applications. One solution is a shared edge where both the mobile network functions and local edge applications run side-by-side. They run in a common zero-trust security framework provided by Azure Stack Edge or Azure Stack HCI. This approach provides seamless integration between the 5G network, edge computing, and the cloud, and significantly reduces CapEx and OpEx.
Alternative solutions involve splitting the compute functions into two sets: one managed by the operator and the other by the enterprise or another managed service provider. In this approach, solution architecture splits up the management, but enterprises benefit from using Azure as the common management layer for both networking and applications.
For example, consider a scenario in which the enterprise customer is a national retail chain with hundreds of stores. The enterprise can choose to integrate a select set of modern connected applications with the private 5G network on a single compute platform that’s managed by the operator. Or the enterprise can use two distinct compute platforms at every location: one for the mobile network functions (managed by the operator) and another to run distributed cloud and enterprise-developed applications. The architecture will provide flexibility for the enterprise and the operator.
The telco experience
This solution meets the high-performance, high-availability, low-latency requirements of telecommunications cloud services. It’s optimized to help operators and MSPs manage and control private 5G network services for their enterprise customers. By addressing the infrastructure requirements of private 5G networks in a seamless and highly scalable platform, the solution allows operators to focus on their strengths and bring the value of the cloud to their customers.
Questions from enterprise customers
As enterprises become better-educated consumers of private 5G network services, they’ll look for specific features that align with their unique requirements and use cases. Here are some of the questions that mobile operators can expect to hear from prospective enterprise customers:
Azure private multiaccess edge compute combines Private 5G Core and the edge compute environment in a single architecture. Seamless integration between the core and the edge provides reassurance that the private network solution will work as expected. Multi-vendor solutions can lead to lengthy integrations and challenges when technical problems arise. Because private 5G networks might handle mission-critical applications, disruptions aren’t acceptable.
Does the solution offer end-to-end management?
End-to-end management needs to incorporate Azure and partner services in a common management framework. Azure currently provides consistency for the edge platform, Kubernetes, and Private 5G Core. We also recommend that operators develop or integrate their order and service management via Azure APIs to provide automation to simplify the consumption of private 5G networks.
Is the solution reliable?
Azure private multiaccess edge compute supports multiple layers of reliability. Enterprises expect high-availability connectivity for mission-critical workloads. Azure provides multi-node edge deployment with Azure Kubernetes Service (AKS) on-premises clusters to run the Private 5G Core containers. For information about the Private 5G Core SLA, see the Azure SLA page after the product reaches general availability.
Is the solution simple, but flexible enough to scale dynamically?
As enterprises realize the benefits of running applications and operations on a private 5G network, the network footprint will expand into other business areas and other sites. Operators will need to scale these solutions quickly and cost-effectively. Having a cloud-based mobile core provides a significant advantage in this scenario.
How secure is the network?
The effective deployment of the Azure Zero Trust security model within a common architecture helps to ensure the consistent application of security policy across both operator and enterprise functions. The security model is enabled across all Azure service components.
Will the private 5G network integrate with my existing business applications and support my devices?
The Azure approach is to provide open and standardized APIs, SIM provisioning, and profile management for integration with business applications and devices. Azure partnerships with most network application and device vendors can help provide smooth integration. Because Microsoft owns both the cloud and the mobile core components, integration with OSS/BSS systems is streamlined.
How can I see what’s happening in my network?
With a unified Azure solution, enterprises and operators can view, manage, and monitor everything from telemetry data to network traffic by using a single management tool. Common lifecycle management, security policy, and orchestration provide end-to-end visibility and control for managing the service.
Containers and microservices are the building blocks for business applications. The ability to automate and orchestrate new mobile services is essential for operators and enterprises as they build new applications and services on their 5G networks. Enterprises also need to be able to host these applications either on-premises or in the cloud. The Azure solution provides automation and orchestration across all domains and network functions: physical, virtual, and cloud.
How do I analyze mobile network data?
Connected devices generate data that can be useful to enterprises. With this solution, enterprises can bring data into the Azure environment with enhanced security. They can use this data for AI, machine learning, and analytics, including analysis via business intelligence tools from Microsoft and others.
Contributors
This article is maintained by Microsoft. It was originally written by the following contributors.
Principal author:
Other contributor:
by Contributed | Dec 21, 2022 | Technology
This article is contributed. See the original author and article here.
I have already written a few articles on AKS, so feel free to have a look at them as I will not repeat what I’ve already written there. For the record, here are the links:
As a side note, this post is about how to harden ingress using Network Security Groups on top of internal network policies. Probably, 99% of the clusters worldwide are hardened using network policies only. If your organization is part of the last percent, and want to harden clusters further, this post is for you.
In AKS, ingress is used to let external components/callers interact with resources that are inside the cluster. Ingress is handled by an ingress controller. There are many of them: Nginx, Istio, Traefik, AGIC, etc. but whatever technology you choose, you will rely on a load balancer (LB) service to serve the traffic. When you instruct K8s to provision a service of type LB, it tells the Cloud provider (Microsoft in this case) to provision a LB service. This LB might be public facing or internal. The recommended approach is to provision an internal LB that is proxied by a Web Application Firewall (WAF) (Front Door+PLS or Application Gateway, or even any third party WAF). API traffic is also often proxied by a more specific API gateway.
The default behavior of a LB service in K8s, is to load balance the traffic twice:
- Firstly, at the level of the Azure LB, which will forward traffic to any healthy AKS node
- Secondly, at the level of K8s itself.
Because the Azure Load Balancer has no clue about the actual workload of the AKS cluster, it will blindly forward traffic to any “healthy” node, no matter what the pod density is. To prevent an imbalanced load balancing, K8s adds its own bits, to achieve a truly evenly distributed load balancing that considers the overall cluster capacity. While this sounds like the perfect thing on earth, it comes with two major caveats:
- K8s might add an extra hop between the Azure Load Balancer and the actual target, thus impacting latency.
- No matter whether there is an extra hop or not, K8s will source network address translation (SNAT) the source traffic, thus hiding the actual client IP. The ingress controller will therefore not be able to apply traffic restriction rules.
When you provision a LB service, for example, following the steps documented here, you will end up with a service, whose externalTrafficPolicy is set to Cluster. The Cluster mode takes care of the imbalanced load balancing. It performs the extra K8s bits to optimize load balancing and comes with the caveats described earlier.
This problem is known and documented so, why am I blogging about this? Well, this is because the load balancing algorithm that you choose at the level of the LB service, also has an impact on how you can restrict (or not) traffic that comes in, at the level of the Network Security Groups, and that is not something I could find guidance on.
If you do not want to restrict ingress traffic in any way, you can stop reading here, else, keep on reading.
Lab environment
Let us deep dive into the internals of AKS ingress with a concrete example.
For this, let us use the following lab:
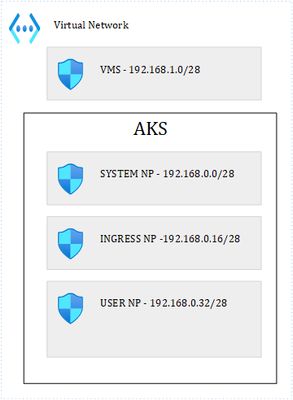
Where we have 1 VNET and 4 subnets. 3 subnets are used by the AKS cluster: 1 for the system node pool, 1 for ingress and the last one for user pods. I have labelled the Ingress and User node pools so that I can schedule pods accordingly. It is important to precise that our cluster is based on Kubenet, which adds a layer of complexity in terms of how networking works with K8s. The VM subnet holds our client VM, used to perform client calls to an API that is exposed through the ingress controller. Ultimately, we end up with this:

Load balancer with default behavior
I have provisioned the following LB service in AKS:
apiVersion: v1
kind: Service
metadata:
annotations:
meta.helm.sh/release-name: ingress-nginx
meta.helm.sh/release-namespace: ingress
service.beta.kubernetes.io/azure-load-balancer-health-probe-request-path: /healthz
service.beta.kubernetes.io/azure-load-balancer-internal: “true”
service.beta.kubernetes.io/azure-load-balancer-internal-subnet: ingress
labels:
app.kubernetes.io/component: controller
app.kubernetes.io/instance: ingress-nginx
app.kubernetes.io/managed-by: Helm
app.kubernetes.io/name: ingress-nginx
app.kubernetes.io/part-of: ingress-nginx
app.kubernetes.io/version: 1.5.1
helm.sh/chart: ingress-nginx-4.4.0
name: ingress-nginx-controller
namespace: ingress
spec:
allocateLoadBalancerNodePorts: true
externalTrafficPolicy: Cluster
internalTrafficPolicy: Cluster
ipFamilies:
– IPv4
ipFamilyPolicy: SingleStack
loadBalancerIP: 192.168.0.22
ports:
– appProtocol: http
name: http
nodePort: 31880
port: 80
protocol: TCP
targetPort: http
selector:
app.kubernetes.io/component: controller
app.kubernetes.io/instance: ingress-nginx
app.kubernetes.io/name: ingress-nginx
sessionAffinity: None
type: LoadBalancer
Notice the Azure-specific annotations at the top, telling Azure to provision an internal load balancer in a specific subnet, and with the /healthz endpoint for the health probe.
I’m only using HTTP but same logic applies to HTTPS. I have three nodes in the cluster:

I also have deployed one API and a few privileged containers, for later use:

Each privileged container runs on its corresponding node (one on the system node, one on the ingress node, and another one on the user node). The API runs on the user node. My ingress controller runs a single pod (for now) on the Ingress node:

Lastly, I deployed the following ingress rule:
apiVersion: networking.k8s.io/v1
kind: Ingress
metadata:
name: weather
spec:
ingressClassName: nginx
rules:
– host: demoapi.eyskens.corp
http:
paths:
– path: /weatherforecast
pathType: Prefix
backend:
service:
name: simpleapi
port:
number: 8080
Upon the deployment of the K8s LB service, Azure creates its own LB service, which after a few minutes, shows the status of the health probe checks:

Each AKS node is being probed by the load balancer. So far so good, we can run our first API call from the client VM:

Our ingress controller sees the call and logs it:
192.168.0.4 – – [20/Dec/2022:06:25:33 +0000] “GET /weatherforecast HTTP/1.1” 200 513 “-“
“Mozilla/5.0 (Windows NT; Windows NT 10.0; en-US) WindowsPowerShell/5.1.17763.3770” 180
0.146 [default-simpleapi-8080] [] 10.244.1.5:8080 513 0.146 200
76e041740b70be9b36dd4fda52f97410
Everything works well until the security architect asks you how you control who can call this service…So, let us pretend that our client VM is the only one that can call the service. We could simply specify a rule at the level of the ingress controller itself. We know the IP of our VM so let’s give it a try:
apiVersion: networking.k8s.io/v1
kind: Ingress
metadata:
name: weather
annotations:
nginx.ingress.kubernetes.io/whitelist-source-range: 192.168.1.4
spec:
ingressClassName: nginx
rules:
– host: demoapi.eyskens.corp
http:
paths:
– path: /weatherforecast
pathType: Prefix
backend:
service:
name: simpleapi
port:
number: 8080
By adding a whitelist-source-range annotation. Surprise, we now we get a Forbidden response from our Client VM:

Looking at the NGINX logs reveals the problem:
…*24932 access forbidden by rule, client: 10.244.2.1, …
The client is 10.244.2.1 (crb0 of the ingress node) instead of our VM (192.168.1.4). Why is that? That is because of caveat number 2 described earlier. The Client IP is always hidden by the SNAT operation because the service is in Cluster mode. Well, is the client always 10.244.2.1? No, just run a few hundred queries from the same client VM, and you will notice things like this:
2022/12/20 07:03:45 [error] 98#98: *39317 access forbidden by rule, client: 10.244.2.1,
server: demoapi.eyskens.corp, request: “GET /weatherforecast HTTP/1.1”, host:
“demoapi.eyskens.corp”
2022/12/20 07:03:45 [error] 98#98: *39317 access forbidden by rule, client: 10.244.2.1,
server: demoapi.eyskens.corp, request: “GET /weatherforecast HTTP/1.1”, host:
“demoapi.eyskens.corp”
2022/12/20 07:03:48 [error] 98#98: *39361 access forbidden by rule, client: 192.168.0.36,
server: demoapi.eyskens.corp, request: “GET /weatherforecast HTTP/1.1”, host:
“demoapi.eyskens.corp”
We can see our CBR0 back, but also 192.168.0.36, which is the IP of our user node. Because you want to understand how things work internally, you decide to analyze traffic from the ingress node itself. You basically exec into the privileged container that is running on that node:
kubectl exec ingresspriv-5cfc6468c8-f8bjf -it — /bin/sh
Then, you go onto the node itself, and run a tcpdump:
chroot /host
tcpdump -i cbr0|grep weatherforecast
Where you can indeed see that traffic is coming from everywhere:
07:15:29.484576 IP aks-user-28786594-vmss000001.internal.cloudapp.net.35448 >
10.244.2.2.http: Flags [P.], seq 14689:14845, ack 26227, win 16411, length 156: HTTP:
GET /weatherforecast HTTP/1.1
07:15:29.499647 IP aks-user-28786594-vmss000001.internal.cloudapp.net.35448 >
10.244.2.2.http: Flags [P.], seq 14845:15001, ack 26506, win 16416, length 156: HTTP:
GET /weatherforecast HTTP/1.1
07:15:29.538515 IP aks-user-28786594-vmss000001.internal.cloudapp.net.35448 >
10.244.2.2.http: Flags [P.], seq 15001:15157, ack 26785, win 16414, length 156: HTTP:
GET /weatherforecast HTTP/1.1
07:15:29.552183 IP aks-user-28786594-vmss000001.internal.cloudapp.net.35448 >
10.244.2.2.http: Flags [P.], seq 15157:15313, ack 27064, win 16413, length 156: HTTP:
GET /weatherforecast HTTP/1.1
07:15:29.552630 IP aks-nodepool1-41831646-vmss000001.internal.cloudapp.net.24631 >
10.244.2.2.http: Flags [P.], seq 1:181, ack 1, win 16416, length 180: HTTP: GET
/weatherforecast HTTP/1.1
07:15:29.604062 IP aks-user-28786594-vmss000001.internal.cloudapp.net.35448 >
10.244.2.2.http: Flags [P.], seq 15313:15469, ack 27343, win 16412, length 156: HTTP:
GET /weatherforecast HTTP/1.1
07:15:29.620439 IP aks-user-28786594-vmss000001.internal.cloudapp.net.35448 >
10.244.2.2.http: Flags [P.], seq 15469:15625, ack 27622, win 16411, length 156: HTTP:
GET /weatherforecast HTTP/1.1
07:15:29.637675 IP aks-nodepool1-41831646-vmss000001.internal.cloudapp.net.24631 >
10.244.2.2.http: Flags [P.], seq 181:337, ack 280, win 16414, length 156: HTTP: GET
/weatherforecast HTTP/1.1
07:15:29.666067 IP aks-nodepool1-41831646-vmss000001.internal.cloudapp.net.24631
This is plain normal: every single node of the cluster could be a potential client. So, no way to filter out traffic from the perspective of the ingress controller, with the Cluster mode.
Never mind, let us use the NSG instead of the ingress controller to restrict traffic to our VM only. That’s even better, let’s stop the illegal traffic sooner and not even hit our ingress controller. Naturally, you tell the security architect that you have a plan and come with the following NSG rules for the ingress NSG:

You basically allow the client VM to talk to the LB, and some system ports, but you deny everything else. You tell the security guy to relax about the “Any” destination since none of the internal cluster IPs is routable or visible to the outside world anyway (Kubenet), so only what is exposed through an ingress rule will be “visible”. For the two other subnets, you decide to be even more restrictive. You basically use the same rules as shown above, except for rule 100. You’re pretty sure it should be ok, and that no one else on earth but your client VM will ever be able to consume that API. Because you are a thoughtful person, you still decided to enable the NSG flow logs to make sure you capture traffic…in case you need to troubleshooting things later on.
So, you retry and you realize that a few queries go through while others are blocked, until every call from the client VM is going through again….What could be the culprit? First reaction is to look at the Azure Load Balancer itself and you’ll notice that it is not in a great shape anymore:

Why is that? It is because of the NSG that you defined at the level of the Ingress subnet, which broke it entirely, although you had authorized the AzureLoadBalancer tag. So, you decide to remove the NSG, wait a few minutes, and inspect again what comes into the CBR0 of the Ingress node, to figure it out from the inside:
tcpdump -i cbr0
This is what comes out of the dump:
08:36:46.835356 IP aks-user-28786594-vmss000001.internal.cloudapp.net.54259 >
10.244.2.2.http: Flags [P.], seq 199:395, ack 125, win 1024, length 196: HTTP: GET
/healthz HTTP/1.1
08:36:48.382720 IP aks-nodepool1-41831646-vmss000001.internal.cloudapp.net.8461 >
10.244.2.2.http: Flags [P.], seq 197:391, ack 125, win 16384, length 194: HTTP: GET
/healthz HTTP/1.1
You see that all nodes are directly probing the HEALTH endpoint on the ingress node…so the NSG rules described earlier are too restrictive. You start realizing that ruling AKS traffic with NSGs is a risky business…So, the non-ingress nodes are considered unhealthy by the Azure LB because they are unable to probe the ingress node. The ingress node is still considered healthy because it can probe itself and AzureLoadBalancer tag is allowed. That’s what explains the fact that ultimately, everything is going through because only the ingress node itself receives traffic, right from the LB and is already allowing the client VM. If you leave the cluster as is, you basically broke the built-in LB algorithm of K8s itself that protects against imbalanced traffic, plus you’ll keep getting calls from the other nodes trying to probe the ingress one. But because you want to optimize LB and avoid further issues, you add this rule to your ingress NSG:

Where you basically allow every node to probe on port 80 (remember we only focus on HTTP). You can safely put Any as destination since the destination is the IP of the Ingress Pod, which you can’t guess in advance. After a few minutes, the Azure LB seems to be in a better shape:

And yet a few minutes later, it’s all green again.
Now that you have restored the ingress, you’re back to square 1: some requests go through but not all. First, you checked the NSG flow logs of the User node pool and realized that you have such flow tuples that are blocked by the NSG:
[“1671521722,192.168.1.4,192.168.0.22,50326,80,T,I,D,B,,,,”]
Where you see that our client VM is trying to hit port 80 of our Azure Load Balancer…Wait, we said that the Cluster mode hides the original client IP, isn’t?? Yes that’s right but only from the inside, not from the outside. The NSGs still see the original IP….Ok, but why do I find these logs in the NSG of the user node?? Well, because each node of the cluster can potentially forward traffic to the destination…. So, it boils down to the following conclusion when using the Cluster mode:
- All nodes must be granted inbound access to the ingress node(s) for the health probes.
- Because each node is potentially forwarding the traffic itself, you must allow the callers (our VM in this case, an Application Gateway, an APIM in reality) in each subnet.
- You must accept de-facto cluster-wide node-level lateral movements to these endpoints/ports.
But what if the security architect cannot live with that? Let us explore the second option.
LB with externalTrafficPolicy set to Local.
The only thing needed to do is to switch the service’s externalTrafficPolicy to Local:
Type: LoadBalancer
IP Family Policy: SingleStack
IP Families: IPv4
IP: 10.0.58.7
IPs: 10.0.58.7
IP: 192.168.0.22
LoadBalancer Ingress: 192.168.0.22
Port: http 80/TCP
TargetPort: http/TCP
NodePort: http 31880/TCP
Endpoints: 10.244.2.2:80
Session Affinity: None
External Traffic Policy: Local
After a minute, you’ll notice this at the level of the Azure Load Balancer:

Don’t worry, this is the expected behavior. When you switch the K8s service to Local, K8s stops adding its own bits to the load balancing algorithm. The only way to prevent the Azure Load Balancer from sending traffic to a non-ingress-enabled node, is to mark these nodes as unhealthy. Any probe to the healthz endpoint will return a 503 answer from non-ingress-enabled nodes (example with the user node):
kubectl exec userpriv-5d879699c8-b2cww -it — /bin/sh
chroot /host
root@aks-user-28786594-vmss000001:/# curl -v http://localhost:31049/healthz
* Trying 127.0.0.1…
* TCP_NODELAY set
* Connected to localhost (127.0.0.1) port 31049 (#0)
> GET /healthz HTTP/1.1
> Host: localhost:31049
> User-Agent: curl/7.58.0
> Accept: */*
>
< HTTP/1.1 503 Service Unavailable
< Content-Type: application/json
< X-Content-Type-Options: nosniff
< Date: Tue, 20 Dec 2022 11:57:34 GMT
< Content-Length: 105
<
{
“service”: {
“namespace”: “ingress”,
“name”: “ingress-nginx-controller”
},
“localEndpoints”: 0
* Connection #0 to host localhost left intact
}root@aks-user-28786594-vmss000001:/#
While it will return a 200 on every ingress-enabled node. But what is it exactly an ingress-enabled node? It’s simply a node that is hosting an ingress controller pod. So, with this, you can control much better the ingress entry point, plus you can also directly use a whitelist-source-range annotation, and this time, the ingress controller will see the real client IP since there is no more SNAT happening.
You still must pay attention to where your ingress controller pods are running. Remember that I have dedicated one node pool in its own subnet for ingress and I have forced the pod scheduling on that node pool through a nodeSelector. Should I omit this, and scale my replicas to 3, I could end up with the following situation where AKS would schedule pods across nodes of different node pools:

This would lead to a situation where nodes hosting an instance of the ingress controller would show up as healthy again at the level of the Azure Load Balancer. Therefore, you’d be hitting NSGs of subnets hosting those nodes…So, if you want to concentrate the ingress traffic to a single entry point, you need to:
- Dedicate a node pool with 1 or more nodes (more for HA) and enable Availability Zones for your ingress pods to run on.
- Make sure to force the pod scheduling of the ingress controller onto that node pool.
- Make sure you white list your clients (APIM, Application Gateway, etc.) at the level of the NSG of the ingress subnet. You do not need to white list other nodes because in Local mode, nodes do not probe the ingress node anymore. If you run a tcdump -i cbr0 on the ingress node, you’ll see only traffic from the node’s pod cidr itself.
Conclusion
Whether you are using Kubenet or CNI, ruling AKS ingress with Network Security Groups is not something you can improvise. Using the native load balancing algorithm (Cluster), you should end up with an optimized load balancing, but you must accept the fact that you have to live with lateral movements across the entire cluster. You can of course try to compensate with additional network policies but OS-level traffic would still be allowed (mind the container escape risk). Using the Local mode, you can control much better the incoming traffic, at the level of the NSGs as well as at the level of the ingress controller itself. You can run any number of ingress controller pods, as long as you scheduled them on identified nodes. The downside is that you might end up with an imbalanced traffic. This is a trade-off!

by Contributed | Dec 20, 2022 | Technology
This article is contributed. See the original author and article here.
What is an MVP?
Microsoft Most Valuable Professionals, or MVPs, are technology experts who passionately share their knowledge and are always willing to help others within the community. They have exhibited great examples that showcase their passion, community spirit, and leadership through which they’ve earned the MVP award. You can also read what it takes to be an MVP to get more insights.
Meet our Security MVPs
Joe Stocker
Joe Stocker is the founder and CEO of Patriot Consulting, a leading Microsoft Security partner in the United States. Patriot Consulting has completed more than 1,200 cybersecurity projects since 2015, including migrating customers from different Security providers to Microsoft Defender for Office 365. Joe is the author of “Securing Microsoft 365”, writes a technology blog at www.TheCloudTechnologist.com and hosts a podcast on Spotify and iTunes called “Cybersecurity 101 with Joe and Larry”.
Joe, can you share some of your top contributions to Security – Microsoft Defender for Office 365 (MDO)?
- Microsoft Ignite 2022 Conference Speaker “Defending against 2nd wave phishing” (watch).
- Published book “Securing Microsoft 365 (2nd Edition)” (read).
- Pro Bono consulting for Microsoft Defending Democracy and Microsoft Tech for Social Impact, (TSI) where I provide free “office hours” for governments and non-profit organizations, helping them securely configure Microsoft Defender products. My blog was recently cited by CISA (US GOV) in their minimum security configurations for M365 (Section 2.5.2 Resources, “Everything you wanted to know about Security and Audit Logging in Office 365”).
What advice related to security would you share with today’s email users?
Add device authentication as a factor of authentication to guard against phishing emails using MFA fatigue attacks.
Why do you recommend Microsoft Defender for Office 365 (MDO) to customers?
There are ten reasons why I recommend Microsoft email security to my clients:
- Automatic signal sharing with Microsoft Defender for Endpoint
- Protect malicious links in SharePoint, OneDrive, Teams, Office on the Web, and Microsoft 365 Apps for Enterprise
- Safe Documents
- Lateral Phishing Protection
- Native Link Rendering
- Anti-Phishing (to prevent Business Email Compromise)
- Automatic Investigation and Response
- Threat Explorer
- Threat Hunting & XDR Integration
- Performance
How has your experience been with the Microsoft Defender for Office 365 (MDO) product and/or Product Engineering team?
I’ve been working with the MDO Product team for several years and they have always been receptive to feedback and have incorporated several of my suggestions into the product. What impresses me the most is how open they are to sharing the roadmap with MVPs and asking for feedback.
Siegfried Jagott

Siegfried Jagott is a CEO and Principal Consultant for Intellity GmbH and a Microsoft Valuable Professional (MVP) for M365 Apps and Services since the year 2013. He is an award-winning author of Microsoft Exchange Server 2010 Best Practices book published by Microsoft Press and has been writing and technical reviewing for several Microsoft Official Curriculum (MOC) courses on various topics such as MOC 20345 Administering Microsoft Exchange Server 2019.
Siegfried, can you share some of your top contributions to Security – Microsoft Defender for Office 365 (MDO)?
- Two sessions on Exchange Online Protection/Microsoft Defender for Office 365 for Microsoft Exchange Community Technical Airlift 2022
- Messaging Security: Deep dive into EOP, MDO and other Messaging Security Features (MEC009WS) (watch).
- Use Advanced Message Tracking to identify Junk Mail or Spoofing (MEC030WS) (watch).
- Early adopter testing on various product features.
- Working with customers on adopting Security features, and with Microsoft on improving the product.
What advice related to security would you share with today’s email users?
Understand your Exchange Online Protection/Microsoft Defender for Office 365 settings, so you can adjust them when needed. Trust the pre-defined configuration, but always review thoroughly as you can make it even better.
Why do you recommend Microsoft Defender for Office 365 (MDO) to customers?
I recommend Microsoft Defender for Office 365 to customers as it’s part of the M365 suite and the Microsoft AI is so much better than an on-premises Anti-Virus or Antispam toolbox. MDO does not need any administrative intervention as it’s always running the most current version, includes one-of the best malware protections in the industry and Microsoft has a lot of people of Researchers & Threat Hunters constantly monitoring for trends and attacks to improve MDO immediately when issues arise. For me it’s important that I can sleep at night, and that’s what MDO provides to my customers in means of protection from viruses, malware or any other malicious code.
How has your experience been with the Microsoft Defender for Office 365 (MDO) Product and/or Product Engineering team?
When preparing for my “Messaging Security: Deep Dive into Exchange Online Protection, Microsoft Defender for Office” session for MEC 2022, I received a lot of support by the Proud Group members that contributed to my slide deck. For example, I was supported by a long time known Product Manager in the Customer Experience team with details on Advanced Hunting and examples I further developed during this process. The MDO MVP Program lead Product Manager also supported me in finding the right people that could clarify detailed in-depth questions that I had for example on priority account labels or Advanced Hunting.
Viktor Hedberg

Viktor Hedberg works as a Security Consultant at a company in Sweden called Truesec. He helps customers with hardening their hybrid Infrastructure, ranging from Active Directory to cloud-based services such as M365. As a speaker on different events and conferences, he frequently highlights the features that help organizations stay safe, including M365 Defender.
Viktor, can you share some of your top contributions to Security – Microsoft Defender for Office 365 (MDO)?
- Co-authoring a book on “Mastering Microsoft 365 Defender” with another MVP, Ru Campbell.
- Hosting user group and conference sessions on implementing RBAC in Microsoft 365 Defender using PAGs and PIM (watch).
- Posting Advanced Hunting queries on public GitHub repo (view).
What advice related to security would you share with today’s email users?
Always be vigilant when receiving emails that break normal patterns. We have seen ransomware gangs using Qakbot to hijack email threads to start attacking environments, as well as normal phishing however evolving with more and more advanced fake web sites. Contact the original sender if possible and don’t click any links just because it ”seems” safe.
Why do you recommend Microsoft Defender for Office 365 (MDO) to customers?
I think MDO, especially coupled with the other features in M365 Defender brings you complete coverage of most of the attack surfaces present in any given organization these days. Of course, no product suite is perfect, and there will always be black spots in your monitoring, but having a product like MDO helps eliminate these. Safe attachments, safe links and impersonation protection are features I know for a fact have actively stopped threat actors from gaining a foothold in the environment and injecting bad code. I always recommend customers to use ALL features in the Defender suite to help them stay safe. You’d also need a security operations center monitoring alerts 24/7 365 days.
How has your experience been with the Microsoft Defender for Office (MDO) 365 Product and/or Product Engineering team?
My favorite part about engagements as an MVP is the NDA (non-disclosure agreement) stuff Microsoft has, which gives me the opportunity to directly impact the future development of the features, bringing in real-world examples to help Microsoft keep the customers safe as well.
Pierre Thoor

Pierre Thoor works as a Trusted Microsoft Cloud Cybersecurity Advisor at Onevinn in Sweden. He helps customers of all sizes with everything from architect Azure environments, doing cost analysis, recommend licenses, to enabling different Microsoft security products and features such as the favorites – M365 Defender and Sentinel. He’s also an active speaker on different events and has a passion to simplify and give the audience a chance to learn something new. He’s planning to release his third podcast with fellow MVPs Mattias Borg and Stefan Schörling, and it will all be focused on cybersecurity and Microsoft.
Pierre, can you share some of your top contributions to Security – Microsoft Defender for Office 365 (MDO)?
- Helping customers adopt MDO and other M365 Defender products in very early stages.
- In the newly upcoming blog series “Strengthen your email protection with Defender for Office 365” (upcoming late December 2022), I will show how to get started with a free trial and what the best practices would be, and how it can be extended to other Microsoft products helping customers to visualize what’s happening in their environment.
- Engaged with Microsoft in improving the products.
What advice related to security would you share with today’s email users?
We have seen a big increase in email attacks around the world, and I think the best advice is to start training your co-workers and employees to be more aware of the potential risk. But also in a technical sense, implement security measures to protect your organization – and don’t forget to visualize the data to make it more impactful for management.
Why do you recommend Microsoft Defender for Office 365 (MDO) to customers?
Email attacks, or phishing attacks, are increasing daily and they are getting better and better. I can just imagine how good it will be now that we have seen OpenAI ChatGTP doing the work for us, so therefore I always recommend my customers to start protecting the email flow. MDO Safe Links and Safe Attachments protection features have drastically improved with new enhancements over time, and I do see a completely new product today where MDO has the speed and more intelligence to be able to detect and protect.
How has your experience been with the Microsoft Defender for Office 365 Product (MDO) and/or Product Engineering team?
The most fantastic part of Microsoft today is that we as a customer, partner, or just interested in Microsoft technologies can influence the product development. I have been part of the Customer Connection Program for two years now and the speed regarding product development is fantastic and I really do believe the product groups are listening very closely to the feedback they get from the community. It is quite amazing to be a small part of new products and features within the Microsoft Security arena. My favorite part about engagements with Microsoft is a private NDA (non-disclosure agreement) community that Microsoft Defender for Office 365 Team has for MVPs where I can have direct contact with the product group, and they are so fast in their responses! I cannot wait to see what the year 2023 and the future will bring.
Thank you, MVPs!
Microsoft cannot be successful without such an incredibly valuable and engaged group of experts! Thank you all MVPs for being together with us on our product journey towards empowering the world to be more secure each day!
Learn more from the Security MVP experts
Checkout this amazing upcoming episode on the Virtual Ninja Training Show to hear experiences from some of the Security MVPs. (The recording will be available post event at aka.ms/ninjashow). Read the blog Getting started as a Security MVP to learn more. Submit this form if you’re an active contributor within the Security realm or would like to start at it, and we can point you in the right direction to getting your knighthood (MVP award)!
See examples of some global events where MVPs were involved:
Thanks for reading about Microsoft’s Most Valuable Professionals (MVPs).
Do you have questions or feedback about Microsoft Defender for Office 365? Engage with the community and Microsoft experts in the Defender for Office 365 forum.
by Contributed | Dec 19, 2022 | Technology
This article is contributed. See the original author and article here.
Microsoft has been working with the EESSI consortium for the past two years and provided Azure Credits to support the hosting of EESSI’s geographically distributed CernVM-FS servers on Azure and for the building, testing and benchmarking of the EESSI software layer across different types of CPU generations. As the year draws to a close, this article provides a brief summary of progress to date, specifically in relation to accessing EESSI using Azure HPC-on-demand, and looks at what’s planned for 2023.
What is EESSI?
The European Environment for Scientific Software Installations (EESSI) is a collaboration between different European partners in the HPC community: the goal of which is to build a common stack of scientific software installations which provides a uniform experience for users whilst minimising duplicate work across HPC sites for HPC System Administrators.
Designed to work on laptops, personal workstations, HPC clusters and in the cloud, the EESSI software stack was inspired by the Compute Canada software stack (now coordinated by Digital Research Alliance of Canada), a unified software environment for Canada’s national advanced computing centres serving the needs of over 10,000 researchers across the country and providing a shared stack of scientific software applications in over 4,000 different combinations.[1]
What is Azure HPC OnDemand?
The Azure HPC OnDemand Platform (azhop) delivers an end to end deployment mechanism for a complete HPC cluster solution in Azure which makes use of industry standard tools to provision and configure the environment Azure HPC OnDemand Platform | Welcome to the Azure HPC OnDemand Platform’s homepage.
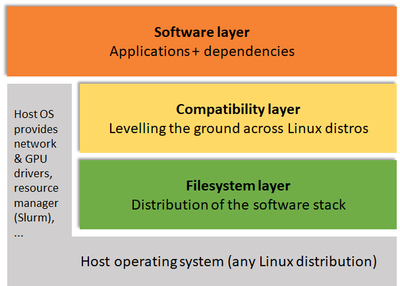
How does EESSI Work?
EESSI comprises a number of layers as shown in the high-level architecture overview (Figure 1): a filesystem later based on CernVM-FS which provides a scalable, reliable and low-maintenance software distribution service across clients, a compatibility layer required for ensuring compatibility of the software stack with the multiple different client operating systems and the software layer, installed using EasyBuild and which provides the scientific software installations and their dependencies[2].
Figure 1: EESSI High-level architecture overview
While EESSI is still in pilot phase the focus is very much focused on automation, procedures, testing and collaboration; recent developments and continued efforts by the consortium partners to secure dedicated workforce to ensure EESSI can become production ready is a definite goal of the collaboration and will start as soon as 2023.
Why Azure?
Azure is currently the only public cloud provider which provides a fleet of HPC Virtual Machines with InfiniBand RDMA so ensuring EESSI runs well on these VMs is essential.
The partnership is collaborative and mutually-beneficial: EESSI can help Microsoft to bridge the gap between on-premise and cloud by helping to make optimised bursting in the cloud possible using the same software stack.
The addition of applications that are useful to Azure customers will also help EESSI in the development/provision of a stable, optimised stack of scientific software, also helping to verify regression of the Azure HPC fleet and serving as a development layer upon which to build proprietary applications.
Verifying EESSI on Azure with RDMA
Ensuring that EESSI is freely available through open projects like Azure HPC on Demand (azhop) has been a key focus over the past few months. As part of this, WRF3 was selected as an important application to verify EESSI on Azure with RDMA and a successful evaluation was recently conducted which leveraged EESSI for WRF simulations at scale on Azure HPC to determine if EESSI could help to lower the adoption curve for customers running HPC on Azure and also to learn and hopefully improve Azure for HPC end-users.
Key differences between Azure and an on-premise HPC Cluster
The total Microsoft Azure estate comprises more than 60 geographically distributed datacentres: of those datacentres, the larger ‘Hero’ datacentres contain a considerable fleet of HPC and InfiniBand-enabled nodes.
Azure is currently the only public cloud provider to provide InfiniBand network, but unlike an on-premise HPC cluster, this InfiniBand network is purely focused on compute, not storage. Furthermore, Azure InfiniBand connectivity is not heterogeneous and connectivity is limited to single stamps, meaning that if multiple stamps are needed then some additional steps are required in order to ensure IB connectivity:
- Either by making sure only a single zone is being used, forcing the VMs to be landing on the same physical cluster which will allow the IB connectivity
- Or by using VM Scale Sets (VMSS) which will provide IB connectivity by default[3].
Running WRF3 to verify EESSI on Azure with RDMA
The aim of the exercise undertaken was to make sure EESSI could be fully compatible with the Azure HPC infrastructure and that the IB would work with no (or at least minimal) additional input required from the end user.
For the exercise, it was decided to use the WRF CONUS 2.5km Benchmark to ensure scaling over many nodes, see Figure 2 below. The total time and compute time were separated to make sure that the RDMA and scaling were performed correctly, and the parallel efficiency and scalability was then calculated using only the compute time (directly related to RDMA).

Figure 2: WRF3 Scaling on Zen3
Using a simple setup with no OpenMP or hybrid parallelism and undertaken in the most vanilla way possible, WRF demonstrated linear behaviour up to 16 nodes. There is certainly room for optimization but importantly this exercise demonstrated that out of the box with no specific changes or modifications this did indeed perform.
So what’s next?
Several next steps are planned for the evaluation from the Microsoft side, including simplifying the CPU detection, to allow more consistent determination of e.g. Zen3 (and upcoming Zen4), ARM64 and more CPU architectures. Extending the software suite with (benchmark) datasets and example submit scripts to allow consistent regression testing and easy onboarding for new users. And adding new software like WRF4 to investigate the potential for further scaling beyond 16 nodes.
Strategies to better optimize EESSI and using ReFrame for automated regression testing will also be areas requiring further investigation in the future.
With funding secured via the MultiXscale EuroHPC JU Centre of Excellence which will start in 2023, it is expected by all that the EESSI Consortium will secure the dedicated human resource to ensure EESSI itself can soon become production ready, continuing to help advance the industry and help in the design, delivery and deployment of new installation technologies: ultimately enabling the impact of end users and helping to further scientific outcomes.
[1] Providing a Unified Software Environment for Canada’s National Advanced Computing Centres (linklings.net)
[2] EESSI Architecture – EESSI (eessi-hpc.org)
[3] Using Azure CycleCloud for orchestration can also be used to combine multiple VMSS in a single running HPC cluster, allowing the total number of VMs to be scaled above the total number that can be in a single stamp.

Recent Comments