This article is contributed. See the original author and article here.
Over the past few months, the world has been captivated by generative AI and applications like the new chat experience in Bing, which can generate original text responses from a simple prompt written in natural language. With the introduction of generative AI across Microsoft business applicationsincluding Microsoft Dynamics 365, Viva Sales, and Power Platforminteractions with AI across business roles and processes will become second nature. With Copilot, Microsoft Dynamics 365 and Power Platform introduce a new way to generate ideas and content drafts, and methods to access and organize information across the business.
Before your business starts using Copilot capabilities in Dynamics 365 and Power Platform, you may have questions about how it works, how it keeps your business data secure, and other important considerations. The answers to common questions below should help your organization get started.
What’s the difference between ChatGPT and Copilot?
ChatGPT is a general-purpose large language model (LLM) trained by OpenAI on a massive dataset of text, designed to engage in human-like conversations and answer a wide range of questions on various topics. Copilot also uses an LLM; however, the enterprise-ready AI technology is prompted and optimized for your business processes, your business data, and your security and privacy requirements. For Dynamics 365 and Microsoft Power Platform users, Copilot suggests optional actions and content recommendations in context with the task at hand. A few ways Copilot for natural language generation is unique:
The AI-generated responses are uniquely contextual and relevant to the task at hand informed by your business datawhether responding to an email from within Dynamics 365, deploying a low-code application that automates a specific manual process, or creating a targeted list of customer segments from your customer relationship management (CRM) system.
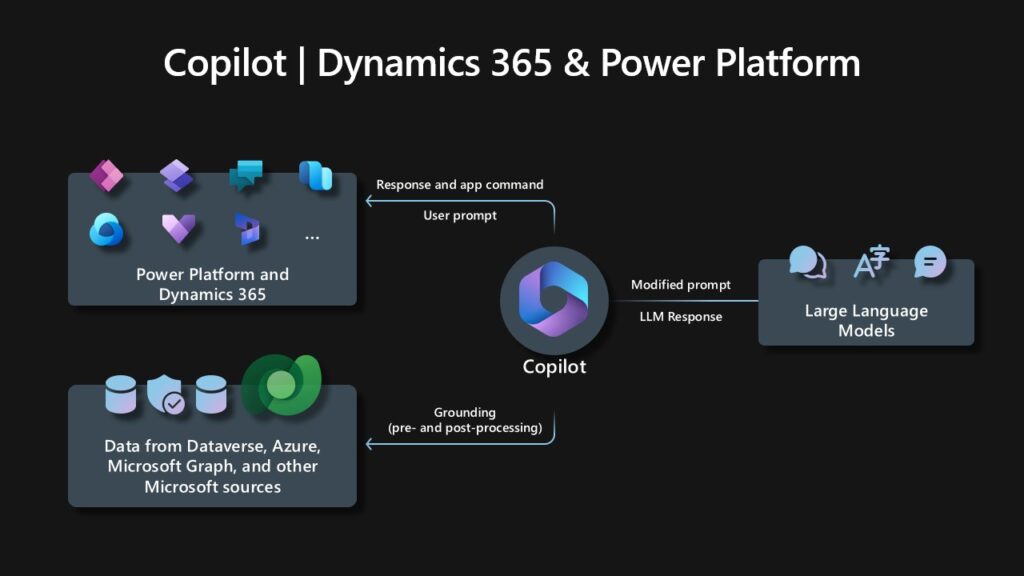
Copilot uses both an LLM, like GPT, and your organization’s business data to produce more accurate, relevant, and personalized results. In short, your business data stays within your tenancy and is used to improve context only for your scenario, and the LLM itself does not learn from your usage. More on how the system works is below.
Powered by Microsoft Azure OpenAI Service, Copilot is designed from the ground up on a foundation of enterprise-grade security, compliance, and privacy.
Read on for more details about these topics.
How does Copilot in Dynamics 365 and Power Platform work?
With Copilot, Dynamics 365 and Power Platform harness the power of foundation models coupled with proprietary Microsoft technologies applied to your business data:
Search (using Bing and Microsoft Azure Cognitive Search): Brings domain-specific context to a Copilot prompt, enabling a response to integrate information from content like manuals, documents, or other data within the organization’s tenant. Currently, Microsoft Power Virtual Agent and Dynamics 365 Customer Service use this retrieval-augmented generation approach as pre-processing to calling an LLM.
Microsoft applications like Dynamics 365, Viva Sales, and Microsoft Power Platform and the business data stored in Microsoft Dataverse.
Microsoft Graph: Microsoft Graph API brings additional context from customer signals into the prompt, such as information from emails, chats, documents, meetings, and more.
Copilot requests an input prompt from a business user in an app, like Microsoft Dynamics 365 Sales or Microsoft Power Apps. Copilot then preprocesses the prompt through an approach called grounding, which improves the specificity of the prompt, so you get answers that are relevant and actionable to your specific task. It does this, in part, by making a call to Microsoft Graph and Dataverse and accessing the enterprise data that you consent and grant permissions to use for the retrieval of your business content and context. We also scope the grounding to documents and data which are visible to the authenticated user through role-based access controls. For instance, an intranet question about benefits would only return an answer based on documents relevant to the employee’s role.
This retrieval of information is referred to as retrieval-augmented generation and allows Copilot to provide exactly the right type of information as input to an LLM, combining this user data with other inputs such as information retrieved from knowledge base articles to improve the prompt. Copilot takes the response from the LLM and post-processes it. This post-processing includes additional grounding calls to Microsoft Graph, responsible AI checks, security, compliance and privacy reviews, and command generation.
Finally, Copilot returns a recommended response to the user, and commands back to the apps where a human-in-the-loop can review and assess. Copilot iteratively processes and orchestrates these sophisticated services to produce results that are relevant to your business, accurate, and secure.
How does Copilot use your proprietary business data? Is it used to train AI models?
Copilot unlocks business value by connecting LLMs to your business datain a secure, compliant, privacy-preserving way.
Copilot has real-time access to both your content and context in Microsoft Graph and Dataverse. This means it generates answers anchored in your business contentyour documents, emails, calendar, chats, meetings, contacts, and other business dataand combines them with your working contextthe meeting you’re in now, the email exchanges you’ve had on a topic, the chat conversations you had last weekto deliver accurate, relevant, contextual responses.
We, however, do not use customers’ data to train LLMs. We believe the customers’ data is their data, aligned to Microsoft’s data privacy policy. AI-powered LLMs are trained on a large but limited corpus of databut prompts, responses, and data accessed through Microsoft Graph and Microsoft services are not used to train Dynamics 365 Copilot and Power Platform Copilot capabilities for use by other customers. Furthermore, the foundation models are not improved through your usage. This means your data is accessible only by authorized users within your organization unless you explicitly consent to other access or use.
Are Copilot responses always factual?
Responses produced with generative AI are not guaranteed to be 100 percent factual. While we continue to improve responses to fact-based inquiries, people should still use their judgement when reviewing outputs. Our copilots leave you in the driver’s seat, while providing useful drafts and summaries to help you achieve more.
Our teams are working to address issues such as misinformation and disinformation, content blocking, data safety and preventing the promotion of harmful or discriminatory content in line with our AI principles.
We also provide guidance within the user experience to reinforce the responsible use of AI-generated content and actions. To help guide users on how to use Copilot, as well as properly use suggested actions and content, we provide:
Instructive guidance and prompts. When using Copilot, informational elements instruct users how to responsibly use suggested content and actions, including prompts, to review and edit responses as needed prior to usage, as well as to manually check facts, data, and text for accuracy.
Cited sources. Copilot cites public sources when applicable so you’re able to see links to the web content it references.
How does Copilot protect sensitive business information and data?
Microsoft is uniquely positioned to deliver enterprise-ready AI. Powered by Azure OpenAI Service, Copilot features built-in responsible AI and enterprise-grade Azure security.
Built on Microsoft’s comprehensive approach to security, compliance, and privacy. Copilot is integrated into Microsoft services like Dynamics 365, Viva Sales, Microsoft Power Platform, and Microsoft 365, and automatically inherits all your company’s valuable security, compliance, and privacy policies and processes. Two-factor authentication, compliance boundaries, privacy protections, and more make Copilot the AI solution you can trust.
Architected to protect tenant, group, and individual data. We know data leakage is a concern for customers. LLMs are not further trained on, or learn from, your tenant data or your prompts. Within your tenant, our time-tested permissions model provides safeguards and enterprise-grade security as seen in our Azure offerings. And on an individual level, Copilot presents only data you can access using the same technology that we’ve been using for years to secure customer data.
Designed to learn new skills. Copilot’s foundation skills are a game changer for productivity and business processes. The capabilities allow you to create, summarize, analyze, collaborate, and automate using your specific business content and context. But it doesn’t stop there. Copilot recommends actions for the user (for example, “create a time and expense application to enable employees to submit their time and expense reports”). And Copilot is designed to learn new skills. For example, with Viva Sales, Copilot can learn how to connect to CRM systems of record to pull customer datalike interaction and order historiesinto communications. As Copilot learns about new domains and processes, it will be able to perform even more sophisticated tasks and queries.
Will Copilot meet requirements for regulatory compliance mandates?
Copilot is offered within the Azure ecosystem and thus our compliance follows that of Azure. In addition, Copilot adheres to our commitment to responsible AI, which is described in our documented principles and summarized below. As regulation in the AI space evolves, Microsoft will continue to adapt and respond to fulfill future regulatory requirements in this space.
Next-generation AI across Microsoft business applications
With next-generation AI, interactions with AI across business roles and processes will become second nature.
Microsoft is committed to creating responsible AI by design. Our work is guided by a core set of principles: fairness, reliability and safety, privacy and security, inclusiveness, transparency, and accountability. We are helping our customers use our AI products responsibly, sharing our learnings, and building trust-based partnerships. For these new services, we provide our customers with information about the intended uses, capabilities, and limitations of our AI platform service, so they have the knowledge necessary to make responsible deployment choices.
This article is contributed. See the original author and article here.
OpenFOAM (Open Field Operation and Manipulation) is an open-source computational fluid dynamics (CFD) software package. It provides a comprehensive set of tools for simulating and analyzing complex fluid flow and heat transfer phenomena. It is widely used in academia and industry for a range of applications, such as aerodynamics, hydrodynamics, chemical engineering, environmental simulations, and more.
Azure offers services like Azure Batch and Azure CycleCloud that can help individuals or organizations run OpenFOAM simulations effectively and efficiently. In both scenarios, these services allow users to create and manage clusters of VMs, enabling parallel processing and scaling of OpenFOAM simulations. While CycleCloud provides a similar experience to on-premises thanks to its support to common schedulers like OpenPBS or SLURM; Azure Batch provides a cloud native resource scheduler that simplifies the configuration, maintenance and support of your required infrastructure.
This article covers a step-by-step guide on a minimal Azure Batch setup to run OpenFOAM simulations. Further analysis should be performed to identify the right sizing both in terms of compute and storage. A previous article on How to identify the recommended VM for your HPC workloads could be helpful.
Step 1: Provisioning required infrastructure
To get started, create a new Azure Batch account. At this point a pool, job or task is not required. In our scenario, the pool allocation method would be configure as “User Subscription” and public network access configured to “All Networks”.
A shared storage across all nodes would be also required to share the input model and store the outputs. In this guide, an Azure Files NFS share would be used. Alternatives like Azure NetApp Files or Azure Managed Lustre could also be an option base on your scalability and performance needs.
Step 2: Customizing the virtual machine image
OpenFOAM provides pre-compiled binaries packaged for Ubuntu that can be installed through its oficial APT repositories. If Ubuntu is your distribution of choice, you can follow the oficial documentation on how to install it, using a pool’s start task is a good approach to do it. As an alternative, you can create a custom image with everything already pre-configured.
This article would cover the second option using CentOS 7.9 as base image to show the end-to-end configuration and compilation of the software from source code. To simplify the process, it would rely on the available HPC images that provide the required pre-requisites already installed. The reference URN for those images is: OpenLogic:CentOS-HPC:s7_9-gen2:latest. The SKU of the VM we would use both to create the custom image and run the simulations is a HBv3.
Start the configuration creating a new VM. After the VM is up and running, execute the following script to download and compile OpenFOAM source code.
The last command compiles with all cores (-j), reduced output (-s, -silent), with queuing (-q, -queue) and logs (-l, -log) the output to a file for later inspection. After the initial compilation, review the output log or re-run the last command to make sure that everything was compiled without errors. Output is so verbose that errors could be missed in a quick review of the logs. It would take a while before the compilation process finishes. After that, you can delete the installers and any other folder not required in your scenario and capture the image into a Shared Image Gallery.
Step 3. Batch pool configuration
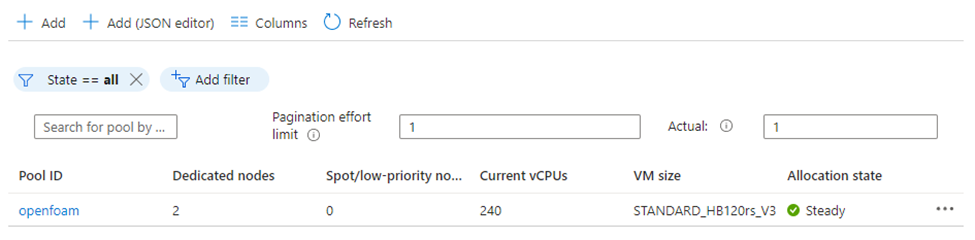
Add a new pool to your previously created Azure Batch account. You can create a new pool using the standard wizard (Add) and fulfilling the required fields with the values mentioned in the following JSON, or you can copy and paste this file into the Add (JSON editor). Make sure you customize the properties between .
Wait till the pool is created and the nodes are available to accept new tasks. Your pool view should look similar to the following image.
Step 4. Batch Job Configuration
Once the pool allocation state value is “Ready”, continue with the next step: create a new Job. Default configuration is enough in this case. In our case, the job is called “flange” because we would use the flange example from OpenFOAM tutorials.
Step 5. Task Pool Configuration
Once the job state value changes to “Active”, it is ready to admit new tasks. You can create a new task using the standard wizard (Add) and fulfilling the required fields with the values mentioned in the following JSON, or you can copy and paste this file into the Add (JSON editor).
Task commandline parameter is configured to execute a Bash script stored into the Azure Files that Batch is mounting automatically into the ‘$AZ_BATCH_NODE_MOUNTS_DIR/data’ folder. You need to copy first the following scripts and the flange example mentioned above into a folder called flange inside that directory.
Command Line Task Script
This script would configure the environment variables and pre-process the input files before launching the mpirun command to execute the solver in parallel across all the available nodes. In this case, 2 nodes with 240 cores.
#! /bin/bash
source /etc/profile.d/modules.sh
module load mpi/openmpi

# Azure Files is mounted automatically in this directory based on the pool configuration
DATA_DIR="$AZ_BATCH_NODE_MOUNTS_DIR/data"
# OpenFoam was installed on this folder
OF_DIR="/openfoam/OpenFOAM-v2212"

# A new folder is created per execution and the input data copied there.
mkdir -p "$DATA_DIR/flange"
unzip -o "$DATA_DIR/flange.zip" -d "$DATA_DIR/$AZ_BATCH_TASK_ID"

# Configures OpenFoam environment
source "$OF_DIR/etc/bashrc"
source "$OF_DIR/bin/tools/RunFunctions"

# Preprocessing of the files
cd "$DATA_DIR/$AZ_BATCH_JOB_ID-flange"
runApplication ansysToFoam "$OF_DIR/tutorials/resources/geometry/flange.ans" -scale 0.001
runApplication decomposePar

# Configure the host file
echo $AZ_BATCH_HOST_LIST | tr "," "n" > hostfile
sed -i 's/$/ slots=120/g' hostfile

# Launching the secondarr script to perform the parallel computation.
mpirun -np 240 --hostfile hostfile "$DATA_DIR/run.sh" > solver.log
Mpirun Processing Script
This script would launch the task in all the nodes available. It is required to configure the environment variables and folders the solver would need to access. If this script is not executed and the solver is invoked directly on the mpirun command, only the primary task node would have the right configuration applied and the rest of the nodes would fail with file not found errors.
#! /bin/bash
source /etc/profile.d/modules.sh
module load gcc-9.2.0
module load mpi/opennmpi

DATA_DIR="$AZ_BATCH_NODE_MOUNTS_DIR/data"
OF_DIR="/openfoam/OpenFOAM-v2212"

source "$OF_DIR/etc/bashrc"
source "$OF_DIR/bin/tools/RunFunctions"

# Execute the code across the nodes.
laplacianFoam -parallel > solver.log
Step 6. Checking the results
Mpirun output is redirected to a file called solver.log in the directory where the model is stored inside the Azure Files file share. Checking the first lines of the log, it’s possible to validate that the execution has properly started and it’s running on top of two HBv3 with 240 processes.
/*---------------------------------------------------------------------------*
| ========= | |
|  / F ield | OpenFOAM: The Open Source CFD Toolbox |
|  / O peration | Version: 2212 |
|  / A nd | Website: www.openfoam.com |
| / M anipulation | |
*---------------------------------------------------------------------------*/
Build : _66908158ae-20221220 OPENFOAM=2212 version=v2212
Arch : "LSB;label=32;scalar=64"
Exec : laplacianFoam -parallel
Date : May 04 2023
Time : 15:01:56
Host : 964d5ce08c1d4a7b980b127ca57290ab000000
PID : 67742
I/O : uncollated
Case : /mnt/resource/batch/tasks/fsmounts/data/flange
nProcs : 240
Hosts :
(
(964d5ce08c1d4a7b980b127ca57290ab000000 120)
(964d5ce08c1d4a7b980b127ca57290ab000001 120)
)
Conclusion
By leveraging Azure Batch’s scalability and flexible infrastructure, you can run OpenFOAM simulations at scale, achieving faster time-to-results and increased productivity. This guide demonstrated the process of configuring Azure Batch, customizing the CentOS 7.9 image, installing dependencies, compiling OpenFOAM, and running simulations efficiently on Azure Batch. With Azure’s powerful capabilities, researchers and engineers can unleash the full potential of OpenFOAM in the cloud.
This article is contributed. See the original author and article here.
Spear phishing campaign is a type of attack where phishing emails are tailored to specific organization, organization’s department, or even specific person. Spear phishing is a targeted attack by its definition and rely on preliminary reconnaissance, so attackers are ready to spend more time and resources to achieve their targets. In this blog post, we will discuss steps that can be taken to respond to such a malicious mailing campaign using Microsoft 365 Defender.
What makes phishing “spear”
Some of the attributes of such attacks are:
Using local language for subject, body, and sender’s name to make it harder for users to identify email as phishing.
Email topics correspond to the recipient’s responsibilities in the organization, e.g., sending invoices and expense reports to the finance department.
Using real compromised mail accounts for sending phishing emails to successfully pass email domain authentication (SPF, DKIM, DMARC).
Using large number of distributed mail addresses to avoid bulk mail detections.
Using various methods to make it difficult for automated scanners to reach malicious content, such as encrypted ZIP-archives or using CAPTCHA on phishing websites.
Using polymorphic malware with varying attachment names to complicate detection and blocking.
In addition to reasons listed above, misconfigured mail filtering or transport rules can also lead to the situation where malicious emails are hitting user’s inboxes and some of them can eventually be executed.
Understand the scope of attack
After receiving first user reports or endpoint alerts, we need to understand the scope of attack to provide adequate response. To better understand the scope, we need to try to answer the following questions:
How many users are affected? Is there anything common between those users?
Is there anything shared across already identified malicious emails, e.g. mail subject, sender address, attachment names, sender domain, sender mail server IP address?
Are there similar emails delivered to other users within the same timeframe?
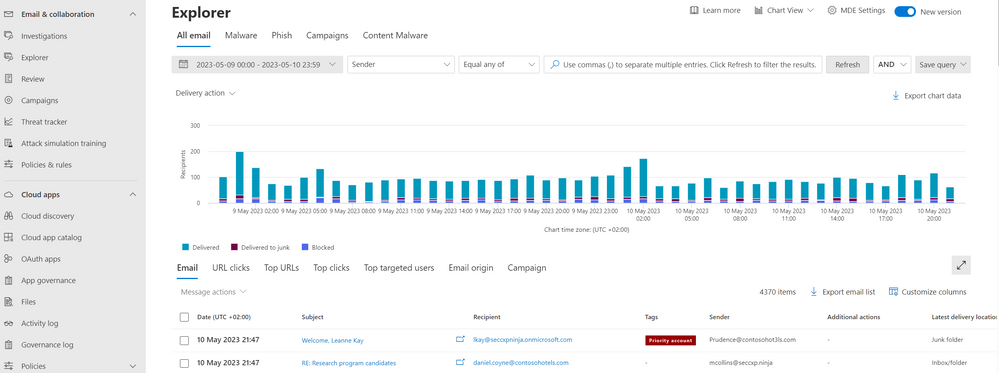
Basic hunting will need to be done at this point, starting with information we have on reported malicious email, luckily Microsoft 365 Defender provides extensive tools to do that. For those who prefer interactive UI, Threat Explorer is an ideal place to start.
Figure 1: Threat Explorer user interface
Using filter at the top, identify reported email and try to locate similar emails sent to your organization, with the same parameters, such as links, sender addresses/domains or attachments.
Figure 2: Sample mail filter query in Threat Explorer
For even more flexibility, Advanced Hunting feature can be used to search for similar emails in the environment. There are five tables in Advanced Hunting schema that contain Email-related data:
EmailEvents – contains general information about events involving the processing of emails.
EmailAttachmentInfo – contains information about email attachments.
EmailUrlInfo – contains information about URLs on emails and attachments.
EmailPostDeliveryEvents – contains information about post-delivery actions taken on email messages.
UrlClickEvents – contains information about Safe Links clicks from email messages
For our purposes we will be interested in the first three tables and can start with simple queries such as the one below:
EmailAttachmentInfo
| where Timestamp > ago(4h)
| where FileType == "zip"
| where SenderFromAddress has_any (".br", ".ru", ".jp")
This sample query will show all emails with ZIP attachments received from the same list of TLDs as identified malicious email and associated with countries where your organization is not operating. In a similar way we can hunt for any other attributes associated with malicious emails.
Check mail delivery and mail filtering settings
Once we have some understanding of how attack looks like, we need to ensure that the reason for these emails being delivered to user inboxes is not misconfiguration in mail filtering settings.
Check custom delivery rules
For every mail delivered to your organization, Defender for Office 365 provides delivery details, including raw message headers. Right from the previous section, whether you used Threat Explorer or Advanced Hunting, by selecting an email item and clicking Open email entity button, you can pivot to email entity page to view all the message delivery details, including any potential delivery overrides, such as safe lists or Exchange transport rules.
Figure 3: Sample email with delivery override by user’s safe senders list
It might be the case that email was properly detected as suspicious but was still delivered to mailbox due to an override, like on screenshot above where sender is on user’s Safe Senders list, other delivery override types are:
Allow entries for domains and email addresses (including spoofed senders) in the Tenant Allow/Block List.
Mail flow rules (also known as transport rules).
Outlook Safe Senders (the Safe Senders list that’s stored in each mailbox that affects only that mailbox).
IP Allow List (connection filtering)
Allowed sender lists or allowed domain lists (anti-spam policies)
If a delivery override has been identified, then it should be removed accordingly. Good news is that malware or high confidence phishing are always quarantined, regardless of the safe sender list option in use.
Check phishing mail header for on-prem environment
One more reason for malicious emails to be delivered to users’ inboxes can be found in hybrid Exchange deployments, where on-premises Exchange environment is not configured to handle phishing mail header appended by Exchange Online Protection.
Check threat policies settings
If there were no specific overrides identified it is always a good idea to double check mail filtering settings in your tenant, the easiest way to do that, is to use configuration analyzer that can be found in Email & Collaboration > Policies & Rules > Threat policies > Configuration analyzer:
Figure 4: Defender for Office 365 Configuration analyzer
Configuration analyzer will quickly help to identify any existing misconfigurations compared to recommended security baselines.
Make sure that Zero-hour auto purge is enabled
In Exchange Online mailboxes and in Microsoft Teams (currently in preview), zero-hour auto purge (ZAP) is a protection feature that retroactively detects and neutralizes malicious phishing, spam, or malware messages that have already been delivered to Exchange Online mailboxes or over Teams chat. Which exactly fits into the discussed scenario. This setting for email with malware can be found in Email & Collaboration > Policies & rules > Threat policies > Anti-malware. Similar setting for spam and phishing messages is located under Anti-spam policies. It is important to note that ZAP doesn’t work for on-premises Exchange mailboxes.
Figure 5: Zero-hour auto purge configuration setting in Anti-malware policy
Performing response steps
Once we have identified malicious emails and confirmed that all the mail filtering settings are in order, but emails are still coming through to users’ inboxes (see the introduction part of this article for reasons for such behavior), it is time for manual response steps:
Report false negatives to Microsoft
In Email & Collaboration > Explorer, actions can be performed on emails, including reporting emails to Microsoft for analysis:
Figure 6: Submit file to Microsoft for analysis using Threat Explorer
Actions can be performed on emails in bulk and during the submission process, corresponding sender addresses can also be added to Blocked senders list.
Alternatively, emails, specific URLs or attached files can be manually submitted through Actions & Submissions > Submissions section of the portal. Files can also be submitted using public website.
Figure 7: Submit file to Microsoft for analysis using Actions & submissions
Timely reporting is critical, the sooner researchers will get their hands on unique samples from your environment, and start their analysis, the sooner those malicious mails will be detected and blocked automatically.
Block malicious senders/files/URLs on your Exchange Online tenant
While you have an option to block senders, files and URLs during submission process, that can also be done without submitting using Email & Collaboration > Policies & rules > Threat policies > Tenant Allow/Block List, that UI also supports bulk operations and provides more flexibility.
Figure 8: Tenant Allow/Block Lists
The best way to obtain data for block lists is Advanced Hunting query, e.g. the following query can be used to return list of hashes:
EmailAttachmentInfo
| where Timestamp > ago(8h)
| where FileType == "zip"
| where FileName contains "invoice"
| distinct SHA256, FileName
Note: such a simple query might be too broad and include some legitimate attachments, make sure to adjust it further to get an accurate list and avoid false positive blockings.
Block malicious files/URLs/IP addresses on endpoints
Following defense-in-depth principle, even when malicious email slips through mail filters, we still have a good chance of detecting and blocking it on endpoints using Microsoft Defender for Endpoint. As an extra step, identified malicious attachments and URLs can be added as custom indicators to ensure their blocking on endpoints.
EmailUrlInfo
| where Timestamp > ago(4h)
| where Url contains "malicious.example"
| distinct Url
Results can be exported from Advanced Hunting and later on imported on Settings > Endpoints > Indicators page (Note: Network Protection needs to be enabled on devices to block URLs/IP addresses). The same can be done for malicious files using SHA256 hashes of attachments from EmailAttachmentInfo table.
Some other steps that can be taken to better prepare your organization for similar incident:
Ensure that EDR Block Mode is enabled for machines where AV might be running in passive mode.
Enable Attack Surface Reduction (ASR) rules to mitigate some of the risks associated with mail-based attacks on endpoints.
Train your users to identify phishing mails with Attack simulation feature in Microsoft Defender for Office 365
This article is contributed. See the original author and article here.
Real-time analytics are critical for organizations that want to stay on top of their contact center operations. The ability to see what’s happening in real-time, and to focus on the metrics that matter most, enables supervisors to identify and address issues efficiently.
We built intraday analytics to help address this requirement. Intraday analytics uses an intermediary database to aggregate metrics from Dataverse and then use it to power the reports.
A better experience with real-time analytics
We received feedback from you about improvements you would like to see around supervisor experiences. Subsequently, we decided to build a feature from the ground up that improves upon the intraday analytics experience.
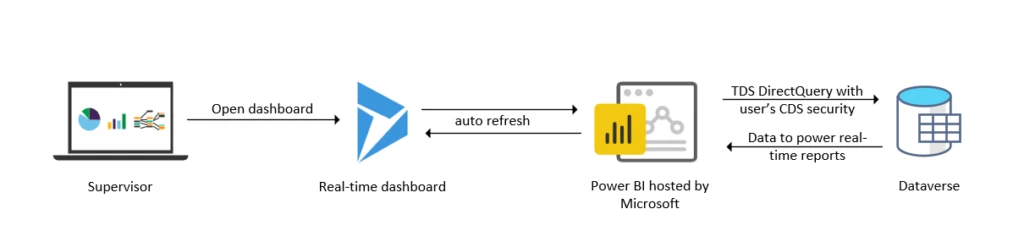
Starting this April, we are providing Real-Time Analytics for Omnichannel reports out of the box with Dynamics 365 Customer Service. The following diagram shows a high-level architecture diagram.
As you start utilizing these reports, you will notice some key improvements.
More frequent report refreshes
With a refresh frequency of less than 30 seconds, supervisors can see what’s happening in their contact center as it happens. This means they can identify issues and address them immediately as compared to getting their updates with a delay of five to 15 minutes with intraday analytics. Real-time analytics make it easier for supervisors to manage their teams’ performance and respond to customer needs in a timely way.
Improved information architecture
Real-time analytics provide supervisors with a better, more intuitive experience. By presenting data in an accessible format, supervisors can understand what’s happening in their contact center more easily. Redundant metrics have been removed, and ambiguity with definitions of some metrics have been addressed enabling supervisors to see more detail into their contact centers and identify areas for improvement more efficiently.
Greater focus on human agents
Real-time analytics distinguishes the performance of agents and bots. Unlike intraday analytics, which builds metrics off both agent and bot performance, real-time analytics considers only parts of the conversation handled by agent for its KPIs. This allows supervisors to measure agent performance. For example, customer wait times will be a measure of how much time your customer had to wait to get connected to a human agent. By starting the timer at time of escalation from the bot, it makes an accurate representation of the customer experience.
Connects directly to Dataverse
With real-time analytics, organizations can be confident that their data visibility and privacy rules are respected. You can ensure that data is only visible to those who need to see it, without any additional effort. Because the reports connect directly to Dataverse, there’s no risk of data being outdated or inaccurate.
Native visual customization and bookmarks
By personalizing their real-time reports, supervisors can focus on the metrics that matter most to their organization. This helps them identify trends, diagnose problems, and make data-driven decisions. Unlike intraday analytics, real-time analytics don’t require additional Power BI licenses to make visual changes and to store bookmarks.
Powerful supervisor actions
With the ongoing conversation dashboard built-in with real-time analytics, supervisors can identify unassigned work, assign work to agents, and actively monitor and intervene when required from a single place. This experience allows supervisors to act on data without having to leave the page or perform additional clicks, saving them valuable time.
With real-time analytics, Dynamics 365 Customer Service provides a powerful tool for supervisors to ensure high customer satisfaction. As hybrid work is actively disrupting the workforce and customers are seeking help across a variety of channels, now is the time to use advanced reporting. We can’t wait to hear your feedback and ideas around this!
This article is contributed. See the original author and article here.
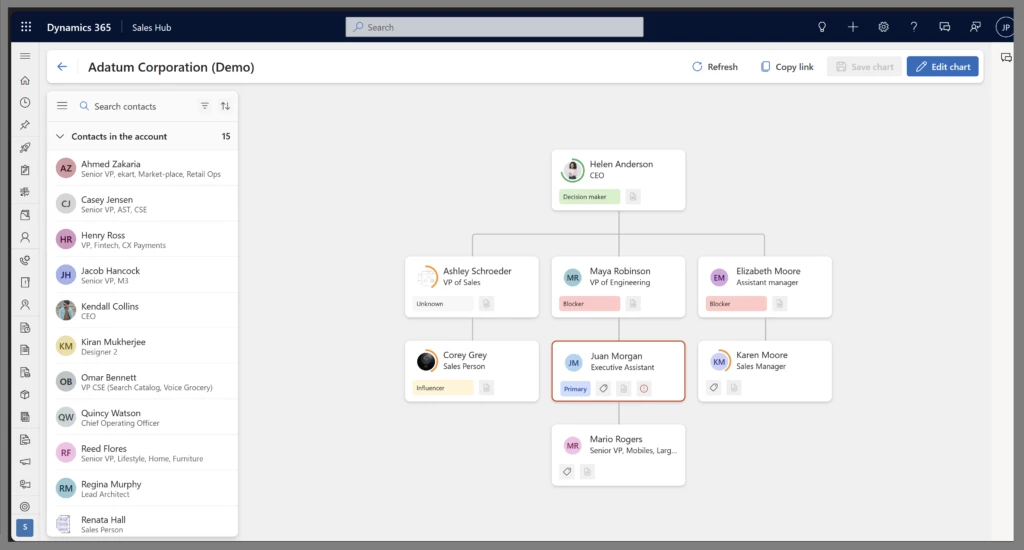
Organization charts enable sellers to better understand their customers’ organizational structures and identify key decision-makers. This information helps sellers develop and execute targeted sales strategies, improve their sales effectiveness, and build stronger relationships with their customers. Additionally, having an org chart in a CRM system helps improve collaboration among sales teams and improves overall communication and coordination with the customer’s organization.
With our new organization charts, you can build your entire org chart with ease and precision!
Creating organization charts made easy
The new feature in Dynamics 365 Sales makes building an organizational chart easier and more efficient, as users can create entire org charts with simple drag-and-drop actions. The list of all contacts of a given account is automatically gathered for you and displayed in the side pane. Through a simple drag-and-drop action, the entire org chart can be built in just a few minutes!
With the new organization chart, users can leverage tags to indicate key players and decision-makers in the org. This helps sellers quickly identify the right people to engage with during the sales process, reducing the time it takes to close deals and improving the overall customer experience. Users can create assistant cards to include executive assistants in the chart as well.
Organization chart
Monitor Contact Health
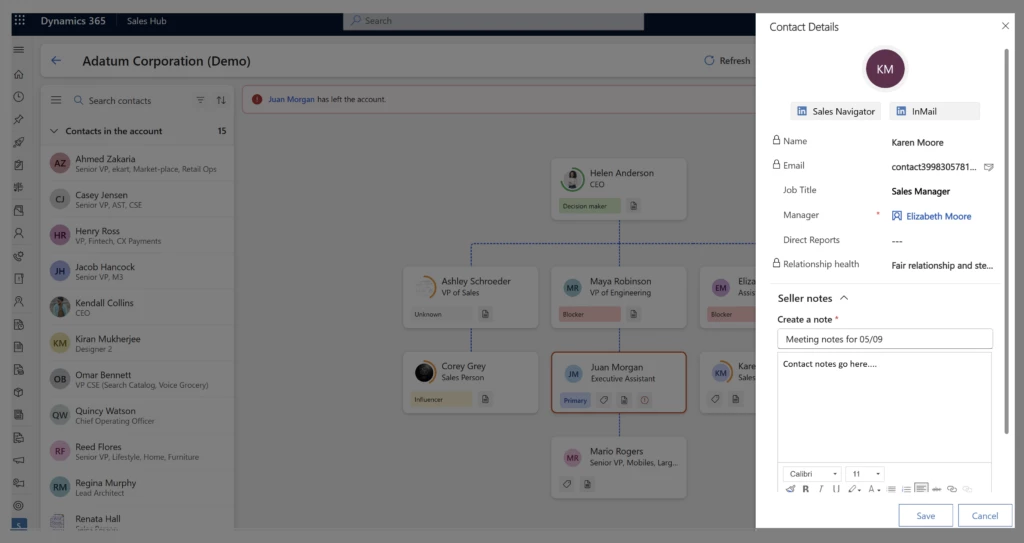
The new feature allows users to monitor the health and risks of customer relationships using relationship health embedded in organization charts. This capability helps sellers to identify potential risks to customer relationships, such as inactive accounts or unresolved issues, and take proactive measures to address them. It improves the overall health of customer relationships and reduces the risk of losing valuable customers. You can learn more about relationship intelligence by reading the Overview of Relationship intelligence | Microsoft Learn
Users can capture notes directly from organization charts on-the-go, enabling them to capture critical information about customers quickly. This feature helps sellers remember important details about their customers and allows them to keep track of their customer interactions. Users can access the org chart directly from the Contacts form, making it easier to navigate and manage customer information.
Contact health
Do more with LinkedIn
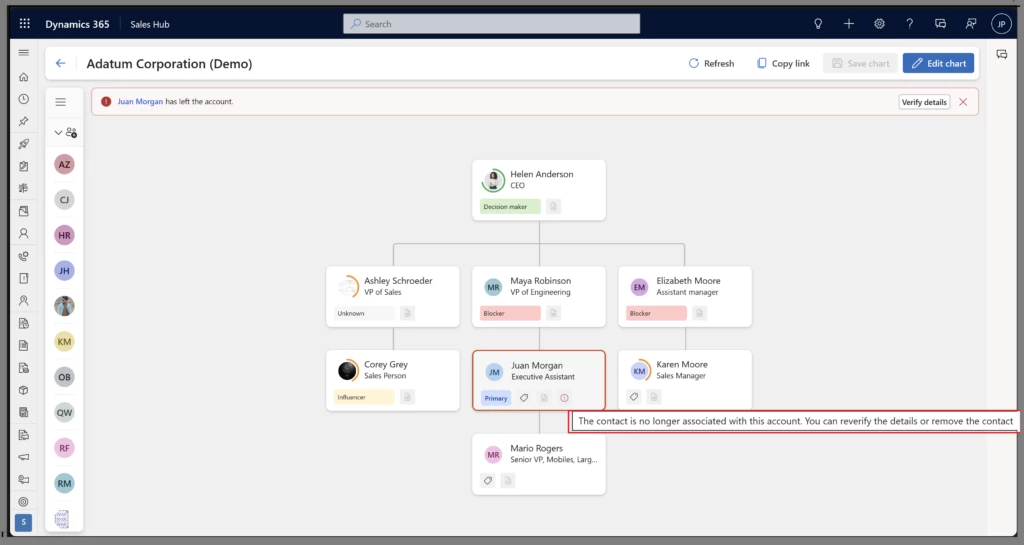
LinkedIn Sales Navigator is a powerful tool that enables sales professionals to build and maintain relationships with their clients and contacts. With a Microsoft Relationship Sales license, users can receive notifications when one of their contacts leaves an account. This feature is particularly useful for sales teams, as they rely on accurate and up-to-date information to achieve their goals. Additionally, with a Sales Navigator license, users can continue to send InMail and access the LinkedIn profile of their contacts. Therefore, organization charts offer even more, when you combine them with LinkedIn Sales Navigator as users get notifications that help maintain data accuracy.
Organization chart with LinkedIn update
To summarize, the smart organization charts offer the following capabilities:
Build the entire org chart via simple drag-and-drop action.
Leverage tags to indicate key players and decision-makers.
Create Assistant cards to include executive assistants in the organization chart.
Capture notes directly from org charts on-the-go.
Access your organization chart directly from the Contacts form as well.
Monitor the health and risks of the customer relationships using relationship health embedded in organization charts.
Get notified when contacts leave the organization with LinkedIn Sales Navigator License.
Next Steps
Increasing your sales team’s collaboration could be as simple as having an organization chart where you can visualize all your stakeholders and Dynamics 365 Sales makes it easy.


Recent Comments