This article is contributed. See the original author and article here.
There are many ways to join Teams meetings depending on your account, device and even the type of the meeting (defined by who organizes the meeting). This blog post covers a few key scenarios how to join a meeting organized by a Teams for work or school user when you are using the free version of Teams.
Windows 11
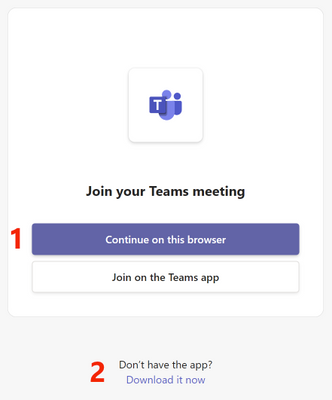
When invited to a Teams meeting organized by a Teams for work or school user and if you don’t have a Teams for work or school account, there are two options to join the meeting. When you tap the Teams meeting link or select ‘Join’ from Calendar, the following page opens in your default web browser:
You can join the meeting as a guest in browser. This option requires no app installation and is a quick way to join the meeting. Most meeting features are available in browser like in the Teams app. Please note that the Teams app coming with Windows 11 supports only personal accounts and it does not support joining Teams for work or school meetings in the app.
Alternatively, you can download and install the Teams for work or school app (which is separate from the Teams app coming with Windows 11) and use that to join the meeting as a guest. After tapping ‘Download it now’ and installing the Teams app, it opens automatically and connects you to the meeting. If this does not happen, you can tap the button ‘Join on the Teams app’ to join the meeting after the app is installed.
If you have a Teams for work or school account, you can install the Teams for work or school app and sign in with the account. You can then join a Teams for work or school meeting in the app instead of browser. Please note that when you join a meeting with your work or school account, the organizer of the meeting will see your account name and your company or school name. If you don’t want the meeting organizer to see this information, you can join as a guest as described above.
Windows 10 and macOS
When invited to a Teams meeting organized by a Teams for work or school user and when there’s no Teams app installed on your computer, tapping a Teams meeting link opens the following page in your default web browser:
You can join the meeting as a guest in browser. This option requires no app installation and is a quick way to join the meeting. Most meeting features are available in browser like in the Teams app.
Alternatively, you can download and install the Teams app and use that to join the meeting as a guest. Tap ‘Download it now’ to install the Teams app.
When you have the Teams app installed on your computer, tapping a Teams meeting link opens the Teams app on this screen:
You need to type in your name, select if you want to join with camera and/or microphone enabled and tap ‘Join now’ to get connected to the meeting.
If you have a Teams for work or school account, you can sign in with that account for the best meeting experience. Please note that when you join a meeting with your work or school account, the organizer of the meeting will see your account name and your company or school name. If you don’t want the meeting organizer to see this information, you can join as a guest as described above.
Android and iOS
When joining a Teams for work or school meeting without a Teams for work or school account, you can join the meeting as a guest in the Teams mobile app. You can install the Teams mobile app by opening this link on your mobile device. After installing the Teams mobile app, when you tap the Teams meeting link, the following page opens in the Teams mobile app:
Tapping ‘Join as a guest’ asks you to type in your name and then connects you to the meeting.
If you have a Teams for work or school account, you can sign in with that account instead by tapping ‘Sign in and join’ for the best meeting experience. Please note that when you join a meeting with your work or school account, the organizer of the meeting will see your account name and your company or school name. If you don’t want the meeting organizer to see this information, you can join as a guest as described above.
How to send feedback and suggestions?
We are always happy to receive feedback and suggestions to make our product even better. To participate in our feedback program and help us in our endeavor, please follow the steps below:
This article is contributed. See the original author and article here.
A swell of innovation is coming. And a lot of it aims to boost the creator in us all – to create faster, more intuitively, with the help of AI – your intranet web design partner.
In this episode, you’ll hear from Adam Harmetz, Vice President of SharePoint Experiences – Microsoft. We get his perspective on the recent SharePoint announcements disclosed at the Microsoft 365 Conference on May 2nd, 2023, in Las Vegas, Nevada. This includes insights on Copilot in SharePoint, all the coming site design goodness – including custom fonts and ‘brand center’, the updated capabilities when working with images and videos, plus one of the core aspects – design goals if you will – to evolve the SharePoint start experience for when you’re in creator mode.
Sit back and get a better grasp on the future of SharePoint awaits — one that allows you to express and communicate your ideas, your plans, your information with less creation resistance.
The Intrazone host and guest – recording at the MGM Grand Hotel in Las Vegas, Nevade: Mark Kashman (left – Senior product manager) talks with Adam Harmetz (right – Vice President of SharePoint experiences).
Links to important on-demand recordings and articles mentioned in this episode:
Be sure to visit our show page to hear all episodes, access the show notes, and get bonus content. And stay connected to the SharePoint community blog where we’ll share more information per episode, guest insights, and take any questions or suggestions from our listeners and SharePoint users (TheIntrazone@microsoft.com).
This article is contributed. See the original author and article here.
Welcome to a new era in enterprise resource planning (ERP) systems, powered by AI. In recent years, businesses have embraced AI to automate and enhance processes from planning to forecasting. Now, generative AI is taking center stage as a game-changing technology that promises to modernize the way work gets done, driving innovation across ERP; from streamlining operations to speeding time to actionable insight.
Dynamics 365 Copilot, announced in March, takes advantage of recent advancements in generative AI to automate tedious tasks and unlock the full creativity of the workforce. In April, we shared how generative AI can be applied to key supply chain processes, and today we are introducing more AI-powered assistance across our ERP portfolio, included in Microsoft Dynamics 365 Finance, Dynamics 365 Project Operations, and Dynamics 365 Supply Chain Management. To activate these new Copilot features within your Dynamics 365 products, work with your IT admin.
ERP systems have long been the central nervous system of modern businesses, centralizing data for better business insight from core functions like finance, HR, procurement, resourcing, and supply chains. However, traditional ERP solutions have struggled to keep pace with the dynamic nature of today’s global markets. Complex and rigid processes within ERP create more work for people, and repetitive manual data entry overwhelms departments. Dynamics 365 Copilot promises to help finance managers, collections agents, project managers, and procurement professionals complete time-consuming tasks and get insights faster.
Speed time to insight—get the most from your ERP data
Harnessing big data is even more crucial as we enter a new era defined by next-generation AI. At Microsoft Build 2023, we announced how Microsoft Dynamics 365 and Microsoft Fabric work with Dataverse and our business intelligence tools to deliver actionable insights and reporting. Our upcoming extended planning and analytics solution will build on this powerful foundation to help finance managers and business analysts spend less time slicing and dicing data. With the ability to use familiar tools like Microsoft Power BI and Excel infused with Copilot capabilities, these professionals can:
Use natural language to bring data to life by simply describing the visuals and insights that one is looking for. Copilot will help create a Microsoft Power BI dashboard or report—complete with visualizations and summaries—and help refine it. One can dig into the data further by asking questions. Copilot will find the right answer.
Collaboratively align plans, budgets, and forecasts with business strategy.
Streamline sales and operations planning.
Automate financial consolidation for seamless book closing.
Strategically close talent gaps for an empowered workforce, gain a comprehensive view of cash flow dynamics, and access highly accurate predictions through advanced predictive analytics powered by machine learning and AI.
By using these tools and technologies, finance managers can optimize their performance, allocate resources effectively, and drive better financial outcomes for their organizations.
Deliver more strategic value with intelligent automation for project managers
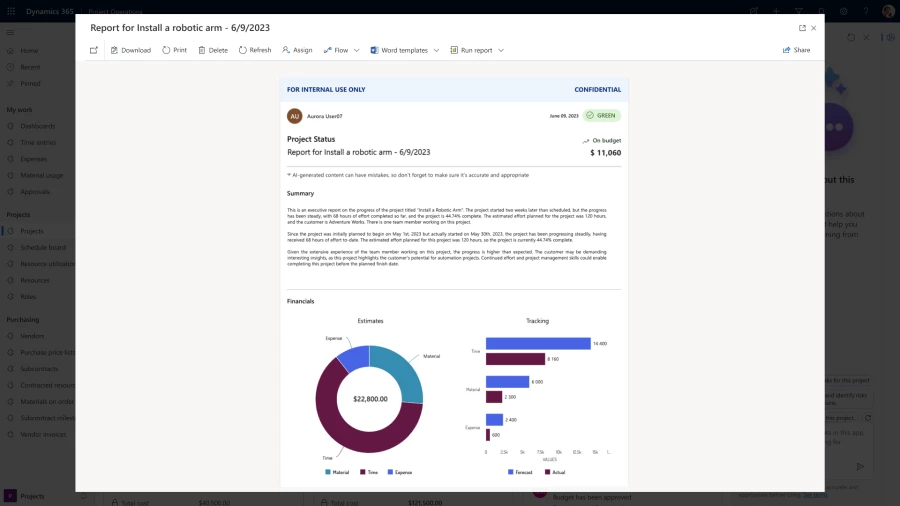
Project managers frequently struggle to complete projects on time and within budget. Today, we are announcing Copilot capabilities for Dynamics 365 Project Operations to dramatically reduce the time spent on project status reports, task planning, and risk assessments.
With Copilot, project managers can rapidly create new project plans for new engagements in minutes, instead of hours, simply by describing details of the project using natural language. Copilot will generate a project plan that can be further refined by the project manager.
Once the project is underway, the project manager can use Copilot to create a project status report, which Copilot will help generate in moments—reducing the hours often spent manually researching and writing. To ensure project success, Copilot then can be used to identify risks and suggest mitigation plans on a continuous basis. For example, the project manager can prompt Copilot to search across all open projects to identify common project risks that can derail a project, such as significant delays or budget overruns.
With Copilot, project managers can improve efficiency, reduce risks, and focus on more strategic and value-added activities.
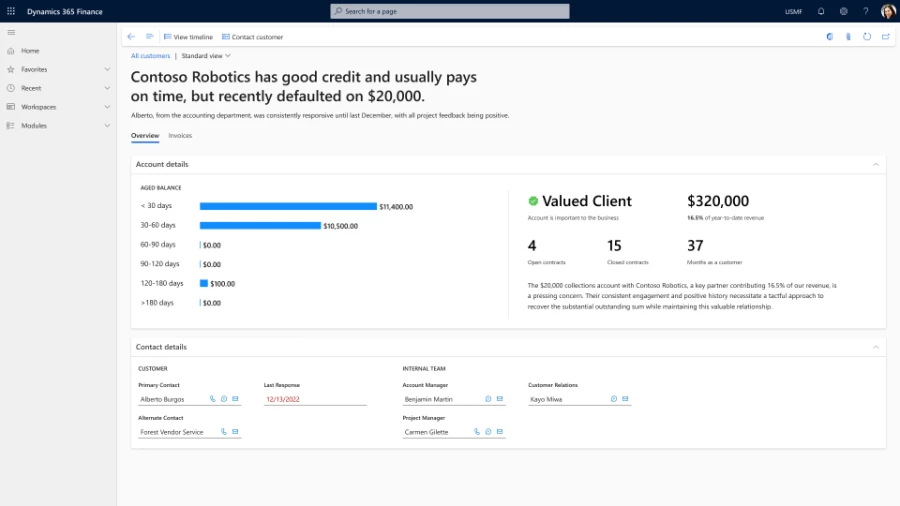
Supercharge productivity of collections agents and procurement professionals
Today, we are announcing Copilot capabilities that will help collections agents and procurement professionals enhance productivity and better collaborate with customers.
Timely payments and healthy cash flows are increasingly important in times of economic uncertainty. With Copilot in Dynamics 365 Finance, collections managers have quick access to credit and payment history so they can prioritize and personalize customer communication, helping to increase successful collection rates and proactively keep customers in good standing.
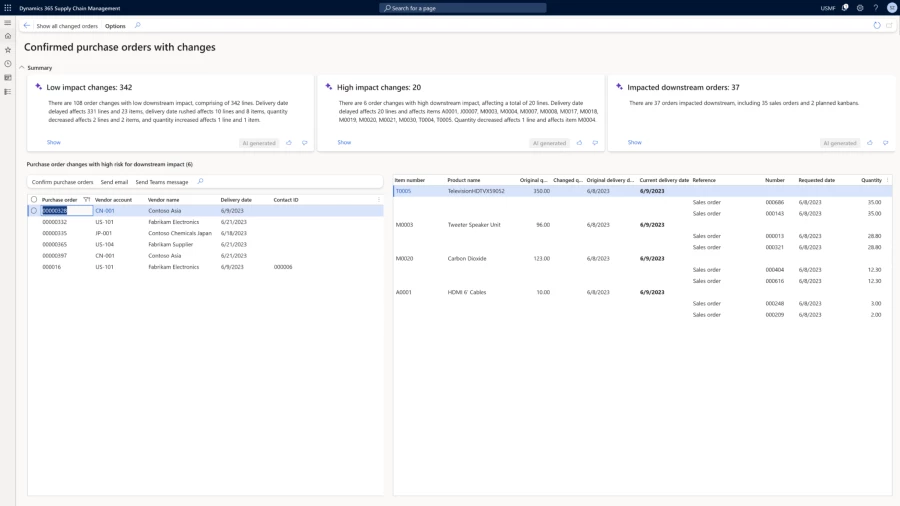
Disruptions to supply chains are an everyday occurrence, and supply and demand can shift quickly. Workers like procurement professionals and buyers are tasked to sort through large volumes of purchase order change responses daily and need more intelligent and agile tools to help address and streamline this process. Order responses oftentimes require changes to ordered quantities, delivery dates, or products delivered. Today, procurement professionals must review the changes for individual orders one by one to identify the risk to plan and potential downstream impacts. With Copilot in Dynamics 365 Supply Chain Management, users are able to efficiently handle changes to purchase orders at scale and assess the impact and risk to help optimize procurement decisions.
They can quickly identify high-impact or low-impact changes and take rapid action to address any risk. Copilot enables quick collaboration with internal and external stakeholders that brings relevant information into Outlook and Teams using natural language. Users can also dig deeper with pointed questions to refine and approve changes so they can rapidly adapt their sourcing plans to meet customer and partner needs.
At Microsoft, we are fully committed to revolutionizing the future of ERP by harnessing the power of intelligent, composable technologies. With its ability to speed time to insight, intelligently automate processes, and foster productivity, Copilot can help you stay ahead in an increasingly complex business landscape. With Copilot, you’re in control as it is grounded in your business data and automatically inherits your valuable security, compliance and privacy policies, regulations, and processes. Stay tuned and join us on this exciting journey into the future of ERP.
Learn more about the latest AI breakthroughs with Microsoft Dynamics 365 Copilot on the Dynamics 365 AI webpage.
Next-generation AI across Microsoft business applications
With next-generation AI, interactions with AI across business roles and processes will become second nature.
This article is contributed. See the original author and article here.
The security community is continuously changing, growing, and learning from each other to better position the world against cyberthreats. In the latest post of our Community Voices blog series, Microsoft Senior Product Marketing Manager Brooke Lynn Weenig talks with Trimarc Founder and Chief Technology Officer Sean Metcalf, who is a Microsoft Certified Master in Active Directory,co-hosts the Enterprise Security Weekly podcast, and created the adsecurity.org website.The thoughts below reflect Sean’s views, not the views of Sean’s employer, and are not legal advice. In this blog post, Sean talks about securing identities.
Brooke: How did you get into Active Directory security?
Sean: When Active Directory came out, I was excited because Microsoft was my technology focus and this was an intriguing new direction. The environment where I worked had Novell NetWare everywhere, and one group was running Windows NT exclusively. I ran Windows NT within this little island and figured out how to navigate the idiosyncrasies that were NT. Once Active Directory was released, I switched to a consulting job to help customers deploy Active Directory.
Active Directory launched with quite a bit of features we did not have with NT, like group policies and other items that help manage the environment. This was a huge improvement over the older NT domain environment. The security side of AD was a bit less clear.
In the early 2000s, I worked as a consultant on a large global multidomain Active Directory deployment. The size of the environment and the global distribution, not to mention active migration efforts, added complexity which resulted in security concerns. To help secure this AD environment, I shifted my focus to Active Directory security. I started trying to figure out what was missing as this environment was getting deployed, configured, and rolled out all around the world, not to mention the approximately 1,000 domain controllers arrayed around the globe. My approach focused on the attacker mindset:
How could I compromise this environment or do something that it is not meant to do? What did we not think about when we were designing it that we should have? And the question many ask themselves about their own AD environment: what am I missing…?
Soon after this, I started the ADSecurity.org website, initially as my “web notebook” that I referred customers to; this became a central location for noting Active Directory security concerns and issues that I saw.
Brooke: What are the biggest challenges of securing identity?
Sean: Active Directory is not inherently insecure. One challenge is that it is a system much like any other, with a variety of configurable options. Since AD offers such great customization, people can do whatever they want, and AD environments can look very different. Admins can add regular user accounts into domain admins (and they have!). They can add certain groups that contain everyone in Active Directory into highly privileged AD groups and give everyone rights. Active Directory is not going to stop you from doing that any more than your car is going to stop you from driving too fast on a residential street.
Another challenge is that there are often too many privileged accounts that have rights that are not really required. The organization does not know all the accounts with highly privileged rights. Group nesting is still an issue in Active Directory that leads to insecure configuration. This is where you have a group that is a member of one group that is a member of another group. Due to this group nesting configuration, the Administrators group at the domain level granted full AD administrative rights to every member of all these groups (and member accounts) in the chain.
Service accounts are associated with an application but are often highly privileged in AD. The challenge is identifying the accounts that have rights because Active Directory security does not always come down to just membership of domain admins and administrators, but delegated rights through AD permissions and group policy rights assignments.
Another challenge is with Active Directory permissions set years ago and forgotten. All these groups and accounts have rights, but nobody knows about them (or remembers!).
That is what the focus for Active Directory security often is – Active Directory integrations, Azure AD Connect, and enterprise password vault features, like secret server and CyberArk – these systems that are highly privileged in Active Directory, but not often reviewed.
Finally, hundreds of companies help move companies into the cloud, but not as many helps them secure it. Azure AD has the same issue of too many privileged accounts, but often with regular user accounts in these privileged Azure AD roles. Group nesting is now something you can do within Azure AD, so that adds another level to it where you can have role-assignable groups that can be placed into an Azure AD privilege role. You end up with another layer and having to figure out who is in that group. With Privileged Identity Management in Azure AD, you can have a role assignable group or have members of that group eligible (or permanently assigned) to be global, application or user administrators. Once you have that layer of abstraction, it gets more difficult to determine what a group does and who should be put into it.
In the world of identity, the challenge comes down to knowing which account has privileged access and protecting those accounts from attack.
Brooke: What vulnerabilities and response times do you see on Azure Active Directory?
Sean: Many issues I hear from incident response partners are with Azure AD configurations. A lot of the defaults are too permissive. Users and guests have too many capabilities. We are starting to see them tighten up, like Azure AD “security defaults” that turn off legacy authentication by default.
Attackers sometimes phish a user and the user sees what looks like a legit application requesting permissions, but it is an application that the attacker created. The attacker then has full access. The attacker could pull data through the application continuously and the user does not even know about it. This is not just a Microsoft thing. This happens due to OAuth and other cloud providers such as Google are susceptible.
In other attacks, the attacker keeps calling the admin until they consent to the multifactor authentication prompt. This is why Microsoft has pushed for number-matching, because number-matching requires that you think about, “What is the number on the screen and the thing that I am authenticating to” and you have to enter that number into the app to complete that multifactor authentication response. This validates that the person requesting the access is the person confirming the access versus just accepting a push response of “Accept” or “Deny”.
In Azure AD, regular users may get full rights to add a credential to an application to a level way above what their rights actually are based on their role membership. There are applications in many tenants around the world that have effective global admin rights and if there is a regular user who created that application and got it approved through the normal process, they are an owner. A compromise of that regular user account could completely compromise the tenant.
Attackers are going after permissions and anything to get a foothold. During the SolarWinds incident, many saw compromise of the on-prem environment and accounts and then the attacker leveraged these credentials to pivot into the cloud. That is a challenge for a lot of organizations because the cloud is seen as an extension of the on-prem environment, where we often see synchronized accounts in Active Directory that are members of highly privileged roles in Azure AD, like Global Administrator.
If neither Conditional Access nor security defaults are enabled, that is a problem. Conditional Access is effectively an identity firewall for the Microsoft cloud environment where you can control who can connect to what, how, and where. All those answers can be done within Conditional Access and Microsoft continues to expand this capability. An Azure AD risk is not enforcing multifactor authentication on all privileged accounts, not just global admin, because there are other roles that are highly privileged. There is even an Azure AD permission where the application delegated this right can give itself its own permissions to have full admin rights to the Azure AD tenant.
Brooke: What challenges are you seeing in the world of permissions and roles?
Sean: One of the biggest challenges many organizations are experiencing today relates to what I call the “Identity Nexus”. The Identity Nexus is where identities across systems connect and often provides attackers opportunity.
We have all these identity systems— on-prem Active Directory, Azure AD, Okta, and other cloud providers, like Google Cloud Platform or Amazon Web Services). Each has its own Identity Access Management system, roles, and permissions. Some things are similar across cloud providers, but there is different nomenclature across cloud providers and a variety of capabilities as far as security, management, and operations. These differences, paired with the required interconnectivity between cloud and on-prem (the nexus), can result in interesting scenarios where a cloud admin can make changes that affect on-prem administration, including updating on-prem privileged access!
Often, Active Directory is still the core of identity. Most companies have on-prem Active Directory accounts that are synchronized with Azure AD, which means there are Azure AD accounts linked to the AD accounts. Unprivileged accounts in Active Directory can have highly privileged rights through Azure AD roles and depending on the configuration, there may be unintended consequences related to our identity systems and infrastructure systems of which attackers can take advantage.
Another interesting connection point between on-prem and cloud is when there is a domain controller virtualized in Azure that is part of the on-prem Active Directory. This configuration could result in the compromise of the on-prem Active Directory due to a breach in the cloud environment.
There are unintended consequences with how most organizations are connecting things across the Identity Nexus, especially with hybrid cloud components like Azure AD Connect. There is interplay among hybrid cloud components and Azure AD Connect is often at the center of this. Common hybrid components include Azure AD, Seamless Single Sign-On, and Pass-Through Authentication. With Pass-Through Authentication, credentials pass through that system that enables an attacker to potentially spoof and impersonate someone on the network if the server is not protected appropriately. This underscores the importance of protecting both the hybrid systems and privileged credentials.
Strong authentication, like Multifactor Authentication, secured systems like Privileged Access Workstations for highly privileged accounts, and limiting rights that service accounts and third-party systems have are the most important ways to protect identity.
To learn more about Microsoft Security solutions, visit our website. Bookmark the Security blog to keep up with our expert coverage on security matters. Also, follow us on LinkedIn (Microsoft Security) and Twitter (@MSFTSecurity) for the latest news and updates on cybersecurity.
This article is contributed. See the original author and article here.
In today’s fast-paced digital world, databases are at the heart of almost every application or service. Databases are responsible for storing and managing vast amounts of data, providing real-time access to information, and powering critical business operations. As the amount of data and the number of users accessing databases continues to grow, it is essential to ensure that they can handle the expected workload and perform efficiently under heavy traffic. Whether you are launching a new application or getting ready for peak traffic, load testing helps you ensure that your database can handle the load and deliver reliable performance.
While most database queries typically happen through an application endpoint, there are situations where it is beneficial to directly test the database without involving intermediaries. One such scenario is when you want to assess the performance of a specific query without executing every query in the system or to evaluate the performance of a new query under heavy load. It could also be that your database is used by multiple applications.
In this blog post we will look at load testing Azure SQL Database using Azure Load Testing. You can use a similar approach to test other databases on Azure like MongoDB, PostgreSQL etc. We will cover everything you need to know, from setting up your JMeter script, to running the load test and identifying performance bottlenecks.
Setting up Azure SQL Database
The first step in load testing an Azure SQL Database is setting it up. You can use an existing Azure SQL Database instance. For this blog post, we’ll use a sample database. You can create your own sample instance using the Azure portal.
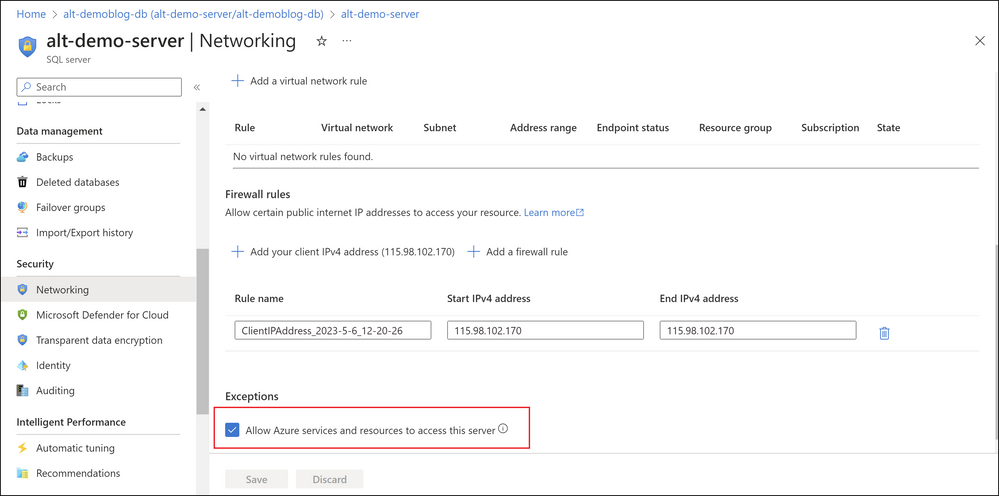
Once you have created the instance, note down the server name, database name, and login credentials. You will need these details later to connect JMeter to the database. Make sure to allow Azure services and resources to access your Azure SQL server as shown below.
Screenshot of Networking tab in Azure SQL Database
Setting up the JMeter script
To load test your Azure SQL DB you will need to download the Microsoft JDBC Driver for SQL Server . You can download the driver here. Follow the steps below to. You use the artifacts from the samples repository to set up the load test.
Open JMeter and create a new test plan. In your JMeter Test Plan browse and choose the JDBC driver. Screenshot of JDBC driver configuration in JMeter GUI
Add a JDBC Connection Configuration element to the test plan.
The server name, database name , and login credentials for the Azure SQL Database instance are parameterized and can be provided using environment variables and secrets. You can store the password in an Azure Key Vault and access the same in your JMeter script using the GetSecret function. See the using secrets in Azure Load Testing docs for more detail.
Screenshot of database configuration in JMeter GUIScreenshot of user defined variables in JMeter GUI
Add a Thread Group element to the test plan.
Configure the Thread Group element to simulate the desired number of users and requests. In this script we have parameterized the concurrent threads (users) and duration as environment variables.
Add a JDBC Request element to the Thread Group.
Enter the SQL query that you want to execute on the Azure SQL Database instance. You can add multiple requests for multiple queries.
If your queries require input data, you can add a CSV input file to provide data to the JMeter script.
Running the load test
You can now run this script on Azure Load Testing.
Create a test by selecting Upload a JMeter script.
Upload the JMeter script, the JDBC driver and the CSV file. You need to upload this because it is not already installed on the test engine. Screenshot of test creation in Azure Load Testing
In the parameters tab, add the following.
The environment variable values for the following
threads – the number of concurrent users per engine
duration – the duration of the test.
Database – the database URL
Username – the username to login to the database
The password as a secret. Enter the secret name and the secret identifier from the Azure Key Vault (AKV). Remember to grant ‘Get’ permission on secrets to this load testing resource on the AKV using managed identity. Screenshot of parameters in Azure Load Testing
In the Monitoring tab, select your Azure SQL database instance. By default you can view the CPU percentage, connections failed and deadlocks for your SQL database.
Select Review + Create to create and run the test.
Monitoring
Once the test run starts, you can monitor the client side and server side metrics on the dashboard in real time. The load begins to ramp up slowly to 150 virtual users and after the load reached the maximum virtual users, the database started returning errors. The errors are of type ‘request limit has exceeded’.
Screenshot of test results in Azure Load Testing with errors
You can monitor the server side metrics as well to understand the reason for errors. You can click on Configure metrics to add additional metrics to monitor the performance of your database. As you can see, the average CPU percentage and average DTU percentage peaked after some time. Azure SQL Database recommends setting alerts for if the average CPU and DTU percentage go above 80%.
Screenshot of test results in Azure Load Testing with high CPU and DTU percent
Fixing performance bottlenecks
Once you have identified performance issues, you can take steps to optimize the performance of your Azure SQL Database. Some tips to improve the performance of your Azure SQL Database include:
Index optimization: Ensure that your database has the appropriate indexes to speed up query execution.
Query optimization: Optimize your SQL queries to ensure that they are as efficient as possible.
Scaling: Consider scaling up or out to increase the capacity of your Azure SQL Database.
In this case I know that my database is not able to handle the load because of the limit in DTUs. Now scale up the Azure SQL Database to 200 DTUs. Once done, re-run the test in Azure Load Testing and monitor the metrics.
Screenshot of test results in Azure Load Testing with no errors
Now I see that there were no errors and the average CPU and DTU percentages were within acceptable limits.
Screenshot of test results in Azure Load Testing with low CPU and DTU percent
Conclusion
In conclusion, load testing is an essential aspect of database performance testing. It helps to identify performance bottlenecks, improve database performance, and ensure that it can handle the expected workload. Remember, load testing should be an ongoing process, so make sure to integrate load tests in your CICD workflows to identify any issues early in the development lifecycle and optimize your database’s performance.
If you have any feedback on Azure Load Testing, let us know through our feedback forum. Refer to the previous blogs on Azure load testing here. The resources used in this blog post are available in the Azure Load Testing samples repository.


Recent Comments