This article is contributed. See the original author and article here.
Recently I was approached by a customer on concerns and possibilities around going from on-premises to hybrid to cloud only. The customer had successfully gone through the hybrid scenario and was able to remove all known dependencies with their on-premises environment. They decommissioned everything but two domain controllers, an Exchange server and their Azure AD Connect server. All of their services have been moved into Azure as well as their client devices Azure AD Joined. Everything is working as expected and they are ready, albeit apprehensive, to take the next leap. This customer does not have a development environment so any testing is done in real time with no real way to test this without impacting their active users. Taking this next step with caution is smart and advisable.
With that in mind I knew if I was in their place, for which I have been in the past, with this process being not well documented and it does not appear that many have gone through this entire scenario I would feel much better if I could see it done first. I would also breathe a little easier if there was a roll back plan just in case something odd went wrong and I wanted to go back to a state before I began the full cut-over last phase. That is the purpose of this article, to walk through my test from everything being migrated into Azure except user management and unplugging completely from any on-premises presence.
Goal:
The ultimate goal is to become a cloud only environment. I have simulated enabling Password Hash Sync with Password Write Back in order to remove my ADFS farm. I also do not have Exchange in my environment. There are no networking devices or any other servers using my domain controllers for authentication. All user logins utilize Azure AD credentials whose attributes are still managed by the on-premises Active Directory and sync’d through the Azure AD Connect server. In order to best support my customer, my Azure AD Connect server was installed with SQL Express, I am not using a full SQL server installation. These steps would be slightly different if SQL Server was used as it would make the roll back process a little easier. But this is a small environment and SQL Server was not required.
Demonstration
First, I want to make sure I document my Azure AD Connect configurations. This will be needed during the roll back phase. I also want to set the stage for the current configuration of my environment prior to beginning this last step to a cloud only organization.
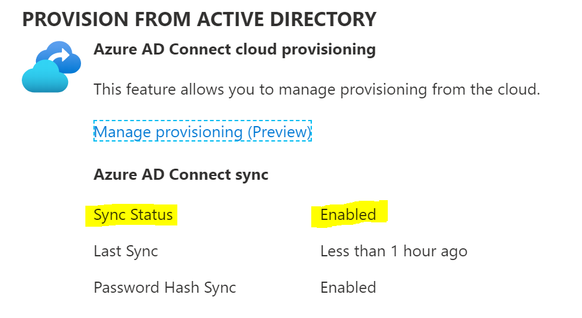
Let’s look at what is shown within the Azure AD Connect blade within the Azure Portal.
- Login to the Azure portal: portal.azure.com
- On the home screen click on the Azure AD icon
- From the Azure AD blade menu, click on Azure AD Connect
You will notice the Sync Status is set to ‘Enabled’. It also reports that there has been a recent sync cycle performed.

Next let’s get the configuration settings of the Azure AD Connect server.
- Login to the Azure AD Connect server
- Launch the Azure AD Connect console (if there is a current sync cycle going it will not allow you to proceed further until it completes. Here you can wait until it is done or run a PowerShell command or use the sync service console to stop the sync)
- Once the console is opened click on ‘Configure’

- Click on ‘View current configuration’ and click ‘Next’

- Take a screen shot of the settings for later reference

You may also want to take screen shots of the ‘Customize synchronization options’ section just to have a visual of the OUs selected or any extension attributes added.
Test user for the scenario: User is managed within the on-premises Active Directory and sync’d by the Azure AD Connect server. Note Source is listed as ‘Windows Server AD’. This represents the user object being a synchronized account.

Test group for the scenario. Customer was curious what happens to the security groups if a roll back is required. Also note Source is ‘Windows Server AD’.

Disable on-premises sync
After recording the basic configuration settings and making note of the objects we will be using for testing we will begin to disable services in order to perform testing scenarios without hard cut over. In order to continue we first need to determine what version of PowerShell is installed on the server as well as from a remote administrative device if one will be used.
Launch a PowerShell console as administrator on the Azure AD Connect server
Run the follow command to determine the PowerShell version installed. (PowerShell V7 does not support the process used in this document)
Get-Host | Select-Object version

Now that we have determined the version is acceptable for our task, we will disable the sync cycle schedule by running the following command:
Set-ADSyncScheduler -SyncCycleEnabled $false

Verify Scheduler has been disabled (this is similar to shutting down the AADC server)

If you look back at the Azure AD Connect blade in the Azure portal you will notice that the Sync services still report as ‘Healthy’. We have not removed the service. Just paused any cycles from running. This does mean that during this time no new accounts can be created nor current accounts modified.

We will be stepping through this process in a very controlled manner so you may feel that some of the testing steps are not necessary. However; I wanted to be sure this process was as seamless as possible to the end users so I strongly believe in testing along the way. This means making sure there is an understanding that by disabling the sync cycle that it will not impact the current objects in Azure AD while their management platform is offline.
To do this we will list all of the users. From a PowerShell console type ‘Connect-MsolService’. Sign in with an account with the Global Administrator role.

If you successfully connect (no errors received), run the following command to see the list of your users.
Get-MsolUser

Verify and record synchronization configuration by running the following command
Get-MsolDirSyncFeatures

User login testing
At this time I successfully tested user login to portal.office.com (any available Azure resource will do)
Once this step is done and you have verified that your users are still able to successfully sign-in to resources it is time to begin the fun stuff.
Begin the Azure AD Connect Decommissioning Process
The first step in changing your synchronized users to cloud managed is to disable synchronization in your tenant. To see the current configuration run the following command:
(Get-MsolCompanyInformation).directorysynchronizationenabled

You should notice that this command returns ‘True’ meaning that synchronization is enabled for your tenant.
To disable the synchronization run the following command and click ‘Yes’ to proceed. This cannot be undone immediately so be sure you are ready to proceed with this process.
Set-MsolDirSyncEnabled -EnableDirSync $false

Now when you re-run the ‘Get’ command it will report as False. This verifies that the change was successful

Prepare to remove Azure AD Connect services
Our next step is to make sure we have solid information to recover if required.
Because we are using SQL Express on the Azure AD Connect server and it is a virtual machine, we will be creating a backup of the virtual machine. However; the recovery process will not use this to restore the service. This is just an extra step to ensure if there is complete failure and missing information we have an option to review.
We also need to ensure you still have the same version of the Azure AD Connect service installer package that is currently running. This is not a hard requirement with our environment as we are not using SQL Server but will provide a familiar experience when recovering. Copy these files to a backup location off of the server.
Next we will backup the configuration of the Connect service. Let’s create a folder to hold all of this information to quickly move to the off-server location identified above.
Create a folder to store the exported data

Within a PowerShell console create the backup files and save them to the newly created folder. To do so run the following command and then verify the files were successfully created.
Get-ADSyncServerConfiguration -Path “C:PathToNewFolder”

Next, we will export custom enabled sync rules. As this will not be automatically restored during a recovery within our scenario we need to make sure we have this available to recreate. On the Azure AD Connect server launch the Synchronization Rules Editor. For ‘Inbound’ and ‘Outbound’ rules export the custom and any default rules for which you may have modified. To do so, highlight the rule in the editor and click ‘Export’. It will create a file that you will need to save to the newly created folder identified earlier (perhaps a sub folder in this folder specifically for these rules). You can give them a meaningful name instead of the default. This gives us a peace of mind that we have our custom rules even though we exported them in the previous step. It also allows us to quickly identify them by a specific name if troubleshooting is required later in the recovery process.


Our last step to change to a cloud only environment is to uninstall the Azure AD Connect server services. This will signal to your Azure AD tenant to take control of all of the currently synchronized objects.
To uninstall Azure AD Connect service, navigate to Programs and Features on the Connect server. Highlight Microsoft Azure AD Connect Server and click on ‘Uninstall’. When prompted click ‘Yes’ to continue.

I de-selected to also uninstall the supporting components as I knew I would be recovering my environment and even if not it makes no difference. The main goal is to get rid of this server.

Continue through to the end of the wizard and click ‘Exit’.

Once the wizard has completed, refresh the program list and note that all of the Azure AD Connect services have been removed.

Once this is complete, you should notice the status has changed in the Azure AD Connect blade within the Azure portal

It will take approximately 72 hours before you begin to see user and group objects change source from Windows AD Server to Azure Active Directory. Once you have noticed they have all changed, your environment is cloud only. Congratulations! Hopefully this all went smoothly. However, if not and you need to revert, have no fear and keep reading.
New environment
Because there was a question about what changes would happen to user and group objects if a roll back is required, I wanted to add a few testing steps. So, I added new attributes to the past sync’d test user using the Azure AD portal.

I also create a new cloud user in the custom domain.

To test group modifications I added the new user and modified past sync’d test user to a past sync’d test security group. I also removed a current member that was sync’d from on-premises.

User login testing
Because we are testing all along the way, I successfully tested the new user and the newly switched test user logins to portal.office.com (any available Azure resource will do)
Roll back scenario
Even though it shouldn’t happen, there may be any number of reasons that you will need to revert back to an on-premises managed domain. For this scenario keep in mind, we did not have SQL Server installed. Even though the steps here could be repeated regardless of which setup you need, if immediate roll back is required SQL Server might make it a bit easier.
First let’s review tenant sync status

Because as you see we are still set to not synchronize, we will need to re-establish synchronization for the tenant

Verify that synchronization has been re-enabled

With the return of ‘True’ we know that our tenant is now ready to again synchronize objects from another source.
Reestablish sync with AADC
Once synchronization has been reestablished in the tenant, we will run the Azure AD Connect installer for the same version that was uninstalled above.
Navigate to the folder where the installer resides and run it. Depending on your policies you may need to perform a ‘run as’ with a privileged account.

Select the required settings

Continue through the wizard prompts

Be sure to select the same settings that you made note of before we began on our journey and select them as needed throughout the installation


When you reach the install page select to “Enable staging mode:…” and uncheck the box to start the sync process. We want to take this process slowly to make sure that the user and group objects will join correctly.

Click ‘Exit’ when the installation completes

Navigate back to the Azure AD Connect blade in the Azure portal and notice that the sync status has changed back to Enabled

Now that the service has been reinstalled, you may need to open the Synchronization Rules Editor and modify and create custom rules as needed.
We will now make sure the Connect server will sync objects the way we want and not throw our environment into a blurry mess. Launch the Synchronization Service Manager on the Azure AD Connect server.
Click on Metaverse and run a full search. Note there are no objects returned.
Click on ‘Connectors’ and run the following tasks in this order. Note depending on the size of your environment these tasks may take some time to complete.
- ‘Active Directory Connector name’ – Run – ‘Full Import’
- ‘Azure AD Connector name’ – Run – ‘Full Import’
- ‘Active Directory Connector name’ – Run – ‘Full Synchronization’
- ‘Azure AD Connector name’ – Run – ‘Full Synchronization’
Once these four tasks have completed successfully click on Metaverse Search again and search for your test user. Click on Properties then Connectors. You will notice that the on-premises connector object has joined with the Azure AD connector object. This confirms that our user and group objects will successfully join during an Export. Please feel free to verify several users and groups before proceeding to ensure there were no unforeseen issues.

If your objects are not joining correctly you may need to review the configuration settings and sync rules to ensure they have been recreated correctly. Once this has been done, you can test individual object commits within the metaverse before running the full import and sync tasks again to reduce the amount of time troubleshooting.
Since successful object joins have been verified we will now change the Azure AD Connect server from staging mode to syncing mode. Launch the Azure AD Connect wizard and click ‘Configure’. If it fails to start a sync cycle may be in progress. You can either wait until this completes or force a stop as mentioned above.

Highlight ‘Configure staging mode’ and click ‘Next’

Uncheck ‘Enable staging mode’ and click on ‘Next’

Make sure the box is checked to start the sync process upon completion. This will kick off a full sync.
Click ‘Configure’


Open the Synchronization Service Manager and click on Operations. You will notice a full sync cycle will run and complete without intervention.

Go back to the Azure AD portal and view the user and group objects. Notice that they now again show source as Windows Server AD.


The changes made to the user object in the Azure portal while cloud managed have been removed as they did not exist in the on-premises Active Directory

Review the group membership for the test group. This has been overwritten by the membership of the on-premises security group as expected.

Remember, these objects are again managed by the on-premises Active Directory; therefore, any changes that had been made prior to returning to a hybrid model will be overwritten.
Summary
We have successfully been able to take a bare bones hybrid environment to cloud only and back again ensuring users could login throughout the entire process. There was never any noted impact to user resources, but it did require a planned downtime for object management. Realizing that this is an extreme model taking things very slowly and documenting in several different ways provided a method to ensure that we were able to return back to the previous state with little to no interruption to active users. There are several ways this could be tackled, some may be easier, but this one is definitely thorough.
I hope this helps you make the decision if it is a right move for you and if so feel a little better about taking the leap.
Helpful resources:
https://docs.microsoft.com/en-us/office365/enterprise/turn-off-directory-synchronization
https://github.com/Microsoft/AADConnectConfigDocumenter
Brought to you by Dr. Ware, Microsoft Office 365 Silver Partner, Charleston SC.

Recent Comments